[VIP专享]萤石云手机客户端操作说明
- 格式:pdf
- 大小:1.51 MB
- 文档页数:10
13456外观介绍*使用产品前请仔细阅读快速操作指南,并妥善保管UD04030B描述说明指示灯描述说明RST键设备在运行情况下,长按RST键6s,指示灯显示红色,设备会自动重启并且恢复至出厂状态。
SD卡槽支持SD卡本地存储。
SD卡具体使用方法请参见本手册“萤石云”手机客户端介绍--录像配置章节。
电源接口。
红色常亮:设备正在启动。
蓝色闪烁:设备启动完成,等待萤石云手机客户端软件进行Wi-Fi配置。
蓝色常亮:网络配置成功,设备正常运行。
红色闪烁:网络异常。
1安装 SD卡(可选)3安装完成·向上调节球芯,显示SD卡槽。
·拆卸SD卡盖,如下图所示插入SD卡,再扣上卡盖。
·选择干净、平整的安装墙面,安装随机附带的贴纸并开孔。
·用螺钉将转接盘安装到贴纸墙面上,摄像机安装到转接盘上,握住底座顺时针旋转卡牢。
通过萤石手机客户端软件的云台控制,可以实现-10°~90°的垂直方向调节,0°~350°的水平方向调节。
2固定设备. .版权所有©2016杭州海康威视数字技术股份有限公司或其子公司。
保留一切权利。
本手册的任何部分,包括文字、图片、图形等均归属于杭州海康威视数字技术股份有限公司或其子公司(以下简称“本公司”或“海康威视”)。
未经书面许可,任何单位和个人不得以任何方式摘录、复制、翻译、修改本手册的全部或部分。
除非另有约定,本公司不对本手册提供任何明示或默示的声明或保证。
关于本手册本手册描述的产品仅供中国大陆地区销售和使用。
本手册作为指导使用。
手册中所提供照片、图形、图表和插图等,仅用于解释和说明目的,与具体产品可能存在差异,请以实物为准。
因产品版本升级或其他需要,本公司可能对本手册进行更新,如您需要最新版手册,请您登录公司官网查阅()。
海康威视建议您在专业人员的指导下使用本手册。
访问本公司官网()获取说明书、应用工具和开发资料。

萤石云操作指导手册第1章萤石云操作1.萤石云服务流程2.添加萤石云步骤a)连接路由器。
请将您的设备连接电源,并将网线连接到路由器的LAN口上。
登陆设备主菜单—系统配置—网络配置—外网访问,启用萤石云打钩,记录设备验证码。
说明若设备通过升级支持萤石云功能的,验证码的位置需要自定义填写6位大写英文字母,例如ABCDEF。
b)用户注册。
在浏览器中输入网址,点击右上角【注册】按钮,注册账户。
根据提示填写表单完成注册。
请使用IE浏览器(IE8、IE9、IE10)或谷歌浏览器进行操作。
c)用户登录。
点击右上角【登录】,进入萤石云登录界面,填写好正确的用户名和密码后,点击【登录】按钮。
登录账户可以使用注册时的用户名或手机号码。
d)插件安装。
如果您第一次使用萤石云或者您的插件版本不是最新的,系统会提示您下载插件,下载完成后进行插件的安装。
注意:安装插件时需关闭浏览器。
e)添加设备。
首次登录萤石云后,会提示您添加设备。
或请点击【进入萤石云】—【配置管理】—【设备管理】,点击【向导添加设备】进行操作。
f)选择需要添加的设备类型。
DVR/NVR产品类型请选择【硬盘录像机】—【其他】。
g)根据提示使用局域网扫描或者输入设备序列号两种方式来搜索设备。
搜索到设备后,选择“”,输入设备验证码,完成设备添加。
h)点击【下一步】,进入【立即开始体验】界面,选择某一个现场视频,即可开启预览。
可以选择“切换多画面模式”,同时预览4路通道。
说明:若以上操作后无法正常将录像机添加到萤石云,可尝试进主菜单——系统维护——缺省配置,将录像机恢复出厂值后再次添加。
第2章手机软件访问DVR/NVR添加萤石云后,可以通过最新版的ivms-4500(V3.4及以上版本)进行预览回放。
一、软件获取方式1、安卓手机请登陆海康官网下载最新的手机监控软件,链接地址如下:/cn/download_more_391.html2、苹果手机请通过iPhone/iTuns进入APP Store,搜索"4500"下载安装。
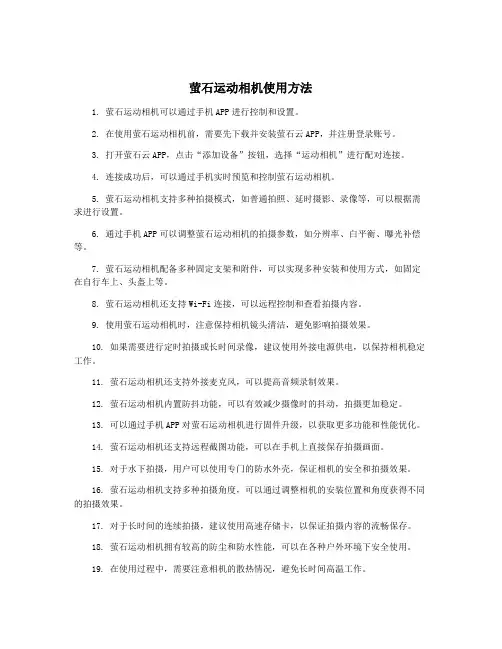
萤石运动相机使用方法1. 萤石运动相机可以通过手机APP进行控制和设置。
2. 在使用萤石运动相机前,需要先下载并安装萤石云APP,并注册登录账号。
3. 打开萤石云APP,点击“添加设备”按钮,选择“运动相机”进行配对连接。
4. 连接成功后,可以通过手机实时预览和控制萤石运动相机。
5. 萤石运动相机支持多种拍摄模式,如普通拍照、延时摄影、录像等,可以根据需求进行设置。
6. 通过手机APP可以调整萤石运动相机的拍摄参数,如分辨率、白平衡、曝光补偿等。
7. 萤石运动相机配备多种固定支架和附件,可以实现多种安装和使用方式,如固定在自行车上、头盔上等。
8. 萤石运动相机还支持Wi-Fi连接,可以远程控制和查看拍摄内容。
9. 使用萤石运动相机时,注意保持相机镜头清洁,避免影响拍摄效果。
10. 如果需要进行定时拍摄或长时间录像,建议使用外接电源供电,以保持相机稳定工作。
11. 萤石运动相机还支持外接麦克风,可以提高音频录制效果。
12. 萤石运动相机内置防抖功能,可以有效减少摄像时的抖动,拍摄更加稳定。
13. 可以通过手机APP对萤石运动相机进行固件升级,以获取更多功能和性能优化。
14. 萤石运动相机还支持远程截图功能,可以在手机上直接保存拍摄画面。
15. 对于水下拍摄,用户可以使用专门的防水外壳,保证相机的安全和拍摄效果。
16. 萤石运动相机支持多种拍摄角度,可以通过调整相机的安装位置和角度获得不同的拍摄效果。
17. 对于长时间的连续拍摄,建议使用高速存储卡,以保证拍摄内容的流畅保存。
18. 萤石运动相机拥有较高的防尘和防水性能,可以在各种户外环境下安全使用。
19. 在使用过程中,需要注意相机的散热情况,避免长时间高温工作。
20. 萤石运动相机可以通过手机APP实时分享拍摄内容至社交平台,与朋友快乐分享。
21. 萤石运动相机内置电子防抖功能,可以在运动拍摄时有效抑制画面抖动。
22. 可以通过手机APP对萤石运动相机进行遥控,实现遥距拍摄和录像。
Battery IP Camera User Manual1. Battery IP Camera Overview1.2 Battery IP Camera SpecificationsPacking List: • Battery IP Camera • Micro USB charging cable • Sync Module (optional)• User Manual •Warranty CardLens Ambient Light SensorMicPIR Sensor Power ButtonSpeaker Wall MountMagnetic BaseMicro USB Interface,Red (Charging) LED,and Micro SD Card Slot Red (Link) LEDUSB Plug SpeakerGreen (Power) LED Reset Button1.1 Sync ModuleMulti-color Status LED2. Getting Started with Your Battery IP CameraBattery IP camera supports Android phones and iPhone. The camera supports automatic video recording to a Micro SD card after startup, and can be played back in the mobile app. To use this feature, you need to insert a Micro SD card into the camera.Insert Micro SD Card: When inserting a Micro SD card, use your fingernail to press the card into the camera. If fully inserted, the card will snap into the slot. To remove the Micro SD card, use your fingernail to gently press the card into the camera and it will pop up, allowing you to remove it.*Note: The camera supports Micro SD cards up to 128GB. The Micro SD card must be formatted with a FAT32 file system format.2.1 Powering On, Off and RechargingTurn On: Press the power button for 2 seconds until you hear “Power up”, then release. When the green LED light turns on, your camera is on.*Note: The first time the camera is turned on, the camera will automatically scan for a connection, indicated by a flashing green LED light and a sound will play “Scan QR code”. Please use the VPai Home app to configure the camera network. For details, refer to section 2.2 “Using Your Battery IP Camera with a Phone”.Turn Off: Press and hold the power button for 2 seconds until hearing “Power down”, then release. When the green LED light turns off, your camera has powered down.Charge the Battery: If the camera’s battery is low on power, the camera battery icon on the VPai Home app screen will flash. To charge the camera’s battery, insert the provided Micro USB to USB charging cable to a 5V/1.5A adapter and your camera. When charging, the red LED light will turn on. When it is fully charged, the red LED light will turn off.*Note: When the battery is too low, the red LED light on the camera will flash quickly for 15 seconds and a sound will play “Low battery, system will shut down”. If not charged, the camera will be shut down automatically.2.2 Using Your Battery IP Camera with a PhoneThe camera connects with Android phones and iPhones. In order to use your Battery IP camera, the official VPai Home app must be installed. You can scan the QR code below to download and install the VPai Home app. The Android app can also be found on the VPai website (/en/apps/), Google Play Store, Baidu App assistant, Tencent mobile assistant, Peasecod platform and on other similar platforms.*Note: Android 5.0 or iOS 9.0 above is required.The Battery IP camera can be connected to a wireless router or Sync Module.The Sync Module is the central hub of your camera system. This connects to your Wi-Fi network and to your IP camera(s).Connect Battery IP Camera to Wireless Router: Once the VPai Home app has been installed on your phone, open the app and choose to log in with either your Email, WeChat, Facebook or LINE account.Tap the add device “+” button on the app screen to enter the “Choose Device” interface. The screen prompts will show as follows:Select “HD Battery IP Cam” to enter the “Config IP Cam” interface, and then tap the “IPC Wi-Fi Config” button when the green LED flashes to enter the “Config Wi-Fi” interface.Tap the Wi-Fi name drop-down arrow and select the Wi-Fi hotspot (iPhones require manualinput), and enter your Wi-Fi password. The Wi-Fi configuration will show as follows:Tap “Next” and then use your Battery IP camera to scan the QR code on the app. Aim the camera to the QR code from a distance of about 15 to 25cm for a few seconds. Please followthe on-screen instruction as shown below.*Note: When rebinding to the device, you have to press the Power button twice to start scanning the QR code.*Note:5G network is not supported.Connect the Sync Module to the power supply. Tap “Start Config” button after hearing the sound “Pairing mode” and when the red LED light on the sync module starts flashing.*Note: It takes around 20 seconds before the sound will play “Pairing mode” and the red LED light starts flashing.*Note: After the QR code has been successfully scanned, you will hear “Scan finished” and the camera will start to connect to the router. The green LED light will continue to flash until the Wi-Fi connection is established. You will hear “Wi-Fi connected” when the connection is successful. The Wi-Fi connection information will be automatically saved. The next time the camera is switched on, the Wi-Fi will connect automatically. If the Wi-Fi disconnects, a red LED light will flash.Connect Sync Module to Wireless Router: Tap the add device “+” button on the app and select “Sync Module” in “Choose Device” interface. The screen prompts will show as follows:Tap the “Go To Connect Sync Module Wi-Fi” button and select the Wi-Fi hotspot named VPaiHome_xxxx. The password is: 12345678. After the connection is established, the “Config Current Sync Module” button becomes clickable when you return to Config Sync Module interface. The screen prompts will show as follows:Once connected to the Sync Module, tap “Config Current Sync Module” button to access the next page. You can change the Wi-Fi name and password by clicking “Change name and password”. Tap “Configure the Wi-Fi connection to the Sync Module” to connect the Sync Module to the Internet.Tap “Change name and password” button, enter a name and password, and then tap “Next” to complete the setup. After that, you need to reconnect to the Sync Module’s Wi-Fi you just set up. Change the name and password settings as shown below:In the “Config Sync Module” interface, you can tap “Configure the Wi-Fi connection to the Sync Module” to connect your Sync Module to the Internet. Tap the Wi-Fi name drop-down arrow (iPhones require manual input), select the Wi-Fi hotspot and enter the password. The Sync M odule will restart after you tap “Next”. When the Sync Module is connected to the In-ternet, the red LED light will stop flashing.*Note: 5G network is not supported.*Note: To reset the Sync Module, press the reset button on the module for 8 seconds until the red LED light flashes fast.The Sync Module’s Wi-Fi can be used as a normal wireless network after the Internet configuration of the Sync Module is complete. You can connect the Battery IP camera to the Internet through the Sync Module.Connect Battery IP Camera to Sync Module’s Wi-Fi:For instructions to connect the Battery IP camera to the Sync Module’s Wi-Fi, follow the steps in the “Connect Battery IP Camera to Wireless Router” mentioned in section 2.2.After the camera has been successfully added to the VPai Home app, you can modify its name. Tap “OK” to return to the app home page. The modified name will be displayed on the home page. Tap the camera preview to enter the camera operation interface. You can view the camera’s real-time image, take photos, record videos, send voice messages and etc. The camera operation interface will show as follows:*Note: To wake up the device, tap on the camera preview screen.For full app instructions please visit the official website. Instructions for Android: www.vpai360. com/en/apps/home/android/; Instructions for iOS: /en/apps/home/ apple/.• Check the user agreement before using the camera.• The camera is limited to a USB charging adapter with an output power of 5V/1.5A. Please use the correct adapter for charging.• Do not drop or beat your camera, so as not to damage the device or scratch the camera lenses.• Be careful not to place your camera under the sun for a long time.• During operation the device will become a little hot, this is normal behavior. Please avoid using the camera in high temperature environments.4. Precautions and WarningsYou can update the Battery IP camera firmware by either manual update or auto update. For manual update, you can check the latest firmware in the Device Settings page of VPai Home app. For auto update, when you connect your Battery IP camera to your phone through the VPai Home app, it will automatically detect the latest firmware and prompt you when a new firmware update is available. If you choose to accept the update, the green LED light will flash quickly and the camera will simultaneously play “Upgrading”. When the firmware update is complete, the green LED light will stop flashing and the camera will play “Upgrading finished”. The camera will restart after the update has finished.*Note: Make sure that your camera is fully charged or connected to a power supply before upgrading the firmware. Do not turn off the camera during the update.3. Battery IP Camera Firmware UpdateBattery IP Camera 用户使用说明1. Battery IP Camera 产品概况1.2 产品规格包装清单: • Battery IP Camera • Micro USB 数据线• 接收盒(可选)• 用户使用说明•保修卡镜头 环境光传感器麦克风PIR传感器电源键扬声器安装孔磁座Micro USB接口,充电指示灯和SD卡槽USB接口扬声器LED红灯复位按钮1.1 接收盒LED指示灯LED绿灯Battery IP Camera支持Android手机和iPhone连接使用。
即插即用智能云网络摄像机让您一切尽收眼底iSmartViewPro(ios版)使用说明书2018-01REV5.01.iSmartViewPro简介iSmartViewPro(ios版本)是我公司基于ios系统开发的应用软件,可适用于ios手机和ios平板电脑,支持ios7.0及以上版本;iSmartViewPro软件功能特点:♦支持7.0以上系统;♦支持手机声波快速配置摄像机Wi-Fi;♦支持SmartP2P云即插即用产品;♦支持多画面观看(最多支持4画面);♦支持手机端回放SD卡录像功能;♦支持视频控制、视频参数设置、语音监听、对讲、云台控制和拍照等功能;♦支持对局域网设备搜索并添加;♦支持设备的编辑与管理(Wi-Fi/邮件/报警/FTP等高级功能);♦支持本地照片拍照分享摄像机指示灯说明X系列设备配置了两颗状态指示灯,红色为工作状态指示灯、蓝色为WIFI状态指示灯,但一些防水机没有暴露。
红色状态指示灯状态说明:1)开机的时候,如果供电正常,红色指示灯亮2)开机后,如果系统正常启动,红色指示灯慢闪3)如果设备连接上互联网,红色指示灯常亮4)长按复位键,红色指示灯快闪,表示恢复出厂默认值成功;固件升级过程中,红色指示灯快闪蓝色状态指示灯说明:1)开机启动后,蓝色指示灯闪烁,表示可以配置WIFI2)蓝色指示灯快闪,表示正在连接无线路由器3)蓝色指示灯常亮,表示已经与无线路由器建立连接4)指示灯灭,表示没有使用任何WIFI操作2.获取软件♦在App Store搜索“iSmartViewPro”下载。
♦可以使用手机二维码扫描下载扫一扫,下载iSmartViewPro3.安装软件下载“iSmartViewPro”软件到手机并安装。
安装完成后显示的图标如下图:iSmartViewPro温馨提示:在使用iSmartViewPro手机软件前,请确保您已经参照摄像机使用手册完成了网络摄像机的网络配置,并能通过局域网或者互联网访问摄像机。
版权所有©杭州萤石软件有限公司。
保留一切权利。
本手册的任何部分,包括文字、图片、图形等均归属于杭州萤石软件公司或其关联公司(以下简称“萤石”)。
未经书面许可,任何单位或个人不得以任何方式摘录、复制、翻译、修改本手册的全部或部分。
除非另有约定,萤石不对本手册提供任何明示或默示的声明或保证。
关于本产品本手册描述的产品仅供中国大陆地区销售和使用。
本产品只能在购买地所在国家或地区享受售后服务及维保方案。
本产品包含联网版与单机版,联网功能需要搭配网关使用。
关于本手册本手册仅作为相关产品的指导说明,可能与实际产品存在差异,请以实物为准。
因产品版本升级或其他需要,萤石可能对本手册进行更新,如您需要最新版手册,请您登录萤石官网查阅()。
萤石建议您在专业人员的指导下使用本手册。
商标声明· 、 、 为萤石的注册商标。
·本手册涉及的其他商标由其所有人各自拥有。
责任声明·在法律允许的最大范围内,本手册以及所描述的产品(包含其硬件、软件、固件等)均“按照现状”提供,可能存在瑕疵或错误。
萤石不提供任何形式的明示或默示保证,包括但不限于适销性、质量满意度、适合特定目的等保证;亦不对使用本手册或使用萤石产品导致的任何特殊、附带、偶然或间接的损害进行赔偿,包括但不限于商业利润损失、系统故障、数据或文档丢失产生的损失。
·您知悉互联网的开放性特点,您将产品接入互联网可能存在网络攻击、黑客攻击、病毒感染等风险,萤石不对因此造成的产品工作异常、信息泄露等问题承担责任,但萤石将及时为您提供产品相关技术支持。
·使用本产品时,请您严格遵循适用的法律法规,避免侵犯第三方权利,包括但不限于公开权、知识产权、数据权利或其他隐私权。
您亦不得将本产品用于大规模杀伤性武器、生化武器、核爆炸或任何不安全的核能利用或侵犯人权的用途。
·如本手册内容与适用的法律相冲突,则以法律规定为准。
“萤石云”声明本产品部分功能(包括但不限于远程管理、分享等功能)的实现将依赖于互联网、电信增值服务;您若希望实现以上功能,需在萤石云平台()完成用户注册,遵守《萤石服务协议》、《萤石隐私政策》等,并接入萤石设备,以实现对萤石设备的管理。
萤石可视门铃操作方法
萤石可视门铃是一种智能门铃产品,可以通过手机或平板电脑远程查看门口的情况,并与访客进行语音对话。
以下是萤石可视门铃的基本操作方法:
1. 下载并安装萤石云APP:在手机应用商店搜索“萤石云”,下载并安装该应用程序。
2. 注册并登录账号:打开萤石云APP,按照提示进行注册和登录。
3. 添加设备:登录后,点击“设备”菜单栏,然后点击右上角的“+”按钮,选择“设备添加”,按照提示完成门铃设备的添加。
4. 查看门铃视频:在设备列表中找到已添加的门铃设备,点击进入设备详情页,然后点击“监控”按钮,即可实时查看门铃视频。
5. 与访客对话:当有人按下门铃时,您将接收到手机推送通知。
点击通知即可进入视频对话界面,通过手机与访客进行语音对话。
6. 设置门铃功能:在设备详情页中,点击“设置”按钮,可以根据需要配置门铃的各种功能,如移动侦测、录像存储、推送通知等。
请注意,使用萤石可视门铃需要确保设备连接了稳定的网络,并且手机处于联网
状态。
操作过程中如有问题,建议参考萤石云APP的具体说明或联系售后技术支持。

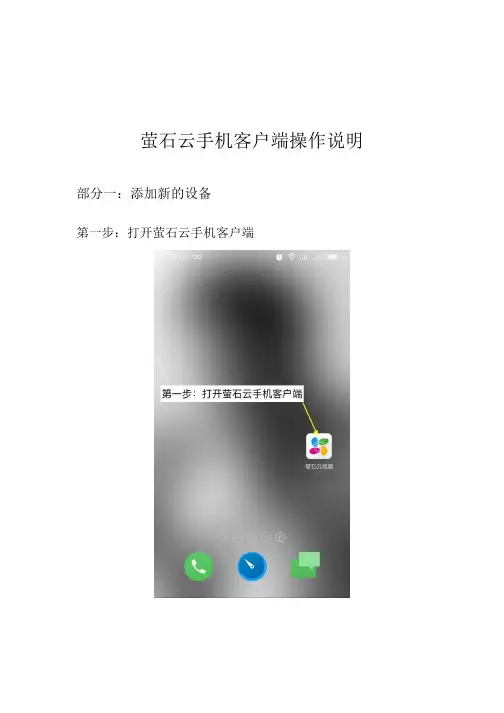
萤石云手机客户端操作说明部分一:添加新的设备
第一步:打开萤石云手机客户端
第二步:点击添加设备按钮,来添加设备
第三步:点击添加设备按钮后,有两种方式添加摄像机,方式一是用过手机的扫一扫功能来识别摄像机背面的二维码,见图片1;方式二是通过手动输入位于摄像机底部的序列号来添加摄像机,见图片2。
找到摄像机后,需要输入位于摄像机底部的设备验证码来匹配摄像机,见图片3。
设备验证码输入完成后,即摄像机添加成功,见图片4。
若提示摄像机已被添加,请参照第四步。
第四步:分享设备给好友
1、点击摄像机画面的右上角按钮
2、点击分享按钮
3、点击萤石好友
4、选择好友,即分享成功(好友需事先申请萤石帐号)
第五步:添加新的好友
1、点击萤石手机客户端首页的右上角的按钮
2、点击添加好友
3、输入新好友的手机号码(需事先注册萤石云帐号)
部分二:手机萤石客户端功能介绍
1、实时播放:双击打开后,即可进入到实时播放界面
2、播放界面功能简介:
a、暂停/启动
b、音量调节
c、多画面显示
d、清晰度调节
e、全屏显示
f、通过云台,上下左右移动画面
g、语音对讲
h、实时画面,画面截屏
i、实时画面,画面录像
j、选择日期,查询录像
4、关闭报警提醒。
AI开放平台用户系统操作指南AI开放平台系统操作流程:一、进入AI开放平台首页,点击右上角【登录】,进入账号登录界面;二、选择登录/注册方式;1.若您已是AI开放平台用户,请选择【企业萤石云账号登录】;1)输入当前使用AI开放平台服务的企业萤石云账号及密码,点击【授权并登2)填写需要进行数据关联的手机号码;说明:该手机号码可以填写为当前使用AI开放平台服务的企业萤石云账号,则原有数据同步至该账号下;如需更换手机号码,此处可填写新手机号码注册,则原有账号的数据同步至新手机号码注册的账号下,原有账号无法重复关联数据;3)根据提示内容填写账号信息,阅读了解《服务协议》及《隐私政策》,点击【注4)阅读了解历史数据管理说明,选择【一键迁移历史数据】,点击【关联账号】,完成开放平台数据迁移;说明:如需更改手机号码进行关联,可点击【修改手机号】,完成新手机号码信息填写注册流程,即可关联新手机号码,原有账号无法重复关联数据;5)当前页面即表示完成AI开放平台数据迁移,所有历史数据均已同步,点击【返回并继续使用】,可返回AI开放平台首页;2.若您是新用户,请直接选择【立即注册】;1)填写需要注册的手机号码,并根据内容提示完成其他信息补充,阅读了解《服务协议》及《隐私政策》,点击【注册】;2)当前页面即表示已完成AI开放平台账号注册,点击【返回登录页面】,可登录账号开始使用;三、企业认证1.进入AI开放平台首页,完成账号登陆后,点击右上角账号下【我的权益】;2.点击【立即认证】进行企业用户认证,上传营业执照,填写公司名称、统一社会信用代码等资料,点击【提交】;3.当前页面即表示企业认证已提交成功,预计3-5个工作日可完成审核。
AI开放平台给处于认证审核中状态的账号暂时开放完整的AI训练资源权益。
萤石怎么操作方法萤石是一种智能家居设备,用于监控家庭或办公场所的安全,其操作方法也很简单易懂,下面我就详细介绍一下。
操作前准备首先需要做好一些操作前的准备工作,包括:1. 下载萤石APP,可以从App Store或Google Play Store下载安装。
登录后需要注册账号,可以选择手机验证码或邮箱注册。
2. 将设备与萤石APP连接,萤石支持连接多种类型的监控设备,比如摄像头、门铃等。
将设备与指南书上的说明连接,连接成功后会出现设备列表。
3. 配置设备,包括设备昵称、地点等信息,以便于快速定位设备。
萤石操作步骤1. 设备预览连接成功后,在“设备列表”页面中可以看到所有已连接的设备,点击设备名称即可进入设备预览模式。
在此模式下,可以实时查看设备画面,进行适当的调整(比如亮度、对比度等)。
2. 拍照和录像在预览模式下,可以通过点击屏幕上的拍照按钮或录像按钮,对设备进行相应操作。
点击拍照按钮可以将当前画面保存到相册中,点击录像按钮可以开始录制视频。
在录制过程中,可以随时停止录像。
注意,录像文件需要存储到本地,所以需要设备安装了TF卡,不然无法录像。
3. 声音设置在预览模式下,可调整设备声音大小,在设备预览界面,点击右上角的设置按钮,找到“声音设置”页签,调整相应的声音设置即可。
4. 报警设置若设备支持报警功能,可在预览模式下,点击右上角的设置按钮跳转至报警设置页签。
在此页面,可以设置报警铃声、开启/关闭警报、选择报警消息推送方式等参数,定制个性化的报警设置。
5. 设备管理在设备列表页面,用户可对设备进行管理,可进行设备删除、设备重命名、分享设备等操作。
6. 云存储回放若设备支持云存储功能,在预览模式下,点击屏幕右下角的时间轴(仅当设备开通云存储服务后才会显示),就可以跳转至云存储服务的回放界面。
在该界面上,可以观看设备在特定时间范围内的录像文件。
总结以上就是萤石的操作方法介绍,总体来说,萤石比较简单易用,且功能比较丰富,满足日常生活和办公需要,让用户可以更加方便快捷地管理监控设备,确保家庭和办公场所的安全。
萤石可视门铃远程操作方法萤石可视门铃是一款智能家居设备,可以实现远程操作。
下面将详细介绍萤石可视门铃的远程操作方法。
首先,要使用萤石可视门铃的远程操作功能,首先需要安装和设置设备。
将门铃设备安装在合适的位置,保证可以正常录制和传输画面。
接下来,下载并安装萤石云手机客户端,这是使用萤石可视门铃远程操作的必要工具。
安装完成后,打开萤石云手机客户端。
首次登录时,需要注册一个账号,并绑定设备。
在登录页面点击“注册账号”,按照提示填写账号、密码、邮箱等信息,然后点击“注册”完成注册。
注册成功后,回到登录页面,输入账号和密码,然后点击“登录”。
完成登录后,就可以看到设备列表页面。
点击“添加设备”按钮,然后选择“扫码添加设备”。
此时,手机客户端会打开摄像头,将摄像头对准设备上的二维码。
稍等片刻,设备会被识别并添加到设备列表中。
添加完成后,在设备列表中选择相应的门铃设备,然后点击“预览”按钮,即可实时查看门铃画面。
接下来介绍远程操作的具体步骤。
首先是远程查看门铃画面。
在设备列表中选择相应的门铃设备,然后点击“预览”按钮。
萤石云手机客户端会加载门铃画面,并显示在手机屏幕上。
在远程查看门铃画面的同时,还可以进行对讲操作。
当有人按下门铃时,手机客户端会弹出通知提示,点击通知可以进入对讲界面。
在对讲界面中,可以通过手机的麦克风和扬声器进行对讲操作。
此外,萤石可视门铃还支持远程录像和拍照。
在门铃画面界面上方,有一系列功能按钮,包括录像和拍照。
点击录像按钮,即可开始录制门铃画面,点击停止按钮即可停止录制。
点击拍照按钮,则可以对门铃画面进行拍照操作。
除了实时查看和对讲外,还可以通过手机客户端查看历史记录。
在设备列表中选择相应的门铃设备,然后点击“回放”按钮,即可查看历史录像。
在回放页面中,可以选择日期和时间段进行查看。
通过以上步骤,我们就可以实现萤石可视门铃的远程操作。
值得注意的是,要确保手机和门铃设备连接的网络稳定,以保证远程操作的顺利进行。
萤石摄像头安装操作方法
萤石摄像头的安装操作方法如下:
1. 下载萤石云APP。
打开手机应用商店,搜索“萤石云”,下载安装。
2. 接通电源。
摄像头的电源线插入插座,确认电源指示灯已亮。
3. 连接网络。
将摄像头和路由器连接,等待指示灯闪烁后稳定。
4. 添加设备。
打开萤石云APP,点击“+”号并选择“添加设备”。
5. 设置网络参数。
在“添加设备”界面中,选择“手动添加设备”并填写摄像头的网络参数,如摄像头序列号、Wi-Fi 密码等。
6. 完成添加。
等待摄像头连接成功,即可开始使用。
注意事项:
1. 可以将摄像头安装在需要监控的位置,如门口、客厅等。
2. 摄像头连接路由器的Wi-Fi 信号必须稳定,避免出现连接异常的情况。
3. 使用时需付费,并且需要购买额外的存储空间。
4. 使用萤石云APP 查看视频时,需要快速的网络速度,避免视频卡顿。
萤石云手机客户端操作说明部分一:添加新的设备
第一步:打开萤石云手机客户端
第二步:点击添加设备按钮,来添加设备
第三步:点击添加设备按钮后,有两种方式添加摄像机,方式一是用过手机的扫一扫功能来识别摄像机背面的二维码,见图片1;方式二是通过手动输入位于摄像机底部的序列号来添加摄像机,见图片2。
找到摄像机后,需要输入位于摄像机底部的设备验证码来匹配摄像机,见图片3。
设备验证码输入完成后,即摄像机添加成功,见图片4。
若提示摄像机已被添加,请参照第四步。
第四步:分享设备给好友
1、点击摄像机画面的右上角按钮
2、点击分享按钮
3、点击萤石好友
4、选择好友,即分享成功(好友需事先申请萤石帐号)
第五步:添加新的好友
1、点击萤石手机客户端首页的右上角的按钮
2、点击添加好友
3、输入新好友的手机号码(需事先注册萤石云帐号)
部分二:手机萤石客户端功能介绍
1、实时播放:双击打开后,即可进入到实时播放界面
2、播放界面功能简介:
a、暂停/启动
b、音量调节
c、多画面显示
d、清晰度调节
e、全屏显示
f、通过云台,上下左右移动画面
g、语音对讲
h、实时画面,画面截屏
i、实时画面,画面录像
j、选择日期,查询录像
4、关闭报警提醒。