用宏批量调整中图片版式大小方向
- 格式:doc
- 大小:24.00 KB
- 文档页数:5
Word采用宏命令批量调整照片大小方法
Word采用宏命令批量调整照片大小方法
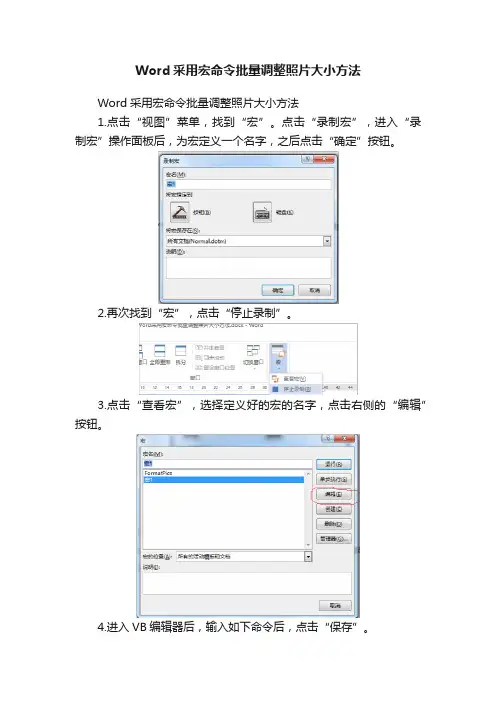
1.点击“视图”菜单,找到“宏”。
点击“录制宏”,进入“录制宏”操作面板后,为宏定义一个名字,之后点击“确定”按钮。
2.再次找到“宏”,点击“停止录制”。
3.点击“查看宏”,选择定义好的宏的名字,点击右侧的“编辑”按钮。
4.进入VB编辑器后,输入如下命令后,点击“保存”。
5.若照片有不同的大小要求,可在命令中的“()”内调整照片的宽度及高度。
6.将照片批量插入到WORD文档中,要求照片必须为“嵌入式”。
7.点击“宏”,进入操作面板后点击“运行”按钮,宏命令就得到了
执行,插入到文档中的图片就会按照在宏命令中设置的大小进行批量调整。

VBA操作WORD(五)批量调整图⽚⼤⼩、居中设置需求:经常阅读⽹上的研报(没钱买排版漂亮的⾼质量研报),有些需要保存的复制下来到word⾥,图⽚很⼤都超出word的边界了,也没有居中,⼿⼯⼀张张调整不现实,上百页的研报,⼏⼗张图⽚。
解决⽅案:利⽤VBA宏批量解决。
第⼀种⽅法经过测试,只是前⾯部分有些,后⾯部分⽆效。
Sub setpicsize() '设置图⽚尺⼨'第⼀种⽅法,经测试,⽂档前⾯部分图⽚有效,后⾯部分⽆效'Dim n '图⽚个数'On Error Resume Next '忽略错误'For n = 1 To ActiveDocument.InlineShapes.Count 'InlineShapes 类型图⽚'ActiveDocument.InlineShapes(n).Height = 198.45 '设置图⽚⾼度为 7cm'ActiveDocument.InlineShapes(n).Width = 455 '单位是像素,设置图⽚宽度 16cm'Next nEnd Sub第⼆种⽅法,经测试,对整篇⽂档图⽚有效:Sub设置图⽚格式()'1.如果图⽚⾏间距设置为固定值,那么⽆论图⽚设置什么格式,图⽚嵌⼊⽂字会重叠,只显⽰部分图⽚。
'2.如果图⽚超出边界才进⾏处理,设置全⽂图⽚⼤⼩不超过某个规格,超过则等⽐例缩⼩Dim picMaxWidth, picMaxHeight, picWith, picHeight As Long'纸张宽减去左右边距,不⽤再乘以28.35,已经是像素picMaxWidth = (ActiveDocument.PageSetup.PageWidth - ActiveDocument.PageSetup.LeftMargin - ActiveDocument.PageSetup.RightMargin)picMaxHeight = (ActiveDocument.PageSetup.PageHeight - ActiveDocument.PageSetup.TopMargin - ActiveDocument.PageSetup.BottomMargin)Dim oILS As InlineShapeFor Each oILS In ActiveDocument.InlineShapes 'Selection.InlineShapesIf oILS.Type = wdInlineShapePicture ThenoILS.SelectoILS.LockAspectRatio = msoTrue '锁定纵横⽐,防⽌默认没有锁定修改了图⽚变形;不锁定纵横⽐是msoFalseSelection.Range.ShapeRange.LockAspectRatio = msoTrue'MsgBox("图⽚宽度" & oILS.Width) '测试,提⽰图⽚⼤⼩以便判断单位'此处单位是像素。
批量改word文件中图大小word批量修改图片大小——固定长宽篇这部分要说的是把word中的所有图片修改成固定的并且相同的长和宽!打开word,工具-宏-宏(或者直接按Alt+F8)进入宏的界面,如下面所示,输入一个宏名,宏名自己起,能记住就行!宏名起好了,单击“创建”进入Visual Basic 编辑器,输入如下代码并保存Sub setpicsize() '设置图片大小Dim n '图片个数On Error Resume Next '忽略错误For n = 1 To ActiveDocument.InlineShapes.Count 'InlineShapes类型图片ActiveDocument.InlineShapes(n).Height = 400 '设置图片高度为 400px ActiveDocument.InlineShapes(n).Width = 300 '设置图片宽度 300pxNext nFor n = 1 To ActiveDocument.Shapes.Count 'Shapes类型图片ActiveDocument.Shapes(n).Height = 400 '设置图片高度为 400px ActiveDocument.Shapes(n).Width = 300 '设置图片宽度 300pxNext nEnd Sub注:px 是像素 1厘米为25px,可以自行按照自己的实际情况修改代码中像素大小3、返回word,工具-宏-宏(或者直接按Alt+F8),再次进入宏的界面,选择刚才编辑好的宏,并单击“运行”按钮,就可以了!(图片多时,可能会花一些时间)word批量修改图片大小——按比例缩放篇这部分要说的是把word中的所有图片按比例缩放!具体操作同上,只是代码部分稍做修改,代码如下:Sub setpicsize() '设置图片大小Dim n '图片个数Dim picwidthDim picheightOn Error Resume Next '忽略错误For n = 1 To ActiveDocument.InlineShapes.Count 'InlineShapes类型图片picheight = ActiveDocument.InlineShapes(n).Heightpicwidth = ActiveDocument.InlineShapes(n).WidthActiveDocument.InlineShapes(n).Height = picheight * 1.1 '设置高度为1.1倍ActiveDocument.InlineShapes(n).Width = picwidth * 1.1 '设置宽度为1.1倍Next nFor n = 1 To ActiveDocument.Shapes.Count 'Shapes类型图片picheight = ActiveDocument.Shapes(n).Heightpicwidth = ActiveDocument.Shapes(n).WidthActiveDocument.Shapes(n).Height = picheight * 1.1 '设置高度为1.1倍ActiveDocument.Shapes(n).Width = picwidth * 1.1 '设置宽度为1.1倍Next nEnd SubWORD中如何:1、批量插入图片;2、批量修改图片大小;3、使图片在WORD中的位置相同。
Sub 图片对齐() (1)Sub 图片大小() (1)Sub 浮于文字上方() ................................................................................................... 错误!未定义书签。
Sub 浮于文字上方() . (4)Sub 连续() (4)Sub 版式转换() (4)Sub 图片方向() (5)Sub 图片对齐()Application.ScreenUpdating = False '关闭屏幕更新Dim nOn Error Resume NextFor n = 1 To ActiveDocument.Shapes.CountActiveDocument.Shapes(n).SelectSelection.ShapeRange.RelativeHorizontalPosition = _wdRelativeHorizontalPositionMarginSelection.ShapeRange.RelativeVerticalPosition = _wdRelativeVerticalPositionMarginSelection.ShapeRange.Left = wdShapeRightSelection.ShapeRange.Top = wdShapeBottomSelection.ShapeRange.LockAnchor = FalseyoutInCell = TrueSelection.ShapeRange.WrapFormat.AllowOverlap = FalseSelection.ShapeRange.WrapFormat.Side = wdWrapBothNextApplication.ScreenUpdating = True '恢复屏幕更新End SubSub 图片大小()On Error Resume NextDim mywidthDim myheightApplication.ScreenUpdating = False '关闭屏幕更新mywidth = Val(InputBox(Prompt:="单位为厘米(cm);如果输入为0,则图片保持原始纵横比,宽度根据输入的高度数值自动调整;", Title:="请输入图片宽度", Default:="0")) * 28.35myheight = Val(InputBox(Prompt:="单位为厘米(cm);如果输入为0,则图片保持原始纵横比,高度根据输入的宽度数值自动调整;", Title:="请输入图片高度", Default:="0")) * 28.35'------------------------------------------------------------------'调整嵌入式图形Dim pic As InlineShapeFor Each pic In ActiveDocument.InlineShapesIf mywidth = "0" Thenpic.Height = myheightpic.ScaleWidth = pic.ScaleHeightElseIf myheight = "0" Thenpic.Width = mywidthpic.ScaleHeight = pic.ScaleWidthElsepic.Width = mywidthpic.Height = myheightEnd IfNext'调整浮动式图形Dim tu As ShapeFor Each tu In ActiveDocument.ShapesIf mywidth = "0" Thentu.Height = myheightElseIf myheight = "0" Thentu.Width = mywidthElsetu.LockAspectRatio = msoFalsetu.Width = mywidthtu.Height = myheightEnd IfNextApplication.ScreenUpdating = True '恢复屏幕更新End SubSub 浮于文字上方()Dim oShape As Variant, tu As Shape, iApplication.ScreenUpdating = False '关闭屏幕更新On Error Resume Next'调整嵌入图形为浮于文字上方,并旋转90度For Each oShape In ActiveDocument.InlineShapesSet oShape = oShape.ConvertToShapeActiveDocument.InlineShapes(i).SelectWith oShape.WrapFormat.Type = 3' (去除.Zorder行.WrapFormat.Type = shapeType四周形.WrapFormat.Type = wdWrapTight紧密形改为.ConvertToInlineShape嵌入形).ZOrder 4 '4浮于文字上方5衬于下方.Rotation = -90#End WithNext'调整其它图形为浮于文字上方,并旋转90度For Each tu In ActiveDocument.ShapesActiveDocument.Shapes(i).SelectWith tu.WrapFormat.Type = 3' (去除.Zorder行.WrapFormat.Type = shapeType四周形.WrapFormat.Type = wdWrapTight紧密形改为.ConvertToInlineShape嵌入形).ZOrder 4 '4浮于文字上方5衬于下方.Rotation = -90#End WithNextApplication.ScreenUpdating = True '恢复屏幕更新End SubSub 浮于文字上方()Dim oShape As Variant, iApplication.ScreenUpdating = False '关闭屏幕更新On Error Resume NextFor Each oShape In ActiveDocument.InlineShapesSet oShape = oShape.ConvertToShapeActiveDocument.InlineShapes(i).Select '选中图片With oShape.ZOrder 4 '选中图片版式调为浮于文字上方.Rotation = -90# '选中图片向左旋转90度End WithNextApplication.ScreenUpdating = True '关闭屏幕更新End SubSub 连续()Call 浮于文字上方Call 图片大小Call 图片对齐End SubSub 版式转换()Dim oShape As Variant, shapeType As WdWrapTypeOn Error Resume NextIf MsgBox("Y将图片由嵌入式转为浮动式,N将图片由浮动式转为嵌入式", 68) = 6 Then shapeType = Val(InputBox(Prompt:="请输入图片版式:0=四周型,1=紧密型, " & vbLf & _"3=衬于文字下方,4=浮于文字上方", Default:=0)) For Each oShape In ActiveDocument.InlineShapesSet oShape = oShape.ConvertToShapeWith oShapeSelect Case shapeTypeCase 0, 1.WrapFormat.Type = shapeTypeCase 3.WrapFormat.Type = 3.ZOrder 5Case 4.WrapFormat.Type = 3.ZOrder 4Case ElseExit SubEnd Select.WrapFormat.AllowOverlap = FalseEnd WithNextElseFor Each oShape In ActiveDocument.ShapesoShape.ConvertToInlineShapeNextEnd IfEnd SubSub 图片方向()Dim nOn Error Resume NextFor n = 1 To ActiveDocument.Shapes.CountActiveDocument.Shapes(n).IncrementRotation -90#Next nEnd Sub。
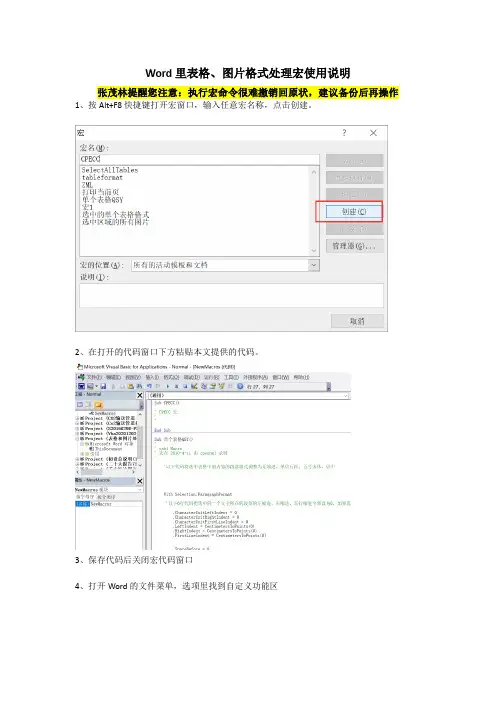
Word里表格、图片格式处理宏使用说明张茂林提醒您注意:执行宏命令很难撤销回原状,建议备份后再操作1、按Alt+F8快捷键打开宏窗口,输入任意宏名称,点击创建。
2、在打开的代码窗口下方粘贴本文提供的代码。
3、保存代码后关闭宏代码窗口4、打开Word的文件菜单,选项里找到自定义功能区5、选择宏命令,添加到右侧6、可以选择新建选项卡,命名为图表格式7、确定后,Word菜单栏里将出现对应的菜单8、选中需要调整表格或者图片的区域,避免超选。
特别是部分文档的表格、图片不需要调整(如初设文件的黑框、公式编辑器的公式图片),不需要调整的部分不能选中。
9、点击选中所有表格10、点击选中所有表格,命令执行完成后,该区域所有表格被选中11、选中后,可以用设计菜单一次调整多个表格样式,用开始菜单调整多个表格内的字体、字号、段落格式等12、图片调整方法与表格类似,先选中需要调整图片的区域。
13、点击所有图片。
14、输入图片的高度、长度值。
本报告建议值高8cm,长12.9cm。
调整后全文的图片长宽均一致,如下15、宏代码Sub SelectAllTables()‘本小程序由CPECC西南管道室张茂林编写Dim aTable As TableApplication.ScreenUpdating = False'判断文档是否被保护If ActiveDocument.ProtectionType = wdAllowOnlyFormFields ThenMsgBox "文档已保护,此时不能选中多个表格!"Exit SubEnd If'删除所有可编辑的区域ActiveDocument.DeleteAllEditableRanges wdEditorEveryone'添加可编辑区域If Selection.Tables.Count >= 1 ThenFor Each aTable In Selection.TablesaTable.Range.Editors.Add wdEditorEveryoneNextActiveDocument.SelectAllEditableRanges wdEditorEveryoneActiveDocument.DeleteAllEditableRanges wdEditorEveryoneApplication.ScreenUpdating = TrueEnd IfMsgBox "张茂林提醒您,选中文档区域表格选择完成"End SubSub 选中区域的所有图片()'本小程序由CPECC西南管道室张茂林编写' pic Macro' 宏由CPECC 张茂林创建'Dim n '图片个数Dim picwidthDim picheightpicheight = InputBox("请输入图片调整高度:厘米", "输入框", 9.9) '输入想调整的图片高度,默认高度7.8cmpicwidth = InputBox("请输入图片调整宽度:厘米", "输入框", 11.72) '输入想调整的图片宽度,默认宽度12.73cmOn Error Resume Next '忽略错误For n = 1 To Selection.InlineShapes.Count 'InlineShapes类型图片With Selection.InlineShapes(n)' .LockAspectRatio = msoTrue.LockAspectRatio = msoFalse.Height = picheight * 28.39.Width = picwidth * 28.39.Range.Paragraphs(1).Range.ParagraphFormat.Alignment = wdAlignParagraphCenter.Fill.Transparency = 0With .Line.Weight = 0.25.Style = msoLineSingle.Visible = msoTrue.DashStyle = msoLineSolid.ForeColor.RGB = RGB(0, 0, 0)End With.LockAspectRatio = msoTrueEnd WithNext nEnd SubSub 选中的单个表格格式()'' tab1 Macro'With Selection.ParagraphFormat.CharacterUnitLeftIndent = 0.CharacterUnitRightIndent = 0.CharacterUnitFirstLineIndent = 0.LeftIndent = CentimetersToPoints(0).RightIndent = CentimetersToPoints(0).FirstLineIndent = CentimetersToPoints(0).SpaceBefore = 0.SpaceBeforeAuto = False.SpaceAfter = 0.SpaceAfterAuto = False.LineSpacingRule = wdLineSpaceSingle.Alignment = wdAlignParagraphCenter.WidowControl = True.KeepWithNext = False.KeepTogether = False.PageBreakBefore = False.NoLineNumber = False.Hyphenation = True.OutlineLevel = wdOutlineLevelBodyText.LineUnitBefore = 0.LineUnitAfter = 0.AutoAdjustRightIndent = True.DisableLineHeightGrid = False.FarEastLineBreakControl = True.WordWrap = True.HangingPunctuation = True.HalfWidthPunctuationOnTopOfLine = False.AddSpaceBetweenFarEastAndAlpha = True.AddSpaceBetweenFarEastAndDigit = True.BaseLineAlignment = wdBaselineAlignAutoEnd WithSelection.Font.Size = 10If Selection.Tables.Count >= 1 ThenFor Each aTable In Selection.TablesWith aTable.Rows.HeightRule = wdRowHeightAtLeast.Rows.Height = CentimetersToPoints(0.7).Rows.AllowBreakAcrossPages = True.Rows.HeadingFormat = True.Borders(wdBorderDiagonalDown).LineStyle = wdLineStyleNone.Borders(wdBorderDiagonalUp).LineStyle = wdLineStyleNone.Borders.Shadow = False' .Cells.VerticalAlignment = wdCellAlignVerticalCenter.AutoFitBehavior Behavior:=wdAutoFitContent.AutoFitBehavior Behavior:=wdAutoFitWindowEnd WithWith aTableWith .Borders(wdBorderLeft).LineStyle = wdLineStyleSingle.LineWidth = wdLineWidth050pt.Color = wdColorAutomaticEnd WithWith .Borders(wdBorderRight).LineStyle = wdLineStyleSingle.LineWidth = wdLineWidth050pt.Color = wdColorAutomaticEnd WithWith .Borders(wdBorderTop).LineStyle = wdLineStyleSingle.LineWidth = wdLineWidth050pt.Color = wdColorAutomaticEnd WithWith .Borders(wdBorderBottom).LineStyle = wdLineStyleSingle.LineWidth = wdLineWidth050pt.Color = wdColorAutomaticEnd WithWith .Borders(wdBorderHorizontal).LineStyle = wdLineStyleSingle.LineWidth = wdLineWidth050pt.Color = wdColorAutomaticEnd WithWith .Borders(wdBorderVertical).LineStyle = wdLineStyleSingle.LineWidth = wdLineWidth050pt.Color = wdColorAutomaticEnd WithWith .Rows.AllowBreakAcrossPages = 1.HeadingFormat = False.Alignment = wdAlignRowCenter.WrapAroundText = 0End WithWith Options.DefaultBorderLineStyle = wdLineStyleSingle.DefaultBorderLineWidth = wdLineWidth050pt.DefaultBorderColor = wdColorAutomaticEnd WithEnd WithNext aTableEnd IfEnd Sub。

用宏批量调整中图片版式大小方向集团标准化工作小组 #Q8QGGQT-GX8G08Q8-GNQGJ8-MHHGN#Sub 图片对齐()= False '关闭屏幕更新Dim nOn Error Resume Next(n).SelectorizontalPosition = _wdRelativeHorizontalPositionMarginwdRelativeVerticalPositionMarginNext= True '恢复屏幕更新End SubSub 图片大小()On Error Resume NextDim mywidthDim myheight= False '关闭屏幕更新mywidth = Val(InputBox(Prompt:="单位为厘米(cm);如果输入为0,则图片保持原始纵横比,宽度根据输入的高度数值自动调整;", Title:="请输入图片宽度", Default:="0")) * myheight = Val(InputBox(Prompt:="单位为厘米(cm);如果输入为0,则图片保持原始纵横比,高度根据输入的宽度数值自动调整;", Title:="请输入图片高度", Default:="0")) *'------------------------------------------------------------------'调整嵌入式图形Dim pic As InlineShapeFor Each pic InIf mywidth = "0" Then= myheight=ElseIf myheight = "0" Then= mywidth=Else= mywidth= myheightEnd IfNext'调整浮动式图形Dim tu As ShapeFor Each tu InIf mywidth = "0" Then= myheightElseIf myheight = "0" Then= mywidthElse= msoFalse= mywidth= myheightEnd IfNext= True '恢复屏幕更新End SubSub 浮于文字上方()Dim oShape As Variant, tu As Shape, i= False '关闭屏幕更新On Error Resume Next'调整嵌入图形为浮于文字上方,并旋转90度 For Each oShape InSet oShape =(i).SelectWith oShape. = 3' (去除.Zorder行. = shapeType四周形. = wdWrapTight紧密形改为.ConvertToInlineShape嵌入形).ZOrder 4 '4浮于文字上方 5衬于下方.Rotation = -90#End WithNext'调整其它图形为浮于文字上方,并旋转90度For Each tu In(i).SelectWith tu. = 3 ' (去除.Zorder行. = shapeType四周形. = wdWrapTight紧密形改为.ConvertToInlineShape嵌入形).ZOrder 4 '4浮于文字上方 5衬于下方.Rotation = -90#End WithNext= True '恢复屏幕更新End SubSub 浮于文字上方()Dim oShape As Variant, i= False '关闭屏幕更新On Error Resume NextFor Each oShape InSet oShape =(i).Select '选中图片With oShape.ZOrder 4 '选中图片版式调为浮于文字上方.Rotation = -90# '选中图片向左旋转90度End WithNext= True '关闭屏幕更新End SubSub 连续()Call 浮于文字上方Call 图片大小Call 图片对齐End SubSub 版式转换()Dim oShape As Variant, shapeType As WdWrapTypeOn Error Resume NextIf MsgBox("Y将图片由嵌入式转为浮动式,N将图片由浮动式转为嵌入式", 68) = 6 ThenshapeType = Val(InputBox(Prompt:="请输入图片版式:0=四周型,1=紧密型, " & vbLf & _"3=衬于文字下方,4=浮于文字上方", Default:=0))For Each oShape InSet oShape =With oShapeSelect Case shapeTypeCase 0, 1. = shapeTypeCase 3. = 3.ZOrder 5Case 4. = 3.ZOrder 4Case ElseExit SubEnd Select. = FalseEnd WithNextElseFor Each oShape InNextEnd IfEnd SubSub 图片方向()Dim nOn Error Resume Next(n).IncrementRotation -90# Next nEnd Sub。
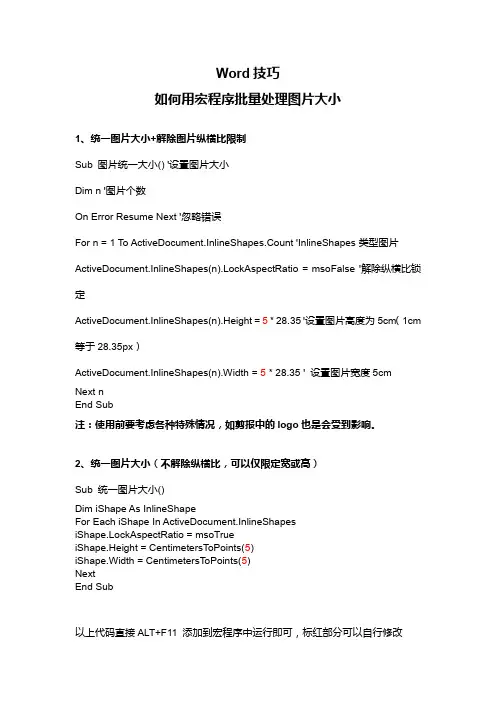
Word技巧
如何用宏程序批量处理图片大小
1、统一图片大小+解除图片纵横比限制
Sub 图片统一大小() '设置图片大小
Dim n '图片个数
On Error Resume Next '忽略错误
For n = 1 To ActiveDocument.InlineShapes.Count 'InlineShapes类型图片ActiveDocument.InlineShapes(n).LockAspectRatio = msoFalse '解除纵横比锁定
ActiveDocument.InlineShapes(n).Height = 5 * 28.35 '设置图片高度为5cm(1cm 等于28.35px)
ActiveDocument.InlineShapes(n).Width = 5 * 28.35 ' 设置图片宽度5cm
Next n
End Sub
注:使用前要考虑各种特殊情况,如剪报中的logo也是会受到影响。
2、统一图片大小(不解除纵横比,可以仅限定宽或高)
Sub 统一图片大小()
Dim iShape As InlineShape
For Each iShape In ActiveDocument.InlineShapes
iShape.LockAspectRatio = msoTrue
iShape.Height = CentimetersToPoints(5)
iShape.Width = CentimetersToPoints(5)
Next
End Sub
以上代码直接ALT+F11 添加到宏程序中运行即可,标红部分可以自行修改。
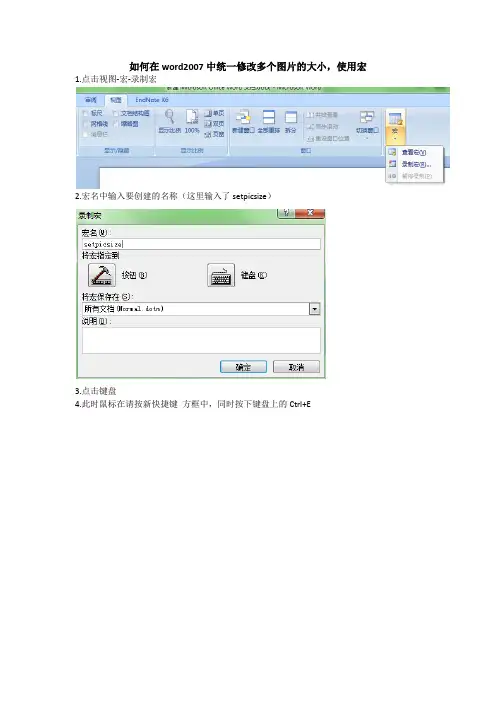
如何在word2007中统一修改多个图片的大小,使用宏1.点击视图-宏-录制宏
2.宏名中输入要创建的名称(这里输入了setpicsize)
3.点击键盘
4.此时鼠标在请按新快捷键方框中,同时按下键盘上的Ctrl+E
(关闭之后,同时按下Ctrl+E操作即可。
但偶不知怎样操作,遂进入第5步)
5.停止录制宏
6.查看宏,点击右侧编辑
7.在该窗口中编辑代码即完成宏的创建
此次统一修改图片的代码为:
sub setpicsize()
dim n
on error resume next
for n=1 to activedocument.inlineshapes.count activedocument.inlineshapes(n).height=400
activedocument.inlineshapes(n).width=300
next n
for n=1 to activedocument.inlineshapes.count
activedocument.inlineshapes(n).height=400
activedocument.inlineshapes(n).width=300
next n
end sub
作为菜鸟,借鉴了网上各位大侠的意见,总结此文档。
虽然不够权威,但尚能解决问题。
与君共勉~。
(完整word版)用宏批量调整word中图片版式、大小、方向Sub 图片对齐() (1)Sub 图片大小() (1)Sub 浮于文字上方() ................................................................................................... 错误!未定义书签。
Sub 浮于文字上方() . (4)Sub 连续() (4)Sub 版式转换() (4)Sub 图片方向() (5)Sub 图片对齐()Application.ScreenUpdating = False '关闭屏幕更新Dim nOn Error Resume NextFor n = 1 To ActiveDocument.Shapes.CountActiveDocument.Shapes(n).SelectSelection.ShapeRange.RelativeHorizontalPosition = _wdRelativeHorizontalPositionMarginSelection.ShapeRange.RelativeVerticalPosition = _wdRelativeVerticalPositionMarginSelection.ShapeRange.Left = wdShapeRightSelection.ShapeRange.Top = wdShapeBottomSelection.ShapeRange.LockAnchor = False/doc/6c8516769.html,youtInCell = TrueSelection.ShapeRange.WrapFormat.AllowOverlap = FalseSelection.ShapeRange.WrapFormat.Side = wdWrapBothNextApplication.ScreenUpdating = True '恢复屏幕更新End SubSub 图片大小()On Error Resume NextDim mywidthDim myheightApplication.ScreenUpdating = False '关闭屏幕更新mywidth = Val(InputBox(Prompt:="单位为厘米(cm);如果输入为0,则图片保持原始纵横比,宽度根据输入的高度数值自动调整;", Title:="请输入图片宽度", Default:="0")) * 28.35myheight = Val(InputBox(Prompt:="单位为厘米(cm);如果输入为0,则图片保持原始纵横比,高度根据输入的宽度数值自动调整;", Title:="请输入图片高度", Default:="0")) * 28.35'------------------------------------------------------------------'调整嵌入式图形Dim pic As InlineShapeFor Each pic In ActiveDocument.InlineShapesIf mywidth = "0" Thenpic.Height = myheightpic.ScaleWidth = pic.ScaleHeightElseIf myheight = "0" Thenpic.Width = mywidthpic.ScaleHeight = pic.ScaleWidthElsepic.Width = mywidthpic.Height = myheightEnd IfNext'调整浮动式图形Dim tu As ShapeIf mywidth = "0" Thentu.Height = myheightElseIf myheight = "0" Thentu.Width = mywidthElsetu.LockAspectRatio = msoFalsetu.Width = mywidthtu.Height = myheightEnd IfNextApplication.ScreenUpdating = True '恢复屏幕更新End SubSub 浮于文字上方()Dim oShape As Variant, tu As Shape, iApplication.ScreenUpdating = False '关闭屏幕更新On Error Resume Next'调整嵌入图形为浮于文字上方,并旋转90度For Each oShape In ActiveDocument.InlineShapesSet oShape = oShape.ConvertT oShapeActiveDocument.InlineShapes(i).SelectWith oShape.WrapFormat.Type = 3' (去除.Zorder行.WrapFormat.Type = shapeType四周形.WrapFormat.Type = wdWrapTight紧密形改为.ConvertToInlineShape嵌入形).ZOrder 4 '4浮于文字上方5衬于下方.Rotation = -90#End WithNext'调整其它图形为浮于文字上方,并旋转90度ActiveDocument.Shapes(i).SelectWith tu.WrapFormat.Type = 3' (去除.Zorder行.WrapFormat.Type = shapeType四周形.WrapFormat.Type = wdWrapTight紧密形改为.ConvertToInlineShape嵌入形).ZOrder 4 '4浮于文字上方5衬于下方.Rotation = -90#End WithNextApplication.ScreenUpdating = True '恢复屏幕更新End SubSub 浮于文字上方()Dim oShape As Variant, iApplication.ScreenUpdating = False '关闭屏幕更新On Error Resume NextFor Each oShape In ActiveDocument.InlineShapesSet oShape = oShape.ConvertT oShapeActiveDocument.InlineShapes(i).Select '选中图片With oShape.ZOrder 4 '选中图片版式调为浮于文字上方.Rotation = -90# '选中图片向左旋转90度End WithNextApplication.ScreenUpdating = True '关闭屏幕更新End SubSub 连续()Call 浮于文字上方Call 图片大小Call 图片对齐End SubSub 版式转换()Dim oShape As Variant, shapeType As WdWrapTypeOn Error Resume NextIf MsgBox("Y将图片由嵌入式转为浮动式,N将图片由浮动式转为嵌入式", 68) = 6 Then shapeType = Val(InputBox(Prompt:="请输入图片版式:0=四周型,1=紧密型, " & vbLf & _"3=衬于文字下方,4=浮于文字上方", Default:=0)) For Each oShape In ActiveDocument.InlineShapesSet oShape = oShape.ConvertT oShapeWith oShapeSelect Case shapeTypeCase 0, 1.WrapFormat.Type = shapeTypeCase 3.WrapFormat.Type = 3.ZOrder 5Case 4.WrapFormat.Type = 3.ZOrder 4Case ElseExit SubEnd Select.WrapFormat.AllowOverlap = FalseEnd WithNextElseFor Each oShape In ActiveDocument.ShapesoShape.ConvertToInlineShapeNextEnd IfEnd SubSub 图片方向()Dim nOn Error Resume NextFor n = 1 To ActiveDocument.Shapes.Count ActiveDocument.Shapes(n).IncrementRotation -90# Next nEnd Sub。
word在用宏批量设置图片大小:word宏设置图片大小最近发现,以前存了很多图片在word,但图片的很大,有的很小,规格都不一样,堆在文档里面很难看,为了美观,下面给大家分享Word中利用宏批量设置图片大小的操作方法,欢迎大家来到学习。
Word用宏批量设置图片大小的方法大家看看我是怎么样利用宏批量修改word中所有图片大小,先打开存有图片的word。
在打开的文档中,选择在工具菜单中选择宏--宏。
随后弹出宏对话框,在宏名中输入setpicsize。
宏名起好了,单击创建按钮进入Visual Basic 编辑器,输入如下代码Sub setpicsize() '设置图片大小Dim n '图片个数On Error Resume Next '忽略错误For n = 1 To ActiveDocument.InlineShapes.Count 'InlineShapes 类型图片ActiveDocument.InlineShapes(n).Height = 400 '设置图片高度为400pxActiveDocument.InlineShapes(n).Width = 300 '设置图片宽度300pxNext nFor n = 1 To ActiveDocument.Shapes.Count 'Shapes类型图片ActiveDocument.Shapes(n).Height = 400 '设置图片高度为400pxActiveDocument.Shapes(n).Width = 300 '设置图片宽度300pxNext nEnd Sub关闭入Visual Basic 编辑器,返回word,重新选择工具--宏--宏(或者直接按Alt+F8),再次进入宏的界面,在弹出的宏名中选择”setpicsize”,最后点击运行---确认即可快速地批量修改word中所有图片大小,注意这里把图片大小都修改成Height = 400,Width = 300,这个规格大家可以需要改变的~感谢您的阅读!。
word宏实现批量处理照片大小方法word办公数码电脑资料Word批量怎么处理图片大小呢,如果一个word文档中有几百张图片我们如果一张张去处理很麻烦,下面我们一起来看利用word宏实现批量处理照片大小,北街最近需要写的文档越来越多了,根据公司文档标准性,我要使用正规的格式和样式做一些图文混排的 Word ,例如使文档中的每一幅图片大小一致。
下面的方法就是告诉大家 Word 批量处理统一图片大小的方法。
使用方法:把代码复制到 Visual Biscal 器中,再回到 Word 界面,运行“宏”命令。
Sub setpicsize() '设置图片大小Dim n '图片个数On Error Resume Next '忽略错误For n = 1 To ActiveDocument.InlineShapes.Count'InlineShapes类型图片ActiveDocument.InlineShapes(n).Height = 400 '设置图片高度为400pxActiveDocument.InlineShapes(n).Width = 300 '设置图片宽度300pxNext nFor n = 1 To ActiveDocument.Shapes.Count 'Shapes类型图片ActiveDocument.Shapes(n).Height = 400 '设置图片高度为 400px ActiveDocument.Shapes(n).Width = 300 '设置图片宽度 300px Next nEnd Sub操作步骤如下:1. 翻开要统一图片大小的 Word 文档,点击“工具”-“宏”-“Visual Biscal 器,按比例缩放的方法和上面的是一样的,只是代码变化一下,过程就不熬述。
VBA 代码如下:Sub setpicsize() '设置图片大小Dim n '图片个数On Error Resume Next '忽略错误For n = 1 To ActiveDocument.InlineShapes.Count'InlineShapes类型图片ActiveDocument.InlineShapes(n).Height = 400 '设置图片高度为400pxActiveDocument.InlineShapes(n).Width = 300 '设置图片宽度300pxNext nFor n = 1 To ActiveDocument.Shapes.Count 'Shapes类型图片ActiveDocument.Shapes(n).Height = 400 '设置图片高度为 400px ActiveDocument.Shapes(n).Width = 300 '设置图片宽度 300px Next nEnd Sub。
Sub 图片对齐() .................................... 错误!未指定书签。
Sub 图片大小().................................... 错误!未指定书签。
Sub 浮于文字上方()................................ 错误!未指定书签。
Sub 浮于文字上方()................................ 错误!未指定书签。
Sub 连续()........................................ 错误!未指定书签。
Sub 版式转换().................................... 错误!未指定书签。
Sub 图片方向().................................... 错误!未指定书签。
Sub 图片对齐()
Application.ScreenUpdating = False '关闭屏幕更新
Dim n
On Error Resume Next
ActiveDocument.Shapes(n).Select
orizontalPosition = _
wdRelativeHorizontalPositionMargin
wdRelativeVerticalPositionMargin
Next
Application.ScreenUpdating = True '恢复屏幕更新
End Sub
Sub 图片大小()
On Error Resume Next
Dim mywidth
Dim myheight
Application.ScreenUpdating = False '关闭屏幕更新
mywidth = Val(InputBox(Prompt:="单位为厘米(cm);如果输入为0,则图片保持原始纵横比,宽度根据输入的高度数值自动调整;", Title:="请输入图片宽度", Default:="0")) * 28.35
myheight = Val(InputBox(Prompt:="单位为厘米(cm);如果输入为0,则图片保持原始纵横比,高度根据输入的宽度数值自动调整;", Title:="请输入图片高度", Default:="0")) * 28.35
'------------------------------------------------------------------
'调整嵌入式图形
Dim pic As InlineShape
For Each pic In ActiveDocument.InlineShapes
If mywidth = "0" Then
pic.Height = myheight
pic.ScaleWidth = pic.ScaleHeight
ElseIf myheight = "0" Then
pic.Width = mywidth
pic.ScaleHeight = pic.ScaleWidth
Else
pic.Width = mywidth
pic.Height = myheight
End If
Next
'调整浮动式图形
Dim tu As Shape
For Each tu In ActiveDocument.Shapes
If mywidth = "0" Then
tu.Height = myheight
ElseIf myheight = "0" Then
tu.Width = mywidth
Else
tu.LockAspectRatio = msoFalse
tu.Width = mywidth
tu.Height = myheight
End If
Next
Application.ScreenUpdating = True '恢复屏幕更新End Sub
Sub 浮于文字上方()
Dim oShape As Variant, tu As Shape, i Application.ScreenUpdating = False '关闭屏幕更新On Error Resume Next
'调整嵌入图形为浮于文字上方,并旋转90度
For Each oShape In ActiveDocument.InlineShapes Set oShape = oShape.ConvertToShape
ActiveDocument.InlineShapes(i).Select
With oShape
.WrapFormat.Type = 3' (去除.Zorder行.WrapFormat.Type = shapeType四周形.WrapFormat.Type = wdWrapTight紧密形改为.ConvertToInlineShape嵌入形)
.ZOrder 4 '4浮于文字上方5衬于下方
.Rotation = -90#
End With
Next
'调整其它图形为浮于文字上方,并旋转90度
For Each tu In ActiveDocument.Shapes
ActiveDocument.Shapes(i).Select
With tu
.WrapFormat.Type = 3' (去除.Zorder行.WrapFormat.Type = shapeType四周形.WrapFormat.Type = wdWrapTight紧密形改为.ConvertToInlineShape嵌入形)
.ZOrder 4 '4浮于文字上方5衬于下方
.Rotation = -90#
End With
Next
Application.ScreenUpdating = True '恢复屏幕更新
End Sub
Sub 浮于文字上方()
Dim oShape As Variant, i
Application.ScreenUpdating = False '关闭屏幕更新
On Error Resume Next
For Each oShape In ActiveDocument.InlineShapes
Set oShape = oShape.ConvertToShape
ActiveDocument.InlineShapes(i).Select '选中图片
With oShape
.ZOrder 4 '选中图片版式调为浮于文字上方
.Rotation = -90# '选中图片向左旋转90度
End With
Next
Application.ScreenUpdating = True '关闭屏幕更新
End Sub
Sub 连续()
Call 浮于文字上方
Call 图片大小
Call 图片对齐
End Sub
Sub 版式转换()
Dim oShape As Variant, shapeType As WdWrapType
On Error Resume Next
If MsgBox("Y将图片由嵌入式转为浮动式,N将图片由浮动式转为嵌入式", 68) = 6 Then shapeType = Val(InputBox(Prompt:="请输入图片版式:0=四周型,1=紧密型, " & vbLf & _
"3=衬于文字下方,4=浮于文字上方", Default:=0)) For Each oShape In ActiveDocument.InlineShapes
Set oShape = oShape.ConvertToShape
With oShape
Select Case shapeType
Case 0, 1
.WrapFormat.Type = shapeType
Case 3
.WrapFormat.Type = 3
.ZOrder 5
Case 4
.WrapFormat.Type = 3
.ZOrder 4
Case Else
Exit Sub
End Select
.WrapFormat.AllowOverlap = False
End With
Next
Else
For Each oShape In ActiveDocument.Shapes
oShape.ConvertToInlineShape
Next
End If
End Sub
Sub 图片方向()
Dim n
On Error Resume Next
ActiveDocument.Shapes(n).IncrementRotation -90# Next n
End Sub。