达美盛-AutoCAD Plant3D三维工厂设计方案建议书
- 格式:pdf
- 大小:3.44 MB
- 文档页数:21
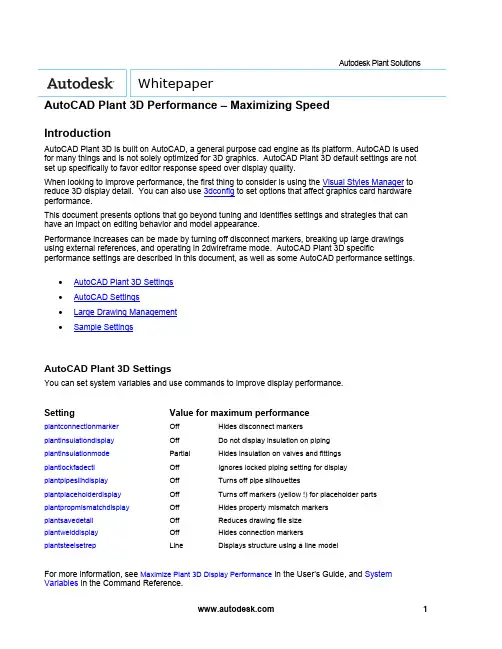
Autodesk Plant Solutions WhitepaperAutoCAD Plant 3D Performance – Maximizing SpeedIntroductionAutoCAD Plant 3D is built on AutoCAD, a general purpose cad engine as its platform. AutoCAD is used for many things and is not solely optimized for 3D graphics. AutoCAD Plant 3D default settings are not set up specifically to favor editor response speed over display quality.When looking to improve performance, the first thing to consider is using the Visual Styles Manager to reduce 3D display detail. You can also use 3dconfig to set options that affect graphics card hardware performance.This document presents options that go beyond tuning and identifies settings and strategies that can have an impact on editing behavior and model appearance.Performance increases can be made by turning off disconnect markers, breaking up large drawings using external references, and operating in 2dwireframe mode. AutoCAD Plant 3D specific performance settings are described in this document, as well as some AutoCAD performance settings.∙AutoCAD Plant 3D Settings∙AutoCAD Settings∙Large Drawing Management∙Sample SettingsAutoCAD Plant 3D SettingsYou can set system variables and use commands to improve display performance.Setting Value for maximum performanceplantconnectionmarker Off Hides disconnect markersplantinsulationdisplay Off Do not display insulation on pipingplantinsulationmode Partial Hides insulation on valves and fittingsplantlockfadectl Off Ignores locked piping setting for display plantpipesilhdisplay Off Turns off pipe silhouettesplantplaceholderdisplay Off Turns off markers (yellow !) for placeholder parts plantpropmismatchdisplay Off Hides property mismatch markersplantsavedetail Off Reduces drawing file sizeplantwelddisplay Off Hides connection markersplantsteelsetrep Line Displays structure using a line modelFor more information, see Maximize Plant 3D Display Performance in the User’s Guide, and System Variables in the Command Reference.You can close AutoCAD Plant 3D palettes that you are not using when working in the model. For example, closing the Data Manager can improve performance, especially when editing. You can also close Project Manager to improve performance. For best results close the palette, do not Auto-Hide.AutoCAD SettingsThere is no single best AutoCAD setting for performance, because some settings are designed to disable features that you need to select and edit. In general, the settings identified here are intended to maximize browsing speed.The most significant choice is between 2D and 3D view modes. 2D modes can display 3D objects that look similar to 3D wireframe, but the modes use a significantly different redraw database. The 3D redraw database is designed for quality and response, but not scalability. In practical terms, this means that in 3D view modes, performance deteriorates faster as the model in the display gets larger. Changing to 2D wireframe with silhouettes off can significantly improve performance.dispsilh=0, isolines=4 dispsilh=1, Isolines=0If you turn off dispsilh to improve performance in wireframe, you should set isolines to 4. Piping also uses plantpipesilhdisplay, which displays silhouettes for tube segments when dispsilh is off.For more information, see Control the Visual Style of the Plant 3D Model.Below are some of the AutoCAD system variables you can use to improve performance.AutoCAD Setting Value for maximum performancedispsilh Off Do not display silhouette edgesisolines 4 The number of contour lines per surface on objectspickfirst Off Objects are selected after the commandviewres 1 Sets the smoothness of curved objects in a 2D view savetime Zero (0) Turn off autosavevscurrent2Dwireframe Sets the fastest display modevtenable 0 Turns off smooth view transitions customerinvolvementprogram Off Turns off activity loggingIt is important to understand the impact of these settings and consider that they could cause undesired behavior. For example, turning off pickfirst speeds up browsing, but it disables the select connected parts shortcut menu. Dragging in 2dwireframe can be slower than 3dwireframe. The best performance configuration depends on how you are working with the model. Setting a low viewres speeds up dragging in 2D mode. Facetres is a similar variable that affects 3D views.You can use vtoptions to set a fast transition speed, lower the performance (fps) threshold, or disable view transitions.Other settings that are not specific to display can be used. For example, you can freeze unused layers to improve performance, instead of turning a layer off.You can also turn off features that you do not use. For example, if you do not need the properties window open, consider closing it until needed. Tracking, dynamic input, and even grips can be turned off when not used.Large Drawing ManagementBreaking up larger drawings into smaller ones using external references can significantly improve performance. For example, you can place equipment, piping, and structure into different drawings and break up large drawings by area.Sample SettingsYou can copy and paste the table below into the Command window, or create and run a LSP file. Values are also provided to restore default settings.Performance settings:(command "plantconnectionmarker" "0")(command "plantinsulationdisplay" "0")(command "plantinsulationmode" "p")(setvar "plantpipesilhdisplay" 0)(setvar "plantpropmismatchdisplay" 0)(command "plantplaceholderdisplay" "0")(setvar "plantwelddisplay" 0)(setvar "plantlockfadectl" 0)(setvar "plantsavedetail" 0)(command "plantsteelsetrep" "L")(setvar "dispsilh" 0)(setvar "isolines" 4)(setvar "pickfirst" 0)(command "viewres" "y" 1)(setvar "savetime" 0)(command "vscurrent" "2dwireframe")(setvar "vtenable" 0)(if (/= (getvar "cipmode") 0) (prompt "\nRun customerinvolvementprogram to disable.")) Default settings:(command "plantconnectionmarker" "1")(command "plantinsulationdisplay" "1")(command "plantinsulationmode" "f")(setvar "plantpipesilhdisplay" 1)(command "plantplaceholderdisplay" "1")(setvar "plantsavedetail" 1)(setvar "dispsilh" 1)(setvar "isolines" 0)(setvar "pickfirst" 1)(command "viewres" "y" 1000)(setvar "savetime" 10)(setvar "vtenable" 3)(command "vscurrent" "realistic")Autodesk, Inc.111 McInnis ParkwaySan Rafael, CA 94903USAAutodesk [and other products] are either registered trademarks or trademarks of Autodesk, Inc., in the USA and other countries. All other brand names, product names, or trademarks belong to their respective holders.© 2010 Autodesk, Inc. All rights reserved.。

浅析三维工厂设计软件Autocad Plant 3D在工厂项目中的应用(兖矿国宏化工有限责任公司,山东 邹城 273512)李仕超摘要:介绍了三维工厂设计软件在国内外的发展情况,重点对Autocad Plant 3D软件的特点和优势进行了介绍,同时阐述了未来工厂设计的发展趋势。
关键词:三维工厂设计;Autocad Plant 3D;工厂;应用1 前言目前,随着科学技术的进步和人类思想认识的逐步提升,新兴的设计手段已越来越广泛的应用于石油、化工、机械和电子等各行各业,其中的三维软件更是如雨后春笋搬纷纷发展,它们以自身的直观、高效、精准和简捷的优势得到了业主和设计院的推崇。
传统的项目设计大多使用二维AutodCAD完成工厂设计,无法直观、精准的反映出工厂布局和设备、厂房和管道布置情况,工作效率低下,设计周期冗长繁琐,而且非常容易出错,修改起来比较麻烦,已经越来越不能适应社会的快速发展,三维工厂系统设计软件的出现使得这些难题迎刃而解。
目前在国内设计院和石化工厂使用较多的三维工厂设计软件有PDS、PDMS、Autoplant 3D和Autocad Plant 3D等,在中小型工厂项目设计中,尤以Autocad Plant 3D(以下简称P3D)发展最为迅猛,得到了设计院和业主的青睐。
2 三维软件特点简介Autocad Plant 3D是由欧特克公司开发的新兴工厂三维系统设计软件,采用MS SQL lite 大型关系数据库,软件包含了P&ID、plant 3d、cad等部分,自带了完整的以欧洲标准、美洲标准和中国国标开发的三维元件库,涵盖了从钢结构、土建、支架、设备、管道,到各种尺寸和压力等级的法兰、垫片、螺栓、螺母、三通、弯头、阀门、过滤器等管件,同时还可以根据项目需要自行添加各式各样的规格表,软件具有的特点有如下几个方面:2.1 精准显示工厂布置情况,与Auto CAD无缝衔接P3D是欧特克公司基于自家AutoCAD平台开发的三维工厂软件,能与CAD实现无缝衔接,文件本身就以DWD格式进行存储,操作命令和CAD全兼容,可随时切换到CAD工作空间进行操作。
A Natural Gas Company’s Journey from 2D to 3D andBeyondWilliam EllsworthCAD Design Manager@TheWSEllsworthClass SummaryLearn the steps to successfully implement AutoCAD Plant 3D, and see how a Natural Gas Company utilized a BIM Project Life Cycle.Key Learning ObjectivesAt the end of this class, you will be able to:▪Understand the steps involved in implementing AutoCAD Plant 3D▪Identify the correct resources to ensure success▪See how a BIM Project Life Cycle is implemented and utilized in the Natural Gas Industry.▪See how applications like AutoCAD P&ID, Autodesk Navisworks and BIM 360 Glue workWilliam EllsworthCAD Design Manager@TheWSEllsworthCarlos Caminos3D Administrator @CCaminosImplementing AutoCAD Plant 3D Steps & ResourcesDESCRIPTIONEQT Midstream is looking for a 3D application which will enable but not limit our Design Engineering team to:✓Transition from 2D to 3D ✓Ease to Learn/Use ✓BOM Capabilities ✓Clash Detection ✓Review Capabilities ✓Work Flow✓Drive Standardization ✓Drive EfficiencyTIMING▪Define –1Q14▪Implementation –2/3Q14▪Training –4Q14▪Pilot –4Q14Scope & Timing5 STEP APPROACHKEYS TO SUCESSResellerAutodesk 3D EvaluationsPlant 3DInventorAutoCADTraining CenterSoftware SupplierConsultingSolution ImplementationTask OrdersCustom DevelopmentAutoCAD P&IDAutoCAD Plant 3DITHardwareSoftwareNetwork Solutions✓COMMUNICATION ✓UPDATE MEETINGS ✓RESOURCES✓ONE GOALAutodesk Consulting Task OrderEXECUTIVE SUMMARYEQT has requested services to assist in the implementation of the Autodesk Plant Design solution AutoCAD P&ID and AutoCAD Plant 3D components.Emphasis of these services will be on configuring the P&ID and Plant 3D tools to EQT’s specific requirements and providing training to EQT Administrators.The following outlines the detailed tasks, deliverables and assumptions that Autodesk will be performing for this project.CONTENT▪Schedule▪Task 1 –Validate Product Config Requirements▪Task 2 –Configure Products▪Task 3 –On-site Product Installation▪Task 4 –MentoringStep #2 -Task Order #1 (Define)Task Order #1 –ScheduleDESCRIPTIONAutodesk will conduct a on-site workshop to review, refineand validate the specifications and requirements that wereprovided to Autodesk during the sales process.The purpose of this task is to ensure that the combinedAutodesk/EQT team has a thorough and mutual understanding ofthe specifications and requirements prior to Autodesk configuringthe P&ID and Plant 3D products.In addition to the requirements clarification activities,Autodesk and EQT will review Plant Design workflow bestpractices.ASSUMPTIONS▪75% of EQT’s P&ID symbology same as P&ID product out-of-the-box symbology. ▪EQT product configuration specifications and requirement ▪EQT P&ID standards ▪EQT Plant 3D standards Task 1 –Validate Product ConfigRequirementsTask 2 –Configure Products (P&ID)DESCRIPTIONAutodesk will configure and test the Autodesk P&ID and Plant 3D products to the agreed upon requirements.Project Requirements▪Project Properties▪Drawing PropertiesP&ID Setup▪CAD Standards▪Engineering data▪Title Block creationCustom report set-up and creationValidation setting set-up✓P&ID LEADSHEETPLANT 3D CONFIGURATIONPlant 3D Setup ▪Create Plant 3D *.dwt▪Layers and color settingsIsometric and orthographic templates▪ 2 different isometric styles identified by EQT ▪Orthographic title block creation ▪Orthographic *.dwtP&ID and Plant 3D data mappingCustom report set-up and creationValidation setting set-upASSUMPTIONS▪Piping specifications will be done in a future task order. Task 2 –Configure Products (PLANT 3D)✓CAD STANDARDDESCRIPTIONAfter Autodesk has configured the P&ID and Plant 3D products at the Autodesk offices, Autodesk will deliver the configured to EQT for validation / testing.DELIVERABLES▪P&ID and Plant 3D products configured per the requirements defined in Task 1▪Documentation for SQL Autodesk database recovery procedure▪Documentation for SQL Server installationASSUMPTIONS▪Use Microsoft Active Directory authentication▪Use AD Groups▪Use preconfigured locations for SQL databases and logs▪Not use the SQL SA account ▪Install and setup hardware and software including Microsoft 2008 r2 SQL Server Task 3 –On-site Product Installation, Deliveryand Validation of Configured Products ✓DEDICATED RESOURCES ✓ACCESS ✓ACTION ITEMS LISTTask 4 –MentoringTechnical Consultant (who completed the configuration) ▪On-site mentoring –(4) days▪Remote Support –(16) hours✓PROJECT CONSULTANT✓ACTION ITEMS LISTAutodesk Consulting Task OrderEXECUTIVE SUMMARYThe purpose of this project is to add the Plant 3D Catalog and some piping specifications to the Plant 3D configuration.The following outlines the detailed tasks, deliverables and assumptions that Autodesk will be performing for this project.CONTENT▪Task 1 –Create Plant 3D Catalog ▪Task 2 –Create Piping Specifications ▪Task 3 –Delivery and Validation ▪Task 4 –Specification Creation TrainingStep #3 -Task Order #2 (Implement)✓SPECIFIC 3D COMPONENT’S✓SPECIFIC PIPING SPEC’SDESCRIPTIONAutodesk will configure the Plant 3D Catalog.Based on the requirements documented in the Parts List excel file.DELIVERABLES▪Plant 3D Catalog for the Plant 3D 2014 versionEQT Responsibilities ▪Provide all cut sheets Task 1–Create Plant 3D Catalog ✓PARTS LIST ✓CUT SHEETSDESCRIPTIONAutodesk will configure Plant 3D piping specifications.Based on the requirements documented in the PartsList excel file.PIPING SPECIFICATION▪AutoCAD Plant 3D Specifications, (C1, C3, C6, C9)▪Procedure to link piping specifications back to theCatalog in EQT’s environment. ▪C1, C3, C6, and C9 Excel files with highlightedcomponents that were not created.Task 2 –Create Piping Specification ✓SPECIFIC SPEC✓SPECIFIC LONG DESCRIPTIONSDESCRIPTIONAutodesk will deliver the configurations to EQT for validation / testing.Autodesk will install the configuration on the appropriate EQT environment and ensure that it is ready for testing.Once the configurations are ready for testing, Autodesk will spend two (2) days on-site working with the EQT team to review and test / validate the configuration of these products based on the requirements defined in the Part List Excel file. DELIVERABLES▪EQT Plant 3D Catalog configured as defined in Task 1 ▪EQT Piping Specifications configured as defined in Task 2. ▪Document detailing the catalog and piping specification deployment procedureTask 3–Delivery and Validation✓CATS N SPEC CREATOR✓ACTION ITEMS LISTDESCRIPTION(1) day training session for up to (4) EQT staff on how to add components to the Catalogand Piping Specifications and how to create new content.Develop a C600 specification as a training exercise. (16) hours Remote Support.Task 4 –Specification Creation Training✓3D ADMINISTRATOR ✓STANDARDIZATIONClass:Intro to Plant 3D 2014Training Days:4 DaysLocation for Training Days:Case Technologies, Inc Training Lab Course:Hands On -interactive with exercises including:▪Introduction to AutoCAD Plant 3D ▪AutoCAD P&ID▪AutoCAD Plant 3D –Imperial ▪Autodesk Navisworks▪Setting up and Administering a Plant ProjectStep #4 -Training✓TIMING✓QUALIFIED TRAINER ✓DURATION ✓MANUALTo help prove out the implementation we chose a small Compressor Station with a Dehy as our Pilot Project. As expected we wentthrough learning curves and tweaked several Config files. The Pilot Project meet all of our expectations and was successfully built and operating on time and with in budget.NOTABLE UPDATES AND LESSONS LEARNEDP&ID ▪Certain Instrument Tag’s did not display all of theirnumbers ▪PRV Tag was missing ▪Learning curve on Primary and Secondary PipelinesModel ▪Cats n Specs for specific project parts ▪Olet connections kept disconnecting ISOS ▪Title Block to show Pipe Line Number ▪ISO Notes▪How to break Pipe Lines up to fit on ISO ▪BOM to show correctlyStep #5 -Pilot ProjectOpportunities▪3D Administrator▪Having an experienced 3D Administrator through this journey is essential.▪Spec and Component Expectation▪Having a better understanding of ‘out of the box’ Spec and Components and it’s importance.▪Configuration during Delivery and Validation ▪Ensure tasks are completed, as expected, before scheduling ‘Delivery and Validation’.Realized Benefits2D Projects vs 3D Projects*✓Compression –(9%)✓Interconnects –(5%)✓Pipeline –(25%)3D Equipment Utilization✓Compressor Station A –32/54 (60%)✓Compressor Station B –34/36 (94%)BIM Project Life Cycle Natural Gas IndustryReview QCFront End DesignConstructionDetail Design3D DataGA PFD Cut & FillIntelligent P&IDModel ReviewMobile Applications BIM 360 GlueA360Equipment DesignPipingDeliverables Orthographics IsometricsReportsBIM Project WorkflowDesign toolsPlant Design Suite / Infrastructure Design Suite•AutoCAD•AutoCAD P&ID•AutoCAD Plant 3D•AutoCAD Civil 3D•Navisworks Manage•ReCap ProData Management•Vault ProfessionalCollaboration tools•A360•BIM 360 GlueGA PFD Cut & FillIntelligent P&IDLifecycle –FRONT END DESIGNEQT creates General Arrangement 2D design & drafting along with PFD’s, Civil 3D Cut & Fill Analysis and the beginning of Intelligent P&ID’sEquipment DesignPipingLifecycle –EQT finalizes the P&ID’s while creating equipment and finalizing piping models to complete Site model.Equipment ModelsCatalog & SpecsModelReviewDeliverablesOrthographicsIsometricsReports Lifecycle –REVIEW QCEQT finalizes the Orthographic drawings from the completed models.We use tools such as Navisworks to review 3d Site Models alongwith drawings. We also provide reports such as BOM’s list, Valve listand Line list that are generated from the model & P&ID’s.Mobile Applications BIM 360 GlueA360Lifecycle -CONSTRUCTIONDuring construction we have the latest models and drawings using A360 and BIM GLUE 360.Benefits of BIM at EQT▪Labor hours▪Less communication errors between Departments ▪Quicker revision process▪Less errors due to Software interoperability ▪Less material loss▪Less rework in Construction Process▪NO RFI’s on our latest project ConstructedBIM Project Workflow /Lifecycle -BENEFITSBeyondUAV Point Cloud Data TechnologyAsset Management Laser ScanningBeyond▪Drone Flyby▪Online access▪Volumetric data▪Site access▪Edit flights▪Measure▪Regions of interest▪Standard mapping format available▪Weekly Construction Meeting using ReCap▪Point Cloud Data▪Measure as built vs design Build▪Surface, Contours▪Volumetric Data (Cut/Fill)▪Specifications▪Some high level specs on Boomerang UAV:▪Weight: 5 lbs▪Dimensions: 13" x 13" x 9"▪Flight speed: 10-25 mph▪Flight coverage: 100-150 acres per battery▪Battery lifetime: 25-35 mins▪Specs on data quality at 400 feet (normal operating altitude):▪Ground Sampling Distance: 2.5 inches▪DSM pointcloud density:2.5 inches▪Elevation Accuracy: 2-6 inches▪Specs on data quality at 100 feet:▪Ground Sampling Distance: 0.5 inches▪DSM pointcloud density: 0.5 inches▪Elevation Accuracy: 0.5-2 inches* some of the specs are variable because different flight patterns can yield different results▪Civil 3D▪Surface and Contours▪Civil 3D▪Volumetric Data (Cut/Fill)▪Navisworks▪Measure as built vs design BuildUAV (Unmanned Aerial Vehicle) ▪Navisworks▪Measure as built vs design BuildFARO120/20▪Range : 0.6 –120m▪Measurement speed: up to 976,000 points/second▪Ranging error: ±2mm▪Laser class: Laser class 1▪Weight: 14.5 kg▪Size: 410 x 160 x 2800mm Laser Scanning –Asset ManagementLaser ScanningCompressor StationFAROFocus3D X 330▪Range Focus3D X 330: 0.6 –330m▪Measurement speed: up to 976,000 points/second▪Ranging error: ±2mm▪Integr. colour camera: Up to 70 mio. pixel▪Laser class: Laser class 1▪Weight: 5,2kg▪Multi-Sensor: GPS, Compass, Height Sensor, Dual Axis Compensator ▪Size: 240 x 200 x 100mm▪Scanner control: via touchscreen display and WLANFAROPointSense Plant▪Catalog piping and structural extraction ▪Integrates directly with AutoCAD Plant 3D ▪Tie-in point extraction▪Tank analysisFAROPointSense Plant▪Catalog piping and structural extraction ▪Integrates directly with AutoCAD Plant 3D ▪Tie-in point extraction▪Tank analysis▪Your class feedback is critical. Fill out a class survey now.▪Use the AU mobile app or fill out a class survey online.▪Give feedback after each session. ▪AU speakers will get feedbackin real-time.▪Your feedback results in betterclasses and a better AU experience. How did I do?Autodesk is a registered trademark of Autodesk, Inc., and/or its subsidiaries and/or affiliates in the USA and/or other countries. All other brand names, product names, or trademarks belong to their respective holders. Autodesk reserves the right to alter product and services offerings, and。

教你如何使用AutoCADPlant3D进行工厂设计和布局第一章:AutoCAD Plant 3D的概述AutoCAD Plant 3D是由Autodesk开发的一款专业工厂设计和布局软件。
该软件集成了AutoCAD平台的强大功能,提供了一系列专为工厂设计和布局而开发的工具和功能,使得用户能够高效、准确地进行工厂的设计和布局。
第二章:AutoCAD Plant 3D的基本操作在使用AutoCAD Plant 3D进行工厂设计和布局前,我们需要先了解一些基本操作。
首先,打开AutoCAD Plant 3D软件,可以看到界面上有各种工具栏、菜单等工具。
可以使用这些工具进行绘图、编辑、标注等操作。
此外,还可以通过命令行输入命令来执行相应的操作。
掌握这些基本操作后,我们就可以开始进行工厂的设计和布局工作了。
第三章:工厂设计在进行工厂设计时,首先需要创建一个工厂模型。
可以通过绘制线条、创建图形和实体来构建工厂模型。
AutoCAD Plant 3D提供了各种工具和功能,如图形构件库、构件编辑器等,可以帮助用户创建出精确的工厂模型。
此外,还可以添加文本、标注和尺寸等信息,以便更好地理解和展示工厂的设计。
第四章:工厂布局工厂布局是指如何将设备、管道和设施等元素有序地布置在工厂模型中。
在进行工厂布局时,我们需要考虑到工厂的功能需求、空间利用率以及安全等因素。
AutoCAD Plant 3D提供了各种布局工具和功能,如对齐、排列、分组等功能,可以帮助用户进行高效的工厂布局。
此外,还可以使用标注工具和尺度工具来确保布局的准确性和一致性。
第五章:管道设计管道设计是工厂设计和布局中的重要一环。
在AutoCAD Plant3D中,可以使用各种管道设计工具和功能进行管道的绘制、编辑和修改。
例如,可以使用管道绘制工具绘制出管道的走向和连接关系;可以使用管道编辑工具对管道进行调整和优化;可以使用管道分析工具来模拟管道的流量和压力等。
学会使用AutoCADPlant3D进行工厂和装置设计第一章:AutoCAD Plant 3D简介AutoCAD Plant 3D是一款专业的软件,用于工厂和装置设计。
它结合了AutoCAD的功能和工具,以及专门为工程师和设计师开发的功能,提供了一套完整的解决方案来设计和布局工厂和装置。
该软件具有丰富的功能和灵活的工具,使用户能够轻松地创建和编辑2D和3D模型,以及生成详细的工程图纸。
第二章:界面和工作空间在开始使用AutoCAD Plant 3D之前,首先需要了解软件的界面和工作空间。
该软件的界面类似于AutoCAD,但也包含了一些专门用于工厂和装置设计的工具和选项。
用户可以自定义工具栏、菜单和快捷键,以适应自己的工作习惯。
工作空间可以根据不同的需求进行切换,例如2D工作空间用于创建和编辑2D图形,3D工作空间用于进行三维建模和设计。
第三章:模型创建和编辑AutoCAD Plant 3D提供了强大的建模和编辑工具,使用户能够创建和修改各种类型的装置和管道模型。
用户可以使用预定义的图库中的组件,例如管道、泵、阀门等,也可以根据自己的需要自定义图库中的组件。
通过拖拽和连接这些组件,用户可以快速构建复杂的装置和管道系统。
此外,用户还可以使用一系列的编辑工具来调整模型的属性和尺寸,以满足设计要求。
第四章:工程图纸生成一旦完成了模型的创建和编辑,下一步就是生成详细的工程图纸。
AutoCAD Plant 3D提供了丰富的注释和标注工具,使用户能够添加文字、尺寸和符号等信息到图纸中。
用户可以通过设置图层和样式来控制图纸的外观和格式。
此外,该软件还支持将图纸导出为多种文件格式,例如DWG、PDF等,以便与其他团队成员共享和查看。
第五章:项目管理和协作AutoCAD Plant 3D具有强大的项目管理和协作功能,使团队成员能够更好地协同工作。
用户可以创建和管理项目,设置访问权限,并使用云存储来共享和同步项目文件。

浅析三维工厂设计软件Autocad Plant 3D在工厂项目中的应用(兖矿国宏化工有限责任公司,山东 邹城 273512)李仕超摘要:介绍了三维工厂设计软件在国内外的发展情况,重点对Autocad Plant 3D软件的特点和优势进行了介绍,同时阐述了未来工厂设计的发展趋势。
关键词:三维工厂设计;Autocad Plant 3D;工厂;应用1 前言目前,随着科学技术的进步和人类思想认识的逐步提升,新兴的设计手段已越来越广泛的应用于石油、化工、机械和电子等各行各业,其中的三维软件更是如雨后春笋搬纷纷发展,它们以自身的直观、高效、精准和简捷的优势得到了业主和设计院的推崇。
传统的项目设计大多使用二维AutodCAD完成工厂设计,无法直观、精准的反映出工厂布局和设备、厂房和管道布置情况,工作效率低下,设计周期冗长繁琐,而且非常容易出错,修改起来比较麻烦,已经越来越不能适应社会的快速发展,三维工厂系统设计软件的出现使得这些难题迎刃而解。
目前在国内设计院和石化工厂使用较多的三维工厂设计软件有PDS、PDMS、Autoplant 3D和Autocad Plant 3D等,在中小型工厂项目设计中,尤以Autocad Plant 3D(以下简称P3D)发展最为迅猛,得到了设计院和业主的青睐。
2 三维软件特点简介Autocad Plant 3D是由欧特克公司开发的新兴工厂三维系统设计软件,采用MS SQL lite 大型关系数据库,软件包含了P&ID、plant 3d、cad等部分,自带了完整的以欧洲标准、美洲标准和中国国标开发的三维元件库,涵盖了从钢结构、土建、支架、设备、管道,到各种尺寸和压力等级的法兰、垫片、螺栓、螺母、三通、弯头、阀门、过滤器等管件,同时还可以根据项目需要自行添加各式各样的规格表,软件具有的特点有如下几个方面:2.1 精准显示工厂布置情况,与Auto CAD无缝衔接P3D是欧特克公司基于自家AutoCAD平台开发的三维工厂软件,能与CAD实现无缝衔接,文件本身就以DWD格式进行存储,操作命令和CAD全兼容,可随时切换到CAD工作空间进行操作。
工厂课程设计plant3D一、教学目标本课程旨在通过工厂课程设计plant3D的学习,让学生掌握以下知识目标:1.理解工厂设计的基本原理和方法;2.熟悉plant3D软件的操作和应用;3.了解工厂设计的实际流程和注意事项。
同时,学生需要具备以下技能目标:1.能够独立操作plant3D软件进行简单工厂设计;2.能够分析并解决工厂设计过程中遇到的问题;3.能够根据实际需求,进行工厂设计的创新和优化。
在情感态度价值观方面,我们希望学生能够:1.培养对工厂设计的兴趣和热情;2.培养团队合作精神和沟通协调能力;3.培养环保意识和可持续发展观念。
二、教学内容本课程的教学内容将围绕plant3D工厂设计软件展开,具体包括以下几个方面:1.plant3D软件的基本操作和功能;2.工厂设计的基本原理和方法;3.工厂设计的实际案例分析和操作;4.工厂设计过程中的常见问题和解决方法;5.工厂设计的创新和优化。
三、教学方法为了提高学生的学习兴趣和主动性,我们将采用多种教学方法进行教学,包括:1.讲授法:通过讲解plant3D软件的基本操作和工厂设计的基本原理,让学生掌握相关知识;2.案例分析法:通过分析实际案例,让学生了解工厂设计的实际流程和注意事项;3.实验法:通过实际操作plant3D软件进行工厂设计,让学生提高实际操作能力;4.小组讨论法:通过小组合作,让学生培养团队合作精神和沟通协调能力。
四、教学资源为了支持教学内容和教学方法的实施,我们将准备以下教学资源:1.教材:plant3D工厂设计软件教材;2.参考书:相关工厂设计理论和实践的参考书籍;3.多媒体资料:plant3D软件的操作视频和案例分析;4.实验设备:plant3D软件的安装和操作所需的计算机设备。
五、教学评估本课程的评估方式将包括以下几个方面,以全面反映学生的学习成果:1.平时表现:通过课堂参与、小组讨论等环节,评估学生的学习态度和积极性;2.作业:通过布置相关工厂设计的练习题和项目,评估学生的理解和应用能力;3.考试:通过期末考试,评估学生对课程知识的掌握程度;4.创新设计:通过学生完成的工厂设计创新项目,评估学生的创新思维和解决问题的能力。
AutoCAD Plant 3D Customer Success Plan Best practices for successful project start-upTable of ContentsExecutive Summary (3)Plant 3D Project Kick-off Timeline Example (3)Planning (4)System Requirements (4)Product Deployments (4)Pilot Projects & Testing (4)Autodesk Training and Consulting (5)Project Kick-off (5)Support (6)Project Setup Checklist (7)General Settings (7)P&ID DWG Settings (8)Plant 3D Drawing Settings (9)Isometric Drawing Configuration (10)Specs and Catalog Content (11)Spec Sheets (11)Catalogs (11)Catalogs + Specs (11)Reports (12)Network Infrastructure (12)Database and File Servers (12)AutoCAD Profile Paths (Multi-user environment) (12)Project Collaboration with Autodesk BIM 360 Team (12)Additional References (12)Executive SummaryEnsuring success for projects with AutoCAD Plant 3D requires careful planning and project team coordination.There are many activities and tasks that must be completed prior to using Plant 3D out-of-the-box. Training, project configuration, catalog / spec creation, etc. are all topics that require time and effort from the project team time before starting a project.This document outlines the tasks that should be addressed before beginning work with Plant 3D on a live project. By following the checklist and recommendations this will help ensuresuccessful project kick-off and production.Project Kick-off Timeline (Example)Planning☐Define project scope☐Estimate time to complete Project Setup Checklist starting on page 7System Requirements☐Review: System requirements for AutoCAD Plant 3DProduct DeploymentsEnsure the following software is deployed on all CAD workstations:☐Microsoft office 2016 or Office 365Used for import / export to Excel and Catalog Builder functions☐Latest release of AutoCAD Plant 3DAlways install the latest release of AutoCAD Plant 3D to ensure you have access to themost current feature enhancements and updates.☐Updates and Hotfixes are installed or included in the deployment☐AutoCAD Updates and Hotfixes☐AutoCAD Plant 3D Updates and HotfixesUpdates & Hotfixes can be located through the Autodesk Desktop App or Autodesk AccountwebsitePilot Projects & TestingIt is recommended to run a pilot project to test configuration from the checklist, catalog parts / specs, and isometric drawings. We also recommend creating a template project containing all standard configuration settings and customizations.Autodesk Training and ConsultingThe list below is a recommended set of training courses for essential and advanced software skills. Training courses are available through Autodesk Consulting and Autodesk Partners. Essentials courses cover daily workflows for P&ID and 3D designers. Advanced courses are intended for project administrators and / or anyone involved with project setup and configuration tasks.☐Plant 3D - P&ID Essentials (standard workflows for P&ID designers)☐Plant 3D - P&ID Advanced (administrator training for project configuration)☐Plant 3D Essentials (standard workflows for 3D model designers)☐Plant 3D Advanced (project administrators / project configuration)☐Plant 3D Specs and Catalogs (Advanced configuration / custom parts)Autodesk Enterprise Priority (EBA) CustomersVisit with your Customer Success Manager about consulting - Autodesk Consulting Autodesk Premium CustomersLearn about working with an Autodesk Partner for training - Work with an Autodesk PartnerProject Kick-off☐Ensure all project team members have received proper training☐All items on project setup checklist are completeSupportWe recommended designated or dedicated in-house support staff for AutoCAD Plant 3D andP&ID. This could be the BIM Model Coordinator or Pipe Design Lead working with Power Users to support the underlaying project team members.When issues are encountered, the end-user will contact the local Plant 3D “Power User” of their team. If the problem is unable to be resolved, it can be escalated to the project leader oradministrator who will then submit a support case as needed to Autodesk Support using theirAutodesk Account portal using the guidance on this page:Autodesk Account Management - Get help from Autodesk SupportProjectManagerBIM / VDCDesign TeamLeaderPlant 3DPower UserDesignerEngineerSpec WriterProject Setup ChecklistThe checklist below contains a list of Project Setup tasks for the configuration of an AutoCAD Plant 3D or AutoCAD P&ID project. The hyperlinks will open corresponding topics within the Autodesk On-line Help website.General SettingsDatabase SetupInformation only section; shows SQLite or SQL Server properties.Note: Use SQL Server for any network, multi-user projectsRefer to the SQL Server section for more informationDrawing Properties / File Name Format (applies to 3D drawings, Orthos, and P&IDs)☐Add custom properties as required☐Configure file name format string (optional)Paths☐Configure project paths as requiredProject Details☐Project general properties☐Drawing Work History prompts☐General paths☐Custom properties☐Tool palette group associationsProject Reports (for P&ID drawings only)☐Control Valve List☐Document Registry☐Equipment List☐Instrument List☐Line List☐Line Summary List☐Nozzle List☐Specialty Items List☐Valve ListP&ID DWG Settings☐Review: AutoCAD P&ID Advanced Configuration GuideEnd Connections☐Modify P&ID end connection symbolsLine Settings☐Review line settings, gaps, standoff distance, line grips, etc.Data Manager Configuration☐Create custom views as requiredP&ID Class Definitions / Symbols☐Create P&ID object class definitions☐Modify existing symbols / create new or custom symbols☐Converting existing AutoCAD blocksNote: converting existing AutoCAD blocks directly within a project P&ID drawing will only convert the block into a P&ID symbol for that drawing. To convert blocks for use with the entire project, refer to the task above for creating new or custom symbols for use onP&ID tool palettes.☐Layers / Colors / LinetypesDefine Property Lists☐Service abbreviations☐Pipe Specs list☐Instrumentation Abbreviations (ex. PI, FT, etc.)Tag Annotations☐Line number tag configuration (should match 3D pipeline tag config)☐Valve tag format☐Instrument tag format☐Equipment tag format☐Text StylesP&ID Drawing Template (DWT File)☐Title block and borderCommon Reports☐Bills of Materials☐Line list☐Equipment List☐Tie-in List☐Drawing Index☐Specialty Item List☐Instrument List☐Valve List8Plant 3D Drawing SettingsExport and Import Settings☐Add custom configuration as needed for data export and import with discipline teams (ex. Instrument tag list, nozzle list, etc.)Data Manager Configuration☐Add custom Data Manager views as needed for viewing / sorting data in a specific wayPiping and Equipment class property definitions☐Add new properties as needed for each class (Equipment, Fasteners, Pipe Run Components)Piping Connection Settings☐Add any new end types that are required☐Configure any new simple joints that are required☐Configure any new compound joints are required☐Adjust settings in DefaultConnectorsConfig.xml as required☐Test all joint types in a test model to verify they work as expectedSelection List Properties☐Service (Under P3d Line Group)☐Instrument prefixes (ex. PI, FT, FC, etc.)Ensure all tag formats are configured:☐Pipe Line Group TagExamples:<Size>-<Service>-<Spec>-<Line Number><Size>-<Service>-<Spec>-<Line Number>-<InsulThk><InsulType><Size>-<Service>-<Spec>-<Line Number>-<Tracing>☐Pipe run component tags☐Valves☐Instrument items☐Equipment☐Specialty itemsP&ID to Plant 3D object property mapping (optional)☐Pipe line properties☐Valve properties☐In-line assets:☐Valves☐Fittings☐Specialty items☐ReducersIsometric Drawing ConfigurationReview:☐Isometric Configuration (Advanced)☐De-mystifying AutoCAD Plant 3D isometrics – configuration referenceIso Styles☐Iso title block and drawing border☐Attribute mapping for title block (service, spec, insulation, etc.)☐Iso table configuration (BOM, cut list, weld list)☐Iso symbol keys (SKEYs) –IsoSymbolStyles.dwg & IsoSkeyAcadBlockMap.xmlIso Themes☐Dimensions☐Small bore☐Continuations☐Vent / drainIso Testing☐Create preliminary pipe runs with fittings, instruments, etc.☐Run iso sheets and ask drawing checker to verify:☐Symbol output / representation☐Dimensions☐Annotations☐Title block propertiesOrthographic Drawing Configuration☐Ortho title block / drawing border☐Drawing layers☐Annotations / text styles☐BOM table setupSpecs and Catalog Content☐Review: Introduction to Specs and CatalogsSpec Sheets☐Gather new and existing spec sheets (digital or hard copy) for the project☐Re-create / re-build / convert:☐AutoPLANT specs☐CADWorx specs☐Batch assign Long Descriptions as required to match standards (Size & Family)☐Configure Part Use Priority for parts the show conflicts☐Configure Branch tablesCatalogs☐Establish a common, shared folder on the network for part catalogs☐Ensure all parts are available in the out-of-the-box Plant 3D catalogsor Content Packs on Autodesk Exchange App Store:☐Pipe run components☐Instruments☐Specialty items☐Fasteners☐Bolt sets and gaskets☐Pipe supports☐Nozzles☐Placeholder parts☐Structural steel shapes☐Create list of all missing parts or parts that need to be manually created for the catalogs (3D block based or Python scripted)☐Create / build new custom catalog(s) containing the required parts using Catalog Builder or manually through Catalog Editor☐Test custom parts and fittings (including any custom end types and joint /connections that are required)☐Test isometric SKEYs for custom parts to verify proper representation anddimensioning (see related: Iso testing)Catalogs + Specs☐Review: How to add a custom property to a catalog component☐Add new custom properties to catalogs and specs as neededShared Content Folder☐Configure common folder for CatalogsNote: workstation setting through user interface (PLANTMODIFYSHAREDCONTENTFOLDER)or set path variable in Windows Registry11ReportsReport Creator☐Configure new report data queries as neededReport Designer☐Create new report layouts as needed to match company / client standards☐Configure data fields☐Configure data grouping and sorting☐Test report outputNetwork InfrastructureDatabase and File Servers☐Windows Server for hosting project files and folders☐Microsoft SQL Server☐How to configure Microsoft SQL Server for AutoCAD Plant 3D projects☐Hosting projects with Vault Server (optional)☐Configure new or existing Vault Server☐Configure Vault roles and permissionsSQLite Databases–Use only for testing / setup purposes on a local machineSQLite is not intended for multi-user projects running on a network☐Review: AutoCAD Plant 3D Projects: SQLite versus SQL ServerAutoCAD Profile Paths (Multi-user environment)☐Tool palettes for P&ID symbols☐AutoCAD Profile (for shared tool palettes)Project Collaboration with Autodesk BIM 360Collaboration for AutoCAD Plant 3D provides access to cloud-based functionality. Project teams work in the same cloud-hosted project and can collaborate with full control over how otherteams see the state of their work. While most of the network infrastructure requirements listed above are not needed with collaboration projects, an entitlement to Autodesk ConstructionCloud (BIM Collaborate Pro) is required to use Collaboration for AutoCAD Plant 3D.About Autodesk Collaboration for AutoCAD Plant 3DCollaboration Workflow documentationAutodesk Collaboration for Plant 3D FAQAdditional ReferencesIntroduction to AutoCAD Plant 3DAutodesk AutoCAD Plant 3D 2023 On-line HelpTailoring AutoCAD Plant 3D and P&IDPlant 3D Information Sources - An Example of Places to Look12。
ENR501579Design Validation for Industrial Piping with AutoCAD Plant 3DDavid WolfeGraitecCorey St-JacquesPCloud InnovationsDescriptionIndustrial piping projects routinely run into difficulties validating model design against P&ID schematics. Missing tags and incorrect descriptions wreak havoc on schedules as designers work to transition from drawing-focused design to data-centered design. Engineering managers and project managers need clarity in design quality. Learn how estimating design points as part of your AutoCAD Plant 3D modeling gives you and your project management team better insight into project progress, identifying critical paths, and helps your projects stay on time and on budget.Speaker(s)David Wolfe - Develops sales and technical software approaches for Autodesk products in the plant and process industry. Identifies product development opportunities for clients and organizational growth. Grows team skills and implements best practices into services execution.Piping Design Review PracticesPiping design tends to be stuck behind the technology curve. Even with the massive digital migrations we have seen toward cloud-enabled systems, many of our review processes are mostly manual effort redlining drawings, or fixing typos in Excel spreadsheets. Plant Vision from PCloud Innovations is the best way to change review processes and improve design communication for a piping design team.Continuous ValidationOne aspect of technology evolution over the last decade has been the rise in continuous integration and continuous deployment. For developers, the deployment process meant stopping work, building installers, testing and writing documentation for 3-5 days (for a small project). By creating scalable automation that does these processes automatically, dev teams get to reclaim the time spent on integration and deployment and instead release more features. For piping designers, the validation process is somewhat similar in that it ends up being pushed to the last minute and creates its own schedule slip as errors get reviewed and corrected. The goal of continuous validation is to allow the thinking and manual efforts to be focused on critical design issues and allowing software to close the gap on data inconsistency.Design ScorePiping designers develop an intuitive sense for complexity and difficulty as the mature in their process. Taking some best practices into account, Plant Vision builds a score to model complexity and risk. While imperfect, the design score should help provide a scale of effort which can steer management and design effort. Here are a couple scenarios the demonstrate the value of a design score.The design score formula has the following components:•Points for the type of item (eg 3 for tanks, 5 for vessels, 1 for pumps)• 1 point for each connected nozzle (nozzles without piping are excluded)• 1 point for each P&ID the equipment appears on (equipment that appears on multiple P&IDs are generally more complex)• 1 point to appear in a plan or section (every item should appear labeled at least once)• 1 point to appear in an isometric (every item should appear in the set of isos at least once)Tank in Tank FarmA tank has 5 nozzles, 3 of which have connected piping. One of the 5 nozzles is a vent, and the other is a drain.Tower in a Process BuildingThe tower has 46 nozzles, 38 have connected piping and appears on 3 P&IDs.VelocityThe term velocity in the agile development world is a way to measure how quickly a team is executing on their workload. In development, they will assign “story points” to a programming item. Based on the team developing a shared language to estimate work difficulty and duration, a project can be estimated by how many story points a team can work through in a week. Extrapolating that pace out for the duration of the project yields the project estimated completion date.The design score concept correlates to the story points concept in that is (hopefully) a useful measure of how hard it is to design something. The key factor that allows us to determine a velocity is that validation must be complete to consider a design “done.” The implementation of a continuous validation process will yield more predictable and practical estimates of schedule than the former estimates based on man-hours, simply because it is a measure of skill and effort, not effort alone. In Plant Vision, the velocity is measured in a weekly basis since that is a common standard to work in for project management.The following example may help clarify. A design team with 2 pipers has a weekly velocity of 24. Using the previous example of a tank in a tank farm and the tower, the project has a design score of 103. The design score (103) / weekly velocity (24) will yield the number of project weeks needed (4.29). If the work is started on a Monday, the project should finish around 11:39 am (just in time for a piper’s lunch) on Tuesday of the 5th week. Obviously, we don’t look for that kind of accuracy, but perhaps one day, it will be that easy.Acting on Untagged ItemsWhile everyone appreciates the value of tags, assigning tags in the design process can be a complex endeavor. In some cases, engineering firms are dependent on their client to provide tag numbers which can delay the design process weeks. A strong, agile tagging workflow (like pre-assigning blocks of tag numbers to use on a project), enables the design process to happen more rapidly by preventing data re-entry and starting validation sooner in the design lifecycle. Plant Vision provides tools to quickly identify how many tags remain to be filled, and ways to quickly navigate to them.Identify Property Conflicts between P&IDs and 3D ModelsP&IDs are the bible for a process plant. While everyone piping designer agreements with this statement, many design firms find the cost of maintaining/using intelligent P&IDs too high. One reason is that ensuring the data and text matches between the P&IDs, isos, plans and sections is too difficult. Firms end up short cutting the process by eliminating the intelligent P&ID effort. The downstream effect though is that the P&IDs no longer reflect an as built design from the data perspective, and any effort in moving towards a digital twin is incapacitated. Plant Visionenables fast resolution of property conflicts lowering the effort to maintain a 2D and 3D as built package.Navigating P&IDs and 3D Models with One ClickFind TK-1001 in this set of 80-120 P&IDs. One task performed daily, maybe even hourly, of locating a project item in a drawing package ends up costing hundreds of unnecessary project hours. Project manager, piping designers, fitters, and anyone else on the team has dreamed of the day when they don’t have to flip sheets, scroll through 50 different search results, or learn wild card searches. Plant Vision enables 1-clik navigation through search results or related drawings, cutting out unnecessary page flips.Complex Design IssuesAny industrial design job brings complexity especially compared to commercial or residential projects. Project managers spend hours and weeks trying to identify where they have the most risk, and they rely on meetings and planning sessions that take designers away from executing their work to sus out the required information. By applying industry best practices, Plant Vision evaluates the most complex items on a project, allowing project managers to focus their efforts where they are needed most.。
教你如何使用AutoCADPlant3D进行工厂布局设计AutoCAD Plant 3D是一款专业的工厂布局设计软件,为工程师和设计师提供了高效、精确的布局设计工具。
本文将分为几个章节,详细介绍如何使用AutoCAD Plant 3D进行工厂布局设计。
第一章节:软件介绍AutoCAD Plant 3D是由Autodesk公司开发的一款三维建模软件。
它结合了AutoCAD的绘图功能和专门用于工厂布局的工具,使用户可以轻松创建和修改工厂布局设计。
该软件支持各种行业,包括石油、化工、能源等,可应用于从小型工厂到大型工厂的布局设计。
第二章节:项目创建与设置在使用AutoCAD Plant 3D进行工厂布局设计之前,我们首先需要创建一个项目并进行基本设置。
打开软件后,点击“新建项目”,设置项目名称、文件夹路径和单位系统等。
选择适合的单位系统对后续设计非常重要,应根据实际需求选择。
第三章节:模型创建与编辑在AutoCAD Plant 3D中,我们可以使用基本的二维绘图工具来创建工厂布局的草图。
通过使用直线、圆、矩形等基本图形工具,可以快速绘制出工厂建筑的轮廓和布局。
此外,软件还提供了一系列专用工具,如管道、设备和配管等,用于创建和编辑模型。
通过选择合适的工具,可以在绘制过程中快速生成准确的布局。
第四章节:管道设计在工厂布局设计中,管道是一个至关重要的部分。
AutoCAD Plant 3D提供了强大的管道设计功能,可以根据设计要求自动生成管道连接和支架。
用户可以通过定义管道的材料、直径和管道类型来进行设计。
软件还可以自动计算管道的流量和压力损失等参数,以确保设计符合实际要求。
第五章节:设备布置在工厂布局设计中,设备的合理布置对整个工厂的运行效率和安全性有很大的影响。
AutoCAD Plant 3D提供了一系列设备模型,如容器、泵站和压力容器等,可以方便地将它们拖放到工厂布局中。
用户可以根据实际需求调整设备的位置和大小,以满足设计要求。
AutoCADPlant3D工厂设计教程第一章: AutoCADPlant3D简介AutoCADPlant 3D是一款专业的三维工厂设计软件,它能够帮助工程师以更高效和准确的方式设计工厂。
它具有强大的功能和丰富的工具,能够支持从项目概念阶段到详细设计和施工的全过程。
本章将介绍AutoCADPlant 3D的基本概念、界面和工作流程。
第二章: 工厂布局设计工厂布局设计是工厂设计的基础,它决定了整个工厂在实际运营中的效率和安全性。
本章将介绍如何使用AutoCADPlant 3D进行工厂的布局设计,包括如何绘制平面图和选择合适的尺寸比例。
同时,还将详细介绍如何利用AutoCADPlant 3D的工具进行设备、管道和管道支撑系统的布置。
第三章: 管道设计与优化管道是工厂中的重要组成部分,它们用于输送各种流体和气体。
本章将介绍如何在AutoCADPlant 3D中进行管道设计,并提供一些优化的技巧。
包括如何选择合适的管径和材料,如何进行管道的布置和连接,以及如何进行管道的分析和优化。
第四章: 设备建模与布置设备建模和布置是工厂设计中的重要环节,它决定了设备在工厂中的位置和相互之间的关系。
本章将介绍如何使用AutoCADPlant 3D进行设备的建模和布置,包括如何选择合适的设备模型、如何进行设备的建模和编辑、以及如何进行设备的布置和对齐。
第五章: 管道连通与连接设计管道的连通和连接是工厂设计中不可或缺的一部分,它们决定了管道系统的完整性和有效性。
本章将介绍如何在AutoCADPlant3D中进行管道的连通和连接设计,包括如何选择合适的连接件、如何进行连接件的布置和连接、以及如何进行管道的连通性分析和验证。
第六章: 工程图纸和文档生成工程图纸和文档的生成是工厂设计中必不可少的一环,它们用于工程施工和运维的参考和指导。
本章将介绍如何使用AutoCADPlant 3D生成各种类型的工程图纸和文档,包括平面图、剖面图、设备图、管道图、功图等。
CS467191Plant 3D: Overcoming the Challenges for Bringing in 3D Equip. from Other SourcesJason DillbeckD3 TechnologiesDescriptionGo beyond the standard ‘globular’ shapes for equipment in Plant 3D and harness the alternative options to convey your piping design more accurately. We will work on understanding the ins-and-outs with using standard equipment, but also get in-depth with options of creating more complex 3D solids or bring in designs from outside sources. Finally, for equipmentconfigurations that constantly change during the design of the project, use the power ofAutoCAD’s external references (Xref) to keep your designs up to date with the latest changes to the equipment.SpeakerJason DillbeckI am an Implementation Consultant at D3 Technologies and have been working with AutoCAD professionally since 1989, staring as a drafter for architects & engineers, and over 12 years with an Autodesk partner. I have worked in all aspects of construction services with many AutoCAD vertical products including AutoCAD’s Plant 3D, Advance Steel,Architecture, & MEP, along with the Revit and Navisworksproducts. I have helped numerous customers set up andcustomize AutoCAD P&ID/Plant 3D, Advance Steel, and otherproducts listed above.Objective #1: Explain the benefits and drawbacks to using AutoCAD Plant 3D’s parametric equipmentOur first objective will show us how to use Plant 3D’s ‘Create Equipment’ dialog to help us create parametrically driven equipment. We can add components like platforms, skirts, etc. to add more detail. And finally, we will save our creation as a template to reuse over and over.Dialog driven parametric equipmentTo create equipment in a drawing, we can use the Create Equipment tool, in theEquipment Panel on the Home ribbon, which will open the Create Equipment dialog box.This will allow us to choose from an equipment type list.C REATE E QUIPMENT I CONC REATE E QUIPMENTD IALOG (SELECT EQUIPMENT TYPE)Building our equipmentTo build an equipment model, we use the Add Shape or Add Trim buttons to add basic shapes in sequential order. Depending on the choice of horizontal or vertical equipment, the shapes added will build the model from top to bottom or left to right, respectively. With shapes or trim items added to the equipment builder, their dimensions can be set in the panel to the right by highlighting each shape and entering its values. Fields with a lighting bolt indicate that they are linked to the corresponding dimension of any adjacent shapes.C REATE E QUIPMENTD IALOG (ADD SHAPES/TRIM AND ADJUST DIMENSIONS)Add AutoCAD objects to our equipmentTo further customize your equipment model, we will use the Attach Equipment command to add additional detail. This command will allow us to add any AutoCAD object to our equipment model. Tip: Add more detail to any part of the model or add clearance areas with transparent 3D objects. Great for clash detection software like Navisworks Manage.A TTACH E QUIPMENT I CONSave Equipment TemplatesTo use this equipment design in the future, we will use the ‘Save current settings as a template…’ option in the right mouse click menu after selecting the equipment.S AVE S ELECTED E QUIPMENT AS T EMPLATE…We can access these saved templates when creating new equipment later in the lower left corner of the Create Equipment dialog.C REATE E QUIPMENTD IALOG –T EMPLATESDrawbacks to AutoCAD Plant 3D’s parametric equipment∙Complex and detailed equipment with multiple surfaces within a large project could cause a burden on AutoCAD and your system. This might result inperformance issues. So our equipment will be ‘globular’ in general when usingthe standard parametric equipment within AutoCAD Plant 3D.∙We can add more detail as needed with the Attach Equipment command.∙If your model has already been created within another software package, this method causes us to recreate the same equipment and revisions are on us tomake.Objective #2: Discover how to use AutoCAD’s 3D solids or imported models as AutoCAD Plant 3D equipment.Our second objective is to discover how to use AutoCAD’s 3D solids or any imported models as AutoCAD Plant 3D equipment. We can make exact models or convert models directly from our vendors. We will then need to designate where piping connections will be on this new equipment.Convert equipment directly from vendors or other outside sourcesThere are a great many software products out there to create detailed models of ourpiping equipment. With the Import command within AutoCAD, we can bring in files froma varity of other software products.I MPORT CAD F ILE T YPESCreate equipment directly within Plant 3D as AutoCAD solidsAs an alternative to bringing in a model from an outside source, we can model usingAutoCAD solids to convey our equipments complexity. AutoCAD Plant 3D’s 3D Piping workspace has a ribbon with all the creation and editing tools to build our equipment.M ODELING R IBBON T ABAlternatively to bringing in a model from an outside source, we can model using AutoCAD solids to convey our equipments complexity.A UTO CAD S OLIDS E QUIPMENT M ODELOnce created, we can convert our AutoCAD solids equipment model in AutoCAD Plant 3D equipment with the Convert Equipment command.C ONVERT E QUIPMENT I CONDesignate piping/nozzle connections for Plant 3D’s pipe routingAfter converting if our model requires them, we will need to specify the piping connections points or nozzles locations. Select the new equipment and, within the right-click menu, choose Add Nozzle…E QUIPMENT R IGHT M OUSE C LICK M ENU (ADD NOZZLE..)Nozzle location and piping direction will need to be specified on screen. Then, we will receive our nozzle property designator which will allow us to set type, size, pressure and additional important properties necessary for AutoCAD Plant 3D’s pipe connection and routing of our connecting pipe.A DD N OZZLE L OCATION AND P ROPERTIESDrawbacks to converting AutoCAD solids into Plant 3D equipment ∙Once converted, these newly created AutoCAD Plant 3D equipment items will be ‘static’ models and any changes will require manual model editing or a reinsert of the vendor’s model.∙Overly detailed models will slow the product and machine performance down.Objective #3: Create AutoCAD Plant 3D equipment from Inventor BIM ContentOur third objective brings us to Autodesk Inventor and its capability to convert our Inventor model into Plant 3D using the BIM Content environment. Again, we can make more exact models of our equipment as well as designate those piping connections but within Inventor if we like. Additionally, Inventor has a great tool to help us simplify our model called ‘Shrinkwrap’.Inventor’s BIM Content environmentOnce our model has been created within Inventor, we are ready to convert this intosomething AutoCAD Plant 3D can use for equipment. First, we’ll need to enter the BIM Content environment by selecting the ribbon icon.BIM C ONTENT I CON WITHIN E NVIRONMENTS T ABNext within the BIM Content environment, we will need to streamline our model for use within the AutoCAD Plant 3D software. Shrinkwrap Substitute command will manyoptions to simplify our model into an exterior shell version with miniumal faces toincrease performance within AutoCAD.S HRINKWRAP S UBSTITUE I CON AND D IALOGOptional: Inventor BIM Content’s pipe connection optionPrior to exporting the model out of Inventor, pipe connections can be assigned in Inventor to identify the connection points. Once inside AutoCAD Plant 3D, these imported connection points must be edited to add required nozzle properties needed to make the appropriate piping connections, such as nozzle end-type, pressure, etc. Click the Pipe Connector icon and then configure the options in the dialog box, as desired. This step is optional as all nozzle properties can also be authored within AutoCAD Plant 3D.P IPE C ONNECTOR D IALOGExport Building Components to .adsk file formatAfter Shrinkwrapping our model and applying any pipe connections, we are ready to export to an Autodesk Exchange file format or .ADSK file.E XPORT B UILDING C OMPONENTS D IALOGConvert Inventor equipment into AutoCAD Plant 3D equipmentNow back in AutoCAD Plant 3D, we will use Convert Inventor Equipment command to import the .ADSK file in as equipment.C ONVERT I NVENTOR E QUIPMENT I CONOnce an insertion point and rotation has been set, we will choose an equipment type to define our equipment.C ONVERT E QUIPMENTD IALOGWith our Inventor model now converted into an AutoCAD Plant 3D equipment object, we are able to adjust properties and apply any nozzles if we didn’t do so within Inventor. Drawbacks to using Inventor’s BIM Content environment for AutoCAD Plant 3D’s equipment∙If we choose not to use the Shrinkwrap Substitute option or do not apply enough level of detail settings, our detailed equipment model may cause performanceissues once converted into AutoCAD Plant 3D equipment.∙Any revisions to the equipment model within Inventor will require a complete recreation in the BIM Content environment and a reinsertion within AutoCADPlant 3D and all properties that were applied in Plant 3D will have to bereentered as well.For additional instruction on exporting Inventor models out to Revit families, please review course FAB466294: Anybody Can Do It! Easily Build Revit Content in Inventor by Peter Strycharske.Objective #4: Harness the power of AutoCAD’s external references (XREF) with AutoCAD Plant 3D equipment.Finally, let us use the power of AutoCAD’s external reference (XREF) to aid in our Plant 3D equipment. This will help us keep our models up to date while retaining our assigned properties. No data reentry.AutoCAD’s external reference (XREF) commandIf we are not already familiar, AutoCAD’s external reference command allows us tocombine files and retain a link. This serves two main purposes: it controls the file sizebecause objects in the referenced drawing do not become part of the host drawing, and objects modified in the reference file are automatically updated in the host drawingbecause the files are linked.Within AutoCAD Plant 3D, we can use this function to add a referenced file of equipment to a Plant 3D equipment object that holds the property data. Then as design changeshappen to the referenced equipment model, our AutoCAD Plant 3D project drawings will reflect those changes to the equipment automatically.For best results, use the right mouse click ‘Xref into current DWG’ option within theProject Manager to reference the equipment model drawing to our current drawing.R IGHT-CLICK TO X REF INTO CURRENT DWGD EFINE P REFERENCES FOR A TTACHING THE XREFCreate an AutoCAD object to convert into Plant 3D equipmentWith an additional object needed to hold property data, we will create an AutoCAD object somewhere near or on the referenced model. This can be a small barely noticeable element or a new detailed component of the equipment model.S MALL A UTO CAD OBJECT ON THE R EFERENCE M ODELConvert our AutoCAD object into an AutoCAD Plant 3D equipment with the Convert Equipment command and apply properties for the equipment.C ONVERT E QUIPMENT I CONDesignate piping/nozzle connections for Plant 3D’s pipe routingAfter converting if our model requires them, we will need to specify the piping connections points or nozzles locations. Select the new equipment object and, within the right-click menu, choose Add Nozzle…E QUIPMENT R IGHT M OUSE C LICK M ENU (ADD NOZZLE..)Nozzle location and piping direction will need to be specified on screen. Then, we will receive our nozzle property designator which will allow us to set type, size, pressure and additional important properties necessary for AutoCAD Plant 3D’s pipe connection and routing of our connecting pipe.A DD N OZZLE L OCATION AND P ROPERTIESAttach the reference model to AutoCAD Plant 3D equipmentWith the Nozzel locations established, we will use the Attach Equipment command toadd the reference model to our equipment. This command will allow us to add anyAutoCAD objects, even XREFs.A TTACH E QUIPMENT I CONDrawbacks to using AutoCAD’s XREFs with AutoCAD Plant 3D’s equipment If nozzle locations have changed in a revision to the referenced equipment model, we will need to use the Detach Equipment command to remove thereferenced model from the Plant 3D equipment. We do this to allow us toreselect the new nozzle locations.D ETATCHE QUIPMENT I CONOnce removed, we will adjust the nozzle locations in the Change Location tabwith the special nozzle property designator.D ETATCHE QUIPMENT I CONA special thanks to Prashant Shekhar for the tank model.。
Some Day I’ll Find a Way:Upgrading Design with Plant Design Suite Cristina MarquezDesign Supervisor –Gas EngineeringSouthern California Gas Co.Tony DiMarcoBusiness ConsultantAutodesk Global ServicesClass SummaryThis roundtable is a discussion of an Autodesk Consulting engagement for the SoCalGas Engineering Design Group to develop a strategy and solution to replace the existing 2D CAD tools and adopt full 3D intelligent design. The project introduces BIM forEngineering Design with an “agile” implementation plan to accelerate adoption. Therecommended solution used Plant Design Suite, including P&ID and Structural Detailing, in combination with AutoCAD Electrical, Civil3D and Vault to completely replace theexisting systems and provide significant productivity improvements. In this class we will discuss the process conducted to develop the system solution business and functional requirements, the solution design and the business justification for 2D to 3D designadoption. We will also discuss the implementation strategy based on best practices and agile methods to completely train and upgrade the design and engineering datamanagement environment.Key Learning ObjectivesAt the end of this class, you will be able to:▪Describe best practices for migrating a 2D Engineering Design Group to adopt 3D and BIM▪Understand how Autodesk Plant Design Suite, Civil3D, Electrical and Vault can be used to collaborate▪Understand how Vault can be used to improve engineering workflows and engineering data management▪Propose a study to develop specifications, solution architecture and implementation plan for 2D to 3DCompany | ProfileSempra Energy▪Largest natural gas utility in the US anda major factor in international gasmarkets▪Regulated Businesses▪San Diego Gas and Electric▪Southern California Gas Co SoCalGas▪Delivering clean, safe and reliable gas to its customers for over 140 years▪Largest natural gas distribution utility in US▪20.9 million consumers ; 5.8 millionmetersWhy Change?Engineering Design / Measurement, Regulators and Controls (MRC) Groups served three internal client organizations:▪Storage Fields▪Transmission▪Distribution▪Pressure to improve efficiency to keep work “in-house”▪Current 2D Bentley Microstation on Microsoft XP, support ending in 2014▪Engineering document revision control challenges▪Maturing workforce and pressures to modernize and move to 3DHow We Planned the Migration to 3DDay One –Hour OneWorkflows and Design ProductsDetailed Assessment Analysis by engineering discipline, designproduct, software tool,expected savingsConceptual Architecture1*P&ID(AutoCAD P&ID)P3D Projects (SQL Server)Electrical (ACAD Electric)Structural (AutoCAD Structural Detailing - ASD)Plant / PipingModel (Plant3D)3D BIM ModelCivil / Site (Civil 3D)Engineering Analysis (CAESAR)Concept / ScopingDetailed DesignPDFsVisualization / Mark Ups (Design Review)Models & Drawings Construction Collaboration / Aggregation (Navisworks Simulate)Material Reservation, Requisition-ECM(SAP)Engineering AnalysisReviewField SurveysAsBuilt Visualizations and Mark Ups (Design Review)As Built MarkupsSurvey DrawingsField Survey / PSEPAs Builts3r d P a r t i e sC u s t o m e r sD e s i g n T e a mE n g i n e e r i n gD a t a M a n a g e m e n tIntranet PDMS (DDB)DDS SheetsPressure Tests(DDS)Drawing Rasters TIFF FilesMDBsRaster Editing (Raster Design)Autodesk Plant Design Suite Premium BOMIntranet Design Data Mgmt. VaultClash Detection (Navisworks Manage)PCFExtranet Data Mgmt. BuzzsawVisualization / Mark Ups (Design Review or Navisworks)Survey / Stationing PointsConstruction Sheet SetAs BuiltMarkupsSurvey Drawings Survey / Stationing PointsConstruction Sheet SetCurrent Ad-HocProcessesModel &Drawing DWFsDesign /Bid / BuildA u t o P u b l i s hA u t o S y n cManual Auto / SemiBOMD e s i g nC o r p o r a t eDGNsCITs (Raster)Legacy Design Data - FALCONPDFsSharepoint (Wkflows, IE Browse&Markup)Model &Drawing DWFsPublishReference or ConversionEither / OrAdsk: Custom AdaptorSCG: AdaptorCat/Specs (SQLite)CIT enablerP&ID DESIGN & DRAFTING AutoCAD ®P&ID MODEL AGGREGATION, REVIEW& CLASH DETECTIONAutodesk ®Navisworks3D MODELING & DOCUMENTATIONAutoCAD ®Plant 3DAutoCAD ElectricalAutodesk Civil 3DGENERAL DESIGN & DRAFTINGAutoCAD and Raster Design ®STRUCTURAL DESIGN & DETAILING AutoCAD ®Structural Detailing.EQUIPMENT & SKID DESIGN Autodesk ®Inventor .Autodesk Plant Design Suite | WorkflowImplementation PlanPresenting the IT Business CaseRoundtable Moderated DiscussionRoundtable Discussion Questions▪What was SCG’s vision and decision making process that you went through to plan and justify the system ?▪Did SCG quantify an expected ROI for the benefits expected?▪What is the greatest technical challenge you expect in order to implement a fully intelligent 3D model based design system?▪Do you expect the system to be accepted by the end users and how are you preparing the organization for change?▪What are your future plans for the system?Autodesk is a registered trademark of Autodesk, Inc., and/or its subsidiaries and/or affiliates in the USA and/or other countries. All other brand names, product names, or trademarks belong to their respective holders. Autodesk reserves the right to alter product and services offerings, and specifications and pricing at any time without notice, and is not responsible for typographical or graphical errors that may appear in this document. © 2013 Autodesk, Inc. All rights reserved.。