
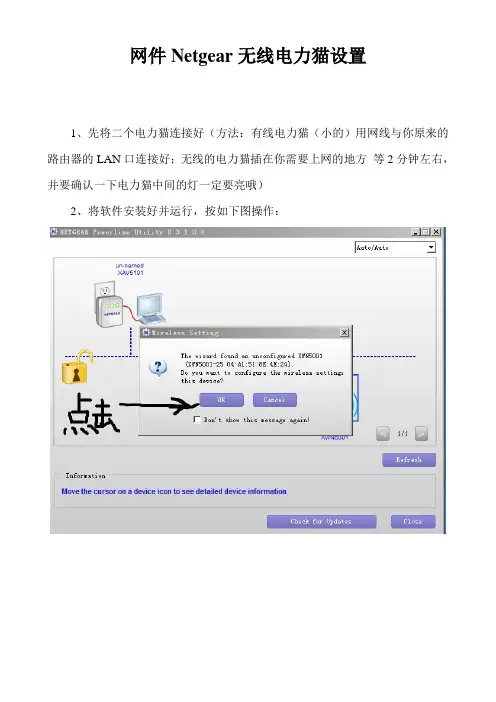
网件Netgear无线电力猫设置
- 格式:pdf
- 大小:233.87 KB
- 文档页数:2

网件路由器的设置技巧分析1. 登录路由器管理页面:用户需要通过浏览器访问路由器的管理页面来进行设置。
默认情况下,访问地址为192.168.1.1,输入该地址后会出现登录界面。
用户可以输入默认的用户名和密码进行登录,通常是“admin”作为用户名,密码为空。
2.修改登录密码:为了增加路由器的安全性,用户应该尽快修改默认的登录密码。
在登录成功后,可以找到密码修改的选项,用户可以设置一个新的复杂密码来保护路由器。
3.修改无线网络名称(SSID):默认情况下,网件路由器的无线网络名称为“NETGEAR”。
为了区分其他无线网络,用户可以修改无线网络名称。
在路由器管理页面中,找到无线设置选项,然后修改SSID为一个容易识别且不容易被猜测的名称。
4.设置无线安全密码:为了保护无线网络不受未经授权的访问,用户需要设置一个无线安全密码(也称为密码密钥或网络密码)。
在路由器管理页面的无线设置选项中,可以找到设置密码的选项。
用户应该选择强密码,它包含字母、数字和特殊字符,并定期更换密码以提高安全性。
5.开启防火墙:网件路由器具有内置的防火墙功能,可以帮助阻止恶意攻击和未经授权的访问。
用户可以在路由器管理页面的防火墙设置选项中启用防火墙,并根据自己的需求进行相应的配置。
6.设置端口转发:如果用户需要在家庭网络中运行特定的应用程序或服务器,可能需要配置端口转发。
用户可以在路由器管理页面的端口转发或虚拟服务器选项中设置需要转发的端口,以便将外部请求转发到相应的设备或应用程序。
7.设置家长控制:对于有孩子的家庭,网件路由器提供了家长控制功能,可以帮助父母限制孩子的上网时间和访问内容。
用户可以在路由器管理页面的家长控制选项中设置并配置相应的限制和过滤规则。
8.设置质量服务(QoS):如果用户的家庭网络上有多个设备同时使用带宽,可能会出现网络拥堵或网速变慢的情况。
网件路由器的QoS功能可以帮助用户分配带宽优先级,以确保关键应用程序或设备获得更高的带宽优先级。

1. Register With the NETGEAR Insight AppUse the NETGEAR Insight App to register your switch.1. On your iOS or Android mobile device, visit the app store, search forNETGEAR Insight, and download the latest app.2. Open the NETGEAR Insight app.3. If you did not set up a NETGEAR account, tap Create NETGEAR Account andfollow the onscreen instructions.4. Enter the email address and password for your account and tap LOG IN .5. Tap + in the upper right corner.6. Either use the camera on your phone to scan the serial number bar codelocated on the bottom of the switch, or type in the serial number. 7. Tap Go .8. Tap View Device to add the switch to a network.The switch is registered and added to your account.NETGEAR® S350 Series 8-Port Gigabit Ethernet Smart Managed Pro Switch (GS308T)NETGEAR® S350 Series 8-Port Gigabit PoE+ Ethernet Smart Managed Pro Switch with 2 SFP • Switch model GS308T or GS310TP• GS308T power adapter (varies by region) orGS310TP adapter with detatchable power cord (varies by region)•Installation guide2. Connect the SwitchNote: For more information, see the hardware installation guide which you can download from https:///support/.3. Check the PoE Status (GS310TP Only)PoE+ power is provided by the GS310TP switch on ports 1-8. The switch can supply up to 30W PoE+ (IEEE 802.3at) to each port, with a maximum PoE power budget of 55W across all active PoE+ ports.The PoE Max LED indicates the status of the PoE budget on the switch:• Off . Sufficient (more than 7W of) PoE power is available.• Solid yellow . Less than 7W of PoE power is available.• Blinking yellow . At least once during the previous two minutes, less than 7Wof PoE power was available.4. Discover the IP AddressAn IP address is required to configure your switch. The switch gets an IPaddress from a DHCP server (such as your router) by default. If your switch is not connected to a DHCP server, use the default IP address: 192.168.0.239.Note: Make sure that you are using the latest version of the app.1. On your mobile device, connect with WiFi to the same router as the switch.2. Open the NETGEAR Insight app and log in to your account.The current IP address of the switch is displayed.GS308T switchGaming consoleDesktopNETGEAR, Inc.350 East Plumeria DriveSan Jose, CA 95134, USA NETGEAR INTL LTDBuilding 3, University Technology Centre Curraheen Road, Cork, Ireland© NETGEAR, Inc., NETGEAR and the NETGEAR Logo are trademarks of NETGEAR, Inc. Any non‑NETGEAR trademarks are used for reference purposes only.SupportThank you for purchasing this NETGEAR product. You can visithttps:///support/ to register your product, get help, access the latest downloads and user manuals, and join our community. We recommend that you use only official NETGEAR support resources.Si ce produit est vendu au Canada, vous pouvez accéder à ce document en français canadien à https:///support/download/.(If this product is sold in Canada, you can access this document in Canadian French at https:///support/download/.)For regulatory compliance information including the EU Declaration of Conformity, visit https:///about/regulatory/.See the regulatory compliance document before connecting the power supply.Do not use this device outdoors. If you connect cables or devices that are outdoors to this device, see https:///000057103 for safety and warranty information.November 20185. Configure the SwitchWe recommend that you use a web browser on a computer or tablet to configure the switch.Note: If your computer is a Mac, use the NETGEAR Switch Discovery Tool, as described in the following section.1. Open a web browser from a computer or tablet connected to the samenetwork as your switch.You can use a WiFi or wired connection. 2. Enter the IP address of the switch.3. Enter the password.The default password is password . We recommend that you change the password to a more secure password.4. Click the Login button.Other Discovery and Configuration MethodsThe NETGEAR Switch Discovery Tool and the Smart Control Center Utility let you discover the IP address and configure the switch. •NETGEAR Switch Discovery Tool . You can use a Mac or a 64-bit Windows-based computer that is on the same network as the switch. You can use a WiFi or wired connection. When you discover the switch, this tool provides access to the local browser interface to c onfigure the switch. To download the NETGEAR Switch Discovery Tool, visit/support/product/netgear-switch-discovery-tool.aspx .•Smart Control Center Utility . You can use a Windows-based computer that is on the same network as the switch. This utility requires Adobe Air. If Adobe Air is not detected during Smart Control Center Utility installation, you are prompted to allow Adobe Air to be installed. To download this utility, visit /support/product/SCC .Note: If you cannot discover or configure the switch, you might need totemporarily disable the firewall, Internet security, or antivirus programs. Make sure to reenable these security services after you discover and configure the switch.PoE ConsiderationsThe PoE and PoE+ power supplied by the GS310TP switch is prioritized in ascending port order (from port 1 to port 8), with a total power budget of 55 watts with a 67.5 watt power adapter. If the power requirements for the attached powered devices (PDs) exceed the total power budget of the switch, the PD on the highest-numbered port is disabled to make sure that the PDs that are connected to the higher-priority, lower-numbered ports are supported first.Just because a PD is listed as an 802.3at PoE powered device does notnecessarily mean that it requires the maximum power limit of the specification. Many PDs require less power, allowing all eight PoE+ ports to be active simultaneously.The following table describes the PoE and PoE+ classes and switch allocations.Device ClassStandardClassDescription PowerReserved by the Device PowerDelivered to the Device*0PoE and PoE+Default power (full)15.4W0.44W–12.95W1PoE and PoE+Very low power4.0W 0.44W–3.84W2PoE and PoE+Low power 7.0W 3.84W–6.49W 3PoE and PoE+Mid power 15.4W 6.49W–12.95W 4PoE+ onlyHigh power30.0W12.95W–25.5W* Calculated with the maximum cable length of 328 feet (100 meters). Shorter cable lengths will provide power closer to the power reserved by the switch.。

netgear无线路由器设置全图解教程现代人买笔记本电脑的越来越多,也都为了本子配备了无线路由器,这里为大家做一个简单的无线路由器入门设置教程,教大家怎么使用无线路由器、如何设置,帮大家早早无线上网。
一、无线路由器基本使用方法(1)首先拿到手的无线路由器,连接好电源(2)无线路由器一般背面有5个网线插孔,其中一个颜色会与另外四个不同。
如图(3)单独的这个颜色不同的插孔是连接ADSL猫的,所以这个地方要用网线与你的猫连接。
•另外4个孔是用来连接台式机的,当然你也可以用来连接笔记本。
•连线设置完成。
二、无线网络的安全配置注意:为了确保自家无线网不被他人随意使用,您需要给你的无线网络设置安全密码。
(1)首先找到【无线设置】-【基本设置】,在【SSID】中填入你的路由器的名字,自己随便设置,用于识别自己的网络。
(2)进入到【安全设置】,这里面主要是用来设置无线访问密码的,路由器品牌不同,但设置的内容基本一致,参照下图。
(3)设置好上面标注的三项内容,然后【保存】即可,牢记密码喔。
(4)无线路由器部分就基本设置好了,最后把打开笔记本的无线网络连接,然后搜寻到你刚才设置的无线网络,最后点击连接,输入你自己刚刚设置的密码,一切OK啦。
三、无线路由器软件的设置方法要让无线路由器正常工作,需要对路由器进行软件设置,告诉路由器你的ADSL用户名和密码,还有如何对你的无线网络进行加密。
(1)用一根网线,把笔记本与路由器连接(图中四个孔其一),然后你就可以通过浏览器对无线路由进行设置了。
路由器地址是:http://192.168.1.1,直接输入访问即可,访问成功的话,浏览器会提示你输入登陆用户名和密码,绝大多数的路由器用户名是admin,密码也是admin。
(2)登陆后,您首先要设置ADSL虚拟拨号(PPPoE),输入你的ADSL用户名密码,这样路由器就能自动拨号上网。
如果您是把这台无线路由与另外一台有线路由相连,那么你可以跳过ADSL设置的步骤,直接设置无线网络。

美国网件路由器安装与调试的方法美国网件关于无线路由器安装的问题很多,无非是连接,调试之类的。
其实美国网件无线路由器安装是一件很简单的事情,只需要几分钟时间,网件让你就可以成为一个这方面的高手的。
今天小编为大家整理了一些资源,希望能对各位看官有所帮助。
关于无线路由器安装与调试问题:两台电脑的网件网线接路由器LAN口,再用一条网线将MODEM的WAN口与路由的LAN口连接,MODEM一定要链接啊。
美国网件无线路由器怎么安装NETGEAR使用宽带无线路由器可自动获取IP地址和DNS,但是建议你手动指定电脑的IP地址和DNS 等参数。
点击“网上邻居”――> “本地连接”――>“属性”――>“Internet协议(TCP/IP)属性”,IP地址:192.168.1.X (1--255之间,注意最后的数字每台电脑不能相同)子网掩码:默认,255.255.255.0;网关:192.168.1.1(路由器LAN口默认地址);首选DNS服务器:美国网件无线路由器怎么安装咨询你当地服务商的DNS。
备用DNS服务器:咨询你当地服务商的DNS,别的电脑同样设置就行了。
NETGEAR附加无线路由器安装与调试的知识:一、美国网件无线路由器怎么安装硬件安装先完成无线路由器NETGEAR安装,用一条网线从宽带无线路由器的WAN口连接至ADSL的ADSL/Cable Modem口,另一条网线从宽带无线路由器的LAN口连接至PC机的RJ45口,电话外线连接至ADSL的Line口,连接完成后打开电脑电源启动电脑,接着打开ADSL、宽带无线路由器的电源,先检查ADSL的状态是否正常,然后美国网件NETGEAR检查宽带无线路由器的工作状态,若宽带无线路由器指示灯M2常亮,,M1熄灭表示工作正常;反之工作不正常。
二、美国网件无线路由器怎么安装宽带路由器安装设置NETGEAR无线路由器怎么安装在硬件安装完成后,启动电脑,打开IE网络游览器窗口,接着在IE网络游览器地址栏中输入宽带无线路由器的IP地址:192.168.1.1[回车],当电脑与宽带无线路由器的连接建立起来后,屏幕上接着出现登录宽带无线路由器怎么安装的界面,输入用户名:admin 密码:admin;按[确定]按钮进入宽带无线路由器的设置。