imagex命令集锦
- 格式:docx
- 大小:15.93 KB
- 文档页数:10

Windows7系统Imagex封装教程(原创)前言:本教程是我自己实践后一个字一个字打出来的,绝非复制网上的教程。
有什么错误或缺陷或疑问欢迎各位朋友们联系我。
(我的百度空间:/villana)一、准备工具1、带有Imagex.exe(版本:6.1.7600.16385)的WindowsPE3.0光盘或U盘2、Windows7安装光盘3、各种预装的应用程序二、安装系统用Windows安装光盘引导系统,格式化系统分区,进行安装,进行到输入用户名界面时手动输入自己想长期使用的用户名,尽量避免封装过后改变用户名。
跳过密钥验证进入桌面。
进入系统后不要安装硬件驱动程序。
三、封装前准备1、进入桌面后,首先打开磁盘管理根据自己的使用习惯调整其它分区盘符,格式化预装应用程序的分区。
2、禁用UAC用户帐户控制、禁用系统错误报告、关闭系统还原、删除所有还原点并重启。
3、定制自己的个性化系统设置。
比如设置个人文件夹位置、临时文件夹位置、定制个性化快捷菜单、定制个性化桌面设置等等。
4、安装必要的系统组件(如C++运行库)和各种预装应用程序,升级IE版本。
(在没有网卡驱动情况下可以安装集成万能网卡驱动的驱动精灵智能安装驱动并手动建立网络连接)5、修复系统安全漏洞并重启。
(可以启动已安装的安全软件进行自动修复比较迅速)6、清理系统垃圾,禁用不必要的服务与开机启动项。
(可以手动或者启用系统优化软件对系统的临时文件、垃圾文件、注册表以及服务、开机启动项进行清理和优化)7、重新启用UAC和错误报告,以管理员身份运行cmd输入“net user administrator /active:yes”后回车启用超级管理员帐户,重启系统。
8、用Administrator帐户登录系统,打开Users文件夹找到重启前所用帐户的用户文件夹,然后将其内的除了文件夹目录以外的所有文件以及AppData文件夹复制到C:\Users\Default中,选择复制并替换所有文件。
[ 备份恢复, 系统工具 - Windows // 2014-04-15 ]imageX 是微软开发的免费系统部署软件,兼容性和稳定性都极好,设备制造商或企业可以利用它修改/定制系统,并封装制作成 .wim 格式镜像,之后便能快速恢复(部署)到多台电脑。
不过对于广大个人用户,imageX 更大的作用是可以用来备份和恢复系统,并且由于它支持「增量备份」特性,因此比起Ghost 更加灵活强大。
由于imageX 不像Ghost 那样基于扇区备份,而是基于文件的。
它采用了“单实例” 的技术,比如系统里存在相同的文件的时候,它们在用imageX 封装成WIM 镜像后,这些重复文件实际只会保存一份,这样大大减少了Wim的体积。
得益于这个技术,imageX 不仅能让wim 文件体积更小,而且还可提供增量备份的功能。
那么增量备份特性有何强大呢?譬如你备份一次系统,首次Ghost 和imageX 都用了8GB空间(版本1),之后你下载试用了新软件,想再次备份多一个版本(版本2),再之后又对系统进行了各种设置又备份一个(版本3),这时Ghost 会耗费三个8.x GB 共24 GB多的空间,而imageX 除首次外,其他每次均只会备份新增/改动的文件部分,每次可能仅需几百MB,3次加起来可能还不到9GB,因此速度会更快也更省空间。
而且重点是,在做了多次增量备份之后,imageX 在恢复时,用户还可以自由选择恢复到任意版本,就像一个时光机器,非常实用。
首先,使用GimageX 对系统进行备份和还原都需要进入Windows PE 环境下操作,我们建议使用Win7 及以上内核的WinPE,它不仅自带imageX 文件,并且在进行格式化操作时也不会影响分区对齐。
启动 GimageX 后,我们主要使用其“制作映像” (备份系统)和“应用映像” (恢复系统) 两项功能。
怎样使用GimageX 备份系统/ 制作wim 系统镜像:如上图,首先选择将要备份的路径[1],选择系统盘(一般系统装在C盘),wim镜像保存的路径[2],然后输入备份文件的信息和描述[3],选择压缩比率[4],填写显示名称/标识等,最后,如果你是首次备份则选择新建映像[5],如果你之前已经有备份过,则选择增量备份[6],软件即会开始对系统进行备份了,备份速度因文件大小、机器性能、压缩比有关,不过个人认为速度还是很快的,特别是增量备份的时候。
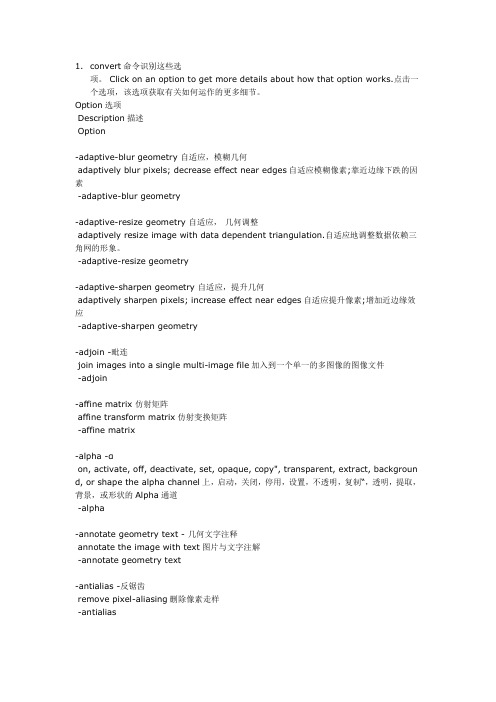
1.convert命令识别这些选项。
Click on an option to get more details about how that option works.点击一个选项,该选项获取有关如何运作的更多细节。
Option选项Description描述Option-adaptive-blur geometry 自适应,模糊几何adaptively blur pixels; decrease effect near edges自适应模糊像素;靠近边缘下跌的因素-adaptive-blur geometry-adaptive-resize geometry 自适应,几何调整adaptively resize image with data dependent triangulation.自适应地调整数据依赖三角网的形象。
-adaptive-resize geometry-adaptive-sharpen geometry 自适应,提升几何adaptively sharpen pixels; increase effect near edges自适应提升像素;增加近边缘效应-adaptive-sharpen geometry-adjoin -毗连join images into a single multi-image file加入到一个单一的多图像的图像文件-adjoin-affine matrix 仿射矩阵affine transform matrix仿射变换矩阵-affine matrix-alpha -αon, activate, off, deactivate, set, opaque, copy", transparent, extract, backgroun d, or shape the alpha channel上,启动,关闭,停用,设置,不透明,复制“,透明,提取,背景,或形状的Alpha通道-alpha-annotate geometry text - 几何文字注释annotate the image with text图片与文字注解-annotate geometry text-antialias -反锯齿remove pixel-aliasing删除像素走样-antialias-append 后缀append an image sequence附加一个图像序列-append-authenticate value 进行身份验证的价值decipher image with this password这个密码破译图片-authenticate value-auto-gamma 全自动-γautomagically adjust gamma level of image自动将影像调整伽玛水平-auto-gamma-auto-level 全自动级automagically adjust color levels of image自动的调整图像色彩层次-auto-level-auto-orient 包括汽车,东方automagically orient image自动的东方形象-auto-orient-background color ,背景颜色background color背景颜色-background color-bench iterations 工作台迭代measure performance测量性能-bench iterations-bias value 偏置价值add bias when convolving an image加偏压时的图像卷积-bias value-black-threshold value 黑,阈值force all pixels below the threshold into black力低于阈值的所有像素为黑色 -black-threshold value-blue-primary point 蓝小学点chromaticity blue primary point蓝色的主色点-blue-primary point-blue-shift factor 蓝移因子simulate a scene at nighttime in the moonlight模拟夜间在月光下一个场景 -blue-shift factor-blur geometry ,模糊几何reduce image noise and reduce detail levels降低图像噪声,减少细节层次-blur geometry-border geometry 边界几何surround image with a border of color环绕图片的颜色边框-border geometry-bordercolor color - bordercolor 颜色border color边框颜色-bordercolor color-brightness-contrast geometry 亮度,对比度几何improve brightness / contrast of the image提高亮度/对比度的图像-brightness-contrast geometry-caption string 字幕字符串assign a caption to an image指定标题图像-caption string-cdl filename - CDL的文件名color correct with a color decision list正确的颜色与颜色决定列表-cdl filename-channel type 通道型apply option to select image channels适用选项来选择图片频道-channel type-charcoal radius 炭半径simulate a charcoal drawing模拟素描-charcoal radius-chop geometry 劈几何remove pixels from the image interior从图像中删除内部像素-chop geometry-clamp 钳restrict colors from 0 to the quantum depth限制从0到量子色深度-clamp-clip 夹clip along the first path from the 8BIM profile夹沿着从8BIM配置第一个路径 -clip-clip-mask filename 剪辑掩模文件名associate clip mask with the image影像剪辑与副面具-clip-mask filename-clip-path id 剪辑路径编号clip along a named path from the 8BIM profile剪辑沿着从8BIM配置命名的道路-clip-path id-clone index ,克隆指数clone an image克隆一个图像-clone index-clut ,查找表apply a color lookup table to the image申请一个颜色查找表中的形象-clut-contrast-stretch geometry 对比度拉伸几何improve the contrast in an image by `stretching' the range of intensity value改善图像对比度的`延伸'的强度值范围-contrast-stretch geometry-coalesce -凝聚merge a sequence of images合并的图像序列-coalesce-colorize value -上色价值colorize the image with the fill color与上色填充颜色的图像-colorize value-color-matrix matrix 彩色矩阵矩阵apply color correction to the image.应用颜色校正的图像。

winpe中的相关命令在WinPE中,有许多常用的命令可用于完成各种任务,包括分区、格式化、文件操作、安装操作系统等等。
下面我们将逐步回答与WinPE相关的命令的主题。
一、分区命令分区命令是在WinPE中非常常用的命令之一。
它用于创建、删除、调整硬盘分区。
1. diskpart命令diskpart命令是一个磁盘分区命令工具,它允许用户管理硬盘驱动器、分区和磁盘卷。
使用diskpart命令,您可以创建新的分区、删除分区、调整分区大小、格式化分区、将分区设置为活动分区等。
2. 详细操作步骤(1)打开命令提示符在WinPE环境中,按下"Win+X"键组合,选择“命令提示符(管理员)”。
(2)运行diskpart命令输入“diskpart”并按下回车键。
(3)列出可用的磁盘在diskpart命令提示符下,输入“list disk”命令以列出所有可用的磁盘。
(4)选定要操作的磁盘使用“select disk n”命令,将“n”替换为您要操作的磁盘号。
(5)执行相应的分区命令执行各种分区命令,例如:创建新分区“create partition primary”、删除分区“delete partition”、格式化分区“format fs=ntfs quick”等。
二、格式化命令格式化命令用于将磁盘或分区格式化为特定的文件系统类型,例如NTFS、FAT32等。
1. format命令format命令用于格式化指定的磁盘或分区。
它提供了多个参数选项,例如文件系统类型、快速格式化等。
2. 详细操作步骤(1)打开命令提示符在WinPE环境中,按下"Win+X"键组合,选择“命令提示符(管理员)”。
(2)运行format命令输入“format X:”命令,并将“X”替换为您要格式化的分区盘符。
(3)选择文件系统类型根据需要选择所需的文件系统类型。
例如,输入“/fs:ntfs”以选择NTFS文件系统。

什么是ImageX?什么是 ImageX?应⽤到: Windows VistaImageX 是⼀个命令⾏⼯具,原始设备制造商 (OEM) 和公司可以使⽤它来捕获、修改和应⽤基于⽂件的磁盘映像以进⾏快速部署。
ImageX 可以使⽤ Windows 映像 (.wim) ⽂件复制到⽹络,或者还可以使⽤其他利⽤ .wim 映像的技术,如 Windows 安装程序、Windows 部署服务(Windows DS) 以及系统管理服务器 (SMS) 操作系统功能部署包。
本主题包括以下内容:ImageX 的优点常见 ImageX ⽅案ImageX 的限制ImageX 的依赖性ImageX 的相关技术ImageX 的优点基于扇区的映像的限制促使 Microsoft 开发出 ImageX 及其附带的 Windows 映像 (.wim) ⽂件格式。
可以使⽤ ImageX 创建映像,在不提取和重新创建映像的情况下修改映像,并最终从同⼀个⼯具中将映像部署到环境。
由于 ImageX 在⽂件级别进⾏⼯作,因此它提供了以下⼏种功能:更具灵活性和可通过部署的介质进⾏控制。
快速提取映像以缩短安装时间。
由于“单实例”⽽缩减了映像⼤⼩,“单实例”意味着将⽂件数据与路径信息分开存储。
这样可以⼀次存储存位于多个路径或多个映像中的⽂件,并通过映像共享这些⽂件。
这样可以⼀次存储位于多个路径或多个映像中的⽂件,并在映像间共享这些⽂件。
⾮破坏性映像应⽤程序。
ImageX 不会对驱动器的内容执⾏完全覆盖操作。
可以选择性添加和删除信息。
跨 Windows ⽀持的任何平台上⼯作的功能。
两种不同的压缩算法(快速压缩和最⼤压缩)可进⼀步缩减映像的⼤⼩。
将映像⽂件视为⽬录的功能。
例如,可以通过⽂件管理⼯具(如 Windows 资源管理器)添加、复制、粘贴和删除⽂件。
许多 OEM 和公司都需要尽可能快地部署和安装 Windows,包括所有相关的更新、应⽤程序和设置。

wimlib-imagex 是一个用于操作 Windows 映像文件的开源工具,它能够对 Windows 映像文件进行创建、修改、提取、挂载、卸载等操作。
本文将介绍 wimlib-imagex 工具的常用命令用法,帮助读者更好地了解和使用该工具。
一、安装 wimlib-imagex1. 在 Linux 系统中,可以通过包管理器直接安装 wimlib-imagex,例如在 Ubuntu 中可以使用以下命令进行安装:```shsudo apt-get install wimtools```2. 在 Windows 系统中,可以通过 wimlib-imagex 冠方全球信息站下载 Windows 版本,并按照冠方指南进行安装。
二、创建 Windows 映像文件1. 创建一个空的 WIM 文件:```shwimlib-imagex capture /path/to/source/path/to/destination.wim "Description" [--solid]```2. 添加或更新文件到现有的 WIM 文件:```shwimlib-imagex update /path/to/source /path/to/existing.wim [new_image_name]```三、提取 Windows 映像文件1. 提取全部映像到指定目录:```shwimlib-imagex apply /path/to/source.wim 1/path/to/destination```2. 提取指定映像到指定目录:```shwimlib-imagex apply /path/to/source.wim index/path/to/destination```四、挂载和卸载 Windows 映像文件1. 挂载 WIM 文件到指定目录:```shwimlib-imagex mountrw /path/to/source.wim index /path/to/mount_point```2. 卸载已挂载的 WIM 文件:```shwimlib-imagex unmount /path/to/mount_point [-mit] ```五、其他常用命令1. 列出 WIM 文件中的映像列表:```shwimlib-imagex info /path/to/source.wim```2. 合并 WIM 文件中的重复数据块以减小文件大小:```shwimlib-imagex optimize /path/to/source.wim```六、总结本文简要介绍了 wimlib-imagex 工具的常用命令用法,包括创建、提取、挂载、卸载和其他常用命令。
1、在虚机内安装需要集成内容的介质系统2、启动系统,执行所需要的自定义操作3、使用sysprep初始化系统(quote of importance:需要启用系统默认administrator账户进行操作,并删除其他账户。
sysprep不会删除用户账户,但是会默认禁用administrator)4、用winpe启动系统,使用imagex capture wim镜像到虚机硬盘,copy到本地机。
一、备份命令:1.初始备份:imagex /compress fast /capture c: d:\Win8备份\win8.wim "win8" "0000-00-00"命令解释:使用ImageX捕捉当前系统盘(C 盘)为win8.wim,保存在D:\Win8备份\ 下,标记为"win8",描述为"0000-00-00"。
/compress fast 是压缩参数,/compress fast 为低压缩,/compress maximum 为高压缩,留空为不压缩。
/capture 参数的目的是创建映像文件。
(用于初始备份)注:"win8"这个是映像名称,以后增量备份的名称不能与这个相同。
"0000-00-00"这个是映像描述,可以是时间或其他。
2.增量备份:imagex /compress fast /append c: d:\Win8备份\win8.wim "win8-2" "0000-00-00"命令解释:/append 参数的目的是增量备份。
注:"win8-2"这个增量备份映像的名称不能与以前的相同。
二、还原命令(把 D 分区的备份镜像win8.wim 还原到 C 分区):imagex /apply d:\Win8备份\win8.wim 1 c: /verify因为imagex不会像ghost 那样格式化你的硬盘,只会恢复文件,所以这里你需要自己格式化系统盘,如果需要的话)命令解释:/apply 命令是把备份好的wim文件还原到某个分区。
imagex使用方法ImageXWindowsVista以及之后的操作系统中的一项实用程序,主要用于创建、修改和恢复 Windows启动映像文件。
它是 Windows 启动映像文件(WIM)文件格式的标准工具,可以用来对 Windows启动映像文件进行操作。
ImageX一项命令行工具,它使用脚本命令,可以在可靠的和可控的方式中运行程序,从而帮助用户制作可安装 Windows统的自动化映像文件。
此外,它还可以使用在工作站管理技术(WMT)中进行报告和远程管理,以便帮助管理员完成有效的系统部署。
本文介绍了 ImageX基本概念,使用方法和优势,并概述了如何使用 ImageX行系统部署和管理。
一、 ImageX介ImageX由微软开发的一项实用程序,是 Windows启动映像文件(WIM)文件格式的标准工具,主要用于创建、修改和恢复 Windows 启动映像文件,可以用来对 Windows启动映像文件进行操作。
ImageX持多个映像文件格式。
它在此外支持特定的文件和文件夹的系统扩展,如 NTFS,FAT,VHD,XFS UDF,以及支持使用多个文件系统,如 NTFS,FAT,ReiserFS,JFS ext2/3。
ImageX一项命令行工具,它可以自动在可用的空间中将多个映像文件合并到一个映像文件中。
它还支持 BitLocker动器加密,以及动态磁盘驱动器。
二、 ImageX 使用方法ImageX 使用脚本命令,可以用来从头创建一个新的 ImageX启动映像文件,或者从一个已有的镜像文件中捕获新的系统映像。
1.建 ImageX像文件要创建 ImageX启动映像文件,需要用户使用在 Windows Vista 更高版本中安装的 ImageX具。
首先,用户可以在要捕获的本地系统上运行 ImageX令,以检查 ImageX状态,并使用 ImageX令捕获本地系统的映像文件。
要创建映像文件,可以使用 ImageX令:imagex /capture <source> <destination> <image name> <flags>,其中 <source>要捕获的本地系统的路径,<destination>要保存映像文件的路径,<image name>想要保存的映像文件的名字,<flags>可选参数,用于指定是否要在捕获系统时运行代理程序。
交流学习:关于imagex的export命令的应用export在英文中是输出的意思。
imagex中的export命令最主要的功能是映像的输出、输入、合并,还可以用于调整映像的排列顺序。
下面是官方AIK手册里的一段话:将指定 .wim 文件的副本导出到其他 .wim 文件。
源文件和目标文件必须使用相同的压缩类型。
也可以通过将映像导出到新的映像文件,来对该映像进行优化。
如果修改映像,ImageX 将存储额外的资源文件,这会增加映像的总体大小。
导出映像将删除不必要的资源文件。
确保有足够的磁盘空间可用于运行/export 选项。
如果在/export选项运行期间磁盘空间不足,可能会损坏Destination.wim 文件。
一个WIM文件中可以有多个映像,比如INSTALL.WIM中有5个映像,名字分别叫A、B、C、D、E,编号分别是1、2、3、4、5。
里面提取其中的一个A出来,新提取出来的映像也是一个WIM文件,其中只有一个A映像。
也就是说WIM中的任何映像都可以单独提取出来,成为一个单一映像的WIM文件。
以下几个方面是了解export命令主要功能的例子:1、怎么看编号?需要用一下info命令。
这是了解WIM内部映像信息的基本命令,是基础,先看一下。
执行:imagex /info E:\INSTALL.WIM >E:INSTALL.TXT执行后,看E盘的INSTALL.TXT文件,里面的 <IMAGE INDEX="5"> 就是编号,<NAME>Windows 7 旗舰版</NAME> 就是映像名称。
2、减少因修改带来的WIM容量增长这里比较强调,重新进行一次输出会减少因用IMAGEX修改WIM文件所带来的额外存储空间,有助于控制WIM文件的大小。
例如: A.WIM中有3个映像,因为进行了修改(如用/mountrw+/commit),所出进行重新输出,以更好地控制WIM文件的大小。
用ImageMagick命令行处理图片ImageMagick是强大的图像处理工具,他的强大之处在于Linux与生俱来的命令行特性,基于命令行的一系列工具可以让你完成、处理常见的图像操作,诸如生成缩略图,缩放,查看信息,加注标题,水印等等,功能上绝不亚于很多自诩出色GUI工具,学习使用ImageMagick是有益的,至少可以体会CLI的强大和简洁的行事风格。
这里列举一些使用ImageMagick的例子来说明如何在命令行界面下处理图像。
确信你的Linux装有ImageMagick的最快方法是rpm -qi ImageMagick(如果你的系统不是基于RPM的,请执行display或animate命令,确保你是在X Windows环境下)生成缩略图和缩放!ImageMagick的convert命令简直是万能的!生成缩略图,convert -sample 100x20 input.jpg output.jpg上述命令生成一个100x20的缩略图更好的方法是用等比例缩放,像这样,统一生成1/4的缩略图,convert -sample 25%x25% input.jpg output.jpg如果写成脚本,就是像这个样子,for img in `ls *.jpg`doconvert -sample 25%x25% ${img} thm${img}done这样可以对一个目录下的JPG文件一起生成缩略图了!convert还可以直接用来生成图片,这个在一些特殊的时候有用,例如,可以用下面的命令生成法国国旗图案,convert -size 20x40 xc:red xc:white xc:blue +append flag.png转化图像格式就更加方便,convert input.png output.jpg这就是Linux,简单直接!!还有旋转,convert -rotate 90 input.jpg output.jpg还有加注图片,convert -font fonts/font.ttf -stroke color -fill color -pointsize size-draw 'text 10,10 "String"' input.jpg output.jpg-font 指定字体,因为这样我加注文字,-stroke 描边用的颜色,-fill 填充用的颜色,这里用none就可以画出空心字了,-pointsize 加注字体大小,像素数,-draw 是用来画,这里是文字,下面的位置10,10 是以图片左上角为原点坐标的。
ImageX Tool for WindowsVersion: 6.1.7600.16385IMAGEX [FLAGS] /APPEND image_pathimage_file "image_name" ["description"]appends a volume image to an existing image (WIM) fileimage_path - The path of the volume image to be captured.image_file - The path of the existing WIM file.image_name - The unique name for the image being appended to the WIM file. description - The text that provides additional reference information.Accepted FLAGS:/BOOTMarks a volume image as bootable. Available for Windows PE images only./CHECKEnables WIM integrity checking. If not provided, existing checks are removed./CONFIG configuration_file.iniEnables use of a configuration file for exclusion and compression options.configuration_file.ini - The path to the configuration file./NORPFIXDisables reparse point path fixup./SCROLLScrolls output for redirection./TEMPSpecifies the path where temporary files are stored./VERIFYEnables file resource verification.Example:imagex /append d: d:\imaging\data.wim "Drive D"IMAGEX [FLAGS] /APPLY image_fileimage_number | image_nameimage_pathApplies a volume image to a specified path.image_file - The path of the WIM file containing the volume image.image_number - The number that identifies the image within the WIM file.image_name - The name that identifies the image within the WIM file.image_path - The path where the image will be applied.Accepted FLAGS:/CHECKVerifies integrity data in WIM file before application./NORPFIXDisables reparse point path fixup./REF splitwim2.swmEnables the reference of split WIM (SWM) files.splitwim2.swm - Path to additional split file(s). Wild cards are accepted./SCROLLScrolls output for redirection./TEMPSpecifies the path where temporary files are stored./VERIFYEnables file resource verification.Example:imagex /apply d:\imaging\data.wim 1 d:\New_PathIMAGEX [FLAGS] /CAPTURE image_pathimage_file "image_name" ["description"]Captures a volume image from a drive to a new WIM file.image_path - The path to the volume image to be captured.image_file - The path of the new WIM file.image_name - The unique name for the image being captured.description - The text that provides additional reference information.Accepted FLAGS:/BOOTMarks a volume image as bootable. Available for Windows PE images only./CHECKEnables WIM integrity checking. Flag must be supplied during updates./COMPRESS [maximum | fast | none]Specifies the type of compression used for the initial capture operation./CONFIG configuration_file.iniEnables use of a configuration file for exclusion and compression options.configuration_file.ini - The path to the configuration file./NORPFIXDisables reparse point path fixup./SCROLLScrolls output for redirection./TEMPSpecifies the path where temporary files are stored./VERIFYEnables file resource verification.Example:imagex /capture d: d:\imaging\data.wim "Drive D"IMAGEX [FLAGS] /DELETE image_fileimage_number | image_nameDeletes the specified volume image from a WIM file with multiple volume images.image_file - The path of the WIM file containing the specified image.image_number - The number that identifies the image within the WIM file.image_name - The name that references the image within the WIM file.Accepted FLAGS:/CHECKEnables WIM integrity checking. If not provided, existing checks are removed./TEMPSpecifies the path where temporary files are stored.Example:imagex /delete d:\imaging\data.wim 1IMAGEX /DIR image_fileimage_number | image_name Displays a list of the files and folders within a specified volume image.image_file - The path of the WIM file containing the specified image.image_number - The number that identifies the image within the WIM file.image_name - The name that identifies the image within the WIM file.Example:imagex /dir d:\imaging\data.wim 1IMAGEX [FLAGS] /EXPORT src_filesrc_number | src_namedest_filedest_nameExports a copy of the specified image to another WIM file.src_file - The path of the WIM file that contains the image to be copied.src_number - The number that identifies the image within the source WIM.src_name - The name that identifies the image within the source WIM.dest_file - The path of the WIM file that will receive the image copy.dest_name - The unique name for the image in the destination WIM.Accepted FLAGS:/BOOTMarks a volume image as bootable. Available for Windows PE images only./CHECKEnables WIM integrity checking. If not provided, existing checks are removed./COMPRESS [maximum | fast | none]Specifies the type of compression used when exporting to a new WIM file./REF splitwim2.swmEnables the reference of split WIM (SWM) files.splitwim2.swm - Path to additional split file(s). Wild cards are accepted./TEMPSpecifies the path where temporary files are stored.Comments:If src_name is "*" then all images are exported to dest_file.Example:imagex /export d:\imaging\data.wim 1 d:\imaging\newfile.wim "Exported Image"IMAGEX [FLAGS] /INFO img_file [img_number | img_name] [new_name] [new_desc]Returns the stored XML descriptions for the specified WIM or image.img_file - The path of the WIM file to be queried for XML information.img_number - The number that identifies an image within the WIM file.img_name - The name that identifies an image within the WIM file.new_name - The new unique name for the specified image.new_desc - The new description for the specified image.Accepted FLAGS:/BOOTMarks a volume image as bootable. Available for Windows PE images only./CHECKIf not provided, existing checks are removed during updates./TEMPSpecifies the path where temporary files are stored./XMLReturns the output as well-formed XML.Example:imagex /info d:\imaging\data.wimIMAGEX [FLAGS] /SPLIT image_filedest_file sizeSplits an existing WIM file into multiple read-only split WIM (SWM) files.image_file - The path of the WIM file to split.dest_file - The path of the split file(s).size - The maximum size in megabytes (MB) for each created file.Accepted FLAGS:/CHECKEnables WIM integrity checking. If not provided, existing checks are removed.Example:imagex /split d:\imaging\data.wim d:\imaging\splitdata.swm 600IMAGEX /MOUNT [image_fileimage_number | image_nameimage_path]Mounts a WIM image with read-only permission, to a specified path.image_file - The path of the WIM file containing the specified image.image_number - The number that identifies the image within the WIM file.image_name - The name that identifies the image within the WIM file.image_path - The path where the specified image will be mounted.Without FLAGS:Lists mounted images.Accepted FLAGS:/CHECKVerifies integrity data in WIM file.Example:imagex /mount d:\imaging\data.wim 2 c:\mounted_imagesIMAGEX [FLAGS] /MOUNTRW [image_fileimage_number | image_nameimage_path]Mounts a WIM image with read/write permission, to a specified path.image_file - The path of the WIM file containing the specified image.image_number - The number that identifies the image within the WIM file.image_name - The name that identifies the image within the WIM file.image_path - The path where the specified image will be mounted.Without FLAGS:Lists mounted images.Accepted FLAGS:/CHECKEnables WIM integrity checking. If not provided, existing checks are removed.Example:imagex /mountrw d:\imaging\data.wim 2 c:\mounted_imagesIMAGEX /REMOUNT [image_path]Recovers an orphaned mount path.image_path - The path to be remounted.Without FLAGS:Lists mounted images.Example:imagex /remount c:\mounted_imagesIMAGEX [FLAGS] /COMMIT mount_path ["image_name"]Commits the changes made to a mounted image without unmounting the image.mount_path - The path of the mounted image to commit.image_name - If the /append flag is set, then a unique image name must be provided. Accepted FLAGS:/APPENDCaptures the changes made to the wim into a new image in the wim./TEMPSpecifies the path where temporary files are stored.Example:imagex /commit c:\mounted_imagesimagex /commit /append c:\mounted_images new_image_nameIMAGEX /UNMOUNT [/COMMIT] [image_path]Unmounts a WIM image from the specified path.image_path - The path to be unmounted.Without FLAGS:Lists mounted images.Accepted FLAGS:/COMMITSaves changes to the mounted WIM file. If not specified changes are discarded.Example:imagex /unmount /commit c:\mounted_imagesIMAGEX /CLEANUPDeletes all the resources associated with a mounted image that has been abandoned. This command will not unmount currently mounted images, nor will it delete images that can be recovered via the imagex /remount command.Example:imagex /cleanup。