Windows server 2008系统安装
- 格式:docx
- 大小:2.19 MB
- 文档页数:6
![[第1单元]Windows Server 2008的安装](https://uimg.taocdn.com/4e500d0aa8114431b90dd868.webp)
一、背景:1、玩的服务器系统一直是Windows Server 2003,感觉很落后了,马上Windows Server2012都出来了。
2、下载过Windows Server 2008系统,由于只想在VMWare虚拟机上安装,下载的系统文件中没有安装引导,所以一直没有装上,这两天研究了下,现在正在虚拟机中安装,趁机将解决过程与大家分享下,高手果断飘过~二、准备工具:1、硬件:PC一个、U盘一个(至少来个4G吧~)2、软件:a) 必须:VMWare虚拟机(我使用的8.0)、Window Server 2008操作系统文件、老毛桃制作U盘启动盘软件b) 非必须:winiso软件、UltraISO/DAEMON TOOL Lite/WinRAR软件之一三、操作步骤:1、制作引导启动U盘a) 解压并启动“老毛桃winpe-u盘版”b) 备份U盘到安全地点c)确保软件读取到U盘,如图d) 点击“一键制作成USB启动盘”e) 等待结束后,制作成功。
打开U盘,发现出现如下一个文件夹。
2、拷贝操作系统文件和解压工具到U盘指定地点a) 手头的Windows Server 2008操作系统,不是Ghost版本,也不是可以含有可引导安装的ISO文件,所以选择使用在PE模式下安装。
b) 将GHO文件拷贝到U盘内“GHO文件夹”内,会在PE模式下生成一键安装(这里没用)。
c) 将手头上的Windows Server 2008操作系统安装文件拷贝到U盘,如果是ISO或者RAR等压缩格式的,就需要将UltraISO/DAEMON TOOL Lite/WinRAR软件之一拷贝到U盘,在PE模式下解压或者加载镜像文件使用。
当然,将RAR文件或者解压好的文件制作成ISO文件,就可以用上面说的winiso文件,其他软件一样的。
使用ISO好处就是直接在PE模式下加载镜像,然后安装即可,方便。
3、 VM虚拟机内分配空间并配置a) 关于VMWare虚拟机的普通安装和使用,这里不再赘述,可以参考我的其他文章。
大家好!我是xrb936!!本人可以说是刚刚加入Windows7之家论坛,以前经常写文章,但还是没有一次以Windows7之家会员的身份写过,今天先小露一手,如果不好,请见谅!今天我给大家带来的是Windows Server 2008(以下简称2008)的详细教程。
Part 1 About My PC我的操作系统采用Windows Server 2008 Enterprise Edition,本文基于Windows Server 2008 Enterprise Edition而作。
Part 2 About Windows Server 2008下面介绍一下Windows Server 2008:(本部分来源于百度百科)Windows Server 2008是微软最新一个服务器操作系统的名称,它继承Windows Server 2003。
Windows Server 2008在进行开发及测试时的代号为"Windows Server Longhorn"。
Windows Server 2008是一套相等于Windows Vista(代号为Longhorn)的服务器系统,两者很可能将会拥有很多相同功能;Vista及Server2008与XP及Server2003间存在相似的关系。
(XP和Server 2003的代号分别为Whistler及Whistler Server)Microsoft Windows Server 2008代表了下一代Windows Server。
使用Windows Server 2008,IT专业人员对其服务器和网络基础结构的控制能力更强,从而可重点关注关键业务需求。
Windows Server 2008通过加强操作系统和保护网络环境提高了安全性。
通过加快IT 系统的部署与维护、使服务器和应用程序的合并与虚拟化更加简单、提供直观管理工具,Windows Server2008还为IT专业人员提供了灵活性。

硬盘安装windows server 2008R2硬盘安装一、windows xp下直接安装windows server 2008 R2windows XP用户可以直接从硬盘启动安装(x86)32位windows server 2008 R2\sources\setup.exe或者windows server 2008R2\setup.exe启动安装二、通过windows PE全新安装window server 2008 R2原系统损坏的情况下,可通过ghost光盘里的win PE微型操作系统,进入系统(这个过程大约一分钟左右即可完成),将原系统盘格式化,然后再进行下面2~10的操作下面是64位windows server 2008 R2安装方法(也适用于32位)使用windowsPE进入界面后,方法如下:1、将Windows2008R2镜像文件(*.iso)尾缀名ISO改为RAR,用winRAR将其解压到指定的文件夹(除系统盘),比如:D:\win2008R2;不是镜像的朋友可以省略第一步~!2、把Win2008R2目录里的“bootmgr”文件和“boot”文件夹都复制到C盘目录下;(注意:BOOT是系统文件夹,默认隐藏着,复制过去就行了)3、在C盘根目录下建个sources文件夹,并把D:\win20082\sources目录下的boot.wim复制到C:\sources目录下;4、确认要安装Windows的那个分区的格式为NTFS格式,否则需要先进行转换格式,cmd 命令为:convert X/fs:ntfs (X表示你想为转换的盘符)5、【运行】cmd,运行:C:\boot\bootsect.exe /nt60 c: ,重启电脑;(注意命令中有两个空格)6、系统会启动安装程序,并自动加载boot.wim文件进入windows 2008R2安装模式最后进入windows安装操作界面7、安装程序启动,选择你要安装的语言类型、时间、货币显示种类及键盘和输入方式等内容;8、在出现“开始安装界面”时一定要注意,不要点击“现在安装”,而是点击左下角的“修复计算机”选项;9、【然后进入“系统恢复选项”,选择最后一项“命令提示符”,进入DOS窗口,输入:foramt X:/q (这里的X同样表示要格式化的盘符,/q表示快速格式化,可有可无)命令格式化要安装的盘符;】此步骤在系统不存在的情况下可省略,选择安装系统到分区的过程中,不难发现一个“高级选项”,里面有格式化功能10、现在可以输入安装命令了,输入:D:\win2008R2\sources\setup.exe 后回车。

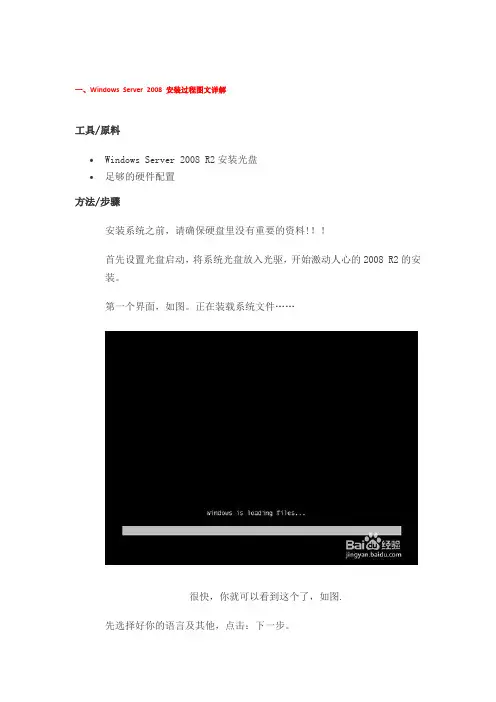
一、Windows Server 2008 安装过程图文详解工具/原料•Windows Server 2008 R2安装光盘•足够的硬件配置方法/步骤安装系统之前,请确保硬盘里没有重要的资料!!!首先设置光盘启动,将系统光盘放入光驱,开始激动人心的2008 R2的安装。
第一个界面,如图。
正在装载系统文件……1.2很快,你就可以看到这个了,如图.先选择好你的语言及其他,点击:下一步。
2.3这个才是真正的开始安装,呵呵,点击:现在安装。
如图。
3. 4到了这里,请选择你要安装的版本,我当然是要安装完整版的企业版啦。
如图。
4.5打勾:接受,再下一步。
如图.5.6安装方式的选择,这个根据你的需要,如果你是从低版本升级到2008的话,你就点击升级吧,其他的当然是自定义啦,如图.因为我的是新装,硬盘上无任何数据呢。
安装之前,得先分区,这个大家都懂的了,如图。
所以,我们点击:驱动器选项。
6.8然后点击:新建,如图。
7.9一般来说,2008的系统占用空间约为20G 左右,但实际安装建议50G以上,如图。
8.10提示:要为系统文件创建额外的分区,这是必须的,点确定吧,如图。
9.吧11然后会返回上一层,这时,硬盘还有空间,我们先把他分成另一个区.先占击未分配的空间,再新建。
如图.10.12分完区后,会返回上一层,这时,大家要小心看清楚,因为我们要安装系统到“C盘”,我们必须这个分区,如图.错了你就得重新安装系统了,好累的。
开始安装了,安装是一个漫长的过程……这个过程如图。
.大约要半小时多.可能反复重启几次终于完成安装了,然后会自动重启……如图。
11.15看到这,有点激活了,如图。
当然还是要设置一个密码。
点击:确定。
12.16设置密码是有些要求的:有长度要求(4个以上字符)、复杂性(要有大小写及数字)要求及历史要求.设置好了,点击:右箭头,如图。
会提示:密码成功修改,请保管你的密码哦。
13.18第一次进入桌面,会先准备好用户信息配置等等,请稍后,如图.到此,系统正式安装完成了,快来尝试新功能吧。
Windows Server 2008 R2安装过程以下将通过Windows Server 2008的安装过程、操作技巧、常见问题等方面深入剖析Windows Server 2008的优势。
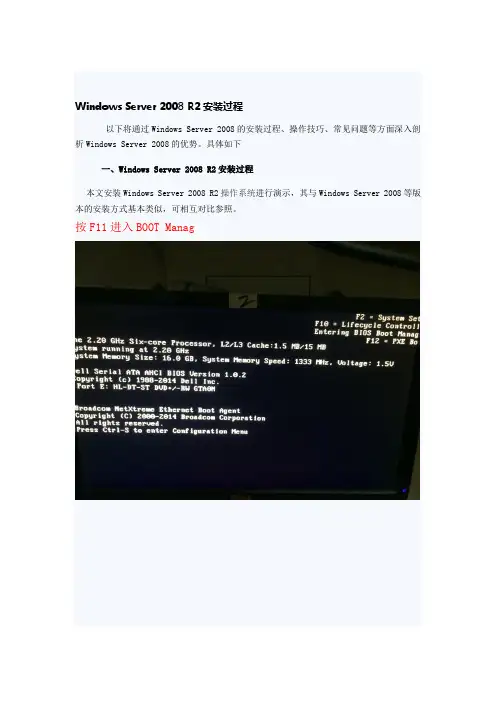
具体如下一、Windows Server 2008 R2安装过程本文安装Windows Server 2008 R2操作系统进行演示,其与Windows Server 2008等版本的安装方式基本类似,可相互对比参照。
按F11进入BOOT Manag进入之后选择BIOS BOOT MENU 选择DVD从光驱启动硬盘读取文件选择语言点击安装以下选择项,主要根据授权序列号和系统需求进行选择,这里以企业版完全安装版进行讲解。
出现选择安装语言等选项,我们可以选择中文选项,直接下一步,不用改变。
选择版本点击接受选择安装版本后,会出现许可条款,点击我接受,下一步就可以进行下面安装。
Windows Server 2008 R2安装类型上面有两个选项,如果想从以前的Windows Server 2003服务器(或者其他)版本升级,就选择第一项,当然最好的情况是选自定义,全新安装,这也是基于系统稳定和安全的考虑。
选择方式服务器单独安装阵列卡的在此界面认不到硬盘,需加载阵列卡驱动点击加载驱程序点击浏览,找到放置驱动的U盘,选择正确的驱动在此附加阵列卡驱动下载网址server 2008 R2 H310-H710驱动:/cViBxikAngckt 访问密码 29d1server 2008 R2 H330-H730驱动:/cViBcYLfKnpXz 访问密码 7d46磁盘如果你是全新的硬件系统,硬盘也没有进行分区的话,可以用Windows Server 2008 R2自带的工具进行分区格式化操作。
选择驱动器选项(高级)进行分区磁盘分区点击“驱动器选项(高级)”可以打开详细的操作选项。
分区显示当使用Windows Server 2008 R2自带工具进行分区操作的时候,默认会在硬盘里生成一个大约100M左右的系统区,这个分区主要用来保存系统启动的相关文件。

Dell服务器安装server2008系统安装步骤
1、检查raid,保证至少有一个raid处于online状态;退出重启
2、开机按F10 进入lifecycle controller
3、进入OS Deployment(OS部署)
4、右边选择Deploy OS
5、选择Go Directly 同OS Deployment
6、进入之后选择自己需要安装的server版本类型
7、Manual Install (手动)
8、BIOS(该处是选择引导模式)
9、检查是否插入启动盘,若无检测到,则无法进入下一步(点击完成之后,至此安装前设
置已完全配置完成,直接重启进入系统)
注:在配置完成之后重启的过程中,跳过bios选项的时候会出现一个“按任意键进入引导盘”的英文选项,此时要及时操作,若无操作则会跳过系统的安装。
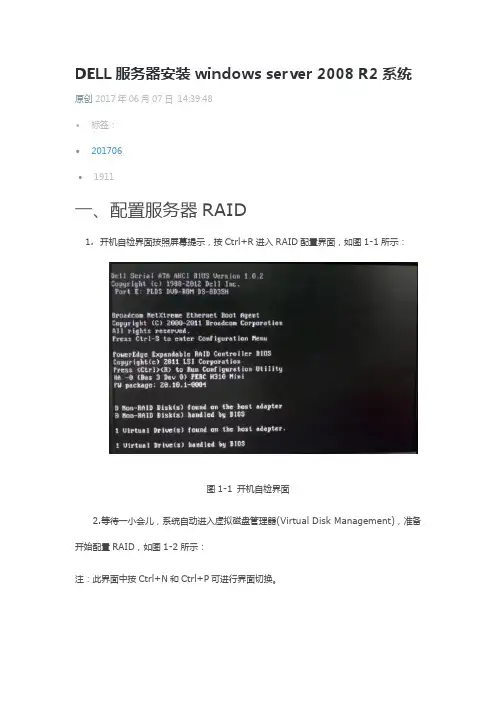
DELL服务器安装windows server 2008 R2系统原创2017年06月07日14:39:48•标签:•201706•1911一、配置服务器RAID1.开机自检界面按照屏幕提示,按Ctrl+R进入RAID配置界面,如图1-1所示:图1-1 开机自检界面2.等待一小会儿,系统自动进入虚拟磁盘管理器(Virtual Disk Management),准备开始配置RAID,如图1-2所示:注:此界面中按Ctrl+N和Ctrl+P可进行界面切换。
图1-2 虚拟磁盘管理器界面3.此时虚拟磁盘为空,按上下键使光标停留在阵列卡型号所在行(图中的PERC H310 Mini),按F2弹出菜单,选择Create New VD创建新的虚拟磁盘,如图1-3所示:图1-3 创建虚拟磁盘菜单项4.在RAID Level选项按回车会出现支持的RAID级别,RAID卡能够支持的级别有RAID0/1/5/10/50,根据硬盘数量不同,此处出现的选项可能也会有所区别。
选择不同的级别,选项会有所差别。
此处我们选择RAID1,按回车确认。
如图1-4所示:图1-4 RAID Level菜单5.确认RAID级别后,按向下方向键,将光标移至Physical Disks列表中,上下移动至需要选择的硬盘位置,按空格键来选择列表中的硬盘,当选择的硬盘数量达到上一步设置的RAID级别所需的要求时,Basic Settings的VD Size中可以显示这个RAID的默认容量信息。
有X标志为选中的硬盘。
选择完硬盘后按Tab键,可以将光标移至VD Size栏,VD Size可以手动设定大小,也就是说可以不将所有的容量配置在一个虚拟磁盘中。
如果这个虚拟磁盘没有使用我们所配置的RAID阵列所有的容量,剩余的空间可以配置为另外的一个虚拟磁盘,但是配置下一个虚拟磁盘时必须返回VD Mgmt创建。
VD Name根据需要设置,也可为空。
如图2-5所示:注:各RAID级别最少需要的硬盘数量,RAID0=1 RAID1=2 RAID5=3 RAID10=4 RAID50=6图1-5 配置RAID6.关于高级设置(Advanced Settings),如果没有特殊要求,不建议更改。

W i n d o w s s e r v e r2008R2安装教程(注:此教程省略了制作R a i d过程,如需做R a i d,请先做好R a i d 阵列再按下面教程进行系统安装)1.开机后将系统盘放入光驱,按F11键进入B I O S B O O T选项菜单,选择B I O S B o o t M e n u:2.进入了B i o s B o o t M a n a g e r后,选择D V D+/-R W,从光驱启动:3.服务器开始从光驱启动,进行读取光碟里的文件及信息:4.读取完系统信息后,系统会进行安装前的预设,第一个界面是选择系统安装的语言类型以及键盘类型,我们还可以看到即将要安装系统是W i n d o w s S e r v e r2008R2系统,我们按E n t e r(确认键)继续:5.第二个界面是询问是现在安装,还是修复计算机,新装系统都是默认按E n t e r键选择现在安装,继续安装:安装程序启动:6.读取完安装程序完毕后,会出现一个选择安装系统的版本提示,一般有三个版本选择,即S t a n d a r d(标准版)、E n t e r p r i s e(企业版)、D a t a c e n t e r(数据中心版),每个版本都会有两个安装形式,一个完全安装,即图形安装;另一个是服务器核心安装,即命令行形式安装。
此教程我们选择安装企业版完全安装:7.选择版本后,会出现许可条款,如果同意,就可以继续安装,如果你对于条款不同意,就会结束当前安装。
当然,我们选择按空格键同意协议条款,继续安装:8.接下来会询问你进行何种类型的安装,如果你先前系统安装的是w i n d o w s2003版本的系统(或其他跟旧的W i n d o w s系统),就选择第一项升级。
如果你想进行全新安装系统,就选择自定义安装类型,这里,我们按上下键,选择自定义安装,进行全新安装系统:9.接下来,如果你看到的是如下两个界面中的一个,你会发现,看不到我们要安装系统的硬盘,为什么呢?这是因为,我们在安装系统前,对硬盘做了R a i d,需要在此加载一个驱动程序,如果你是做集成R a i d的话,就选择相应主板集成的阵列驱动程序,如果你的服务器安装了独立阵列卡,请加载相对应的阵列卡的驱动。
计算机网络Windows Server 2008安装部署在安装Windows Server 2008时,Windows Server 2008 Setup程序会要求提供关于怎样安装和配置操作系统的信息。
因此,在安装Windows Server 2008之前我们应做好充分准备,以免在安装时或安装后出现问题。
1.系统和硬件设备要求●CPU 最小速度1千兆赫(GHz)32位(X86)处理器或1千兆赫(GHz)64位(X64)处理器,建议为2GHz,最佳速度为3GHz或更快●内存最小512MB RAM,建议为1GB RAM,最佳为2GB RAM(完全安装)或1GBRAM(服务器核心安装)或更大。
最大空间(32位操作系统)为4GB(Standard)或64GB(Enterprise和Datacenter)●128MB显存(最低)●可用磁盘空间最小空间8GB,建议为40GB(完全安装)或10GB(服务器核心安装),最佳空间为80GB(完全安装)或40GB(服务器核心安装)或者更大空间。
●驱动器DVD-ROM驱动器●显示器和外围设备超级VGA(800*600)或更高分辨率显示器;键盘;Microsoft鼠标或兼容的指针设备提示实际要求根据系统配置以及所选择安装的应用程序和功能的不同而有所差异。
如果要通过网络进行安装,还可能需要额外的可用硬盘空间。
2.安装方式Windows Server 2008提供两种安装方式,分别为升级和全新安装。
升级安装即将Windows 的早期版本升级至Windows Server 2008;全新安装即更新运行Windows Server2008的现有计算机、执行新的安装。
在安装Windows Server 2008时,为安装分区选择一种文件系统,如NTFS或FAT。
建议选择NTFS文件系统格式。
在Windows Server 2008安装完成后,我们还需根据其所处的网络环境进行规划Windows Server 2008服务器所扮演的角色、高可用性、管理Windows Server 2008的安全等工作,以便于符合用户需求的服务,保证Windows Server 2008在网络上持续、稳定和可靠的运行。
Microsoft®Windows®Small Business Server 2008 for Dell™PowerEdge™ SystemsInstallation GuideNotes and CautionsNOTE: A NOTE indicates important information that helps you make better use of your computer.CAUTION: A CAUTION indicates potential damage to hardware or loss of data if instructions are not followed.Information in this document is subject to change without notice.©2010Dell Inc.All rights reserved.Reproduction of these materials in any manner whatsoever without the written permission of Dell Inc. is strictly forbidden.Trademarks used in this text: Dell, the DELL logo, Dell OpenManage, and PowerEdge are trademarks of Dell Inc.; Microsoft, Windows, and Windows Server are either trademarks or registered trademarks of Microsoft Corporation in the United States and/or other countries.Other trademarks and trade names may be used in this document to refer to either the entities claiming the marks and names or their products. Dell Inc. disclaims any proprietary interest in trademarks and trade names other than its own.February 2010 A00This document provides the instructions to install your Microsoft® Windows® Small Business Server2008 operating system and includes the following topics:•“Pre-Installation Requirements” on page4•“Installing Microsoft Windows Small Business Server 2008 Using the USC” on page4•“Installing Microsoft Windows Small Business Server 2008 Using the Dell Systems Management Tools and Documentation Media” onpage6•“Installing Microsoft Windows Small Business Server 2008 Using the Operating System Media” on page8NOTE: If you purchased a Dell™ system without the operating system installed on your system, it is strongly recommended that you use the Unified ServerConfigurator (USC) or the supported version of the Dell Systems Management Tools and Documentation media to guide you through the operating system installation. NOTE: If you use the operating system media to install the operating system,you must install the latest device drivers located either on the Dell Systems Management Tools and Documentation media or at/support/downloads.Installing Windows Small Business Server 200834Installing Windows Small Business ServerPre-Installation RequirementsCAUTION:The following installation procedures erase all data on your hard drive. It is recommended that you backup all important data before you begin installation.To determine the devices that are installed on your system:1Boot your system from the Dell Systems Management T ools and Documentation media.2Select View Hardware in the System Software Manager window.The devices installed on your system are listed on your screen.Before you install the operating system:•Read any additional document that ships with your operating system.•Ensure that your system has the latest BIOS, firmware, and driver updates. If required, download the latest BIOS, firmware, and driver updates from or use the Dell Server Update Utility available on the Dell Server Updates media.•Create a device driver media (diskette, USB drive, CD, or DVD). NOTE: If you are not using the Dell Systems Management Tools andDocumentation media or the USC, and the operating system does not have the driver for the storage controller, you must create a device driver media. For more information, see “Creating a Device Driver Media” on page 10.Installing Microsoft Windows Small Business Server 2008 Using the USC1Connect the keyboard, monitor, mouse, and any peripherals to the system that you have chosen to configure as the management server.2T urn on the system and the attached peripherals.3Press <F10> to enter System Services .The Unified Server Configurator menu is displayed with several options.4Select OS Deployment .The Configure RAID now or Go directly to OS deployment screen is displayed.5Configure the RAID at this time. If the RAID is already configured, select OS deployment, and click Next.The Select Operating System screen is displayed with a list of compatible operating systems.NOTE: Ensure that the RAID is properly configured to enable the requiredWindows Small Business Server 2008 configuration. For information onrecommended partition sizes and configurations, see the Getting Starteddocument and other reference documentation from . 6Select Microsoft Windows Small Business Server 2008, and click Next. 7Insert the operating system media when prompted, and click Finish to reboot the system.8Press <F11> to ensure that you boot from the operating system media and select the DVD drive or press a key when prompted.The Install Windows screen is displayed.9Select the appropriate option for Language, Time and Currency Format, and Keyboard or Input Method, and click Next.The Operating System Install screen is displayed.10Select the operating system you want to install, and click Next.The License Agreement screen is displayed.11Read the information carefully. If you agree with all the information, selectI accept the license terms and then click Next.The Which T ype of Installation Do Y ou Want screen is displayed.12Click Custom(advanced), if it is not selected.The Disk Partition screen is displayed.13Select the partition on which you want to install Windows Small Business Server 2008 and click Next.The Installing Windows screen is displayed and the installation process begins.Installing Windows Small Business Server 200856Installing Windows Small Business Server14Complete the instructions in the Windows Small Business Server 2008 Installation wizard.To complete the operating system installation, perform the procedure described in "Completing the Operating System Installation " onpage 12.Installing Microsoft Windows Small Business Server 2008 Using the Dell Systems Management Tools and Documentation MediaY ou must configure the system to boot from the CD/DVD drive. To install the operating system using the Dell Systems Management T ools and Documentation media:1Connect the keyboard, monitor, mouse, and any additional peripherals to your system.2T urn on the system and the attached peripherals.3Insert the Dell Systems Management T ools and Documentation media into the CD/DVD drive.4Press <F2> when prompted to run the setup utility.The BIOS Settings screen is displayed.5Using the arrow keys, scroll to the Boot Sequence field and press <Enter>.6Configure the DVD ROM drive to be the first boot option and press <Esc> to exit the BIOS Setting screen.The system prepares to boot from the CD/DVD drive. NOTE: Alternatively, you can press <F11> to enter the Boot Device Menu to select the DVD ROM drive as the boot option.The Dell Systems Management T ools and Documentation media menu is displayed with several options.Installing Windows Small Business Server 200877Select Dell Systems Build and Update Utility.The system boots from the selected option.NOTE: This may take several minutes depending on the speed of the drive.The Dell Systems Build and Update Utilityscreen is displayed.8Select the Server OS Installationoption in the Single Server Solutionsection.The Select Operating System screen is displayed with a list of compatible operating systems.9Select Microsoft Windows Small Business Server 2008.Ensure Create Utility Partition option is checked if you want to create a utility partition and click Continue .NOTE: If you select the Create Utility Partition option, you can run system diagnostics and memory tests using the <F10> key during post.The Configure or Skip RAID screen is displayed.10Select Skip Raid Configuration if RAID is already configured and click Continue .NOTE: If the RAID is configured, then the existing RAID configuration details are displayed.NOTE: Ensure that the RAID is properly configured to enable the required Windows Small Business Server 2008 configuration. For information onrecommended partition sizes and configurations, see the Getting Starteddocument and other reference documentation from .The Installation Summary screen and the installation options that you have selected, are displayed.11Click Back to change the installation options. If the options displayed are accurate, click Continue .CAUTION: All system partitions are erased along with all data on the local hard drives.The Server OS Installation screen is displayed and the operating system installation begins.8Installing Windows Small Business ServerCAUTION: TheDell Systems Build and Update Utility screen prompts you toremove the media after all the installation settings are finalized. Remove the Dell Systems Management Tools and Documentation media. The system reboots to local hard drives and then prompts for the Windows Installation media. Do not boot directly to the CD/DVD drive at this stage.12Click Finish after you have inserted the Windows installation media in the CD/DVD drive.The system may display messages during installation.13Press OK to continue with installation.14Follow "Installing Microsoft Windows Small Business Server 2008 Using the USC" on page 4.To complete the operating system installation, perform the procedure described in "Completing the Operating System Installation" on page 12.Installing Microsoft Windows Small Business Server 2008 Using the Operating System MediaNOTE: It is recommended that you use the USC or Dell Systems Management Tools and Documentation media as it includes the latest drivers and fixes for your Dell system.1Connect a keyboard, monitor, mouse, and any additional peripherals to your system.2T urn on your system and any attached peripherals.Several BIOS screens appear during startup, but do not require any user intervention.3Insert the Microsoft Windows Small Business Server 2008 media into the DVD drive.NOTE: If a Windows operating system is installed on your system, thefollowing message is displayed: Press any key to boot from the CD/DVD ...Press any key to begin the installation.The following message is displayed:Windows is Loading FilesAfter the files are loaded, the Install Windows screen is displayed.Installing Windows Small Business Server 200894Select the appropriate Language , Time & Currency , and Keyboard values and click Next .The Windows Small Business Server 2008 screen is displayed.5Click Install Now .The T ype your product key for activation screen is displayed.6Enter the 25-character product key located on your Certificate of Authenticity (COA) label and clickNext .NOTE: The COA label is shipped along with your operating system.NOTE: If you are using the Dell recovery media to install or reinstall youroperating system, you will not be prompted for the product key.The Please read the license terms screen is displayed along with the software license terms.7Read the license terms, select the I accept the license terms option, and click Next to continue with the installation.The Which type of installation do you want screen is displayed.8Select Custom (advanced) for a new operating system installation.The Where do you want to install Windows screen is displayed.9Specify the partition on which you want to install the operating system.NOTE: If the storage controller driver is not installed on your system, youcannot create the hard-drive partitions. You may need to provide massstorage drivers during installation. Download the required driver file to adriver diskette, CD, DVD, or USB drive in the root directory of the media. For more information, see "Creating a Device Driver Media" on page 10. To provide the driver during setup, click Load Driver . You can browse to locate the driver or use Setup to search the media.To create a partition and begin installation:aClick New .b Specify the size of the partition in MB, and click Apply .NOTE: The recommended minimum partition size for the Primary partition is 60 GB. If you are installing additional memory on your system, you may require additional primary partition space to accommodate the page file. For moreinformation on page files, see Microsoft Knowledge Base (KB) article 99768 and KB article 889654 on .c Select the newly-created partition and click Next.The Installing Windows screen displays the progress bar for the installation of the operating system.NOTE:The installation procedure may take some time to complete.After the first phase of operating system installation is complete, thesystem reboots.The Continue Installation screen is displayed.10Click Next if you are not migrating from Windows Small Business Server 2003 to Windows Small Business Server 2008. For more information onmigrating from Windows Small Business Server 2003 to Windows SmallBusiness Server 2008, see the Windows Small Business Server 2008Migration Guide at .To complete the operating system installation, perform the proceduredescribed in "Completing the Operating System Installation" on page12.Creating a Device Driver MediaUse one of the methods described in the following sections to create a device driver media:Downloading Drivers From the Dell Systems Management Tools and Documentation Media:1Insert the Dell Systems Management T ools and Documentation media into the system.The Welcome to Dell Service and Diagnostic Utilities screen is displayed.2Select your server model and operating system and click Continue.The list of drivers is displayed.3Select the required driver, the self-extracting zip file and click Run. Copy the driver to a diskette drive, CD, DVD, or USB drive.Repeat this step for all the drivers that you require.4Use the media that you created with the Load Driver option, to load mass storage drivers.NOTE: To provide the driver during setup, click Load Driver. You can browseto locate the driver or use Setup to search the media.10Installing Windows Small Business ServerDownloading Drivers From the Dell Support Site1Go to .2Click Drivers and Downloads.3Enter the service tag of your system in the Choose by Service Tag field or select your system’s model.4Select the System T ype, Operating System, Driver Language, Category, and Importance from the drop-down list.NOTE: On the primary server, select Microsoft Windows Small BusinessServer 2008 x64 to install the operating system. On the secondary server(Premium only), depending on the operating system you want to install, selectMicrosoft Windows Server 2008 x64 or Microsoft Windows Server 2008 x86.The drivers that are applicable to your selection are displayed.5Download the drivers that you require to a diskette drive, USB drive, CD, or DVD.6Use the media that you created with the Load Driver option, to load mass storage drivers.NOTE: To provide the driver during setup, click Load Driver. You can browseto locate the driver or use Setup to search the media.Using the DRAC Diskette ImageInstall the Dell mass storage drivers using Dell Remote Access Controller DRAC 4, DRAC 5 or iDRAC diskette images located at . For information on setting up the virtual diskette drive media, see the DRAC documentation available at /manuals.NOTE: You can install drivers using the DRAC diskette image only if your system has a DRAC installed and configured.Completing the Operating System InstallationAfter installing the operating system, perform the following procedure to enter the required information:1In the Verify the clock and time zone settings screen, click Open Date and Time to verify the clock and time zone settings to change the clock and time zone settings.Click Next.The Get important updates screen is displayed.NOTE: If the operating system does not have the driver for the networkcontroller, A network adapter not found screen is displayed. Use one of thefollowing options to install a network controller driver:•Open Device Manager to install drivers•BrowseNOTE: You cannot proceed with the installation unless you install the networkcontroller driver.2Select Go online and get the most recent installation updates.NOTE: You can select this option only if the system is connected to theInternet. Select Do not get the most recent installation updates if the system isnot connected to the Internet.The Connecting your server screen is displayed along with the progress of the installation updates.Once the updates are completed, the Company information screen isdisplayed.3Enter the details of the company(optional) and click Next.The Personalize your server and your network screen is displayed.4Enter the server name, the internal domain name and click Next.NOTE: The server name and internal domain name cannot be changed afterthe installation.The Add a network administrator account screen is displayed.5Enter the network administrator user name and password and click Next.The Install Security services screen is displayed.6Select the appropriate security service(optional) and click Next.NOTE: The security services listed in the Install Security services screen aretrial versions valid for four months. You have to buy the full license separately.Check the details of the network administrator account, server name, anddomain name in That is all the information needed screen, and click Next toconfirm.The Expanding and Installing files screen is displayed along with the progress of installation.NOTE: The installation may take 30 mins to an hour to complete dependingupon the hardware you are using.NOTE: During the operating system installation, the system reboots multipletimes.The Successful installation screen is displayed once the installation is complete.7Click Start using the server.NOTE: If the system encounters problems during installation, the InstallationIssues screen displays the list of problems.The Windows SBS Console screen is displayed.8Select the appropriate initial configuration tasks to complete the system setup and close the window once the configuration is complete.Installing Windows Small Business Server 2008 Premium EditionTo install the Premium edition of Microsoft Windows Small Business Server 2008, you must install two servers.1To install the first server, use this document.2To install the second server, ensure that you select the required media architecture (x86 or x64), and follow one of the installation proceduresexplained in this document to install the operating system using USC,Dell Systems management T ools and Documentation media, or theoperating system media.NOTE: If you require specific instructions, see Installing Windows Server2008 available at /ostechsheets. After installing, join the secondserver to the Windows Small Business Server 2008 domain using the nativemethod.3To view the second server in the Windows Small Business Server 2008 console, click Network→ Computers. The second server is listed under Client computers.Installing SQL Server 2008For information on installing SQL Server 2008 on your system, see How to: Install SQL Server 2008 at .NOTE: The SQL Server 2008 license is included in Windows Small BusinessServer 2008 Premium Edition that you can use to install SQL Server 2008 on thesecond server in the Windows Small Business Server 2008 domain.NOTE: Product keys for SQL Server are available on the Product Key labels,found inside the DVD case.。
WINDOWS 2008操作系统配置及软件安装说明一、安装企业版Windows 2008 操作系统;二、安装Windows 2008 sp2 补丁下载地址:/downloads/zh-cn/details.aspx?FamilyID=891ab806-2431-4d00-afa3-99ff6f22448d&Di splayLang=zh-cn三、安装OFFICE 2007 , 并打OFFICE 2007 SP2 补丁集四、安装杀毒软件1、建议使用360安全卫士、360杀毒软件2、360漏洞修复方式设置为“开机扫描,发现高危漏洞即使提示”,此处设置是为了避免360自动安装漏洞但是没有重启电脑,影响客户方登录软件。
3、修复所有系统漏洞五、开启3GB功能;windows 2008使用超过4G大内存启动APE支持:方法1:在运行命令栏:输入cmd 然后在DOS界面输入:bcdedit /set pae forceenable方法2.:修改注册表来实现注册表位置和修改参数如下HKEY_LOCAL_MACHINE\SYSTEM\CurrentControlSet\Control\Session Manager\Memory PhysicalAddressExtension 修改DWORD 值是(0),PAE 被禁用;值为(1),启用PAE六、由于万维软件在打印时候调用了Office EXCEl组件,在默认安装的环境下:在Windows Server 2008 下调用Office Excel 2007会出错,具体的解决方案:如果是Windows 2008 Server x64,创建目录C:\Windows\SysWOW64\config\systemprofile\Desktop如果是Windows 2008 Server x86,创建目录C:\Windows\System32\config\systemprofile\Desktop七、安装WINDOWS组件IIS1、开始→所有程序→管理工具→服务器管理器2、角色 添加角色3、选择“web 服务器(IIS)”4、选择“添加必需的功能”5、“下一步” 选择要安转的角色服务6、确认安装八、IIS设置1、开始→所有程序→管理工具→Internet 信息服务(IIS)管理器出现以下界面:2、设置应用程序池为本地系统3、建立网站及虚拟目录右击“网站” 添加网站设置网站属性(此处以为例)4、添加虚拟目录设置虚拟目录属性(此处以anywell_gzww为例,物理路径为软件所在路径)5、将虚拟目录转换为应用程序6、设置默认文档,打开默认文档,添加设置为“login.aspx”7、开启状态服务设置为“自动”九、安装SQL Server 2008 数据库(企业版)一、安装SQL Server2008步骤:1、打开SQL2008安装程序,双击SE TUP.EXE文件;如图1-16图1-162、系统开始跳转到安装界面;如图1-17图1-173、单击左边的“安装”,再单击右边第一个选项;如图1-18图1-18 4、接着跳转到安装程序支持规则,只有所有操作的都通过了,才能继续进行安装;如图1-19图1-195、输入SQL2008的安装序列号;如图1-20;图1-206、在许可条款下“我接受许可条款”打勾,点击下一步,如图1-21;图1-217、一直安装到图1-22时,需将功能显项全选,如图1-22;图1-228、实例配置时,选择默认实例,其它不用改动,如图1-23;图1-239、服务器配置时,所有账户名改成NT AUTHORITY \NE TWORK SE RVICE ,启动类型都设置为自动,如图1-24;图1-2410、数据库引擎配置时需要设置sa 密码及在账户设置中添加当前用户;图1-25图1-2512、Anal ysi s Services 配置中也需添加当前用户,如图1-26;图1-2612、Report ing S ervi ces 配置,安装本机默认配置便可,如图1-27;图1-2713、在后面的安装步骤中不需要更改别的设置,一直到安装完成即可,如图1-28;图1-2814、安装SQL补丁集SP115、安装SQL补丁集SP2以上操作步骤便完成了S QL 2008数据库安装;二、服务器安全设置服务器安装完成之后,为保证服务器安全,不被网络黑客轻易攻击,需要对服务器配置进行设置;操作步骤:1、选择计算机程序中SQL Server 配置管理器。
1.将 2008 安装光盘插入 DVD 光驱; 2,开机的时候按 F11 进入 boot menu,从 boot menu 中选择从光驱启动(optical drive);
3,选择好语言与区域
4,点击 Install Now 继续安装
5,输入 CD-KEY,如果是 DELL 的 OEM 系统,那么序列号在服务器机箱上贴着
如果暂时没有没有 CD-KEY,可以点击 NEXT 跳过继续,但在操作系统安装完毕后会要求你输入序列号
6,同意协议并继续
7,选择需要的模式进行安装,这里我们选择 Custom (Advanced).
8,确认安装的硬盘及分区继续(如果需要加载 SCSI 驱动,点击 load driver 即可) (因您的服务器有配置 raid 卡,在这个界面无法直接识别到硬盘,需要加载阵列卡驱动) 加载阵列卡驱动步骤为: 1. 首先下载阵列卡驱动; 2. 解压驱动至 U 盘; 3. 在以下界面点击 load drives(加载驱动)加载即可识别到硬盘.
9,
10,
11,
12,
13,
14,
15,
16
安装完毕
。
U盘安装Windows server 2008
制作方法:
1. 2G以上U盘一个. UltraISO软件(下面有下载)
2.首先插入U盘格式化成FAT文件系统,打开UltraISO软件
(1)用UltraISO软件打开Windows server 2008光盘镜像(如图1)
(2)点击菜单"启动"-写入硬盘映像(如图2)
(3)写入方式改成USB-HDD ,点击便捷启动-写入新硬盘主引导记录(MBR)-USB-HDD (如图
3)
(4)点击写入(如图4) 写入完毕就做好了然后重启把
BIOS里的启动项调成USB-HDD启动保存后重启就可以安装了
安装windows server 2008过程中会要求重启,这点要注意在重启时一定要把BIOS里的启动项调回硬盘启动不然会再次被引导到U盘重新安装的注:windows7和Vista系统也可以这样制作安装
------------------------------------------------
注:对于DELL服务器新的阵列卡PERC S100/S300 H700/H800 H200,windows2008没有包含驱动,可以下载好对应的驱动解压缩后(开始我没有解压缩,所以就不找到到驱动),将驱动目录在图1中,拖到windows2008的根目录。
待会在windows2008安装时,在硬盘界面点load driver,就可以直接选择U盘上拷贝的阵列卡驱动目录了(参考图片6)。
----------------------------------------------------
图片1:
图片2:
图片3:
图片4:
图片5:
图片6:。