图像处理之三种常见双立方插值算法
- 格式:doc
- 大小:14.69 KB
- 文档页数:9

1.数学模型对于一个目的像素,其坐标通过反向变换得到的在原图中的浮点坐标为(i+u,j+v),其中i、j均为非负整数,u、v为[0,1)区间的浮点数,双三次插值考虑一个浮点坐标(i+u,j+v)周围的16个邻点,目的像素值f(i+u,j+v)可由如下插值公式得到:f(i+u,j+v) = [A] * [B] * [C][A]=[ S(u + 1)S(u + 0)S(u - 1)S(u - 2) ]┏f(i-1, j-1)f(i-1, j+0)f(i-1, j+1)f(i-1, j+2) ┓[B]=┃f(i+0, j-1)f(i+0, j+0)f(i+0, j+1)f(i+0, j+2) ┃┃f(i+1, j-1)f(i+1, j+0)f(i+1, j+1)f(i+1, j+2) ┃┗f(i+2, j-1)f(i+2, j+0)f(i+2, j+1)f(i+2, j+2) ┛┏S(v + 1) ┓[C]=┃S(v + 0) ┃┃S(v - 1) ┃┗S(v - 2) ┛┏1-2*Abs(x)^2+Abs(x)^3, 0<=Abs(x)<1S(x)={4-8*Abs(x)+5*Abs(x)^2-Abs(x)^3, 1<=Abs(x)<2┗0, Abs(x)>=2S(x)是对Sin(x*Pi)/x 的逼近(Pi是圆周率——π),为插值核。
2.计算流程1. 获取16个点的坐标P1、P2……P162. 由插值核计算公式S(x) 分别计算出x、y方向的插值核向量Su、Sv3. 进行矩阵运算,得到插值结果iTemp1 = Su0 * P1 + Su1 * P5 + Su2 * P9 + Su3 * P13iTemp2 = Su0 * P2 + Su1 * P6 + Su2 * P10 + Su3 * P14iTemp3 = Su0 * P3 + Su1 * P7 + Su2 * P11 + Su3 * P15iTemp4 = Su0 * P4 + Su1 * P8 + Su2 * P12 + Su3 * P16iResult = Sv1 * iTemp1 + Sv2 * iTemp2 + Sv3 * iTemp3 + Sv4 * iTemp44. 在得到插值结果图后,我们发现图像中有“毛刺”,因此对插值结果做了个后处理,即:设该点在原图中的像素值为pSrc,若abs(iResult - pSrc) 大于某阈值,我们认为插值后的点可能污染原图,因此用原像素值pSrc代替。

计算机视觉(五)双三次插值(Bi...超分辨率基础_插值算法简介1.插值算法数学的数值分析领域中,内插或称插值(英语:interpolation)是一种通过已知的、离散的数据点,在范围内推求新数据点的过程或方法。
常见的三种插值算法为最近邻插值、双线性插值和双三次插值。
一组离散数据点在一个外延的插值。
曲线中实际已知数据点是红色的;连接它们的蓝色曲线即为插值。
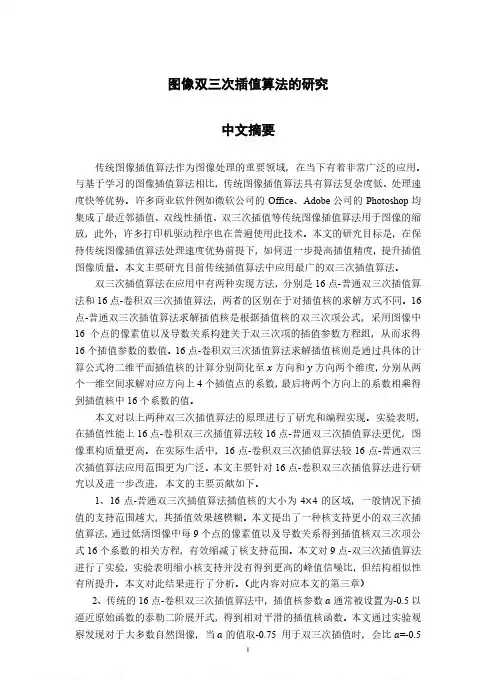
2.最近邻插值算法最邻插值算法(Nearest Neighborinterpolation)是最简单的一种插值算法,当图片放大时,缺少的像素通过直接使用与之最近原有像素生成,原理就是选取距离插入的像素点(x+u, y+v)【注:x,y为整数,u,v为小数】最近的一个像素点,用它的像素点的灰度值代替插入的像素点。
i+u, j+v为待求像素坐标,如果 i+u, j+v落在A区,即 u<0.5,v<0.5,则将左上角像素的灰度值赋给待求像素,同理落在B区则赋予右上角的像素灰度值,落在C区则赋予左下角像素的灰度值,落在D区则赋予右下角像素的灰度值。
最近邻插值法计算量较小,但可能会造成生的图像灰度上的不连续,在变化地方可能出现明显锯齿状。
3.双线性插值算法在数学上,双线性插值是有两个变量的插值函数的线形插值扩展,其核心思想是在两个方向分别进行一次线性插值。
以上是一维的,接下来看看二维中的双线性插值首先在x方向上面线性插值,得到R2、R1然后以R2,R1在y方向上面再次线性插值如果选择一个坐标系统使得 f 的四个已知点坐标分别为 (0, 0)、(0, 1)、(1, 0) 和 (1, 1),那么插值公式就可以化简为用矩阵表示双线性内插法的计算比最邻近点法复杂,计算量较大但没有灰度不连续的缺点,结果基本令人满意。
它具有低通滤波性质,使高频分量受损,图像轮廓可能会有一点模糊。
4.双三次插值算法(bicubic interpolation)在数值分析这个数学分支中,双三次插值(英语:Bicubic interpolation)是二维空间中最常用的插值方法。

双三次插值的计算公式双三次插值是一种常用的图像处理技术,它可以通过对图像进行插值来改善图像的质量。
在双三次插值中,我们使用一个3x3的像素块来计算新像素的值。
这个像素块中的每个像素都有一个权重,这些权重是根据像素的位置和距离来计算的。
下面是双三次插值的计算公式:f(x,y) = ∑i=0,1,2 ∑j=0,1,2 wi(x)wj(y)pi,j其中,f(x,y)是新像素的值,pi,j是像素块中的像素值,wi(x)和wj(y)是像素块中每个像素的权重。
这些权重是根据像素的位置和距离来计算的,具体的计算公式如下:wi(x) = si(x+1)si(x)si(x-1)wj(y) = sj(y+1)sj(y)sj(y-1)其中,si(x)和sj(y)是插值函数,它们的计算公式如下:si(x) = { 1-|x|³+2|x|²-|x|, |x|<1{ 4-8|x|³+5|x|²-|x|, 1≤|x|<2{ 0, |x|≥2sj(y)的计算公式与si(x)相同。
双三次插值的计算公式看起来比较复杂,但实际上它的原理很简单。
我们可以将像素块中的每个像素看作一个函数,然后使用插值函数来计算这些函数的权重。
最后,将这些权重乘以像素值,再将它们相加,就可以得到新像素的值。
双三次插值的优点是可以提高图像的清晰度和细节,但它也有一些缺点。
首先,它需要大量的计算,因此速度比较慢。
其次,它容易产生锯齿状的边缘效果,这是因为插值函数在边缘处的值比较大,导致像素值的变化比较剧烈。
双三次插值是一种常用的图像处理技术,它可以通过对图像进行插值来改善图像的质量。
虽然它有一些缺点,但在实际应用中仍然具有很大的价值。

双立方插值算法双立方插值算法是一种用于图像处理和计算机图形学中的重要技术。
它是一种高效的插值算法,能够处理较大的数据集以及高分辨率的图像。
本文将向您介绍双立方插值算法。
一. 插值算法的定义及作用在介绍双立方插值算法之前,我们先来了解什么是插值算法及其作用。
插值算法是一种数学方法,可以根据一些已知点的函数值,来推断出未知点的函数值。
其作用是通过已知的样本点推断未知点的值以获取更加平滑的曲线或者图形。
二. 双立方插值算法的应用场景在二维或三维图形处理中,常常需要根据不规则点集进行图像重构或者显示。
常用的插值算法有双线性插值,最邻近插值、双三次插值等。
双立方插值算法是一种更为高效的插值算法,被广泛运用于拼接数码相机拍摄图片和电视信号插补等领域。
三. 双立方插值算法求解流程1. 首先确定插值点周围的16个点。
2. 对于每个插值点,计算其在四个相邻顶点围成的矩形中的权重。
3. 根据权重计算每个插值点的像素值。
4. 对所有插值点进行插值,并生成新的图像。
四. 双立方插值算法优缺点优点:1. 精度高,采样效果更平滑。
2. 速度快,能够在较短时间内处理较大的数据集。
3. 低耗费,因为双立方插值算法只需要进行一次内插运算即可得到精确的像素值。
缺点:1. 双立方插值算法需要进行大量的计算和内存操作,因此在处理复杂的图像时可能会导致计算量过大。
2. 该算法对于某些过大或者过小的像素不够鲁棒。
五. 结论双立方插值算法是一种高效、精确的插值算法,广泛应用于图像处理和计算机图形学中。
该算法能够处理较大的数据集以及高分辨率的图像,并能够在较短时间内获得精确的像素值。
但是在处理复杂的图形时,双立方插值算法可能会面临计算量过大的问题。
需要在实际应用中根据具体问题进行选择和调整,以最大化算法的优势。
图像双三次插值算法的研究中文摘要传统图像插值算法作为图像处理的重要领域,在当下有着非常广泛的应用。
与基于学习的图像插值算法相比,传统图像插值算法具有算法复杂度低、处理速度快等优势。
许多商业软件例如微软公司的Office、Adobe公司的Photoshop均集成了最近邻插值、双线性插值、双三次插值等传统图像插值算法用于图像的缩放,此外,许多打印机驱动程序也在普遍使用此技术。
本文的研究目标是,在保持传统图像插值算法处理速度优势前提下,如何进一步提高插值精度,提升插值图像质量。
本文主要研究目前传统插值算法中应用最广的双三次插值算法。
双三次插值算法在应用中有两种实现方法,分别是16点-普通双三次插值算法和16点-卷积双三次插值算法,两者的区别在于对插值核的求解方式不同。
16点-普通双三次插值算法求解插值核是根据插值核的双三次项公式,采用图像中16个点的像素值以及导数关系构建关于双三次项的插值参数方程组,从而求得16个插值参数的数值。
16点-卷积双三次插值算法求解插值核则是通过具体的计算公式将二维平面插值核的计算分别简化至 x 方向和 y 方向两个维度,分别从两个一维空间求解对应方向上4个插值点的系数,最后将两个方向上的系数相乘得到插值核中16个系数的值。
本文对以上两种双三次插值算法的原理进行了研究和编程实现。
实验表明,在插值性能上16点-卷积双三次插值算法较16点-普通双三次插值算法更优,图像重构质量更高。
在实际生活中,16点-卷积双三次插值算法较16点-普通双三次插值算法应用范围更为广泛。
本文主要针对16点-卷积双三次插值算法进行研究以及进一步改进,本文的主要贡献如下。
1、16点-普通双三次插值算法插值核的大小为4×4的区域,一般情况下插值的支持范围越大,其插值效果越模糊。
本文提出了一种核支持更小的双三次插值算法,通过低清图像中每9个点的像素值以及导数关系得到插值核双三次项公式16个系数的相关方程,有效缩减了核支持范围。

数字图像处理中常⽤的插值⽅法
分类:算法数字图像处理中常⽤的插值⽅法
2010-11-15 14:05 在做数字图像处理时,经常会碰到⼩数象素坐标的取值问题,这时就需要依据邻近象如:做地图投影转换,对⽬标图像的⼀个象素进⾏坐标变换到源图像上对应的点时,数,再⽐如做图像的⼏何校正,也会碰到同样的问题。
以下是对常⽤的三种数字图像
1、最邻近元法
这是最简单的⼀种插值⽅法,不需要计算,在待求象素的四邻象素中,将距离待求象
对于 (i, j+v),f(i, j) 到 f(i, j+1) 的灰度变化为线性关系,则有:
f(i, j+v) = [f(i, j+1) - f(i, j)] * v + f(i, j)
同理对于 (i+1, j+v) 则有:
f(i+1, j+v) = [f(i+1, j+1) - f(i+1, j)] * v + f(i+1, j)
从f(i, j+v) 到 f(i+1, j+v) 的灰度变化也为线性关系,由此可推导出待求象素灰度的计算 f(i+u, j+v) = (1-u) * (1-v) * f(i, j) + (1-u) * v * f(i, j+1) + u * (1-v) * f(i+1, j) 双线性内插法的计算⽐最邻近点法复杂,计算量较⼤,但没有灰度不连续的缺点,结性质,使⾼频分量受损,图像轮廓可能会有⼀点模糊。
3、三次内插法
该⽅法利⽤三次多项式S(x)求逼近理论上最佳插值函数sin(x)/x, 其数学表达式为:
待求像素(x, y)的灰度值由其周围16个灰度值加权内插得到,如下图:
待求像素的灰度计算式如下:f(x, y) = f(i+u, j+v) = ABC
其中:
三次曲线插值⽅法计算量较⼤,但插值后的图像效果最好。
分类: 算法 数字图像处理中常用的插值方法
2010-11-15 14:05 在做数字图像处理时,经常会碰到小数象素坐标的取值问题,这时就需要依据邻近象如:做地图投影转换,对目标图像的一个象素进行坐标变换到源图像上对应的点时,数,再比如做图像的几何校正,也会碰到同样的问题。
以下是对常用的三种数字图像
1、最邻近元法
这是最简单的一种插值方法,不需要计算,在待求象素的四邻象素中,将距离待求象
对于 (i, j+v),f(i, j) 到 f(i, j+1) 的灰度变化为线性关系,则有:
f(i, j+v) = [f(i, j+1) - f(i, j)] * v + f(i, j)
同理对于 (i+1, j+v) 则有:
f(i+1, j+v) = [f(i+1, j+1) - f(i+1, j)] * v + f(i+1, j)
从f(i, j+v) 到 f(i+1, j+v) 的灰度变化也为线性关系,由此可推导出待求象素灰度的计算 f(i+u, j+v) = (1-u) * (1-v) * f(i, j) + (1-u) * v * f(i, j+1) + u * (1-v) * f(i+1, j) 双线性内插法的计算比最邻近点法复杂,计算量较大,但没有灰度不连续的缺点,结性质,使高频分量受损,图像轮廓可能会有一点模糊。
3、三次内插法
该方法利用三次多项式S(x)求逼近理论上最佳插值函数sin(x)/x, 其数学表达式为:
待求像素(x, y)的灰度值由其周围16个灰度值加权内插得到,如下图:
待求像素的灰度计算式如下:f(x, y) = f(i+u, j+v) = ABC
其中:
三次曲线插值方法计算量较大,但插值后的图像效果最好。
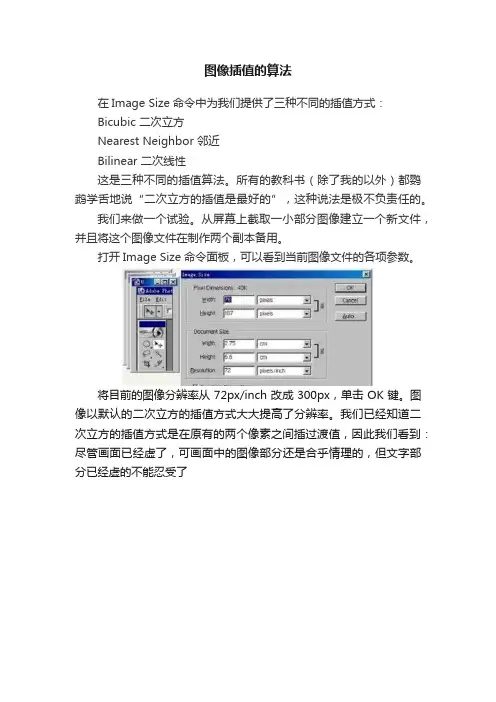
图像插值的算法在Image Size命令中为我们提供了三种不同的插值方式:Bicubic 二次立方Nearest Neighbor 邻近Bilinear 二次线性这是三种不同的插值算法。
所有的教科书(除了我的以外)都鹦鹉学舌地说“二次立方的插值是最好的”,这种说法是极不负责任的。
我们来做一个试验。
从屏幕上截取一小部分图像建立一个新文件,并且将这个图像文件在制作两个副本备用。
打开Image Size命令面板,可以看到当前图像文件的各项参数。
将目前的图像分辨率从72px/inch改成300px,单击OK键。
图像以默认的二次立方的插值方式大大提高了分辨率。
我们已经知道二次立方的插值方式是在原有的两个像素之间插过渡值,因此我们看到:尽管画面已经虚了,可画面中的图像部分还是合乎情理的,但文字部分已经虚的不能忍受了将另外一个副本图像的分辨率也提高到300px,设定邻近的差值方式,单击OK键。
我们可以看到:按照邻近方式插值后,画面中的文字部分十分清晰,而图像部分则呈现明显的马赛克现象。
当然,文字的这种所谓“清晰”也是相对的,它在曲线上是不可能做到平滑的。
再将最后一个副本图像的分辨率也提高到300px,设定二次线性的差值方式,单击OK键,可以看到这种插值的结果介于二次立方与二次线性之间。
图像部分比二次立方要软,文字部分比邻近要硬。
将三种插值方式所产生的效果放在一起,仔细比较可以看出它们的明显差别。
这个结果告诉我们:如果画面中以图像为主,应该用二次立方或者二次线性的办法来插值;如果画面中以文字为主,则应该用邻近的方式来插值。
对于画面中图像和文字都要兼顾的问题,只好采取一个变通的办法:将图像分别用两种方式做插值,然后从一个图像中拷贝局部图像粘贴到另一个图像中。
我们形象的称这种做法为:打补丁。
Photoshop 中三种插值算法是怎么回事?下面这个函数有6个点,如何用5个点表示呢?比较简单的方法被称作线性插值法。
线性插值法有一种理解方法,就是把所有相邻点两两连接。

高质量的快速的图像缩放——二次线性插值和三次卷积插值限制条件:为了便于讨论,这里只处理32bit的ARGB颜色;代码使用C++;涉及到汇编优化的时候假定为x86平台;使用的编译器为vc2005;为了代码的可读性,没有加入异常处理代码;测试使用的CPU为AMD64x2 4200+(2.37G) 和Intel Core2 4400(2.00G);速度测试说明:只测试内存数据到内存数据的缩放测试图片都是800*600缩放到1024*768; fps表示每秒钟的帧数,值越大表示函数越快A: 近邻取样插值、二次线性插值、三次卷积插值缩放效果对比原图近邻取样缩放到0.6倍近邻取样缩放到1.6倍二次线性插值缩放到0.6倍二次线性插值缩放到1.6倍三次卷积插值缩放到0.6倍三次卷积插值缩放到1.6倍原图近邻取样缩放到8倍二次线性插值缩放到8倍三次卷积插值缩放到8倍二次线性插值(近似公式)近邻取样插值缩放简单、速度快,但很多时候缩放出的图片质量比较差(特别是对于人物、景色等),图片的缩放有比较明显的锯齿;使用二次或更高次插值有利于改善缩放效果;B: 首先定义图像数据结构:#define asm __asmtypedef unsigned char TUInt8; // [0..255]struct TARGB32 //32 bit color{TUInt8 b,g,r,a; //a is alpha};struct TPicRegion //一块颜色数据区的描述,便于参数传递{TARGB32* pdata; //颜色数据首地址long byte_width; //一行数据的物理宽度(字节宽度);//abs(byte_width)有可能大于等于width*sizeof(TARGB32);long width; //像素宽度long height; //像素高度};//那么访问一个点的函数可以写为:inline TARGB32& Pixels(const TPicRegion& pic,const long x,const long y){return ( (TARGB32*)((TUInt8*)pic.pdata+pic.byte_width*y) )[x];}二次线性差值C: 二次线性插值缩放原理和公式图示:缩放后图片原图片(宽DW,高DH) (宽SW,高SH)缩放映射原理:(Sx-0)/(SW-0)=(Dx-0)/(DW-0) (Sy-0)/(SH-0)=(Dy-0)/(DH-0)=> Sx=Dx*SW/DW Sy=Dy*SH/DH聚焦看看(Sx,Sy)坐标点(Sx,Sy为浮点数)附近的情况;对于近邻取样插值的缩放算法,直接取Color0颜色作为缩放后点的颜色;二次线性插值需要考虑(Sx,Sy)坐标点周围的4个颜色值Color0\Color1\Color2\Color3,把(Sx,Sy)到A\B\C\D坐标点的距离作为系数来把4个颜色混合出缩放后点的颜色;(u=Sx-floor(Sx); v=Sy-floor(Sy); 说明:floor函数的返回值为小于等于参数的最大整数) 二次线性插值公式为:tmpColor0=Color0*(1-u) + Color2*u;tmpColor1=Color1*(1-u) + Color3*u;DstColor =tmpColor0*(1-v) + tmpColor2*v;展开公式为:pm0=(1-u)*(1-v);pm1=v*(1-u);pm2=u*(1-v);pm3=u*v;则颜色混合公式为:DstColor = Color0*pm0 + Color1*pm1 + Color2*pm2 + Color3*pm3;参数函数图示:二次线性插值函数图示对于上面的公式,它将图片向右下各移动了半个像素,需要对此做一个修正;=> Sx=(Dx+0.5)*SW/DW-0.5; Sy=(Dy+0.5)*SH/DH-0.5;而实际的程序,还需要考虑到边界(访问源图片可能超界)对于算法的影响,边界的处理可能有各种方案(不处理边界或边界回绕或边界饱和或边界映射或用背景颜色混合等;文章中默认使用边界饱和来处理超界);比如: 边界饱和函数://访问一个点的函数,(x,y)坐标可能超出图片边界; //边界处理模式:边界饱和inline TARGB32 Pixels_Bound(const TPicRegion& pic,long x,long y){//assert((pic.width>0)&&(pic.height>0));bool IsInPic=true;if (x<0) {x=0; IsInPic=false; }else if (x>=pic.width ) {x=pic.width -1; IsInPic=false; }if (y<0) {y=0; IsInPic=false; }else if (y>=pic.height) {y=pic.height-1; IsInPic=false; }TARGB32 result=Pixels(pic,x,y);if (!IsInPic) result.a=0;return result;}D: 二次线性插值缩放算法的一个参考实现:PicZoom_BilInear0该函数并没有做什么优化,只是一个简单的浮点实现版本;inline void Bilinear0(const TPicRegion& pic,float fx,float fy,TARGB32* result){long x=(long)fx; if (x>fx) --x; //x=floor(fx);long y=(long)fy; if (y>fy) --y; //y=floor(fy);TARGB32 Color0=Pixels_Bound(pic,x,y);TARGB32 Color2=Pixels_Bound(pic,x+1,y);TARGB32 Color1=Pixels_Bound(pic,x,y+1);TARGB32 Color3=Pixels_Bound(pic,x+1,y+1);float u=fx-x;float v=fy-y;float pm3=u*v;float pm2=u*(1-v);float pm1=v*(1-u);float pm0=(1-u)*(1-v);result->a=(pm0*Color0.a+pm1*Color1.a+pm2*Color2.a+pm3*Color3.a);result->r=(pm0*Color0.r+pm1*Color1.r+pm2*Color2.r+pm3*Color3.r);result->g=(pm0*Color0.g+pm1*Color1.g+pm2*Color2.g+pm3*Color3.g);result->b=(pm0*Color0.b+pm1*Color1.b+pm2*Color2.b+pm3*Color3.b);}void PicZoom_Bilinear0(const TPicRegion& Dst,const TPicRegion& Src){if ( (0==Dst.width)||(0==Dst.height)||(0==Src.width)||(0==Src.height)) return;unsigned long dst_width=Dst.width;TARGB32* pDstLine=Dst.pdata;for (unsigned long y=0;y<Dst.height;++y){float srcy=(y+0.4999999)*Src.height/Dst.height-0.5;for (unsigned long x=0;x<dst_width;++x){float srcx=(x+0.4999999)*Src.width/Dst.width-0.5;Bilinear0(Src,srcx,srcy,&pDstLine[x]);}((TUInt8*&)pDstLine)+=Dst.byte_width;}}//////////////////////////////////////////////////////////////////////////////// //速度测试://============================================================================== // PicZoom_BilInear0 8.3 fps//////////////////////////////////////////////////////////////////////////////// E: 浮点计算改为定点数实现:PicZoom_BilInear1inline void Bilinear1(const TPicRegion& pic,const long x_16,const long y_16,TARGB32* result){long x=x_16>>16;long y=y_16>>16;TARGB32 Color0=Pixels_Bound(pic,x,y);TARGB32 Color2=Pixels_Bound(pic,x+1,y);TARGB32 Color1=Pixels_Bound(pic,x,y+1);TARGB32 Color3=Pixels_Bound(pic,x+1,y+1);unsigned long u_8=(x_16 & 0xFFFF)>>8;unsigned long v_8=(y_16 & 0xFFFF)>>8;unsigned long pm3_16=(u_8*v_8);unsigned long pm2_16=(u_8*(unsigned long)(255-v_8));unsigned long pm1_16=(v_8*(unsigned long)(255-u_8));unsigned long pm0_16=((255-u_8)*(255-v_8));result->a=((pm0_16*Color0.a+pm1_16*Color1.a+pm2_16*Color2.a+pm3_16*Color3.a)>>16);result->r=((pm0_16*Color0.r+pm1_16*Color1.r+pm2_16*Color2.r+pm3_16*Color3.r)>>16);result->g=((pm0_16*Color0.g+pm1_16*Color1.g+pm2_16*Color2.g+pm3_16*Color3.g)>>16);result->b=((pm0_16*Color0.b+pm1_16*Color1.b+pm2_16*Color2.b+pm3_16*Color3.b)>>16);}void PicZoom_Bilinear1(const TPicRegion& Dst,const TPicRegion& Src){if ( (0==Dst.width)||(0==Dst.height)||(0==Src.width)||(0==Src.height)) return;long xrIntFloat_16=((Src.width)<<16)/Dst.width+1;long yrIntFloat_16=((Src.height)<<16)/Dst.height+1;const long csDErrorX=-(1<<15)+(xrIntFloat_16>>1);const long csDErrorY=-(1<<15)+(yrIntFloat_16>>1);unsigned long dst_width=Dst.width;TARGB32* pDstLine=Dst.pdata;long srcy_16=csDErrorY;long y;for (y=0;y<Dst.height;++y){long srcx_16=csDErrorX;for (unsigned long x=0;x<dst_width;++x){Bilinear1(Src,srcx_16,srcy_16,&pDstLine[x]); //bordersrcx_16+=xrIntFloat_16;}srcy_16+=yrIntFloat_16;((TUInt8*&)pDstLine)+=Dst.byte_width;}}//////////////////////////////////////////////////////////////////////////////////速度测试://==============================================================================// PicZoom_BilInear1 17.7 fps//////////////////////////////////////////////////////////////////////////////// F: 边界访问超界的问题二次线性插值需要考略边界访问超界的问题,我们可以将边界区域和内部区域分开处理,这样就可以优化内部的插值实现函数了:比如不需要判断访问超界、减少颜色数据复制、减少一些不必要的重复坐标计算等等inline void Bilinear2_Fast(TARGB32* PColor0,TARGB32* PColor1,unsigned long u_8,unsigned long v_8,TARGB32* result){unsigned long pm3_16=u_8*v_8;unsigned long pm2_16=(u_8<<8)-pm3_16;unsigned long pm1_16=(v_8<<8)-pm3_16;unsigned long pm0_16=(1<<16)-pm1_16-pm2_16-pm3_16;result->a=((pm0_16*PColor0[0].a+pm2_16*PColor0[1].a+pm1_16*PColor1[0].a+pm3_16*PColor1[1].a)>>16);result->r=((pm0_16*PColor0[0].r+pm2_16*PColor0[1].r+pm1_16*PColor1[0].r+pm3_16*PColor1[1].r)>>16);result->g=((pm0_16*PColor0[0].g+pm2_16*PColor0[1].g+pm1_16*PColor1[0].g+pm3_16*PColor1[1].g)>>16);result->b=((pm0_16*PColor0[0].b+pm2_16*PColor0[1].b+pm1_16*PColor1[0].b+pm3_16*PColor1[1].b)>>16);}inline void Bilinear2_Border(const TPicRegion& pic,const long x_16, const long y_16,TARGB32* result){long x=(x_16>>16);long y=(y_16>>16);unsigned long u_16=((unsigned short)(x_16));unsigned long v_16=((unsigned short)(y_16));TARGB32 pixel[4];pixel[0]=Pixels_Bound(pic,x,y);pixel[1]=Pixels_Bound(pic,x+1,y);pixel[2]=Pixels_Bound(pic,x,y+1);pixel[3]=Pixels_Bound(pic,x+1,y+1);Bilinear2_Fast(&pixel[0],&pixel[2],u_16>>8,v_16>>8,result);}void PicZoom_Bilinear2(const TPicRegion& Dst,const TPicRegion& Src){if ( (0==Dst.width)||(0==Dst.height)||(0==Src.width)||(0==Src.height)) return;long xrIntFloat_16=((Src.width)<<16)/Dst.width+1;long yrIntFloat_16=((Src.height)<<16)/Dst.height+1;const long csDErrorX=-(1<<15)+(xrIntFloat_16>>1);const long csDErrorY=-(1<<15)+(yrIntFloat_16>>1);unsigned long dst_width=Dst.width;//计算出需要特殊处理的边界long border_y0=-csDErrorY/yrIntFloat_16+1;//y0+y*yr>=0; y0=csDErrorY => y>=-csDErrorY/yrif (border_y0>=Dst.height) border_y0=Dst.height;long border_x0=-csDErrorX/xrIntFloat_16+1;if (border_x0>=Dst.width ) border_x0=Dst.width;long border_y1=(((Src.height-2)<<16)-csDErrorY)/yrIntFloat_16+1;//y0+y*yr<=(height-2) => y<=(height-2-csDErrorY)/yrif (border_y1<border_y0) border_y1=border_y0;long border_x1=(((Src.width-2)<<16)-csDErrorX)/xrIntFloat_16+1;if (border_x1<border_x0) border_x1=border_x0;TARGB32* pDstLine=Dst.pdata;long Src_byte_width=Src.byte_width;long srcy_16=csDErrorY;long y;for (y=0;y<border_y0;++y){long srcx_16=csDErrorX;for (unsigned long x=0;x<dst_width;++x){Bilinear2_Border(Src,srcx_16,srcy_16,&pDstLine[x]); //bordersrcx_16+=xrIntFloat_16;}srcy_16+=yrIntFloat_16;((TUInt8*&)pDstLine)+=Dst.byte_width;}for (y=border_y0;y<border_y1;++y){long srcx_16=csDErrorX;long x;for (x=0;x<border_x0;++x){Bilinear2_Border(Src,srcx_16,srcy_16,&pDstLine[x]);//bordersrcx_16+=xrIntFloat_16;}{unsigned long v_8=(srcy_16 & 0xFFFF)>>8;TARGB32* PSrcLineColor= (TARGB32*)((TUInt8*)(Src.pdata)+Src_byte_width*(srcy_16>>16)) ;for (unsigned long x=border_x0;x<border_x1;++x){TARGB32* PColor0=&PSrcLineColor[srcx_16>>16];TARGB32* PColor1=(TARGB32*)((TUInt8*)(PColor0)+Src_byte_width); Bilinear2_Fast(PColor0,PColor1,(srcx_16 & 0xFFFF)>>8,v_8,&pDstLine[x]);srcx_16+=xrIntFloat_16;}}for (x=border_x1;x<dst_width;++x){Bilinear2_Border(Src,srcx_16,srcy_16,&pDstLine[x]);//bordersrcx_16+=xrIntFloat_16;}srcy_16+=yrIntFloat_16;((TUInt8*&)pDstLine)+=Dst.byte_width;}for (y=border_y1;y<Dst.height;++y){long srcx_16=csDErrorX;for (unsigned long x=0;x<dst_width;++x){Bilinear2_Border(Src,srcx_16,srcy_16,&pDstLine[x]); //bordersrcx_16+=xrIntFloat_16;}srcy_16+=yrIntFloat_16;((TUInt8*&)pDstLine)+=Dst.byte_width;}}//////////////////////////////////////////////////////////////////////////////////速度测试://==============================================================================// PicZoom_BilInear2 43.4 fps////////////////////////////////////////////////////////////////////////////////F' 补充: 二次线性插值(近似公式)如果不想处理边界访问超界问题,可以考虑扩大源图片的尺寸,加一个边框(“哨兵”优化);这样插值算法就不用考虑边界问题了,程序写起来也简单很多!如果对缩放结果的边界像素级精度要求不是太高,我还有一个方案,一个稍微改变的缩放公式:Sx=Dx*(SW-1)/DW;Sy=Dy*(SH-1)/DH;(源图片宽和高:SW>=2;SH>=2)证明这个公式不会造成内存访问超界:要求Dx=DW-1时: sx+1=int( (dw-1)/dw*(dw-1) ) +1 <= (sw-1)有: int( (sw-1)*(dw-1)/dw ) <=sw-2(sw-1)*(dw-1)/dw <(sw-1)(dw-1) /dw<1(dw-1) <dw比如,按这个公式的一个简单实现: (缩放效果见前面的"二次线性插值(近似公式)"图示)void PicZoom_ftBilinear_Common(const TPicRegion& Dst,const TPicRegion& Src){if ( (0==Dst.width)||(0==Dst.height)||(2>Src.width)||(2>Src.height)) return;long xrIntFloat_16=((Src.width-1)<<16)/Dst.width;long yrIntFloat_16=((Src.height-1)<<16)/Dst.height;unsigned long dst_width=Dst.width;long Src_byte_width=Src.byte_width;TARGB32* pDstLine=Dst.pdata;long srcy_16=0;for (unsigned long y=0;y<Dst.height;++y){unsigned long v_8=(srcy_16 & 0xFFFF)>>8;TARGB32* PSrcLineColor= (TARGB32*)((TUInt8*)(Src.pdata)+Src_byte_width*(srcy_16>>16)) ;long srcx_16=0;for (unsigned long x=0;x<dst_width;++x){TARGB32* PColor0=&PSrcLineColor[srcx_16>>16];Bilinear_Fast_Common(PColor0,(TARGB32*)((TUInt8*)(PColor0)+Src_byte_width),(srcx_16 & 0xFFFF)>>8,v_8,&pDstLine[x]);srcx_16+=xrIntFloat_16;}srcy_16+=yrIntFloat_16;((TUInt8*&)pDstLine)+=Dst.byte_width;}}G: 模拟单指令多数据处理利用单指令多数据处理的MMX指令一般都可以加快颜色的运算;在使用MMX改写之前,利用32bit寄存器(或变量)来模拟单指令多数据处理;数据储存原理:一个颜色数据分量只有一个字节,用2个字节来储存单个颜色分量的计算结果,对于很多颜色计算来说精度就够了;那么一个32bit寄存器(或变量)就可以储存2个计算出的临时颜色分量;从而达到了单个指令两路数据处理的目的;单个指令两路数据处理的计算:乘法:((0x00AA*a)<<16) | (0x00BB*a) = 0x00AA00BB * a可见只要保证0x00AA*a和0x00BB*a都小于(1<<16)那么乘法可以直接使用无符号数乘法了加法: ((0x00AA+0x00CC)<<16) | (0x00BB+0x00DD) = 0x00AA00BB + 0x00CC00DD 可见只要0x00AA+0x00CC和0x00BB+0x00DD小于(1<<16)那么加法可以直接使用无符号数加法了(移位、减法等稍微复杂一点,因为这里没有用到就不推导运算公式了)inline void Bilinear_Fast_Common(TARGB32* PColor0,TARGB32* PColor1, unsigned long u_8,unsigned long v_8,TARGB32* result){unsigned long pm3_8=(u_8*v_8)>>8;unsigned long pm2_8=u_8-pm3_8;unsigned long pm1_8=v_8-pm3_8;unsigned long pm0_8=256-pm1_8-pm2_8-pm3_8;unsigned long Color=*(unsigned long*)(PColor0);unsigned long BR=(Color & 0x00FF00FF)*pm0_8;unsigned long GA=((Color & 0xFF00FF00)>>8)*pm0_8;Color=((unsigned long*)(PColor0))[1];GA+=((Color & 0xFF00FF00)>>8)*pm2_8;BR+=(Color & 0x00FF00FF)*pm2_8;Color=*(unsigned long*)(PColor1);GA+=((Color & 0xFF00FF00)>>8)*pm1_8;BR+=(Color & 0x00FF00FF)*pm1_8;Color=((unsigned long*)(PColor1))[1];GA+=((Color & 0xFF00FF00)>>8)*pm3_8;BR+=(Color & 0x00FF00FF)*pm3_8;*(unsigned long*)(result)=(GA & 0xFF00FF00)|((BR & 0xFF00FF00)>>8); }inline void Bilinear_Border_Common(const TPicRegion& pic,const long x_16,const long y_16,TARGB32* result){long x=(x_16>>16);long y=(y_16>>16);unsigned long u_16=((unsigned short)(x_16));unsigned long v_16=((unsigned short)(y_16));TARGB32 pixel[4];pixel[0]=Pixels_Bound(pic,x,y);pixel[1]=Pixels_Bound(pic,x+1,y);pixel[2]=Pixels_Bound(pic,x,y+1);pixel[3]=Pixels_Bound(pic,x+1,y+1);Bilinear_Fast_Common(&pixel[0],&pixel[2],u_16>>8,v_16>>8,result);}void PicZoom_Bilinear_Common(const TPicRegion& Dst,const TPicRegion& Src) {if ( (0==Dst.width)||(0==Dst.height)||(0==Src.width)||(0==Src.height)) return;long xrIntFloat_16=((Src.width)<<16)/Dst.width+1;long yrIntFloat_16=((Src.height)<<16)/Dst.height+1;const long csDErrorX=-(1<<15)+(xrIntFloat_16>>1);const long csDErrorY=-(1<<15)+(yrIntFloat_16>>1);unsigned long dst_width=Dst.width;//计算出需要特殊处理的边界long border_y0=-csDErrorY/yrIntFloat_16+1;//y0+y*yr>=0; y0=csDErrorY => y>=-csDErrorY/yrif (border_y0>=Dst.height) border_y0=Dst.height;long border_x0=-csDErrorX/xrIntFloat_16+1;if (border_x0>=Dst.width ) border_x0=Dst.width;long border_y1=(((Src.height-2)<<16)-csDErrorY)/yrIntFloat_16+1;//y0+y*yr<=(height-2) => y<=(height-2-csDErrorY)/yrif (border_y1<border_y0) border_y1=border_y0;long border_x1=(((Src.width-2)<<16)-csDErrorX)/xrIntFloat_16+1;if (border_x1<border_x0) border_x1=border_x0;TARGB32* pDstLine=Dst.pdata;long Src_byte_width=Src.byte_width;long srcy_16=csDErrorY;long y;for (y=0;y<border_y0;++y){long srcx_16=csDErrorX;for (unsigned long x=0;x<dst_width;++x){Bilinear_Border_Common(Src,srcx_16,srcy_16,&pDstLine[x]); //bordersrcx_16+=xrIntFloat_16;}srcy_16+=yrIntFloat_16;((TUInt8*&)pDstLine)+=Dst.byte_width;}for (y=border_y0;y<border_y1;++y){long srcx_16=csDErrorX;long x;for (x=0;x<border_x0;++x){Bilinear_Border_Common(Src,srcx_16,srcy_16,&pDstLine[x]);//bordersrcx_16+=xrIntFloat_16;}{unsigned long v_8=(srcy_16 & 0xFFFF)>>8;TARGB32* PSrcLineColor= (TARGB32*)((TUInt8*)(Src.pdata)+Src_byte_width*(srcy_16>>16)) ;for (unsigned long x=border_x0;x<border_x1;++x){TARGB32* PColor0=&PSrcLineColor[srcx_16>>16];TARGB32* PColor1=(TARGB32*)((TUInt8*)(PColor0)+Src_byte_width);Bilinear_Fast_Common(PColor0,PColor1,(srcx_16 & 0xFFFF)>>8,v_8,&pDstLine[x]);srcx_16+=xrIntFloat_16;}}for (x=border_x1;x<dst_width;++x){Bilinear_Border_Common(Src,srcx_16,srcy_16,&pDstLine[x]);//bordersrcx_16+=xrIntFloat_16;}srcy_16+=yrIntFloat_16;((TUInt8*&)pDstLine)+=Dst.byte_width;}for (y=border_y1;y<Dst.height;++y){long srcx_16=csDErrorX;for (unsigned long x=0;x<dst_width;++x){Bilinear_Border_Common(Src,srcx_16,srcy_16,&pDstLine[x]); //bordersrcx_16+=xrIntFloat_16;}srcy_16+=yrIntFloat_16;((TUInt8*&)pDstLine)+=Dst.byte_width;}}//////////////////////////////////////////////////////////////////////////////////速度测试://============================================================================== // PicZoom_BilInear_Common 65.3 fps//////////////////////////////////////////////////////////////////////////////// H: 使用MMX指令改写:PicZoom_Bilinear_MMXinline void Bilinear_Fast_MMX(TARGB32* PColor0,TARGB32* PColor1, unsigned long u_8,unsigned long v_8,TARGB32* result){asm{MOVD MM6,v_8MOVD MM5,u_8mov edx,PColor0mov eax,PColor1PXOR mm7,mm7MOVD MM2,dword ptr [eax]MOVD MM0,dword ptr [eax+4]PUNPCKLWD MM5,MM5PUNPCKLWD MM6,MM6MOVD MM3,dword ptr [edx]MOVD MM1,dword ptr [edx+4]PUNPCKLDQ MM5,MM5PUNPCKLBW MM0,MM7PUNPCKLBW MM1,MM7PUNPCKLBW MM2,MM7PUNPCKLBW MM3,MM7PSUBw MM0,MM2PSUBw MM1,MM3PSLLw MM2,8PSLLw MM3,8PMULlw MM0,MM5PMULlw MM1,MM5PUNPCKLDQ MM6,MM6PADDw MM0,MM2PADDw MM1,MM3PSRLw MM0,8PSRLw MM1,8PSUBw MM0,MM1PSLLw MM1,8PMULlw MM0,MM6mov eax,resultPADDw MM0,MM1PSRLw MM0,8PACKUSwb MM0,MM7movd [eax],MM0//emms}}void Bilinear_Border_MMX(const TPicRegion& pic,const long x_16,const long y_16,TARGB32* result){long x=(x_16>>16);long y=(y_16>>16);unsigned long u_16=((unsigned short)(x_16));unsigned long v_16=((unsigned short)(y_16));TARGB32 pixel[4];pixel[0]=Pixels_Bound(pic,x,y);pixel[1]=Pixels_Bound(pic,x+1,y);pixel[2]=Pixels_Bound(pic,x,y+1);pixel[3]=Pixels_Bound(pic,x+1,y+1);Bilinear_Fast_MMX(&pixel[0],&pixel[2],u_16>>8,v_16>>8,result);}void PicZoom_Bilinear_MMX(const TPicRegion& Dst,const TPicRegion& Src) {if ( (0==Dst.width)||(0==Dst.height)||(0==Src.width)||(0==Src.height)) return;long xrIntFloat_16=((Src.width)<<16)/Dst.width+1;long yrIntFloat_16=((Src.height)<<16)/Dst.height+1;const long csDErrorX=-(1<<15)+(xrIntFloat_16>>1);const long csDErrorY=-(1<<15)+(yrIntFloat_16>>1);unsigned long dst_width=Dst.width;//计算出需要特殊处理的边界long border_y0=-csDErrorY/yrIntFloat_16+1;//y0+y*yr>=0; y0=csDErrorY => y>=-csDErrorY/yrif (border_y0>=Dst.height) border_y0=Dst.height;long border_x0=-csDErrorX/xrIntFloat_16+1;if (border_x0>=Dst.width ) border_x0=Dst.width;long border_y1=(((Src.height-2)<<16)-csDErrorY)/yrIntFloat_16+1;//y0+y*yr<=(height-2) => y<=(height-2-csDErrorY)/yrif (border_y1<border_y0) border_y1=border_y0;long border_x1=(((Src.width-2)<<16)-csDErrorX)/xrIntFloat_16+1;if (border_x1<border_x0) border_x1=border_x0;TARGB32* pDstLine=Dst.pdata;long Src_byte_width=Src.byte_width;long srcy_16=csDErrorY;long y;for (y=0;y<border_y0;++y){long srcx_16=csDErrorX;for (unsigned long x=0;x<dst_width;++x){Bilinear_Border_MMX(Src,srcx_16,srcy_16,&pDstLine[x]); //border srcx_16+=xrIntFloat_16;}srcy_16+=yrIntFloat_16;((TUInt8*&)pDstLine)+=Dst.byte_width;}for (y=border_y0;y<border_y1;++y){long srcx_16=csDErrorX;long x;for (x=0;x<border_x0;++x){Bilinear_Border_MMX(Src,srcx_16,srcy_16,&pDstLine[x]);//bordersrcx_16+=xrIntFloat_16;}{unsigned long v_8=(srcy_16 & 0xFFFF)>>8;TARGB32* PSrcLineColor= (TARGB32*)((TUInt8*)(Src.pdata)+Src_byte_width*(srcy_16>>16)) ;for (unsigned long x=border_x0;x<border_x1;++x){TARGB32* PColor0=&PSrcLineColor[srcx_16>>16];TARGB32* PColor1=(TARGB32*)((TUInt8*)(PColor0)+Src_byte_width);Bilinear_Fast_MMX(PColor0,PColor1,(srcx_16 & 0xFFFF)>>8,v_8,&pDstLine[x]);srcx_16+=xrIntFloat_16;}}for (x=border_x1;x<dst_width;++x){Bilinear_Border_MMX(Src,srcx_16,srcy_16,&pDstLine[x]);//bordersrcx_16+=xrIntFloat_16;}srcy_16+=yrIntFloat_16;((TUInt8*&)pDstLine)+=Dst.byte_width;}for (y=border_y1;y<Dst.height;++y){long srcx_16=csDErrorX;for (unsigned long x=0;x<dst_width;++x){Bilinear_Border_MMX(Src,srcx_16,srcy_16,&pDstLine[x]); //bordersrcx_16+=xrIntFloat_16;}srcy_16+=yrIntFloat_16;((TUInt8*&)pDstLine)+=Dst.byte_width;}asm emms}//////////////////////////////////////////////////////////////////////////////// //速度测试://============================================================================== // PicZoom_BilInear_MMX 132.9 fps//////////////////////////////////////////////////////////////////////////////// H': 对BilInear_MMX简单改进:PicZoom_Bilinear_MMX_Exvoid PicZoom_Bilinear_MMX_Ex(const TPicRegion& Dst,const TPicRegion& Src){if ( (0==Dst.width)||(0==Dst.height)||(0==Src.width)||(0==Src.height)) return;long xrIntFloat_16=((Src.width)<<16)/Dst.width+1;long yrIntFloat_16=((Src.height)<<16)/Dst.height+1;const long csDErrorX=-(1<<15)+(xrIntFloat_16>>1);const long csDErrorY=-(1<<15)+(yrIntFloat_16>>1);unsigned long dst_width=Dst.width;//计算出需要特殊处理的边界long border_y0=-csDErrorY/yrIntFloat_16+1;//y0+y*yr>=0; y0=csDErrorY => y>=-csDErrorY/yrif (border_y0>=Dst.height) border_y0=Dst.height;long border_x0=-csDErrorX/xrIntFloat_16+1;if (border_x0>=Dst.width ) border_x0=Dst.width;long border_y1=(((Src.height-2)<<16)-csDErrorY)/yrIntFloat_16+1;//y0+y*yr<=(height-2) => y<=(height-2-csDErrorY)/yrif (border_y1<border_y0) border_y1=border_y0;long border_x1=(((Src.width-2)<<16)-csDErrorX)/xrIntFloat_16+1;if (border_x1<border_x0) border_x1=border_x0;TARGB32* pDstLine=Dst.pdata;long Src_byte_width=Src.byte_width;long srcy_16=csDErrorY;long y;for (y=0;y<border_y0;++y){long srcx_16=csDErrorX;for (unsigned long x=0;x<dst_width;++x){Bilinear_Border_MMX(Src,srcx_16,srcy_16,&pDstLine[x]); //bordersrcx_16+=xrIntFloat_16;}srcy_16+=yrIntFloat_16;((TUInt8*&)pDstLine)+=Dst.byte_width;}for (y=border_y0;y<border_y1;++y){long srcx_16=csDErrorX;long x;for (x=0;x<border_x0;++x){Bilinear_Border_MMX(Src,srcx_16,srcy_16,&pDstLine[x]);//bordersrcx_16+=xrIntFloat_16;}{long dst_width_fast=border_x1-border_x0;if (dst_width_fast>0){unsigned long v_8=(srcy_16 & 0xFFFF)>>8;TARGB32* PSrcLineColor= (TARGB32*)((TUInt8*)(Src.pdata)+Src_byte_width*(srcy_16>>16)) ;TARGB32* PSrcLineColorNext= (TARGB32*)((TUInt8*)(PSrcLineColor)+ Src_byte_width) ;TARGB32* pDstLine_Fast=&pDstLine[border_x0];asm{movd mm6,v_8pxor mm7,mm7 //mm7=0PUNPCKLWD MM6,MM6PUNPCKLDQ MM6,MM6//mm6=v_8mov esi,PSrcLineColormov ecx,PSrcLineColorNextmov edx,srcx_16mov ebx,dst_width_fastmov edi,pDstLine_Fastlea edi,[edi+ebx*4]push ebpmov ebp,xrIntFloat_16neg ebxloop_start:mov eax,edxshl eax,16shr eax,24//== movzx eax,dh //eax=u_8MOVD MM5,eaxmov eax,edxshr eax,16 //srcx_16>>16MOVD MM2,dword ptr [ecx+eax*4]MOVD MM0,dword ptr [ecx+eax*4+4]PUNPCKLWD MM5,MM5MOVD MM3,dword ptr [esi+eax*4]MOVD MM1,dword ptr [esi+eax*4+4]PUNPCKLDQ MM5,MM5 //mm5=u_8PUNPCKLBW MM0,MM7PUNPCKLBW MM1,MM7PUNPCKLBW MM2,MM7PUNPCKLBW MM3,MM7PSUBw MM0,MM2PSUBw MM1,MM3PSLLw MM2,8PSLLw MM3,8PMULlw MM0,MM5PMULlw MM1,MM5PADDw MM0,MM2PADDw MM1,MM3PSRLw MM0,8PSRLw MM1,8PSUBw MM0,MM1PSLLw MM1,8PMULlw MM0,MM6PADDw MM0,MM1PSRLw MM0,8PACKUSwb MM0,MM7MOVd dword ptr [edi+ebx*4],MM0 //write DstColor add edx,ebp //srcx_16+=xrIntFloat_16inc ebxjnz loop_startpop ebpmov srcx_16,edx}}}for (x=border_x1;x<dst_width;++x){Bilinear_Border_MMX(Src,srcx_16,srcy_16,&pDstLine[x]);//bordersrcx_16+=xrIntFloat_16;}srcy_16+=yrIntFloat_16;((TUInt8*&)pDstLine)+=Dst.byte_width;}for (y=border_y1;y<Dst.height;++y){long srcx_16=csDErrorX;for (unsigned long x=0;x<dst_width;++x){Bilinear_Border_MMX(Src,srcx_16,srcy_16,&pDstLine[x]); //bordersrcx_16+=xrIntFloat_16;}srcy_16+=yrIntFloat_16;((TUInt8*&)pDstLine)+=Dst.byte_width;}asm emms}//////////////////////////////////////////////////////////////////////////////// //速度测试://============================================================================== // PicZoom_Bilinear_MMX_Ex 157.0 fps//////////////////////////////////////////////////////////////////////////////// I: 把测试成绩放在一起://////////////////////////////////////////////////////////////////////////////// //CPU: AMD64x2 4200+(2.37G) zoom 800*600 to 1024*768//============================================================================== // StretchBlt 232.7 fps// PicZoom3_SSE 711.7 fps//// PicZoom_BilInear0 8.3 fps// PicZoom_BilInear1 17.7 fps// PicZoom_BilInear2 43.4 fps// PicZoom_BilInear_Common 65.3 fps// PicZoom_BilInear_MMX 132.9 fps// PicZoom_BilInear_MMX_Ex 157.0 fps////////////////////////////////////////////////////////////////////////////////补充Intel Core2 4400上的测试成绩://////////////////////////////////////////////////////////////////////////////// //CPU: Intel Core2 4400(2.00G) zoom 800*600 to 1024*768//============================================================================== // PicZoom3_SSE 1099.7 fps//// PicZoom_BilInear1 24.2 fps// PicZoom_BilInear2 54.3 fps// PicZoom_BilInear_Common 59.8 fps// PicZoom_BilInear_MMX 118.4 fps// PicZoom_BilInear_MMX_Ex 142.9 fps//////////////////////////////////////////////////////////////////////////////// 三次卷积插值J: 三次卷积插值原理二次线性插值缩放出的图片很多时候让人感觉变得模糊(术语叫低通滤波),特别是在放大的时候;使用三次卷积插值来改善插值结果;三次卷积插值考虑映射点周围16个点(4x4)的颜色来计算最终的混合颜色,如图;P(0,0)所在像素为映射的点,加上它周围的15个点,按一定系数混合得到最终输出结果;混合公式参见PicZoom_ThreeOrder0的实现;插值曲线公式sin(x*PI)/(x*PI),如图:三次卷积插值曲线sin(x*PI)/(x*PI) (其中PI=3.1415926...)K: 三次卷积插值缩放算法的一个参考实现:PicZoom_ThreeOrder0 该函数并没有做过多的优化,只是一个简单的浮点实现版本;inline double SinXDivX(double x){//该函数计算插值曲线sin(x*PI)/(x*PI)的值 //PI=3.1415926535897932385;//下面是它的近似拟合表达式const float a = -1;//a还可以取 a=-2,-1,-0.75,-0.5等等,起到调节锐化或模糊程度的作用if (x<0) x=-x; //x=abs(x);double x2=x*x;double x3=x2*x;if (x<=1)return (a+2)*x3 - (a+3)*x2 + 1;else if (x<=2)return a*x3 - (5*a)*x2 + (8*a)*x - (4*a);elsereturn 0;}inline TUInt8 border_color(long Color){if (Color<=0)return 0;else if (Color>=255)return 255;elsereturn Color;}void ThreeOrder0(const TPicRegion& pic,const float fx,const float fy,TARGB32* result){long x0=(long)fx; if (x0>fx) --x0; //x0=floor(fx);long y0=(long)fy; if (y0>fy) --y0; //y0=floor(fy);float fu=fx-x0;float fv=fy-y0;TARGB32 pixel[16];long i,j;for (i=0;i<4;++i){for (j=0;j<4;++j){long x=x0-1+j;long y=y0-1+i;pixel[i*4+j]=Pixels_Bound(pic,x,y);}}。
最临近插值法原理:这种算法就是根据原图像和目标图像的尺寸,计算缩放的比例,然后根据缩放比例计算目标像素所依据的原像素,过程中自然会产生小数,这时就采用四舍五入,取与这个点最相近的点。
图解如下:如果(i+u, j+v)落在A区,即u<0.5, v<0.5,则将左上角象素的灰度值赋给待求象素,同理,落在B区则赋予右上角的象素灰度值,落在C区则赋予左下角象素的灰度值,落在D区则赋予右下角象素的灰度值。
具体Matlab源代码实现:clear all;A=imread('12.png'); %读取图像信息imshow(A); %显示原图title('原图128*128');Row = size(A,1); Col = size(A,2); %图像行数和列数nn=8; %放大倍数m = round(nn*Row); %求出变换后的坐标的最大值n = round(nn*Col);B = zeros(m,n,3); %定义变换后的图像for i = 1 : mfor j = 1 : nx = round(i/nn); y = round(j/nn); %最小临近法对图像进行插值if x==0 x = 1; endif y==0 y = 1; endif x>Row x = Row; endif y>Col y = Col;endB(i,j,:) = A(x,y,:);endendB = uint8(B); %将矩阵转换成8位无符号整数figure;imshow(B); %显示输出图片title('最邻近插值法放大8倍1024*1024');运行程序后,原图如图1所示:图1用最邻近插值法放大8倍后的图如图2所示:图2双线性内插值法:计算过程简单了解,如图,已知Q12,Q22,Q11,Q21,但是要插值的点为P 点,这就要用双线性插值了,首先在x轴方向上,对R1和R2两个点进行插值,这个很简单,然后根据R1和R2对P点进行插值,这就是所谓的双线性插值。
常见图像插值算法只有3种么?电脑摄像头最高只有130万像素的,800万是通过软件修改的。
何为数码插值(软件插值)插值(Interpolation),有时也称为“重置样本”,是在不生成像素的情况下增加图像像素大小的一种方法,在周围像素色彩的基础上用数学公式计算丢失像素的色彩。
简单地说,插值是根据中心像素点的颜色参数模拟出周边像素值的方法,是数码相机特有的放大数码照片的软件手段。
一、认识插值的算法“插值”最初是电脑术语,后来引用到数码图像上来。
图像放大时,像素也相应地增加,但这些增加的像素从何而来?这时插值就派上用场了。
插值就是在不生成像素的情况下增加图像像素大小的一种方法,在周围像素色彩的基础上用数学公式计算丢失像素的色彩(也有些相机使用插值,人为地增加图像的分辨率)。
所以在放大图像时,图像看上去会比较平滑、干净。
但必须注意的是插值并不能增加图像信息。
以图1为原图(见图1),以下是经过不同插值算法处理的图片。
1.最近像素插值算法最近像素插值算法(Nearest Neighbour Interpolation)是最简单的一种插值算法,当图片放大时,缺少的像素通过直接使用与之最接近的原有像素的颜色生成,也就是说照搬旁边的像素,这样做的结果是产生了明显可见的锯齿(见图2)。
2.双线性插值算法双线性插值算法(Bilinear Interpolation)输出的图像的每个像素都是原图中四个像素(2×2)运算的结果,这种算法极大程度上消除了锯齿现象(见图3)。
3.双三次插值算法双三次插值算法(Bicubic Interpolation)是上一种算法的改进算法,它输出图像的每个像素都是原图16个像素(4×4)运算的结果(见图4)。
这种算法是一种很常见的算法,普遍用在图像编辑软件、打印机驱动和数码相机上。
4.分形算法分形算法(Fractal Interpolation)是Altamira Group提出的一种算法,这种算法得到的图像跟其他算法相比更清晰、更锐利(见图5)。
高质量的快速的图像缩放一一二次线性插值和三次卷 积插值限制条件:为了便于讨论,这里只处理 32bit 的ARGB 颜色;代码使用C++;涉及到汇编优化的时候假定为x86平台;使用的编译器为 VC2005;为了代码的可读性,没有加入异常处理代码;测试使用的 CPU 为 AMD64x2 4200+(2.37G) 和 In tel Core2 4400(2.00G);速度测试说明:只测试内存数据到内存数据的缩放测试图片都是800*600缩放到1024*768; fps 表示每秒钟的帧数,值越大表示函数越快 A:近邻取样插值、二次线性插值、三次卷积插值 缩放效果对比三次卷积插值缩放到 0.6倍 三次卷积插值缩放到 1.6倍近邻取样缩放到0.6倍 近邻取样缩放到1.6倍二次线性插值缩放到 0.6倍 二次线性插值缩放到 1.6倍原图近邻取样插值缩放简单、速度快,但很多时候缩放出的图片质量比较差 缩放有比较明显的锯齿;使用二次或更高次插值有利于改善缩放效果;B :首先定义图像数据结构#defi ne asm __asmtypedef un sig ned char TUIn t8; // [0..255] struct TARGB32 〃32 bit color{TUI nt8 b,g,r,a; //a is alpha};struct TPicRegion // 一块颜色数据区的描述,便于参数传递 {TARGB32* pdata; // 颜色数据首地址long byte_width; // 一行数据的物理宽度(字节宽度);〃abs(byte_width) 有可能大于等于 width*sizeof(TARGB32);long width; // 像素宽度long height; // 像素高度};//那么访问一个点的函数可以写为:inline TARGB32& Pixels(const TPicRegion& pic,const long x,const long y) {return ( (TARGB32*)( (TUI nt8*)pic.pdata+pic.byte_width*y) ) [x];原图 近邻取样缩放到8倍 二次线性插值缩放到 8倍 三次卷积插值缩放到 8倍二次线性插值(近似公式) (特别是对于人物、景色等),图片的二次线性差值C:二次线性插值缩放原理和公式图示原图片(宽 SW,高 SH) 缩放映射原理:聚焦看看(Sx,Sy)坐标点(Sx,Sy 为浮点数)附近的情况; L____;"TZ 信X,Sy)(ColorO)(Color?)(jColorl) OCclorS)对于近邻取样插值的缩放算法,直接取 ColorO 颜色作为缩放后点的颜色;二次线性插值需要考虑 (Sx,Sy)坐标点周围的4个颜色值Color0\Color1\Color2\Color3, 把(Sx,Sy)到A\B\C\D 坐标点的距离作为系数来把 4个颜色混合出缩放后点的颜色;(u=Sx-floor(Sx); v=Sy-floor(Sy); 说明:floor 函数的返回值为小于等于参数的最大整数)二次线性插值公式为: (0,0)eI(Sx-0)/(SW-0)=(Dx-0)/(DW-0) => Sx=Dx*SW/DW (Sy-0)/(SH-0)=(Dy-0)/(DH-0)Sy=Dy*SH/DH缩放后图片 (宽 DW,高 DH)tmpColorO=ColorO*(1-u) + Color2*u; tmpColor 1= Color1*(1-u) + Color3*u; DstColor=tmpColorO*(1-v) + tmpColor2*v;展开公式为:pm0=(1-u)*(1-v);pm1=v*(1-u);pm2=u*(1-v);pm3=u*v;则颜色混合公式为:DstColor = ColorO*pmO + Color1*pm1 + Color2*pm2 + Color3*pm3;参数函数图示:二次线性插值函数图示对于上面的公式,它将图片向右下各移动了半个像素,需要对此做一个修正;=> Sx=(Dx+0.5)*SW/DW-0.5; Sy=(Dy+0.5)*SH/DH-0.5;(不处理边而实际的程序,还需要考虑到边界(访问源图片可能超界)对于算法的影响,边界的处理可能有各种方案界或边界回绕或边界饱和或边界映射或用背景颜色混合等;文章中默认使用边界饱和来处理超界);比如:边界饱和函数//访问一个点的函数,(x,y) 坐标可能超岀图片边界;//边界处理模式:边界饱和inline TARGB32 Pixels_Bound(const TPicRegion& pic,long x,long y){ _〃assert((pic.width>0)&&(pic.height>0));bool IsI nPic=true;if (x<0) {x=0; Is In Pic=false; }else if (x>=pic.width ) {x=pic.width -1; IsI nPic=false; }if (y<0) {y=0; Is In Pic=false; }else if (y>=pic.height) {y=pic.height-1; Is In Pic=false; }TARGB32 result=Pixels(pic,x,y); if (!lsl nPic) result.a=O; return result;}D:二次线性插值缩放算法的一个参考实现:PicZoom_BillnearO该函数并没有做什么优化,只是一个简单的浮点实现版本;inline void Bili nearO(c onst TPicRegio n& pic,float fx,float fy,TARGB32* result){long x=(l on g)fx; if (x>fx) --x; 〃x=floor(fx);long y=(l on g)fy; if (y>fy) --y; //y=floor(fy);TARGB32 ColorO=Pixels_Bou nd(pic,x,y);TARGB32 Color2=Pixels_Bou nd(pic,x+1,y);TARGB32 Color1=Pixels_Bou nd(pic,x,y+1);TARGB32 Color3=Pixels_Bou nd(pic,x+1,y+1);float u=fx-x;float v=fy-y;float pm3=u*v;float pm2=u*(1-v);float pm1=v*(1-u);float pm0=(1-u)*(1-v);result->a=(pmO*ColorO.a+pm1*Color1.a+pm2*Color2.a+pm3*Color3.a);result->r=(pmO*ColorO. r+pm1*Color1.叶pm2*Color2 .r+ pm3*Color3.r);result->g=(pmO*ColorO.g+pm1*Color1.g+pm2*Color2.g+pm3*Color3.g);result->b=(pmO*ColorO.b+pm1*Color1.b+pm2*Color2.b+pm3*Color3.b);}void PicZoom_Bili nearO(c onst TPicRegio n& Dst,co nst TPicRegi on& Src){if ( (O==Dst.width)||(O==Dst.height)||(O==Src.width)||(O==Src.height)) return;un sig ned long dst_width=Dst.width;TARGB32* pDstLi ne=Dst.pdata;for (u nsig ned long y=0;y<Dst.height;++y){float srcy=(y+0.4999999)*Src.height/Dst.height-0.5;for (u nsig ned long x=0;x<dst_width;++x){ _float srcx=(x+0.4999999)*Src.width/Dst.width-0.5;Bili nearO(Src,srcx,srcy,&pDstLi ne[x]);}((TUI nt8*&)pDstLi ne)+=Dst.byte_width;} _}//////////////////////////////////////////////////////////////////////////////////速度测试:}〃=====================================:// PicZoom_Bill nearO 8.3 fps////////////////////////////////////////////////////////////////////////////////E:浮点计算改为定点数实现: PicZoom_BilInear1in li ne void Bili near1(c onst TPicRegio n& pic,c onst long x_16, co nst long y_16,TARGB32* result){ _long x=x_16>>16;long y=y_16>>16;TARGB32 Color0=Pixels_Bou nd(pic,x,y);TARGB32 Color2=Pixels_Bou nd(pic,x+1,y);TARGB32 Color1=Pixels_Bou nd(pic,x,y+1);TARGB32 Color3=Pixels_Bou nd(pic,x+1,y+1);un sig ned long u_8=(x_16 & 0xFFFF)>>8;un sig ned long v_8=(y_16 & 0xFFFF)>>8;(u_8*(u nsig ned lon g)(255-v_8)); (v_8*(u nsig ned lon g)(255-u_8)); ((255-u_8)*(255-v_8)); result->a= ((pm0_16*Color0.a+pm1_16*Color1.a+pm2_16*Color2.a+pm3_16*Color3.a)>>16); result->r= ((pm0_16*Color0. r+pm1_16*Color1.r+pm2_16*Color2.叶pm3_16*Color3.r)>>16); result->g=((pm0_16*Color0.g+pm1_16*Color1.g+pm2_16*Color2.g+pm3_16*Color3.g)>>16); result->b=((pm0_16*Color0.b+pm1_16*Color1.b+pm2_16*Color2.b+pm3_16*Color3.b)>>16);} - - - -void PicZoom_Bili near1(c onst TPicRegio n& Dst,co nst TPicRegi on& Src){ _if ( (0==Dst.width)||(0==Dst.height)||(0==Src.width)||(0==Src.height)) return;long xrln tFloat_16=((Src.width)<<16)/Dst.width+1;long yrln tFloat_16=((Src.height)<<16)/Dst.height+1;const long csDErrorX=-(1<<15)+(xrl ntFloat_16>>1);const long csDErrorY=-(1<<15)+(yrl ntFloat_16>>1);un sig ned long dst_width=Dst.width;TARGB32* pDstLi ne=Dst.pdata;long srcy_16=csDErrorY;long y;for (y=0;y<Dst.height;++y){long srcx_16=csDErrorX;for (u nsig ned long x=0;x<dst_width;++x){ _Bili near1(Src,srcx_16,srcy_16,&pDstLi ne[ x]); //border srcx_16+=xr In tFloat_16;un sig ned long pm3_16 (u_8*v_8);un sig ned longpm2_16 un sig nedlong pm1_16 un signed long pm0_16srcy_16+=yrl ntFloat_16;((TUI nt8*&)pDstLi ne)+=Dst.byte_width;} _}//////////////////////////////////////////////////////////////////////////////////速度测试://==============================================================================// PicZoom_Bill near1 17.7 fps////////////////////////////////////////////////////////////////////////////////F:边界访问超界的问题二次线性插值需要考略边界访问超界的问题,我们可以将边界区域和内部区域分开处理,这样就可以优化内部的插值实现函数了:比如不需要判断访问超界、减少颜色数据复制、减少一些不必要的重复坐标计算等等inline void Bili near2_Fast(TARGB32* PColorO,TARGB32* PColor1,un sig ned long u_8,u nsig ned long v_8,TARGB32* result){un sig ned long pm3_16=u_8*v_8;un sig ned long pm2_16=(u_8<<8)-pm3_16;un sig ned long pm1_16=(v_8<<8)-pm3_16;un sig ned long pm0_16=(1<<16)-pm1_16-pm2_16-pm3_16;result->a=((pm0_16*PColor0[0].a+pm2_16*PColor0[1].a+ pm1_16*PColor1[0].a+pm3_16*PColor1[1].a)>>16);result->r=((pm0_16*PColor0[0].r+pm2_16*PColor0[1].r+ pm1_16*PColor1[0].r+pm3_16*PColor1[1].r)>>16);result->g=((pm0_16*PColor0[0].g+pm2_16*PColor0[1].g+ pm1_16*PColor1[0].g+pm3_16*PColor1[1].g)>>16);result->b=((pm0_16*PColor0[0].b+pm2_16*PColor0[1].b+ pm1_16*PColor1[0].b+pm3_16*PColor1[1].b)>>16);} - -in li ne void Bili near2_Border(c onst TPicRegi on& pic,c onst long x_16, co nst long y_16,TARGB32* result){ _long x=(x_16>>16);lo ng y=(y_16>>16);un sig ned long u_16=((u nsig ned short)(x_16));un sig ned long v_16=((u nsig ned short)(y_16));TARGB32 pixel[4];pixel[0]=Pixels_Bou nd(pic,x,y);pixel[1]=Pixels_Bou nd(pic,x+1,y);pixel[2]=Pixels_Bou nd(pic,x,y+1);pixel[3]=Pixels_Bou nd(pic,x+1,y+1);Bili near2_Fast(&pixel[0],&pixel[2],u_16»8,v_16»8,result);} - - -void PicZoom_Bili near2(c onst TPicRegio n& Dst,co nst TPicRegi on& Src){ _if ( (O==Dst.width)||(O==Dst.height)||(O==Src.width)||(O==Src.height)) return;long xrln tFloat_16=((Src.width)«16)/Dst.width+1;long yrln tFloat_16=((Src.height)<<16)/Dst.height+1;const long csDErrorX=-(1<<15)+(xrl ntFloat_16>>1);const long csDErrorY=-(1<<15)+(yrl ntFloat_16>>1);un sig ned long dst_width=Dst.width;// 计算岀需要特殊处理的边界long border_yO=-csDErrorY/yrl ntFloat_16+1;〃y0+y*yr>=0; yO=csDErrorY => y>=-csDErrorY/yrif (border_yO>=Dst.height) border_yO=Dst.height;long border_xO=-csDErrorX/xrl ntFloat_16+1;if (border_xO>=Dst.width ) border_x0=Dst.width;long border_ y仁(((Src.height-2)«16)-csDErrorY)/yrl ntFloat_16+1;〃y0+y*yr<=(height-2) => y<=(height-2-csDErrorY)/yrif (border_y1<border_y0) border_y1=border_y0;long border_x 仁(((Src.width-2)«16)-csDErrorX)/xr In tFloat_16+1;if (border_x1<border_x0) border_x1=border_x0;TARGB32* pDstLi ne=Dst.pdata;long Src_byte_width=Src.byte_width;long srcy_16=csDErrorY;long y;for (y=0;y<border_y0;++y){ _long srcx_16=csDErrorX;for (u nsig ned long x=0;x<dst_width;++x){ _Bili near2_Border(Src,srcx_16,srcy_16,&pDstL in e[x]); //border srcx_16+=xr In tFloat_16;}- -srcy_16+=yrl ntFloat_16;((TUl nt8*&)pDstLi ne)+=Dst.byte_width;} _for (y=border_y0;y<border_y1;++y){long srcx_16=csDErrorX;long x;for (x=0;x<border_x0;++x){ _Bili near2_Border(Src,srcx_16,srcy_16,&pDstL in e[x]);//border srcx_16+=xr In tFloat_16;}- -{un sig ned long v_8=(srcy_16 & 0xFFFF)>>8;TARGB32* PSrcLi neColor= (TARGB32*)( (T Ul nt8*)(Src.pdata)+Src_byte_width*(srcy_16>>16));for (u nsig ned long x=border_x0;x<border_x1;++x){ - -TARGB32* PColor0=&PSrcLi neColor[srcx_16>>16];TARGB32* PColor1=(TARGB32*)( (T Ul nt8*)(PColorO)+Src_byte_width);Bili near2_Fast(PColorO,PColor1,(srcx_16 & 0xFFFF)»8,v_8,& pDstLi ne[ x]);srcx_16+=xrl ntFloat_16;}- -for (x=border_x1;x<dst_width;++x){ - -}Bili near2_Border(Src,srcx_16,srcy_16,&pDstL in e[x]);//border srcx_16+=xr In tFloat_16;}- -srcy_16+=yrI ntFloat_16;((TUI nt8*&)pDstLi ne)+=Dst.byte_width;} _for (y=border_y1;y<Dst.height;++y){long srcx_16=csDErrorX;for (u nsig ned long x=0;x<dst_width;++x){ _Bili near2_Border(Src,srcx_16,srcy_16,&pDstL in e[x]); //border srcx_16+=xr In tFloat_16;}srcy_16+=yrI ntFloat_16;((TUI nt8*&)pDstLi ne)+=Dst.byte_width;} _}//////////////////////////////////////////////////////////////////////////////////速度测试://==============================================================================// PicZoom_Bill near2 43.4 fps////////////////////////////////////////////////////////////////////////////////F'补充:二次线性插值(近似公式)如果不想处理边界访问超界问题,可以考虑扩大源图片的尺寸,加一个边框(哨兵”优化);这样插值算法就不用考虑边界问题了,程序写起来也简单很多!如果对缩放结果的边界像素级精度要求不是太高,我还有一个方案,一个稍微改变的缩放公式:Sx=Dx*(SW-1)/DW ;Sy=Dy*(SH-1)/DH ;(源图片宽和高:SW>=2;SH>=2)证明这个公式不会造成内存访问超界:要求Dx=DW-1 时:sx+1=int( (dw-1)/dw*(dw-1) ) +1 <= (sw-1)有:int( (sw-1)*(dw-1)/dw ) <=sw-2(sw-1)*(dw-1)/dw <(sw-1)(dw-1) /dw<1(dw-1) <dw比如,按这个公式的一个简单实现:(缩放效果见前面的"二次线性插值(近似公式)"图示)void PicZoom_ftBili near_Com mon(const TPicRegio n& Dst,c onst TPicRegio n& Src){ - -if ( (O==Dst.width)||(O==Dst.height)||(2>Src.width)||(2>Src.height)) return;long xrln tFloat_16=((Src.width-1)<<16)/Dst.width;long yrln tFloat_16=((Src.height-1)<<16)/Dst.height;un sig ned long dst_width=Dst.width;long Src_byte_width=Src.byte_width;TARGB32* pDstLi ne=Dst.pdata;long srcy_16=0;for (u nsig ned long y=O;y<Dst.height;++y){un sig ned long v_8=(srcy_16 & 0xFFFF)>>8;TARGB32* PSrcLi neColor= (TARGB32*)( (T UI nt8*)(Src.pdata)+Src_byte_width*(srcy_16>>16));long srcx_16=0;for (u nsig ned long x=0;x<dst_width;++x){ _TARGB32* PColor0=&PSrcLi neColor[srcx_16>>16];Bili near_Fast_Commo n(PColorO,(TARGB32*)((TUI nt8*)(PColorO)+Src_byte_width),(srcx_16 & 0xFFFF)»8,v_8,&pDstLi ne[x]);srcx_16+=xr In tFloat_16;}srcy_16+=yrI ntFloat_16;((TUI nt8*&)pDstLi ne)+=Dst.byte_width;}}G:模拟单指令多数据处理利用单指令多数据处理的MMX指令一般都可以加快颜色的运算;在使用MMX改写之前,利用32bit寄存器(或变量)来模拟单指令多数据处理;数据储存原理:一个颜色数据分量只有一个字节,用2个字节来储存单个颜色分量的计算结果,对于很多颜色计算来说精度就够了;那么一个32bit寄存器(或变量)就可以储存2个计算出的临时颜色分量;从而达到了单个指令两路数据处理的目的;单个指令两路数据处理的计算:乘法:((0x00AA*a)<<16) | (0x00BB*a) = 0x00AA00BB * a可见只要保证0x00AA*a和0x00BB*a都小于(1<<16)那么乘法可以直接使用无符号数乘法了加法:((0x00AA+0x00CC)<<16) | (0x00BB+0x00DD) = 0x00AA00BB + 0x00CC00DD可见只要0x00AA+0x00CC 和0x00BB+0x00DD 小于(1<<16)那么加法可以直接使用无符号数加法了(移位、减法等稍微复杂一点,因为这里没有用到就不推导运算公式了)inline void Bili near_Fast_Com mon (TARGB32* PColor0,TARGB32* PColor1,un sig ned long u_8,u nsig ned long v_8,TARGB32* result){ - -un sig ned long pm3_8=(u_8*v_8)>>8;un sig ned long pm2_8=u_8-pm3_8;un sig ned long pm1_8=v_8-pm3_8;un sig ned long pm0_8=256-pm1_8-pm2_8-pm3_8;un sig ned long Color=*(u nsig ned lon g*)(PColor0);un sig ned long BR=(Color & 0x00FF00FF)*pm0_8;un sig ned long GA=((Color & 0xFF00FF00)»8)*pm0_8;Color=((u nsig ned lon g*)(PColorO))[1];GA+=((Color & 0xFF00FF00)»8)*pm2_8;BR+=(Color & 0x00FF00FF)*pm2_8;Color=*(u nsig ned lon g*)(PColor1);GA+=((Color & 0xFF00FF00)»8)*pm1_8;BR+=(Color & 0x00FF00FF)*pm1_8;Color=((u nsig ned lon g*)(PColor1))[1];GA+=((Color & 0xFF00FF00)»8)*pm3_8;BR+=(Color & 0x00FF00FF)*pm3_8;*(u nsig ned lon g*)(result)=(GA & 0xFF00FF00)|((BR & 0xFF00FF00)>>8);}in li ne void Bili near_Border_Com mon(const TPicRegio n& pic,co nst long x_16,co nst long y_16,TARGB32* result){long x=(x_16>>16);lo ng y=(y_16>>16);un sig ned long u_16=((u nsig ned short)(x_16));un sig ned long v_16=((u nsig ned short)(y_16));TARGB32 pixel[4];pixel[0]=Pixels_Bou nd(pic,x,y);pixel[1]=Pixels_Bou nd(pic,x+1,y);pixel[2]=Pixels_Bou nd(pic,x,y+1);pixel[3]=Pixels_Bou nd(pic,x+1,y+1);Bili near_Fast_Commo n(&pixel[0],&pixel[2],u_16»8,v_16»8,result);} -- - -void PicZoom_Bili near_Com mon(const TPicRegio n& Dst,c onst TPicRegi on& Src) { if ( (O==Dst.width)||(O==Dst.height)||(O==Src.width)||(O==Src.height)) return;long xrln tFloat_16=((Src.width)«16)/Dst.width+1;long yrln tFloat_16=((Src.height)<<16)/Dst.height+1;const long csDErrorX=-(1<<15)+(xrl ntFloat_16>>1);const long csDErrorY=-(1<<15)+(yrl ntFloat_16>>1);un sig ned long dst_width=Dst.width;// 计算岀需要特殊处理的边界long border_yO=-csDErrorY/yrl ntFloat_16+1;//y0+y*yr>=0; yO=csDErrorY => y>=-csDErrorY/yrif (border_y0>=Dst.height) border_y0=Dst.height;long border_xO=-csDErrorX/xrl ntFloat_16+1;if (border_x0>=Dst.width ) border_x0=Dst.width;lo ng border_ y仁(((Src.height-2)«16)-csDErrorY)/yrl ntFloat_16+1;//y0+y*yr<=(height-2) => y<=(height-2-csDErrorY)/yrif (border_y1<border_y0) border_y1=border_y0;long border_x 仁(((Src.width-2)«16)-csDErrorX)/xr In tFloat_16+1;if (border_x1<border_x0) border_x1=border_x0;TARGB32* pDstLi ne=Dst.pdata;long Src_byte_width=Src.byte_width;long srcy_16=csDErrorY;long y;for (y=0;y<border_y0;++y){ _long srcx_16=csDErrorX;for (u nsig ned long x=O;x<dst_width;++x){ _Bili near_Border_Commo n(Src,srcx_16,srcy_16,&pDstL ine[ x]); //border srcx_16+=xr In tFloat_16;}- -srcy_16+=yrI ntFloat_16;((TUI nt8*&)pDstLi ne)+=Dst.byte_width;} _for (y=border_y0;y<border_y1;++y){long srcx_16=csDErrorX;long x;for (x=0;x<border_x0;++x){ _Bili near_Border_Commo n(Src,srcx_16,srcy_16,&pDstL ine[ x]);//border srcx_16+=xr In tFloat_16;}- -{un sig ned long v_8=(srcy_16 & 0xFFFF)>>8;TARGB32* PSrcLi neColor= (TARGB32*)( (T UI nt8*)(Src.pdata)+ Src_byte_width*(srcy_16>>16));for (u nsig ned long x=border_x0;x<border_x1;++x){ - -TARGB32* PColor0=&PSrcLi neColor[srcx_16>>16];TARGB32* PColor1=(TARGB32*)( (T UI nt8*)(PColorO)+Src_byte_width);Bili near_Fast_Commo n(PColorO,PColor1,(srcx_16 & 0xFFFF)>>8, v_8,&pDstLi ne[x]);srcx_16+=xrI ntFloat_16;}- -}for (x=border_x1;x<dst_width;++x){ - -Bili near_Border_Commo n(Src,srcx_16,srcy_16,&pDstL ine[ x]);//border srcx_16+=xr In tFloat_16;}- -srcy_16+=yrI ntFloat_16;((TUI nt8*&)pDstLi ne)+=Dst.byte_width;} _for (y=border_y1;y<Dst.height;++y){long srcx_16=csDErrorX;for (u nsig ned long x=0;x<dst_width;++x){Bili near_Border_Commo n(Src,srcx_16,srcy_16,&pDstL ine[ x]); //border srcx_16+=xr In tFloat_16;}srcy_16+=yrI ntFloat_16;((TUI nt8*&)pDstLi ne)+=Dst.byte_width;}}//////////////////////////////////////////////////////////////////////////////////速度测试://==============================================================================// PicZoom_Bill near_Com mon 65.3 fps////////////////////////////////////////////////////////////////////////////////H:使用MMX 指令改写:PicZoom Bilinear MMXinline void Bili near_Fast_MMX(TARGB32* PColorO,TARGB32* PColor1, un sig ned long u_8,u nsig ned long v_8,TARGB32* result){asm{MOVD MM6,v_8MOVD MM5,u_8mov edx,PColor0mov eax,PColor1PXOR mm7,mm7MOVD MM2,dword ptr [eax]MOVD MM0,dword ptr[eax+PUNPCKLWD MM5,MM5PUNPCKLWD MM6,MM6MOVD MM3,dword ptr [edx]MOVD MM1,dword ptr[edx+PUNPCKLDQ MM5,MM5PUNPCKLBW MM0,MM7PUNPCKLBW MM1,MM7PUNPCKLBW MM2,MM7PUNPCKLBW MM3,MM7PSUBw MM0,MM2PSUBw MM1,MM3PSLLw MM2,8PSLLw MM3,8PMULlw MM0,MM5PMULlw MM1,MM5PUNPCKLDQ MM6,MM6PADDw MM0,MM2PADDw MM1,MM3PSRLw MM0,8PSRLw MM1,8PSUBw MM0,MM1PSLLw MM1,8PMULlw MM0,MM6mov eax,resultPADDw MM0,MM1PSRLw MM0,8PACKUSwb MM0,MM7movd [eax],MM0//emmsvoid Bili near_Border_MMX(co nst TPicRegi on& pic,co nst long x_16, co nst long y_16,TARGB32* result)long x=(x_16>>16);io ng y=(y_i6»i6);un sig ned long u_16=((u nsig ned short)(x_16));un sig ned long v_16=((u nsig ned short)(y_16));TARGB32 pixel[4];pixel[O]=Pixels_Bou nd(pic,x,y);pixel[1]=Pixels_Bou nd(pic,x+1,y);pixel[2]=Pixels_Bou nd(pic,x,y+1);pixel[3]=Pixels_Bou nd(pic,x+1,y+1);Bili near_Fast_MMX(&pixel[0],&pixel[2],u_16>>8,v_16»8,result);} -- - -void PicZoom_Bili near_MMX(co nst TPicRegio n& Dst,co nst TPicRegio n& Src) { if ( (O==Dst.width)||(O==Dst.height)||(O==Src.width)||(O==Src.height)) return;long xrln tFloat_16=((Src.width)«16)/Dst.width+1;long yrln tFloat_16=((Src.height)<<16)/Dst.height+1;const long csDErrorX=-(1<<15)+(xrl ntFloat_16>>1);const long csDErrorY=-(1<<15)+(yrl ntFloat_16>>1);un sig ned long dst_width=Dst.width;// 计算岀需要特殊处理的边界long border_yO=-csDErrorY/yrl ntFloat_16+1;//y0+y*yr>=0; yO=csDErrorY => y>=-csDErrorY/yrif (border_y0>=Dst.height) border_y0=Dst.height;long border_xO=-csDErrorX/xrl ntFloat_16+1;if (border_x0>=Dst.width ) border_x0=Dst.width;lo ng border_ y仁(((Src.height-2)«16)-csDErrorY)/yrl ntFloat_16+1;〃y0+y*yr<=(height-2) => y<=(height-2-csDErrorY)/yrif (border_y1<border_y0) border_y1=border_y0;long border_x 仁(((Src.width-2)«16)-csDErrorX)/xr In tFloat_16+1;if (border_x1<border_x0) border_x1=border_x0;TARGB32* pDstLi ne=Dst.pdata;long Src_byte_width=Src.byte_width;long srcy_16=csDErrorY;long y;for (y=0;y<border_y0;++y){ _long srcx_16=csDErrorX;for (u nsig ned long x=0;x<dst_width;++x){ _Bili near_Border_MMX(Src,srcx_16,srcy_16,&pDstL in e[x]); //border srcx_16+=xr In tFloat_16;}- -srcy_16+=yrl ntFloat_16;((TUl nt8*&)pDstLi ne)+=Dst.byte_width;} _for (y=border_y0;y<border_y1;++y){long srcx_16=csDErrorX;long x;for (x=0;x<border_x0;++x){Bili near_Border_MMX(Src,srcx_16,srcy_16,&pDstL in e[x]);//border srcx_16+=xr In tFloat_16;}{un sig ned long v_8=(srcy_16 & 0xFFFF)>>8;TARGB32* PSrcLi neColor= (TARGB32*)( (T UI nt8*)(Src.pdata)+ Src_byte_width*(srcy_16>>16));for (u nsig ned long x=border_x0;x<border_x1;++x){ - -TARGB32* PColor0=&PSrcLi neColor[srcx_16>>16];TARGB32* PColor1=(TARGB32*) ((TUI nt8*)(PColorO)+Src_byte_width);Bili near_Fast_MMX(PColorO,PColor1,(srcx_16 & 0xFFFF)>>8,v_8,&pDstLi ne[x]);srcx_16+=xrI ntFloat_16;}}for (x=border_x1;x<dst_width;++x){ - -Bili near_Border_MMX(Src,srcx_16,srcy_16,&pDstL in e[x]);//border srcx_16+=xr In tFloat_16;}- -srcy_16+=yrI ntFloat_16;((TUI nt8*&)pDstLi ne)+=Dst.byte_width;} _for (y=border_y1;y<Dst.height;++y){long srcx_16=csDErrorX;for (u nsig ned long x=0;x<dst_width;++x){ _Bili near_Border_MMX(Src,srcx_16,srcy_16,&pDstL in e[x]); //border srcx_16+=xr In tFloat_16;}- -srcy_16+=yrI ntFloat_16;((TUI nt8*&)pDstLi ne)+=Dst.byte_width;} _asm emms}//////////////////////////////////////////////////////////////////////////////////速度测试://============================================================================== // PicZoom_BilI near_MMX 132.9 fps////////////////////////////////////////////////////////////////////////////////H':对Billnear_MMX 简单改进:PicZoom_Bilinear_MMX_Exvoid PicZoom_Bili near_MMX_Ex(c on st TPicRegio n& Dst,co nst TPicRegio n& Src){ ---if ( (O==Dst.width)||(O==Dst.height) ||(O==Src.width)||(O==Src.height)) return;long xrln tFloat_16=((Src.width)«16)/Dst.width+1;long yrln tFloat_16=((Src.height)<<16)/Dst.height+1;const long csDErrorX=-(1<<15)+(xrl ntFloat_16>>1);const long csDErrorY=-(1<<15)+(yrl ntFloat_16>>1);un sig ned long dst_width=Dst.width;// 计算岀需要特殊处理的边界long border_yO=-csDErrorY/yrl ntFloat_16+1;〃y0+y*yr>=0; yO=csDErrorY => y>=-csDErrorY/yrif (border_yO>=Dst.height) border_yO=Dst.height;long border_xO=-csDErrorX/xrl ntFloat_16+1;if (border_xO>=Dst.width ) border_x0=Dst.width;long border_ y仁(((Src.height-2)«16)-csDErrorY)/yrl ntFloat_16+1; 〃y0+y*yr<=(height-2) => y<=(height-2-csDErrorY)/yr if (border_y1<border_y0) border_y1=border_y0;long border_x 仁(((Src.width-2)«16)-csDErrorX)/xr In tFloat_16+1;if (border_x1<border_x0) border_x1=border_x0;TARGB32* pDstLi ne=Dst.pdata;long Src_byte_width=Src.byte_width;long srcy_16=csDErrorY;long y;for (y=0;y<border_y0;++y){ _long srcx_16=csDErrorX;for (u nsig ned long x=0;x<dst_width;++x){ _Bili near_Border_MMX(Src,srcx_16,srcy_16,&pDstL in e[x]); //border srcx_16+=xr In tFloat_16;}- -srcy_16+=yrl ntFloat_16;((TUl nt8*&)pDstLi ne)+=Dst.byte_width;} _for (y=border_y0;y<border_y1;++y){ - -long srcx_16=csDErrorX;long x;for (x=0;x<border_x0;++x){ _Bili near_Border_MMX(Src,srcx_16,srcy_16,&pDstL in e[x]);//border srcx_16+=xr In tFloat_16;}- -{long dst_width_fast=border_x1-border_x0;if (dst_width_fast>0){un sig ned long v_8=(srcy_16 & 0xFFFF)>>8;TARGB32* PSrcLi neColor= (TARGB32*)((TUl nt8*)(Src.pdata)+ Src_byte_width*(srcy_16>>16));TARGB32* PSrcLi neColorNext= (TARGB32*)((TUl nt8*)(PSrcLi neColor)+ Src_byte_width);TARGB32* pDstLi ne_Fast=&pDstLi ne[border_xO]; asm{movd mm6,v_8pxor mm7,mm7 〃mm7=0PUNPCKLWD MM6,MM6PUNPCKLDQ MM6,MM6//mm6=v_8mov esi,PSrcLi neColormov ecx,PSrcLi neColorNextmov edx,srcx_16mov ebx,dst_width_fastmov edi,pDstL in e_Fastlea edi,[edi+ebx*4]push ebpmov ebp,xrI ntFloat_16neg ebxloop_sta rt:mov eax,edxshl eax,16shr eax,24//== movzx eax,dh 〃eax=u_8MOVD MM5,eaxmov eax,edxshr eax,16 〃srcx_16>>16MOVD MOVD MM2,dword ptr [ecx+eax*4] MM0,dword ptr [ecx+eax*4+4]PUNPCKLWD MM5,MM5MOVD MOVD MM3,dword ptr [esi+eax*4] MM1,dword ptr [esi+eax*4+4]PUNPCKLDQ MM5,MM5 //mm5=u_8 PUNPCKLBW MM0,MM7 PUNPCKLBW MM1,MM7 PUNPCKLBW MM2,MM7 PUNPCKLBW MM3,MM7PSUBw PSUBw PSLLw PSLLw PMULlw PMULlw PADDw PADDw MM0,MM2 MM1,MM3 MM2,8 MM3,8 MM0,MM5 MM1,MM5 MM0,MM2 MM1,MM3PSRLw PSRLwPSUBw PSLLw PMULlw PADDw MM0,8MM1,8 MM0,MM1 MM1,8 MM0,MM6MM0,MM1PSRLw MM0,8PACKUSwb MM0,MM7MOVd dword ptr [edi+ebx*4],MM0 //write DstColoradd edx,ebp 〃srcx_16+=xrl ntFloat_16inc ebxjnz loop_startpop ebpmov srcx_16,edx}}for (x=border_x1;x<dst_width;++x){ - -Bili near_Border_MMX(Src,srcx_16,srcy_16,&pDstL in e[x]);//border srcx_16+=xr In tFloat_16;}- -srcy_16+=yrI ntFloat_16;((TUI nt8*&)pDstLi ne)+=Dst.byte_width;} _for (y=border_y1;y<Dst.height;++y){ _long srcx_16=csDErrorX;for (u nsig ned long x=0;x<dst_width;++x){Bili near_Border_MMX(Src,srcx_16,srcy_16,&pDstL in e[x]); //border srcx_16+=xr In tFloat_16;}- -srcy_16+=yrI ntFloat_16;((TUI nt8*&)pDstLi ne)+=Dst.byte_width;} _asm emms}//////////////////////////////////////////////////////////////////////////////////速度测试://==============================================================================// PicZoom_Bili near_MMX_Ex 157.0 fps////////////////////////////////////////////////////////////////////////////////I:把测试成绩放在一起://////////////////////////////////////////////////////////////////////////////////CPU: AMD64x2 4200+(2.37G) zoom 800*600 to 1024*768 //============================================================================== // StretchBlt 232.7 fps// PicZoom3_SSE 711.7 fps//// PicZoom_BilI near0 8.3 fps// PicZoom_BilI near1 17.7fps// PicZoom_BilI near2 43.4fps// PicZoom_BilI near_Common 65.3 fps// PicZoom_BilI near_MMX 132.9 fps// PicZoom_BilI near_MMX_Ex 157.0 fps////////////////////////////////////////////////////////////////////////////////补充In tel Core2 4400 上的测试成绩://////////////////////////////////////////////////////////////////////////////////CPU: In tel Core2 4400(2.00G) zoom 800*600 to 1024*768 //==============================================================================// PicZoom3_SSE 1099.7 fps//// PicZoom_BilI near0 10.7 fpsII PicZoom_Billnearl 24.2 fps// PicZoom_BilI near2 54.3 fpsII PicZoom_BilI near_Common 59.8 fps// PicZoom_BilI near_MMX 118.4 fpsII PicZoom_BilI near_MMX_Ex 142.9 fps///////////////////////////////////////////////////////////////////////////////I三次卷积插值J:三次卷积插值原理P-1-1F0-1P1-1F2-1F-10F03F10P20F-11P01P11P21F-12P02F12P22P(0,0)所在像素为映射的点,加上它周围的15个点,按一定系数混合得到最终输出结果;混合公式参见PicZoom_ThreeOrder0的实现;y= SiiL(x+PI)/Ori)-Tifi似拟合表达式〔莖见正交说明I二次线性插值缩放出的图片很多时候让人感觉变得模糊插值来改善插值结果;三次卷积插值考虑映射点周围(术语叫低通滤波),特别是在放大的时候;使用三次卷积三次卷积插值曲线sin(x*PI)/(x*PI) (其中Pl=3.1415926...)K:三次卷积插值缩放算法的一个参考实现:PicZoom_Three OrderO该函数并没有做过多的优化,只是一个简单的浮点实现版本inline double Si nXDivX(double x){// 该函数计算插值曲线si n(x*PI)/(x*PI) 的值〃PI=3.1415926535897932385;// 下面是它的近似拟合表达式const float a = -1;//a 还可以取a=-2,-1,-0.75,-0.5 等等,起到调节锐化或模糊程度的作用if (x<0) x=-x; 〃x=abs(x);double x2=x*x;double x3=x2*x;if (x<=1)return (a+2)*x3 - (a+3)*x2 + 1;else if (x<=2)return a*x3 - (5*a)*x2 + (8*a)*x - (4*a);elsereturn 0;}inline TUI nt8 border_color(l ong Color){ _if (Color<=0)return 0;else if (Color>=255)retur n 255;elsereturn Color;}void ThreeOrder0(c onst TPicRegi on& pic,c onst float fx,const float fy,TARGB32* result){long x0=(lo ng)fx; if (x0>fx) --x0; 〃x0=floor(fx);long y0=(lo ng)fy; if (y0>fy) --y0; //y0=floor(fy);float fu=fx-x0;float fv=fy-y0;TARGB32 pixel[16];long i,j;for (i=0;i<4;++i){for (j=0;j<4;++j){long x=x0-1+j;long y=y0-1+i;pixel[i*4+j]=Pixels_Bou nd(pic,x,y);。
基于六角像素的图像双三次插值算法摘要与传统的方形网格相比,基于六角网格的数字图像处理方法有它独特的优点,因此,基于六角像素的图像处理技术的研究越来越受到人们的关注。
然而,由于没有成熟的硬件来支持基于六角网格下图像的获取和显示,人们的研究工作往往在模拟六角网格进行。
在四角像素中,双三次插值算法是一种插值效果较好的方法。
本文的主要任务就是研究在六角像素下的双三次插值算法的使用和使用效果。
试图证明:在六角像素下双三次插值算法也同样具有更好的插值效果。
本文采用一种Pseudo六角像素模拟方法中关于虚拟六角像素的SA算法,在虚拟六角像素定址的基础上实现虚拟六角网格中的插值实验。
具体步骤:1.首先将一个正方形像素细分为7×7的49个小像素,用双线性插值算法求每个小像素的灰度,并表示图像。
2.在虚拟的六角结构下运用双线性插值算法对灰度图像进行灰度重建,再采用双三次插值算法,对相同的灰度图像进行灰度重建。
本文采用三次卷积公式进行双三次插值。
3.返回到四角结构下显示重建图像,比较两个重建灰度图的重建效果。
4.通过计算原始图像信号-噪音功率比和最终图像的信号-噪音功率比,对实验结果进行分析比较,我们可以得到这样的结论:在六角形象素下的图像双三次插值算法同样具有更好的插值效果。
关键词:六角网格,灰度值,双三次插值精品文档你我共享Image Bicubic Interpolation AlgorithmBase on Hexagonal GridAbstractCompared to the traditional square grid,The way of image processing based on the hexangular grid has its special advantage.Therefore,people pay more and more attention to the study of image processing techlnique.However,Because there is no mature hardware supporting for the capture and display of hexagonal-based image,the study work of researchers is done based on hexangular grid imitation.Bicubic interpolation is a way in square grid which has better effect of image interpolation.The main job of this paper. is studying how to use Bicubic interpolation on the hexangular pixel and the effect of using.Try to prove that Bicubic interpolation also has better effect of image interpolation on hexangular pixel.This paper uses SA algorithm about virtual hexangular pixel which is a part of Pseudo hexangular pixel imitation,,it uses the SA algorithm to implement the virtual hexangular grid based on ascertaining the address in imitating the hexangular pixel. Concrete step:1. First,each one pixel is divided delicately to 49 small pixel. Then, we adoptthe Blinear interpolation to calculate the grey and figure the image.2. We adopt the improved Blinear interpolation based on hexangular gridimitation to reconstruct the grey image. We do it again using the improvedBicubic interpolation instead and reconstruct the same grey image. Thispaper adopts Bicubic interpolation in the use of cubic convolution formula.3. We compare the rebuilding effect of two grey images after displaying thereconstructed image on square grid.4. After computing signal to noise between original and final image andanalysing,comparing the result, we can make the conclusion that the imageBicubic interpolation based on hexangular grid has better effect ininterpolationKey Words: hexagonal grid, grey value,bicubic-interpolation目录摘要 (I)Abstract ........................................................... I I 第一章绪论 (1)1.1 研究背景 (1)1.2 研究的主要内容 (1)1.3 研究的目的意义 (2)第二章虚拟六角结构分析 (3)2.1四角网格 (3)2.2六角网格 (3)2.3六角网格的特点 (4)2.3.1四角网格与六角网格的进一步比较 (4)2.3.2六角网格的优点 (4)2.4 模拟六角网格 (5)2.3.1四角像素错位模拟六角像素 (5)2.3.2另一种方法的模拟六角结构 (6)2.3.3 Pseudo六角像素 (7)2.3.4虚拟六角结构下的图像处理 (8)第三章插值实验设计 (9)3.1 灰度插值算法 (9)3.1.1 最近邻插值算法(近邻取样法) (9)3.1.2 双线性插值法 (9)3.1.3 双三次插值法 (10)3.2 实验的软硬件条件 (11)3.2.1 实验的硬件要求 (11)3.2.2 实验的软件要求 (11)3.3 定址方法 (11)3.4基于六角网格的双线性插值实验 (13)3.5基于六角网格的双三次插值实验 (16)3.5.1传统的双三次插值算法 (16)3.5.2 改进后的基于六角网格的双三次插值算法 (16)3.5.3 实现基于六角网格的双三次插值法 (17)第四章实验结果及分析 (19)4.1 实验结果 (19)4.2 结果分析 (20)结论 (22)谢辞 (23)参考文献 (24)第一章绪论1.1 研究背景插值算法是计算机图形学和图像处理的基本算法,它广泛地应用在图像缩放和旋转、动画中间帧的生成等图形学和图像处理问题的研究之中。
1.数学模型对于一个目的像素,其坐标通过反向变换得到的在原图中的浮点坐标为(i+u,j+v),其中i、j均为非负整数,u、v为[0,1)区间的浮点数,双三次插值考虑一个浮点坐标(i+u,j+v)周围的16个邻点,目的像素值f(i+u,j+v)可由如下插值公式得到:f(i+u,j+v) = [A] * [B] * [C][A]=[ S(u + 1)S(u + 0)S(u - 1)S(u - 2) ]┏f(i-1, j-1)f(i-1, j+0)f(i-1, j+1)f(i-1, j+2) ┓[B]=┃f(i+0, j-1)f(i+0, j+0)f(i+0, j+1)f(i+0, j+2) ┃┃f(i+1, j-1)f(i+1, j+0)f(i+1, j+1)f(i+1, j+2) ┃┗f(i+2, j-1)f(i+2, j+0)f(i+2, j+1)f(i+2, j+2) ┛┏S(v + 1) ┓[C]=┃S(v + 0) ┃┃S(v - 1) ┃┗S(v - 2) ┛┏1-2*Abs(x)^2+Abs(x)^3, 0<=Abs(x)<1S(x)={4-8*Abs(x)+5*Abs(x)^2-Abs(x)^3, 1<=Abs(x)<2┗0, Abs(x)>=2S(x)是对Sin(x*Pi)/x 的逼近(Pi是圆周率——π),为插值核。
2.计算流程1. 获取16个点的坐标P1、P2……P162. 由插值核计算公式S(x) 分别计算出x、y方向的插值核向量Su、Sv3. 进行矩阵运算,得到插值结果iTemp1 = Su0 * P1 + Su1 * P5 + Su2 * P9 + Su3 * P13iTemp2 = Su0 * P2 + Su1 * P6 + Su2 * P10 + Su3 * P14iTemp3 = Su0 * P3 + Su1 * P7 + Su2 * P11 + Su3 * P15iTemp4 = Su0 * P4 + Su1 * P8 + Su2 * P12 + Su3 * P16iResult = Sv1 * iTemp1 + Sv2 * iTemp2 + Sv3 * iTemp3 + Sv4 * iTemp44. 在得到插值结果图后,我们发现图像中有“毛刺”,因此对插值结果做了个后处理,即:设该点在原图中的像素值为pSrc,若abs(iResult - pSrc) 大于某阈值,我们认为插值后的点可能污染原图,因此用原像素值pSrc代替。
双三次插值的计算公式
双三次插值是一种常用的图像处理方法,用于在已知离散点的基础上,通过插值计算出未知点的值。
其计算公式如下:
设已知点的坐标为(x0,y0),(x1,y1),(x2,y2),(x3,y3),未知点的坐标为(x,y)。
首先,根据已知点的坐标,计算出在x轴和y轴方向上的插值系数:
u = (x - x1) / (x2 - x1)
v = (y - y1) / (y2 - y1)
然后,根据插值系数,计算出在x轴和y轴方向上的插值权重:
w0 = ((-u + 2) * u - 1) * u
w1 = ((3 * u - 5) * u * u + 2) * 0.5
w2 = ((-3 * u + 4) * u + 1) * u
w3 = ((u - 1) * u * u) * 0.5
w4 = ((-v + 2) * v - 1) * v
w5 = ((3 * v - 5) * v * v + 2) * 0.5
w6 = ((-3 * v + 4) * v + 1) * v
w7 = ((v - 1) * v * v) * 0.5
最后,根据插值权重,计算出未知点的值:
f(x,y) = w0 * y0 + w1 * y1 + w2 * y2 + w3 * y3
+ w4 * f(x0,y0) + w5 * f(x0,y2) + w6 * f(x2,y0) + w7 * f(x2,y2)
其中,f(x0,y0),f(x0,y2),f(x2,y0),f(x2,y2)分别表示已知点的四个角落的值。
以上就是双三次插值的计算公式。
需要注意的是,这种插值方法需要保证已知点的分布足够密集,否则可能会出现插值误差较大的情况。
1.数学模型对于一个目的像素,其坐标通过反向变换得到的在原图中的浮点坐标为(i+u,j+v),其中i、j均为非负整数,u、v为[0,1)区间的浮点数,双三次插值考虑一个浮点坐标(i+u,j+v)周围的16个邻点,目的像素值f(i+u,j+v)可由如下插值公式得到:f(i+u,j+v) = [A] * [B] * [C][A]=[ S(u + 1)S(u + 0)S(u - 1)S(u - 2) ]┏f(i-1, j-1)f(i-1, j+0)f(i-1, j+1)f(i-1, j+2) ┓[B]=┃f(i+0, j-1)f(i+0, j+0)f(i+0, j+1)f(i+0, j+2) ┃┃f(i+1, j-1)f(i+1, j+0)f(i+1, j+1)f(i+1, j+2) ┃┗f(i+2, j-1)f(i+2, j+0)f(i+2, j+1)f(i+2, j+2) ┛┏S(v + 1) ┓[C]=┃S(v + 0) ┃┃S(v - 1) ┃┗S(v - 2) ┛┏1-2*Abs(x)^2+Abs(x)^3, 0<=Abs(x)<1S(x)={4-8*Abs(x)+5*Abs(x)^2-Abs(x)^3, 1<=Abs(x)<2┗0, Abs(x)>=2S(x)是对Sin(x*Pi)/x 的逼近(Pi是圆周率——π),为插值核。
2.计算流程1. 获取16个点的坐标P1、P2……P162. 由插值核计算公式S(x) 分别计算出x、y方向的插值核向量Su、Sv3. 进行矩阵运算,得到插值结果iTemp1 = Su0 * P1 + Su1 * P5 + Su2 * P9 + Su3 * P13iTemp2 = Su0 * P2 + Su1 * P6 + Su2 * P10 + Su3 * P14iTemp3 = Su0 * P3 + Su1 * P7 + Su2 * P11 + Su3 * P15iTemp4 = Su0 * P4 + Su1 * P8 + Su2 * P12 + Su3 * P16iResult = Sv1 * iTemp1 + Sv2 * iTemp2 + Sv3 * iTemp3 + Sv4 * iTemp44. 在得到插值结果图后,我们发现图像中有“毛刺”,因此对插值结果做了个后处理,即:设该点在原图中的像素值为pSrc,若abs(iResult - pSrc) 大于某阈值,我们认为插值后的点可能污染原图,因此用原像素值pSrc代替。
图像处理之三种常见双立方插值算法图像处理之三种常见双立方插值算法双立方插值计算涉及到16个像素点,其中(i’, j’)表示待计算像素点在源图像中的包含小数部分的像素坐标,dx表示X方向的小数坐标,dy表示Y方向的小数坐标。
具体可以看下图:根据上述图示与双立方插值的数学表达式可以看出,双立方插值本质上图像16个像素点权重卷积之和作为新的像素值。
其中R(x)表示插值表达式,可以根据需要选择的表达式不同。
常见有基于三角取值、Bell分布表达、B样条曲线表达式。
1. 基于三角形采样数学公式为最简单的线性分布,代码实现如下:[java] view plain copy private double triangleInterpolation( double f ) { f =f / 2.0; if( f < 0.0 ) { return ( f +1.0 ); } else { return ( 1.0 -f ); } } 2.基于Bell分布采样的数学公式如下:Bell分布采样数学公式基于三次卷积计算实现。
代码实现如下:[java] view plain copy private doublebellInterpolation( double x ) { double f = ( x / 2.0 ) * 1.5; if( f > -1.5 && f < -0.5 ){ return( 0.5 * Math.pow(f + 1.5, 2.0)); } else if( f > -0.5 && f < 0.5 ){ return 3.0 / 4.0 - ( f * f ); } else if( ( f > 0.5 && f < 1.5 ) ){ return( 0.5 * Math.pow(f - 1.5, 2.0)); } return 0.0; } 3.基于B样条曲线采样的数学公式如下:是一种基于多项式的四次卷积的采样计算,代码如下:[java] view plain copy private doublebspLineInterpolation( double f ) { if( f < 0.0 ){ f = -f; } if( f >= 0.0&& f <= 1.0 ) { return ( 2.0 / 3.0 ) + ( 0.5 ) * ( f* f * f ) - (f*f); } else if( f >1.0 && f <=2.0 ) { return 1.0 / 6.0 * Math.pow( ( 2.0 - f ),3.0 ); } return1.0; } 实现图像双立方插值的完整源代码如下:[java] view plain copy package com.gloomyfish.zoom.study; import java.awt.image.BufferedImage; importjava.awt.image.ColorModel; importcom.gloomyfish.filter.study.AbstractBufferedImageOp; public class BicubicInterpolationFilter extends AbstractBufferedImageOp { public final static int TRIANGLE__INTERPOLATION = 1; public final static int BELL__INTERPOLATION = 2; public final static int BSPLINE__INTERPOLATION = 4; publicfinal static int CATMULLROOM__INTERPOLATION = 8; public final static double B = 0.0; public final static double C = 0.5; // constant private int destH; // zoom height private int destW; // zoom width private int type; public BicubicInterpolationFilter(){ this.type =BSPLINE__INTERPOLATION; } public void setType(int type) { this.type = type; } public void setDestHeight(int destH) { this.destH = destH; } public void setDestWidth(int destW) { this.destW = destW; }private double bellInterpolation( double x ){ double f = ( x / 2.0 ) * 1.5; if( f >-1.5 && f < -0.5 ){ return( 0.5 * Math.pow(f + 1.5,2.0)); } else if( f > -0.5 &&f < 0.5 ) { return 3.0 / 4.0 - ( f * f ); } else if( ( f > 0.5 && f < 1.5 ) ) { return( 0.5 *Math.pow(f - 1.5, 2.0)); } return0.0; } private double bspLineInterpolation( double f ) { if( f <0.0 ) { f = -f; }if( f >= 0.0 && f <= 1.0 ){ return ( 2.0 / 3.0 ) + ( 0.5 ) * ( f* f * f ) -(f*f); } else if( f > 1.0 && f <= 2.0 ) { return 1.0 / 6.0 * Math.pow( ( 2.0 - f ), 3.0 ); } return 1.0; } private double triangleInterpolation( double f ) { f = f / 2.0; if( f < 0.0 ) { return ( f +1.0 ); } else{ return ( 1.0 - f ); } } private double CatMullRomInterpolation( double f ){ if( f < 0.0 ) { f = Math.abs(f); } if( f < 1.0 ){ return ( ( 12 - 9 * B - 6 * C ) * ( f * f * f ) + ( -18 + 12 * B + 6 *C ) * ( f * f ) + ( 6 - 2 * B ) ) / 6.0; } else if( f >= 1.0&& f < 2.0 ) { return ( ( -B - 6 * C ) * ( f * f * f ) + ( 6 * B + 30 * C ) * ( f *f ) + ( - ( 12 * B ) - 48 * C ) * f + 8 * B + 24 * C)/ 6.0; }else { return0.0; } } @Override public BufferedImage filter(BufferedImage src, BufferedImage dest) { int width = src.getWidth(); int height = src.getHeight(); if (dest == null)dest = createCompatibleDestImage(src, null);int[] inPixels = new int[width * height]; int[] outPixels = new int[destH * destW]; getRGB(src, 0, 0, width, height, inPixels); float rowRatio = ((float) height) / ((float) destH); float colRatio = ((float) width) / ((float) destW); int index = 0;for (int row = 0; row < destH; row++) { int ta = 0, tr = 0, tg = 0, tb = 0; double srcRow = ((float) row) * rowRatio; // 获取整数部分坐标row Index double j = Math.floor(srcRow); // 获取行的小数部分坐标double t = srcRow - j; for (int col = 0; col < destW; col++) { double srcCol = ((float) col) * colRatio; // 获取整数部分坐标column Index double k = Math.floor(srcCol);// 获取列的小数部分坐标double u = srcCol - k; double[] rgbData = new double[3]; double rgbCoffeData = 0.0;for(int m=-1; m<3; m++){ for(int n=-1; n<3; n++){ int[] rgb = getPixel(j+m, k+n, width, height, inPixels);double f1 = 0.0d; double f2 = 0.0d; if(type ==TRIANGLE__INTERPOLATION){ f1 = triangleInterpolation( ((double) m ) - t );f2 = triangleInterpolation ( -(( (double) n ) -u ) ); }else if(type == BELL__INTERPOLATION){ f1 = bellInterpolation( ((double) m ) - t );f2 = bellInterpolation ( -(( (double) n ) -u ) ); }else if(type == BSPLINE__INTERPOLATION){ f1 = bspLineInterpolation( ((double) m ) - t );f2 = bspLineInterpolation ( -(( (double) n ) -u ) ); }else{ f1 = CatMullRomInterpolation( ((double) m ) - t );f2 = CatMullRomInterpolation ( -(( (double) n ) -u ) );} // sum of weight rgbCoffeData += f2*f1; // sum of the RGB values rgbData[0] += rgb[0] * f2 * f1; rgbData[1] += rgb[1] * f2 * f1; rgbData[2] += rgb[2] * f2 *f1; } }ta = 255; // get Red/green/blue value for sample pixel tr = (int)(rgbData[0]/rgbCoffeData); tg = (int) (rgbData[1]/rgbCoffeData); tb = (int) (rgbData[2]/rgbCoffeData); index = row * destW + col; outPixels[index] = (ta<< 24) | (clamp(tr) << 16)| (clamp(tg) << 8) |clamp(tb); } }setRGB(dest, 0, 0, destW, destH, outPixels);return dest; } public int clamp(int value){ return value > 255 ? 255 :(value < 0 ? 0 : value); } private int[] getPixel(double j, double k, int width, int height,int[] inPixels) { int row = (int) j; int col = (int) k; if (row >= height){ row = height - 1; } if (row < 0) { row = 0; }if (col < 0) { col = 0; }if (col >= width) { col = width -1; } int index = row * width + col;int[] rgb = new int[3]; rgb[0] = (inPixels[index]>> 16) & 0xff; rgb[1] = (inPixels[index] >> 8) & 0xff; rgb[2] = inPixels[index] & 0xff; return rgb; } public BufferedImagecreateCompatibleDestImage( BufferedIma ge src, ColorModel dstCM) { if ( dstCM == null ) dstCM = src.getColorModel(); return new BufferedImage(dstCM,dstCM.createCompatibleWritableRaster(destW, destH), dstCM.isAlphaPremultiplied(), null); } } 运行效果:原图双立方插值放大以后:总结:基于这里三种方法实现的双立方插值以后图片跟原图像相比,都有一定模糊这里时候可以通过后续处理实现图像锐化与对比度提升即可得到Sharpen版本当然也可以通过寻找更加合适的R(x)函数来实现双立方卷积插值过程时保留图像边缘与对比度。