喜马拉雅IOS系统使用操作手册
- 格式:doc
- 大小:5.27 MB
- 文档页数:4
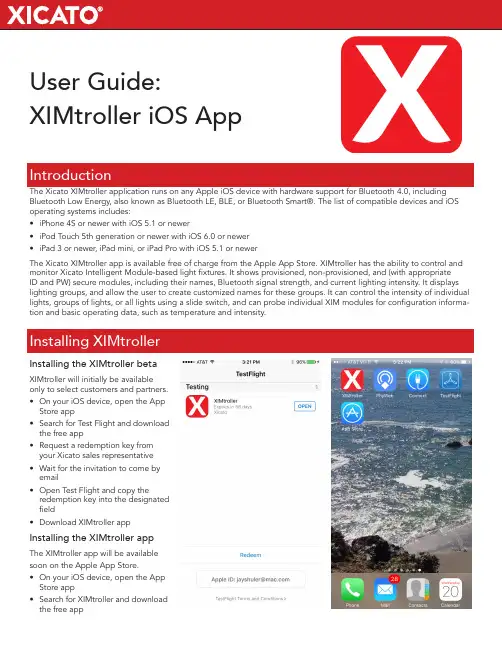
User Guide:XIMtroller iOS AppIntroductionThe Xicato XIMtroller application runs on any Apple iOS device with hardware support for Bluetooth 4.0, including Bluetooth Low Energy, also known as Bluetooth LE, BLE, or Bluetooth Smart®. The list of compatible devices and iOS operating systems includes:• iPhone 4S or newer with iOS 5.1 or newer• iPod Touch 5th generation or newer with iOS 6.0 or newer• iPad 3 or newer, iPad mini, or iPad Pro with iOS 5.1 or newerThe Xicato XIMtroller app is available free of charge from the Apple App Store. XIMtroller has the ability to control and monitor Xicato Intelligent Module-based light fixtures. It shows provisioned, non-provisioned, and (with appropriateID and PW) secure modules, including their names, Bluetooth signal strength, and current lighting intensity. It displays lighting groups, and allow the user to create customized names for these groups. It can control the intensity of individual lights, groups of lights, or all lights using a slide switch, and can probe individual XIM modules for configuration informa-tion and basic operating data, such as temperature and intensity.Installing the XIMtroller beta XIMtroller will initially be availableonly to select customers and partners.• On your iOS device, open the App Store app• Search for Test Flight and download the free app• Request a redemption key from your Xicato sales representative • Wait for the invitation to come by email• Open Test Flight and copy the redemption key into the designated field• Download XIMtroller app Installing the XIMtroller app The XIMtroller app will be available soon on the Apple App Store.• On your iOS device, open the App Store app• Search for XIMtroller and downloadthe free appInstalling XIMtrollerWhen you open the XIMtroller appli-cation, you will immediately see the Dashboard view. When opened, the app will immediately start listening for XIM advertisements and will begin listing the units. The listing process may take several seconds, depending on the number of units and how strong their signals are.At the top in gray, you see the name of the screen and the Settings button, whose icon looks like three horizontal bars. Below that, you see a slider with -/+ “trim” buttons to the left and an on-off switch to the right. By default, the slider is set to 100%, but it does not control the lights unless you tog-gle the On/Off button twice.Below that is a table header bar in darker gray. The columns are:• “Signal”, for signal strength• “Intensity”, for the light intensity • “## Lights” which states the num-ber of lights in the list and is the header for the Name column, and • “All”, showing that you that thecontroller is initially set to control Allof the lightsBelow that is the list of modules.Note that “Signal” is highlighted. Theapp initially lists the units in order ofSignal Strength, which means that theunits closest to you should appearhigher in the list.Alternatively, you can select “Inten-sity” or “## Lights”, which will causethe list to be reordered by outputintensity or name, respectively. If youtouch the same header repeatedly, itwill toggle between ascending anddescending order.The slider shows the current intensi-ty level of the selected unit or units.When “All” is shown, moving theslider or touching the switch will affectAll modules. If you select one module,it will only affect that module, and theword “All” will change to “Deselect”in the table header.Note that the number of bars under“Signal” will change dynamically dueto various signal propagation vari-ables. However, the listed intensitylevel will not change, even if you usethe slider, and the list will not reorder.To reorder the list and update inten-sity levels, either pull the list down bytouching anywhere on or below thetable header and dragging your fingerdown, or shake the iPhone. This willcause the app to start from scratch,listening for modules and reorder-ing them according to the selectedparameter.Module names are color-coded.• Names in Blue are Public modules– those that are not assigned to asecure network and therefore un-protected and able to be controlledby anyone with XIMtroller.• Names in Red are Legacy modules– those that have not been updatedto a supported firmware version.You will be able to see, but notcontrol these modules. You shouldupdate these modules to teh latestfirmware.• Names in Black are Secure mod-ules – those that are assigned toa secure network, and thereforeonly accessible to users who haveadded the secure network to theirXIMtroller app by entering the ap-propriate network name and pass-word through the Settings menu.• Names that have an bullet (•) infront of them are “Unprovisioned”nodes – nodes that have not yetbeen named or configured by theprovisioning or Control Panel app.These nodes carry the name of theirXicato XIM model number.You can scroll through the list byswiping vertically with your finger,and you can switch between theModules Dashboard and the SensorsDashboard by swiping sideways ineither direction.Using XIMtrollerOpening the App: Viewing Units in the DashboardSettingsAt the top right of the display you will see an icon with three horizontal bars.This is the Setting menu. Touching thisbutton should bring up the Settingsscreen.In the Settings screen, you can:• See the current version number of your XIMtroller software• Adjust the brightness and contrast of the app screen• Set “Indicate on touch”, which causes lights to blink 3 times when you select them in the Dashboard screen. This is useful to identify which light is associated with a par-ticular name.• Select “Show legacy modules”. This allows you to see (but not control) XIMs with older, unsupported ver-sions of firmware• Select “Show unassigned mod-ules.” This allows you to see mod-ules that have not yet been named or provisioned by the Control Panel application. Such modules arenamed by their XIM model number, and have a small bullet (•) next totheir name.• Set the “On and Off Fade Time”,which determines how quicklymodules turn on and off when youtoggle them in the Dashboard orDetail screens.Fade time can be in the range of 0-30 seconds, and can be set in • 0.1 second increments up to 5 sec-onds, in• 0.5 second increments from 5-10 seconds,• 1 second increments from 10 to 30 seconds.Fade time is shown to the left of the slider, as are trim buttons that al-low you to fine-tune the setting you choose with the slider.Settings apply to ALL modules. Even if you have first selected a specific module in the Dashboard, going to the Settings menu will set parameters for all modules, not just the selected module.To go back to the previous screen, just select the blue text with the left-point -ing arrow that appears in the extreme upper left of the screen. Or, you can swipe from left to right to “flip the page” back to the previous screen.Controlling individual XIMsFrom the Modules screen, you can select an individual module by touch-ing it once. Note that “All” changes to “Deselect” on the right side of the gray table header bar.Now, if you toggle the On-Off switch at the top right, you will turn that indi-vidual light on and off, using the ramp speed that you set in the Settings menu. If you use the slider, it will only dim or brighten that individual mod-ule. Ramp speed does not apply tothe slider.Viewing XIM StatusFrom the Dashboard, if you touch an individual module name a second time, or tap the right arrow, it will take you to the Module Status screen.At the top left, you can see at a glance the status of the module (“Status OK”). On the right, you can touch the “Indicate” button to cause the light to blink 3 times to make it easy to locate.Under that, you see another slider with trim control that allows you to control the intensity level from this screen, or turn it On/Off using the switch.Below that you see dynamic, real-time data on the status of the module, pre-sented graphically, including:• Signal Strength• Intensity, in 0.1% increments• Input Power in Watts, in 0.1W incre-ments• Input Voltage in 0.1V increments. This is one way to see whether your DC power supply is functioning properly. Much more power statusinformation is available in the Con-trol Panel application.• LED temperature. This shows you whether your modules are running hot or cool, which has implications for lifetime. XIM has a thermal fold-back circuit that detects LED tem-perature and reduces the dim level if it gets too high. This means the unit should never exceed our 90˚C warranty threshold temperature. But this information is useful to prevent and diagnose thermal issues.• Operating Hours – the total num-ber of hours that the unit has been operating at > 0% intensity. This does not include time when the unit is plugged in and under load but “off” (0% intensity), but does include 0.1% intensity. “Off” time can be seen in the Control Panel by pulling the Intensity histogram from the unit. Operating Hours is important because it is the reading that Xicato uses to establish lifetimefor purposes of Warranty support.XIM Configuration InformationFrom the XIM Status screen for an individual module, you can select “More Information” at the bottom to look at static information about the module itself, including:• Its provisioned Name • Network address• Bluetooth firmware revision • XIM hardware revision • XIM firmware revision• Group numbers to which the mod-ule has been assignedThis information is useful for technical diagnosis and support. Eventually, this screen will be configurable by OEMs with their company name and model number.Return to the XIM Status menu by selecting the name and left arrow at the top left of the screen.Viewing XIM GroupsFrom the Dashboard, touch the “All” header to see a complete list of XIM groups, along with the number of XIMmodules that belong to each group.Viewing Group MembersSelecting a group brings up a screen similar to the Dashboard that lists the modules in the group, and allows you to control all of the modules in the group at once.To return to the Groups screen, touch the number in the list header.Naming XIM GroupsGroups are represented in the XIM modules themselves as numbers. XIM modules do not store group names.However, XIMtroller users will soon be able to give custom names to these groups from within the XIMtroller application by selecting the group and pulling up a keyboard. The group names will then be stored in theXIMtroller app, but not the XIMs. This means that other XIMtroller users will not see your group names, but can give the groups their own names.。

DisplayIOS智能播控系统用户手册(V7.0)2021年12月北京思普时代技术有限公司目录1.产品介绍 (1)2.登录 (3)3.控制台 (4)4.设备 (5)4.1播放器 (5)4.1.1快速绑定显示屏 (5)4.1.2播放器状态监控 (7)4.1.3软硬定时开关机设置 (9)4.1.4网络测速 (10)4.1.5 版本升级 (12)4.2显示屏 (14)4.2.1创建显示屏 (14)4.2.2绑定播放器 (16)4.2.3远程控制播放器 (19)4.2.4屏幕截屏下载 (23)4.2.5添加显示屏位置信息 (25)4.2.6分配显示屏 (28)4.3显示屏组 (33)4.3.1 添加显示屏组 (33)4.3.2 设置同步播放 (34)5.内容管理 (36)5.1.1上传音视频图片 (36)5.1.2 添加链接 (38)5.1.3 添加应用 (38)5.1.4 添加直播 (39)5.1.5 新建文件夹 (42)5.1.6 将素材移动到文件夹 (43)5.1.7 批量操作 (45)5.2素材列表 (47)5.2.1 添加素材列表 (47)5.2.2 更换播放顺序 (48)5.2.3 编辑播放时长 (49)5.2.4 创建列表副本 (50)5.3布局(分区播放) (52)5.3.1 添加布局 (52)5.3.2 创建布局副本 (54)5.4滤镜 (54)5.4.1 新建我的滤镜 (55)5.4.2 滤镜预览 (56)6.H5制作 (57)6.1我的作品 (57)6.1.1创建作品 (57)6.1.2 发布作品 (63)6.2H5模板 (65)6.2.1 创建我的模板 (66)6.2.2 使用模板 (66)7.内容商店 (68)8.播放中心 (70)8.1显示屏 (70)8.1.1选择播放内容 (70)8.1.2发布内容 (71)8.1.3选择草稿内容 (72)8.1.4显示当前播放内容 (73)8.1.5一键显示、一键关屏 (74)8.1.6 显示定位地图 (74)8.2频道 (76)8.2.1添加频道,创建节目单 (76)8.2.2编辑频道 (76)8.2.3添加内容 (77)8.2.4频道设置定时发布 (78)8.2.5频道内素材设置定时发布 (79)8.2.6显示屏订阅频道 (80)8.2.7发布频道节目 (83)8.3通知 (84)8.3.1添加编辑通知 (84)9.统计分析 (86)9.1播放报表 (86)9.2显示屏 (86)9.3素材 (87)9.4报警信息 (88)10.用户管理 (90)10.1创建本组系统角色用户 (90)10.2创建子组管理员账号 (95)10.3自定义角色管理 (96)10.3.1创建自定义角色 (96)10.3.2设置编辑自定义角色权限 (97)10.4创建自定义角色用户 (98)10.5角色禁用 (99)10.6用户账号管理 (100)10.6.1修改密码 (100)10.6.2编辑修改账号信息 (101)11.协作管理(协作内容) (102)11.1协作方 (102)11.1.1邀请注册用户协作 (102)11.1.2邀请未注册用户协作 (103)11.2协作内容 (105)12.系统设置 (109)12.1日志管理 (109)12.2标签管理 (109)12.3消息 (110)13.个人中心 (113)13.1基本信息 (113)13.2我的订单 (113)1.产品介绍欢迎使用!DisplayIOS智能播控系统是一个结合云计算、边缘计算、IoT、AI及5G 等新技术构建的面向商业显示的新一代智能操作系统。

Piascore用户手册Piascore 用户手册1. 基本1.1. 基本1.2. 乐谱1.3. 目录1.4. 获取乐谱2. 翻页2.1. 基本2.2. 翻页布局2.3. 自动垂直滚动2.4. 演奏模式2.5. 蓝牙页面转换器(如AirTurn)2.6. 同步页面在设备之间切换2.7. 远程翻页(Piascore Air)3. 页面工具3.1. 书签3.2. 调整页面(缩放,旋转)3.3. 起始页2页显示(左页和右页)3.4. 改变页面的顺序3.5. 在页面之间跳转3.6. 导出到其他应用程序(电子邮件和打印)4. 获取乐谱4.1. 免费古典音乐乐谱4.2. 音乐商店4.3. 雲端硬碟(Dropbox,Google云端硬碟和iCloud)4.4. 摄像头捕捉4.5. 从PC传输(iTunes文件共享)4.6. 从其他应用转移(打开"Piascore”)5. 写作5.1. 钢笔5.2. 邮票5.3. 文本5.4. 形状5.5. 橡皮5.6. 复原/重做5.7. 棕榈拒绝5.8. 删除所有写作6. 目录6.1. 排序乐谱6.2. 切换显示(格,名单)6.3. 应用程序中的搜索表音乐7. 编辑7.1. 删除乐谱7.2. 编辑标题,艺术家,作曲家7.3. 更换书封面8. 标签8.1. 选择标签8.2. 添加或删除标签8.3. 添加一个分数来标记8.4. 标签分数9. 播放列表9.1. 添加播放列表9.2. 删除播放列表9.3. 编辑播放列表9.4. 共享播放列表10. 音乐工具10.1. 音乐播放器10.2. 键盘10.3. 调音器10.4. 录音机10.5. 电影10.6. 节拍器1.1.1. 基本1.2. 乐谱1.3. 目录1.4. 获取乐谱2. 翻页2.1. 基本你可以把网页中的各种方式。
•滑动屏幕•轻按右侧下一步去页•点击左上画面上以去第一页•滑动底部页滑块去任何页2.2. 翻页布局Piascore可以让您自由翻页。
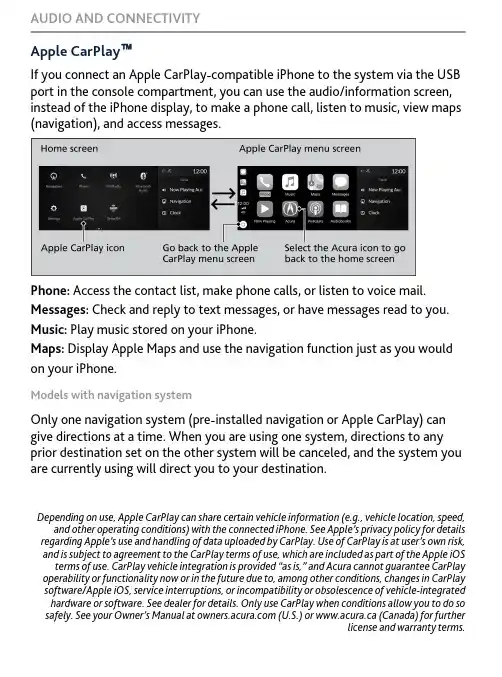
Apple CarPlay ™If you connect an Apple CarPlay-compatible iPhone to the system via the USB port in the console compartment, you can use the audio/information screen,instead of the iPhone display, to make a phone call, listen to music, view maps(navigation), and access messages.Phone: Access the contact list, make phone calls, or listen to voice mail. Messages: Check and reply to text messages, or have messages read to you. Music: Play music stored on your iPhone.Maps: Display Apple Maps and use the navigation function just as you would on your iPhone.Models with navigation systemOnly one navigation system (pre-installed navigation or Apple CarPlay) can give directions at a time. When you are using one system, directions to any prior destination set on the other system will be canceled, and the system you are currently using will direct you to your destination.Depending on use, Apple CarPlay can share certain vehicle information (e.g., vehicle location, speed,and other operating conditions) with the connected iPhone. See Apple’s privacy policy for details regarding Apple’s use and handling of data uploaded by CarPlay. Use of CarPlay is at user’s own risk,and is subject to agreement to the CarPlay terms of use, which are included as part of the Apple iOS terms of use. CarPlay vehicle integration is provided “as is,” and Acura cannot guarantee CarPlay operability or functionality now or in the future due to, among other conditions, changes in CarPlay software/Apple iOS, service interruptions, or incompatibility or obsolescence of vehicle-integrated hardware or software. See dealer for details. Only use CarPlay when conditions allow you to do so safely. See your Owner’s Manual at (U.S.) or www.acura.ca (Canada) for further license and warranty terms.AUDIO AND CONNECTIVITY。

云智AI苹果手机客户端使用手册V1.01目录1软件使用说明 (3)1.1账号注册 (3)1.2账号登录 (3)1.3重置密码 (4)1.4自动登录 (4)2设备列表 (5)2.1添加设备 (5)2.2设备排列 (7)2.3设备分享 (7)2.4修改别名 (8)2.5设备设置 (11)2.6设备搜索 (12)3设备功能 (15)3.1预览 (16)3.2回放 (16)3.3抓拍 (17)3.4录像 (17)3.5监听 (17)3.6对讲 (17)3.7分屏 (18)3.8码流切换 (18)3.9色彩调节 (18)3.10PTZ (18)3.11设置 (18)3.12横竖屏切换 (18)4本地文件 (19)4.1本地文件筛选 (19)4.2本地文件编辑 (19)4.3图片文件查看 (20)4.4录像文件查看 (20)5报警消息 (20)5.1报警消息编辑 (21)5.2报警消息分页 (25)5.3报警消息查看 (28)5.4报警消息筛选 (29)6用户 (20)6.1用户信息修改 (30)6.2本地设置 (31)6.3帮助 (31)6.4关于 (30)26.5意见反馈 (31)6.6清理缓存 (3)341软件使用说明1.1账号注册点击按钮进入注册界面,如图1.1所示。
图1.1注册在账号一栏输入为未注册的手机号或邮箱地址,然后点击该界面下的即可获取注册验证码,在邮箱找到验证码后填入该按钮左侧的栏中,然后输入密码并勾选隐私保护协议后,便可以成功注册账号了。
1.2账号登录启用app 后,进入登录界面,如图1.2所示:图1.2登录1.3重置密码在登录页面点击按钮后,便可以进入重置密码界面,进入该界面后输入已注册的邮箱或手机号,点击即可获取注册验证码,在邮箱或短信中找到验证码后填入该按钮左侧栏中,输入新密码,便可以成功重置密码了。
5图1.3重置密码1.4自动登录在登录界面勾选自动登录功能,在没有通过推出登录功能返回登录界面的情况下,下次打开APP时可以自动登录,直接进入设备列表界面。

Student User Guide - iPhone AppEnjoy access to hundreds of study aids made available through your law library. The Aspen Learning Library: Study Aids collection includes more than 200 titles plus video and audio lectures, covering 30 topics. Series include:Examples & ExplanationsClear explanations of each class topic in a conversational, funny style. Features hypotheticals similar to those presented in class with corresponding analysis so you can use them during the semester to test your understanding and again at exam time to help you review.Emanuel® Law OutlinesEach ELO contains comprehensive coverage of the topics, cases, and black letter law found in your specific casebook but is explained in a way that is understandable. The Quiz Y ourself and Essay Q&A features help you test your knowledge throughout the semester.Glannon GuidesStraightforward explanations of tough concepts with hypos that help you understand their application. Emanuel® CrunchTimeFlowcharts and capsule summaries of major points of law and critical issues, as well as exam tips for identifying common traps and pitfalls, and sample exam and essay questions with model answers.Casenote Legal BriefsExpert case studies and analyses and quicknote definitions of legal terms help you prepare for class discussion. They include expert case summaries, which include the black letter law, facts, majority opinion, concurrences, and dissents, as well as analysis of the case.Inside SeriesConcise description of essential principles and pertinent cases and statutes with summary of essential principles at the end of each chapter.Friedman’s SeriesExam preparation with real law school essay exams, model answers, multiple choice questions and academic analysis. Offers students insights into writing essay exams in core courses.Jumpstart SeriesStudy aid series covering first-year course areas. Each title is a short book, roughly 170 pages, that addresses a problem students experience as they navigate their first year courses.Logging InWhen you log in to your institutional account, you will have read-only access to all the eBook content. Y ou can choose to stay at this level andread any book. This is also referred to as the “first-level login.”Tip: If you are already registered, click the “Login” button and enter your personalized account information. Y ou can always click“forgot password” and reset your password.Y ou can create a personalized account to save notes, bookmarks, highlights, favorites, share with others, print text, and create shelves. In order to access your account through remote login, you must have a personalized account.To create a personalized account, login to the institution from a web browser – you cannot create a personalized account from any app. Click “Register” and create your username and password.Common Question:To check if you are logged into the Institution-only level or personalized level, click the profile button in the top-right. If you are in the Institution-only log in, you can choose to log into your personalized account from that screen.If you’re logged into the Institution-only level:If you are logged in to your personalized level:Tip:Reading an eBookRead online or download the book directly from the app to read offline.How to Download eBooks for Online or Offline ReadingChoose the book you want and click on the download button. You can read this while online or offline now, as it will be saved on your device. If you sign into your personalized account, any notes and highlights will be saved and synced when you come back online. There is no limit to the number of books you can download at one time. Downloads stay on the bookshelf for 120 days. To delete an expired book from your device, enter the list view and swipe left on the expired book and tap delete in the dialog box that appears.Currently offline viewing of videos is not supported. To watch videos on a mobile device,please access them within the app while onlineReading an eBook• Interactive Table of Contents • Single/Double page view, Zoom, Rotate, Link • Page navigationBookmark a Page:Click the bookmark icon on the top right of the page you are viewing. To find a previously bookmarked page, click the open book icon and then click the Bookmarks tab.FAQsQ: Do I have the option to print part or all of the books in my library? A: Y ou can print up to 30% of the book from a web browser. The iPhone app does not currently support printing.Q: Can I export notes or print them?A: T o export your notes and print them, you must access the A.L.L. from a web browser. The iPhone app does not currently support exporting notes or printing. All of your devices will sync your personalized account if you have internet, so you will be able to get your notes you made within the app on the web browser version.Authentication MethodsStudents should check with their librarian if they are not sure which method their school uses.Option 2: “Library Card” Authentication In the login screen, students can choose the Library Card Option, choose their school and enter their library card information. Option 3: Referrer URL Authentication (via institution’s password-protected web site)Students log in to the library website using their credentials. Once logged in, they can create a personalized account (must be done from a web browser). Students open the app and choose the “Remote Login” option. They can then use their personalized login details and click the checkbox for remote login.Single Sign-On (SSO) Options Option 4: Shibboleth Students use their student ID through their school’s SSO login.Students open the app on their phone and select Single Sign-On and then their school from a dropdown. The student will be automatically authenticated into the institution level and can create a personalized account or login to their personalized account from there.Option 5: OpenAthensStudents use their student ID through their school’s SSO login.Students open the app on their phone and select OpenAthens Login, and then their school from a dropdown.The student will be automatically authenticated into the institution level and their personalized account.Library Card LoginShibboleth LoginOpenAthens Login。

Features About Your Audio SystemThe audio system features AM/FM radio and SiriusXM® Radio service*. It can alsoplay USB flash drives, and iPod, iPhone and Bluetooth® devices.You can operate the audio system from the buttons and switches on the panel, theremote controls on the steering wheel, or the icons on the touchscreen interface.*1About Your Audio SystemSiriusXM® Radio* is available on a subscription basisonly. For more information on SiriusXM® Radio*,contact a dealer.SiriusXM® Radio* is available in the United States andCanada, except Hawaii, Alaska, and Puerto Rico.SiriusXM®* is a registered trademark of SiriusXMRadio, Inc.iPod, iPhone and iTunes are trademarks of Apple Inc.State or local laws may prohibit the operation ofhandheld electronic devices while operating avehicle.Remote ControlsiPodUSB Flash Driveuu Audio System u USB Port(s)FeaturesUSB Port(s)u The USB port (1.0A) is for playing audio files on a USB flash drive and connecting a cellular phone and charging device.u The USB port (1.5A) is for charging devices, playing audio files andconnecting compatible phones with Apple CarPlay or Android Auto.u To prevent any potential issues, be sure to use an Apple MFi Certified Lightning Connector for Apple CarPlay, and for Android Auto, the USB cables should be certified by USB-IF to be compliant with USB 2.0 Standard.Your vehicle comes supplied with a USB extension cable that runs from the USB port up through to the front console.*1: Models with the smart entry system have an ENGINE START/STOP button instead of an ignition switch.*2: Pre-installed on U.S. models only.1USB Port(s)•Do not leave the iPod or USB flash drive in the vehicle. Direct sunlight and high temperatures may damage it.•We recommend that you use a USB cable if you are attaching a USB flash drive to the USB port.•You may also use your own USB cable.•Do not connect the iPod or USB flash drive using a hub.•Do not use a device such as a card reader or hard disk drive, as the device or your files may be damaged.•We recommend backing up your data before using the device in your vehicle.•Displayed messages may vary depending on the device model and software version.The USB port can supply up to 1.5A of power. It does not output 1.5A unless requested by the device.For amperage details, read the operating manual of the device that needs to be charged.Under certain conditions, a device connected to the port may generate noise in the radio you are listening to.USB chargeModels with color audio system Models with Display AudioUSB Extension Cable *2Models with Display AudioU.S. modelsuu Audio System u USB Port(s)Features ■In the console compartment*The USB port (1.0A) is for playing audio files on the USB flash drive and connecting a cellular phone and charging device.u Move the removable beverage holdertray rearward.uu Audio System u Audio System Theft ProtectionAudio System Theft ProtectionThe audio system is disabled when it is disconnected from the power source, such aswhen the battery is disconnected or goes dead. In certain conditions, the systemmay display a code entry screen. If this occurs, reactivate the audio system.■Reactivating the audio system1.Turn the ignition switch to ON w*1.2.Turn on the audio system.3.Press and hold the audio system power button for more than two seconds.u The audio system is reactivated when the audio control unit establishes aconnection with the vehicle control unit. If the control unit fails to recognizethe audio unit, you must go to a dealer and have the audio unit checked.Features *1: Models with the smart entry system have an ENGINE START/STOP button instead of anignition switch.uu Audio System u Audio Remote ControlsFeatures Audio Remote ControlsAllow you to operate the audio system while driving. The information is shown onthe driver information interface.ButtonsPress or to cycle through the audiomode as follows:FM AM SiriusXM®*USB iPodBluetooth® Audio Pandora®*AppleCarPlay/Android Auto*Audio Apps*ENTER Button•When listening to the radio and SiriusXM®*1.Press ENTER to switch the display to a preset list you stored in the preset buttons.2.Press or to select a preset, then press ENTER.•When listening to a USB flash drive1.Press ENTER to display the folder list.2.Press or to select a folder.3.Press ENTER to display a list of files in that folder.4.Press or to select a file, then press ENTER.1Audio Remote ControlsSome modes appear only when an appropriatedevice or medium is used.Depending on the Bluetooth® device you connect,some functions may not be available.Press the (Hang-up/back) button to go backto the previous command or cancel a command.Press the button to switch display.ButtonButton+- BarButtonButton3Button4ENTER Button3434Models with Display Audio343434uu Audio System u Audio Remote ControlsFeatures•When listening to an iPod1.Press ENTER to display the iPod music list.2.Press or to select a category.3.Press ENTER to display a list of items in the category.4.Press or to select an item, then press ENTER .u Press ENTER and press or repeatedly until the desired mode you want to listen to is displayed.•When listening to Pandora ®*1.Press ENTER to display the station list.2.Press or to select an item, then press ENTER .•When listening to Bluetooth ®Audio 1.Press ENTER to display the track list.2.Press or to select a track, then press ENTER .3434343434uu Audio System u Audio Remote ControlsFeatures +- (Volume) BarPress +: To increase the volume.Press -: To decrease the volume.Buttons•When listening to the radioPress :To select the next preset radio station.Press :To select the previous preset radio station.Press and hold : To select the next strong station.Press and hold : To select the previous strong station.•When listening to an iPod, USB flash drive, or Bluetooth® Audio Press :To skip to the next song.Press :To go back to the beginning of the current or previous song.•When listening to a USB flash drivePress and hold : To skip to the next folder.Press and hold : To go back to the previous folder.•When listening to Pandora®*Press :To skip to the next track.Press and hold : To select the next station.Press and hold : To select the previous station.FeaturesTo use the audio system, the ignition switch must be in ACCESSORY q or ON w .Use the selector knob or MENU/CLOCK button to access some audio functions.Press to switch between the normal and extended display for some functions.Selector Knob: Rotate left or right to scroll through the available choices. Press to set your selection.MENU/CLOCK button: Press to select any mode.The available modes include wallpaper, display, clock, language setup, and play modes. Play mode choices include scan, random, repeat, and so on.(Back) button: Press to go back to the previous display.button: Press to select the sound (Day/Night) button: Press to change the audio/information screen brightness.Press , then adjust the brightness using .u Each time you press , the mode switches between the daytime mode, nighttime mode and OFF mode.1Audio System Basic OperationThese indications are used to show how to operate the selector knob.Rotate to select.Pressto enter.Press the button on the steering wheel to change any audio setting.uu Audio System Basic Operation u Audio/Information ScreenFeatures Audio/Information ScreenDisplays the audio status and wallpaper. From this screen, you can go to varioussetup options.■Switching the DisplayAudio/Information ScreenAudioClock/Wallpaperuu Audio System Basic Operation u Audio/Information Screen■AudioShows the current audio information.■Clock/WallpaperShows a clock screen or an image you import.■Change display1.Press the MENU/CLOCK button.2.Rotate to select Settings, then press .3.Rotate to select Display Change, then press .4.Rotate to select Wallpaper, then press .u If you want to return to the audio display, select Audio.Featuresuu Audio System Basic Operation u Adjusting the SoundFeatures Adjusting the SoundPress the (Sound) button, and rotateto scroll through the following choices:Rotate to adjust the sound setting, thenpress .1Adjusting the SoundThe SVC has four modes: Off, Low, Mid, and High.SVC adjusts the volume level based on the vehiclespeed. As you go faster, audio volume increases. Asyou slow down, audio volume decreases.BASTREFADBALSVCBassTrebleFaderBalanceSpeed-sensitiveVolumeCompensationMID Middle。

【无限互联】学员作品:喜马拉雅听书iOS客户端本次做的是一款听书软件,主要的功能包括在线音频的收听,音频内容下载,FM广播,用户可以通过新浪微博账号,QQ账号,人人网账号登陆该软件,也可以免登陆进行浏览。
此款音乐播放软件包含相声、音乐、曲艺、综艺节目等多种音频内容,年轻人可以使用此款播放器来收听音乐和娱乐信息,中年人可以使用它来收听像相声、戏曲、历史等内容,该软件能够满足不同年龄段对音频内容的需求。
通过账号登陆的用户,还可以对自己喜爱的内容进行关注,关注的内容一更新,就会像微博一样自动推送给你,无需再费劲找。
同时,用户可以将自己喜爱的音乐,自己录制的声音进行分享上传。
实现效果展示:登陆界面主界面(find界面)下载界面(没有下载任务时,文字提示)下载界面(有任务时)个人中心界面(未登录时,弹出登陆界面)个人中心界面(登陆后)Find模块子界面: 1.子类别目录2.专辑列表页面3.专辑详情页面4.播放界面(主要功能之一)其他界面不再进行赘述。
本项目整体采用MVC架构,分为发现、下载、动态、个人中心4个模块。
发现模块在进行界面展示的基础上,重点是对功能的实现,像:使用账号登陆、音乐在线播放并实现全局播放、音乐下载并实现了全局下载和断点下载。
一、账号登陆在这里以新浪微博账号登陆为例,将新浪微博提供的SDK集成到项目中,从本地的plist 文件中查询是否已存在用户的token,如果存在,则直接进入项目的主界面(主控制器),如果不存在,跳转到登陆界面。
在该登陆界面可以选择使用不同的账号进行登陆,也可以向上滑动界面,不登陆进入页面。
1.不登陆进入页面。
点击第4个模块(个人中心界面)时,弹出的是另一个登陆界面,上图以做展示。
在这个登陆界面进行登陆,会跳转到主界面,并默认选择第1个模块(发现界面)。
2.通过登陆进入页面。
点击第四个模块时,弹出的是个人信息页面,在该页面可以查看并编辑用户信息。
同时可以通过设置界面清除缓存,注销登陆等功能。

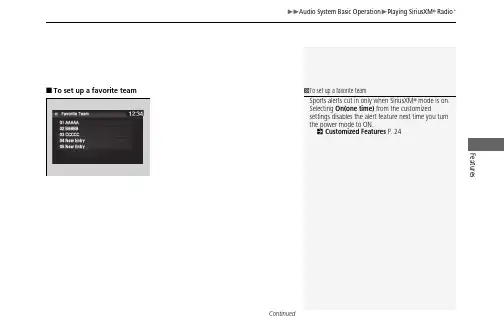
uu Audio System Basic Operation u Playing SiriusXM ® Radio *Features■To set up a favorite team1To set up a favorite teamSports alerts cut in only when SiriusXM ® mode is on. Selecting On(one time) from the customizedsettings disables the alert feature next time you turn the power mode to ON.2 Customized Features P. 24Use the audio/information screen to customize certain features.■How to customizeWhile the vehicle is at a complete stop with the power mode in ON, select , and Settings, then select a setting item.1Customized FeaturesWhen you customize settings, make sure that the vehicle is at a complete stop and shift to P.To customize other features, select Settings.2List of customizable options P.256Audio/InformationScreenFeaturesuu Customized Features uFeatures■Customization flowSelect Settings .Other Auto Time Zone *Manual Time Zone *Auto Daylight *Clock Display Clock ResetInfo Screen PreferenceAcuraLink *Date Format DefaultBluetooth On/Off Status Bluetooth Device List Edit Pairing Code Wi-Fi On/Off Status Wi-Fi Network List Wi-FiBluetoothBluetooth/Wi-Fi Wi-Fi InformationFixed Guideline Dynamic GuidelineRear CameraCameraDefaultDefaultuu Customized Features u Featuresuu Customized Features uFeaturesuu Customized Features u Featuresuu Customized Features uFeaturesuu Customized Features u Featuresuu Customized Features uFeaturesuu Customized Features uFeatures■List of customizable options*1:Default SettingSetup GroupCustomizable FeaturesDescriptionSelectable Settings Clock/InfoClockClock/Wallpaper TypeClockChanges the clock display type.Analog /Digital *1/Small Digital /Off Wallpaper•Changes the wallpaper type.•Imports an image file for a new wallpaper.•Deletes an image file for a wallpaper.Blank /Galaxy *1/Metallic /Time ZoneClock Adjustment Adjusts Clock.—Clock Format Selects the digital clock display from 12H to 24H.12H *1/24HDate FormatChanges the date display type.YYYY/MM/DD , MM/DD/YYYY *1, DD/MM/YYYY Auto Time Zone *Automatically adjusts the clock when driving through different time zones.On *1/OffManual Time Zone *Changes the time zone manually.—Auto Daylight *Select On to have the GPS automatically adjust the clock to daylight savings time. Select Off to cancel this function.On *1/Off Clock Display Selects whether the clock display comes on.On *1/Off Clock ResetResets the clock settings to the factory default.Yes /NoFeatures*1:Default SettingSetup Group Customizable Features Description Selectable Settings Clock/Info AcuraLink *AcuraLink Subscription Status Displays your current AcuraLink subscription status.—Other Info Screen Preference Changes the information screen type.•Info Top - A brief menu pops up.•Info Menu - A full menu pops up.•Off - A menu does not pop up.Info Top /Info Menu *1/OffDefault Cancels/Resets all customized items in the Clock/Info group as default.Yes /NoCamera Rear Camera Fixed Guideline Selects whether the fixed guidelines come on therear camera monitor.2Multi-View Rear Camera P.373On *1/OffDynamic Guideline Selects whether the guidelines adjust to themovement of the steering wheel.2Multi-View Rear Camera P.373On *1/OffDefault Cancels/Resets all customized items in the RearCamera setting group as default.Yes /NoFeatures *1:Default SettingSetup Group Customizable Features Description Selectable Settings Bluetooth /Wi-Fi Bluetooth Bluetooth On/Off Status Changes the Bluetooth ® status.On *1/Off Bluetooth Device List Pairs a new phone to HFL, edits or deletes a paired phone.2Phone Setup P.282—Edit Pairing Code Edits a pairing code.2To change the pairing code setting P.283Random /Fixed*1Wi-Fi Wi-Fi On/Off Status Changes the Wi-Fi mode.On /Off *1Wi-Fi Network List Connects, disconnects, or deletes the Wi-Fidevice.—Wi-Fi Information Shows the Wi-Fi information of the head unit.—Default Cancels/Resets all customized items in theBluetooth/Wi-Fi group as default.Yes /NoFeatures*1:Default SettingSetupGroup Customizable Features Description Selectable SettingsPhone PhoneBluetooth Device List Pairs a new phone to HFL, connects ordisconnects a paired phone.2Phone Setup P.282—Edit Speed Dial Edits, adds or deletes a speed dial entry.2Speed Dial P.288—Ring Tone Selects the ring tone.Fixed /MobilePhone *1Automatic Phone Sync Sets phonebook and call history data to beautomatically imported when a phone is paired to HFL.On *1/OffText/Email Enable Text/Email Turns the text/e-mail message function on andoff.On *1/OffSelect Account Selects a text or e-mail message account.—New Message Notification Selects whether a pop-up alert comes on thescreen when HFL receives a new text/e-mail message.On /Off *1Default Cancels/Resets all customized items in the Phonesettings group as default.Yes /NoFeatures *1:Default SettingSetup Group Customizable Features Description Selectable Settings Audio Common Sound Adjusts the settings of the audio speakers’ sound.2Adjusting the Sound P.185-6~0*1~+6 (BASS and TREBLE ),RR9~0*1~FR9 (FADER ),L9~0*1~R9 (BALANCE ),-6~0*1~+6 (Center * and Subwoofer ),Off /Low /Mid *1/High (Speed Volume Compensation ),Off *1/On (Neural *)Audio Source Pop-Up Selects whether the list ofselectable audio sources comes onwhen Audio is selected on the home screen.On /Off *1[Your selected media]Cover Art Turns the cover art display on andoff.On *1/OffBluetooth Device List Pairs a new phone to HFL, edits ordeletes a paired phone.2Phone Setup P.282—FM HD Radio Mode Selects whether the audio systemautomatically switches to thedigital radio waves or receives the analog waves only.Auto *1/AnalogRDS INFO Turns on and off the RDSinformation.On *1/OffFeatures*1:Default SettingSetup Group Customizable Features Description Selectable Settings Audio SXM *Tune Start Turns on and off, starts the song from the beginning as you change preset stations.On *1/OffSportsFlash Setup(Interrupt)Turns on and off the sports alert function.Off *1/On(one time)/On(continue)SportsFlash Setup(Interrupt Beep)Causes the system to beep when the sports alertis notified.On *1/OffSportsFlash Setup(Favorite Team)Selects your favorite sports teams.2Live Sports Alert P.201—Traffic & Weather Setup Selects the region you want to receive theinformation.—Default Cancels/Resets all customized items in the Audiosettings group as default.Yes /NoFeatures *1:Default SettingSetup Group Customizable Features Description Selectable Settings System Display Display Settings Brightness Changes the brightness of the audio/information screen.0~5~10*1 (Daytime mode)0~5*1~10 (Nighttime mode)Contrast Changes the contrast of the audio/information screen.-5~0*1~+5Black Level Changes the black level of the audio/informationscreen.-5~0*1~+5Background Color Changes the background color of the audio/information screen.Blue *1/Amber /Red /VioletTrack Mode Display Turns the limitation screen for the TRACK modeon and off.2Limitations for Manual Operation P.187On *1/OffSound/Beep Guidance Volume *Changes the sound volume.Adjusts the guidance volume of the navigation system.1~6*1~11Text Message Volume Changes the text/e-mail message readingvolume.1~6*1~11Features*1:Default SettingSetupGroup Customizable Features Description Selectable SettingsSystem Sound/Beep Voice Recog. Volume Changes the volume of the voice prompt.1~6*1~11Verbal Reminder *Turns the verbal reminders on and off.On *1/OffBeep Volume Changes the beep volume.Off *1/1/2/3Voice Recog Voice Prompt Turns the voice prompt on and off.On *1/Off Voice Recog. Volume Changes the volume of the voice prompt.1~6*1~11Song by Voice *Turns the Song By Voice TM on and off.On *1/OffSong by Voice Phonetic Modification *Modifies a voice command for music stored in the system oran iPod/iPhone.2Phonetic Modification P.208—Phonebook Phonetic Modification Modifies a voice command for the phonebook.2Phonebook Phonetic Modification P.291—Automatic Phone Sync Sets phonebook and call history data to be automaticallyimported when a phone is paired to HFL.On *1/OffOne Press Voice Operation Changes the setting of the (Talk) button operation when using the voice operation.On *1/OffFeatures *1:Default SettingSetup Group Customizable Features Description Selectable Settings System Clock Clock/Wallpaper Type Clock See Clock/Info on P.256Wallpaper Clock Adjustment Clock Format Date Format Auto Time Zone *Manual Time Zone *Auto Daylight *Clock DisplayClock ResetOthers Language Change the display language.English *1/Français /EspañolTouch Panel Sensitivity Sets the sensitivity of the touch panel screen.High *1/LowSetupGroupCustomizable Features Description Selectable SettingsSystem OthersClimate Screen TimeoutChanges the length of time the climate controldisplay stays on when you press the CLIMATEbutton.Never/5 Seconds/10Seconds*1/20SecondsDetail InformationDisplays the details of the head unit andoperating system information.—Factory Data ResetResets all the settings to their factory default.2Defaulting All the Settings P.270Yes/NoDefaultCancels/Resets all customized items in theSystem group as default.Yes/NoFeatures*1:Default SettingFeatures *1:Default SettingSetup Group Customizable Features Description Selectable Settings Vehicle MeterSetup Language Selection Changes the displayed language on the driver information interface.English *1/Français /Español Adjust Outside Temp Display Adjusts the temperature reading by a few degrees.-5°F ~ ±0°F *1 ~ +5°F (U.S.)-3°C ~ ±0°C *1 ~ +3°C (Canada)“Trip A” Reset Timing Changes the setting of how to reset trip meter A and average fuel economy A.With Refuel /IGN Off /Manually Reset *1“Trip B” Reset Timing Changes the setting of how to reset trip meter B and average fuel economy B.With Refuel /IGN Off /Manually Reset *1Turn by Turn Display *Selects whether the turn-by-turn display comes on during the route guidance.On *1/Off Display km/Miles Selects the trip computer units.Auto *1/km /Milesuu Customized Features uFeatures*1:Default SettingSetupGroup Customizable Features Description Selectable Settings Vehicle Driving Position Setup *Easy Entry/Exit Moves the seat rearward when you get in/get out of the vehicle. Changes the setting for this feature.On *1/OffMemory Position Link Turns the driving position memory system on andoff.On *1/OffKeylessAccess Setup Door Unlock Mode Changes which doors unlock when you grab the driver’s door handle.Driver Door Only *1/All DoorsKeyless Access Light Flash Causes some exterior lights to flash when you unlock/lock the doors.On *1/OffKeyless Access Beep Causes the beeper to sound when you unlock/lock the doors.On *1/OffLighting Setup Interior Light Dimming Time Changes the length of time the interior lights stayon after you close the doors.60 sec /30 sec *1/15 secHeadlight Auto Off Timer Changes the length of time the exterior lights stay on after you close the driver’s door.60 sec /30 sec /15 sec *1/0 secAuto Interior Illumination Sensitivity Changes the sensitivity of the brightness of theinstrument panel when the headlight switch is in the AUTO position.Min /Low /Mid *1/High /Maxuu Customized Features u Features *1:Default SettingSetup Group Customizable Features Description Selectable Settings Vehicle Lighting Setup Auto Headlight On with Wiper On Changes the settings for the wiper operation when the headlights automatically come on while the headlight switch is in the AUTO position.On *1/Off Auto Light Sensitivity *Changes the level of ambient light that causes the headlights to come on in AUTO position.Max /High /Mid *1/Low /Min Door Setup Auto Door Lock Used to change the setting for when the doors automatically lock.With VehicleSpeed *1/Shift from P /OffAuto Door Unlock Changes the setting for when the doors unlock automatically.All Doors withDriver’s DoorOpens *1/All Doorswith Shift to P /AllDoors with IGN Off /OffKey And Remote Unlock Mode Sets up the driver’s door or all the doors to unlock on the first push of the remote.Driver Door *1/AllDoorsKeyless Lock Answer Back LOCK/UNLOCK- The exterior lights flash.LOCK (2nd push)- The beeper sounds.On *1/OffSecurity Relock Timer Changes the time it takes for the doors to relockand the security system to set after you unlock the vehicle without opening either door.90 sec /60 sec /30 sec *1uu Customized Features u Features*1:Default Setting SetupGroup Customizable Features Description Selectable Settings Vehicle Dynamic Mode Setup Scheduler Changes the Integrated Dynamics System mode schedule. The vehicle starts in the QUIET or SPORT mode according to the selected item or time schedule.OFF /Always Sport *1/Always Quiet /LastStart /Quiet: 12am-6am /Quiet: 12am-8amMaintenance Info Reset Used to reset the engine oil life display when themaintenance service has been performed.—Default Cancels/Resets all customized items in theVehicle group as default.Yes /NoSmart-phoneApple CarPlay Sets up the Apple CarPlay connection.—Android Auto Sets up the Android Auto connection.—Default Cancels/Resets all customized items in theSmartphone group as default.Yes /Nouu Customized Features u Defaulting All the SettingsFeatures Defaulting All the SettingsReset all the menu and customized settings as the factory defaults.1.Select .2.Select Settings.3.Select System.4.Select the Others tab.5.Select Factory Data Reset.u A confirmation message appears on thescreen.6.Select Yes to reset the settings.7.Select Yes again to reset the settings.u A confirmation message appears on thescreen. Select OK.u After selecting OK, the system willreboot.1Defaulting All the SettingsWhen you transfer the vehicle to a third party, resetall settings to default and delete all personal data.If you perform Factory Data Reset, it will reset thepre-installed apps to their factory default.。

ADSOUNDS 音频+广告采买平台喜马拉雅中国知名音频平台4.7亿500万73%135分激活用户超4.7亿超过500万主播/其中20万V 行业占有率73%活跃用户日均收听时长135分钟喜马拉雅77.6%中高收入人群根据全国最新年收入等级划分:低收入:0-12万;中等收入:13万-50万;高收入:50万以上;喜马拉雅数据中心32%汽车人群喜马拉雅汽车用户占比57%,活跃汽车用户占比40%艾瑞咨询75%高学历人群本科及以上学历占比75%喜马拉雅数据中心喜马拉雅ADSOUNDS音频+广告采买平台ADSOUNDS是喜马拉雅FM推出的广告投放平台。
它是国内领先的效果广告营销+竞价广告投放,依托于喜马拉雅FM海量优质资源,给广告主提供跨平台,跨终端的网络推广方案,并利用喜马拉雅FM大数据处理算法实现成本可控,效果可观,智能投放的互联网广告投放平台45%精准投放43% 伴随式投放12% 强化记忆喜马拉雅开机大图,无声贴片,banner,有声贴片等多种创意广告形式不仅包含人口属性,地理位置,使用设备,更包含了用户在喜马拉雅上面的行为偏好,兴趣偏好等您可以为广告组设置日预算或者总预算,并且可以随时编辑预算或者停止投放广告,我们的系统会立即为您执行随时查看账户扣费信息,通过查看实时数据,随时调整出价策略,最大限度满足广告主的需求多种创意广告形式精准投放成本可控实时扣费喜马拉雅开机大图贴片广告音频广告喜马拉雅视频开机丰富的创意表达方式,足够吸睛*H.264/AVC; 文件大小:5秒文件≤2M; 音量必须为0,并且音轨是aac格式;*视频物料只在WiFi环境下加载,并且只显示预加载视频,预加载时间为3天,如果未预加载过视频将显示静态图片喜马拉雅GIF 开机图片物料的升级表达方式*GIF图片只在WiFi环境下加载,并且只显示预加载GIF,预加载时间为3天,如果未预加载过GIF图片将显示静态图片喜马拉雅1243大图模式海报模式泡泡条弹幕大图喜马拉雅音频+图片样式组合拳,打造品效合一;亮屏展现,听觉+视觉的双重冲击喜马拉雅音频广告颠覆传统电台广告无法定向,无法监测,无法查看转化数据的弊端独占性听众在收听节目时不会漏掉广告内容,曝光量几乎等于接收量伴随性耳朵经济逐步取代眼球经济,声音的营销价值得到空前的放大喜马拉雅如何制作音频广告?传统制作音频广告流程耗时:寻找播音人员耗时制作耗时调整耗时传统制作音频广告流程花销:音频后期制作文案书写播音人员劳务费喜马拉雅12345音频广告需求确认与发布广告主在确认音频广告文字版大纲后,可登陆至喜马拉雅微任务平台发布需求并设置预算音频广告制作与验收主播制作音频广告完毕后,需上传至微任务平台,广告主可对音频广告内容进行验收主播与客户合作意愿达成主播在看到广告主发布的任务后,可参与进行需求沟通,双方达成一致后,主播开始进行音频广告的制作音频广告交付与投放广告主确认音频广告符合要求后,该音频广告可自动进行投放多样性的用户定向条件性别年龄职业消费能力事实标签平台网络运营商地域(城市)预测标签性别年龄职业长短期兴趣喜马拉雅喜马拉雅晓雅mini 等硬件渠道+用户收听行为+收听习惯=母婴类人群精准定位母婴人群通过分析用户的购买频次,购买行为发生的时间节点,确定用户的行进而确认用户的消费能力高消费人群根据用收听内容的专业深度,确定用户是否属于某一领域的高端人群白领人群车载+车机+蓝牙+用户收听行为=有车人群有车人群实时扣费与成本可控成本可控:广告主根据账户扣费信息,可随时调整预算与出价,进而调整策略,能够最大程度满足广告主的效果预期实时扣费:ADSOUNDS 平台采用实时扣费策略。
产品体验分析|浅析喜马拉雅FM知识付费情况2016年被称为知识付费的元年,在这一年中,知乎推出了知乎live和值乎,豆瓣推出豆瓣时间,果壳推出分答。
而喜马拉雅FM也紧跟潮流,在16年12月3日当天,推出国内首个内容消费节“123知识狂欢节”,加入了知识付费的潮流大军。
喜马拉雅FM作为国内规模最大的音频平台,功能众多,本文将仅就知识付费这一个点进行分析并发表一点浅见。
一. 体验环境机型:IPHONE 7系统:IOS 10.2.1App版本:6.3.9二. 产品概述1. 产品定位音频类互联网产品知识付费内容以PGC为主流,同时融合优秀的UGC内容(用户可以申请成为主播,当订阅播放量达到一定标准时可以申请付费)2. 用户分析(以下数据均来源于极光)(1)男女分布喜马拉雅FM上男性用户占比51.5%,女性用户占比48.5%。
(2)年龄分布由上图可以看出,喜马拉雅上20-24用户占比最多达28.7%,总体来说用户年龄集中在20-32岁,也正是互联网用户最多的年龄段。
(3)城市分布由上图可以发现,喜马拉雅FM的用户来大城小镇,且在各个不同类型的城市分布也十分均匀。
总的来说,无论性别,年龄,城市,喜马拉雅都未出现明显的“偏科”。
这样的均衡形式奠定了喜马拉雅做成“淘宝”式(知识内容丰富,用户能自由选购感兴趣的)知识付费app的基础。
这样的发展模式无疑是最稳定的,能更好适应用户口味的变化和市场形势的动荡。
(4)需求分析笔者结合了appstore和华为手机上的应用宝中对于喜马拉雅fm这款软件的评论,发现喜马拉雅fm解决了以下用户痛点:•时间比较碎片化,没有成块的时间学习。
•做杂事(例如打扫卫生)时感觉比较浪费时间,希望能通过音频的方式学习娱乐。
•懒得看书,希望有人能提炼出精华点。
•希望有专业而又有趣的东西帮助教育孩子。
•想爱护眼睛不看东西又能娱乐或者学习。
还未满足的需求有:•广告穿插在听音频的过程中另用户很烦恼。
这里笔者认为在付费专辑的逐步推进后,喜马拉雅fm的广告是可以逐步减少的。
FeaturesPlaying SiriusXM ® Radio(Back) ButtonPress to go back to the previous display.Channel IconsSelect or to the previous or next channel.Select and hold to rapidly skip 10 channels at a time.VOL/ AUDIO (Volume/Power) Knob Push to turn the audio system on and off.Turn to adjust the volume.Category IconsSelect or to display and select a SiriusXM ® Radio category.Audio/Information ScreenPreset IconsTune the radio frequency for preset memory. Select and hold the preset icon to store that channel. Select to display beyond preset 5.>Album ArtSettings IconSelect settings to display and customize siriusXM settings./ Buttons Select or to the previous or next channel.Select and hold to rapidly skip 10 channels at a time.Sound IconSelect to display the sound settings.Channel List IconSelect to display the channel list.Select Keypad to use the on-screen keyboard for entering the channel number directly.ContinuedFeatures1.Select Settings .2.Select Tune Mode .3.Select Channel or Category .■To Change the Tune Mode1Playing SiriusXM ® RadioIn the channel mode, all available channels are selectable. In the category mode, you can select a channel within a category (Jazz, Rock, Classical, etc.).There may be instances when SiriusXM ® Radio does not broadcast all the data fields (artist name, title). This does not indicate a problem with your audio system.SiriusXM ® Radio stations load in ascending order, which can take about a minute. Once they have loaded you will be able to scroll up or down to make your selections.Switching the Audio ModeRoll up or down to select Audio on the left selector wheel or select the audio source icon on the screen.2Audio Remote Controls P.227Tune Start:When you change to a preset channel, a song being played on that channel restarts from the beginning with this function. This can be turned on or off by the following procedure.1.Select Settings .2.Select Tune Start .3.Select ON or OFF .To change a category, select Category icons, or select More and then select Category List .Features1.Select Channel List .2.Select Keypad .3.Enter the desired channel number using the on-screen keyboard.4.Select Enter to tune into the channel.To store a channel:1.Tune to the selected channel.2.Select and hold the preset number for the station you want to store.■Multi-channel preset (for music channels only)You can store up to 10 of your preferred music channels per preset.1.Tune a station.2.Select and hold the preset number you want to add a music channel.3.Select Add to TuneMix or Create TuneMix .u A message appears if there are no available presets.■SiriusXM ® Channel Manual Tune Screen1SiriusXM ® Channel Manual Tune Screen/ icons:Select or to the previous or next channel.Select and hold to rapidly skip 10 channels at a time.■Preset Memory1Preset MemoryYou can store 12 SiriusXM ® channels into the preset memory.1Multi-channel preset (for music channels only)TuneMix TM is registered trademarks of SiriusXM ® Radio, Inc.TuneMix:The multi-channel preset function can be turned on or off by the following procedure.1.Select Settings .2.Select TuneMix .3.Select ON or OFF .When you want to replace the channel, select Replace preset .If you want to delete a channel, select Edit TuneMix , and then select the channel you want to delete.ContinuedFeaturesSuggested channel listing received from SiriusXM ® can be displayed and selected.1.Select Category List .2.Select Featured Favorites .■Listening to Featured Channels1Listening to Featured ChannelsUp to ten featured channels by SiriusXM ® can be displayed.Featured channel lists are at the top of the channel list.To switch the sorting method, select Number or Name on the upper right of the screen.Select Keypad to use the on-screen keyboard for entering the channel number directly.FeaturesThe system can record up to the last 60 minutes broadcast of your currently tuned channel as well as the last 30 minutes broadcast of preset channels, starting from the moment you turn the vehicle on. If you tuned to preset channel, the system records up to 60 minutes of a broadcast instead of up to 30 minutes. You can rewind and replay the last 30 or 60 minutes of a broadcast.Move the position you want to replay by selectingor.To play or pause on playback mode, select the play/pause icon.■Returning to real-time broadcastSelect and hold.■Replay Function1Replay FunctionThe system starts storing broadcast in memory when the power mode is turned ON. You can go back to the program from that point.You can no longer replay any program once the power mode is turned off as it erases memory.You can check how long the program has been stored in memory from the audio/information screen.After 30 or 60 minutes of recording the system will automatically start deleting the oldest data.(A): Shows how much time the replayed segment is behind the real-time broadcast (B): Replayed segment(C): Length stored in memory (D): Play/Pause iconAudio/Information Screen(C)(B)(A)(D)ContinuedFeaturesWhile listening to other channel, you can receive sports alerts such as scores from your favorite teams.■To set up a favorite team1.Select Settings .2.Select Sports Notifications Setup .3.Select Favorite Teams .4.Select + Add Favorite Team .5.Select a team.■To set up an alert message1.Select Settings .2.Select Sports Notifications Setup .3.Select Notifications .4.Select Game Notifications or SportsFlash Game Play Notifications .5.Select Notifications .6.Select ON .7.Select a favorite team.■Live Sports Alert1Live Sports AlertThe Pop-up appears and notifies you of a sports alert function.1To set up a favorite teamSports alerts cut in only when SiriusXM ® mode is on.FeaturesYou can receive traffic and weather information.1.Select Settings .2.Select Traffic & Weather Now Setup .3.Select Selected City .4.Select the region.■Traffic and Weather Information1Traffic and Weather InformationWhen traffic and weather information is received, a notification is displayed in the header area.2Status Area P.244Traffic & Weather Now are registered trademarks of SiriusXM ® Radio, Inc.ContinuedFeaturesYou can view a channel schedule or receive an alert when your favorite program is about to start.■To view a channel schedule1.Select More .2.Select Channel Schedule .■To set up an alert message1.Select More .2.Select Channel Schedule .3.Select a program.4.Select Set Program Alert .5.Select Just Once or Everytime .■Channel Schedule1Channel ScheduleSelect Keypad to use the on-screen keyboard for entering the channel number directly.1To set up an alert messageThe Pop-up appears and notifies you of an alert function.Selecting Just Once disables the alert feature next time you turn the power mode to ON.If you want to delete the alert, select Remove Alert .To enable an alert message, change settings for the alert function.2To enable the alert function P.270FeaturesYou can change settings for the alert function.■To enable the alert function1.Select Settings .2.Select Manage Program Alerts .3.Select Notifications .4.Select ON or OFF .■To remove an alert1.Select Settings .2.Select Manage Program Alerts .3.Select Alerts Set .4.Select on the alert you want to delete.u A confirmation message appears on the screen. Select Yes .■Manage Program AlertContinuedFeaturesSample each channel on the selected mode for 10 seconds.1.Select More .2.Select Scan .You can change a scan mode by the following procedure.1.Select Settings .2.Select Scan Mode .3.Select Channel or Preset .To turn off scan, select Stop .■Scan1ScanThe “Scan Songs in Presets” function is based on TuneScan TM technology of SiriusXM ®.The “Featured Channels” function is based on Featured Favorites TM technology of SiriusXM ®.TuneScan TM and Featured Favorites TM are registered trademarks of SiriusXM ® Radio, Inc.Features Change the SiriusXM settings.1.Select Settings.2.Select an option.•Tune Mix: Turns multiple channel mix preset on and off.•Tune Mode: Choose whether to group by category or channel number when changing channels.•Scan Mode: Select the scan mode from all channels or presets.•Tune Start: Start the currently playing song at the beginning when you switch toa music channel preset.•Sports Notifications Setup: Set to receive sports alerts such as scores from your favorite teams.2Live Sports Alert P.267•Traffic & Weather Now Setup: Set to receive traffic and weather information.2Traffic and Weather Information P.268•Manage Program Alerts: Change settings for the alert function.2Manage Program Alert P.270■SiriusXM Settings。
播主帮助手册(进阶版)一、专辑的制作方法:点击后到达页面:若您选择上传文件到该专辑,可以同时选择多个文件如果您从已有文件中建立专辑,只用选择““在专辑里改变专辑里面节目的顺序:将鼠标放在其中一个专辑上会出现“编辑”字样,点击它。
我们可以直接在界面上编辑专辑内容的排序。
二、链接分享(如何扩大自己在喜马拉雅的影响力?)将自己的链接和声音转发到微博,朋友网,QQ空间等。
如何将喜马拉雅的上传的声音和您的评论同时链接到微博呢??绑定成功后,就可以将评论分享到新浪或腾讯微博,或者不分享点灰图标就行。
PS:重点提示,使用微博或者腾讯账号直接注册的,不要解绑三、提高人气的方法。
一、申请加V:只有加V播主才能够获得在我们平台上的推荐机会。
而且我们会通过我们的传播渠道,给予加V播主的高质量内容以传播和宣传,全力扶持播主积聚人气。
推广防守包括媒体广告投放,微博等社交平台的推广等。
而且只有加V播主才能获取未来的经济收益。
我们认证加V地址:/verify二、怎样才能快速积累粉丝?1,给您的声音内容配一些好看的图片,尺寸最好是640*640的,因为那在苹果手机的高分辨率屏幕下,效果特别好,能很好在手机上吸引听众。
即便您的内容质量很高,依然要控制自己内容发布频率,千万不要随便刷屏(即一次性上传很多内容),那样有可能导致您掉粉哦。
粉丝增加提示框,2,粉丝的留言,最好能及时回复,如果不方便经常在线,至少每天上来一次“消灭”这些留言。
更多的互动可以迅速为您聚集人气!偶尔用语音来发布一些与粉丝的互动,将会是对粉丝们最大的激励!,3,官方账号最好和台里的主播号们形成一个互动的群聚效应,人都爱凑热闹,越热闹的地方粉丝自然就越多。
三、怎样让我的声音被更多人发现?给声音配上一个简单直白又吸引人的标题,最好不要超过10个字,或者前10个字为主,后面的文字做补充。
给自己配一个好看的头像图片,给声音配一张吸引人的照片,无论是美丽的风景还是您自信大方的自拍照,只要是美的东西,大家都会喜欢!(为了适应苹果手机的高分辨率,图片尺寸尽量640*640)PS: 整档节目的更新尽量选在7点、16点、21点这3个节点,对应服务听众的上下班和睡前收听。
IOS 客户端使用手册注:为了保护您的隐私安全, 登陆后请修改机器的出厂密码, 并请妥善保管好用户名及密码。
手册版本:1、手机要求软件:IOS系统要求IOS 5.0或以上版本。
2、网络摄像机网络连接用户请参照《快速按装指南》来配置网络连接.3、客户端软件安装在App Store上搜索mipc。
点击【下载】按钮,下载完成后点击【安装】按钮。
输入App Store ID帐号和密码,安装完成。
4、客户端软件系统概述手机端主要功能包括:视频观看,对讲,云台控制,图片拍照,录像/回放,设备软件在线升级,设备设置管理及客户端后台通知提醒等功能。
4.1客户端软件系统登陆:4.1.1扫描二维码(云摄像机的ID 号)登陆:在应用程序中点击名为“mipc ”的图标运行进入登陆界面。
如下图:注:如果二维码扫描不到,需要手动输入机器上的ID 及密码(每台摄像机都配有一个唯一的ID 号及密码)。
4.1.2注册帐号登陆,添加管理多台摄像机: 在应用程序中打开“mipc ”。
如下图:点击【注册】按钮用户注册成功后,进到下图界面。
1.点击mipc 图标1.点击mipc 图标2.点击"注册"账号注:摄像机设备管理界面的设备左下角是绿点表示设备在线,红点表示设备不在线4.2客户端软件系统操作:4.2.1 监控主界面功能按键:5.登陆用手指滑动画面,云台转动:声音监听开关按键:对讲开关按键:手动拍照:手动(临时)录像按键,灰色表示没有录像,红色表示正在录像。
注:如果用户使用手动(临时)录像按键来录像时,当用户退出监控画面后,录像就会结束,录像文手动拍照后保存图片,点击监控画面的键,进行以下的画面。
4.2.2图像分辩率选择:4.2.3注册账号添加摄像机设备:1.点击图标保存图片到手机1.点击图标4.2.4 客户端设置:注:通过管理员密码登录帐号,可以对该账号中的设备进行管理,如添加、删除设备等;通过访客密码登录该账号,则只能观看、旋转该账号中的摄像机,不能修改该账号中的摄像机的参数。
喜马拉雅
软件简介:中国最大声音库,万能电台,你可以随时随地听我想听,也可以轻松创建个人电台,随时分享好声音。
主要功能:
1、重新发明电台,只为你需要!
2、上下班路上必备收听神器!
3、随手发声音微博,随时和播主互动!
产品特点:
内容丰富,包括有声小说、新闻谈话、相声评书小品、综艺节目、音乐节目、 教育培训、财经证券、儿童故事、笑话大全、健康养生等。
下载安装:
在手机APP STORE 或者电脑Itunes 中搜索喜马拉雅,根据系统提示操作即可免费下载安装。
使用介绍: 1、主界面:
2、登陆:点击“登陆”,如有新浪微博账号或者腾讯QQ账号,可直接选择登陆。
3、主界面菜单:“关注的”、“下载的”、“录音”、“发现”、“我”
点击此处
可以看自
己喜欢的,
播放历史,
和自己的
分组
这里可以
换各种头
像
4、找听友:点击左上角的图标会出现“找听友”的选项,可根据提示选择添加听友。
5、正在播放:选择右上角的图标则显示目前正在收听的节目。
按住此处
就可以录
音啦
这里可以
查找各种
听友
这里可以
关注您所
喜欢听好
现在所播
放的节目。