基于NI Vision的变送器液晶显示自动检测系统研究
- 格式:pdf
- 大小:676.29 KB
- 文档页数:2

实验一 NI ELVIS 虚拟仪器实验系统及LabVIEW 认知实验一、 实验目的1.熟悉NI ELVIS 虚拟仪器实验系统的工作环境。
2.熟悉LabVIEW 虚拟仪器软件及其开发环境。
二、 实验仪器组成及功能(一) NI ELVIS 虚拟仪器实验系统硬件组成部分:NI ELVIS 虚拟仪器实验系统是以LabVIEW 为软件开发平台,集成了常用仪器功能的系统,它包括一套多功能数据采集设备与一个用户自定义的实验工作台,工作台上还有一块原型实验面包板。
一套完整的NI ELVIS 虚拟仪器实验系统由如下四部分组成。
如图1-1图1-1 NI ELVIS 虚拟仪器实验系统的硬件部分 1.计算机配置要求:内存1G 以上,DVD 光驱; 2.NI ELVIS 实验工作台:外形如图1-2图1-2 NI ELVIS实验工作台它由如下几部分组成:1)控制面板:如图1-3图1-3 NI ELVIS实验工作台控制面板按功能区分有以下七部分:(1)系统电源LED显示(2)面包板电源开关(3)通讯开关(4)可变电源控制:分正负电源控制(5)函数发生器控制(6)数字多用表接线端:有电压,电流两组香蕉插座注意:如果已经使用了控制面板上的DMM(数字多用表)的输入端,则实验面包板上的DMM输入插孔就不能再使用。
否则会导致这两部分短路,损坏仪器。
(7)示波器接线端注意:如果已经使用了控制面板上的SCOPE(示波器)的BNC连接端,则实验面包板上的Oscilloscope的输入插孔就不能再使用。
否则会导致这两部分短路,损坏仪器。
2)后面板:如图1-4图1-4 NI ELVIS实验工作台后面板3)实验面包板NI ELVIS实验工作台的实验面包板如图1-5所示,主要包括如下9个部分图1-5 NI ELVIS实验工作台面包板(1)Analog Input Signals,Oscilloscope,and Programmable Function I/O (模拟输入信号行,示波器输入行,可编程函数I/O行)(2)Digital I/O (数字输入/输出信号行)(3)LED Array (LED 阵列)(4)D-SUB (D形接口)(5)Counters,User Configurable I/O,and DC Power Supply (计数器输入行,用户配置I/O行(数字信号),直流电源信号行)(6)DMM,Analog Outputs,Function Generator,User Configurable I/O,Variable Power Supplies,DC Power Supplies (数字多用表信号输入行,模拟信号输出行,函数发生器信号行,用户配置I/O行(模拟信号),可变电源信号行,直流电源信号行)(7)Power LEDs (电源LED显示)(8)BNC Connectors (同轴电缆连接端)(9)Banana Jack Connectors (香蕉插座连接端) (二)NI ELVIS虚拟仪器实验系统软件:图1-6 NI ELVIS虚拟仪器软件套件的启动界面NI ELVIS 虚拟仪器软件套件集成了由LabVIEW软件开发出的12种虚拟仪器,它们分别是Digital Multimeter(数字多用表)、Oscilloscope(示波器)、Function Generator(函数发生器)、Variable Power Supplies(可变电源)、Bode Analyzer(波特分析仪)、Dynamic Signal Analyzer(动态信号分析仪)、Arbitrary Waveform Generator(任意信号发生器)、Digital Reader (数字信号监控仪)、Digital Writer(数字信号记录仪)、Impedance Analyzer(阻抗分析仪)、Two-Wire Current-V oltage Analyzer(两线电流-电压分析仪)、Three-Wire Current-Voltage Analyzer(三线电流-电压分析仪)。


NI VisionNI Vision Builder for Automated Inspection TutorialAugust 2012373379K-01Worldwide Technical Support and Product InformationWorldwide OfficesVisit /niglobal to access the branch office Web sites, which provide up-to-date contact information, support phone numbers, email addresses, and current events.National Instruments Corporate Headquarters11500 North Mopac Expressway Austin, Texas 78759-3504USA Tel: 512 683 0100 For further support information, refer to the Technical Support and Professional Services appendix. To comment on National Instruments documentation, refer to the National Instruments Web site at /info and enter the Info Code feedback.Important InformationWarrantyThe media on which you receive National Instruments software are warranted not to fail to execute programming instructions, due to defects in materials and workmanship, for a period of 90 days from date of shipment, as evidenced by receipts or other documentation. National Instruments will, at its option, repair or replace software media that do not execute programming instructions if National Instruments receives notice of such defects during the warranty period. National Instruments does not warrant that the operation of the software shall be uninterrupted or error free.A Return Material Authorization (RMA) number must be obtained from the factory and clearly marked on the outside of the package before any equipment will be accepted for warranty work. National Instruments will pay the shipping costs of returning to the owner parts which are covered by warranty.National Instruments believes that the information in this document is accurate. The document has been carefully reviewed for technical accuracy. In the event that technical or typographical errors exist, National Instruments reserves the right to make changes to subsequent editions of this document without prior notice to holders of this edition. The reader should consult National Instruments if errors are suspected. In no event shall National Instruments be liable for any damages arising out of or related to this document or the information contained in it.E XCEPT AS SPECIFIED HEREIN, N ATIONAL I NSTRUMENTS MAKES NO WARRANTIES, EXPRESS OR IMPLIED, AND SPECIFICALLY DISCLAIMS ANY WARRANTY OF MERCHANTABILITY OR FITNESS FOR A PARTICULAR PURPOSE. C USTOMER’S RIGHT TO RECOVER DAMAGES CAUSED BY FAULT OR NEGLIGENCE ON THE PART OF N ATIONAL I NSTRUMENTS SHALL BE LIMITED TO THE AMOUNT THERETOFORE PAID BY THE CUSTOMER. N ATIONAL I NSTRUMENTS WILL NOT BE LIABLE FOR DAMAGES RESULTING FROM LOSS OF DATA, PROFITS, USE OF PRODUCTS, OR INCIDENTAL OR CONSEQUENTIAL DAMAGES, EVEN IF ADVISED OF THE POSSIBILITY THEREOF. This limitation of the liability of National Instruments will apply regardless of the form of action, whether in contract or tort, including negligence. Any action against National Instruments must be brought within one year after the cause of action accrues. National Instruments shall not be liable for any delay in performance due to causes beyond its reasonable control. The warranty provided herein does not cover damages, defects, malfunctions, or service failures caused by owner’s failure to follow the National Instruments installation, operation, or maintenance instructions; owner’s modification of the product; owner’s abuse, misuse, or negligent acts; and power failure or surges, fire, flood, accident, actions of third parties, or other events outside reasonable control.CopyrightUnder the copyright laws, this publication may not be reproduced or transmitted in any form, electronic or mechanical, including photocopying, recording, storing in an information retrieval system, or translating, in whole or in part, without the prior written consent of National Instruments Corporation.National Instruments respects the intellectual property of others, and we ask our users to do the same. NI software is protected by copyright and other intellectual property laws. Where NI software may be used to reproduce software or other materials belonging to others, you may use NI software only to reproduce materials that you may reproduce in accordance with the terms of any applicable license or other legal restriction.End-User License Agreements and Third-Party Legal NoticesYou can find end-user license agreements (EULAs) and third-party legal notices in the following locations:•Notices are located in the <National Instruments>\_Legal Information and <National Instruments> directories.•EULAs are located in the <National Instruments>\Shared\MDF\Legal\license directory.•Review <National Instruments>\_Legal Information.txt for more information on including legal information in installers built with NI products.TrademarksLabVIEW, National Instruments, NI, , the National Instruments corporate logo, and the Eagle logo are trademarks of National Instruments Corporation. Refer to the Trademark Information at /trademarks for other National Instruments trademarks.Other product and company names mentioned herein are trademarks or trade names of their respective companies. Members of the National Instruments Alliance Partner Program are business entities independent from National Instruments and have no agency, partnership, or joint-venture relationship with National Instruments.PatentsFor patents covering National Instruments products/technology, refer to the appropriate location: Help»Patents in your software, the patents.txt file on your media, or the National Instruments Patent Notice at /patents.Export Compliance InformationRefer to the Export Compliance Information at /legal/export-compliance for the National Instruments global trade compliance policy and how to obtain relevant HTS codes, ECCNs, and other import/export data.WARNING REGARDING USE OF NATIONAL INSTRUMENTS PRODUCTS(1) NATIONAL INSTRUMENTS PRODUCTS ARE NOT DESIGNED WITH COMPONENTS AND TESTING FOR A LEVEL OF RELIABILITY SUITABLE FOR USE IN OR IN CONNECTION WITH SURGICAL IMPLANTS OR AS CRITICAL COMPONENTS IN ANY LIFE SUPPORT SYSTEMS WHOSE FAILURE TO PERFORM CAN REASONABLY BE EXPECTED TO CAUSE SIGNIFICANT INJURY TO A HUMAN.(2) IN ANY APPLICATION, INCLUDING THE ABOVE, RELIABILITY OF OPERATION OF THE SOFTWARE PRODUCTS CAN BE IMPAIRED BY ADVERSE FACTORS, INCLUDING BUT NOT LIMITED TO FLUCTUATIONS IN ELECTRICAL POWER SUPPLY, COMPUTER HARDWARE MALFUNCTIONS, COMPUTER OPERATINGPROBLEMS, MALFUNCTIONS OR FAILURES OF ELECTRONIC MONITORING OR CONTROL DEVICES, TRANSIENT FAILURES OF ELECTRONIC SYSTEMS (HARDWARE AND/OR SOFTWARE), UNANTICIPATED USES OR MISUSES, OR ERRORS ON THE PART OF THE USER OR APPLICATIONS DESIGNER (ADVERSE FACTORS SUCH AS THESE ARE HEREAFTER COLLECTIVELY TERMED “SYSTEM FAILURES”). ANY APPLICATION WHERE A SYSTEM FAILURE WOULD CREATE A RISK OF HARM TO PROPERTY OR PERSONS (INCLUDING THE RISK OF BODILY INJURY AND DEATH) SHOULD NOT BE RELIANT SOLELY UPON ONE FORM OF ELECTRONIC SYSTEM DUE TO THE RISK OF SYSTEM FAILURE. TO AVOID DAMAGE, INJURY, OR DEATH, THE USER OR APPLICATION DESIGNER MUST TAKE REASONABLY PRUDENT STEPS TO PROTECT AGAINST SYSTEM FAILURES, INCLUDING BUT NOT LIMITED TO BACK-UP OR SHUT DOWN MECHANISMS. BECAUSE EACH END-USER SYSTEM IS CUSTOMIZED AND DIFFERS FROM NATIONAL INSTRUMENTS' TESTING PLATFORMS AND BECAUSE A USER OR APPLICATION DESIGNER MAY USE NATIONAL INSTRUMENTS PRODUCTS IN COMBINATION WITH OTHER PRODUCTS IN A MANNER NOT EVALUATED OR CONTEMPLATED BY NATIONAL INSTRUMENTS, THE USER OR APPLICATION DESIGNER IS ULTIMATELY RESPONSIBLE FOR VERIFYING AND VALIDATING THE SUITABILITY OF NATIONAL INSTRUMENTS PRODUCTS WHENEVER NATIONAL INSTRUMENTS PRODUCTS ARE INCORPORATED IN A SYSTEM OR APPLICATION, INCLUDING, WITHOUT LIMITATION, THE APPROPRIATE DESIGN, PROCESS AND SAFETY LEVEL OF SUCH SYSTEM OR APPLICATION.ContentsAbout This Manual Conventions (x)Related Documentation (x)Chapter 1Introduction to Vision Builder AIVision Builder AI Configuration Interface.......................................................................1-4 Elements of the Configuration Interface..................................................................1-5 Inspection State Diagram..........................................................................................1-6 Vision Builder AI Inspection Interface............................................................................1-7 Running an Inspection......................................................................................................1-8 Configuration Interface.............................................................................................1-8 Inspection Interface..................................................................................................1-9 Chapter 2Checking for the Presence of a PartCreating a New Inspection...............................................................................................2-1 Acquiring Inspection Images............................................................................................2-1 Defining a Feature on which to Base a Coordinate System.............................................2-2 Setting a Coordinate System.............................................................................................2-6 Checking for the Cap Using Measure Intensity................................................................2-6 Setting the Inspection Status.............................................................................................2-8 Testing the Inspection.......................................................................................................2-9 Saving the Inspection........................................................................................................2-9 Chapter 3Inspecting Objects for Correct MeasurementsCreating a New Inspection...............................................................................................3-1 Acquiring and Calibrating Inspection Images..................................................................3-1 Locating Features to Measure...........................................................................................3-4 Measuring Parts of the Gasket..........................................................................................3-7 Setting the Inspection Status.............................................................................................3-8 Testing the Inspection.......................................................................................................3-8 Saving the Inspection........................................................................................................3-9 Chapter 4Inspecting for Multiple Correct Instances of an ObjectCreating a New Inspection...............................................................................................4-1 Acquiring Inspection Images............................................................................................4-1 Defining a Feature on which to Base a Coordinate System.............................................4-2 Setting a Coordinate System.............................................................................................4-3ContentsMeasuring the Separation between Connectors................................................................4-3 Inspecting the Fuse Conductor.........................................................................................4-5 Making Logical PASS/FAIL Decisions...........................................................................4-7 Setting the Inspection Status.............................................................................................4-9 Testing the Inspection.......................................................................................................4-10 Saving the Inspection........................................................................................................4-10 Chapter 5Inspecting an Object that Spans Two Image FramesCreating a New Inspection................................................................................................5-1 Acquiring Inspection Images from Two Cameras............................................................5-1 Acquiring and Calibrating the Image of the Left Edge............................................5-2 Acquiring and Calibrating the Image of the Right Edge..........................................5-5 Locating the Right Edge of the Part..................................................................................5-7 Switching Images..............................................................................................................5-9 Locating the Left Edge of the Part....................................................................................5-9 Calculating the Width of the Part.....................................................................................5-10 Setting Calculator Step Inputs and Outputs..............................................................5-11 Adding Operators and Constants..............................................................................5-12 Connecting the Equation Elements...........................................................................5-14 Making Logical PASS/FAIL Decisions with the Calculator Step............................5-15 Setting the Inspection Status.............................................................................................5-17 Testing the Inspection.......................................................................................................5-17 Saving the Inspection........................................................................................................5-18 Chapter 6Branching and Decision MakingCreating a New Inspection................................................................................................6-1 Creating the Inspection State Diagram.............................................................................6-1 Acquiring Inspection Images............................................................................................6-5 Checking for a Spray Bottle in the Image.........................................................................6-6 Checking for the Cap Using the Caliper...........................................................................6-7 Setting the Inspection Status.............................................................................................6-9 Creating Custom Overlays for Inspection........................................................................6-9 Configuring State Transitions...........................................................................................6-11 Testing the Inspection.......................................................................................................6-13 Saving the Inspection........................................................................................................6-14 Chapter 7Looping and VariablesCreating a New Inspection................................................................................................7-1 Creating the Inspection State Diagram.............................................................................7-1 Creating a Variable...........................................................................................................7-5 Acquiring Inspection Images............................................................................................7-5Contents Finding Pin Edges.............................................................................................................7-6 Initializing the Variable....................................................................................................7-7 Indexing Measurements in a Result Array.......................................................................7-8 Setting a Coordinate System.............................................................................................7-8 Checking the Pin Gap.......................................................................................................7-9 Updating the Variable.......................................................................................................7-10 Identifying Failed Pins......................................................................................................7-10 Setting the Inspection Status.............................................................................................7-11 Displaying the Current Inspection Image.........................................................................7-12 Configuring State Transitions...........................................................................................7-13 Testing the Inspection.......................................................................................................7-14 Saving the Inspection........................................................................................................7-14 Appendix ATechnical Support and Professional ServicesGlossaryAbout This ManualThis manual contains many techniques for using NI Vision Builder for Automated Inspection (Vision Builder AI) to solve visual inspection tasks including inspection, gauging, part presence, guidance, and counting.Follow the instructions in this manual to familiarize yourself with Vision Builder AI and perform common inspection tasks.This manual contains the following chapters:•Chapter1, Introduction to Vision Builder AI, introduces the Vision Builder AI environment and describes how to run an inspection.•Chapter2, Checking for the Presence of a Part, introduces the Match Pattern, Measure Intensity, and Set Coordinate System steps. Follow the instructions in this chapter to create an inspection that checks for the presence of a spray bottle cap regardless of the bottle position in the inspection images.•Chapter3, Inspecting Objects for Correct Measurements, introduces image calibration, and the Detect Objects and Geometry steps. Follow the instructions in this chapter to create an inspection that measures the distance between holes in a gasket to verify that the gasket conforms to manufacturing specifications.•Chapter4, Inspecting for Multiple Correct Instances of an Object, introduces the Find Straight Edge, Caliper, and Decision Making steps. Follow the instructions in thischapter to create an inspection that measures the distance between the blade connectors ofa fuse and checks the integrity of the fuse conductor regardless of the fuse position orwhether the fuse is inverted.•Chapter5, Inspecting an Object that Spans Two Image Frames, introduces the Select Image and Calculator steps. Follow the instructions in this chapter to create an inspection that measures the width of a wooden plank that spans two images.•Chapter6, Branching and Decision Making, introduces the inspection state diagram and the Custom Overlay step. Follow the instructions in this chapter to create an inspection that checks the image for the presence of a spray bottle and, if a bottle is present, transitions to another state to determine if the bottle has a cap. If there is no spray bottle present in the image, the inspection moves on to the next image.•Chapter7, Looping and Variables, uses the inspection state diagram to implement a looping inspection and introduces the Set Variable and Array Operator steps. Follow the instructions in this chapter to create an inspection that inspects images of electroniccomponents to determine if the distance between pins on the component is within apredetermined range. If the pin is too close or too far away from an adjacent pin, then the inspection fails. The inspection does not need to check every pin on the microchip before failing the inspection. The inspection fails at the first failed pin.About This ManualConventionsThe following conventions appear in this manual:»The » symbol leads you through nested menu items and dialog boxoptions to a final action. The sequence Options»Settings»Generaldirects you to pull down the Options menu, select the Settings item,and select General from the last dialog box.This icon denotes a tip, which alerts you to advisory information.This icon denotes a note, which alerts you to important information.This icon denotes a caution, which advises you of precautions to taketo avoid injury, data loss, or a system crash.bold Bold text denotes items that you must select or click in the software,such as menu items and dialog box options. Bold text also denotesparameter names.italic Italic text denotes variables, emphasis, a cross-reference, or anintroduction to a key concept. Italic text also denotes text that is aplaceholder for a word or value that you must supply.monospace Text in this font denotes text or characters that you should enter fromthe keyboard, sections of code, programming examples, and syntaxexamples. This font is also used for the proper names of disk drives,paths, directories, programs, subprograms, subroutines, device names,functions, operations, variables, filenames, and extensions. Related DocumentationThe following documents contain information that you might find helpful as you read this manual:•NI Vision Builder for Automated Inspection Readme—Contains information about the minimum system requirements, installation instructions, device support, and known issues for NI Vision Builder for Automated Inspection. The NI Vision Builder for Automated Inspection Readme is available at Start»All Programs»National Instruments»Vision Builder AI»Documentation.•NI Vision Builder for Automated Inspection: Configuration Help—Contains information about using the Vision Builder AI Configuration interface to create a machine visionapplication. NI Vision Builder for Automated Inspection: Configuration Help is available by selecting Help»Online Help from the Vision Builder AI Configuration interface.About This Manual •NI Vision Builder for Automated Inspection: Inspection Help—Contains information about running applications created using Vision Builder AI in the Vision Builder AI Inspection Interface. NI Vision Builder for Automated Inspection: Inspection Help is available by selecting Help»Online Help from the Vision Builder AI Inspection interface.•NI Developer Zone—Visit /zone for the latest example programs, tutorials, technical presentations, and a community area where you can share ideas, questions, and source code with developers around the world.•NI 17xx Smart Camera User Manual—Describes the electrical and mechanical aspects of the NI 17xx smart camera, troubleshooting guidelines, and information about the LEDs, DIP switches, and connectors on the NI 17xx.•NI 177x Smart Camera User Manual—Describes the electrical and mechanical aspects of the NI 177x smart camera and information about the LEDs and connectors on the NI 177x.•NI EVS-1463 User Manual—Describes the electrical and mechanical aspects of the NI EVS-1463 embedded vision system, troubleshooting guidelines, and information about the LEDs, DIP switches, and connectors on the EVS-1463 device.•NI EVS-1464 User Manual—Describes the electrical and mechanical aspects of the NI EVS-1464 embedded vision system, troubleshooting guidelines, and information about the LEDs, DIP switches, and connectors on the EVS-1464 device.•NI Smart Camera I/O Accessory User Guide—Describes the features of the NI Smart Camera I/O Accessory, what you need to get started, and the installation and operation of the device.•NI Vision Concepts Help—Describes the basic concepts of image analysis, image processing, and machine vision. This document also contains in-depth discussions about imagingalgorithms for advanced users. The NI Vision Concepts Help is available by selectingStart»All Programs»National Instruments»Vision Builder AI»Documentation»NI Vision Concepts Help from the Start menu.1 Introduction to Vision Builder AIThis chapter introduces the Vision Builder AI environment and describes how to run an inspection.Figures1-1 and1-2 show general instructions for creating a Vision Builder AI inspection. Figure1-1 describes the basic steps for designing a Vision Builder AI inspection. The Add Inspection Steps module of Figure1-1 is expanded in Figure1-2.Chapter 1Introduction to Vision Builder AIFigure 1-1. Instructions for Creating a Basic Vision Builder AI InspectionChapter 1Introduction to Vision Builder AIFigure 1-2. Adding Inspection Steps to a Vision Builder AI InspectionChapter 1Introduction to Vision Builder AIVision Builder AI Configuration InterfaceVision Builder AI has two modes of operation: Configuration and Inspection. Use the Configuration interface to configure and test your inspection. Use the Inspection interface to deploy the software and perform online or offline visual inspection.Complete the following instructions to open the Vision Builder AI Configuration interface. 1.Select Start»All Programs»National Instruments»Vision Builder AI to launch VisionBuilder AI.Note By default, My Computer is selected in the list of targets. When My Computeris selected Vision Builder AI runs on the development computer.2.On the Vision Builder AI welcome screen, click New Inspection to open the Vision BuilderAI Configuration Interface.Chapter 1Introduction to Vision Builder AIElements of the Configuration InterfaceFigure 1-3 shows the Vision Builder AI Configuration interface. The Configuration interface contains four areas: Main window, Overview window, Inspection Steps palette, and State Configuration window.Figure 1-3. Vision Builder AI Configuration Interface•Main window —Displays the image being processed, property pages for some inspection steps, or the state diagram for the inspection. Use the Main window to define regions of interest in an image, configure step parameters for some steps, and create/modify the state diagram for an inspection.•Overview window —Displays a thumbnail view of either the current inspection image or the state diagram for the inspection.1M a in Window 2Overview Window3In s pection S tep s P a lette 4S t a te Config u r a tion Window43Chapter 1Introduction to Vision Builder AI•Inspection Steps palette—Lists and describes the steps that you use to create your inspection. When you click on most steps, the palette transforms into the property page for the step.•State Configuration window—Displays the list of steps in the currently selected state in the inspection.Inspection State DiagramVision Builder AI uses a state diagram to define inspections with unique states and transitions that govern the execution flow of the inspection. Simple inspections can be defined using the single-state default inspection, shown in Figure1-4.Figure 1-4. Default Inspection State DiagramMore complex inspections can be created by adding additional states and transitions to the default state diagram. Figure1-5 shows an example of an inspection that uses the state diagram to perform branching and looping in the inspection.Figure 1-5. Example of a Vision Builder AI Inspection State DiagramChapter 1Introduction to Vision Builder AI Within a state diagram, each state can lead to one or multiple states or can end the inspection cycle. Each state diagram relies on in-state calculations or user input to determine the next state to execute. Vision Builder AI executes the state diagram continuously from the Start point to the End point.Each state in an inspection is intended to contain a discrete set of inspection steps. To access the steps contained in a state, select the state on the state diagram. The steps present in the state will appear in the State Configuration window. The currently selected state is highlighted on the state diagram.Chapter6, Branching and Decision Making,and Chapter7, Looping and Variables,provide examples of using the state diagram.Vision Builder AI Inspection InterfaceAs mentioned in the Vision Builder AI Configuration Interface section of this chapter, use the Vision Builder AI built-in Inspection Interface to deploy and run an inspection. Figure1-6 shows the built-in Inspection interface, which has three main areas: the Results panel, the Inspection Statistics panel, and the Display window.121In s pection S t a ti s tic s P a nel2Di s pl a y Window 3Re su lt s P a nelFigure 1-6. Vision Builder AI Built-in Inspection Interface。

基于LabVIEW的仪器自动化监控系统设计与实现随着科技的不断发展,仪器设备在各行各业中扮演着越来越重要的角色。
为了提高工作效率和准确性,我们需要一种自动化的仪器监控系统来实时监测仪器设备的状态,并能够迅速响应异常情况。
而基于LabVIEW的仪器自动化监控系统正是为了满足这一需求而设计和实现的。
LabVIEW是一款基于图形化编程语言的开发环境,它具有直观、可视化的特点,使得用户能够快速开发各种类型的测量和控制应用。
利用LabVIEW,我们可以轻松地设计和实现仪器自动化监控系统,并通过数据采集、处理、分析和可视化等功能,实现对仪器设备的实时监控。
首先,我们需要明确系统的功能需求。
通常情况下,仪器自动化监控系统应该具备以下功能:1. 实时监测仪器设备状态:通过传感器、数据采集卡等设备,实时采集仪器设备的各种参数,比如温度、湿度、压力等。
这些数据将作为监控系统的输入,用于判断仪器设备是否正常工作。
2. 异常报警和处理:当仪器设备发生异常时,监控系统应该及时发出警报,并采取相应的措施进行处理。
比如,如果温度超过设定的范围,系统应该立即通知操作人员,或者自动采取控制措施调整温度。
3. 数据记录和分析:监控系统应该能够将仪器设备的工作数据记录下来,并提供数据分析和报告功能,帮助用户了解仪器设备的工作情况以及发现潜在的问题。
这对于仪器设备的维护和改进非常重要。
4. 跨平台支持和远程访问:监控系统应该支持跨多个平台,比如Windows、Linux等,以便用户可以在不同的操作系统上使用。
同时,系统还应该支持远程访问,使得用户可以在远程地点监控和操作仪器设备。
在明确系统功能需求后,我们就可以开始设计和实现基于LabVIEW的仪器自动化监控系统了。
首先,我们需要根据实际情况选择合适的硬件设备,比如传感器、数据采集卡等,用于采集仪器设备的各种参数。
LabVIEW支持与多种硬件设备的通信,并提供了一系列的函数和工具包来实现数据采集。
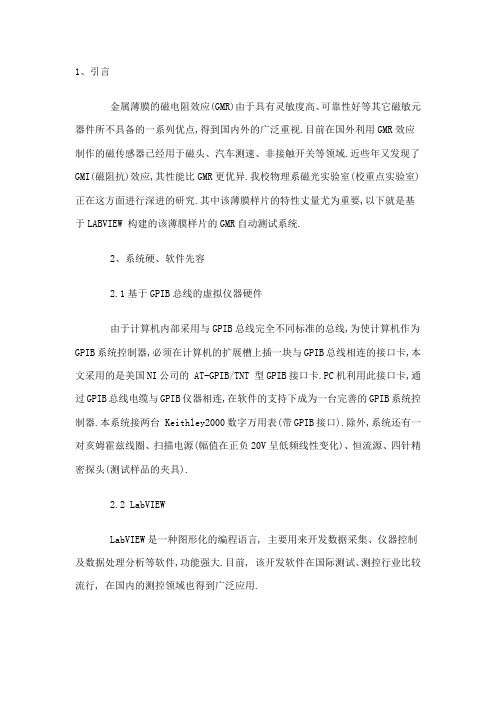
1、引言金属薄膜的磁电阻效应(GMR)由于具有灵敏度高、可靠性好等其它磁敏元器件所不具备的一系列优点,得到国内外的广泛重视.目前在国外利用GMR效应制作的磁传感器已经用于磁头、汽车测速、非接触开关等领域.近些年又发现了GMI(磁阻抗)效应,其性能比GMR更优异.我校物理系磁光实验室(校重点实验室)正在这方面进行深进的研究.其中该薄膜样片的特性丈量尤为重要,以下就是基于LABVIEW 构建的该薄膜样片的GMR自动测试系统.2、系统硬、软件先容2.1基于GPIB总线的虚拟仪器硬件由于计算机内部采用与GPIB总线完全不同标准的总线,为使计算机作为GPIB系统控制器,必须在计算机的扩展槽上插一块与GPIB总线相连的接口卡,本文采用的是美国NI公司的 AT-GPIB/TNT 型GPIB接口卡.PC机利用此接口卡,通过GPIB总线电缆与GPIB仪器相连,在软件的支持下成为一台完善的GPIB系统控制器.本系统接两台 Keithley2000数字万用表(带GPIB接口).除外,系统还有一对亥姆霍兹线圈、扫描电源(幅值在正负20V呈低频线性变化)、恒流源、四针精密探头(测试样品的夹具).2.2 LabVIEWLabVIEW是一种图形化的编程语言, 主要用来开发数据采集、仪器控制及数据处理分析等软件,功能强大.目前, 该开发软件在国际测试、测控行业比较流行, 在国内的测控领域也得到广泛应用.采用美国NI公司的LABVIEW的图形化编程语言作为开发平台,可以通过三种方式对GPIB仪器进行控制:(1) 用GPIB程序库实现控制在InstrumentI/O功能子模板下有很多GPIB函数,GPIB488-2子模板下有很多GPIB通讯功能子程序模块,这些模块在工作平台上可以调用低层的488-2驱动软件.(2)利用仪器驱动程序进行控制LABVIEW提供世界50多家着名厂家的600多种GPIB 仪器、VXI仪器以及串行口仪器的驱动程序.仅仅拥有控制单台仪器的软件,意义并不大,其真正意义在于可以把仪器驱动程序作为子程序调用.这样利用仪器驱动程序库,很方便的实现对GPIB仪器的控制.(3)利用VISA库实现控制VISA(Virtual Instrument Software Architecture),实质是一个I/O接口软件库及其规范的总称,它包含了GPIB仪器、VXI仪器、RS232仪器等各类仪器的控制操纵.所有的VISA功能模块都包含在Instrument I/O功能模块的VISA子模块中,其中VISA OPEN模块用于与指定的设备建立通讯;VISA WRITE 模块把写缓冲其中的字符串写进指定的设备;VISA READ 模块读取制定设备的数据;VISA CLOSE 模块封闭制定设备的通讯过程,开释系统资源.本系统采用GPIB程序库实现对GPIB仪器的控制.3、测试系统组成及原理基于GPIB总线的虚拟仪器系统组成原则,我们建立了一套H--R曲线虚拟仪器测试系统,计算机通过GPIB 接口卡及两个Keithley2000 六位半数字电压表对测试对象进行实时测试.样片阻抗丈量采用四端口丈量法.两根电流引线接1mA恒流源,另两根电压引线接Keithley2000数字电压表,由于电压丈量回路的高输进阻抗特性,吸取的电流极小,因此能够避免引线及接点电阻给丈量带来的影响.样片所在磁场的磁场的磁场强度时通过拟合曲线B=f(U/R)得到的,其中U 为对亥姆霍兹线圈所加的电压,R为线圈电阻,B为线圈在不同电压下的磁场强度.3.1系统测试硬件结构图为:本测试系统要研究的是样品在连续线性变化的磁场中所呈现的阻值的变化特性,即数字表1的丈量值(经过处理为样品阻值)随数字表2的丈量值(通过拟合曲线得到磁场强度)的变化情况,因此选择 XY波形记录控件来显示丈量结果.要完成虚拟仪器的测试功能,软件的设计是关键.基于LABVIEW的虚拟仪器测试软件设计包括前面板的设计及后台图形化控制程序的设计.前面板是图形化用户界面,模拟真实仪器,由控制、指示和修饰等部分组成.用户可以使用各种图标,如按钮、开关、XY波形记录控件等等,设置输进数值和观察输出量.3.2测试系统的前面板设计L abV IEW 通过"所见即所得"的可视化技术建立起友好的人机界面,针对测试和过程控制领域,提供了大量的控制对象.本系统仪器控制前面板如图1所示,主要控制对象包含有:图1 虚拟仪器测试系统前面板设计GPIB Address: 通过设置地址来控制指定的GP IB 仪器功能: 数字表的丈量功能,包括直流电流、交流电流、直流电压、交流电压、两线电阻,四线电阻某一点求均匀值的个数N1:对N1个数取均匀得到绘图时的一个元素N毫秒采集一个有效点:采样时间间隔取点数N: 采集够N个元素后绘图Chart history size: XY波形记录的最大缓存字节数write: 点击启动测试主要显示对象:XY chart: H---R 曲线图STOP : 点击则停止采样开始将H---R 曲线数据以文本文件形式保存到可以选择的路径下3.3对应前面板的后台程序如下(图形化语言):该框图充分利用了循环、顺序和条件等程序控制的结构框架,灵活处理了各模块间的连接,另外,全局变量及局部变量的运用也使前面板简洁了很多.框图中为XY波形记录建立的缓存Chart history size采用SubVI的形式也充分体现了LABVIEW的模块化编程思想.启动测试后,有效数据显示在XY波形图上,若对测试效果满足,按下STOP 按钮停止丈量,当弹出文件保存对话框时,输进文件名及保存地址保存数据以便后处理.文件保存后,丈量继续.框图程序与系统硬件一起组成一个完整的虚拟仪器测试系统,充分体现了"软件就是仪器"的思想.4、结论本文基于GPIB总线技术,计算机通过GPIB接口卡控制带有GPIB总线接口的数字电压表,在Labview环境下完成了虚拟仪器前面板以及后台框图程序的设计,建立了一套H-R曲线虚拟仪器测试系统.经实际使用证实,该系统工作可靠,丈量正确,与用传统语言编写的软件相比,界面简洁、清楚.这也充分体现了LABVIEW 在自动测试领域的上风及辉煌的远景,尤其为巨磁电阻的特性丈量提供了更直观更便捷的测试平台.。

基于LabVIEW的智能测控系统设计复旦大学物理学系芦维宁梁建辉摘要为了创造舒适的家居环境、开发便捷的运输工具,本文将介绍如何以LabVIEW 为平台,进行智能家居系统的设计和智能电梯的实现。
实验中,我们编写了对温度、光强、压力的数据采集程序,以及对LED信号灯、马达的仪器控制程序,并以此为基本模块,使用一定的逻辑语言将其组合成为智能家居系统和智能电梯系统。
智能家居系统能够对温度、光照度信号进行实时采集,通过信号处理,实现对门窗和窗帘的控制;智能电梯除了具备现有电梯的功能之外,增加了对环境指数评估、进行语音提示等功能。
软件平台简单易用,实验效率和数据测试精度高,而且测试成本低。
关键词智能家居系统智能电梯 LabVIEW 数据采集仪器控制引言随着现代科技的发展和生活节奏的加快,智能与便捷成了人们对日常工具的基本要求,创造智能家居系统和便捷的智能运输工具非常必要。
实现智能控制的方法有很多,可以通过可编程控制器PLC、单片机、标准逻辑器件等方案实现,但是这些控制方法的功能修改和调试都需要硬件电路的支持,一定程度上增加了设计难度,提高了设计成本。
随着计算机技术的迅猛发展虚拟仪器技术在数据采集、自动测试和仪器控制领域得到广泛应用,促进并推动测试技术和测量控制的设计方法与实现技术发生了深刻变化。
“软件就是仪器”已经成为测试和测量技术发展的重要标准。
LabVIEW 是美国国家仪器公司(National Instrument)开发的一种虚拟仪器平台,它是一种用图标代码来代替文本式编程语言创建应用程序的开发工具。
直观的图形化开发环境、强大的数据处理功能、丰富的可视化显示功能、完备的仪器驱动程序、完善的外部代码接口和强大的网络功能等诸多优势让它成为了我们实现智能系统的不二选择。
基本程序的设计一.光强测量程序【前面板设计】如图所示,前面板的左上旋钮可以调节光强大小,右上曲线图可以显示光强的历史曲线,右下图形条可以形象地显示即时光强。
基于 labVIEW 和 IMAQ 的 LCD 机器视觉精确检测系统 Lxy Lxy, the accurate Machine vision system for LCD modules check, based onlabVIEW and IMAQ作者李春森职务测试工程师公司飞利浦移动显示系统公司上海分公司应用领域:产品测试挑战:如何应用成熟的技术实现对移动电话的液晶显示点阵实现精确的检测应用方案应用图像处理的基本方法和飞利浦公司的液晶驱动硬件以及采用NI公司应用程序开发平台labVIEW 和强大的图像处理软件IMAQ实现对移动电话液晶显示屏的机器视觉检测使用产品labVIEW; IMAQ; PCI-1408介绍随着通讯事业在中国的蓬勃发展移动电话的使用在中国越来越普遍作为移动电话的核心之一的液晶显示器由于用户的需求正向大屏幕多点及彩色方向发展由于液晶显示的分辨率不断上升对其进行人工检测的难度也越来越大采用机器视觉的液晶显示检测系统 Lxy就成为必然之选Lxy系统组成及检测方法1. 系统组成系统的结构组成如下图11所示图1 1 Lxy系统组成本系统采用NI公司的高速图像采集卡PCI1408,该采集卡支持多路图像采集现采用双镜头输入以提高系统的分辨率该系统采用背光照明光度可调图像经由CCD摄影头并经采集卡转换为数字化图像输入计算机经处理后判定是否正常2. 检测方法本系统的检测方法是采用预先经自学习产生的一系列标准图像与采集的相应图像相减并转换成为二值图的方式在经一系列的处理之后得到检测的结果并判断产品的好坏其流程如图12所示图1 2 图像处理流Lxy的图像处理及图像分析原理1. Lxy 系统照明无论进行图像处理还是进行图像分析照明条件都是最重要的外部条件对于机器视觉而言可控并恒定的光源是使检测可靠并突出检测目标的最重要的手段之一对于 LCD 检测尤其如此因为对于LCD 生产公司而言不仅检测系统的检测精度很重要检测的时间也是衡量一个机器视觉检测系统优劣的指标如果照明系统不够均匀稳定势必造成重测率的上升而影响到生产所以如何确定Lxy 系统的照明光源非常重要在Lxy 系统中采用进口FOSTEC 可调式光源20750.2并经光纤将光线引至磨砂灯板使之作为均匀并可调的背光在实践中取得了很好的效果2. Lxy 系统采集图像位置调整由于操作人员的摆放每次不同并且由于采用双镜头提高系统的分辨率所以采集图像与标准图像之间必然有位置上的差异进行位置调整的算法就必不可少如图21所示图2 1 定位模板图为定位需要经Philips 的LCD 驱动产生定位用模板图如图21所示在液晶显示矩阵的四角各显示四个定位用方形小块作为将来模板识别pattern match)时用的标准图形模板在每个镜头 的标准图像中在自学习标准图像的时候会自动将工程师定义的每个镜头的左右两个模板的图像及其坐标保存下来如图22左镜头左模板绿框内部分)则在定位用的标准图像上必有一对定位模板在检测产品时首先产生图21所示的跳图由于labVIEW具有功能强大的模板识别功能其在目标图像上搜寻图形模板的精确坐标的精度非常高所以本系统利用保存在硬盘中的模板在采集图像上进行模板识别然后将找到的模板坐标与保存在硬盘上的标准图像上相应模板的坐标进行比较就可以知道究竟采集图像有多少位移和旋转然后将将标准图像相应位移并旋转这样就可以进行图像相减了图2 2 左镜头左模3. 二值图像的处理在进行了标准图像的位置调整后经与采集图像相减得到一系列差异图像但由于照明产品差异及对位精确度等原因在每个差异图像上还需进一步处理方可得到正确的问题点经大量试验得出问题点的得出与三个因素有关分别是LCD显示矩阵的行列边缘引起的对位问题LCD透射反射膜引起的背景噪声以及照明引起的图像整体灰度平移所以在得到差异图像之后还必须对这三个方面进行处理如采用labVIEW图像处理软件中的关于图像过滤的功能过滤差异图像以去除边缘带来的对位问题对采集图像增加一个背景系数以减小噪声的影响对采集图像整体增加一灰度阀值以消除照明引起的灰度偏移产品差异的调整如下点所述这样就可将可能的问题点都提取出来了4. 产品差异的调整在LCD的生产过程中或多或少总存在产品的差异担由于机器视觉系统无法区分这些差别就必须预先对采集的图像作预调整以尽可能的减小产品差异对检测的影响本系统采用灰度整体拉伸的方法调节因为对于LCD而言总归只有黑白两种颜色对应灰度直方图则必有两个峰值分别为亮度大的峰值和亮度小的峰值如图23所示图2 3LCD灰度直方在程序中将此灰度直方图的峰值找出来将较高的一个作为调整的基点与设定的标准值( 如灰度200)相除得到的商为灰度拉伸的放大倍数然后利用labVIEW中关于图像相乘的子模块将此倍数乘采集图像所有点的灰度得到灰度拉伸之后的采集图像这样产品差异造成的影响就最大程度地得到减小解决的问题与结论由于LCD产品科技附加值大客户对产品的质量就有很高的要求以往人工检测存在人为的因素会导致误判和漏判经采用带有人工智能的机器视觉检测系统Lxy后基本排除了人为因素造成的检测问题使客户对产品的质量有了很大的信心对竞争激烈的LCD行业而言有着非同寻常的意义而在此就不能不提及NI公司的labVIEW5.1开发平台及功能强大的图像处理软件IMAQ所起的作用因为采用了以上的产品使我们的开发时间缩短很多又由于NI公司产品的重用性能良好对将来的LCD新产品相应的检测提供了广阔的发展前景。
LabVIEW在实时测控系统中的应用研究LabVIEW在实时测控系统中的应用研究一、引言实时测控系统是一种将计算机技术与仪器仪表技术相结合的技术手段,用于实时监测、控制和调节物理系统的状态和参数。
这种系统具有广泛的应用领域,例如工业生产、科学研究、环境监测等。
在实时测控系统中,LabVIEW(Laboratory Virtual Instrument Engineering Workbench)作为一种基于图形化编程的集成开发环境,提供了强大的能力和便捷的操作性,因此被广泛应用于实时测控系统中。
二、LabVIEW的基本特点与优势1. 图形化编程:LabVIEW采用图形化编程,使得用户可以使用“拖拽”和“连线”的方式搭建测控系统,而不需要编写繁琐的代码。
这使得编程变得更加简单快捷,大大降低了学习和使用的门槛。
2. 虚拟仪器:LabVIEW本质上是一种虚拟仪器平台,可以将计算机变成一个接口灵活、功能强大的仪器。
通过LabVIEW,用户可以实时采集和展示各种物理量,并进行分析和处理。
这种灵活性使得LabVIEW非常适合用于实时测量和控制。
3. 强大的功能模块:LabVIEW提供了丰富的函数库和工具箱,包括数据采集、信号处理、控制算法等,用户可以根据自己的需求选择相应的模块,快速构建出符合要求的实时测控系统。
4. 兼容性和扩展性:LabVIEW可以与各种硬件设备相连接,包括传感器、执行器、数据采集卡等。
同时,LabVIEW也可以与其他编程语言(如C、C++、Python等)进行交互,实现更加复杂的功能。
三、LabVIEW在实时测控系统中的应用1. 实时数据采集与显示LabVIEW提供了丰富的数据采集模块,可以连接各种传感器,实时采集各种物理量。
通过数据显示模块,用户可以将采集到的数据以图形、曲线等形式实时显示出来,可以方便地观测和分析数据的变化情况。
2. 实时控制LabVIEW中的控制模块可以用于实时控制物理系统的状态和参数。