电炉使用说明书
- 格式:docx
- 大小:37.36 KB
- 文档页数:3
第二部分技术说明一、技术参数1、电气参数:变压器容量:1250KVA中频电源额定功率:1000KW工作频率:500Hz最高输出电压:2200V2、工作参数:额定容量:2t最大容量:2.4t额定功率:1000KW工作温度:1450℃(最高1600℃)熔化率:1.70t/h耗电量:580KWh/t功率因数:≥0.95启动成功率:100%工作噪音:≤85dB(离设备1米处)3、冷却系统技术参数:循环水压力:0.2~0.4Mpa循环水量: 35t/台循环水温:进<30℃,出<55℃纯水压力: 0.15~0.2Mpa4、液压系统参数:油箱容量:300L液压介质:抗磨液压油工作压力:11Mpa流量:40L/min5、设备运行要求:海拔高度:<3000m环境温度:5-42℃相对温度:<90%(平均温度不低于20℃)环境要求:周围无导电尘埃,爆炸性气体及严重破坏金属和绝缘的腐蚀性气体无明显的震动和颠簸安装方式:户内二、控制技术特点简介1、采用全数字集成单板结构控制线路,所有器件都经过高温老化筛选;关键器件采用军品,关键线路使用表面微封工艺,大大减少了控制板的面积,提高了可靠性;整板进行72小时高低温冲击,避免了早期失效,使控制电路具有高可靠性。
控制电路采用数字控制,抗干扰能力强,除完成常规的整流、逆变、过压、短路、限流、限压的控制功能外,还带有故障自诊断功能和故障延时功能。
2、用零压数字扫频电路启动方式,确保满炉、冻炉启动的可靠性;同时具备常规的自动重启动功能。
3、具有网压过高、水温过高、水压过低、输出中频电压过高和漏炉报警装置,具备声光报警和电源切断处理功能。
4、输出功率连续可调,以满足烘炉、熔化、升温、保温的需求。
5、专门设计的逆变角控制环路,可根据负载工况,通过控制逆变角实时调整等效负载阻抗,使电源和负载处于最佳匹配,使电源一直处于可能的最大出力状态,功率因数可达0.98,最大限度地发挥了设备的出力。
这样在整个工艺允许的工况范围内,设备可达到恒功率输出,加快了熔化速度,节约了电能。
电炉使用方法说明书首先,感谢您购买我们的电炉产品。
为了确保您能正确、安全地使用电炉,我们为您提供以下使用方法说明。
请您仔细阅读并遵循以下指导,以确保您能充分享受电炉的便利和效果。
第一部分:电炉的基本介绍1. 外观和部件电炉外观简洁大方,采用高品质材料制作。
主要部件包括加热盘、控制面板、温度调节器、电源开关等。
2. 电炉的特性电炉具备以下特点:- 快速加热:电炉采用电能加热方式,能够快速达到所需温度,缩短加热时间。
- 高效节能:由于电炉采用电能直接转化为热能,能够有效利用能量,具有较高的能源利用效率。
- 温度稳定:电炉内置温度控制模块,能够在设定范围内稳定控制加热温度,确保烹饪食物的质量。
- 安全可靠:电炉配备过热保护装置、电压稳定器等安全设备,确保使用过程中的安全可靠性。
第二部分:电炉的使用方法3. 准备工作在开始使用电炉之前,请确保室内空气流通良好,避免使用于潮湿的环境中。
同时,清洁电炉表面,确保没有油污等杂质。
4. 接通电源将电炉插头插入电源插座,确保电压与电炉标牌上的额定电压一致。
接通电源后,按下电源开关,电炉即可开始工作。
5. 设置加热温度通过控制面板上的温度调节器,您可以轻松设置所需的加热温度。
将温度调节器旋转到合适的位置,即可将电炉加热盘的温度调整到相应水平。
6. 使用炊具将适合电炉使用的炊具放置在加热盘上,确保炊具与加热盘接触良好。
小巧型电炉一般只能同时放置一个炊具,而大型电炉可以放置多个炊具。
7. 使用注意事项- 请勿将身体直接接触加热盘,避免烫伤。
- 使用过程中,使用耐高温炊具,避免炊具损坏或变形。
- 长时间使用电炉,请适当休息,避免过度疲劳或设备过热。
- 在使用完成后,及时关闭电源开关,并拔出电源插头。
第三部分:电炉的清洁和维护8. 清洁方法使用后,等待电炉冷却后,使用湿布擦拭电炉表面,避免使用酸性或强腐蚀性清洁剂。
不要将电炉浸入水中清洗。
9. 注意事项- 在清洁电炉时,请注意防水,避免接触电源插座和电线。
MELT MANAGER 操作说明——按下工作方式键后 ,出现如下屏幕:说明:根据实际需要,可以通过小键盘上的1、2、3、4数字键,选择不同的工作方式-按下数字键1,选择正常工作方式后,出现如下屏幕:工作方式键设置键诊断键命令键退出键 确认键数字键1、正常工作方式 4、烧结工作方式2、千瓦时工作方式 5、3、冷启动工作方式 6、说明:此屏幕是日常工作时,经常看到的屏幕-按下数字键2,选择千瓦时工作方式后,出现如下屏幕:-按下数字键3,选择冷启动工作方式后,出现如下屏幕:功率:00000逆变电流:00000 电容电压:00000 频率:00000 电炉电压:00000泄漏电流:00000 电度数:0000015371.76 功率(KW ):00000剩余电度数: 0.00 剩余时间:――:――:―― 重量: 0Kg 保温功率:0泄漏电流值= 000mA 现在时间 15:16:43-按下数字键4,选择炉衬烧结工作方式后,出现如下屏幕:——按下设置键后 ,出现如下屏幕:功率(KW ):00652第一步的最终温度:1098摄氏度 剩余时间:4:41(4小时41分钟) 预计温度:64摄氏度 实际温度:60摄氏度 泄漏电流值=005 mA烧结工作方式 炉 #1**设置菜单**1.系统设置 4. 烧结工作方式设置 2.千瓦时工作方式设置 5.-按下数字键1,选择系统设置菜单后,出现如下屏幕:说明:如果无打印机,打印模式应设为0。
新日期、新时间用来更改当前的日期或时间。
-按下数字键2,选择千瓦时工作方式设置后,出现如下屏幕:**系统设置** 打印模式: 0(1=ON ) 重复打印: 1 新日期: 新时间:1/11/06 15:18:13 (当前日期及时间) **千瓦时工作方式设定**总的电度数: 0.00 每吨料给予的电度数:10 炉内炉料重量: 0 保温功率:0-按下数字键4,选择炉衬烧结工作方式设定后,出现如下屏幕:◎继续按下数字键1,进行烧结曲线设定,如下:**冷启动工作方式设定**冷启动开始日期:17 每吨料给予的电度数:10 冷启动开始时间:13:11:02 功率:0**烧结工作方式设定**1. 烧结曲线设定 2. 烧结过程控制设定**烧结曲线设定**◎继续按下数字键2,进行烧结过程控制设定,如下:说明:1、15%、25%是指满功率的15%、25%2、烧结控制方式为0时,在整个自动控制烧结过程中,当实际温度小于预计温度时,电源自动打开;当实际温度大于预计温度时,电源将自动断开。
高温电炉使用方法说明书一、前言高温电炉是一种用于高温试验和材料热处理的设备。
本说明书将详细介绍高温电炉的使用方法,以确保用户正确操作并获得最佳的使用效果。
二、设备概述高温电炉由炉体、控温系统、电源系统、加热元件等组成。
炉体为高温隔热箱,内部容积为XX升,并配备高温耐磨内衬。
控温系统采用智能控制器,精确控制温度范围为XX°C至XX°C。
电源系统为XXV电源,额定功率为XX千瓦。
加热元件为高温合金丝,可快速达到设定温度。
三、安全须知1. 请确保设备电源已接地,并且使用专用插座。
2. 使用前请确保高温电炉外部干净整洁,不得有杂物堆放。
3. 使用过程中严禁将易燃、易爆物品靠近高温电炉,确保周围安全。
4. 高温电炉工作时,外部温度高,请勿触摸,以免烫伤。
5. 使用完毕后,请先关闭电源,待设备冷却后再进行清洁和维护。
四、使用步骤1. 准备工作a. 检查电源和电源线是否正常连接,确保设备已接地。
b. 确保高温电炉内无杂物和残留物,如有需清理干净。
2. 设定温度a. 打开控温系统电源,进入设备主界面。
b. 使用上下左右方向键设定所需温度,按确认键保存。
3. 加热操作a. 打开高温电炉电源,启动加热元件。
b. 控温系统将自动检测温度,并实时显示在界面上。
c. 当温度接近设定值时,加热元件功率自动调整,以保持稳定温度。
4. 使用注意事项a. 在加热过程中,请勿开启高温电炉的门,以免温度波动。
b. 如需要调整设定温度,可按照第2步的操作进行修改。
5. 使用完毕a. 使用完毕后,先关闭高温电炉的电源。
b. 等待设备冷却至安全温度后,打开高温电炉的门。
c. 清洁高温电炉内部和外部,并定期进行维护保养。
五、故障排除在使用高温电炉过程中,若出现以下故障,请参照以下步骤进行排除:1. 温度显示异常a. 检查控温系统是否正常运行。
b. 如异常,请联系售后服务中心。
2. 加热不均匀a. 清洁加热元件表面,确保无灰尘和杂物。

El Centro de Recursos del Departamento de Seguros de TexasDivisión de Compensación para TrabajadoresServicios Laborales y Médicos, Alcance y EducaciónIntroducciónLos hornos eléctricos que se usan para la alfarería y cerámica deben usarse solamente por operadores capacitados. Los peligros de los hornos eléctricos incluyen choques eléctricos, quemadu-ras e incendios. Se puede asegurar la seguridad si los hornos se diseñan bien y si se instalan, se ubican, se operan y se mantienen de manera apropiada. Otros peligros asociados con los hornos eléctricos incluyen:• revestimientos refractarios de fi bras de cerámica (RCF, por sus siglas en ingles), (incluyendo asbesto en los hornos antigüos);• gases que pueden despedirse durante algunos ciclos de cocer; y• problemas de manejo manual asociados con el meter y sacar producto.Instalación y ubicación del hornoMuchos incendios involucrando hornos ocurren de noche, debido al sobrecalentamiento de la madera en los techos o pisos arriba del horno. La caja metálica del horno puede llegar a estar muy caliente (hasta 830º en algunos casos) a pesar de insulación mineral.• Los hornos deben ubicarse lejos de áreas de trabajo general en un cuarto o área separada.• Deben ubicarse en un piso de carga con mucho espacio entre el horno y el techo. Si hay alguna duda respecto a la fuerza del piso donde se va a ubicar el horno, comuníquese con un especialista estructural (o sea, un ingenierio estructural) para asesoramiento.• Cuando hay espacio limitado entre el techo, revestimientos de calor o campanas metálicas y tiros (salidas de humo) deben instalarse arriba de los hornos para proteger contra incendios.• Puede que la campana requiera insulación y debe extenderse bastante sobre la puerta del horno.• Los tiros deben instalarse por un profesional capacitado.• El piso, techo y paredes cerca del horno deben todos hacerse de un material no combustible.• Se debe dejar espacio sufi ciente alrededor del horno para per-mitir mantenimiento, servicio y movimiento libre de aire. • Todos los hornos sin conexiones permanentes deben conec-tarse directamente a tomas de corriente sufi cientemente clasifi cadas y protegidas sin usar una extensió Seguridad con losHornos Eléctricos Industriales• El buen aseo alrededor de los hornos es esencial y materialescombustibles nunca deben almacenarse cerca.• Cuando están aprendiendo la cerámica los niños, personascon discapacidades físicas o de aprendizaje o el público, unabarrera o armazón protector debe usarse como protección.• Medidas preventivas deben adoptarse para prevenir que laspersonas lleguen a atraparse adentro de la barrera o armazóny los controles de operación deben localizarse afuera de labarrera o armazón y posicionados de manera que la puertadel horno no obstruya el acceso a ellos al estar abierta.La seguridad con la electricidadAntes de instalar un horno eléctrico, el sistema eléctrico debeinspeccionarse y comprobarse por un electricista profesionalpara determinar si es seguro y si puede satisfacer las demandasde potencia requeridas del horno. Si es que no puede, se debeinstalar un nuevo sistema eléctrico que es apto para el horno.Operación seguraLos hornos eléctricos deben usarse solamente por operadorescapacitados quienes conocen procedimientos seguros de trabajo,uso correcto de los controles y mecanismos de seguridad, y soncapaces de reconocer peligros y encargarse de emergencias.Los estudiantes que están aprendiendo la cerámica puedenusar el horno bajo la supervisión estricta de un operador capac-itado.Para asegurar sufi ciente personal en la ausencia del opera-dor normal, dos o más personas deben ser capaces de operarel horno y deben estar familiarizadas con procedimientos deemergencia.Instrucciones por escrito sobre el funcionamiento seguro ylos procedimientos de emergencia para el horno deben fi jarsecerca junto con una lista de los operadores capacitados y susnúmeros telefónicos.Prácticas seguras deben adoptarse y usarse al estar el horno enfuncionamiento. Al quitar producto del horno todavía caliente, sedebe siempre usar lentes protectivos y guantes que proporcionanprotección termal. Adicionalmente, los lentes protectivos debenllevar fi ltros para usar al quitar las tapas de las mirillas parainspeccionar los conos pirométricos al estar el horno caliente.Mantenimiento del hornoLas instalaciones eléctricas y el horno deben mantenersecon regularidad. Esto incluye a inspecciones regulares, par-HS04-039A (9-06)ticularmente donde se usan enchufes y cables fl exibles. Ambas instalaciones eléctricas y el horno deben comprobarse periodi-camente para asegurar que las juntas, terracería, conexiones de insulación y protección eléctrica funcionarán debidamente. Si se encuentran fallas, el horno y las instalaciones se sacarán de servicio hasta que las fallas se corrijan.• Cualquier trabajo realizado en el horno o las instalaciones eléctricas debe llevarse a cabo por un profesional capacitado que está familiarizado con este tipo de equipo.• Los operadores de hornos deben mantener archivos actu-alizados de la naturaleza y alcance de todos los trabajos de mantenimiento y reparación realizados en el horno. GasesSe requiere ventilación en general alrededor de los hornos para proporcionar aire fresco con el fi n de mantener un entorno de trabajo saludable. Se puede crear la ventilación naturalmente (o sea, por las puertas, ventanas, etc) o mecánicamente (utilizando un ventilador para suministrar aire). La ventilación natural depende de la presión del viento y diferencias en temperatura, mientras la ventilación mecánica es controlable.Manejo manualSegún la naturaleza del producto siendo horneado, el meterlo y sacarlo del horno tal vez represente un peligro. Los operadores capacitados necesitarán considerar tanto las cargas que se mane-jan durante esas operaciones como la cantidad de movimientos que hay que hacer. Donde es posible, se deben usar carritos para transportar producto por las instalaciones y para levantar cargas pesadas. Todos los empleados involucrados en el manejo manual de objetos pesados deben recibir capacitación adecuada para prevenir lesiones.Recuerde poner en práctica la seguridad. No la aprenda por accidente.Este programa de capacitación se publicó con información del Ejecutivo de Salud y Seguridad (Reino Unido de Gran Bretaña e Irlanda del Norte) y el Departamento de Seguros de Texas, División de Compensación para Trabajadores.Preguntas de Repaso1. ¿Por qué debe estar ubicado un horno en un cuarto aparte?2. La ventilación es crítica al trabajar con hornos. Verdad o Falso.3. ¿Qué tipo de guantes se debe usar al trabajar en un horno? RespuestasRecursosEl Centro de Recursos del Departamento de Seguros de Texas, División de Compensación para Trabajadores ofrece una biblio-teca de videos sobre la salud y seguridad del trabajador. Llame al (512) 804-4620 para más información o visite nuestra página web a .Descargo de responsabilidad: La información contenida en este programa se considera correcta en la hora de publicación.Departamento de Seguros de Texas,División de Compensación para Trabajadores (TDI/DWC) correo electrónico ************************ o llame al 1-800-687-7080 para más información.Línea Directa de Violaciones de Seguridad1-800-452-9595***********************1.R e d u c i r e l c a l o r.2.V e r d a d.3.T e r m a l。

1.目的
1.1规范台式封闭电炉操作程序,正确使用和维护仪器,保证检测工作顺利进行,保证操作人员
人身安全和设备安全。
2.范围
2.1适用于本实验室台式封闭电炉的使用操作。
3.职责
3.1仪器管理人员负责台式封闭电炉的日常维护保养
3.2SCMC QAR负责对设备状态的确认。
3.3仪器设备使用人员应按本规程执行,做好相关记录。
4.定义
无
5.操作程序
5.1接通电源,指示灯亮。
5.2将需要加热物品放入加热盘上,根据加热温度的需要按所标方向顺时针旋转温控调节钮,加
热盘开始加热工作。
旋转范围越大,加热温度越高。
5.3当加热物品达到所需要温度或需降低温度时,则按相反方向旋转。
在停止加热时关闭温控调
节钮,仪器开始停止加热工作。
6.注意事项
6.1应保持加热盘清洁卫生。
6.2严禁空烧,以防损坏表面涂层。
6.3在首次使用时加热盘产生烟迹,属于正常现象。
7.参考文件
《台式封闭电炉》使用说明书
7.1记录:无。

家用电烤炉使用说明书使用前须知:- 请先仔细阅读本使用说明书,并按照操作指引正确使用电烤炉。
- 在初次使用之前,请将电烤炉连接到适当的电源电压,并确保电源线路无损坏。
- 请避免在潮湿或多尘的环境中使用电烤炉,以免影响使用效果和安全性能。
- 为确保使用安全,请务必将电烤炉放置在平稳的工作台面上,在使用过程中避免碰撞并保持良好通风。
一、外观和主要组成部分1. 电烤炉的外观:电烤炉采用优质不锈钢材料制成,具有耐高温、防腐蚀的特点。
2. 主要组成部分:电烤炉主要由加热器、控制器、温度调节器等部分组成。
二、使用步骤1. 插入电源:将电烤炉插头插入相应的电源插座,并确认电源已连接。
2. 打开电烤炉:将电烤炉的主开关置于打开的位置,此时电烤炉开始供电。
3. 温度设置:根据需求,使用温度调节器调节所需的烤炉温度。
转动温度调节器至所需温度位置,调节器上的示数即为当前设定温度。
4. 预热:关闭烤炉门,在温度设定完成后,按下预热按钮,使电烤炉进行预热。
预热完成后,等待指示灯亮起。
5. 烹饪食物:将待烹饪的食物置于电烤炉烤架上,并将烤架置于合适的高度位置。
关闭烤炉门,开始烹饪。
6. 调整烤制时间:根据食物种类和烹饪要求,使用控制器调整烤制时间。
7. 烤制完成:当烤制时间到达设定时间后,电烤炉会自动停止加热并发出提示音。
此时,打开烤炉门,取出烹饪好的食物。
8. 关闭电烤炉:使用完成后,将电烤炉的主开关置于关闭的位置,断开电源。
三、注意事项1. 使用电烤炉过程中,请勿触摸加热器、控制器和温度调节器等零部件,以免烫伤。
2. 在使用过程中,电烤炉表面会有一定的温度升高,请避免直接接触,以免烫伤。
3. 在烹饪过程中,请勿将手或其他物品放入电烤炉内部,以免造成伤害或设备故障。
4. 请勿长时间空转电烤炉,以免对设备造成损坏。
5. 清洁时,请先断开电源,待烤炉完全冷却后再进行清洁。
6. 清洁电烤炉时,请使用温和的洗涤剂和软布擦拭,切勿使用粗糙的洗刷工具。
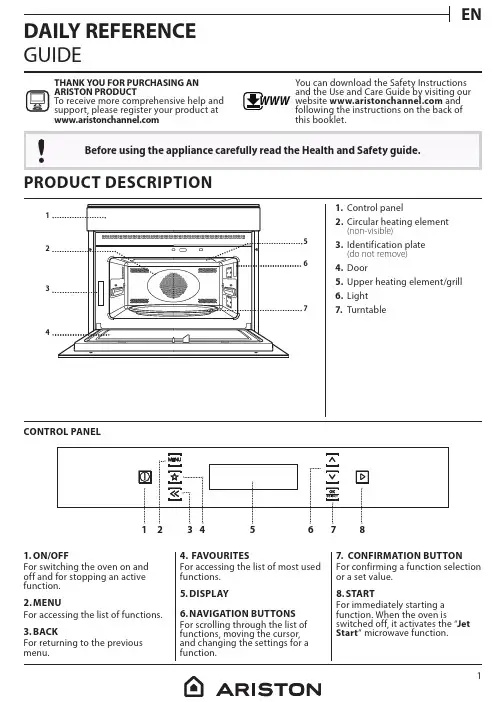
EN1PRODUCT DESCRIPTIONCONTROL PANEL1. Control panel2. Circular heating element (non-visible)3. Identification plate (do not remove)4. Door5. Upper heating element/grill6. Light7. Turntable1. ON/OFFFor switching the oven on and off and for stopping an active function.2. MENUFor accessing the list of functions.3. BACKFor returning to the previous menu.4. FAVOURITESFor accessing the list of most used functions.5. DISPLAY6. NAVIGATION BUTTONS For scrolling through the list of functions, moving the cursor, and changing the settings for a function.7. CONFIRMATION BUTTONFor confirming a function selection or a set value.8. STARTFor immediately starting a function. When the oven isswitched off, it activates the “Jet Start ” microwave function.GUIDE1243THANK YOU FOR PURCHASING AN ARISTON PRODUCTTo receive more comprehensive help and support, please register your product at www. a ristonchannel. c omYou can download the Safety Instructions and the Use and Care Guide by visiting our website www.a ristonchannel.c om and following the instructions on the back of this booklet.2ACCESSORIESDownload the Use and Care Guide fromwww. a ristonchannel. c om for more informationTURNTABLEPlaced on its support, the glass turntable can be used with all cooking methods.The turntable must always be used as a base for other containers or accessories, withthe exception of the rectangular baking plate.TURNTABLE SUPPORT Only use the support for the glassturntable. Do not rest other accessories on the support.Only for use with the specific “Dynamic Crisp” function.The Crisp plate must always be placed in the centre of the glass turntable and can be pre-heated when empty, using the specialOnly use the baking plate with functions that allow for convection cooking; it must never be used in combination with microwaves. Insert the plate horizontally, resting it on the rackPlease note: You do not need to remove the turntable and its support when using the rectangular baking plate.LOW WIRE SHELFThis allows you to place food closer to the grill, for perfectly browning your dish and foroptimal hot air circulation. Place the wire shelf on the turntable, making sure that it does notcome into contact with other surfaces.STEAMERTo steam foods such as fishor vegetables, place these in the basket (2) and pour drinking water (100 ml) into the bottom of the steamer (3) to achieve the right amount of steam.To boil foods such as pasta, rice or potatoes, place thesedirectly on the bottom of the steamer (the basket is not required) and add an appropriate amount of drinking water for the amount you are cooking.For best results, cover the steamer with the cover (1) provided.Always place the steamer on the glass turntable and only use it with the appropriate cooking functions, or with microwave functions.COVERUseful for covering food while it is cooking or heating in the microwave.The cover reduces splashes, keeps foods moist and can also be used to create two cooking levels.It is not suitable for use in convection cooking or with any of the grill functions (including “Dynamic Crisp”).Please note: The number of accessories may vary depending on which model is purchased.Other accessories can be purchased separately from the After-sales Service.321EN3FUNCTIONSDownload the Use and Care Guide fromwww. a ristonchannel. c om for more information4USING THE APPLIANCE FOR THE FIRST TIMEEN5APPLY SETTINGSInitially, it is possible to set the values of the chosen value will flash.ACTIVATE THE FUNCTIONrequire, pressto activate the function.Please note: Where possible, some values can even be changed during cooking.DAILY USE1. SELECT A FUNCTION143 1. S ymbol for the function selected2. Function selected3. Other available functions4. Description of the function selectedNAVIGATE THE MENUSELECT AN ITEM FROM THE MENUfunctions.SELECT A FUNCTION2. SETTING AND ACTIVATING THE FUNCTION1. S elector cursor(highlights the setting selected)2. Duration3. Time at which the function will finish4. Name of the function5. Settings for the function(power, temperature, grill level, weight or quantity, desired degree of cooking, etc.)6. FAVOURITESto select the function you require, pressbasic settings).Once finished, pressto activate the function.. RESIDUAL HEATIn many cases, when food has been cooked, the oven will activate an automatic cooling process, which willbe indicated on the display.To view the clock during this process, press Please note: Opening the door temporarily interrupts theprocess.. TIMERThe timer will appear on the display.the selected time. Please note: The timer does not activate any of the cooking cycles.. KEY LOCKat the unlock the keypad.COOKING TABLEEN7* Turn the food halfway through cooking ** Preheat the Crisp plate for 3-5 minuteswww. a ristonchannel. c omwww. a ristonchannel. c om for the table of tested recipes, compiled for the8INTERIOR AND EXTERIOR SURFACES• Clean the surfaces with a damp microfibre cloth. If they are very dirty, add a few drops of pH-neutral detergent. Finish off with a dry cloth.• Clean the glass in the door with a suitable liquid detergent.• At regular intervals, or in case of spills, remove the turntable and its support to clean the bottom of the oven, removing all food residue.• The grill does not need to be cleaned as the intense heat burns away any dirt. Use this function on a regular basis.ACCESSORIES• All accessories are dishwasher safe with the exception of the Crisp plate.• The Crisp plate should be cleaned using water and a mild detergent. For stubborn dirt, rub gently with a cloth. Always leave the Crisp plate to cool down before cleaning.ProblemPossible causeSolutionThe oven is not working.Power cut.Disconnection from the mains.Check for the presence of mains electrical power and whether the oven is connected to the electricity supply.Turn off the oven and restart it to see if the fault persists.The oven makes noises, even when it is switched off.Cooling fan active.Open the door or wait until the cooling process has finished.The display shows the letter “F” followed by a number.Software fault.Contact you nearest Client After-sales Service Centre and state the number following the letter “F”.TROUBLESHOOTINGDownload the Use and Care Guide fromwww. a ristonchannel. c omfor more informationCLEANINGwww. a ristonchannel. c omwww. a ristonchannel. c om (you can use this QR Code), specifying the product’s commercial code.> Alternatively, contact our Client After-sales Service.CONTACTING OUR AFTER-SALES SERVICEYou can find our contact details in the warranty manual. When contacting our Client After-sales Service, please state the codes provided on yourproduct's identification plate.XXX/XXXXXXXXXXXXXXXXXXXXXXXXXXX。
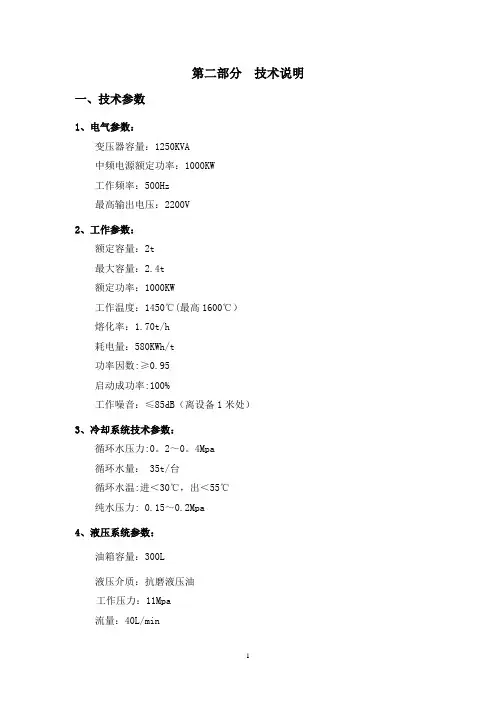
第二部分技术说明一、技术参数1、电气参数:变压器容量:1250KVA中频电源额定功率:1000KW工作频率:500Hz最高输出电压:2200V2、工作参数:额定容量:2t最大容量:2.4t额定功率:1000KW工作温度:1450℃(最高1600℃)熔化率:1.70t/h耗电量:580KWh/t功率因数:≥0.95启动成功率:100%工作噪音:≤85dB(离设备1米处)3、冷却系统技术参数:循环水压力:0。
2~0。
4Mpa循环水量: 35t/台循环水温:进<30℃,出<55℃纯水压力: 0.15~0.2Mpa4、液压系统参数:油箱容量:300L液压介质:抗磨液压油工作压力:11Mpa流量:40L/min5、设备运行要求:海拔高度:<3000m环境温度:5—42℃相对温度:<90%(平均温度不低于20℃)环境要求:周围无导电尘埃,爆炸性气体及严重破坏金属和绝缘的腐蚀性气体无明显的震动和颠簸安装方式:户内二、控制技术特点简介1、采用全数字集成单板结构控制线路,所有器件都经过高温老化筛选;关键器件采用军品,关键线路使用表面微封工艺,大大减少了控制板的面积,提高了可靠性;整板进行72小时高低温冲击,避免了早期失效,使控制电路具有高可靠性。
控制电路采用数字控制,抗干扰能力强,除完成常规的整流、逆变、过压、短路、限流、限压的控制功能外,还带有故障自诊断功能和故障延时功能.2、用零压数字扫频电路启动方式,确保满炉、冻炉启动的可靠性;同时具备常规的自动重启动功能。
3、具有网压过高、水温过高、水压过低、输出中频电压过高和漏炉报警装置,具备声光报警和电源切断处理功能.4、输出功率连续可调,以满足烘炉、熔化、升温、保温的需求。
5、专门设计的逆变角控制环路,可根据负载工况,通过控制逆变角实时调整等效负载阻抗,使电源和负载处于最佳匹配,使电源一直处于可能的最大出力状态,功率因数可达0。
98,最大限度地发挥了设备的出力.这样在整个工艺允许的工况范围内,设备可达到恒功率输出,加快了熔化速度,节约了电能。
产品综述1.1 产品特点27MVA密闭电石炉采用组合式把持器式电极系统全密闭埋弧冶炼,设备特点为炉体整体密封,连续加料。
电极系统配置手动及自动操作模式。
1.2 主要用途及适用范围1.2.1 主要用途27MVA密闭电石炉用来冶炼电石(工业CaC2),本设备仅适用于云南云维乙炔2³27MVA密闭电石炉工程电石炉车间的冶炼工艺及原料条件。
1.2.2 适用范围本装置在如下原料条件(见表1)情况下,可每小时生产电石约6.25吨。
本装置仅用于电石冶炼。
表1 原料条件1.3 技术特性27MVA密闭电石炉技术特性见表2。
表2 27MVA密闭电石炉技术特性表2 30MVA密闭电石炉技术特性(续)1.4 使用环境条件密闭电石炉在如下环境条件下,能正常工作运行: ²环境温度-15℃~+40℃(炉体及炉盖周围例外); ²相对湿度≧90%;²工作环境多粉尘和有一定的辐射热; ²出炉口地面必须保持干燥。
当炉壳温度超过100℃时,必须停炉检查耐火衬,以防烧坏炉壳;当出炉口地面有积水时必须停止设备运行,待水清理完毕后方可运转;有地震发生警告期间需停炉。
1.5 工作条件密闭电石炉正常工作条件必须满足如下规定,对不符合如下各项要求规定的,严禁使用设备。
²设备的工作环境条件处在正常范围内;²设备中机、电、液各零部件均处于正常的使用状态; ²设备中及地面的安全保护装置处于正常工作状态; ²设备的操作者须经培训具备操作该设备的资格认证; ²确保出炉口周围地面没有任何积水;²确保各装置的工作区域没有危险发生,无关人员已远离设备; 1.6 对环境及能源的影响密闭电石炉虽然在设计上充分考虑环保因素,但在使用过程中还可能会对周围的环境造成影响,具体影响见表3:表3 密闭电石炉对环境及能源的影响1.7 结构特征与工作原理1.7.1 总体结构及其工作原理、工作特征·本密闭电石炉主要由如下部件组成(详见表4)表4 总体结构及其工作原理密封套,该水冷密封套对电极起密封及导向作用。
硅控可调电炉使用说明书
一、用途
万用电炉为工矿、企业、医院、学校实验室常用的加热设备,用途广泛,使用便利、清洁,并可根据需要随意调节功率变换温度。
二、使用说明
工作时为了防止金属体及导电物体触及炉丝,首先把炉圈放在炉丝盘上部,使其起到绝缘且集中热量的作用,炉板放在炉圈上,可防止明火直烤,炉棍插在炉体后部的固定圈内,以供吊起加热之用。
三、性能说明
本产品采用可控硅调压电路,以调压方式加大或缩小功率以达到控温目的。
每组炉盘可调最小功率约0.5KW,可调最大功率为1.0KW,每一组功率变换器调节扭可控制相对的一组加热盘。
四、注意事项
一、使用电压为220V,电炉必须有良好的接地线。
二、不得在加热面上直接放入液体易溶解物品及导热物体。
五、外形尺寸
型号尺寸
DDL-1KW15×17×18.5
DDL-2KW15×17×18.5
DDL-2×1KW30×17×18.5
DDL-4×1KW60×17×18.5
DDL-6×1KW90×17×18.5
南北潮商城|。
72025ZH - CHINESE04/15/18220V-240V ,额定电流频率为 50/60Hz ,额定输出功率:2200Wm 在操作之前,请先阅读所有的说明。
m 本产品应连接到带接地保护的插座。
m 本产品应连接在剩余电流断路器(RCD )上,而且该断路器的额定剩余动作电流不超过 30毫安。
m 如果插座已损坏,请勿操作设备。
m 应定期检查电源线是否有损坏的迹象。
如果电源线已损坏,则不应使用本产品。
m 如果温控器的电源线或插头已损坏,请勿使用烤炉。
请致电WEBER ,更换温控器。
此温控器是为本烤炉特制的。
m 务必先把温控器插到烤炉上,然后再把电源线插入插座。
m 当从烤炉上拆下温控器时,先拔下电源插头。
m 如果长时间不使用烤炉,则从烤炉上拆下温 控器。
当不使用温控器时,请务必将它存放在室内。
m 清洁温控器时,请勿浸泡电源线。
m 清洁时,请勿将烤炉浸泡在水中。
m 为了防止触电,不要把插头、电源线或加热元件控制器浸入水中或其他任何液体内。
m 使用烤炉时,请保持插头和电源线干燥。
m 请勿在雨中使用烤炉。
m 仅在平稳的台面上操作烤炉。
m 请勿在本烤炉中使用木炭或其他易燃燃料。
本烤炉不适合使用木炭。
若使用木炭,可能会起火。
火灾会威胁用户安全,并损坏烤炉。
m 本产品可由 8 岁以上的儿童及身体、感官或心智能力下降或缺乏相关经验和知识的人群 使用,前提是他们在有人看管的情况下使用 本烤炉,或者获得安全使用本品的指导,并了解相关危险。
m 应看管好儿童,确保不让儿童玩本产品。
儿童不得在没有监督的情况下进行清洁和用户维护。
IP# IPX4若未能遵循本使用手册中的“危险”、 “警告”和“注意”提示,可能导致严重身体伤害或死亡,或者可能引发火灾或爆炸,造成财产损失。
m切勿以任何方式改装本产品或更改其用途。
m您只能按照本手册中的用法使用本烤炉。
本手册未推荐的用法可能造成火灾、触电或人身伤害。
m不得用作加热器。
m使用烤炉时,切勿让烤炉处于无人看管的状态。
京泉盛铁签电烤炉说明书摘要:一、产品简介二、产品特点三、使用方法四、安全注意事项五、清洁与维护六、售后服务正文:一、产品简介京泉盛铁签电烤炉是一款集时尚、实用、安全于一体的电烤炉。
它采用高品质材料制造,精湛工艺,外观美观大方,占地面积小,便于摆放和携带。
适用于家庭、餐厅、烧烤摊等场合,让您轻松享受烧烤美食。
二、产品特点1.节能环保:京泉盛铁签电烤炉采用先进的加热技术,使热量更加集中,节省能源,降低能耗。
2.温度可控:该电烤炉设有温度调节功能,您可以根据食材和个人口味调整火候,烤出美味佳肴。
3.安全设计:产品具备过热保护、漏电保护等功能,确保您和家人在使用过程中的安全。
4.易清洗:烤炉表面采用不粘涂层,使食物不易粘连,便于清洗。
5.便携式设计:轻巧的机身和可折叠把手,让您随时随地享受烧烤乐趣。
三、使用方法1.插上电源,打开开关,调节所需的温度。
2.预热电烤炉约5分钟,待温度稳定后,放入食材进行烧烤。
3.根据食材厚度和个人口味,适当调整温度和烤制时间。
4.烤制完成后,关闭电源,用烤炉附带的烤架取出食物。
四、安全注意事项1.使用前请仔细阅读说明书,确保了解产品性能和操作方法。
2.确保电源线和插座完好无损,避免使用过程中发生意外。
3.切勿用水直接冲洗烤炉,以免损坏产品。
4.烤制过程中,请勿触碰发热部分,以免烫伤。
5.儿童和老人请在成人监护下使用。
五、清洁与维护1.使用后,请将烤炉表面擦拭干净,保持清洁。
2.定期检查烤炉内部,清理积碳和油渍,以延长产品使用寿命。
3.不要使用锋利的工具刮擦烤炉表面,以免损坏涂层。
六、售后服务1.购买之日起,享受一年的免费保修服务。
2.如遇产品质量问题,请及时联系售后服务人员。
3.保修期内,如需更换零部件,请提供购买凭证和产品序列号。
4.保修期外,提供有偿维修服务。
通过以上介绍,相信您已经对京泉盛铁签电烤炉有了更深入的了解。
这款电烤炉凭借其出色的性能和人性化设计,必将为您带来美好的烧烤体验。
家用电炉使用说明书及安全规范家用电炉使用说明书及安全规范首先,感谢您选择我们的家用电炉产品,本使用说明书将为您详细介绍该产品的使用方法和相关安全规范,希望能为您提供便利和保障。
一、产品概述1.1 产品型号:我们的家用电炉产品型号为DDF45-6002。
该产品可满足您日常家庭烹饪的需求,具有高效、稳定、安全等特点。
1.2 产品组成:该产品由电炉主体、电源线、温控器等组成。
二、使用方法2.1 开箱检查:收到产品后,请首先进行开箱检查,确认产品配件是否齐全,产品是否完好无损。
如发现破损、缺陷等问题,请及时联系售后服务。
2.2 安装及调试:将电源线连接插座,将电炉主体放置在平稳、稳固的台面上,并确保后方有足够的空间供电线接头使用。
接通电源,调节温控器至适宜的温度,等待10分钟左右,直至温度达到预期值后即可开始使用。
2.3 使用方法:使用前请先检查电炉主体的表面是否清洁干净。
将需要加热的锅、盘等器具放置在电炉上,注意保持器具稳定不滑动。
使用过程中请调节温控器的温度,根据实际需要进行掌握。
2.4 结束使用:使用结束后,先关掉温控器,等待电炉降温后再移动器具、搬离电炉。
三、安全规范为确保产品的安全使用,请您在使用时仔细遵守以下规范:3.1 防止电击:运行过程中不允许拆卸或触摸电炉机身。
使用时请勿将湿手或其它导电物品放在电炉附近。
3.2 防止过热:使用前请确认器具表面是否平整,放置是否稳定。
加热时请注意调节温度,不要超过最高温度。
使用过程中请避免离开电炉过久,防止器具过热。
3.3 防止烫伤:使用后请等待电炉降温再移动器具。
建议使用隔热手套等工具进行移动。
3.4 防止爆炸:在加热切记勿用易燃易爆物品(如汽油、酒精、清洁剂等)进行操作,否则可能会引起火灾或爆炸。
3.5 其他:使用过程中请勿将其它物品放置在电炉上,以免影响热量传递。
使用后请关掉电源,拔出插头。
当产品长时间未使用时,应拔掉电源线。
以上便是我们家用电炉的使用说明书及安全规范,希望能为您提供帮助和保障。
HD9257产品注册欢迎购买并使用飞利浦产品!为了能充分享受飞利浦提供的支持,请在/welcome 上注册您的产品。
产品概况91021865743C A B D F H G E a控制面板b 透明视窗A 温度降低按钮c 炸篮B 温度增加按钮d 炸篮拆卸按钮滑盖C 预设程序选择按钮e 炸篮拆卸按钮D 灯光按钮f 炸篮手柄E 开始/暂停按钮g 炸锅F 待机按钮h 进风口G 时间减少按钮i 出风口H时间增加按钮j电源线首次使用之前1 拆掉所有包装材料。
2 去除产品上的贴纸或标签(如果有)。
3 首次使用之前,请根据清洁章节中的说明彻底清洁本产品。
使用前的准备1 将本产品置于稳固、水平、平整且隔热的表面上。
注意•请勿在产品上方、两侧及背面放置物品。
这会阻隔气流并影响空气加热的效果。
•切勿将正在运行的产品放在可能被蒸汽损坏的物体 (例如墙壁和橱柜)附近或下方。
•将橡胶塞留在炸锅中。
请勿在烹饪之前将其取出。
使用本产品烹饪表下表提供了常见食物的基本烹饪设置。
注意•这些基本设置仅供参考。
由于食材的来源、大小、形状和品牌各有不同,我们无法保证为您的食材提供最佳设置。
•制作大量食物时(例如,炸薯条、对虾、鸡腿、冷冻点心),为获得更好的效果,请将炸篮中的原料摇晃、翻动或搅拌 2 至 3 次。
原料份量时间分钟温度注意香肠2-6 根10-18180°C炸制期间摇晃、翻动或搅拌原料鸡腿约 125 克1 个2-6 个17-27180°C 鸡胸肉1-5 片15-25180°C 鱼排1-5 块1 层平铺25-32160°C鸡米花 冷冻半成品250 克14-16180°C 炸制期间摇晃、翻动或搅拌原料速冻春卷8-14 块15-30180°C 空气煎炸警告• 该款空气炸锅采用热空气加热。
请勿在炸锅中倒入油、油脂或任何其他液体。
• 切勿触摸高温表面。
接触高温表面前请佩戴隔热手套。
电炉使用说明书
1. 概述
电炉是一种利用电能进行加热的设备,具备快速、高效、环保等特点,适用于家庭和办公场所。
本使用说明书将详细介绍电炉的组成部分、使用方法、注意事项等内容,以帮助用户正确、安全地操作电炉。
2. 组成部分
电炉主要由以下几个部分组成:
a) 机身:电炉的主要外壳部分,包括加热面板、控制按键等。
b) 加热元件:位于机身内部,负责产生热能的关键部件。
c) 控制器:用于调节电炉的加热温度和时间,通常通过面板上的按键进行操作。
d) 电源线:将电炉连接至电源插座,供电使用。
3. 使用方法
a) 安装:确保电炉放置于平稳、通风的位置,远离易燃物品。
将电源线插头插入插座,并保证插头和插座接触良好。
b) 预热:打开电源开关,按照控制器上的指示调节加热温度和时间,待电炉预热完成后即可进行下一步操作。
c) 使用:将待加热的物品放置在电炉的加热面板上,然后按照需要的温度和时间设置控制器,开始加热过程。
注意不要超过电炉的最大负荷范围。
d) 关闭:在加热完成后,及时关闭电炉的电源开关,并拔掉电源线插头。
4. 注意事项
a) 使用环境:使用电炉时,应保证周围无易燃或易爆物品,并保持良好的通风环境,以确保安全。
b) 加热限制:在加热物品时,要注意不要超过电炉的承载能力,必要时可分批加热。
c) 温度控制:根据加热物品的需求,合理设置加热温度,避免因温度过高而造成损坏或危险。
d) 使用时间限制:建议每次使用电炉不超过持续使用时间限制,以免损坏设备或造成其他安全隐患。
e) 定期维护:定期清洁电炉外壳和加热面板,并注意排查是否有松动、老化等现象,保持设备的正常运行状态。
5. 故障解决
a) 无法启动:首先检查电源开关是否打开,插头是否插紧,电源是否正常。
如问题仍未解决,可联系售后服务。
b) 加热不均匀:检查加热面板是否有异物阻挡,物品是否放置平整。
如问题仍未解决,可联系售后服务。
c) 其他故障:如遇其他故障或问题,请勿私自拆卸维修,应咨询专业维修人员或联系售后服务。
本使用说明书仅为电炉的使用方法和基本要求提供指导,如需更详细的信息或遇到特殊情况,请及时咨询电炉的生产厂家或售后服务。
祝您使用愉快!。