博士无线WIFI介绍
- 格式:pptx
- 大小:8.45 MB
- 文档页数:39


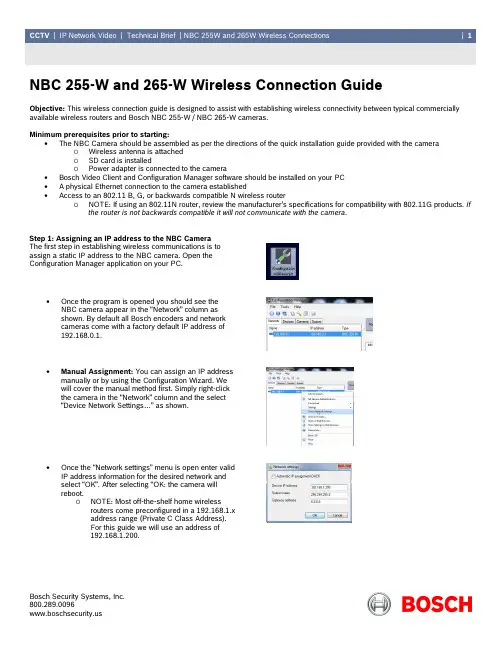
NBC 255-W and 265-W Wireless Connection GuideObjective: This wireless connection guide is designed to assist with establishing wireless connectivity between typical commercially available wireless routers and Bosch NBC 255-W / NBC 265-W cameras.Minimum prerequisites prior to starting:• The NBC Camera should be assembled as per the directions of the quick installation guide provided with the camera o Wireless antenna is attachedo SD card is installedo Power adapter is connected to the camera• Bosch Video Client and Configuration Manager software should be installed on your PC • A physical Ethernet connection to the camera established • Access to an 802.11 B, G, or backwards compatible N wireless router o NOTE: If using an 802.11N router, review the manufacturer’s specifications for compatibility with 802.11G products. Ifthe router is not backwards compatible it will not communicate with the camera .Step 1: Assigning an IP address to the NBC CameraThe first step in establishing wireless communications is toassign a static IP address to the NBC camera. Open theConfiguration Manager application on your PC.• Once the program is opened you should see the NBC camera appear in the “Network” column asshown. By default all Bosch encoders and networkcameras come with a factory default IP address of192.168.0.1.•Manual Assignment: You can assign an IP address manually or by using the Configuration Wizard. Wewill cover the manual method first. Simply right -clickthe camera in the “Network” column and the select“Device Network Settings…” as shown.• Once the “Network settings” menu is open enter valid IP address information for the desired network andselect “OK”. After selecting “OK: the camera will reboot.o NOTE: Most off-the-shelf home wirelessrouters come preconfigured in a 192.168.1.xaddress range (Private C Class Address).For this guide we will use an address of192.168.1.200.• Using the Configuration Wizard: To assign an IPaddress using the wizard, select the “Tools” menu and “Configuration Wizard…” from the drop downmenu as shown.•Once the “Wizard” opens follow the prompts until you come to the “Network” menu. From this menu select“Use the following IP address settings” and entervalid IP addressing for the network in which thedevice will operate.o Follow the “Wizard” prompts until you havethe reached the “Summary” page. Select“Finish”.Step 2: Establishing wireless communication• Once you have assigned a valid IP address to your NBC camera navigate to the “Network” menu and the“WLAN” submenu as shown.• From the “WLAN” submenu select “Auto” in the “Activate” drop down menu as shown here. This turnson the camera’s radio.•Next select the proper region from the “Region code” dropdown menu as shown. In this guide we will use “USA (FCC)”• Select the “Scan” button. Once the wireless network scan is complete you will see a list of availablewireless networks with which to establishcommunications. Select the wireless access point towhich you wish to connect. This will auto-fill the SSIDmenu with the Service Set Identifier of the router youselected.o NOTE: NBC-W cameras will communicateto 802.11 B and G routers using WPA andWPA2 encryption.oIf there are multiple routers detected, bestpractices dictate that the routers should beat least 6 channel numbers apart to preventinterference in communication.o If the wireless router you are working with isin hidden mode you can manually enter theSSID and PSK.• Enter the “pass key” to access the wireless router in the PSK menu as shown.o NOTE: The wireless router you areconnecting to must have security enabledfor the NBC camera to connect.•Select the “Save” button and immediately disconnect the Ethernet cable from the camera!Once you select “Save” the camera will reboot andthe network changes will take effect. The camera willnot function in wireless mode while an Ethernetcable is attached. If the camera does not reboot, youmust cycle power.Step 3: Validating wireless communication• Disconnect your physical network connection and ensure your PC is connected to the desired wireless network. Close theConfiguration Manager application and re-open it. This will ensure that the application’s detection beacon is using the wireless network and not the wired network.• Right-click the camera’s icon in the “Network” or “Devices” tab and select “Show in Web Browser”. This should open the camera’s web page.• From the Web Browser you can mouse over the “WLAN” menu in the top right hand corner. This will display the current signal strength of your wireless network to the camera.。
WiFi技术的原理及未来发展趋势时间:2021.03.12 创作:欧阳文文章出处:作者:张春飞WiFi——Wireless Fidelity,无线保真技术与蓝牙技术一样,同属于在办公室和家庭中使用的短距离无线技术。
该技术使用的是2.4GHz附近的频段。
其目前可使用的标准有两个,分别是IEEE802.11a和IEEE802.11b。
该技术由于有着自身的优点,因此受到厂商的青睐。
什么是WiFi?WiFi全称Wireless Fidelity,又称802.11b标准,它的最大优点就是传输速度较高,可以达到11Mbps,另外它的有效距离也很长,同时也与已有的各种802.11 DSSS设备兼容。
IEEE 802.11b无线网络规范是IEEE 802.11网络规范的变种,最高带宽为11Mbps,在信号较弱或有干扰的情况下,带宽可调整为5.5Mbps、2Mbps和1Mbps,带宽的自动调整,有效地保障了网络的稳定性和可靠性。
其主要特性为:速度快、可靠性高。
在开放性区域,通讯距离可达305米;在封闭性区域,通讯距离为76米到122米,方便与现有的有线以太网络整合,组网的成本更低。
WiFi——Wireless Fidelity,无线保真技术与蓝牙技术一样,同属于在办公室和家庭中使用的短距离无线技术。
该技术使用的是2.4GHz附近的频段。
其目前可使用的标准有两个,分别是IEEE802.11a和IEEE802.11b。
该技术由于有着自身的优点,因此受到厂商的青睐。
WiFi技术突出的优势其一,无线电波的覆盖范围广,基于蓝牙技术的电波覆盖范围非常小,半径大约只有50英尺左右,约合15米,而WiFi的半径则可达300英尺左右,约合100米,办公室自不用说,就是在整栋大楼中也可使用。
据悉,由Vivato 公司推出的一款新型交换机。
该款产品能够把WiFi无线网络300英尺接近100米的通信距离扩大到4英里约6.5公里。
其二,虽然由WiFi技术传输的无线通信质量不是很好,数据安全性能比蓝牙差一些,传输质量也有待改进,但传输速度非常快,可以达到11Mbps,符合个人和社会信息化的需求。

Data SheetRBK40Whole Home AC2200 Tri-band WiFi SystemOverviewThis Orbi WiFi System comes with an Orbi WiFi Router and Satellite that deliver unparalleled WiFi coverage. It covers homes up to 4,000 square feet with strong WiFi signals. Innovative Tri-band WiFi helps maximize the Internet speeds available in your home.Enjoy better WiFi. Everywhere.FeaturesSingle Network Name.One WiFi name and seamless roaming for your whole home to enjoy.Max Internet Speeds.Innovative Tri-band WiFi helps deliver fast Internet speeds even as more devices connect.Your Home. Covered.This kit of two covers up to a 4,000 sq ft † home with high-performance AC2200 WiFi.Simple & Secure.Use the Orbi app or a web browser to create secure whole home WiFi in minutes. With no accounts to set up.Data SheetRBK40Whole Home AC2200 Tri-band WiFi SystemHouse DiagramD E D I CA T E DT R I-B AN DC O N N EC T I ONINTERNETOrbi SatelliteOrbi Router4,000 Square Feet of Orbi WiFi CoverageDedicated Tri-band Connection ensures devices connect directly to maximum Internet speeds1Internet plan and devices that support these speeds are required.Simple setup from your smartphone or tablet.Use the Orbi app to set up and manage your network. To find the app, scan one of the following QR codes or search for NETGEAR Orbi in the Apple App Store or Google Play Store.Data SheetRBK40 Whole Home AC2200 Tri-band WiFi SystemOrbi Router (RBR40)Sync buttonPower buttonPlugs intoexisting modemPlugs into Ethernet-enabled devicesSync buttonPower buttonPlugs into Ethernet-enabled devicesOrbi Satellite (RBS40)Data SheetRBK40Whole Home AC2200 Tri-band WiFi SystemTechnical Specifications• O rbi AC2200 Router & AC2200 Satellite (866+866+400Mbps)†• Simultaneous Tri-band WiFi- R adio 1: IEEE ® 802.11b/g/n 2.4GHz–256QAM support - R adio 2: IEEE ® 802.11a/n/ac 5GHz–256QAM support - R adio 3: IEEE ® 802.11a/n/ac 5GHz–256QAM support • Dedicated Backhaul Technology• F our (4) high-performance antennas with high-power amplifiers • I mplicit/Explicit Beamforming for 2.4 & 5GHz bands (866+866+400Mbps)†• M U-MIMO capable for simultaneous data streaming on multiple devices • F our (4) 10/100/1000Mbps Gigabit Ethernet ports - O rbi Router (RBR40): 1 WAN & 3 LAN - O rbi Satellite (RBS40): 4 LAN • S ecurity- W PA/WPA2-PSK support- G uest WiFi Network is easy to setup separate& secure Internet access for guestsThis product comes with a limited warranty that is valid only if purchased from a NETGEAR authorized reseller.* 90-day complimentary technical support following purchase from a NETGEAR authorized reseller.† M aximum wireless signal range derived from IEEE standard 802.11 specifications. Actual data throughput and data over distance will vary. Network conditions and environmental factors, including volume of network traffic, building material and construction, and network overhead, result in lower actual data throughput rate and wireless coverage.1Internet plan and devices that support these speeds are required.For indoor use only.For regulatory compliance information, visit /about/regulatoryNETGEAR, the NETGEAR Logo, and Orbi are trademarks and/or registered trademarks of NETGEAR, Inc. Any other trademarks mentioned herein are for reference purposes only. ©2017 NETGEAR, Inc.NETGEAR, Inc. 350 E. Plumeria Drive, San Jose, CA 95134-1911 USA, /supportD-RBK40-2Physical Specifications• Orbi Router (RBR40)- D imensions: 6.4 x 3.1 x 8.0 in - W eight: 1.65 lb • Orbi Satellite (RBS40)- D imensions: 6.4 x 3.1 x 8.0 in - W eight: 1.65 lbWhat’s In the Box?• One (1) Orbi Router (RBR40)• One (1) Orbi Satellite (RBS40)• One (1) 2m Ethernet cable • Two (2) 12V/2.5A power adapters • Quick start guideWhat Do I Need for Orbi to Work?• High-speed Internet connection • Connect to existing modem or gateway。
双频wifi是什么意思有什么功能宽带路由器在一个紧凑的箱子中集成了路由器、防火墙、带宽控制和管理等功能,具备快速转发能力,宽带路由器灵活的网络管理和丰富的网络状态等特点。
这篇文章主要介绍了双频wifi是什么意思?双频wifi技术介绍,双频WiFi指得是一台无线设备(无线路由器、无线AP 等)同时提供了2.4GHz和5GHz两个频段的无线WiFi信号,其属于第五代Wi-Fi传输技术,需要的朋友可以参考下方法帮助双频WiFi值得是一台无线设备(无线路由器、无线AP等)同时提供了2.4GHz和5GHz两个频段的无线WiFi信号,可支持包含802.11a/b/g/n 完整无线网络,其属于第五代Wi-Fi传输技术(5G Wi-Fi)。
首先大家要知道,无线路由器发射的无线WiFi信号都是有一个无线频段的,之前的无线路由器使用的都是2.4GHz频段的无线信号,随着802.11 ac技术的成熟,5GHz频段的无线信号也被用在了无线路由器上,同时该技术向下兼容2.4GHz频段的无线WiFi信号,所有就有了我们所说的双频WiFi。
目前市面上已经有一些无线路由器开始支持双频WiFi信号了,例如TP-Link、华为、水星、腾达、小米等厂商生产都已经推出了自己的11ac 千兆无线路由器。
这里要说明一下,腾达是最先在国内推出5GHz无线路由器的厂商,早在2012年11月的时候,推出了国内首款5G WiFi 千兆无线路由器W1800R,5G频段无线速率最高达1300Mbps,无线并发速率高达1750Mbps。
双频WiFi无线设备的优点在于无线WiFi信号的传输速度更快速、信号更加的稳定、并且可以让无线设备更加的省电,5G WiFi的入门级速度是433M,这至少是现在Wi-Fi速率的三倍,一些高性能的5G Wi-Fi还能达到1G以上,可以满足未来高清以及大数据传输的需求;同时对于提升智能手机电池的使用时间也有一定的帮助,因为我们的智能手机大多数时候都是连接无线路由器的WiFi来上网的。
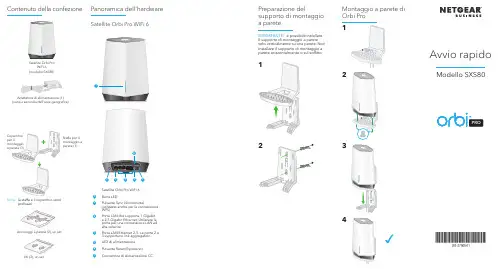
Panoramica dell'hardwareAdattatore di alimentazione (1) (varia a seconda dell'area geografica)Contenuto della confezioneSatellite Orbi Pro WiFi 6PROAvvio rapidoModello SXS80Nota: l a staffa e il coperchio sonoprefissati.Viti (2), un setAncoraggi a parete (2), un setIMPORTANTE: è possibile installare il supporto di montaggio a parete solo verticalmente su una parete. Non installare il supporto di montaggio a parete orizzontalmente o sul soffitto.1234Montaggio a parete di Orbi ProPreparazione delsupporto di montaggio a pareteSatellite Orbi Pro WiFi 61Barra LED2Pulsante Sync (Sincronizza)(utilizzato anche per la connessione WPS)3Porta LAN che supporta 1 Gigabit e 2,5 Gigabit Ethernet. Utilizzare la porta per una connessione LAN ad alta velocità.4Porte LAN Ethernet 2-5. Le porte 2 e 3 supportano link aggregation.5LED di alimentazione 6Pulsante Reset (Ripristino)7Connettore di alimentazione CCSatellite Orbi ProWiFi 6(modello SXS80)utilizzare l'app NETGEAR Insight o sincronizzare il satellite manualmente.Sincronizzazione del satellite utilizzando l'app NETGEAR InsightPer sincronizzare il satellite con il router Orbi Pro, è possibile utilizzare l'app NETGEAR Insight. Per ulteriori informazioni sull'app, visitare https:///insight/.1. Scaricare l'app NETGEAR Insight da Apple App Store o Google Play Store.2. Avviare l'app NETGEAR Insight sul dispositivo mobile e seguire le istruzionivisualizzate.BluLa connessione tra il router e il satellite Orbi Pro è buona.ArancioneLa connessione tra il router e il satellite Orbi Pro è discreta. Avvicinare il satellite Orbi Pro al router Orbi Pro.MagentaIl satellite Orbi Pro non è riuscito a connettersi al router Orbi Pro. Avvicinare il satellite Orbi Pro al router Orbi Pro.Nota: se la barra LED rimane magenta dopo circa un minuto, premere il pulsante Sync (Sincronizza) sul retro del router Orbi Pro e sul retro del satellite Orbi Pro. Quando il satellite Orbi Pro si sincronizza con il router Orbi Pro, la barra LED del satellite diventa bianca, quindi blu a indicare una connessione buona, poi si spegne.La barra LED del satellite Orbi Pro si accende di colore bianco mentre il satellite tenta di sincronizzarsi con il router Orbi Pro. Dopo che la barra LED del satellite Orbi Pro diventa bianca, il colore cambia in uno dei seguenti colori per circa 3 minuti, quindi si spegne:Informazioni sulla sincronizzazione del satellite Orbi Pro WiFi 6Supporto e CommunityVisita /support per trovare le risposte alle domande e accedere agli ultimi download.È possibile trovare utili consigli anche nella Community NETGEAR all'indirizzo .Conformità normativa e note legaliPer la conformità alle normative vigenti, compresa la Dichiarazione di conformità UE, visita il sito Web https:///about/regulatory/.Prima di collegare l'alimentazione, consultare il documento relativo alla conformità normativa.NETGEAR, Inc.piazza Della Repubblica 32, 20124 Milano© NETGEAR, Inc. NETGEAR e il logo NETGEAR sono marchi di NETGEAR, Inc. Qualsiasi marchio non-NETGEAR è utilizzato solo come riferimento.Settembre 2020NETGEAR INTERNATIONAL LTD Floor 1, Building 3,University Technology Centre Curraheen Road, Cork, T12EF21, IrlandaSincronizzazione manuale del satellite con il routerÈ possibile sincronizzare manualmente il satellite utilizzando i pulsanti Sync (Sincronizza) sul satellite Orbi Pro e sul router.1. Collocare il satellite Orbi Pro in una posizione centrale per una migliore coperturaWiFi.2. Collegare il satellite Orbi Pro a una fonte di alimentazione.Il LED di alimentazione sul retro del satellite Orbi Pro si illumina in verde.3. Premere il pulsante Sync (Sincronizza) sul retro del satellite. Entro due minuti,premere il pulsante Sync (Sincronizza) sul retro del router.Il LED circolare del router Orbi Pro si spegne una volta completata la configurazione.。

博士c5参数
博士c5是一款高性能的计算机,其参数包括以下几个方面:
1. 处理器:博士c5采用最新的英特尔i9处理器,拥有8个物理核心和16个逻辑核心,主频
2.3GHz,可加速至4.8GHz。
2. 显卡:博士c5配备了一块NVIDIA GeForce RTX 3080显卡,显存16GB GDDR6,支持实时光线追踪,能够提供出色的画质和流畅的游戏体验。
3. 内存:博士c5拥有64GB DDR4内存,可以满足多任务处理和大型游戏的需求。
4. 存储:博士c5采用了快速的固态硬盘(SSD)作为系统盘,容量为1TB,读写速度均可达到3500MB/s以上。
5. 显示器:博士c5配备了一块27英寸4K分辨率的IPS显示器,可提供高品质的图像显示效果。
6. 其他参数:博士c5还配备了蓝牙5.0、WiFi 6、雷电3、USB-C 等接口,以及内置高清摄像头和立体声扬声器等功能。
- 1 -。
时代金刚838参数详解1.天线配置:时代金刚838采用双天线配置,支持2.4GHz和5GHz双频段,每个频段配备一根天线,提供更好的信号覆盖和传输性能。
2. 传输速率:金刚838支持AC1200的无线传输速率,其中2.4GHz 频段的最大传输速率为300Mbps,5GHz频段的最大传输速率为867Mbps。
这种高速传输能力可以满足大多数用户对快速上网的需求。
3. 无线标准:金刚838支持802.11ac无线标准,这是当前最新的无线网络标准,与以前的802.11n相比,提供更高的速度、更大的带宽和更低的功耗。
4.天线增益:金刚838的天线增益为5dBi,能够增强信号传输的稳定性和覆盖范围,有效提高无线网络的传输速率和稳定性。
5.天线类型:金刚838采用了MIMO(多输入多输出)技术,通过多个天线同时发送和接收数据,提高了无线网络的传输速度和稳定性。
6.网络接口:金刚838具有4个千兆以太网口,可以连接多个有线设备,如电脑、电视、机顶盒等,提供更稳定的有线网络连接。
B端口:金刚838配备了一个USB3.0接口,可以连接外部存储设备,实现文件共享和媒体服务器功能。
8.安全性:金刚838支持WPA/WPA2-PSK等多种安全加密方式,保障无线网络的安全性。
此外,金刚838还支持MAC地址过滤、防火墙等安全功能,可以进一步提高网络的安全性。
9. 管理界面:金刚838采用简洁易用的Web管理界面,用户可以通过浏览器进行设置和管理路由器。
10. QoS功能:金刚838支持QoS(Quality of Service)功能,可以根据用户的需求对流量进行优先级管理,保障重要的应用程序和服务的网络质量。
11.宽带接入方式:金刚838支持多种宽带接入方式,包括ADSL、光纤、千兆以太网等,可以适应不同的网络环境。
12.管理方式:金刚838可以通过手机APP进行管理,支持远程设置和管理路由器,方便用户进行操作。
13.无线覆盖范围:金刚838采用了全向天线设计,具备较大的无线覆盖范围,适用于中小型家庭和办公环境。
BoostWithin 2mPairing buttonSetting up your Optus Ultra WiFi Booster Preparing your Optus modemNote: The following instructions apply to the setup of your Booster with a compatible Optus supplied modem.It’s important to follow all steps in this quick guide to help you successfully set up your Booster. You may need to reconnect your existing devices to your WiFi network, so we recommend allowing enough time to complete your setup in one go.Note: If you’re setting up multiple Boosters, you only need to prepare your Optus modem once.1. Restart your modem to make sure you have the latest firmware installed. The easiest way to restart is to turn your modem off and then on again.T ip: wait until your modem’s lights have turned off before turning the modem back on. Once you’ve turned your modem back on, it may take up to 5 minutes for the latest firmware to be installed on your modem. Your modem may automatically restart a couple of times during this period. After 5 minutes you can move to the next step.Pairing your Booster with your modemPositioning your BoosterCheck your devices2. Press and hold the WiFi button and WPS button simultaneously on your modem until the top row of your modem’s LED lights start blinking. Then release the WiFi and WPS buttons and wait for the LED lights to stop blinking.5. Unplug your Booster and place it in-between your modem and the area you want to boost your WiFi coverage.6. The colour of the middle LED light on your Booster indicates the strength of the WiFi connection to the modem. Green means great, orange is medium, and solid red means your connection is poor. Flashing red means your connection is lost. If the middle LED is solid red, try repositioning the Booster closer to your modem to improve your connection.T ip: the best approach is to try a number of placements until you find optimum WiFi coverage.3. Make sure your Booster and modem are within 2 metres of each other, plugged in and powered on. The Booster may take up to 45 seconds to finish powering on. Please wait until the middle LED light on your Booster starts flashing before moving on to the next step.4. Press the WPS button on your modem and pairing button on your Booster for approximately 3 seconds to start pairing them. Once the middle LED light on your Booster goes from flashing red to solid red, orange or green, you’ve successfully paired. This step may take up to 3 minutes. If you’ve purchased more than one Booster, this step is required for the first and additional Boosters.7. After you’ve set up your Booster, you may need to reconnect your other devices to your WiFi network.LightsPositioning your Booster properly is key to ensuring optimal WiFi coverage.The LED lights on the front of your Booster indicate the status and strength of its connection to your modem.Buttons1. Pinhole reset buttonPress this button for5 seconds to restore theBooster to its factorydefault configuration.2. Power toggle switchOn/off togglepush button.3. Pairing buttonPress the pairing button to:• Connect the Boosterto your Optus modem.• Connect a device tothe Booster via WiFi.2Take control of your home WiFi network with My Optus appSpeed testingTest the speed of your WiFi connection.24/7 supportMessage us anytime for help and support inMy Optus app .au/message or online at .au/message.The layout and design of your home makes a big difference when it comes to finding the ideal placement of your Optus Ultra WiFi Booster. WiFi strength can be impacted by factors like wall thickness and other electrical devices running in the home.The best approach is to try a number of placements, until you find what’s optimum in your home. You should place the Booster close enough to the modem to get a strong connection, but also at a distance that effectively maximises the WiFi coverage in your home. To help find the right placement, you can use the middle LED on your Booster to check signal strength. Depending on the size of your home, you may choose to use one or more Boosters to optimise your WiFi coverage.Placing your Booster for the best results The name says it all really. Your Optus Ultra WiFi Booster connects with your existing modem to boost your WiFi signal to areas of your home that may otherwise be out of range. The result is a stronger network, sharing the same name and password as your modem for ease of use.。
DCN-WCCU 是 DCN 无线会议系统的核心。
它可控制多达 150个无线会议装置和 95 个新一代 DCN 有线装置。
WCCU 使用博世的专利光纤网络,易于连接至无线接入点和其他博世会议设备。
网络可设置为单独分支或冗余环路配置,具体取决于安装的设备。
WCCU 具有两个 DCN 主干电缆插座,以便连接至 DCN-IDESK 译员台。
与 PC 和 DCN-SWSMV 会议控制软件配合使用时,WCCU 可以提供更强大的会议控制功能。
基本功能•光纤网络可以:-将 WCCU 连接至 WAP-以执行各种音频馈送和分配功能(可以连接至其他博世会议设备,如 Integrus 发射机以执行红外语言分配;音频扩展器和 CobraNet™接口)•DCN 主干电缆以连接 DCN 新一代装置;例如 DCN 会议装置、DCN Concentus、DCN 译员台或 DCN 嵌入式安装装置•基本话筒管理功能•三种操作话筒模式:-开放:话筒按钮控制发言请求(自动)-覆盖:话筒按钮覆盖已开启的话筒 (FIFO)-PTT:按下讲话(按住按钮发言)•最多可打开 4 个话筒(3 个用于代表,1 个用于主席)•同声传译功能,通过 DCN 无线会议系统提供多达 10 个语言通道和 1 个会场语言通道。
当使用 10 个以上的语言分配通道时(最多 32 个),额外的通道由系统的其余部分进行分配,因此它们可以通过有线装置或通过 Integrus 红外接收机收听•使用 PC 和 DCN-SWSMV 软件时,可用于代表大会投票程序的投票控制•每个已连接的无线会议装置(DCN-WDCS-D、DCN-WDDCS-D 和 DCN-WDVCS-D)都具有集成的同声传译功能,并附带多达 10 个语言选择通道•基本内部对讲功能•自动摄像机控制•使用 PC 和 DCN-SWSMV 软件时可以扩展会议功能•可调节音频输入/ 输出的灵敏度•音频插入功能,用于连接外部音频处理设备或电话耦合器•可通过显示屏和单个旋钮对 WCCU 和系统进行配置•安装人员可为每个 WCCU 分配唯一的名称以便识别•通过 VU 计量表读数来监控音频输入/输出(可以使用耳机来监控音频。
WirelessLAN ControllerAC500Model No.10/100MbpsMultiple SSIDUSB 2.0AC500 is a wireless LAN controller that designed to central manage TOTOLINK ceiling mount AP and In-wall AP series in your organization.It supports up to 200 access points management, mainly used in hotels, enterprises, schools, shopping malls, restaurants to simplify the deployment and operation of wireless network.Overview- Centralized configuration for multiple access points - Supports access points management by group - APs working status monitoring in real time - Access points auto detect for easy use - APs binding offers high security without unauthorized access- Supports maximum of 200 AP connections - USB 2.0 port for unified firmware upgrade of APs - Supports manual and scheduled AP reboot - Supports ByPass Mode for management. - Supports Local Bridge mode.- Provides WEB (HTTP and HTTPS) for network management.FeaturesModel No.AC500Wireless LAN ControllerUSB 2.0 For Unified Firmware UpgradeSelling pointAs long as you upload latest AP firmware to storage device and plug it into AC500’s USB 2.0 port, the controller will automatically detect all AP’s existing firmware version and upgrade them to the latest version, making the AP maintenance more flexible and intelligent.Access Point Discovery AutomaticallyAC500 could automatically find out all TOTOLINK ceiling mount APs and in-wall APs in the network, allowing you to control all by adding them into AP management list.Access Points Isolation, Multiple Wi-Fi Networks AvailableFeatured by AP isolation, AC500 enables APs under management to create multiple SSIDs and isolate them due to different network purpose so that each network connected terminals can’t access to each other, protecting user’s privacy conveniently.SSID Binding With VLANAC500 allows different SSID binding with different Tag VLAN and DHCP to provide IP address range in different domain,realizing the real traffic isolation between different wireless networks to guarantee the network security.Office-AC500Multiple Secure Wireless NetworksFirmware UpgradeUSB 2.0Sharing PortHardwareMaximum Number of Manageable APsAP ManagementAC Working ModeAC System Management - 200- AP Scan- AP Status- AP Group Management- AP Settings- AP System Management- Local Management- Remote Management- Local IP Settings; Administrator Settings; Time Zone Settings; Firmware Upgrade; System Con guration; Reboot ScheduleSoftwarePackage ContentsEnvironment- AC500 AP Controller*1- Power Adapter *1- Ethernet Cable *1- Quick Installation Guide *1- Operating Temperature: 0℃~40 ℃ (32 ℉~104℉)- Storage Temperature: -40℃~70 ℃ (-40 ℉~158℉)- Operating Humidity: 10%~90% non-condensing - Storage Humidity: 5%~90% non-condensingOthersHeadquarter & R&D Center7/F , Unit D, 4 Building Shenzhen Software Industry Base, Xuefu Road, Nanshan District Shenzhen, Guangdong, ChinaTel : +86-755-6136-3288 (Ext. 851) l FAX : +86-755-6136-3344Direct Line : +86-755-6136-3395 l FAX : +86-755-6136-3322FactoryBuilding A1 & A2 Lantian Technology Park, Xinyu Road, Xinqiao Henggang Block, Shajing Street, Baoan District, Shenzhen, Guangdong, China Copyright 2018 ZIONCOM (HK) TECHNOLOGY CO., LTD. All Rights Reserved.ZIONCOM ( HK ) TECHNOLOGY LIMITED。
Linksys EA9500 AC5400M路由器评测作为不同网络之间互相连接的枢纽,路由器系统构成了基于TCP/IP 的国际互联网络Internet 的主体脉络,也可以说,路由器构成了Internet的骨架。
作为旗舰级产品,EA9500的参数规格和做工自然是毫不逊色,下面为大家带来Linksys EA9500 AC5400M路由器全面评测,来看看吧巨无霸有多大?Linksys EA9500绝对是路由器里的大个子——264.52mm×318.15mm×66.66mm的身躯实在是太大了,基本是其他路由器身材的两到三倍。
当然了,块头这么大功能自然更多。
比如说其硬件规格上,就比一般的路由器要丰富许多,EA9500配备有8个千兆Lan口和1个千兆Wan口,同时USB2.0、USB 3.0各一,充分满足了家庭乃至小企业的使用需求。
对USB接口部分需要说的一点是,USB 2.0更加适合连接USB打印机实现网络打印,USB 3.0的传输速度才更符合局域网的存储需求(连接硬盘或闪盘)。
Linksys EA9500具备4×4 MU-MIMO能力,在2.4GHz的802.11n下,最大带宽达到了1000Mbps(需要客户端支持),5GHz的802.11ac部分则提供了两个频段,分别可以达到2166Mbps之多!小知识:MU-MIMO(多用户多入多出技术)是一种让你的路由器同时与多个设备沟通的技术,它是802.11ac标准第二阶段的里程碑,这种进步甚至比802.11b/g到802.11n,再到802.11ac来得还要大,因为版本号的进化只是提升了理论速率,MU-MIMO才是真正改善了网络资源利用率。
与之匹配的是这款EA9500拥有8个可调节增益天线,可进行调节定位获得最佳的性能。
它们可以确保在整个住宅范围内实现无死角的Wi-Fi覆盖,与其他品牌路由器仅有2/3条数据流通道不同的是,EA9500每个频段均拥有4条同时数据流通道,这样可以充分保障数据传输的稳定性。
EW-7438RPn AirN300Wi-Fi無線訊號延伸器產品資訊1-1 包裝內容- EW-7438RPn Air - 安裝指南1-2 系統需求- 使用現有2.4GHz 無線網路- 配備2.4GHz 802.11/b/g/n 無線網卡的電腦及瀏覽器(IE 8或以上版本、Google Chrome 、Firefox 或最新版Safari)- iOS 5 (或以上) 或 Android 4.x (或以上)版本的作業系統1-3 LED 燈號說明安裝1.請將EW-7438RPn Air插入電源插座。
開機中,LED燈號會閃爍紅燈,待開機完成,LED燈將轉為恆亮的紅燈。
2.請使用您的上網裝置(如:電腦、平板或智慧手機)搜尋SSID為“EdimaxEXT.Setup xx”的Wi-Fi無線訊號,並且與它連線。
若您使用電腦連線,請您先拔除網路線。
若您使用手機或平板上網,請注意其作業系統須為iOS 4.3 或Android 4.x以上版本。
3.請開啟網路瀏覽器,在網址列輸入http://192.168.9.2並點選”開始”啟動安裝步驟。
可選擇語言為動態IP位址(進一步說明,請參考使用手冊)。
4.請詳閱畫面說明”如何為您的EW-7438RPn Air選擇最佳的架設位置”後,點選”下一步”。
您將可以在下一頁中檢視您的訊號強度。
5.請在表列中選擇您要連線的無線網路,並輸入您要連線的無線網路設備的連線密碼,接著,請點選”下一步”。
您輸入的連線密碼,必須和您家中Wi-Fi 密碼相同。
若您希望連線至一已隱藏網路,請勾選”手動安裝訊號延伸器”,以手動方式輸入隱藏網路的SSID。
欲了解進一步說明,請參照使用手冊。
6.請稍待EW-7438RPn Air進行連線測試。
若EW-7438RPn Air無法自您的無線分享器或無線AP取得IP位址,您將會看到如下視窗訊息。
請點選”Static IP (靜態IP位址)”,指定一個IP位址給EW-7438RPn Air,欲了解進一步說明,請參照使用手冊。