古野电子罗经操作说明书
- 格式:pdf
- 大小:6.92 MB
- 文档页数:23
操作手册船桥导航监视警报系统 (BNWAS)BR-500型号Pub. No. OZS-44610-D DATE OF ISSUE: MAY. 2012i重要注意事项概述• 设备操作员必须阅读和遵守本手册的说明。
错误的操作或维护可能导致保修失效,或造成伤害。
• 未经 FURUNO 的书面许可,不得复制本手册的任何部分。
• 如果本手册丢失或破损,请咨询经销商如何更换。
• 本手册内容和设备规格如有更改,恕不另行通知。
• 本手册中屏幕显示(或图示)范例可能与您的屏幕显示有所区别。
您所看到的屏幕取决于您的系统配置和设备设置。
• 请保留手册,以备将来参考。
• 如未经 FURUNO 授权擅自对设备(包括软件)进行任何改装/修改,保修将失效。
• 所有品牌和产品名称均为各自持有者的商标、注册商标或服务标记。
如何丢弃本产品须根据当地工业废品处理规范丢弃本产品。
如在美国处理,请参阅电子工业联盟的主页 (/),了解正确的处理方法。
如何丢弃废旧电池有些 FURUNO 产品使用电池。
如要了解您的产品是否使用电池,请参阅维护章节。
如果使用电池,请遵守以下说明。
请用胶带封住电池正负接头后再弃置,防止因短路造成燃烧或发热。
在欧盟打叉的垃圾桶标志表示禁止将所有类型的电池丢弃到标准垃圾桶或垃圾站。
请根据所在国家的法规和《电池指令 2006/66/EU 》,将废旧电池带到电池回收站点。
在美国莫比斯环符号(三箭追逐环)表示必须回收的镍镉和铅酸充电电池。
请根据当地法律将废旧电池带到电池回收站点。
在其他国家不存在电池回收标志国际标准。
其他国家如在将来制作自己的回收标志,该标志的数量将增加。
PbNi-Cd安全说明parts inside. ii安全说明iii目录前言 (vi)系统配置 (viii)1.主警报面板...............................................................................................................1-1 1.1控制钮..............................................................................................................................................1-1 1.2如何开启/关闭系统.........................................................................................................................1-1 1.3BNWAS 显示屏................................................................................................................................1-2 1.4如何调整 LCD/LED 亮度、按键背光................................................................................................1-3 1.5如何选择支援船员............................................................................................................................1-4 1.6模式..................................................................................................................................................1-4 1.7休眠期..............................................................................................................................................1-4 1.8监视警报顺序...................................................................................................................................1-5 1.9帮助区域...........................................................................................................................................1-81.9.1 系统故障指示........................................................................................................................1-81.9.2 操作性事件指示.....................................................................................................................1-9 1.10如何进行紧急呼叫............................................................................................................................1-91.11如何呼叫导航员..............................................................................................................................1-102.另选购设备...............................................................................................................2-1 2.1计时器重置面板 BR-530,BR-550..................................................................................................2-1 2.2船舱面板 BR-540.............................................................................................................................2-2 2.3运动检测器 BR-560..........................................................................................................................2-32.4闪光灯 BR-570.................................................................................................................................2-43.维护与故障排除........................................................................................................3-1 3.1维护..................................................................................................................................................3-1 3.2更换保险丝.......................................................................................................................................3-1 3.3故障排除...........................................................................................................................................3-2 3.4如何检查处理器单元/船舱面板/计时器重置面板之间的连接........................................................3-33.5主要部件的预期寿命.........................................................................................................................3-44.安装..........................................................................................................................4-1 4.1设备列表...........................................................................................................................................4-1 4.2安装注意事项...................................................................................................................................4-2 4.3主警报面板 BR-510.........................................................................................................................4-34.3.1 桌面安装................................................................................................................................4-34.3.2 嵌入式安装............................................................................................................................4-34.3.3 屏蔽膜(选件).....................................................................................................................4-4 4.4处理器单元 BR-520.........................................................................................................................4-4 4.5计时器重置面板 BR-530、机舱面板 BR-540、运动检测器 BR-560、闪光灯 BR-570(另选购单元).........................................................................................................................................................4-44.5.1 嵌入式安装............................................................................................................................4-44.5.2 舱壁安装................................................................................................................................4-5 4.6防水计时器重置面板 BR-550(选件)............................................................................................4-9 4.7布线................................................................................................................................................4-114.7.1 处理器单元..........................................................................................................................4-114.7.2 布线信息..............................................................................................................................4-134.7.3 主警报面板..........................................................................................................................4-144.7.4 计时器重置面板、机舱面板、运动检测器、闪光灯.............................................................4-144.7.5 闪光灯.................................................................................................................................4-15 ivSUMARIO4.7.6 如何装配船舱面板、计时器重置面板、闪光灯和运动检测器的电缆...................................4-15 4.8DIP 开关,旋转开关设置...............................................................................................................4-16 4.9如何调整 LED 亮度.......................................................................................................................4-17 4.10菜单设置........................................................................................................................................4-174.10.1 管理员菜单........................................................................................................................4-174.10.2 检修菜单...........................................................................................................................4-21 4.11I/O 语句信息..................................................................................................................................4-22附录1 菜单树、缩略语、JIS 电缆选用指南..............................................................AP-1规格............................................................................................................................SP-1装箱单..........................................................................................................................A-1外形图..........................................................................................................................D-1接线图..........................................................................................................................S-1索引.............................................................................................................................IN-1vvi前言尊敬的 BR-500 用户承蒙惠购 FURUNO BR-500 船桥导航监视警报系统 (BNWAS )。

编号: NLT-SR362-SSCN 版本号: V120327仪器简介操舵罗经复显仪SR362,用于航海及内河航行导航罗经度数分显。
仪器将接入的NMEA0183罗经信号立体直观的指示出来,用以指示航向的变化;其带有可调高亮LED背光照明以便用于夜间观测,使用便于操作的触摸式按键;能自动监察有无数据信号输入并通过指示灯指示;仪器安装方便,可立式或嵌入式安装,便于安装在各个需要观察、监测的位置;其显示精度、最小刻度为1°。
产品显著特性罗经指示:通过刻度盘转动指示接入的NMEA0183罗经度数监察信号:通过信号指示灯指示有无信号输入开机对零:开机零刻度线自动对准指示线零度校准:进行零度校准,减少偏差背光可调:高亮6级可调LED背光装箱清单序号内容数量备注1 主机 1 型号:SR3622 说明书 14 合格证 15 盘头自攻螺钉 4 嵌入式安装时使用(ST4.2×25)6 盘头自攻螺钉 3 悬挂式安装时使用(黑色ST4.2×20)7 电源数据线 1 附件(线长2米,焊9芯插头)8 远程调光器 1 型号:DIM930,选配技术条件整机性能外形尺寸:长218mm 宽202mm 高64mm嵌入式安装尺寸: 170×170mm(6.693×6.693 inch)重量:约2Kg电源电压: DC18~36V,具有防止反接与过流保护功能功耗:≤8.4W(DC 24V)指示范围:0~359°指示精度:±1°数据格式: NMEA0183格式(如下)$--HDT,x.x,T*hh<CR><LF>航向,实际角度*校验值输入波特率: 4800bps引用标准仪器引用的标准为IEC61162-1。
使用环境工作环境温度:0℃~ +40℃存储环境温度: -20℃~ +70℃~ 90% 相对湿度湿度: 10%22防护等级: IP面板介绍①背光区域: 高亮LED 背光照明区6级可调②指示线: 罗经度数指示 ③信号指示灯: 仪器工作状态指示1. 正常模式:有信号输入时为绿色,无信号输入时为红色闪烁;2. 校准模式:红色/绿色闪烁(Reset 键可切换指示灯闪烁颜色,详见操作说明)。
古野ECDIS电子海图的设置和航线设计纸图海图大致步骤是:1草拟航线(以便申请航线途径海图)2-申请海图(用CATALOGUE选图并发海图清单给公司)3接收海图(一般是海图供应商/代理送船)4更新海图(根据航海通告NTM及T&P改正并登记于海图左下角)同理电子海图大致步骤1.在ECDIS--PLAN-Planning--Route上草拟航线2.申请permit , 在CHARTS--Cell Status--use Filter tool (select the Edit route --search chart data-- filtering by route),然后和纸质海图一样,保证这些chart cell installed & up to date,如果没有installed就向公司申请new permit3.安装permit , 公司把新的permit发到船上后,CHARTS--License--Import Licenses4.更新Update CHARTS AIO & ENC4.1.AOUS Update the ENC+Download the AIO4.2.CD BASE UPDATE the AIO & ENC4.ECDIS--PLAN-Planning--Route 细拟航线5.PLAN--Planning --User Chart --和纸质海图一样标注这条航线画报告线--------等5.1.PLAN--Planning--Route--User Chats可以关联4张user chart5.2.NAVI --Voyage --User Chart 能关联4张user chart5.3.其中一张user chart 可以是自己随时更新的Navtex& Navwarning &其他航行警告6.设置电子海图的一些重要参数6.1.DISP--SET--Chart Alert里设置Shallow Contour,Satety Depth ,Safety Contour;Deep Contour6.2.DISP--SET--Symbol Display设置tracking6.3.DISP--SET--Chart Display 设置Scale MIN/Four Shades/ Accuracy6.4.Overlay/NAV Tools 设置Echo (radar echo) / Look-ahead / Predictor / UKC / PI / Ring / TT & AIS ...6.5其他Check depth --Accuracy (Cat ZOC A1-A2-B-C-D-U) LEG BY LEG 同步到航线设计的文件里7.PLAN--ROUTE--User chart关联到设置的航线上--Check Route 最后Monitor航线1.在ECDIS--PLAN-Planning--Route上草拟航线1.草拟航线.jpg2.申请permit , 在CHARTS--Cell Status--use Filter tool (select the Edit route --search chart data-- filtering by route),然后和纸质海图一样,保证这些chart cell installed & up to date,如果没有installed就向公司申请new permit2.申请permit1.jpg2.申请permit2.jpg3.安装permit , 公司把新的permit发到船上后,CHARTS--License--Import Licenses3.安装permit.jpg4.1.AOUS Update the ENC+Download the AIO4.1.1.AIO update 每周二下午更新AIO (T&P)临时通告和永久通告,更新网址:ftp:///Digital%20Product%20Updates/AVCS_S63 1-1/AIO/ZIP_Files/需要输入公开的账号和密码:(Account:ukhopublic Password:Public12345)4.1 update AIO .png4.1.2 ENC UPDATEAVCS Online Updating Service是UKHO的在线更新程序,简称AOUS4.1.2.jpg1--导入Permit2--更新CATALOGUE3--选择更新的起始通告期数4--ONLY显示LISENCE且需更新的海图5--点击NEW REQUEST新命名一个申请,例如20161202SGP-NB6--点SEND REQUEST,程序联网,将申请发送7--右下角显示更新完成,即100% COMPLETED时,点击CREAT UPDATE,依次NEXT,NEXT~,生成更新文件(见图十),USB 拷贝此文件,导入ECDIS,更新完毕4.1.2.2.png5.PLAN--Planning --User Chart --和纸质海图一样标注这条航线画报告线5.1.PLAN--Planning--Route--User Chats可以关联4张user chart5.1.1.jpg6.1.DISP--SET--Chart Alert里设置Shallow Contour,Satety Depth ,Safety Contour;Deep Contour6.1 CHART ALERT.jpg6.2.DISP--SET--Symbol Display设置tracking6.3.DISP--SET--Chart Display 设置Scale MIN/Four Shades/ Accuracy6.4.Overlay/NAV Tools 设置Echo (radar echo) / Look-ahead / Predictor / UKC / PI / Ring / TT & AIS ...6.5其他Check depth --Accuracy (Cat ZOC A1-A2-B-C-D-U) LEG BY LEG 同步到航线设计的文件里待更新。


助航仪器及其它设备TG-8000电罗经操作说明一、开机1.打开罗经控制箱内的主电源开关,打开罗经操作面板上的电源开关(POWER),此时电罗经开始工作。
2.设置罗经启动时间。
3.设置罗经启动方位。
4.设置电罗经内部纬度系统。
5.调整罗经复示器与主罗经同步。
6.罗经稳定时间大约需6小时,此时禁止校正电罗经误差。
7.设置电罗经内部船速系统。
8.确认罗经系统的真方位。
9.选择罗经真方位显示模式。
二、关机1.关掉各电罗经复示器。
2.关掉主罗经操作面板上的电源开关。
3.关掉主罗经控制箱内的主电源开关,此时电罗经停止工作。
RT2048VHF操作说明一、开机1.旋转VHF操作面板上的电源及音量开关,打开电源并选择合适音量。
2.按数字键输入VHF频道。
3.调节操作面板上的SQ旋钮,进行静燥调节。
4.5.按/取消双功值守功能。
6.按二、关机旋转VHF操作面板上的电源开关,关掉电源,VHF停止工作。
KR100A航向记录仪操作说明一、开机1.向下掀开记录仪下方的盖板,将“RECORD”开关扳至“START”位置,“LIGHT”开关扳至“ON”位置,“SPEED”开关选择“NORMAL”2.向左掀开记录仪上方的盖板,按下操作面板右下角的电源开关(白色),此时记录仪开始工作并自动跟踪。
二、关机1.将上述“RECORD”开关扳至“STOP”位置,“LIGHT”开关扳至“OFF”位置。
2.按操作面板右下角的电源开关关掉电源,记录仪停止工作。
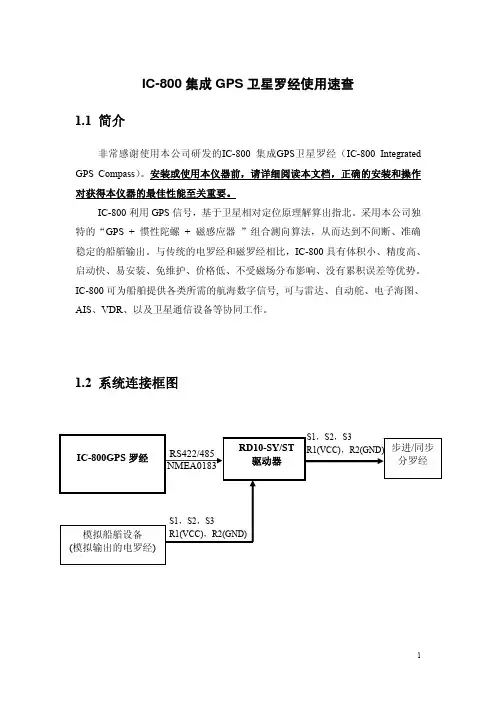
IC-800集成GPS卫星罗经使用速查1.1 简介非常感谢使用本公司研发的IC-800集成GPS卫星罗经(IC-800 Integrated GPS Compass)。
安装或使用本仪器前,请详细阅读本文档,正确的安装和操作对获得本仪器的最佳性能至关重要。
IC-800利用GPS信号,基于卫星相对定位原理解算出指北。
采用本公司独特的“GPS + 惯性陀螺 + 磁感应器”组合测向算法,从而达到不间断、准确稳定的船艏输出。
与传统的电罗经和磁罗经相比,IC-800具有体积小、精度高、启动快、易安装、免维护、价格低、不受磁场分布影响、没有累积误差等优势。
IC-800可为船舶提供各类所需的航海数字信号, 可与雷达、自动舵、电子海图、AIS、VDR、以及卫星通信设备等协同工作。
1.2 系统连接框图1.3 安装IC-800由天线单元、主机单元、显示单元三大部分构成。
天线单元包括:天线架 1付 1100(长)x 100(宽)GPS 接收天线 2个 磁感应器 1个 GPS 射频电缆 2根 磁感应器传输电缆 1根 抗干扰遮挡圆盘 2个主机单元包括:IC-800主机 1台 254(长)x 300(宽)x 80(高) 安装操作速查 1本显示单元包括:操作显示器 1台235(长)x 132(宽)x 50(深) 显示器连接电缆 1根1.3.1 天线单元安装按照箭头指向船首 船首 船尾平行一致安装注意事项:(1)为了得到最佳的解算结果,天线应该选择合适的位置,最好是安装于雷达天线之上无遮挡的位置;为了避免雷达信号的干扰,安装时应考虑的避开雷达辐射波束以外,而且安装雷达信号遮挡圆盘。
(2)如果不便安装在最高点,需要找到合适的位置,原则是尽量避开遮挡物(如桅杆、烟囱等),避开射频信号辐射源,由于在雷达信号盲区内,不必安装雷达信号遮挡圆盘。
(3)在船停航安装时,可以观察IC-800主机GPS接收机星空视图接收情况以及航向解算的稳定情况来判断天线位置是否合适。
古野FURUNO FM-8500 VHF/DSC的使用介绍前述1:取消错误的遇险报警1.立即关掉发射机。
2.打开设备,放在16频道。
3.把你的船名、呼号、DSC号码向所有船作一个广播,同时取消错误的遇险报警。
例子:A L L S T A T I O N S,A L L S T A T I O N S,A L L S T A T I O N S所有船,所有船,所有船THIS IS NAME,CALL SIGN,我是XX船,呼号是,DSC NUMBER,POSITION. DSC号码是,船位,CANCEL MY DISTRESS ALERT OF 取消我于日期、UTC时间DATE,TIME UTC. 发的遇险报警=MASTER, NAME, CALL SIGN, XX轮船长DSC NUMBER, DATE, TIME UTC. 重复XX船,呼号,DSC号码,日期、时间。
前述2:系统结构图CH70天线图-1 FM-8500系统结构图FM-8500是由一个主收发单元和两根天线构成。
收发单元包括VHF发射部分、接收部分和70频道DSC值守机。
该机的性能和操作全部是由前面板控制。
一根天线用于VHF发射和接收,另一根天线用于DSC值守。
第一节VHF 无线电话各旋钮功能1.1 控制,指示控制 CHANNEL/ 用于选择一个频道。
MODE 按下这个旋钮,用于在INTL 、USA 、WX 和PRIV 四种模式之间转换。
SQUELCH/ 用于静噪比。
当所选的频道没有人讲话时,自动降低噪音,使接收机哑声。
DW/SCAN 按一下这个旋钮,可以改变操作模式:双值守,扫描和关掉这两项功能。
VOLUME/ 开机、关机和调整喇叭音量。
LOUDSPEAKER 按一下这个旋钮,用于打开和关掉喇叭。
HI/LOW key 高功率/低功率 CH16 key 16频道指示1.2 电话操作开机关机 顺时钟旋转VOLUME 直到听见一声响,就可以开机;逆时钟旋转VOLUME 直到听见一声响,就可以关机。
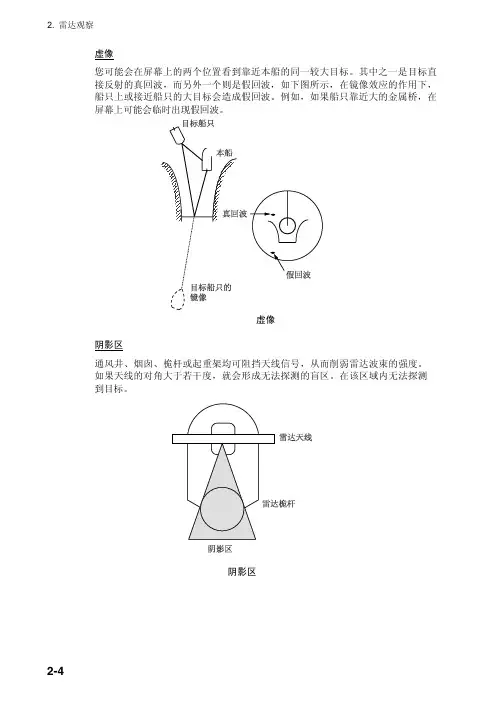
2. 雷达观察虚像您可能会在屏幕上的两个位置看到靠近本船的同一较大目标。
其中之一是目标直接反射的真回波,而另外一个则是假回波,如下图所示,在镜像效应的作用下,船只上或接近船只的大目标会造成假回波。
例如,如果船只靠近大的金属桥,在屏幕上可能会临时出现假回波。
虚像阴影区通风井、烟囱、桅杆或起重架均可阻挡天线信号,从而削弱雷达波束的强度。
如果天线的对角大于若干度,就会形成无法探测的盲区。
在该区域内无法探测到目标。
阴影区2. 雷达观察2.3 SART(搜救雷达应答器)说明2.3.1 SART任何距离大约为 8 海里的 X-波段(3 厘米)雷达脉冲均可触发搜救雷达应答器(SART)。
每个接收到的雷达脉冲都会使其发射一个应答脉冲,此脉冲会在完整的雷达频段反复扫描。
询问时,它会首先快速扫描 (0.4 µs) 整个波段,然后开始以较慢速度 (7.5 µs) 回扫该波段,并返回至起始频率。
该过程反复执行 12 次。
在每次扫描过程中的某些点,SART 频率会与位于雷达接收器通频内的应答脉冲频率相匹配。
如果 SART 在距离内,则 12 次慢速扫描过程中的每个匹配频率都将在雷达显示屏上产生一个应答点,并显示一条由 12 个等距(大约 0.64 海里)点组成的线。
当雷达与 SART 的距离减小为大约 1 海里时,雷达显示屏也会显示快速扫描过程中所生成的 12 个应答点。
这些额外应答点(也是等距的,为 0.64 海里)散布在原始的 12 个点所组成的线周围。
它们比原始点稍微微弱并小一些。
SART2. 雷达观察2.3.2 在雷达显示屏上显示 SART 标记该雷达配备为 SART 探测对雷达实行最优化设置的功能。
这项功能可以自动调谐雷达接收器,使其偏离最佳调谐状态。
这会消除或削弱所有正常雷达回波,但由于 SART 应答信号是扫描整个 9GHz 频段,因此 SART 标记不会消除。
当雷达接近 SART,SART 标记会扩大为大弧,使大部分的屏幕变得模糊。
【二副业务】FURUNO古野电子海图用户指南分享1 IntroductionThe purpose of this guide is to provide equipment-specific information to assist users inmanaging their AVCS ENC holdings.This guide should be used in conjunction with the AVCS User Guide, as well as the ECDIS Operators Manual or other documentation as supplied by the equipment manufacturer.The actual instructions and screenshots in this guide are based on the version of theFURUNO 3000 Series ECDIS installed in the UKHO as detailed on the front cover. There maybe minor differences between certain models (i.e. screen layouts may vary).2 Data ManagementAll electronic chart licensing and data management operations are carried out through the “Charts” Option on the Top Toolbar and then from the various Tabs on the left hand side ofthe Home screen on the FURUNO ECDIS:3 The User Permit Number (UPN)The User Permit Number is a 28 character alphanumeric string that is unique to each ECDIS installation or group of ECDIS, e.g. multiple bridge installations. The User Permit Numbershould have been supplied at the time of delivery and must be used when ordering an AVCS licence.To check the 'User Permit Number’:License: ENC → ENC User Permit → ENC User Permit’ Box1. Select 'License’ on the Home screen2. In the 'Licenses’ window, select 'ENC User Permit’The User Permit then appears in the 'ENC User Permit’ Box.4 Deleting ENC DataNew AVCS customers who had previously subscribed to other ENC services are strongly recommended to remove (purge) all ENC Permits and ENCs from the system before installing AVCS. For more information please refer to the 'Data Cleansing’ section in the AVCS UserGuide.Deleting 1 Chart OnlyManage Charts: Select Chart to be deleted → Delete Charts1. Select 'Manage Charts’ on the Home screen2. In the 'Manage Charts’ window, tick the Chart to be deleted3. Click on 'Delete Charts’An 'Attention’ window with the message “All selected Charts will be deleted. Do you wish to continue?” is then displayed. Click 'OK’ to confirm the deletion of the selected Chart.A final 'Attention’ window then confirms the deletion. Click 'OK’.The deleted Chart will disappear from the 'Licenses’ window.Deleting ALL ChartsManage Charts:Right-click to left of Type box → Select All → Delete Charts1. Select 'Manage Charts’ on the Home screen2. In the 'Manage Charts’ window, right-click the block to the left of the 'Type’ box.3. 2 options then appear 'Select All’ and 'Deselect All’. Click on 'Select All’.4. When all Charts are selected with a Tick in front of them, click on 'Delete Charts’An 'Attention’ window with the message “All selected Charts will be deleted. Do you wish to continue?” is then displayed. Click 'OK’ to confirm the deletion of all the selected Charts.A final 'Attention’ window then confirms the deletion. Click 'OK’.The deleted Charts will disappear from the 'Manage Charts’ window.5 Deleting ENC PermitsIf the user has previously subscribed to another ENC service it is advised to remove these ENC permits from the ECDIS system before use. The user must select the cells for which permits are to be deleted. In most instances this will simply involve selecting all cells. In certain circumstances it may be required to remove permits for individual cells, in this case simply select the cells for which permits need to be deleted.Deleting 1 Permit onlyLicense: ENC → Select Permit to be deleted → Delete Licenses1. Select 'License’ on the Home screen5. In the 'Licenses’ window, select the Chart for which the Permit is to be deleted, with a Tick in front of them6. Click on 'Delete Licenses’An 'Attention’ window with the message 'Selected group will be deleted. Do you wish to continue?’ is then displayed. Click 'OK’ to confirm the deletion of all the selected Charts.A final 'Attention’ window then confirms the deletion: '1 ENC Permit removed’. Click 'OK’. The deleted Chart will disappear from the 'Licenses’ window.Deleting ALL PermitsLicense: ENC → Select All Permits → Delete Licenses1. Select 'License’ on the Home screen2. In the 'Licenses’ window, right-click the block to the left of the 'Type’ box.3. 2 options then appear 'Select All’ and 'Deselect All’. Click on 'Select All’.4. Once all the Permits to be deleted are selected with a tick in front of them, click 'Delete Licences’ on this 'Licenses’ window.An 'Attention’ window with the message “Selected group will be deleted. Do you wish to continue?” is then displayed. Click 'OK’ to confirm the deletion of all the selected Charts.A final 'Attention’ window then confirms the deletion: 'XXX ENC Permits removed’. Click 'OK’. The deleted Charts will now disappear from the 'Licenses’ window.6 The Public KeyThe Admiralty Vector Chart Service currently uses the IHO.CRT, issued by the International Hydrographic Organisation, to authenticate its AVCS ENCs. However, the Furuno 3000 ECDIS uses the IHO.PUB Public Key which is included in all AVCS Media.To view the installed Public KeyPublic Key: Select Public Key window → Display Content1. Select 'Public Key’ Menu on the Home screen2. In the 'Select Public Key’ window appearing, when a Public Key is already activated, an 'A’populates the box next to the selected Public Key3. Click on 'Display Content’ to view the already activated Public KeyTo install a new Public KeyPublic Key: Select Public Key window → Load New Key1. Select 'Public Key’ Menu on the Home screen2. In the 'Select Public Key’ window appearing, click on 'Load New Key’ to install a new Public KeyOn the next 'Open File’ window, select the location where the new Public Key to install is stored (i.e. CD, DVD, USB). Select the IHO.PUB and click 'Open’.An 'Attention’ message confirming the installation of the new Public Key will appear on the screen. Click 'OK’.3. Highlight the new Public Key and select 'Activate’ to select the required Public Key to be installed4. An 'A’ will then populate the box next to the selected Public Key.5. Click 'Close’ to finish.7 Installing ENC PermitsTo install AVCS ENC Permits:License: Licenses → ENC Tab → Install Licenses → Select File window → Permit.txt file →Open → OK1. Select 'License’ on the Home screen and in the 'Licenses’ window, select the 'ENC’ Tab2. Select 'Install Licenses’In the next 'Select File’ window, highlight the Permit.txt file from the selected source location (i.e. USB), click 'Open’ and then 'OK’If needed, the Permit List can then be exported to external Media (i.e. CD, DVD, USB) by clicking on the 'Export List’ option:8 Installing AVCS Base CDsThere are currently 9 AVCS Base CDs but this number will grow as more ENCs become available for distribution within AVCS. It is unlikely that users will need to install all of the CDs in order to load all licensed ENCs. Reference to the Schedule A can avoid the unnecessary loading of some CDs and save the user time.The process described here should be used in almost all circumstances as it will automatically select data to be loaded according to the permit file installed by the user.Note: Ensure the latest permits have been installed before attempting to install any dataAuto Load: Search File Media → OK → Install Chart Data1. After having inserted the first AVCS Base CD identified in the Schedule A into the appropriate drive (i.e. D/Q), click on 'Auto Load’ on the Home screenAn 'Attention’ window then appears warning that 'this process takes time to complete and the operation speed of the system will decline. Do you wish to continue?’. Click 'OK’.Another 'Attention’ window confirms how many 'Charts are contained in the inserted AVCS Media and how many can be installed (based on the previously installed Permit file). Do you wish to continue?’. Click 'OK’.Note: Whenever Charts are cancelled, they will automatically be removed from the system. When this happens, this will be communicated in the 'Error/Warning Guidance’ window at the end of the installation.The AVCS Media will be read and a progress Bar will display on the 'Install Chart Data’ window on the screen.When the installation is complete, a window confirming the installation will appear, click'Confirm’(this window can take some time to appear even if the Progress Bar shows a completion rate of 100%)To check the details of the data installation, click on 'Show Details’ on the 'Install Chart Data’window. Click 'Finish’ to close. This process should be repeated until all required Base CDs have been installed.Note: Make sure that all the required AVCS Base CDs have been inserted and the import operations completed before installing the latest Update CD. Updates cannot be applied unless the ENC base file is present in the system database.9 Installing AVCS Update CDThe Weekly AVCS Update CD must only be inserted into the CD Drive after having installed the latest required Base CD(s).Insert the latest AVCS Update CD into the appropriate Drive (i.e. D/Q)Note: Base CDs are re-issued about every 6 to 8 weeks. The AVCS Update disc will indicate which Base disc week must have been installed. It is important that users do not attempt to load an Update CD that is not consistent with the Base CDs.Auto Load: Search File Media → OK → Install Chart Data1. Click on 'Auto Load’ on the Home screenAn 'Attention’ window then appears warning that 'this process takes time to complete and the operation speed of the system will decline. Do you wish to continue?’. Click 'OK’.Another 'Attention’ window confirms how many 'Charts are contained in the inserted AVCS Media and how many can be updated (based on the previously installed Permit file). Do you wish to continue?’. Click 'OK’.Note: Whenever Charts are cancelled, they will automatically be removed from the system. When this happens, this will be communicated in the 'Error/Warning Guidance’ window at the end of the installation.The AVCS Media will be read and a progress Bar will display on the 'Install Chart Data’ window on the screen.When the installation is complete, a window confirming the installation will appear, click'Confirm’(this window can take some time to appear even if the Progress Bar shows a completion rate of 100%)To check the details of the data installation, click on 'Show Details’ on the 'Install Chart Data’window. Click 'Finish’ to close.10 Installing AVCS DVDWhen using the AVCS DVD Service, only one disc needs to be installed because it contains all the Base ENCs and Updates up to the date of its issue.Insert the latest AVCS DVD into the appropriate Drive (i.e. D/Q)Note: The loading process within the ECDIS will be very similar to that required for the AVCS CD Service however there are some minor differences which are detailed belowAuto Load: Search File Media → OK → Install Chart Data1. Click on 'Auto Load’ on the Home screenAn 'Attention’ window then appears warning that 'this process takes time to complete and the operation speed of the system will decline. Do you wish to continue?’. Click 'OK’. Another 'Attention’ window confirms how many 'Charts are contained in the inserted AVCS Media and how many can be installed (based on the previously installed Permit file). Do you wish to continue?’. Click 'OK’.Note: Whenever Charts are cancelled, they will automatically be removed from the system. When this happens, this will be communicated in the 'Error/Warning Guidance’ window at the end of the installation.The AVCS Media will be read and a progress Bar will display on the 'Install Chart Data’ window on the screen.When the installation is complete, a window confirming the installation will appear, click'Confirm’(this window can take some time to appear even if the Progress Bar shows a completion rate of 100%)To check the details of the data installation, click on 'Show Details’ on the 'Install Chart Data’window. Click 'Finish’ to close.11 Installing AIO PermitsThe Admiralty Information Overlay (AIO) is installed in the Furuno FMD 3000 ECDIS by installing the Cell GB800001 included in the PERMIT.TXT file and then the AIO Data.To install the AIO Permits:License: Licenses → ENC Tab → Install Licenses → Select File window → Permit.txt file →Open → OK1. Select 'License’ on the Home screen and in the 'Licenses’ window, select the 'ENC’ Tab2. Select 'Install Licenses’In the next 'Select File’ window appearing, highlight the Permit.txt file which contains the AIO Permit from the selected source location (i.e. USB), click 'Open’ and then 'OK’3. The AIO Permit will now appear in the Licenses List12 Installing AIO CDThe AIO Media can only be installed when the usual AVCS S-63 1.1 Data has been previously installed. After having previously installed the Permit for the AIO Cell GB800001, the AIO Media now needs to be installed.Insert the latest AIO CD into the appropriate drive (i.e. D/Q)Auto Load: Search File Media → OK → Install Chart Data1. Click on 'Auto Load’ on the Home screenAn 'Attention’ window then appears warning that 'this process takes time to complete and the operation speed of the system will decline. Do you wish to continue?’. Click 'OK’.Another 'Attention’ window confirms how many 'Charts are contained in the inserted AVCS Media and how many can be installed (based on the previously installed Permit file). Do you wish to continue?’. Click 'OK’.The AIO CD will be read and a progress Bar will display on the 'Install Chart Data’ window on the screen.When the installation is complete, a window confirming the installation will appear, click'Confirm’(this window can take some time to appear even if the Progress Bar shows a completion rate of 100%)To check the details of the data installation, click on 'Show Details’ on the 'Install Chart Data’window. Click 'Finish’ to close.2. Once the AIO Permits and Media have been installed, the AIO is enabled3. If needed, the system will give the user the option of then disabling the AIO from the'Licenses’ window:13 Systems ChecksThe user has the option to review the status of all installed ENCs on the Furuno FMD 3000 ECDIS by consulting various Reports.1. Select 'Record’ on the Home screen2. Select 'Chart Log’3. Select 'ENC’A Report containing all the installed Cells then appears on the screen. This Report contains information about all the Update status of the Cells currently installed on the system. Select 'Close’ to close the Report.The Furuno FMD 3000 ECDIS displays the Cell status of the Cells installed within a colour coding system on the Geographical Display:Green: The Permit is valid and the ENC is available for use in SENC format. If the source of the ENC is a RENC, then the ENC is also up-to-date. If the source of the S-57 vector chart is something other than a RENC then all loaded updates are included into the SENC.Orange: You have a valid Permit and the ENC is available for use in SENC format but it is either not up-to-date or has been cancelled. This could be for several reasons, either the SENC is from a previous edition, the latest SENC update was missed or the ENC has been cancelled.Red: If an ENC is installed in the SENC but does not have a corresponding permit installed then the ENC is no longer available for display in the viewer.Blue: The conversion of the Cells from RENC to SENC as somehow failed during the conversion process. This can be due to a software upgrade or an issue with the data itself preventing the Furuno from successfully converting to SENC. For example, one Cell was up-to-date before a software upgrade and was not updated when the software was upgraded. Then the Cell would show as blue until the conversion process is completed. Contrary to the Magenta colour which means that the RENC to SENC conversion was not even started. Magenta: You have a permit to use the ENC, but the installed ENC is not available in SENC format and thus you cannot use the ENC currently.It is also possible to check the updating status of all Cells installed within the Cell Status mode:1. Select 'Cell Status’ on the Home screen2. The 'Cell Status’ window then appears displaying the Updating status of all Cells installed: If screenshots need to be taken (i.e. report specific issues), this is carried out in the Furuno FMD 3000 by clicking on 'Capture Screenshot’ on the Home screen.When the required screenshot is taken, it will be automatically saved on the system within the 'Settings’ Tab on the top MenuIn the next 'Settings’ window, find the screenshot previously taken (usually at the bottom of the drop down list), highlight it with a tick on its left hand side and then click on 'Export’. This will open a new window where you can then save this screenshot on the preferred source location (i.e. USB).14 TroubleshootingMany of the difficulties that could be experienced when using the Admiralty Vector Chart Service with this system can be avoided by carefully following the instructions in this guide. However, issues that are known to have caused confusion in the past are detailed in the Frequently Asked Questions (FAQ) section which can be found at:If you encounter problems that are not solved by referring to the FAQs, you may wish to seek Technical Support. Please see the section below for contact details.Who should you contact?You will receive the most effective support if you address your initial query to either yourECDIS Manufacturer or ADMIRALTY Chart Agent, but in certain circumstances you may need to contact the UKHO Customer Services.When reporting a chart related problem it is useful if you can provide the following details:> Licence number> Vessel name> ECDIS/Software Manufacturer> Details of error message – Including 'SSE’ error code> Screen shot(s) of error> Details of Base Discs used (date)> Details of Update CD used (date)> Details of Permits used (date)> Details of Cell number(s) errors apply to> Have there been any configuration changes to system(s)> Details of User Permit(s) and PIN Number(s)Emergency Chart Permit GenerationIn certain circumstances it may be necessary for a vessel to get access to an AVCS chart at very short notice, for instance if a route needs to be diverted due to a medical or safety emergency.In these emergency circumstances only, individual AVCS ENC Permits can be obtained from the UKHO 24 hours a day, 365days a year.To obtain the AVCS emergency permit, please quote:> Vessel Name> ECDIS User Permit Number> Required ENCsThe permits can be sent directly to the vessel by email wherever possible, by fax, or simply by reading the characters out over the telephone or radio.Please contact UKHO Customer Services using the contact details below:。


JUWOP/U(版本10.3)操作说明书目录............................................................1引言5 ......................................................1.1操作元件5..............................................................1.1.1树枝图6............................................................1.1.2输入页面6..................................................1.1.3快速导航的特殊功能6........................................................1.1.4钥匙开关位置6........................................................2一般数据8..............................................2.1基本画面“JUWOP”8................................................................2.1.1设置9..............................................2.2文件(文件管理)12......................................................2.3数据交换13......................................................2.4机床参数13............................................................2.4.1砂轮参数14......................................2.4.2机床专用参数和轴参数(轴设置)16....................................................2.4.3C-轴和X-轴的参数19............................................................2.4.4功能选项19..................................................2.4.5基于元件类型的选项20............................................2.4.6用于JUCENTER机床的配置21......................................................3对轴的描述24..........................................3.1轴上的元件(元件表)26........................................................3.1.1轴元件的数据27..........................................................3.2加工29..........................................................3.2.1加工组概况293.2.2通道一览30..........................................................................................................................3.2.3加工组33............................................................3.2.4加工过渡363.2.5工艺分析37..........................................................................................................................3.2.5.1制动区393.3所用元件(元件一览表)39....................................................................................................3.3.1元件类型40................................................3.3.1.1带有扁平卡规的升程表403.3.1.2带有圆卡规的升程表43........................................................................................................3.3.1.3连杆轴颈/偏心轮44................................................................3.3.1.4椭圆46................................................................3.3.1.5平板47....................................................3.3.1.6几何元件为极坐标48................................................3.3.1.7几何元件为笛卡儿坐标49.......................................3.3.1.8符合德国标准DIN32712的多边形50.................................3.3.1.9符合德国标准DIN32711的多边形(P3G)51............................................3.3.1.10有可变提升高度的连杆轴颈52..............................................................3.3.1.11主轴颈53............................................3.3.2对所有元件类型的通用提示53..............................................3.3.2.1非圆元件的切入/切出运动53..............................................3.3.2.2用于导入功能的外部数据543.3.2.3生成用于测量机的设定数值表格54................................................................................3.4所用的工艺(工艺概况)54............................................................3.4.1工艺类型55......................................................3.4.1.1非圆/偏心轮磨削55............................................................3.4.1.2工艺定位65.............................................3.4.1.3非圆工艺采用DIN/ISO程序663.4.1.4DIN/ISO标准的工艺70...........................................................................................3.5测量值(测量数据一览)71..........................................................3.5.1测量数值表723.5.2测量文件的筛选76......................................................................................................................3.5.2.1范例78......................................................3.5.3测量值自动导入82 4Juwop/U的宏变量85.......................................................................................................按键功能简述911引言JUWOP/U是用于定义磨削加工的编程系统,并被用于Jucam和Jucrank机床系列。
最初,雷达会沿用先前使用的量程和脉冲长度。
而其它设置(例如亮度水平、VRM、EBL 和菜单选项的选择)也会使用先前的设置。
[STBY/TX] 键(或 TX STBY 方框)在雷达的 STBY(待机)和 TRANSMIT(发射)状态之间来回切换。
在待机状态中,天线停转;在发射状态中,天线转动。
磁控管会随时间推移逐渐老化,导致输出功率降低。
强烈建议在雷达闲置时将其设置为待机,以延长使用寿命。
快速启动如果雷达刚刚使用过且发射管(磁控管)依然温热,您可以直接将雷达切换到TRANSMIT(发射)状态而无需进行三分钟的预热。
如果由于操作失误或类似原因导致 [PO WER] 开关关闭,您应该在断电后的 10 秒钟之内打开 [PO WER]开关以快速地重新启动雷达。
回波区域非 IMO雷达的回波显示区域可以使用三种配置:圆形、矩形和全屏。
您可以使用 ECHO(回波)菜单上的 7 ECHO AREA(7 回波区域)选择配置。
1-21.3 控制单元有两种控制单元:控制单元 RCU-014(完全键盘)和控制单元 RCU-105(掌上控制单元 RCU-014(完全键盘)控制单元 RCU-015(掌上控制)1-3控制说明控制按钮说明控制单元 RCU-014(完全键盘)POWER 开启和关闭系统。
分别调整 EBL 和 VRM。
EBL 和 VRM 旋转式控制按钮EBL ON,EBL OFF 分别开启和关闭 EBL。
F1-F4 执行快捷分配的菜单。
ALARM ACK 消除声音警报。
STBY TX 在待机和发射之间切换。
BRILL 调整显示亮度。
A/C RAIN 抑制雨滴杂波。
A/C SEA 抑制海浪杂波。
GAIN 调整雷达接收器的灵敏度。
HL OFF 按下时暂时清除艏线。
EBL OFFSET 启用、禁用 EBL 偏移。
在菜单操作中,在北南及东西之间切换极性。
MODE 选择显示模式。
OFF CENTER 移动本船位置。
CU/TM RESET •将本船位置移动到船尾方向半径的 75% 处。
5. 视频测绘仪操作5.14 记录数据需要选用的存储卡 I/F 单元 CU-200 来记录或回放数据。
CU-200 有两个卡槽;您可以连接两个单元,共计四个卡槽。
5.14.1 初始化存储卡 (RAM)存储卡 (RAM) 必须经初始化后才能使用。
格式化为在系统中使用存储卡准备记录表面,并删除储存卡上保存的全部数据。
您可以对以前用过的存储卡进行格式化,但此时以前的全部信息都将被清除。
1.存储卡 I/F 单元,正面2. 转动跟踪球,选择 MENU (菜单)方框,然后按下左按钮。
3. 转动滚轮,选择 6 [CARD](卡),然后按下滚轮或左按钮。
(注意 CARD(卡)菜单中的“WR”表示“Write”(写入)。
)CARD 菜单,第一页4. 转动滚轮,选择 2 DRIVE SELECT (驱动器选择),然后按下滚轮或左按钮。
5. 转动滚轮,选择合适的驱动器,然后按下滚轮或左按钮。
注意:如果连接一个单元,从单元左边的驱动器开始,驱动器为 A=1 和B=2。
如果再连接一个驱动器单元,从单元左边的驱动器开始,驱动器为 C=1 和 D=2。
* 显示可用的驱动器。
** 不适用于 IMO 类型5. 视频测绘仪操作6. 转动滚轮,选择 0 NEXT ,然后按下滚轮或左按钮。
CARD 菜单,第二页7. 转动滚轮,选择 3 CARD INITIAL IZE (卡初始化),然后按下滚轮或左按钮。
CARD INITIALIZE 菜单8. 转动滚轮,选择 2 INITIALIZE START (初始化开始),然后按下滚轮或左按钮,对卡进行初始化。
卡附近的 LED 闪烁,CARD (卡)菜单消失,消息“FORMAT CARD ”(格式化卡)出现。
5.14.2 记录数据当存储器空间已满,清除最早的轨迹,以便为最新的轨迹腾出空间。
另外,如果存储器已满,您将无法输入另一个标记或线条,除非将多余的标记、线条或轨迹清除。
因此,您可以将重要数据保存到一张存储卡上,以防丢失。
1. 雷达操作1.17 抑制海浪杂波波浪的回波可以产生称为“海浪杂波”的随机信号,并遮盖显示屏的中心部分。
波浪越大,天线超出水面越高,则杂波越强。
当海浪杂波遮盖画面时,使用 A/CSEA 控制按钮以手动或自动方式进行抑制。
1.17.1 选择调整方式1. 转动跟踪球,选择显示器顶部的 SEA AUTO 或 SEA MAN(取显示者)。
A/C SEA 级别指示符2. 按左按钮显示相应的 SEA AUTO 或 SEA MAN。
1.17.2 通过 A/C SEA 控制按钮进行自动调整Auto A/C SEA 允许微调 A/C SEA 电路,调整范围为 ±20 dB。
因此,当级别条读数设置为 100 时,由于手动 A/C SEA 在邻近距离上,增益不会减低到最小值。
而且,因为原始输入回波的平均值在没有海面反射的地区处于较低位置,所以自动 A/C SEA 的级别较低。
例如,当船只停靠码头时,雷达画面显示来自陆地和海洋的回波;由于 STC 曲线随回波的大小而不同,您可以观测到回波的大小。
注意:自动 A/C 功能可以消除微弱的目标回波。
观察显示屏的同时,小心调节控制按钮。
操纵键盘1. 按照第 1.17.1 节中的步骤选择 SEA AUTO。
2. 观察 A/C SEA 级别指示器的同时,使用 [A/C SEA] 控制按钮调整 A/C SEA。
有 100 个可用级别。
1. 雷达操作操纵跟踪球1. 按照第 1.17.1 节中的步骤选择 SEA AUTO。
2. 转动跟踪球,将箭头置于显示器顶部的 A/C SEA 级别指示器内。
3. 观察 A/C SEA 级别指示器的同时,向下转动滚轮减少 A/C SEA 或者向上转动滚轮增加 A/C SEA。
有 100 个可用级别 (0-100)。
1.17.3 手动调整 A/C SEAA/C SEA 控制按钮可以减小短距(杂波最强)回波的放大率,随着距离增加逐渐提高放大率,因此在没有海浪杂波的距离上,放大率将保持正常。