10T半自动端子压接机说明书1
- 格式:pdf
- 大小:342.42 KB
- 文档页数:12

端子压接机操作规程端子压接机是一种常见的电线连接设备,专用于将电线端子与导线连接,确保电线连接牢固、稳定。
为确保操作安全、正常使用,以下是端子压接机的操作规程:一、操作前的准备工作:1. 了解端子压接机的工作原理和操作要点,熟悉机器的结构和各个部位的名称及功能。
2. 检查端子压接机的电源插头是否合格,电源线是否正常无损伤。
3. 检查工作台面和周围环境是否整洁有序,无杂物和阻碍物。
4. 检查端子压接机是否在正常工作状态,各个控制按钮和开关是否正常灵活。
二、操作步骤:1. 启动端子压接机前,先将电源开关调到“关”位,确保安全。
然后将电源线插入电源插座。
2. 打开电源开关,等待机器预热,通常需要几分钟时间。
3. 对于待压接的电线,首先根据要求选取相应规格的端子,并将端子插入压接机的端子位。
4. 将待压接的导线插入导线夹中,注意确保导线的顺直和无毛刺。
5. 调节压接机的压接力度,通常有调节旋钮或开关,根据电线和端子的规格进行调整,以确保连接质量。
6. 将待压接的导线插入端子压接机的导线位。
7. 按下压接按钮,机器会自动进行压接动作,待压接完成后,松开按钮。
8. 检查压接后的连接质量,确保没有锈迹、短路、接触不良等问题。
9. 启动下一个压接任务前,需要及时清理压接机的工作台面和周围的杂物。
三、注意事项:1. 操作人员必须经过培训并持证上岗,禁止未经授权或未经培训的个人操作端子压接机。
2. 操作人员要佩戴劳动防护用品,包括安全帽、防护眼镜、防护手套等。
3. 在使用端子压接机时,严禁超负荷操作,以免引发机器故障或事故。
4. 在操作过程中,注意机器的运行状态,及时发现异常情况要及时停机检查,确保设备正常运行。
5. 操作人员在使用压接机时,切勿将手或其他物体放入机器工作区域,以免发生伤害。
6. 在清理压接机时,一定要切断电源,并确保机器处于停机状态,以防止触电事故。
7. 对于压接机的维护保养,应按照制造商提供的说明进行,定期清洗、加油、更换磨损零件等。

半自动端子机操作指导 IMB standardization office【IMB 5AB- IMBK 08- IMB 2C】一、作业步骤1、打开端子机电源开关,电源指示灯亮。
2、留意机器内外部有无明显异响,若有暂停作业,请机修人员判定是否需要维修。
3、选刀装刀:由指定人员操作,装刀之前必须进行手工比对所选刀片是否配套,对比无误后方可装刀装刀完成后,必须使用手摇测试,首先关闭端子机电源,按下调摸钮,使用专用板手摇动主从动轮,使端子机冲压行程至最大,如手摇不动,则考虑是否压力过大或其他问题,检查调试至合格。
作业前需对各锁紧螺丝做相应检查并确认无松动。
4、装料:装上需要打的端子,使用内六角板手调节进料压板,使端子可以轻松通过,目测送料位置是否适宜,若不行,进行调节,使用内六角板手松开送料器锁紧螺丝,拧动调节缧杆进行调节,直至最佳状态,然后锁紧送料器锁紧螺丝,开始作业。
5、测试拉力:调机OK后,取废料线材试打,进行拉力测试,主要参照值见《拉力测试对照表》具体操作方法如下,按下拉力测试归零键调至归零,将需测的端子线材夹好,进行测试,若所测拉力不在标准范围内,请机修人员重新调节,直到达到标准值为止。
6、试产10PCS送质检员进行首件确认,检验合格,方可进行批量生产,生产过程中操作员必须自检所打端子是否有包胶,压伤等不良,并每隔2小时进行一次端子拉力测试。
7、生产完成后整理好良品、废次品,并清理干净机台周边的环境卫生。
二、注意事项1、作业过程中,若机器出现异常,先关掉电源,并及时请机修人员进行维修调试。
2、非指定人员严禁私自调试或拆装机器零部件。
3、作业中,机器电源未断开,禁止手指或身体任何部位进入冲压范围,以免造成工伤事故。
4、作业中,若需要离开工作岗位,必须关闭电源方可离开。
5、更换端子时,必须先断开电源,再进行更换作业,严禁在机器运作中进行更换。
6、作业中,若有端子卡在刀模内,必须关闭电源后用剪刀或挑针清除后,再继续作业。

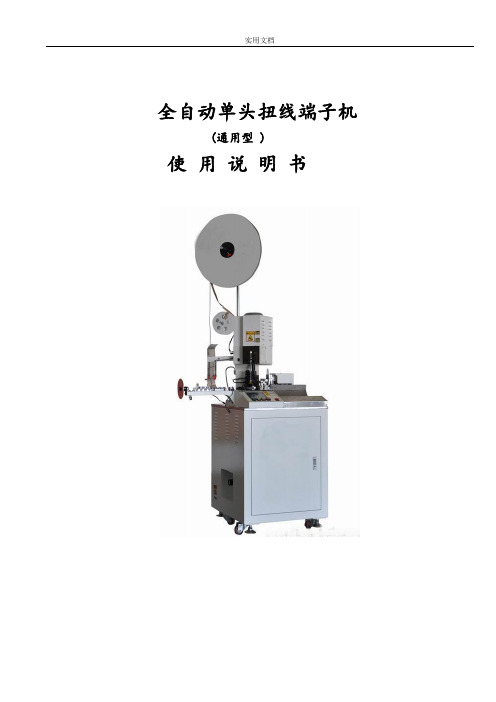
实用文档全自动单头扭线端子机(通用型 )使用说明书安全声明感谢您购买我们的产品全自动单头扭线端子机。
请您务必仔细阅读本说明书,并在完全理解其内容的基础上使用本设备。
为操作人员的安全着想,设备在设计阶段就充分考虑了安全方面的问题。
但是为了确保安全,下面所列的条款均为当进行安装、操作、检查、调整时,务必要遵守的事项,请加以注意:1. 接入电源必须进行可靠接地。
否则,万一发生因电气故障,可避免触电等对操作人员的伤害,将损失控制在最小限度。
2. 机箱罩是为了安全而安装的,所以在机箱罩没有可靠锁紧或移开的情况下不得开动设备。
因维修等原因需要取下机箱罩时,必须先断开电源、气源后,才能进行维修等作业。
3. 机械正在自动运转时,请勿将手等放到活动的部位或端子机模具之间。
有必要时,应先停止设备运转,断开电源、或拔下电源插头后才可进行。
不遵守以上原则而接触机械,有可能会引起意外的事故。
4. 由两个以上的人进行维修、保养时一定要一边互相招呼确认安全,一边进行操做。
5. 为了更换(电线、端子、端子机模具等)或清扫等,需要把手进入主机机体作业时,必须断开电源、气源后方可进行。
6. 发生了打掉端子的情况时,必须断开端子机的电源,用小镊子等工具作业。
绝对不能把手直接伸插入端子机内拿取。
7. 可编程控制器、传感器、驱动器等电气组件不要随意触动,否则可能会导致设备失去控制从而引起事故。
如有其它要求,请按本说明书封面所示联系方式与我们尽快取得联系。
概要介绍我司是国内专业从事电线末端加工设备的研发、生产、销售于一体的高科技企业。
本机吸收和借鉴了德国同行在电线末端加工设备方面的前沿技术,采用进口可编程控制系统及高精密步进电机、模块化的软件设计,保证了各个工作模块的有机联接,集进线、裁线、剥皮、端子压着、扭线(可选件)为一体,整套工序一次完成。
特点说明:4500PCS/H。
采用静音电子离合端子机.5.7英寸触摸屏,更加直观.数字化,图形化控制介面.送线机构改善,超低噪音.减少电磁阀的使用采用目前最先进的欧式端子机,机体结构精巧,市场上通用的OTP/2000 型等横、直送料模具均可适用,不改变现有的端子机操作方式,方便易用。

端子机操作说明书
生效日期
2014-02-28 编 号 SOP-EN-1648
版本/次
A/1
核准: 审核: 制定:梁恩超2014.2.25 1、目的:
为正确指导员工操作,提高工作效率,加强产品品质,规范现场管理。
2、范围:
生产车间的全体管理干部及操作员。
3、定义:
3.1 无
4、职责:
4.1课长:对设备的日常维护监督。
4.2组长:对设备的日常点检确认。
4.3 技术员/作业员:对设备的日常操作/维护和点检。
5、操作技方法:
5.1开机(ON/OFF );
5.2铆压端子前应由工务人员对刀具进行调整,并由品管人员依“端子压着表”确认端子
高、宽度和磅力,确认OK 后方可开始作业。
5.3右手拇指和食指拿着待铆端子的线材放入端子刀座上,左手食指按住线材使其定位,
脚踩脚踏板开关进行铆压;
5.4铆压端子时手不可离刀片太近,以免刀片打伤手;
5.5操作人员离开应随时关机,以免发生误动作;
5.6铆压时若送料不到位时(端子未送到下刀口之正上方),应松开料爪之螺丝进行适当
调整,以避免刀片折断;
5.7每2H 用气枪将端子碎屑吹干净,以免损坏刀片;
6. 注意事项:
6.1.调试机台非必要情况下,要关闭动力装置或者电源。
6.2.严禁两人同时操作。
6.3.必须取得上岗证裁可以作业。


端子接头压着机操作规程
一.适用范围:
本公司端子接头压着机。
二.内容:
2-1作业前准备:
2-1-1检查机台是否稳固。
2-1-2踏板插座、电源插座是否插牢。
2-1-3踏定卡式模座及上模安装是否正确。
2-1-4调整压着机高度及送料准确位置。
2-1-5主轴使冲头在上死点(电磁伐控制)。
2-1-6将板手及调模工具拿开。
2-1-7开启电源,试踏踏板,如运转正常则准备完毕。
2-2操作方法:
2-2-1将电源开关置于“ON”位置。
2-2-2将加工料件置于端子接头内的适当位置。
2-2-3踏一次踏板,电磁解开离开器,使上模由上死点往下压至下死点,将加工料件打入端子接头内结合,再回到原位。
2-3作业程序:
2-3-1电源开关置于“ON”位置。
2-3-2用手压着电磁伐开关解开离开器。
2-4异常处理:
2-4-1操作中,如果电磁伐不动作,开掉电源,呈报组长通知专业人员进行维修。
2-4-2操作中踏踏板一次,动作两次以上属不正常情况,呈报组长通知专业人员进行维修。
2-4-3如果操作中发出漏气时,应停止作业,通知专业人员维修。
2-5注意事项:
2-5-1开启电源之前,板手及调模工具须拿开。
2-5-2 启动前冲头须上死点。
2-5-3机器作业前,手不宜放在模具口以免危险。
2-6清洁保养:
2-6-1每天操作后,均需清洁机体及模具,以保寿命。
2-6-2机台及模座油孔,每周须加机油一次。
MAINTE OPERATING & MAINTENANCE10 TONHYDRAULIC PRESSModel Nos. CSA10F and CSA10B0200Thank you for purchasing this CLARKE 10 Ton Hydraulic Press.Please read this manual thoroughly and follow the instructions carefully, in doing so you will ensure the safety of yourself and that of others around you, and you can look forward to the press giving you long and satisfactory service.Please note that this manual is an integral part of the Hydraulic Press and must always accompany it, even in the event of sale.The press owner and/or user must read and fully understand the operating instructions and recommendations before using this press.CLARKE International shall not be held liable to any damage to persons or equipment due to improper or non-permitted use of the press.This CLARKE product is guaranteed against faulty manufacture for a period of 12 months from the date of purchase. Please keep your receipt as proof of purchase. This guarantee is invalid if the product is found to have been abused or tampered with in any way, or not used for the purpose for which it was intended.Faulty goods should be returned to their place of purchase, no product can be returned to us without prior permission. This guarantee does not effect your statutory rights.•During assembly or if the press is moved, ALWAYS use a lifting appliance -crane or hoist etc., do not man handle.•The press MUST BE located on firm level ground, or a sturdy workbench, with adequate light. The operator must never work in his/her own shadow.•Before applying a load, be certain that all press bed support pins are fully engaged, and the hydraulic ram is fully located into the ram mount. Ensure also that hydraulic hoses and couplings are completely sound.•Before use always ensure the workpiece is firmly secure and stable.•Always clean spills of hydraulic oil immediately as this can be extremely dangerous in a workshop environment.•Do not exceed the rated capacity.•Do not allow any person, who is inexperienced in the use of hydraulic presses, to use the machine unless they are under direct supervision.•Do not allow anyone to work directly in front of the machine when it is in use.•Never tamper with the machine. The safety valve is calibrated and sealed at the factory, do not attempt to change these settings.•Use ONLY the recommended hydraulic oil.•Never use the machine for any purpose other than that for which it is designed.•Components of this press are specially designed to withstand the rated capacity. Do not substitute bolts, pins, or any other components.•Always apply the load on the centre of ram plunger. Offset loads can damage the ram or ram mount and may cause work piece to eject.•Before operating, check for signs of cracked welds, bent bed pins, loose or missing bolts, or any other structural damage. Do not operate if any of these conditions exist. Have repairs made only by authorised service centres.•Remove all loads from press bed before attempting to adjust bed height.Beware of possible falling bed.•Press only on a work piece supported by the press bed.•When using accessories such as arbor plates, be certain they are centered on press bed, and are in full contact with the bed.•Parts being pressed may splinter, shatter, or be ejected from the press. Due to varied applications, it is your responsibility to always use adequate guards, wear eye protection and heavy protective clothing when operating this press.•Keep hands and fingers out of the press and away from the parts that may pinch and shift.•It is the owners responsibility to keep warning decals legible and intact.Replacement decals may be obtained from Clarke International Spare Parts Dep’t.•Failure to heed these warnings may result in damage to the equipment, or failure resulting in property damage, personal, or even fatal injury.•NEVER operate the ram without the bed locating pins fully in place.•DO NOT use extension tubes on the pump handle. Excessive effort can cause severe damage.A.CSA10FFig.1 Ensure the press and its components Array suffered no damage during transit.Should any damage be apparent,contact your Clarke dealerimmediately.1.Attach the feet and foot strutsto the side supports using thenuts, bolts and washersprovided, leaving them fingertight.2.Raise the assembly and rock itto ensure that no part is understress and that the structure iscompletely stable beforetightening all nuts securely.3.Feed the ram assembly downthrough the hole in the topplate and screw it fully into thethreaded hole in the bottomplate. The pressure gauge atthis point should be facing thefront.4.Attach the pump assembly tothe frame by hooking the frontedge into the recess in oneend of the pump platform andsecuring at the opposite endwith the screws provided.Finally, screw on the hoseassembly to the ram inlet.Your Hydraulic Press is now readyfor use.B.CSA10BFig.2 1.Bolt the feet to the sidemembers using the nutsbolts and washers provided.2.Bolt on the top and bottomplates in the manner shownin fig. 2 , ensuring the bottomplate is that with thethreaded hole at its centre.Do not fully tighten the nuts.3.Feed the ram assemblydown through the hole inthe top plate and screw itfully into the threaded holein the bottom plate. Thepressure gauge at this pointshould be facing the front.Centralise the ram betweenthe top rails beforetightening the securing boltsIt is strongly recommended thatthe Bench Press be securelybolted to a sturdy workbenchThe pump is provided with handwheel , which opens or closes a valve in the pump to raise the ram or lower it under pressure.Turn the handwheel clockwise and pump the handle to operate (or lower) the ram. Turning the handwheel anticlockwise releases the pressure and the ram will rise.1.Position the bed to the desired height, so as it will be as close as possible to theram when the workpiece is mounted.Raise one side of the bed, and insert a pin into a locating hole directlybeneath the bed. Repeat the process at the other side, until the bed is level and at the desired height, with the pins fully ‘home’.2.The workpiece is placed on top of the bed, or on top of the arbour, or cloverleaf, plate and must be completely stable. To achieve this you must use packing or shims where required.NOTE: Any packing pieces or shims used, MUST be capable of withstanding the extreme pressure that will be brought to bear, and MUST be of sufficient size with sufficient surface contact, so as to avoid the possibility of slipping or springing taking place. Mating surfaces MUST be horizontal so that the force being exerted will be vertical and NOT at an angle.3.Two Mandrels are provided, either of which should be screwed to the end ofthe Ram, depending upon the size of workpiece bearing surface. One of these is ‘stepped’ and is shown fitted at B1, Figs.1 and 2. The other has a larger bearing surface area and is shown at B2.3.Turn the Pump Handwheel, fully clockwise and pump the handle to bring theram very lightly into contact with the workpiece.Manoeuvre the workpiece so that the desired point of contact is directly beneath the centre of the ram.4.When satisfied that the workpiece is correctly lined up and is completelystable in that position, slowly pump the handle so that the ram begins to exert pressure on the workpiece.Continue to pump the handle, whilst standing to the side of the press (DO NOT stand directly in front of the work), and constantly monitor the process, ensuring the ram and work remain completely in line, and there is no risk of slipping.5.When the process is complete, turn the Pump Handwheel anticlockwise torelease ram pressureA Visual inspection must be made before each use of the press, checking for leaking hydraulic fluid, and damaged, loose or missing parts.Owners and/or users should be aware that repair of this equipment may require specialised knowledge and facilities. It is recommended that a thorough annual inspection of the press be made and that any defective parts, decals or warning labels be replaced with genuine Clarke parts.Any press which appears to be damaged in any way, is found to be badly worn, or operates abnormally SHOULD BE REMOVED FROM SERVICE until necessary repairs are made.•Periodically check the press frame to make sure all bolts are tight and inspect for cracked welds, bent, loose or missing parts.•Periodically check the hydraulic connections for possible leaks. Replace or properly repair damaged or leaking hydraulic components before using.•Periodically apply a light smear of oil to the moving parts and the bed support pins.•If oil leaks, caused by a loose union/connection etc., have been repaired, check the hydraulic pump oil level, by removing the pump from its mounting, holding it vertically on its nose, and removing the filler/dipstick, shown at ‘A’, Fig.1. Top up if necessary to the level on the dipstick, with CLARKE Hydraulic Oil, Part No. 3050830 only.This operation is carried out with the ram fully retracted.•Replace the Hydraulic oil every TWO years. This operation requires the dismantling of the hydraulic system, for which you should consult your CLARKE dealer.CSA10F - Part No. 7613010CSA10B - Part No. 761400011。
压接机操作规程压接机操作规程之相关制度和职责,一、点检压接机检查电器、传动系统是否正常,控制开关是否灵敏可靠并在润滑点加润滑油。
二、检查模具是否正常,如有异常立即请机修工调整。
三、按加工表要求领取压接端子。
四、按压接要求把端子...一、点检压接机检查电器、传动系统是否正常,控制开关是否灵敏可靠并在润滑点加润滑油。
二、检查模具是否正常,如有异常立即请机修工调整。
三、按加工表要求领取压接端子。
四、按压接要求把端子放置在下刀口上,把剥好的电线头部放到端子尾部,脚踏(手推)开关实现压接。
五、试压后检查压接尺寸及形状,初步判定合格后交专职检验员检验并做拉力测试,完全合格后方可正常生产。
六、开机时严禁用手拨弄端子和压接模,如因有异常现象需调整时,必须停机。
七、在暂停压接时,脚要从控制开关上移开,以免发生意外。
八、工作时如发生事故,应保护现场,向主管部门汇报。
九、工作结束,切断电源,保持压接机整洁。
篇2:摆辗铆接机操作规程1、操作者必须熟悉设备的一般结构及性能,严禁超性能使用设备。
2、操作者必须掌握好所使用的设备的"三好""四会"和按设备维护保养的"四项要求"使用和维护设备,持证上岗。
3、开动前应检查设备的润滑系统、机械系统,安全防护装置是否齐全、完好,机床各紧固件是否牢靠,各运转部件及滑动面有无障碍物。
4、工作前先作空行程试运转,检查各按钮、开关、阀门、限位装置等是否灵活可靠,确认液压系统压力正常,活塞连同主轴运动正常后方可开始工作,机床油压不得超过2.5Mpa。
5、调整铆头与工件的高度时,应把转换开关置在手动位置,且主轴不得转动。
调整后应锁紧工作台,并锁紧螺母。
6、在工作时不允许将手伸进铆头与工件之间,不得在工作台面上放置工具、工件或其它物品。
7、机床有异常现象,应立即停机检查。
8、工作完毕后,把转换开关置于手动位置,关掉油泵开关及主轴开关。
9、开机前,应检查机床接地,无接地严禁使用,检查油泵电机转向及系统油压是否正常。