Amlogic 在UBUNTU环境搭建
- 格式:doc
- 大小:64.00 KB
- 文档页数:6

安装ubuntu 64位10.04版本,因为之前编译过全志android4.0系统,系统需要的软件包都已经安装,想应该没啥问题,有问题编译也不会通过,结果让人失望,编译通过了,但是烧写过程过程中出错,看了下错误,大概是无法打开dev/下面的一个文件,一直没有想到是环境配置问题,另一个同事用虚拟机编译后,居然烧写成功,纳闷....于是,我从新安装虚拟机,10.4 安装需要的软件包You will need a 64-bit version of Ubuntu. Ubuntu 10.04 is recommended. Building using a newer version of Ubuntu is currently only experimentally supported and is not guaranteed to work on branches other than master.$ sudo apt-get install git-core gnupg flex bison gperf build-essential \zip curl zlib1g-dev libc6-dev lib32ncurses5-dev ia32-libs \x11proto-core-dev libx11-dev lib32readline5-dev lib32z-dev \libgl1-mesa-dev g++-multilib mingw32 tofrodos python-markdown \libxml2-utils xsltproc进入源代码目录:1、编译ROOTFS. build/envsetup.shlunch16make5、编译KERNELcd commonmake meson6_g02_defconfigmake modules将编译好的ko拷贝cp drivers/amlogic/mali/mali.ko ../out/target/product/g02ref/root/boot/cp drivers/amlogic/mali/mali.ko ../device/amlogic/g02ref/cp drivers/amlogic/ump/ump.ko ../out/target/product/g02ref/root/boot/cp drivers/amlogic/ump/ump.ko ../device/amlogic/g02ref/cp drivers/amlogic/wifi/rtl8xxx_CU/8192cu.ko ../out/target/product/g02ref/system/lib/ cp drivers/amlogic/wifi/rtl8xxx_CU/8192cu.ko ../device/amlogic/g02ref/cp ./arch/arm/boot/uImage ../out/target/product/g02ref/make uImagemake menuconfigmake uImagecp ./arch/arm/boot/uImage ../out/target/product/g02ref/uImage_recovery编译成功,呵呵,第一次遇到ubuntu环境问题,引起android系统烧写异常的问题。

ubuntu安装及android源码编译环境搭建为了能够编译和运行 Android 源码,我们需要在 Ubuntu 系统中搭建相应的开发环境。
下面是 Ubuntu 安装及 Android 源码编译环境搭建的详细步骤:一、Ubuntu 系统的安装2.将ISO文件写入USB或DVD中,制作启动盘。
3.在计算机上将系统引导到USB活动盘或DVD上,并启动系统。
4. 在启动菜单中选择安装 Ubuntu,按照提示完成安装过程。
二、系统更新和软件安装1.安装后,运行系统更新以获取最新的软件包和安全修复程序。
可以在终端中运行以下命令:```sudo apt updatesudo apt upgrade```2.安装开发工具和编译器。
可以在终端中运行以下命令:```sudo apt install build-essentialsudo apt install openjdk-8-jdksudo apt install pythonsudo apt install gitsudo apt install curlsudo apt install gnupg```1. 配置 Git 个人信息,可以在终端中运行以下命令:```git config --global "Your Name"``````chmod a+x ~/bin/repo```3. 配置 PATH 环境变量,这样在终端中就可以使用 Repo 了。
打开`~/.bashrc` 文件,并在末尾添加以下内容:```export PATH=~/bin:$PATH```4.执行以下命令使配置生效:```source ~/.bashrc```1. 创建一个空文件夹作为 Android 源码存放的目录,并在终端中进入该目录。
```repo init -u <URL> -b <branch>````````````repo sync```5.开始编译。
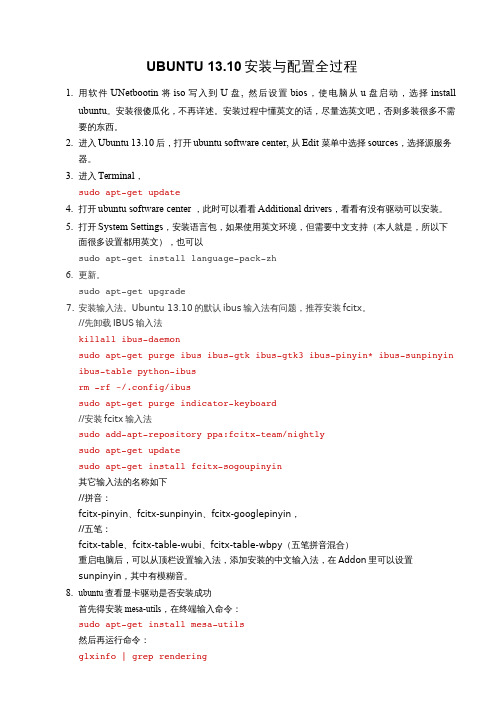
UBUNTU 13.10安装与配置全过程1.用软件UNetbootin将iso写入到U盘, 然后设置bios,使电脑从u盘启动,选择installubuntu。
安装很傻瓜化,不再详述。
安装过程中懂英文的话,尽量选英文吧,否则多装很多不需要的东西。
2.进入Ubuntu 13.10后,打开ubuntu software center, 从Edit 菜单中选择sources,选择源服务器。
3.进入Terminal,sudo aptget update4.打开ubuntu software center ,此时可以看看Additional drivers,看看有没有驱动可以安装。
5.打开System Settings,安装语言包,如果使用英文环境,但需要中文支持(本人就是,所以下面很多设置都用英文),也可以sudo aptget install languagepackzh6.更新。
sudo aptget upgrade7.安装输入法。
Ubuntu 13.10的默认ibus输入法有问题,推荐安装fcitx。
//先卸载IBUS输入法killall ibusdaemonsudo aptget purge ibus ibusgtk ibusgtk3 ibuspinyin* ibussunpinyin ibustable pythonibusrm rf ~/.config/ibussudo aptget purge indicatorkeyboard//安装fcitx输入法sudo addaptrepository ppa:fcitxteam/nightlysudo aptget updatesudo aptget install fcitxsogoupinyin其它输入法的名称如下//拼音:fcitx-pinyin、fcitx-sunpinyin、fcitx-googlepinyin,//五笔:fcitx-table、fcitx-table-wubi、fcitx-table-wbpy(五笔拼音混合)重启电脑后,可以从顶栏设置输入法,添加安装的中文输入法,在Addon里可以设置sunpinyin,其中有模糊音。

如何在Ubuntu上安装图像处理软件?在 Ubuntu 操作系统上,安装图像处理软件可以为我们的图像编辑和处理工作提供很大的便利。
接下来,让我们一步步了解如何在Ubuntu 上安装常用的图像处理软件。
首先,我们需要确保系统是最新的。
打开终端,输入以下命令来更新系统:```sudo apt updatesudo apt upgrade```更新完成后,我们可以开始安装图像处理软件。
GIMP 是一款功能强大且免费的开源图像编辑软件,类似于 Adobe Photoshop。
安装 GIMP 非常简单,在终端中输入以下命令:```sudo apt install gimp```等待安装完成,您就可以在应用菜单中找到 GIMP 并打开使用。
如果您需要更专业的图像处理工具,比如 Darktable,它主要用于RAW 图像的处理。
安装命令如下:```sudo apt install darktable```对于简单的图像查看和基本编辑需求,ImageMagick 是一个不错的选择。
安装方式为:```sudo apt install imagemagick```Shotwell 则是一款用于照片管理和简单编辑的软件,安装命令:```sudo apt install shotwell```除了通过命令行安装,我们还可以使用 Ubuntu 软件中心来安装图像处理软件。
打开 Ubuntu 软件中心,在搜索栏中输入您想要安装的图像处理软件名称,然后点击安装按钮即可。
在安装过程中,可能会遇到一些依赖问题。
如果出现这种情况,系统会自动尝试解决依赖关系或者提示您需要安装哪些额外的包。
按照系统的提示进行操作通常可以顺利完成安装。
另外,如果您想要安装商业软件,比如 Adobe Photoshop,可能会稍微复杂一些。
由于 Adobe 没有为 Linux 系统提供官方的安装包,我们可以通过 Wine 来运行 Windows 版本的 Photoshop。

Ubuntu操作系统安装及设置步骤介绍Ubuntu是一个基于Linux内核的开源操作系统,具有稳定性和安全性好的特点,适用于个人用户、企业用户以及开发者。
本文档将向您介绍如何安装和设置Ubuntu操作系统。
步骤一:准备安装介质2. 制作安装介质,可以选择将镜像文件烧录到DVD或制作启动盘。
步骤二:安装Ubuntu操作系统1. 将制作好的安装介质插入计算机,并从该介质启动计算机。
2. 在启动界面选择“Install Ubuntu”以开始安装过程。
3. 选择安装语言和键盘布局,点击“Continue”继续。
4. 在安装类型界面,可以选择完全安装或自定义分区。
对于新用户,建议选择完全安装以便快速上手。
5. 设置系统时钟和时区,确保时间设置准确。
6. 创建和设置用户名和密码,确保密码的强度。
7. 等待系统安装完成,并根据需要重启计算机。
步骤三:系统设置1. 进入安装后的Ubuntu系统界面,根据提示更新系统软件包。
在终端中输入以下命令执行更新:sudo apt updatesudo apt upgrade2. 安装所需软件,可以通过终端命令行或Ubuntu软件中心安装,如:sudo apt install <软件名>3. 配置网络设置,根据网络环境连接无线网络或配置有线网络。
4. 设置系统语言和地区,可以在“Settings”中选择“Language & Region”进行设置。
5. 调整系统外观和个性化设置,包括桌面壁纸、主题风格、程序启动器等。
6. 配置软件源,根据需要添加、删除或更改软件源以便获取最新的软件包。
7. 安装必要的驱动程序,如果系统中有硬件设备需要特定驱动程序支持,进行相应的安装和设置。
步骤四:系统维护和安全设置1. 定期更新系统和软件包,将系统保持最新状态,提高系统安全性和稳定性。
2. 安装杀毒软件和防火墙,保护系统免受恶意软件和网络攻击。
3. 设置用户权限和访问控制,避免非授权用户访问您的系统。

Ubuntu环境下编译Android源码及安装本次实验环境为Ubuntu10.04、Android版本为2.1,采用的是ARM9 Mini6410开发板自带的Android源码。
其它版本尚未测试,不过原理类似。
第一步:准备JDK环境Android源码有部分是用Java编写的,所以编译Android源码前,必须安装Java类库,即JDK。
编译Android源码需要JDK1.5版(主要是需要其中的javadoc),1.6版是不兼容的。
JDK1.5已经停止支持,其最终的版本是JDK 5.0 Update 22安装JDK有两种方法(推荐第二种):方法一,自己下载jdk可从Sun官网上下载:/javase/downloads/5u22/jdk 选择平台Linux,勾选同意许可协议:单击Continue,在弹出的页面中一共有两个下载,选第一个jdk-1_5_0_22-lin ux-i586.bin下载:方法二,用apt-get命令首先,打开/etc/apt/sources.list文件,打开时注意,无论用vim还是gedit命令,都要在前面加上sudo,如sudo vim /etc/apt/sources.list,不然没法保存。
然后,将下面语句添加到文件末尾,注意空格deb /ubuntu/ jaunty multiversedeb /ubuntu/ jaunty-updates multiverse 最后,分别执行如下命令sudo apt-get updatesudo apt-get install sun-java5-jdk因为,要从网上下载安装包,所以时间可能比较长,请耐心等待。
安装过程中,会弹出一个许可证说明书,按Tab切换,选择Yes,等待安装完成即可。
第二步:安装编译所需的包分别执行一下命令(注意空格):sudo apt-get install git-core flex bison gperf libesd0-dev zipsudo apt-get install libwxgtk2.6-dev zlib1g-dev build-essential libstdc++6sudo apt-get install tofrodos x-dev libx11-dev libncurses5-dev第三步:编译源码首先,解压源码,本例中源码路径为/home/user/Android/android-2.1-fs-20100815.tar.gz ,切换到源码包目录执行sudo tar xzvf android-2.1-fs-20100815.tar.gz ,在当前目录会生成一个Android文件夹,里面存放着解压出来的所有源码。
从U盘安装Ubuntu教程(针对unable to find a medium containing a live file system这种错误)说明:本教程适用于没有刻录光盘,使用ubuntu提供的U 盘安装工具或从硬盘启动的辅助安装工具也无法安装Ubuntu的情况(一般会出现unable to find a medium containing a live file system 这样的错误)Step 1: 下载ubuntu的iso文件。
Step 2: 下载本教程下载网址(附后)中指定的《U盘安装ubuntu 工具包》Step 3: 插入空白U盘,打开工具包中的第1个文件夹“1-MBR写入工具”中的grubinstGui2,选择“安装”,”grldr”至你的U盘,一般为第2块介质,一定看清是U盘,有容量提示。
千万别写到硬盘里去。
Step 4: 复制工具包中第2个文件夹“2-引导文件包”里的全部文件到U盘的根目录,注意不要将“2-引导文件包”这个文件夹也复制过来。
Step 5:用解压缩工具将ubuntu的iso文件解压至U盘根目录,成功解压后,U盘根目录应当有casper这样的文件夹。
至此,U盘启动盘已经做好了,开机启动,选择第一项StartUbuntu Setup from Ukey,启动ubuntu后,即可安装。
若未出现图形界面,可在命令行界面输入startx。
Step 6(可选步骤): 若U盘不能正常启动,用记事本打开U 盘根目录下的menu.lst文件,找到如下几行文字:{find --set-root /casper/vmlinuzkernel /casper/vmlinuz noprompt file=/preseed/ubuntu.seed live-media-path=/casper boot=casper persistent text splash vga=791--initrd /casper/initrd.lz}确认U盘根目录下的/casper/vmlinuz、/preseed/ubuntu.seed、/casper/initrd.lz这三个文件的名称和路径是否正确。
Android系统移植与调试之------->Amlogic方案编译步骤时间 2013-07-25 09:36:57 CSDN博客原文/qq446282412/article/details/9464251主题Android Linux命令1. 拷贝 Amlogic 的 SourceCode切换目录到 /home/roco/work/amlogic/SourceCode/mx0831-0525下将mx0831-0525.tgz 拷贝到/home/pyou/ 目录下,解压,生成mx0831-0525目录。
此目录就是将来的工作目录。
tar.bz2 命令: tar -jxvf *.tar.bz22. 配置环境变量2.1 准备工作切换目录到 /home/roco/work/amlogic/Document中,拷贝amlogic-tool.zip到 /home/pyou 下解压生成 amlogic-tool目录该目录下有以下3 个压缩文件1. arm-2010q1-188-arm-none-eabi-i686-pc-linux-gnu.tar.bz22. arm-2010q1-202-arm-none-linux-gnueabi-i686-pc-linux-gnu1.tar.bz23. gnutools-arc2.3-p0-ubuntu-9.04-2010-5-10.tar.bz2由于前面两个解压的目录相同,所以新建一个目录188,并将 arm-2010q1-188-arm -none-eabi-i686-pc-linux-gnu.tar.bz2移到188 目录下,解压生成目录 /amlogic-tool/18 8/arm-2010q切换目录到/amlogic-tool,分别解压gnutools-arc2.3-p0-ubuntu-9.04-2010-5-10.tar. bz2文件和arm-2010q1-202-arm-none-linux-gnueabi-i686-pc-linux-gnu1.tar.bz2 文件,生成目录/amlogic-tool/arm-2010q1和目录/amlogic-tool/opt2.2 修改 .bashrc 文件添加环境变量切换目录到/home/pyou目录下,使用ll命令查文件列表,然后使用vim命令修改 . bashrc 文件,在该文件最后添加环境变量。
Ubuntu 17.10 Linux Inbox DriverUser ManualTable of ContentsDocument Revision History (5)1Firmware Burning (6)2Port Type Management (7)3Modules Loading and Unloading (9)4Important Packages and Their Installation (10)5SR-IOV Configuration (12)5.1Setting up SR-IOV (12)6Default RoCE Mode Setting (14)Table 1: Document Revision History (5)Table 1: Document Revision History1 Firmware Burning1.Check the device’s PCI address.lspci | grep MellanoxExample:00:06.0 Infiniband controller: Mellanox Technologies MT27520 Family[ConnectX-3 Pro]2.Identify the adapter card's PSID.# mstflint -d 81:00.0 qImage type: FS2FW Version: 2.36.5000FW Release Date: 26.1.2016Rom Info: type=PXE version=3.4.718 devid=4103Device ID: 4103Description: Node Port1 Port2Sys imageGUIDs: e41d2d0300b3f590 e41d2d0300b3f591 e41d2d0300b3f592e41d2d0300b3f593MACs: e41d2db3f591 e41d2db3f592VSD:PSID: MT_10901110193.Download the firmware BIN file from the Mellanox website that matches your card'sPSID: → Support/Education→Support Downloader4.Burn the firmware.# mstflint -d <lspci-device-id> -i <image-file> b5.Reboot your machine after the firmware burning is completed.6.Validate new firmware burned successfully:# ethtool -i ens3driver: mlx4_enversion: 2.2-1 (Feb 2014)firmware-version: 2.40.5000expansion-rom-version:bus-info: 0000:0a:00.0supports-statistics: yessupports-test: yessupports-eeprom-access: nosupports-register-dump: nosupports-priv-flags: yes2 Port Type ManagementConnectX®-3/ConnectX®-3 Pro/ConnectX®-4 ports can be individually configured to workas InfiniBand or Ethernet ports. By default both ConnectX®-4 VPI ports are initialized asInfiniBand ports. If you wish to change the port type use the mstconfig after the driver isloaded.1.Install mstflint tools.yum install mstflint2.Check the device’s PCI address.lspci | grep MellanoxExample:00:06.0 Infiniband controller: Mellanox Technologies MT27520 Family[ConnectX-3 Pro]e mstconfig to change the link type as desired IB – for InfiniBand, ETH – for Ethernet.mstconfig –d <device pci> s LINK_TYPE_P1/2=<ETH|IB|VPI>Example:# mstconfig -d 00:06.0 s LINK_TYPE_P1=ETHDevice #1:----------Device type: ConnectX3ProPCI device: 00:06.0Configurations: Current NewLINK_TYPE_P1 IB(1) ETH(2)Apply new Configuration? ? (y/n) [n] : yApplying... Done!-I- Please reboot machine to load new configurations.4.Reboot your machine.5.Query the device’s parameters to v alidate the new configuration.# mstconfig -d 00:06.0 qDevice #1:----------Device type: ConnectX3ProPCI device: 0a:00.0Configurations: CurrentSRIOV_EN True(1)NUM_OF_VFS 8LINK_TYPE_P1 ETH(2)LINK_TYPE_P2 IB(1)LOG_BAR_SIZE 3BOOT_PKEY_P1 0BOOT_PKEY_P2 0BOOT_OPTION_ROM_EN_P1 True(1)BOOT_VLAN_EN_P1 False(0)BOOT_RETRY_CNT_P1 0LEGACY_BOOT_PROTOCOL_P1 PXE(1)BOOT_VLAN_P1 1BOOT_OPTION_ROM_EN_P2 True(1)BOOT_VLAN_EN_P2 False(0) BOOT_RETRY_CNT_P2 0LEGACY_BOOT_PROTOCOL_P2 PXE(1)BOOT_VLAN_P2 1IP_VER_P1 IPv4(0)IP_VER_P2 IPv4(0)3 Modules Loading and UnloadingMellanox modules for ConnectX®-2/ConnectX®-3/ConnectX®-3 Pro are:∙mlx4_en, mlx4_core, mlx4_ibMellanox modules for ConnectX®-4/ConnectX®-4 Lx are:∙mlx5_core, mlx5_ibIn order to unload the driver, you need to first unload mlx*_en/ mlx*_ib and then themlx*_core module.To load and unload the modules, use the commands below:∙Loading the driver: modprobe <module name># modprobe mlx5_ib∙Unloading the driver: modprobe –r <module name># modprobe –r mlx5_ib4 Important Packages and Their Installationlibibverbs: InfiniBand verbs librarylibibverbs-devel Development files for the libibverbs librarylibibverbs-utils Examples for the libibverbs librarylibibverbs A library for direct userspace use of RDMA (InfiniBand/iWARP)librdmacm: RDMA cm librarylibrdmacm-devel Development files for the librdmacm librarylibrdmacm Userspace RDMA Connection Managerlibibcm: Userspace InfiniBand Connection Management APIlibibcm Userspace InfiniBand Connection Managerlibibmad: Low layer InfiniBand diagnostic and management programslibibmad OpenFabrics Alliance InfiniBand MAD librarylibibumad: Low layer InfiniBand diagnostic and management programslibibumad-devel Development files for the libibumad librarylibibumad OpenFabrics Alliance InfiniBand umad (user MAD) librarylibmlx4: Mellanox ConnectX InfiniBand HCA User space Driverlibmlx4 Mellanox ConnectX InfiniBand HCA Userspace Driverlibmlx5: Mellanox Connect-IB InfiniBand HCA User space Driverlibmlx5 Mellanox Connect-IB InfiniBand HCA Userspace Driveropensm: InfiniBand Subnet Manageropensm-libs Libraries used by OpenSM and included utilitiesopensm OpenIB InfiniBand Subnet Manager and management utilitiesibutils: OpenIB Mellanox InfiniBand Diagnostic Toolsibutils-libs Shared libraries used by ibutils binariesibutils OpenIB Mellanox InfiniBand Diagnostic Toolsinfiniband-diags: OpenFabrics Alliance InfiniBand Diagnostic Toolsinfiniband-diags OpenFabrics Alliance InfiniBand Diagnostic Toolssrptools: Tools for SRP/IBsrptools Tools for using the InfiniBand SRP protocol devicesperftest: IB Performance testsperftest IB Performance Testsmstflint: Mellanox Firmware Burning and Diagnostics Toolsmstflint Mellanox firmware burning toolrdmacm-utilslibrdmacm-utils Examples for the librdmacm libraryibverbs-utilslibibverbs-utils Examples for the libibverbs libraryTo install the packages above run:# apt-get install libibverbs1 librdmacm1 libibcm1 libibmad5 libibumad3 libmlx4-1 libmlx5-1 opensm ibutils infiniband-diags srptools perftestmstflint rdmacm-utils ibverbs-utils –y5 SR-IOV Configuration5.1 Setting up SR-IOV1.Install the mstflint tools.# yum install mstflint2.Check the device’s PCI.# lspci | grep MellanoxExample:00:06.0 Infiniband controller: Mellanox Technologies MT27520 Family[ConnectX-3 Pro]3.Check if SR-IOV is enabled in the firmware.mstconfig -d <device pci> qExample:# mstconfig -d 00:06.0 qDevice #1:----------Device type: ConnectX3ProPCI device: 00:06.0Configurations: CurrentSRIOV_EN True(1)NUM_OF_VFS 8LINK_TYPE_P1 ETH(2)LINK_TYPE_P2 IB(1)LOG_BAR_SIZE 3BOOT_PKEY_P1 0BOOT_PKEY_P2 0BOOT_OPTION_ROM_EN_P1 True(1)BOOT_VLAN_EN_P1 False(0)BOOT_RETRY_CNT_P1 0LEGACY_BOOT_PROTOCOL_P1 PXE(1)BOOT_VLAN_P1 1BOOT_OPTION_ROM_EN_P2 True(1)BOOT_VLAN_EN_P2 False(0)BOOT_RETRY_CNT_P2 0LEGACY_BOOT_PROTOCOL_P2 PXE(1)BOOT_VLAN_P2 1IP_VER_P1 IPv4(0)IP_VER_P2 IPv4(04.Enable SR-IOV:mstconfig –d <device pci> s SRIOV_EN=<False|True>5.Configure the needed number of VFsmstconfig –d <device pci> s NUM_OF_VFS=<NUM>NOTE:This file will be generated only if IOMMU is set in the grub.conf file (byadding “intel_iommu=on” to /boot/grub/grub.conf file).6.[mlx4 devices only] Create/Edit the file /etc/modprobe.d/mlx4.conf:options mlx4_core num_vfs=[needed num of VFs] port_type_array=[1/2 for IB/ETH],[ 1/2 for IB/ETH]Example:options mlx4_core num_vfs=8 port_type_array=1,17.[mlx5 devices only] Write to the sysfs file the number of needed VFs.echo [num_vfs]re > /sys/class/infiniband/mlx5_0/device/sriov_numvfs Example:# echo 8 > /sys/class/infiniband/mlx5_0/device/sriov_numvfs8.Reboot the driver.9.Load the driver and verify that the VFs were created.# lspci | grep mellanoxExample:00:06.0 Network controller: Mellanox Technologies MT27520 Family[ConnectX-3 Pro]00:06.1 Network controller: Mellanox Technologies MT27500/MT27520 Family [ConnectX-3/ConnectX-3 Pro Virtual Function]00:06.2 Network controller: Mellanox Technologies MT27500/MT27520 Family [ConnectX-3/ConnectX-3 Pro Virtual Function]00:06.3 Network controller: Mellanox Technologies MT27500/MT27520 Family [ConnectX-3/ConnectX-3 Pro Virtual Function]00:06.4 Network controller: Mellanox Technologies MT27500/MT27520 Family [ConnectX-3/ConnectX-3 Pro Virtual Function]00:06.5 Network controller: Mellanox Technologies MT27500/MT27520 Family [ConnectX-3/ConnectX-3 Pro Virtual Function]00:06.6 Network controller: Mellanox Technologies MT27500/MT27520 Family [ConnectX-3/ConnectX-3 Pro Virtual Function]00:06.7 Network controller: Mellanox Technologies MT27500/MT27520 Family [ConnectX-3/ConnectX-3 Pro Virtual Function]00:06.0 Network controller: Mellanox Technologies MT27500/MT27520 Family [ConnectX-3/ConnectX-3 Pro Virtual Function]For further information, refer to section Setting Up SR-IOV MLNX_OFED User Manual.6 Default RoCE Mode Setting1.Mount the configfs file.# mount -t configfs none /sys/kernel/config2.Create a directory for the mlx4/mlx5 device.# mkdir -p /sys/kernel/config/rdma_cm/mlx4_0/3.Validate what is the used RoCE mode in the default_roce_mode configfs file.# cat /sys/kernel/config/rdma_cm/mlx4_0/ports/1/default_roce_modeIB/RoCE v14.Change the default RoCE mode,∙For RoCE v1: IB/RoCE v1∙For RoCE v2: RoCE v2# echo "RoCE v2" >/sys/kernel/config/rdma_cm/mlx4_0/ports/1/default_roce_mode# cat /sys/kernel/config/rdma_cm/mlx4_0/ports/1/default_roce_modeRoCE v2# echo "IB/RoCE v1" >/sys/kernel/config/rdma_cm/mlx4_0/ports/1/default_roce_mode# cat /sys/kernel/config/rdma_cm/mlx4_0/ports/1/default_roce_modeIB/RoCE v1。
Ubuntu IDE及环境配置目录0 常用软件1)桌面图标2)任务栏3)Vi / vim配置1 C/C++1)基本库2)Qt2 Java1)JDK2)环境变量配置3)Eclipse4)Eclipse生成桌面图标3 Android1)Eclipse2)安卓ADT3)VirtualBox4)Genymotion(安卓虚拟机)4 Python5 数据库6 web开发0 常用软件在Ubuntu下文件名字最好不要出现空格在软件中心里的软件一般都比较陈旧,想要安装最新版本的最好还是到官方下载虽然不推荐安装Ubuntu麒麟版本,但是官方的软件还是可以下来用用的,软件下载地址:/applications/下载后,双击安装即可里面包含了wps,搜狗输入法,QQ等,其中QQ为wine qq2012版本,网上有2013,2014等版本,不过BUG比较多,不稳定,此外该QQ不支持搜狗输入法1)复制图标到桌面,作为快捷方式所有应用图标如上图,复制到桌面即可2)任务栏Ctrl + Alt + T打开终端,输入sudo apt-get install tint2,可复制然后右键粘贴让其开机启动,按下键盘Win键搜索start打开Startup Application,选择Add,添加以下信息关闭后注销当前用户再登陆或者重启,即可看到任务栏3)vi / vim略1 C/C++1)安装C/C++库Ctrl + Alt + T打开终端,输入sudo apt-get install build-essential另启一个终端,输入gcc -v测试是否安装成功2)Qt官方下载地址:/downloads击运行,整个安装过程与Windows下类似安装完成后似乎会有些问题,就是无法编译文件,这个我不记得如何处理了,具体可以复制错误信息百度看看2 Java其实还有两种比较简便的安装方法,这里不作介绍1)安装JDK官方最新版地址:/technetwork/java/javase/downloads/jdk8-downloads-213 3151.html下载.tar.gz文件2)配置环境变量下载完成后双击解压,解压完成后,按Ctrl + Alt + T打开终端,输入以下命令:sudo gedit /etc/environment 可复制,然后右键粘贴然后会打开系统环境配置窗口,复制JDK的路径,到bin这一级目录,如我的是/home/liwen/Programs/jdk8/bin,以下路径请填写自己的JDK路径,路径被双引号括起在PATH后添加::/home/liwen/Programs/jdk8/bin冒号相当于windows下的分号,分割环境变量在后面添加:JAVA_HOME="/home/liwen/Programs/jdk8"CLASSPATH="/home/liwen/Programs/jdk8/lib:."3)安装Eclipse官网:/downloads/index-developer.php?mars可能由于浏览器原因,在LINUX下无法完整显示标准版本,以下分别是标准版本和企业版本,推荐企业版本,方便以后的web开发下载完成后,解压即可,双击图标便可直接运行4)创建桌面图标(可跳过)Ctrl + Alt + T 打开终端,新建一个桌面图标文件,输入或者复制右键粘贴sudo gedit /usr/share/applications/eclipse.desktop复制以下内容,注意路径填写自己的[Desktop Entry]Encoding=UTF-8Name=eclipseComment=Eclipse IDEExec=/home/liwen/Programs/eclipse/eclipseIcon=/home/liwen/Programs/eclipse/icon.xpmTerminal=falseStartupNotify=trueType=ApplicationCategories=Application;Development;保存关闭,到/usr/share/applications/目录下将该图标复制到桌面即可,其他的图标也可以复制到桌面3 Android(要安装的东西很多)1)Eclipse安装建议从官方下载另外一个标准版本的Eclipse,如果用原来的Eclipse可以跳过官网:/downloads/index-developer.php?mars下载完后解压2)ADT官网很慢,这里链接非官方地址,23.0.2版本地址:/s/1qWFJoF6#path=%252Fandroid%2520adt下载完后不需要解压,这里选择离线安装ADT,在安装前请关闭网络打开Eclipse -> Help -> Install New Solfware起一个名字,然后选择ADT的zip压缩包所在路径,OK即可,然后在Name一栏中勾选第一项Developer Tools即可,第二项可不选,第二项好像是包含了转换成C语言编程的类,然后就是NEXT。
Amlogic 在UBUNTU环境搭建一、系统安装安装说明安装ubuntu系统二、安装sshSudo apt-get install openssh_server三、安装ftpsudo apt-get install vsftpd-----安装sudo vi /etc/vsftpd.conf—配置文件需要打开write_enable=YESsudo /etc/init.d/vsftpd restart—重启FTP服务四、安装工具链1.拷贝工具到/opt/tool/目录2.解压缩tar jxvf arm-2010q1-202-arm-none-linux-gnueabi-i686-pc-linux-gnu.tar.bz2export 进入环境变量—这个是kernel编译用的uboot编译使用tar jxvf arm-2010q1-188-arm-none-eabi-i686-pc-linux-gnu.tar.bz2export 进入环境变量3.安装其他工具链$ sudo apt-get install git-core gnupg flex bison gperf build-essential \zip curl zlib1g-dev libc6-dev lib32ncurses5-dev ia32-libs \x11proto-core-dev libx11-dev libreadline5-dev libz-dev \libgl1-mesa-dev g++-multilib mingw32 tofrodos4.安装JDKchmod a+x jdk-1_6_0_55-linux-i586.bin./ jdk-1_6_0_55-linux-i586.bin添加JA V A_HOME=/home/amlogic/jdk_1.6.0PA TH=$PA TH:/home/amlogic/jdk_1.6.0/binANDROID_JA V A_HOME=JA V A_HOME5.五、编译android1.source build/envsetup.sh2.lunch3.选择需要选择的板子4.make –j4—编译六、编译uboot1.cd uboot2.make help3.make <board_name>七、编译kernel1.make meson_refc01_defconfig2.make –j43.make uImage –j4八、问题1. host Java: host-libprotobuf-java-2.3.0-micro (out/host/common/obj/JA V A_LIBRARIES/host-libprotobuf-java-2.3.0-micro_intermediates/classe s)make: *** [out/target/product/c03ref/system/etc/security/otacerts.zip] Error 127make: *** Waiting for unfinished jobs....解决:sudoapt-get install zip2.使用32位系统编译时候报错解决:修改build/code/main.mk4./usr/bin/ld: cannot find –lzcollect2: ld returned 1 exit statusmake: *** [out/host/linux-x86/obj/lib/libneo_cgi.so] Error 1make: *** Waiting for unfinished jobs....解决:缺少lib32z1-dev,安装即可:apt-get install lib32z1-devE: Couldn't find package lib32z1-dev:apt-get install lib64z1-dev—可以找到5.问题make: *** [out/target/common/docs/api-stubs-timestamp] Error 45make: *** Waiting for unfinished jobs....make: *** [out/target/common/docs/doc-comment-check-timestamp] Error 45解决:这是由于clearsilver在编译时如果检测到使用Java JDK 6,就使用64位编译。
要避开此错误,需要修改下面四个文件:把这四个Makefile中的下列语句注掉即可:# This forces a 64-bit build for Java6# Comment by# LOCAL_CFLAGS += -m64# LOCAL_LDFLAGS += -m64然后在external/clearsilver目录中执行一下make clean,然后回到项目根目录,继续ma ke即可。
当编译完成时,生成的image文件放在out/target/product/generic目录中。
九、服务器64位编译注意事项使用版本120103版本1.kernel编译使用make meson_reff11_defconfig编译通过2.uboot这个目前在64位系统下面会报错3.android使用lib注意是lib32readline5-dev4.make otapackage出现如下错误:Could not load 'clearsilver-jni'java.library.path = out/host/linux-x86/libmake: *** [out/target/common/docs/api-stubs-timestamp] Error 45解决:这是由于clearsilver在编译时如果检测到使用Java JDK 6,就使用64位编译。
要避开此错误,需要修改下面四个文件:▪external/clearsilver/cgi/Android.mk▪external/clearsilver/java-jni/Android.mk▪external/clearsilver/util/Android.mk▪external/clearsilver/cs/Android.mk把这四个Makefile中的下列语句注掉即可:# This forces a 64-bit build for Java6# Comment by Easwy# LOCAL_CFLAGS += -m64# LOCAL_LDFLAGS += -m64然后在external/clearsilver目录中执行一下make clean,然后回到项目根目录,继续make即可。
当编译完成时,生成的image文件放在out/target/product/generic目录中。
5./usr/lib64/libz.a: could not read symbols: Bad value解决:解决方法如下:cd zlib-1.2.3 //进入zlib目录CFLAGS=”-O3 -fPIC” ./configure//使用64位元的方法进行编译make cleanmakeCFLAGS="-O3 -fPIC" ./configure --prefix=/usr/local/zlib/6.ICS4.0版本kernel问题drivers/built-in.o: In function `dhd_customer_gpio_wlan_ctrl':f_mass_storage_tmp.c:(.text+0x187acc): undefined reference to `extern_wifi_reset'f_mass_storage_tmp.c:(.text+0x187adc): undefined reference to `extern_wifi_reset' make: *** [.tmp_vmlinux1] Error 1解决:board-m3-reff10.c文件#if 0//修改成1解决问题7.#if 0 //rick8.void extern_wifi_reset(int is_on)9.{10.unsigned int val;11.12./*output*/13.val = readl(amlogic_card_info[1].card_power_en_reg);14.val &= ~(amlogic_card_info[1].card_power_en_mask);15.writel(val, amlogic_card_info[1].card_power_en_reg);16.17.if(is_on){18./*high*/19.val = readl(amlogic_card_info[1].card_power_output_reg);20.val |=(amlogic_card_info[1].card_power_output_mask);21.writel(val, amlogic_card_info[1].card_power_output_reg);22.printk("on val = %x\n", val);23.}24.else{25./*low*/26.val = readl(amlogic_card_info[1].card_power_output_reg);27.val &=~(amlogic_card_info[1].card_power_output_mask);28.writel(val, amlogic_card_info[1].card_power_output_reg);29.printk("off val = %x\n", val);30.}31.32.printk("ouput %x, bit %d, level %x, bit %d\n",33.amlogic_card_info[1].card_power_en_reg,34.amlogic_card_info[1].card_power_en_mask,35.amlogic_card_info[1].card_power_output_reg,36.amlogic_card_info[1].card_power_output_mask);37.return;38.}39.EXPORT_SYMBOL(extern_wifi_reset);40.#endif //rick ICS4.0版本uboot只有一个配置选项解决:41.ICS4.0版本uboot编译还是报错-mbox-z01/uboot/build/include -I /home/michael/code/0103-m3-mbox-z01/uboot/lib/libfdt -I /home/michael/code/0103-m3-mbox-z01/uboot/tools -DTEXT_BASE=0x8F800000 -DUSE_HOSTCC -D__KERNEL_STRICT_NAMES -std=c99 -g -pedantic -o /home/michael/code/0103-m3-mbox-z01/uboot/build/tools/uclpack/home/michael/code/0103-m3-mbox-z01/uboot/build/tools/uclpack.o/home/michael/code/0103-m3-mbox-z01/uboot/build/tools//libucl_linux.a/usr/bin/ld: i386 architecture of input file `/home/michael/code/0103-m3-mbox-z01/uboot/build/tools//libucl_linux.a(n2b_99.o)' is incompatible with i386:x86-64 output/usr/bin/ld: i386 architecture of input file `/home/michael/code/0103-m3-mbox-z01/uboot/build/tools//libucl_linux.a(n2b_d.o)' is incompatible with i386:x86-64 output/usr/bin/ld: i386 architecture of input file `/home/michael/code/0103-m3-mbox-z01/uboot/build/tools//libucl_linux.a(n2b_ds.o)' is incompatible with i386:x86-64 output/usr/bin/ld: i386 architecture of input file `/home/michael/code/0103-m3-mbox-z01/uboot/build/tools//libucl_linux.a(n2d_99.o)' is incompatible with i386:x86-64 output/usr/bin/ld: i386 architecture of input file `/home/michael/code/0103-m3-mbox-z01/uboot/build/tools//libucl_linux.a(n2d_d.o)' is incompatible with i386:x86-64 output/usr/bin/ld: i386 architecture of input file `/home/michael/code/0103-m3-mbox-z01/uboot/build/tools//libucl_linux.a(n2d_ds.o)' is incompatible with i386:x86-64 output/usr/bin/ld: i386 architecture of input file `/home/michael/code/0103-m3-mbox-z01/uboot/build/tools//libucl_linux.a(n2e_99.o)' is incompatible with i386:x86-64 output/usr/bin/ld: i386 architecture of input file `/home/michael/code/0103-m3-mbox-z01/uboot/build/tools//libucl_linux.a(n2e_d.o)' is incompatible with i386:x86-64 output/usr/bin/ld: i386 architecture of input file `/home/michael/code/0103-m3-mbox-z01/uboot/build/tools//libucl_linux.a(n2e_ds.o)' isincompatible with i386:x86-64 output/usr/bin/ld: i386 architecture of input file `/home/michael/code/0103-m3-mbox-z01/uboot/build/tools//libucl_linux.a(ucl_init.o)' is incompatible with i386:x86-64 output/usr/bin/ld: i386 architecture of input file `/home/michael/code/0103-m3-mbox-z01/uboot/build/tools//libucl_linux.a(ucl_ptr.o)' is incompatible with i386:x86-64 output/usr/bin/ld: i386 architecture of input file `/home/michael/code/0103-m3-mbox-z01/uboot/build/tools//libucl_linux.a(ucl_util.o)' is incompatible with i386:x86-64 output/usr/bin/ld: i386 architecture of input file `/home/michael/code/0103-m3-mbox-z01/uboot/build/tools//libucl_linux.a(alloc.o)' is incompatible with i386:x86-64 outputcollect2: ld returned 1 exit statusmake[1]: *** [/home/michael/code/0103-m3-mbox-z01/uboot/build/tools/uclpack] Error 1make[1]: Leaving directory `/home/michael/code/0103-m3-mbox-z01/uboot/tools'make: *** [tools] Error 2解决:42.。