Mio 迈欧 SLICE_智能手环说明书
- 格式:pdf
- 大小:1.67 MB
- 文档页数:13
目录感谢您的购买3包装清单3Mio FUSE简介3安全须知入门指南4激活 Mio FUSE4充电4设置Mio FUSE 的使用5全天模式6运动模式6心率区间7佩戴 Mio FUSE7故障排除数据存储和传输8与接受装置连接8通过蓝牙与手机应用程序配对8与运动装置如自行车电脑配对Mio FUSE 的保养9电池保养9电池保养指南9电池寿命9Mio FUSE的清洁9Mio FUSE的防水10Mio FUSE的保养10Mio FUSE的规格保修和售后感谢您的购买感谢您购买Mio FUSE! FUSE手环集心率、运动数据和日常运动功能为一体. Mio FUSE使用 ANT+?和蓝牙 Bluetooth? Smart (BLE) 技术无线传输您的运动数据至智能手机、自行车电脑或其他兼容的装置。
它可以通过 Mio Go 或许多第三方软件监测您的运动状况。
包装清单1.Mio FUSEB充电器3.快速操作指南Mio FUSE 简介A.顶端触点 B 左边触点 C. 右边触点D.显示屏E.心率指示灯安全须知在开始新的训练计划前,请咨询医生Mio Fuse 可以精准测量心率,但是不能用于医疗用途。
Mio Fuse 及 USB 充电器有很强磁性,佩戴起搏器、除颤器或其他植入电子设备的用户使用前请咨询医生。
入门指南激活 Mio FUSE只需连接充电器进行充电,即可激活Mio FUSE。
Mio FUSE激活成功后会显示.充电1.注意:充电前请确认FUSE后盖充电触点是干燥的。
2.将充电器一头接入电脑USB端接口。
3.将 FUSE后盖的充电触点和充电器针脚如下图排成一行。
充电针脚的磁性有利于充电器和FUSE吸附到一起。
充电过程中, Mio FUSE会显示.电充满后会显示,同时心率指示灯会熄灭。
电量过低时,Mio FUSE会显示;也可以从Mio Go 软件上查看电量电池充满后,如果每天测心率 1 个小时,可以使用6-7 天。
更多电池信息,可以查看电池注意事项一节设置设置 Mio FUSE,下载 Mio GO app 到你的手机或平板从苹果的 App Store 或 Google Play store. 安装Mio GO 后 ,打开软件后按照提示设置。
功能说明书功能说明书一、产品概述本产品是一款智能手表,具备多种功能,包括通讯功能、健康监测功能、运动记录功能以及智能提醒功能。
二、功能介绍1. 通讯功能本产品支持蓝牙连接,可以与手机进行通讯,用户可以通过智能手表来接听电话、查看短信以及接收社交媒体的通知。
该功能方便用户在不方便拿出手机的情况下查看消息,提高使用效率。
2. 健康监测功能本产品内置了心率传感器和睡眠监测器,可以准确地测量用户的心率和睡眠情况。
用户可以通过手表上的应用程序查看自己的心率曲线和睡眠质量,帮助用户了解自己的身体状况,并采取相应的措施来改善健康。
3. 运动记录功能本产品内置了多种运动模式,包括跑步、健身、骑行等,用户可以通过选择相应的运动模式来记录自己的运动数据。
手表配备了加速度计和陀螺仪,能够准确测量用户的运动数据,包括步数、距离、卡路里消耗等。
用户可以通过应用程序查看运动数据的统计和趋势分析,帮助用户更好地了解自己的运动状态。
4. 智能提醒功能手表可以通过手机与用户的日历和提醒事项同步,用户可以在手表上查看自己的日程安排和提醒事项。
此外,手表还可以智能提醒用户长时间不活动的情况,提醒用户起身活动。
三、使用方法1. 首次使用时,需要先下载并安装相应的手机应用程序。
然后,将手表与手机通过蓝牙连接。
2. 打开手机应用程序,设置个人信息和相关权限,例如姓名、性别、年龄等信息。
用户还可以根据自己的需求设置健康提醒、闹钟提醒等功能。
3. 手表在佩戴时需要注意尺寸合适和佩戴舒适。
四、注意事项1. 请避免手表长时间暴露在阳光下,以免损坏电子元件。
2. 请避免手表长时间接触水或浸泡在水中,以免损坏手表的防水性能。
3. 请勿使用硬物或尖锐物品刮擦手表屏幕,以免刮伤屏幕。
4. 请定期清洁手表,避免灰尘和污垢进入手表。
五、维护保养1. 请定期充电,确保手表正常工作。
建议使用原装充电器进行充电。
2. 如发现手表有异常情况,如无法启动、功能异常等,请及时联系售后服务中心进行维修。
3目录感谢您的购买03包装清单03 Mio FUSE简介03安全须知入门指南04激活Mio FUSE04充电04设置Mio FUSE的使用05全天模式06运动模式06 心率区间07 佩戴Mio FUSE07故障排除数据存储和传输08与接受装置连接08通过蓝牙与手机应用程序配对08与运动装置如自行车电脑配对Mio FUSE的保养09电池保养09电池保养指南09电池寿命09 Mio FUSE的清洁09 Mio FUSE的防水10 Mio FUSE的保养10 Mio FUSE的规格保修和法规10 保修服务13 版权和商标13 合规评定感谢您的购买感谢您购买Mio FUSE!FUSE手环集心率、运动数据和日常运动功能为一体. Mio FUSE使用ANT+™ 和蓝牙Bluetooth® Smart (BLE) 技术无线传输您的运动数据至智能手机、自行车电脑或其他兼容的装置。
它可以通过Mio Go 或许多第三方软件监测您的运动状况。
包装清单1.Mio FUSEB充电器3.快速操作指南Mio FUSE简介A.顶端触点B左边触点C. 右边触点D.显示屏E.心率指示灯安全须知在开始新的训练计划前,请咨询医生Mio Fuse可以精准测量心率,但是不能用于医疗用途。
Mio Fuse及USB充电器有很强磁性,佩戴起搏器、除颤器或其他植入电子设备的用户使用前请咨询医生。
入门指南激活Mio FUSE只需连接充电器进行充电,即可激活Mio FUSE。
Mio FUSE激活成功后会显示.充电1.注意:充电前请确认FUSE后盖充电触点是干燥的。
2.将充电器一头接入电脑USB端接口。
3.将FUSE后盖的充电触点和充电器针脚如下图排成一行。
充电针脚的磁性有利于充电器和FUSE吸附到一起。
充电过程中,Mio FUSE会显示.电充满后会显示,同时心率指示灯会熄灭。
电量过低时, Mio FUSE会显示;也可以从Mio Go软件上查看电量电池充满后,如果每天测心率1个小时,可以使用6-7天。
智能健康监测手环使用说明书尊敬的用户:感谢您选择并使用我们的智能健康监测手环。
为了让您更好地使用该产品,我们特别为您提供以下使用说明。
1. 产品概述智能健康监测手环是一款功能强大的智能设备,它能够实时监测您的健康状况,记录您的运动数据,并提供各类健康建议和提醒。
2. 使用前准备在开始使用前,请确保已经将手环充电至电量充足,并且已经成功与您的手机进行蓝牙连接。
如果您是首次使用,请下载我们提供的手机应用程序,并按照应用程序的指引进行设备绑定。
3. 主要功能(1)健康监测:该手环配备了高度敏感的传感器,能够准确监测您的心率、血压、血氧水平以及睡眠质量。
通过手机应用程序,您可以随时查看这些数据,并对自己的身体状况进行科学的评估和分析。
(2)运动记录:手环能够自动记录您的步数、距离和卡路里等运动数据。
您可以在手机应用中查看运动记录,并设定运动目标,让手环成为您的私人运动教练。
(3)消息提醒:当您手机接收到短信、电话或社交媒体消息时,手环会通过振动和显示屏提醒您。
您无需取出手机即可及时处理重要事务。
(4)久坐提醒:手环还具备久坐提醒功能,它会在您长时间静坐后进行提醒,以防止长期久坐给身体带来的不利影响。
(5)防丢提醒:手环支持防丢功能,当手机和手环的蓝牙连接中断时,手环会自动发出警报,提醒您手机可能丢失或遗忘。
4. 使用方法(1)佩戴:请将手环佩戴在手腕上,并根据自己的舒适程度进行适当调整。
(2)充电:通过附带的充电线将手环连接到电源适配器或电脑USB接口上,等待充电状态显示为满格后即可断开充电线。
(3)开机及关闭:按下手环侧面的开关按钮,手环将会开机并显示欢迎画面。
长按按钮可关闭手环。
手环也会在长时间无操作后自动关闭以节省电量。
(4)数据同步:打开手机上的应用程序,确保蓝牙已打开,手环将会自动与手机同步数据。
您可以在应用程序中查看详细信息。
5. 注意事项(1)合理佩戴:请适度佩戴手环,避免过紧或过松。
(2)切勿过度使用:手环是电子产品,请合理使用,并避免长时间过度使用。
MioFUSE详细中⽂说明书⽬录感谢您的购买03包装清单03 Mio FUSE简介03安全须知⼊门指南04激活Mio FUSE04充电04设置Mio FUSE的使⽤05全天模式06运动模式06 ⼼率区间07 佩戴Mio FUSE07故障排除数据存储和传输08与接受装置连接08通过蓝⽛与⼿机应⽤程序配对08与运动装置如⾃⾏车电脑配对Mio FUSE的保养09电池保养09电池保养指南09电池寿命09 Mio FUSE的清洁09 Mio FUSE的防⽔10 Mio FUSE的保养10 Mio FUSE的规格保修和售后感谢您的购买感谢您购买Mio FUSE!FUSE⼿环集⼼率、运动数据和⽇常运动功能为⼀体. Mio FUSE使⽤ANT+? 和蓝⽛Bluetooth? Smart (BLE) 技术⽆线传输您的运动数据⾄智能⼿机、⾃⾏车电脑或其他兼容的装置。
它可以通过Mio Go 或许多第三⽅软件监测您的运动状况。
包装清单1.Mio FUSE/doc/922628016f1aff00bfd51e0b.html B充电器3.快速操作指南Mio FUSE简介A.顶端触点B左边触点C. 右边触点D.显⽰屏E.⼼率指⽰灯安全须知在开始新的训练计划前,请咨询医⽣Mio Fuse可以精准测量⼼率,但是不能⽤于医疗⽤途。
Mio Fuse及USB充电器有很强磁性,佩戴起搏器、除颤器或其他植⼊电⼦设备的⽤户使⽤前请咨询医⽣。
⼊门指南激活Mio FUSE只需连接充电器进⾏充电,即可激活Mio FUSE。
Mio FUSE激活成功后会显⽰.充电1.注意:充电前请确认FUSE后盖充电触点是⼲燥的。
2.将充电器⼀头接⼊电脑USB端接⼝。
3.将FUSE后盖的充电触点和充电器针脚如下图排成⼀⾏。
充电针脚的磁性有利于充电器和FUSE吸附到⼀起。
充电过程中,Mio FUSE会显⽰.电充满后会显⽰,同时⼼率指⽰灯会熄灭。
电量过低时, Mio FUSE会显⽰;也可以从Mio Go软件上查看电量电池充满后,如果每天测⼼率1个⼩时,可以使⽤6-7天。
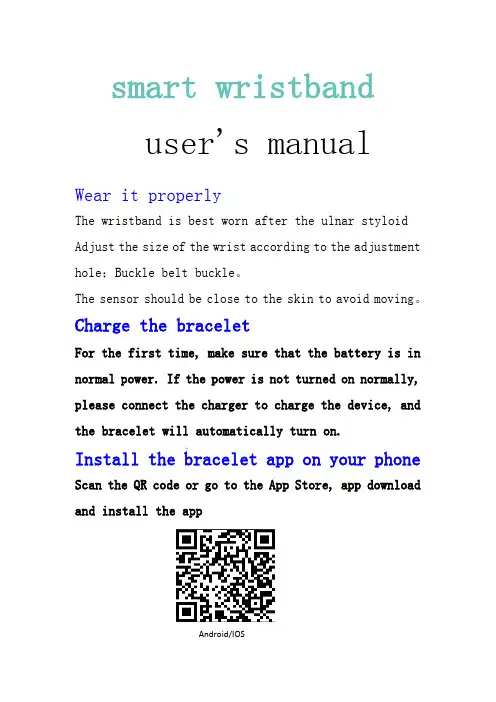
smart wristbanduser's manualWear it properlyThe wristband is best worn after the ulnar styloid Adjust the size of the wrist according to the adjustment hole;Buckle belt buckle。
The sensor should be close to the skin to avoid moving。
Charge the braceletFor the first time, make sure that the battery is in normal power. If the power is not turned on normally, please connect the charger to charge the device, and the bracelet will automatically turn on.Install the bracelet app on your phone Scan the QR code or go to the App Store, app download and install the appAndroid/IOSSystem Requirements:Android 5.0 or above; iOS9.0 or above;Support for Bluetooth 4.0.Device connectionFor the first use, you need to connect to the APP for calibration. After the connection is successful, the bracelet will automatically synchronize the timeTurn on the Bluetooth switch of the mobile phone system →enter the app device module settings → click "bind device, experience more functions" to enter, it will automatically search for the nearby Bluetooth device, find the bracelet device and connect it.●After the pairing is successful, the APP will automaticallysave the Bluetooth address of the bracelet.When the APP is opened or running in the background, it will automatically search and connect the bracelet;● Android phones use all notification permissions such ascontact information and mobile app settings to run in the backgroundBracelet function description●When the device is turned off, touch and hold the functionbutton for more than 3 seconds to turn the device onMore menu-long press the shutdown menu to enter the shutdown interface●Under the power on state, touch the short press function keyto light up the screen●When the device is turned on, touch the function key to lightthe screen;●Whether the default clock page of the bracelet, you canenter more menus to set different clock pages, no operation default five-second screen●Switch to the heart rate three-in-one interface to start thetest, heart rate three-in-one interface 60s timeoutautomatically off screen (heart rate and blood pressure need bracelet hardware support)Clock interfaceAfter syncing with the phone, the bracelet will automatically calibrate the time.;(tracks Step)Number of stepsWear the bracelet and record the number of daily movement steps to view the current real-time steps.DistanceThe distance of motion is estimated based on the number of walking steps.CalorieEstimate the calories burned based on the number of walking stepsHeart rate, blood pressure, blood oxygen three-in-oneAfter entering the heart rate three-in-one test interface for a few seconds, the current heart rate, blood pressure, and blood oxygen test results are displayed. This feature requires a wristband to support heart rate and blood pressure sensors Multi-sport modeAfter all exercise modes are activated, calories consumed and duration can be recorded;Sleep modeWhen you fall asleep, the bracelet will automatically enter the sleep monitoring mode; it will automatically detect the number of deepsleep/light sleep/waking up throughout the night and calculate your sleep quality; the sleep data bracelet will only view the total duration of deep sleep and light sleep. For details, please View on the APP side. Note: Sleep data will only be available when you wear the bracelet when you fall asleep. Sleep will be detected from 10 o'clock in the evening. Sleep data for 3/4 hours of falling asleep can be synchronized to the app while you sleep.music playerSuccessfully connected to the APP, the band can start the music player (play/pause/up and down song function control)the weatherIf the APP is successfully connected, the bracelet can obtain the current weather data, and the APP setting-personal information-can set the temperature unit switch (the conversion between Celsius and Fahrenheit)Note: When connecting to the APP, please be sure to turn on the phone location functionCustom watch faceYou need to connect to the APP to get the dial settings, you can choose the recommended dial/photo album custom dial to synchronize to the braceletTemperature measurementPlease wear it for 15 minutes every time you use it to perform temperature measurement, connect the APP to convert the unit, and view the temperature data (the data is not uploaded without APP or Bluetooth disconnection).Note: The temperature measurement results vary according to the ambient temperature, and the data is for reference only.Information modeWhen the bracelet pushes multiple reminder messages, enter this interface to view the latest message recordAPP function and settings(Personal information)Please set your personal information after enteringthe app.Settings → Personal Information, you can set gender- age - height - weightYou can also set your daily goal steps to monitor daily completions(Application push)incoming call:In the connected state, if the call alert function is enabled, when the call comes in, the wristband will vibrate and display the name or number of the caller.(You need to give APP read address book permission)SMS notification:In the connected state, if the SMS reminder function is enabled, the bracelet will vibrate when there is a text message.Other reminders:In the connected state, if this function is enabled, when there is a message such as WeChat, QQ, Facebook, etc., the bracelet will vibrate to remind and display the content received by the app.(You need to give the APP permissionto get system notifications. The wristband can display20-40 words).Other functions::Turn on vibration to set this function,When there is a call, message or other reminder, the bracelet will vibrate. If it is closed, the bracelet will only have a screen reminder without shaking to avoid disturbing.Tips for Android users:When using the reminder function, you need to set itto allow "FitPro" to run in the background; it is recommended to add "FitPro" to the rights managementand open all permissions.(Alarm setting)In the connected state, 8 alarms can be set. After setting, it will be synchronized to the bracelet; offline alarm is supported. After the synchronization is successful, even ifthe APP is not connected, the bracelet will be reminded according to the set time.(Looking for a bracelet)In the connected state, click the “Look for the bracelet”option and the bracelet will vibrate.(Remote photography)In the connected state, the app end enters the remote camera interface, shakes the wristband/turns the wrist, and automatically takes a photo after 3 seconds of counting down. Please allow the APP to access the album to save theself-portrait photos. (Note: When taking a remote control photo, the bracelet can not operate other functions, the app should exit the camera function)(Sedentary reminder)Set whether to enable the sedentary reminder function, you can set the reminder interval, if you sit for a long time in the set time, the bracelet will remind.(Raise your hand to brighten)Turn this function on. When the wristband is in the state of the screen, lift your wrist and turn the screen to yourself to light up the screen.(Do not disturb mode)Turn on the Do Not Disturb mode. You can set the Do not disturb time period. During the set time period, the bracelet stops receiving notification messages to avoid reminding messages.(Device reset)Setting this feature reset will erase all data in the bracelet (such as step counting)(Remove device)Remove device This feature will erase data and remove deviceBasic parametersPrecautions1.Bathing and swimming should not be worn.2.Please Connect the bracelet when synchronizing data.e the included charging cable to charge.4.Do not expose the bracelet to high moisture, high temperature, or very low temperatures for long periods of time5.The bracelet appears to crash and restart. Please Checkthe phone memory information clear and try again, or exitthe APP and reopen it.Component introduction*Host *Wrist strap *Charging cable *Packing box and instructionsThis device complies with part 15 of the FCC Rules. Operation is subject to the following two conditions: (1) This device may not cause harmful interference, and (2) this device must accept any interference received, including interference that may cause undesired operation.Any Changes or modifications not expressly approved by the party responsible for compliance could void the user's authority to operate the equipment.Note: This equipment has been tested and found to comply with the limits for a Class B digital device, pursuant to part 15 of the FCC Rules. These limits are designed to provide reasonable protection against harmful interference in a residential installation. This equipment generates uses and can radiate radio frequency energy and, if not installed and used in accordance with the instructions, may cause harmful interference to radio communications. However, there is no guarantee that interference will not occur in a particular installation. If this equipment does cause harmful interference to radio or television reception, which can be determined by turning the equipment off and on, the user is encouraged to try to correct the interference by one or more of the following measures:-Reorient or relocate the receiving antenna.-Increase the separation between the equipment and receiver.-Connect the equipment into an outlet on a circuit different from that to which the receiver is connected.-Consult the dealer or an experienced radio/TV technician for help.。
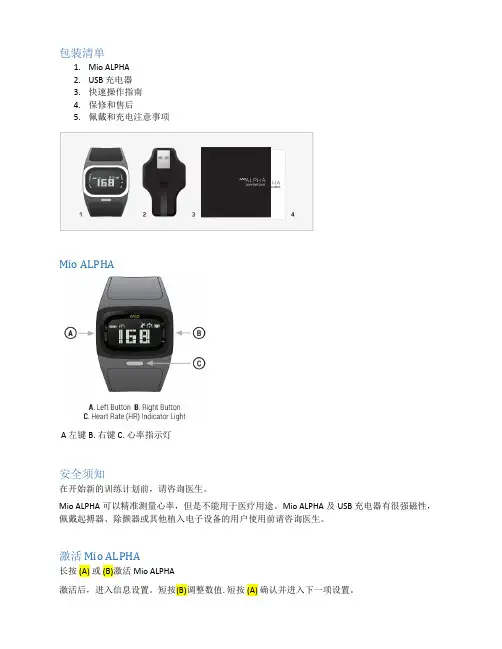
包装清单1.Mio ALPHAB 充电器3.快速操作指南4.保修和售后5.佩戴和充电注意事项Mio ALPHAA 左键 B. 右键 C. 心率指示灯安全须知在开始新的训练计划前,请咨询医生。
Mio ALPHA可以精准测量心率,但是不能用于医疗用途。
Mio ALPHA及USB充电器有很强磁性,佩戴起搏器、除颤器或其他植入电子设备的用户使用前请咨询医生。
激活 Mio ALPHA长按 (A) 或 (B)激活Mio ALPHA激活后,进入信息设置。
短按(B)调整数值. 短按 (A) 确认并进入下一项设置。
用户配置设置设置以下个人信息有利于 Mio ALPHA测得的数据更加精准有效∙日期(date)和时间(time)∙英制(imperial)或公制(metric),一般选公制。
∙体重(weight)和身高(height)∙性别(gender)∙出生年( year of birth)∙最大心率(Maximum heart rate),会根据你输入的个人信息自动生成,也可以手动输入(220-年龄)在手表上直接设置在时间模式下,长按 (A) 进入个人信息设置。
短按 (B) 调整数值和设置内容. 短按 (A) 确认并进入下一项设置。
长按(A),退出个人信息设置。
充电1.警告:充电时,请确保充电器的针脚是干燥的。
2.将USB 接口一端连到电脑。
3.将Mio ALPHA后盖的充电触点和充电器针脚如下图排成一行。
充电针脚的磁性有利于充电器和Mio ALPHA吸附到一起。
充电时,屏幕显示动态的电池充电标志充满后,屏幕显示FULL,然后满格标志背光灯连续敲击屏幕2次,开启背光灯。
运动模式Mio ALPHA 运动模式下的功能:∙连续心率测量∙心率报警∙秒表、倒计时和计圈∙配速、计步和卡路里等Mio ALPHA 的佩戴为了保证数据精准度,请按照一下方式佩戴:∙将Mio ALPHA 紧贴你的小臂, 离腕骨 1-3 英寸 (3-8 cm) 处. 表后盖的光电传感器需要紧贴你的皮肤∙如果你手腕比较细,请将ALPHA 带高点∙注意:为了保证ALPHA测量的精准度,建议在测心率前,做几分钟热身运动,特别是经常手脚冰凉或血液循环不佳的用户。
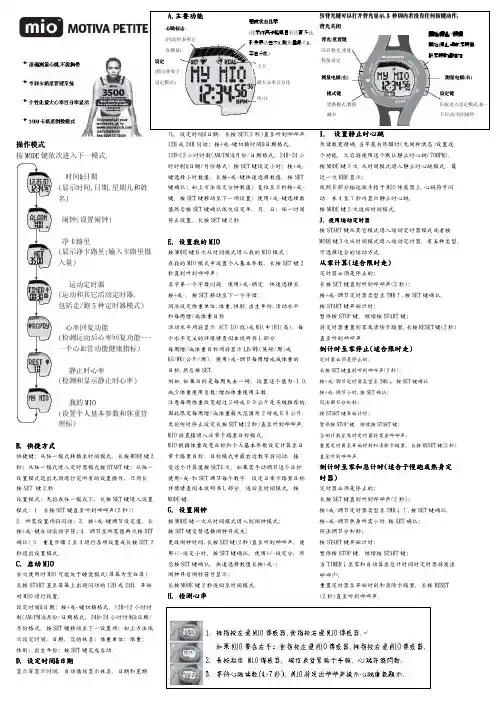
操作模式按MODE 键依次进入下一模式.时间&日期(显示时间,日期,星期几和姓名)闹钟(设置闹钟)凈卡路里(显示净卡路里;输入卡路里摄入量)运动定时器(运动和其它活动定时器,包括走/跑5种定时器模式)心率回复功能(检测运动后心率回复功能---一个心血管功能健康指标)静止时心率(检测和显示静止时心率)我的MIO(设置个人基本参数和体重管理标)B. 快捷方式快捷方式快捷键: 从任一模式转换至时间模式, 长按MODE 键2秒; 从任一模式进入定时器模式按START 键; 从任一设置模式退出无须进行完所有的设置操作, 只须长按SET 键2秒设置模式: 无论在任一模式下, 长按SET 键进入设置模式: 1. 长按SET 键直至听到哔哔声(2秒); 2. 所需设置项将闪动; 3. 按+或-键调节设定值, 长按+或-键自动滚动字符; 4. 调节至所需值再次按SET 确认; 5. 重复步骤2至4进行各项设置或长按SET 2秒退出设置模式.C. 启动MIO MIO首次使用时MIO 可能处于睡觉模式(屏幕为空白屏) 长按START 直至屏幕上出现闪动的12H 或24H, 开始对MIO 进行设置.设定时间&日期: 按+或-键切换格式, 12H=12小时时制(AM/PM)&月份/日期格式, 24H=24小时时制&日期/月份格式, 按SET 键移动至下一设置项; 如上方法依次设定时间, 日期, 您的姓名; 体重单位; 体重; 性别; 出生年份; 按SET 键完成启动.D. 设定时间设定时间&&日期日期显示屏显示时间, 自动循环显示姓名, 日期和星期A.A.主要功能主要功能主要功能几. 设定时间&日期: 长按SET(2秒)直至听到哔哔声. 12H 或24H 闪动; 按+或-键切换时间&日期格式, 12H=12小时时制(AM/PM)&月份/日期格式, 24H=24小时时制&日期/月份格式; 按SET 键设定小时; 按+或- 键选择小时数值, 长按+或-键快速选择数值, 按SET 键确认; 如上方法设定分钟数值; 复位至0秒按+或-键. 按SET 键移动至下一项设置; 使用+或-键选择数值然后按SET 键确认依次设定年, 月, 日; 任一时间 停止设置, 长按SET 键2秒.E. 设置我的MIO MIO按MODE 键6次从时间模式进入我的MIO 模式; 在我的MIO 模式中设置个人基本参数, 长按SET 键2秒直到听到哔哔声;名字第一个字母闪现. 使用+或-调定. 快速选择长按+或-. 按SET 移动至下一个字母. 同法设定体重单位,体重,性别,出生年份,活动水平和每周增/减体重目标 活动水平项将显示 ACT LO(低)或MI(中)HI(高). 每个水平定义的详情请查阅本说明书L 部分. 每周增/减体重目标项将显示LB/WK(英磅/周)或KG/WK(公斤/周). 使用+或-调节每周增或减体重的目标.然后按SET. 例如,如果目标是每周失去一磅, 设置这个值为-1.0. 减少体重使用负数;增加体重使用正数. 注意每周体重改变超过2磅或0.9公斤是不被推荐的, 因此限定每周增/减体重最大范围为2磅或0.9公斤. 无论何时停止设定长按SET 键(2秒)直至听到哔哔声. MIO 将直接进入日常卡路里目标模式.MIO 根据体重改变目标和个人基本参数设定计算出日常卡路里目标. 目标模式中最右边数字将闪动. 接受这个计算值按SET4次. 如果需手动调节这个目标使用+或-和SET 调节每个数字. 设定日常卡路里目标详情请查阅本说明书L 部分. 返回至时间模式, 按MODE 键.G. G. 设置闹钟设置闹钟设置闹钟按MODE 键一次从时间模式进入到闹钟模式; 按SET 键交替选换闹钟开或关;更改闹钟时间,长按SET 键(2秒)直至听到哔哔声, 使用+/-设定小时, 按SET 键确认, 使用+/-设定分, 然后按SET 键确认. 快速选择数值长按+或-; 闹钟开启闹铃符号显示;长按MODE 键2秒返回至时间模式.H. H. 检测心率检测心率检测心率按背光键可以打开背光显示,5秒钏内若没有任何按键动作,背光关闭I. 设置静止时心跳设置静止时心跳为读数更精确,当早晨自然醒时(无闹钟状态)设置这个功能. 之后将使用这个默认静止时心跳(70BPM). 按MODE 键5次 从时间模式进入静止时心跳模式. 最近一次RHR 显示;依照H 部分描述放手指于MIO 传感器上.心跳符号闪 动. 在4至7秒内显示静止时心跳. 按MODE 键2次返回时间模式. J. J. 使用运动定时器使用运动定时器使用运动定时器按START 键从其它模式进入运动定时器模式或者按MODE 键3次从时间模式进入运动定时器. 有五种类型. 可选择适合的运动方式.从零计算从零计算((适合限时走适合限时走))定时器必须是停止的;长按SET 键直到听到哔哔声(2秒);按+或-调节定时器类型至TMR↑.按SET 键确认. 按START 键开始计时;暂停按STOP 键. 继续按START 键;将定时器重置到零及清除卡路里,长按RESET 键(2秒)直至听到哔哔声.倒计时至零停止计时至零停止((适合限时走适合限时走))定时器必须是停止的;长按SET 键直到听到哔哔声(2秒);按+或-调节定时器类型至TMR↓.按SET 键确认. 按+或-调节小时.按SET 确认; 同法调节分和秒; 按START 键开始计时;暂停按STOP 键. 继续按START 键; 当倒计数至零时定时器将发出哔哔声;重置定时器至开始时刻和清除卡路里, 长按RESET 键(2秒)直至听到哔哔声.倒计时至零和总计时倒计时至零和总计时((适合于慢跑或热身定时器时器))定时器必须是停止的;长按SET 键直到听到哔哔声(2秒);按+或-调节定时器类型至TMR↓↑.按SET 键确认. 按+或-调节热身所需小时.按SET 确认; 同法调节分和秒; 按START 键开始计时;暂停按STOP 键. 继续按START 键;当TIMER↓至零和自动算出总计时间时定时器将发出哔哔声;重置定时器至开始时刻和清除卡路里, 长按RESET (2秒)直至听到哔哔声.最大心率百分比大卡完成状态显示完成状态显示(显示你离卡路里目标还有多远,形象表达每次心跳测量最大心率百分比)心跳标志 (闪动时表明正在测量) 设定(指示你处于 设定模式)次/分開始/停止/+按鍵開始,停止,運動定時器,設定時數值增加背光/重置键开启背光,重置数值设定 测量电极(左)测量电极(右) 模式键更换模式,数值减少设定键长按进入设定模式,按一下启动/关闭闹铃迈欧(MIO)心率表使用说明书使用走使用走//跑(两者间隔时间两者间隔时间))定时器定时器((适合于训练训练))走/跑的程序请查阅您的MIOSENSE 指南, 设置跑的间隔时间,其次是走的. 定时器必须是停止的;长按SET(2秒)直至听到哔哔声;按+或-调节定时器类型至TIMER↓↓.按SET 键确认.按+或-调节TIMER1(跑)所需小时数值.按SET 确认; 同法调节TIMER1分和秒;按+或-调节TIMER2(走)所需小时数值.按SET 确认; 同法调节TIMER2分和秒;按+或-调节走和跑重复的次数. 按SET 键确认; 开始走/跑计时, 按START 键开始跑;当第一个间隔时间倒计数为零时定时器发出哔哔声;走至第二个间隔时间倒计数为零时MIO 发出哔哔声; 如此反复直至完成所设重复次数;任一时间暂停按STOP 键, 继续按START 键; 重置定时器至开始时刻和清除卡路里, 长按RESET 键(2秒)直至听到哔哔声.倒计时至零和重复训练倒计时至零和重复训练((适合训练适合训练))定时器必须是停止的;长按SET(2秒)直至听到哔哔声;按+或-调节定时器类型至TMR REP.按SET 键确认. 按+或-调节所需小时数值.按SET 确认; 同法调节分和秒;按+或-调节重复的次数. 按SET 键确认; 按START 键开始计时;暂停按STOP 键. 继续按START 键;当倒计为零时定时器发出哔哔声, 然后再次倒计时直到完成所设重复的次数; 按STOP 停止定时器;重置定时器至开始时刻和清除卡路里, 长按RESET 键(2秒)直至听到哔哔声.清除累积的卡路里消耗量清除累积的卡路里消耗量定时器必须是停止的;在EXERCISE TIME 模式按SET 键多次直至看到屏幕显示如下, 长按RESET 直至听到哔哔声. 如果不删除,卡路里会自动累加。

智能手环的使用方法智能手环作为一种智能穿戴设备,已经成为了现代人们日常生活中不可或缺的一部分。
它不仅可以记录我们的运动数据,还能监测我们的健康状况,甚至可以作为手机的延伸,提供来电、短信等提醒功能。
因此,掌握智能手环的使用方法对于我们充分发挥其功能至关重要。
下面,我将为大家详细介绍智能手环的使用方法。
首先,我们需要正确佩戴智能手环。
通常来说,智能手环应该佩戴在手腕的正中位置,紧贴皮肤,不应过紧或过松。
佩戴时应留意手环的传感器和显示屏是否与皮肤接触良好,以确保数据的准确记录和显示。
其次,我们需要熟悉智能手环的操作方法。
大多数智能手环都配备了一个触摸屏或按键,通过它们我们可以进行各种操作。
比如,轻触屏幕或按键可以切换不同的功能界面,滑动屏幕可以查看更多的信息,长按按键可以进行特定的设置。
在使用时,我们应该根据手环的说明书,熟悉各种操作方法,以便更好地使用智能手环。
接着,我们需要关注智能手环的充电和维护。
智能手环通常都需要定期充电,一般来说,每次充满电后的续航时间可以达到数天甚至数周。
在充电时,我们应该使用配套的充电器,并注意保持充电接口的清洁,避免灰尘或污垢进入影响充电效果。
另外,我们还需要注意防水和防汗,避免长时间浸泡在水中或暴露在高温环境下,以免损坏手环。
最后,我们需要充分利用智能手环提供的各种功能。
除了基本的计步、睡眠监测功能外,智能手环还可以提供心率监测、血压监测、运动轨迹记录等高级功能。
我们可以根据自己的需求,设置手环的各种功能,并通过手机APP进行数据同步和分析。
这样可以更好地了解自己的健康状况和运动情况,有针对性地进行健康管理和运动锻炼。
总的来说,掌握智能手环的使用方法对我们充分发挥其功能至关重要。
通过正确佩戴、熟悉操作、注意充电和维护、充分利用功能等一系列操作,我们可以更好地享受智能手环带来的便利和乐趣。
希望以上内容对大家有所帮助,谢谢阅读!。
智能健身手环功能使用手册随着人们健康意识的不断提高,智能健身手环已经成为许多人日常生活中的必备装备。
它不仅能够记录运动数据,还能监测身体健康状况,为我们的健身和生活提供了极大的便利。
但对于初次使用的人来说,可能会对其丰富的功能感到有些不知所措。
接下来,就让我们详细了解一下智能健身手环的各种功能以及如何正确使用它们。
一、外观与佩戴智能健身手环通常由表带和主体组成,主体上配备有显示屏和按键。
表带一般采用柔软舒适的材质,如硅胶或TPU,有多种尺寸可供选择,以确保佩戴的舒适性和稳固性。
在佩戴时,将手环主体的屏幕朝上,穿过手腕,调整表带至合适的松紧度,既不能过紧影响血液循环,也不能过松导致容易脱落。
二、开机与连接1、开机长按手环上的按键,直到屏幕亮起,显示出品牌标志或启动画面,即为开机成功。
2、连接手机首先,在手机应用商店中下载对应品牌的手环 APP,如“_____手环”。
打开 APP 后,根据提示注册或登录账号。
然后,开启手机的蓝牙功能,在 APP 中搜索附近的手环设备,点击连接。
连接成功后,手环和手机将能够实现数据同步。
三、基本功能1、运动记录这是智能健身手环的核心功能之一。
它可以自动识别多种运动模式,如跑步、步行、骑行、游泳等,并准确记录运动的时间、距离、速度、消耗的卡路里等数据。
在开始运动前,确保在手环或手机 APP 中选择正确的运动模式,以获得更精确的记录。
2、睡眠监测手环能够通过内置的传感器监测您的睡眠状况,包括入睡时间、醒来时间、浅睡时长、深睡时长等。
在晚上睡觉时,正常佩戴手环即可,它会自动进行监测。
第二天早上,您可以在手机 APP 中查看详细的睡眠报告,并根据分析结果调整睡眠习惯。
3、心率监测实时监测心率是了解身体健康状况的重要手段。
智能健身手环可以24 小时不间断地监测您的心率变化,并在心率异常时发出提醒。
一些手环还支持手动测量心率,只需在手环界面上选择心率测量功能,等待几秒钟即可获得结果。
User ManualWelcomeThank you for purchasing a MioCARE product. This Quick Start Guide guides you through the successful setup of your device and familiarises you with the basic skills of using the device.Getting to know your device1. POWER Button2. Barcode Reader*3. LED Indicators - Left LED: Battery status (Green /Amber /Red ) - Right LED: Barcode reader status* (Green /Red ) & System notification4. Light Sensor5. Front Camera6. Microphone7. Programmable Application Buttons A: Camera B: Browser C: Settings D: Barcode reader*8. USB Ports A: USB Host port B: Micro-USB port9. Headphone Socket 10. Power Jack 11. Volume Buttons 12. Flash 13. Rear Camera 14. RESET Button 15. Speakers 16. Battery Cover L ches at 17. Dock Connector* For selected models only .Getting startedCharging the batteryWhen charging the battery for the very first time, you should charge it for at least 8 hours (using the AC charger) with your device turned off.To charge the battery, plug the supplied power cable into the Power jack () on the left of the device and the mains power charger into a power socket* (). While charging, the LED indicator on the device lights up to indicate the battery charge status: Green – battery full; Amber – battery charging; Red – battery fault.* The plug type varies with the region of your purchase.CAUTION! For optimal performance of the lithium battery, note the following:•Do not charge the battery where the temperature is high (e.g. in direct sunlight). The batterywill stop charging when the ambient temperature is less than -3ºC (26.6ºF) or more than55ºC (131ºF). The device will operate when the ambient temperature is between -10ºC (14ºF)and 50ºC (122ºF).•Recharge the battery when it is nearly discharged. When recharging, make sure that thebattery is fully charged. Doing so can extend the battery life.•If the device has not been used for over a month or if you find the discharge/recharge timehas been shortened, be sure to fully discharge the battery first before recharging it. You arealso advised to fully discharge and recharge the battery once every 1~2 months.• Failure to follow the battery usage instructions can cause damage to your device, battery andeven bodily injury or property damage and will void the warranty.Replacing the batteryThe device contains a replaceable LI-ION polymer battery. Follow the instructions below to replace the battery:1. Open the battery cover and remove the battery.Note: When you remove the battery cover, the system will automatically enter Sleep mode.The device includes a hot-swap feature allowing the battery to be changed in Sleep mode. 2. Install the battery.3. Replace the battery cover and turn both latches to the locked position to ensure the batterycover is securely closed.Installing the memory card and SAM card1. Open the battery cover and remove the battery.2.Follow the instruction below to install the cards (not supplied):a. SAM (Secure Access Module) card*b. MicroSD card* For selected models only.3. Replace the battery.4. Replace the battery cover and turn both latches to the locked position to ensure the battery cover is securely closed. Note:• The device supports up to 32GB MicroSD memory cards. However, it does not guarantee the device’s compatibility with memory cards from all manufacturers.• While installing a card, do not apply pressure to the centre of the card. Do not use your finger or any metal objects to touch and scratch the contact part of the card.• To remove a card, gently push the top edge of the card inwards to release it and then pull it out of the slot.Connecting your device to a computerConnect the Micro-USB end of the USB cable to your device () and the other end to a USB port in your computer (). Once connected, you will be able to transfer the files between your computer and device easily through MTP*.* MTP (Media Transfer Protocol) allows media files (including music, pictures, and other files) to be transferred automatically to and from portable devices. However, for Windows XP users, it is required to install Windows XP Service Pack 3 and Windows Media Player 10 (or higher). Connecting the USB deviceThe USB Host port of the device allows you to connect an external USB storage (e.g. a USB flash drive) as the additional storage for the system.Operating basicsUsing the POWER button•To turn on the deviceNote: Before turning on the device, make sure that the battery is installed and the batterycover is closed securely. The device will not power on if the battery cover is missing or open.Briefly press the POWER button to turn the device on. After the boot up screen, the Homescreen will be displayed and the device is in Lock mode by default.Drag the Lock icon (>) to unlock the system. You can now use your device.•Sleep modeYour device will automatically enter Sleep mode after 1 minute (by default) of inactivity. Youcan also manually switch to Sleep mode by pressing the POWER button briefly.To resume from Sleep mode, briefly press the POWER button.Note: When the battery power is less than 5%, the system will not resume from Sleepmode after you press the POWER button. Please connect the power cable to charge thebattery.•Aeroplane modeWhen you are in an aeroplane or in the area where the use of wireless radio is prohibited, enable Aeroplane mode. Many of your devices applications will continue to work (e.g. playing games or listening music) but all wireless radios, including wireless network and Bluetooth, on the device are turned off – it cannot send or receive data.To enter Aeroplane mode, press and hold the POWER button and select Aeroplane mode from the option menu.•To restart / turn off the devicePress and hold the POWER button and select Restart / Power off from the option menu.•To shut down the device manuallyPress and hold the POWER button for 8 seconds.Navigating on the screenTo operate your device, touch the screen with your fingertip*. You can perform the following actions:•Tap: Touch the screen once with your fingertip to open items or select onscreen buttons or options.•Tap and hold: Tap and hold on the desired item to open the pop-up menu that contains the available options for the item.•Drag: Tap and hold on the item and then move it to the target position without releasing your fingertip.•Slide: Drag to the left/right (or the top/bottom) to switch to the next/previous item on the list.•Multi-touch gestures: Move your fingertips apart or together on the screen to zoom in or out while viewing a picture or a web page.•Rotating the screen: For most applications, you can automatically change the screen orientation (from portrait to landscape, and vise versa) by turning the device sideways.* Instead of using your fingertip, the active digitizer stylus (optional) lets you enjoy the freedom to write, draw and navigate on your device without leaving fingerprints or smudges.Home screenThe Home screen is your starting place for tasks, providing quick access to frequently used applications and settings.Tip: To display the Home screen, tap the HOME button at any time.Customising your deviceYou can customise the device through the Settings menu, including personalising the Home screen, changing the display and sound settings, configuring the connection settings, and more.From the desktop, do one of the following to access the Settings menu:•Tap the All Applications button () > Settings.•Tap from the Quick Launcher.For more informationSupportFor initial support, contact your IT department or your local authorised dealer.Occasionally, MiTAC may offer free system updates to improve user experience. Please regularly check the website / for more information.IP67The IEC 60529/IP67 is a European system of test specification standards for classifying the degree of protection provided by the enclosures of electrical equipment. An IP67 designation means that the unit is totally protected against dust, and withstands immersion in one meter (approx 3ft) of still water for up to 30 minutes. MiTAC guarantees this grade provided the battery door and all jack covers are properly and securely closed. This device is not IPX8 grade; water-pressure such aswashing the unit with running water may cause damage to the unit and voids warranty.Federal Communication Commission Interference StatementThis device complies with Part 15 of the FCC Rules. Operation is subject to the following twoconditions: (1) This device may not cause harmful interference, and (2) this device must accept any interference received, including interference that may cause undesired operation.This equipment has been tested and found to comply with the limits for a Class B digital device, pursuant to Part 15 of the FCC Rules. These limits are designed to provide reasonable protection against harmful interference in a residential installation. This equipment generates, uses and can radiate radio frequency energy and, if not installed and used in accordance with the instructions, may cause harmful interference to radio communications. However, there is no guarantee thatinterference will not occur in a particular installation. If this equipment does cause harmfulinterference to radio or television reception, which can be determined by turning the equipment off and on, the user is encouraged to try to correct the interference by one of the following measures: •Reorient or relocate the receiving antenna.•Increase the separation between the equipment and receiver.•Connect the equipment into an outlet on a circuit different from that to which the receiver is connected.•Consult the dealer or an experienced radio/TV technician for help.FCC Caution: Any changes or modifications not expressly approved by the party responsible for compliance could void the user's authority to operate this equipment.This transmitter must not be co-located or operating in conjunction with any other antenna or transmitter.Note: The country code selection is for non-US model only and is not available to all US model. Per FCC regulation, all WiFi product marketed in US must fixed to US operation channels only. Radiation Exposure Statement:This device meets the government’s requirements for exposure to radio waves.This device is designed and manufactured not to exceed the emission limits for exposure to radio frequency (RF) energy set by the Federal Communications Commission of the U.S. Government. The exposure standard for wireless device employs a unit of measurement known as the Specific Absorption Rate, or SAR. The SAR limit set by the FCC is 1.6W/kg. *Tests for SAR are conducted using standard operating positions accepted by the FCC with the device transmitting at its highest certified power level in all tested frequency bands.IC Regulations:This device complies with Industry Canada’s licence-exempt RSSs. Operation is subject to the following two conditions:(1) This device may not cause interference; and(2) This device must accept any interference, including interference that may cause undesired operation of the device.Le présent appareil est conforme aux CNR d'Industrie Canada applicables aux appareils radio exempts de licence. L'exploitation est autorisée aux deux conditions suivantes:(1) l'appareil ne doit pas produire de brouillage, et(2) l'utilisateur de l'appareil doit accepter tout brouillage radioélectrique subi, même si le brouillage est susceptible d'en compromettre le fonctionnement."CAN ICES-3(B)/NMB-3(B)The device could automatically discontinue transmission in case of absence of information to transmit, or operational failure. Note that this is not intended to prohibit transmission of control or signaling information or the use of repetitive codes where required by the technology.- The device for operation in the band 5150–5250 MHz is only for indoor use to reduce the potentialfor harmful interference to co-channel mobile satellite systems;High-power radars are allocated as primary users (i.e. priority users) of the bands 5250-5350 MHz and 5650-5850 MHz and that these radars could cause interference and/or damage to LE-LAN devices.Regulatory information (CE)For regulatory identification purposes, MioCARE L130/L135 is assigned a model number of N450. Products with the CE marking comply with Radio & Telecommunication Terminal Equipment Directive (R&TTE) (1999/5/EC), the Electromagnetic Compatibility Directive (2004/108/EC) and the Low Voltage Directive (2006/95/EC) - issued by the Commission of the European Community.Compliance with these directives implies conformity to the following European Standards:EN 301 489-1: Electromagnetic compatibility and Radio spectrum Matters (ERM); ElectroMagnetic Compatibility (EMC) standard for radio equipment and services; Part 1: Common technical requirementsEN 301 489-3: Electromagnetic compatibility and Radio spectrum Matters (ERM); ElectroMagnetic Compatibility (EMC) standard for radio equipment and services; Part 3: Specific conditions for Short-Range Devices (SRD) operating on frequencies between 9 kHz and 246 GHzEN 301 489-17: Electromagnetic compatibility and Radio spectrum Matters (ERM); ElectroMagnetic Compatibility (EMC) standard for radio equipment; Part 17: Specific conditions for Broadband Data EN 300 328: Electromagnetic compatibility and Radio spectrum Matters (ERM); Wideband transmission systems; Data transmission equipment operating in the 2,4 GHz ISM band andusing wide bandEN301893:Broadband Radio Access Networks (BRAN); 5 GHz high performance RLAN; Harmonized EN covering the essential requirements of article 3.2 of the R&TTE DirectiveEN 300 440: Electromagnetic compatibility and Radio spectrum Matters (ERM); Short range devices; Radio equipment to be used in the 1 GHz to 40 GHz frequency range; Part 2: Harmonized EN covering the essential requirements of article 3.2 of the R&TTE DirectiveEN 302 291-1: Electromagnetic compatibility and Radio spectrum Matters (ERM); Short Range Devices (SRD); Close Range Inductive Data Communication equipment operating at 13,56 MHz; Part 1: Technical characteristics and test methodsEN 302 291-2: Electromagnetic compatibility and Radio spectrum Matters (ERM); Short Range Devices (SRD); Close Range Inductive Data Communication equipment operating at 13,56 MHz; Part 2: Harmonised EN under article 3.2 of the R&TTE DirectiveEN 50566: Product standard to demonstrate compliance of radio frequency fields from handheld and body- mounted wireless communication devices used by the general public (30 MHz — 6 GHz) EN 62209-2: Human exposure to radio frequency fields from handheld and bodymounted wireless communication devices — Human models, instrumentation, and proceduresEN 62479: Assessment of the compliance of low power electronic and electrical equipment with the basic restrictions related to human exposure to electromagnetic fields (10 MHz to 300 GHz)EN 60601: Medical electrical equipment —Part 1-2: General requirements for basic safety and essential performance — Collateral standard: Electromagnetic compatibility — Requirements and testsIEC 60950-1/A1: 2009: Product SafetyEN 50332-2: Sound system equipment: Headphones and earphones associated with portable audio equipment — Maximum sound pressure level measurement methodology and limit considerations —Part 2: Matching of sets with headphones if either or both are offered separatelyEN 55022: Information technology equipment — Radio disturbance characteristics — Limits and methods of measurementEN 55024: Information technology equipment — Immunity characteristics — Limits and methods of measurementEN 61000-3-2: Limits for harmonic current emissionsEN 61000-3-3: Limitation of voltage fluctuation and flicker in low-voltage supply systemThis device have been tested to comply with the Sound Pressure Level requirement laid down in the applicable EN 50332-2 standards. Permanent hearing loss may occur if earphones or headphones are used at high volume for prolonged periods of time.Warning statement:To prevent possible hearing damage, do not listen at high volume levels for longperiods.The manufacturer cannot be held responsible for modifications made by the user and the consequences thereof, which may alter the conformity of the product with the CE Marking.Declaration of ConformityHereby, MiTAC Europe Ltd declares that N450 is in compliance with the essential requirements and other relevant provisions of Directive 1999/5/EC.BluetoothSAR informationThe radio wave exposure guidelines employ a unit of measurement known as the Specific Absorption Rate (SAR), which adopts the limit of 2 W/kg averaged over ten (10) gram of tissue. Your device has been designed to comply with applicable safety requirements for exposure to radio waves.SAR = 1.5 W/kgWEEEThis product must not be disposed of as normal household waste, in accordance with the EU directive for waste electrical and electronic equipment (WEEE - 2002/96/EC). Instead, it should be disposed of by returning it to the point of sale, or to a municipal recycling collection point.。
苹果手机4S 及以上,系统达到7.0的可以在APP里搜索下载miogoIPAD 版可以简单设置,完善中安卓手机需要系统4.3级以上,蓝牙4.0 。
软件可以找客服索取。
第一次使用时,会进入个人信息和配置文件设置。
第一次配对成功后,以后,每次打开手环或手表,及软件后,他们会自动连接。
连接配对前,要保证心率手环或手表在测心率然后,打开手机的蓝牙最后,打开软件苹果搜索结果如下图。
点击下载即可。
第一次打开软件出现如图所示:SET UP PROFILE: 点击开始设置个人信息 CONNECT MIO DEVICE: 连接迈欧手表/手环FIRST WORKOUT:第一次运动SET UP PROFILE: 点击开始设置个人信息 个人信息包括:Account Info(账户):名(First name ),姓(Last name ), 邮箱(Email)Display Units(单位制): Metric(公制,中国用这个) 和 Imperial(英制)Height: 身高 Weight:体重 Birthday:生日 Gender: 性别个人信息设置好后,进入设备搜索连接。
列表中会出现搜到的设备,点击连接自己的设备即可。
个人信息设置好后,进入设备搜索连接。
列表中会出现搜到的设备,点击连接自己的设备即可。
个人信息设置好后,进入设备搜索连接。
列表中会出现搜到的设备,点击连接自己的设备即可。
和手机连接后,心率数字会显示在手机上可以在下面对手环/手表进行设置MODE(心率区间设置),点击即可进入心率区间上下限设置1-zone :报警心率模式5-zone:训练心率模式Max Heart Rate: 最大心率(会根据个人信息自动生成,也可以手动设置)Customize Workout Screen (个性化设置显示屏显):这里面可以选择自己想要在手环/手表上可以查看的运动数据Daily Goal(每日目标):每天走多少步(STEP Walked),消耗多少卡路里(Active cals Burned)、或者运动距离(Distance)Zone LED Flash Pattern: 心率报警指示灯闪灯时间(1秒,默认2秒或一直亮(always on))ARM Position:左手或右手(可以根据佩戴的手腕可以设置屏幕显示的方向)Vebration alert: 心率震动报警开(ON)/关(OFF)Screen lock: 屏幕锁(锁了之后,会一直显示最后一次的屏幕界面。
智能运动手环基本功能:来电提醒、计步器、每日行走里程数计算、每日消耗卡路里计算、睡眠跟踪、相机遥控器、防丢提醒部件介绍:主机OLED显示屏硅胶腕带腕带上的智能按钮腕带扣腕带孔基本参数:Charging type:USB充电接口Rechargeable battery:60mA可充电电池Data transfer:蓝牙4.0 LE数据传送Water-proof:防水等级IP57Display type:OLED显示屏手机配对首次配对:1.扫描外包装盒侧面的二维码,进入APP Store,Google Play,或HiMarket,在App Store(应用商城)或Google Play(谷歌市场)下载“Body Sensor”应用软件;2.长按腕带上的智能按钮开机,开启手机或平板电脑蓝牙设备,将智能手环靠近手机或平板电脑;3.智能手环显示屏上会出现一串四位数字;4.打开“Body Sensor”应用软件;5.选择搜索出来的“power watch”的设备名;6.手机上显示的数字与智能手环上显示的四位数字需一致;7.重命名您的智能手环,并设置个人信息;8.成功配对后,进入应用主页,同步智能手环;9.“Body Sensor”分为主页、活动、睡眠、设置四个页面【主页和活动页面主要显示追踪到的运动步数、运动距离、燃烧的卡路里、运动目标完成度等数据;睡眠页面主要显示睡眠时间及睡眠质量;设置页面包含个性设置、电话提示、智能按钮功能设置、设备提醒、其他设置几项。
】正确佩戴智能手环:将主机插入腕带槽中,佩戴智能手环时,请扣紧腕带扣,否则手环很容易脱落。
特性:来电显示提醒功能:1.Android OS操作系统的手机或平板:智能手环软件连接同步显示来电号码;2.IOS操作系统的手机或平板:智能手环显示屏上仅显示“来电”。
防丢功能:当智能手环与配对手机相隔超过一定距离,智能手环会有提醒功能。
手表功能:显示时间其他功能包括信息提示,手机搜寻相机遥控,视频遥控闹钟提醒全日追踪:运动步数、运动距离、燃烧的卡路里睡眠追踪:睡眠时间、睡眠质量运动提醒:每30分钟提醒用户起身运动分享健康数据:Facebook、新浪微博平台任务提醒:最多设置3个任务,振动或显示提醒智能按钮的功能:1. 相机遥控:在“Body Sensor”设置界面选择智能按钮的该功能后,进入手机拍照界面,双击腕带上的智能按钮拍照;2. 摄像遥控:选择该功能后,进入手机摄像界面,双击腕带上的智能按钮开始摄像,双击按钮终止并保存摄像;3. 手机搜寻:选择该功能后,双击智能按钮,手机会自动响铃,由此找到手机,并关闭手机响铃。
Owner’s manualIntroductionThank you for choosing MAGICO.Your Mini loudspeakers are precision transducers incorporating many innovative techniques unique to MAGICO and are capable of reproducing recorded sound to the highest standards. So that they may perform at their best, it is essential to take time and care with the installation process. Please read this manual fully before unpacking and installing the product. MAGICO maintains a network of dedicated distributors who will be able to help you should you have any problems your dealer cannot resolve.UnpackingThe product is heavy and may require more than one person to unpack and position it safely. We recommend you wear the provided gloves to avoid finger printing. Observe the normal rules of good posture when lifting heavy objects to avoid strain. Remove any rings and bracelets to avoid damage to the surfaces of the product. We suggest that you unpack and properly position the stand first.•Transport the speaker in its packing box close to the intended position in the listening room.•The lids are held in place with 4 metal clips and 4 wood screws. Use a screwdriver or a hammer claw to pry the clips out and unscrew the 4 screws.•Remove the top lid of the crate.•Check in the carton for:o 6 ball bearing.o Pair of gloveso Cleaning cloth•Carefully lift the enclosures, grabbing its sides, out of the crate. Avoid grabbing, touching, or pushing against the front of the speakers. The driversare exposed and could sustain damage if directly touched or handled. Wesuggest you retain the packing for future use.MAGICO has provided coupling solution for both hard and soft floors. You can also experiment using no feet at all. Please choose the appropriate coupler and make sure the stands are secure in their place before mounting the speakers on them.Speaker and stand interfacePlace the 3 ball bearings in the concave circular recesses on the top of the stand. Position the speaker’s bottom recesses directly on to the ball bearings.Mini handlingPlease avoid pushing or pulling on the Mini top. Always slide or lift the stand if needed.PositioningFinding the optimum position in the room may involve a certain amount of experimentation, but as an initial guide:•Position the speakers and the centre of the listening area approximately at the corners of an equilateral triangle.•Keep the speakers at least 2-3m apart to maintain left-right separation.ConnectionsAll connections should be made with all electronic equipment (amplifiers, preamplifiers) turned off.There is one pair of terminals at the back of the speaker. The terminals are insulated to prevent any likelihood of electrical shock, even when the speakers are used with the highest powered amplifiers, and accept a variety of cable termination to suit most applications. DO NOT use tools to tighten the binding posts.Break-inA loudspeaker is a mechanical device and as such requires an extended initial period of normal use during which a noticeable improvement in sound quality will occur.Do not attempt to accelerate the break-in process by playing sine waves, tone sweeps or other generated signals.CareFor wood enclosures, occasionally use a soft dry cloth, to wipe off dust.For aluminum panels, use lint free soft cloth (provided), dampened with warm slightly soapy, water only (a small drop of dishes soap will do).DO NOT use cleaners that contain ammonia, strong solvents, or abrasive materials. Use of these materials can degrade, scratch, or DESTROY the finish.Specifications:Description2-way sealed enclosure with matching stand monitor Frequency response (-/+ 2db) 40Hz – 40KHz (in room)Efficiency (2.8V/1m)87dbNominal impedance 4Crossover frequency2KHzPower handling<250WDimensions (HxWxD)Mini 16”x 12” x 17” / Stand 28” 15” 19”Weight Mini 70lbs / stand 110lbsLimited WarrantyDear MAGICO Purchaser,This product has been designed and manufactured to the highest quality standards. However, if something does go wrong with this product, MAGICO and its national distributors warrant the replacement of defective parts including labor (exclusions may apply) in any country served by an official MAGICO distributor. This limited warranty is valid for a period of 3 years from the date of purchase or two years for electronics including amplified loudspeakers.Terms and Conditions1.The warranty is limited to the repair of the equipment. Neither transportation,shipping, nor any other costs, nor any risk for removal, transportation andinstallation of products is covered by this warranty.2.This warranty is only valid for the original owner. It is not transferable.3.This warranty will not be applicable in cases other than defects in materialsand/or workmanship at the time of purchase and will not be applicable:•For damages caused by incorrect installation, connection or packing,•For damages caused by any use other than correct use described in the user manual, negligence, modifications, or use of parts that are not madeor authorized by MAGICO,•For damages caused by faulty or unsuitable ancillary equipment,•For damages caused by accidents, lightning, water, fire heat, extreme weather condition, war, public disturbances or any other cause beyondthe reasonable control of MAGICO and its appointed distributors,•For products whose serial number has been altered, deleted, removed or made illegible,•If repairs or modifications have been executed by an unauthorized person.4.This guarantee complements any national/regional law obligations of dealersor national distributors and does not affect your statutory rights as acustomer.5.Unauthorized dismantling of this product will render this warranty void.6.MAGICO strives to manufacture the very finest possible equipment, andtherefore reserves the right to make changes in design and improvementsupon its products, without necessarily assuming an obligation to retrofit such changes to it’s previously manufactured models.。
• ••••••••••• • STRIDED.••.EASYFASTACCURATE健步之星 使用说明书→心电原理,无需胸带→计步模式记录步数和距离→卡路里消耗本说明书可在下载•时间步数&目标心率目标闹钟计时器倒计时双时显示显示时间、星期几、日期显示步数&目标显示心率上限值和下限值测量、显示静息心率设定每日闹钟设定整点报时显示计时时间显示和设置倒计时时间显示另一时间按 键切换到下一个计步模式显示运动中的平均心率值显示运动时间和消耗卡路里显示运动距离显示当前运动速度显示运动步数和步数目标值快速提示捷径从任一功能开启的模式下(如开启倒计时),按MODE键1次即可返回到时间模式在时间模式下按 键,步数和步数目标显示3秒钟在设置的过程中,长按SET键2秒即可退出设置设置模式在任意模式下,长按SET键进入设置:1.长按SET键2秒,设置的信息闪动2.按+/-键调整数值,长按+/-键可快速调整3.数值调整完成后,按SET键确定4.长按SET键退出设置E.设定时间和日期1.在时间模式下长按SET键2秒直到秒钟闪动,按RESET键秒钟数值归零;或者按SET键分钟数值闪动2.按+/-键调整数值,长按+/-键可快速调整3.同样方法选择设置小时、年份、月份、日期4.按+/-键切换月份/日期或者日期/月份显示,按SET键确定5.同样的方法选择12/24小时制6.按+/-键,设置按键声音开启/关闭,按SET键确定7.任何时候退出设置,长按SET键2秒用干净的软布蘸上温和的肥皂水或者用类似的清洁溶液清理手表将用于测量心率的手指蘸些水改善接触,同样的可在和手表底壳接触的腕部皮肤也蘸点水如果您试了以上所有方法都测不到心率,请联系我们(下面一页有我们的服务电话)注意:不可在水下测量心率•按 键进入计步模式H.I. • • ••••• • • J. •••• F. • • •G. • • • • • • • • • • • • K. • • • • • • • • • • • • • • • L. • • • • • M. 心率目标区间此功能可将您的运动心率与设定的目标心率区进行对照如果心率低于目标心率下限或者高于目标心率上限,手表响两声,显示心率时同时显示“LO(LOW)”或者“HI(HIGH)”如果心率在区间内,手表响一声,显示心率时同时显示“IN”如果您不想设置目标心率区间,您仍然可以通过测心率,根据最大心率百分率显示了解自己的运动强度心率区间⑴50%-60% 保持健康散步,能增进健康但不一定健身;对身体热身和放松有益;对多数心脏疾病和肥胖患者有帮助⑵60%-70% 运动能力提升慢跑,适合刚开始进行运动计划的人和运动热身;燃烧脂肪和减重需要较长时间的运动量⑶70%-80% 有氧、健身运动轻松运动,增强健身效果;提升力量和耐力;燃烧脂肪和碳水化合物⑷80%-90% 无氧、力量练习高强度运动,用于提升能力的短时间(1小时内)体育训练⑸90%100% 竞技训练全力运动,运动员短时间使用的间歇训练和大多数体育活动的短跑活动训练设置心率目标区&个人信息输入您的年龄和性别,手表会自动计算标准的心率目标区间;您也可以根据自己的喜好来手动修改心率目标区。
包装清单1.Mio ALPHAB 充电器3.快速操作指南4.保修和售后5.佩戴和充电注意事项Mio ALPHAA 左键 B. 右键 C. 心率指示灯安全须知在开始新的训练计划前,请咨询医生。
Mio ALPHA可以精准测量心率,但是不能用于医疗用途。
Mio ALPHA及USB充电器有很强磁性,佩戴起搏器、除颤器或其他植入电子设备的用户使用前请咨询医生。
激活 Mio ALPHA长按 (A) 或 (B)激活Mio ALPHA激活后,进入信息设置。
短按(B)调整数值. 短按 (A) 确认并进入下一项设置。
用户配置设置设置以下个人信息有利于 Mio ALPHA测得的数据更加精准有效∙日期(date)和时间(time)∙英制(imperial)或公制(metric),一般选公制。
∙体重(weight)和身高(height)∙性别(gender)∙出生年( year of birth)∙最大心率(Maximum heart rate),会根据你输入的个人信息自动生成,也可以手动输入(220-年龄)在手表上直接设置在时间模式下,长按 (A) 进入个人信息设置。
短按 (B) 调整数值和设置内容. 短按 (A) 确认并进入下一项设置。
长按(A),退出个人信息设置。
充电1.警告:充电时,请确保充电器的针脚是干燥的。
2.将USB 接口一端连到电脑。
3.将Mio ALPHA后盖的充电触点和充电器针脚如下图排成一行。
充电针脚的磁性有利于充电器和Mio ALPHA吸附到一起。
充电时,屏幕显示动态的电池充电标志充满后,屏幕显示FULL,然后满格标志背光灯连续敲击屏幕2次,开启背光灯。
运动模式Mio ALPHA 运动模式下的功能:∙连续心率测量∙心率报警∙秒表、倒计时和计圈∙配速、计步和卡路里等Mio ALPHA 的佩戴为了保证数据精准度,请按照一下方式佩戴:∙将Mio ALPHA 紧贴你的小臂, 离腕骨 1-3 英寸 (3-8 cm) 处. 表后盖的光电传感器需要紧贴你的皮肤∙如果你手腕比较细,请将ALPHA 带高点∙注意:为了保证ALPHA测量的精准度,建议在测心率前,做几分钟热身运动,特别是经常手脚冰凉或血液循环不佳的用户。