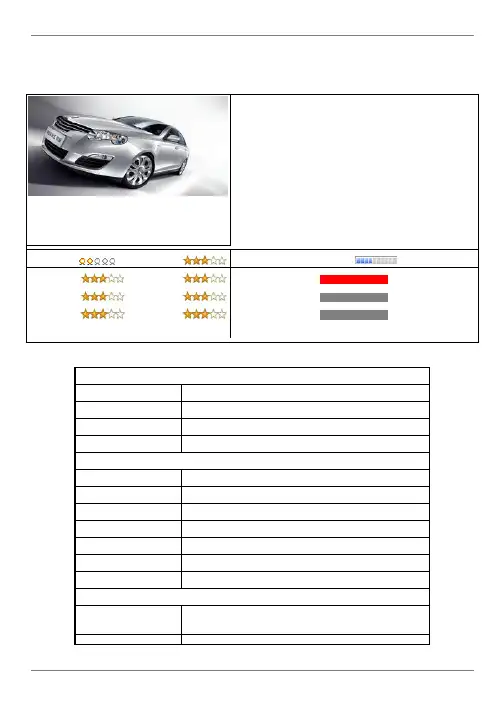
荣威550操作手册说明书
- 格式:doc
- 大小:2.84 MB
- 文档页数:57

目录如何使用电路图. . . . . . . . . . . . . . . . . . . . . . . . . . . . . . . . . . . . . . . . . . . . . . . . . . . . . . . . . . . . . . . . . . . . . . . . . . . . . . . . . . . . . . . . . . . . . . . . . . . . . . . . . . . . . . . . . . . . . .1电路图. . . . . . . . . . . . . . . . . . . . . . . . . . . . . . . . . . . . . . . . . . . . . . . . . . . . . . . . . . . . . . . . . . . . . . . . . . . . . . . . . . . . . . . . . . . . . . . . . . . . . . . . . . . . . . . . . . . . . . . . . . . . .3电源分配-发动机舱 . . . . . . . . . . . . . . . . . . . . . . . . . . . . . . . . . . . . . . . . . . . . . . . . . . . . . . . . . . . . . . . . . . . . . . . . . . . . . . . . . . . . . . . . . . . . . . . . . . . . . . . . . . . . . . . . . . . . .3电源分配-发动机舱 . . . . . . . . . . . . . . . . . . . . . . . . . . . . . . . . . . . . . . . . . . . . . . . . . . . . . . . . . . . . . . . . . . . . . . . . . . . . . . . . . . . . . . . . . . . . . . . . . . . . . . . . . . . . . . . . . . . . .4电源分配-乘客舱. . . . . . . . . . . . . . . . . . . . . . . . . . . . . . . . . . . . . . . . . . . . . . . . . . . . . . . . . . . . . . . . . . . . . . . . . . . . . . . . . . . . . . . . . . . . . . . . . . . . . . . . . . . . . . . . . . . . . . .5电源分配-乘客舱. . . . . . . . . . . . . . . . . . . . . . . . . . . . . . . . . . . . . . . . . . . . . . . . . . . . . . . . . . . . . . . . . . . . . . . . . . . . . . . . . . . . . . . . . . . . . . . . . . . . . . . . . . . . . . . . . . . . . . .6电源分配-乘客舱. . . . . . . . . . . . . . . . . . . . . . . . . . . . . . . . . . . . . . . . . . . . . . . . . . . . . . . . . . . . . . . . . . . . . . . . . . . . . . . . . . . . . . . . . . . . . . . . . . . . . . . . . . . . . . . . . . . . . . .7 ABS/DSC . . . . . . . . . . . . . . . . . . . . . . . . . . . . . . . . . . . . . . . . . . . . . . . . . . . . . . . . . . . . . . . . . . . . . . . . . . . . . . . . . . . . . . . . . . . . . . . . . . . . . . . . . . . . . . . . . . . . . . . . . . . . .8空调-自动空调控制 . . . . . . . . . . . . . . . . . . . . . . . . . . . . . . . . . . . . . . . . . . . . . . . . . . . . . . . . . . . . . . . . . . . . . . . . . . . . . . . . . . . . . . . . . . . . . . . . . . . . . . . . . . . . . . . . . . . . .9空调-电子空调控制 . . . . . . . . . . . . . . . . . . . . . . . . . . . . . . . . . . . . . . . . . . . . . . . . . . . . . . . . . . . . . . . . . . . . . . . . . . . . . . . . . . . . . . . . . . . . . . . . . . . . . . . . . . . . . . . . . . . .10音响系统-CD/收音机. . . . . . . . . . . . . . . . . . . . . . . . . . . . . . . . . . . . . . . . . . . . . . . . . . . . . . . . . . . . . . . . . . . . . . . . . . . . . . . . . . . . . . . . . . . . . . . . . . . . . . . . . . . . . . . . . . .11音响系统-导航. . . . . . . . . . . . . . . . . . . . . . . . . . . . . . . . . . . . . . . . . . . . . . . . . . . . . . . . . . . . . . . . . . . . . . . . . . . . . . . . . . . . . . . . . . . . . . . . . . . . . . . . . . . . . . . . . . . . . . . .12总线系统及诊断插座-中速CAN . . . . . . . . . . . . . . . . . . . . . . . . . . . . . . . . . . . . . . . . . . . . . . . . . . . . . . . . . . . . . . . . . . . . . . . . . . . . . . . . . . . . . . . . . . . . . . . . . . . . . . . . . .13总线系统及诊断插座-高速CAN . . . . . . . . . . . . . . . . . . . . . . . . . . . . . . . . . . . . . . . . . . . . . . . . . . . . . . . . . . . . . . . . . . . . . . . . . . . . . . . . . . . . . . . . . . . . . . . . . . . . . . . . . .14总线系统及诊断插座-LIN总线. . . . . . . . . . . . . . . . . . . . . . . . . . . . . . . . . . . . . . . . . . . . . . . . . . . . . . . . . . . . . . . . . . . . . . . . . . . . . . . . . . . . . . . . . . . . . . . . . . . . . . . . . . . .15总线系统及诊断插座-K总线 . . . . . . . . . . . . . . . . . . . . . . . . . . . . . . . . . . . . . . . . . . . . . . . . . . . . . . . . . . . . . . . . . . . . . . . . . . . . . . . . . . . . . . . . . . . . . . . . . . . . . . . . . . . . .16接地分配. . . . . . . . . . . . . . . . . . . . . . . . . . . . . . . . . . . . . . . . . . . . . . . . . . . . . . . . . . . . . . . . . . . . . . . . . . . . . . . . . . . . . . . . . . . . . . . . . . . . . . . . . . . . . . . . . . . . . . . . . . . . .17接地分配. . . . . . . . . . . . . . . . . . . . . . . . . . . . . . . . . . . . . . . . . . . . . . . . . . . . . . . . . . . . . . . . . . . . . . . . . . . . . . . . . . . . . . . . . . . . . . . . . . . . . . . . . . . . . . . . . . . . . . . . . . . . .18发动机管理-无涡轮增压 . . . . . . . . . . . . . . . . . . . . . . . . . . . . . . . . . . . . . . . . . . . . . . . . . . . . . . . . . . . . . . . . . . . . . . . . . . . . . . . . . . . . . . . . . . . . . . . . . . . . . . . . . . . . . . . .19发动机管理-无涡轮增压 . . . . . . . . . . . . . . . . . . . . . . . . . . . . . . . . . . . . . . . . . . . . . . . . . . . . . . . . . . . . . . . . . . . . . . . . . . . . . . . . . . . . . . . . . . . . . . . . . . . . . . . . . . . . . . . .20发动机管理-涡轮增压 . . . . . . . . . . . . . . . . . . . . . . . . . . . . . . . . . . . . . . . . . . . . . . . . . . . . . . . . . . . . . . . . . . . . . . . . . . . . . . . . . . . . . . . . . . . . . . . . . . . . . . . . . . . . . . . . . .21发动机管理-涡轮增压 . . . . . . . . . . . . . . . . . . . . . . . . . . . . . . . . . . . . . . . . . . . . . . . . . . . . . . . . . . . . . . . . . . . . . . . . . . . . . . . . . . . . . . . . . . . . . . . . . . . . . . . . . . . . . . . . . .22外饰灯-前 . . . . . . . . . . . . . . . . . . . . . . . . . . . . . . . . . . . . . . . . . . . . . . . . . . . . . . . . . . . . . . . . . . . . . . . . . . . . . . . . . . . . . . . . . . . . . . . . . . . . . . . . . . . . . . . . . . . . . . . . . . .23外饰灯-后 . . . . . . . . . . . . . . . . . . . . . . . . . . . . . . . . . . . . . . . . . . . . . . . . . . . . . . . . . . . . . . . . . . . . . . . . . . . . . . . . . . . . . . . . . . . . . . . . . . . . . . . . . . . . . . . . . . . . . . . . . . .24燃油泵. . . . . . . . . . . . . . . . . . . . . . . . . . . . . . . . . . . . . . . . . . . . . . . . . . . . . . . . . . . . . . . . . . . . . . . . . . . . . . . . . . . . . . . . . . . . . . . . . . . . . . . . . . . . . . . . . . . . . . . . . . . . . . .25喇叭 . . . . . . . . . . . . . . . . . . . . . . . . . . . . . . . . . . . . . . . . . . . . . . . . . . . . . . . . . . . . . . . . . . . . . . . . . . . . . . . . . . . . . . . . . . . . . . . . . . . . . . . . . . . . . . . . . . . . . . . . . . . . . . . .26组合仪表. . . . . . . . . . . . . . . . . . . . . . . . . . . . . . . . . . . . . . . . . . . . . . . . . . . . . . . . . . . . . . . . . . . . . . . . . . . . . . . . . . . . . . . . . . . . . . . . . . . . . . . . . . . . . . . . . . . . . . . . . . . . .27内部照明. . . . . . . . . . . . . . . . . . . . . . . . . . . . . . . . . . . . . . . . . . . . . . . . . . . . . . . . . . . . . . . . . . . . . . . . . . . . . . . . . . . . . . . . . . . . . . . . . . . . . . . . . . . . . . . . . . . . . . . . . . . . .28内部照明灯. . . . . . . . . . . . . . . . . . . . . . . . . . . . . . . . . . . . . . . . . . . . . . . . . . . . . . . . . . . . . . . . . . . . . . . . . . . . . . . . . . . . . . . . . . . . . . . . . . . . . . . . . . . . . . . . . . . . . . . . . . .29后视镜. . . . . . . . . . . . . . . . . . . . . . . . . . . . . . . . . . . . . . . . . . . . . . . . . . . . . . . . . . . . . . . . . . . . . . . . . . . . . . . . . . . . . . . . . . . . . . . . . . . . . . . . . . . . . . . . . . . . . . . . . . . . . . .30驻车距离控制 . . . . . . . . . . . . . . . . . . . . . . . . . . . . . . . . . . . . . . . . . . . . . . . . . . . . . . . . . . . . . . . . . . . . . . . . . . . . . . . . . . . . . . . . . . . . . . . . . . . . . . . . . . . . . . . . . . . . . . . . .31座椅 . . . . . . . . . . . . . . . . . . . . . . . . . . . . . . . . . . . . . . . . . . . . . . . . . . . . . . . . . . . . . . . . . . . . . . . . . . . . . . . . . . . . . . . . . . . . . . . . . . . . . . . . . . . . . . . . . . . . . . . . . . . . . . . .32目录起动和充电 . . . . . . . . . . . . . . . . . . . . . . . . . . . . . . . . . . . . . . . . . . . . . . . . . . . . . . . . . . . . . . . . . . . . . . . . . . . . . . . . . . . . . . . . . . . . . . . . . . . . . . . . . . . . . . . . . . . . . . . . . . 33电动天窗 . . . . . . . . . . . . . . . . . . . . . . . . . . . . . . . . . . . . . . . . . . . . . . . . . . . . . . . . . . . . . . . . . . . . . . . . . . . . . . . . . . . . . . . . . . . . . . . . . . . . . . . . . . . . . . . . . . . . . . . . . . . . 34辅助约束系统. . . . . . . . . . . . . . . . . . . . . . . . . . . . . . . . . . . . . . . . . . . . . . . . . . . . . . . . . . . . . . . . . . . . . . . . . . . . . . . . . . . . . . . . . . . . . . . . . . . . . . . . . . . . . . . . . . . . . . . . . 35自动变速箱 . . . . . . . . . . . . . . . . . . . . . . . . . . . . . . . . . . . . . . . . . . . . . . . . . . . . . . . . . . . . . . . . . . . . . . . . . . . . . . . . . . . . . . . . . . . . . . . . . . . . . . . . . . . . . . . . . . . . . . . . . . 36整车安全 . . . . . . . . . . . . . . . . . . . . . . . . . . . . . . . . . . . . . . . . . . . . . . . . . . . . . . . . . . . . . . . . . . . . . . . . . . . . . . . . . . . . . . . . . . . . . . . . . . . . . . . . . . . . . . . . . . . . . . . . . . . . 37整车安全 . . . . . . . . . . . . . . . . . . . . . . . . . . . . . . . . . . . . . . . . . . . . . . . . . . . . . . . . . . . . . . . . . . . . . . . . . . . . . . . . . . . . . . . . . . . . . . . . . . . . . . . . . . . . . . . . . . . . . . . . . . . . 38电动窗-前. . . . . . . . . . . . . . . . . . . . . . . . . . . . . . . . . . . . . . . . . . . . . . . . . . . . . . . . . . . . . . . . . . . . . . . . . . . . . . . . . . . . . . . . . . . . . . . . . . . . . . . . . . . . . . . . . . . . . . . . . . . 39电动窗-后. . . . . . . . . . . . . . . . . . . . . . . . . . . . . . . . . . . . . . . . . . . . . . . . . . . . . . . . . . . . . . . . . . . . . . . . . . . . . . . . . . . . . . . . . . . . . . . . . . . . . . . . . . . . . . . . . . . . . . . . . . . 40简单非-键式电动窗-副驾乘客与后乘客. . . . . . . . . . . . . . . . . . . . . . . . . . . . . . . . . . . . . . . . . . . . . . . . . . . . . . . . . . . . . . . . . . . . . . . . . . . . . . . . . . . . . . . . . . . . . . . . . . . . 41洗涤/雨刮. . . . . . . . . . . . . . . . . . . . . . . . . . . . . . . . . . . . . . . . . . . . . . . . . . . . . . . . . . . . . . . . . . . . . . . . . . . . . . . . . . . . . . . . . . . . . . . . . . . . . . . . . . . . . . . . . . . . . . . . . . . 42如何使用电路图本文件中的所有信息应当与连接器分册一起使用。

荣威R550轿车发动机电子节气门自学习的说明
佚名
【期刊名称】《《汽车与驾驶维修:维修版》》
【年(卷),期】2009(000)007
【摘要】涉及车型:上汽荣威R550轿车,搭载1.8L DVVT发动机。
通报内容:蓄电池断电后,会导致电子节气门自学习值归零/重置,如不进行自学习操作,发动机控制单元ECM可能会存储故障码P2101。
【总页数】1页(P34)
【正文语种】中文
【中图分类】U4
【相关文献】
1.荣威R550轿车燃油液位显示的原理说明 [J],
2.荣威R750轿车发动机防盗指示灯的控制策略说明 [J], 无
3.荣威R550轿车发动机增压系统故障 [J], 赵武琪
4.荣威R750/R550轿车发动机曲轴传动带轮的拆装说明 [J],
5.荣威R550轿车燃油液位显示的原理说明 [J],
因版权原因,仅展示原文概要,查看原文内容请购买。
龙源期刊网
上汽荣威550轿车加速无力
作者:戴晓明
来源:《汽车与驾驶维修(维修版)》2019年第06期
关键词:歧管绝对压力传感器、排气凸轮轴
故障现象:一辆上汽荣威550轿车,搭载双可变气门正时(DVVT)发动机,行驶里程13万km。
用户反映该车加速无力,且有顿挫感。
检查分析:据用户反映,该车冷却液经常缺失,引起发动机高温,经检查发现发动机缸盖有损坏,于是更换了缸盖。
维修完成后,发动机水温高的现象消失,但试车中发现了新的故障:加速无力和有顿挫感。
维修人员连接诊断仪读取故障码(图1),并结合故障现象分析,认为“P0107——歧管绝对压力(MAP)传感器回路低电压”和“P0014——排气凸轮轴位置系统性能”,与该车故障现象的相关性比较高。
根据由简到繁的思路,首先拆下歧管绝对压力传感器检查,未见异常,复位后再次连接诊断仪检测,发现故障码消失,但试车加速顿挫感依旧。
考虑到该车是在更换缸盖后出现的故障,且该车装备的是DVVT发动机,因此很有可能是上次维修时维修人员没有对
好凸轮轴正时。
经过检查,果然发现排气凸轮轴的位置有轻微的偏差。
故障排除:调整凸轮轴正时角度,试车故障排除。
回顾总结:该车故障的原因是在第一次维修中,维修人员在安装进排气凸轮轴时疏忽大意,没有使用专用工具调整进排气凸轮轴的角度。
在凸轮轴正时轻微偏差的情况下,发动机仍然可以起動,但在急加速时会有顿挫感。
荣威550 各类问题解决办法(超强集合帖)1、车窗异响。
:更换密封条。
(新车基本没有这个情况)2、刹车片异响。
:可以说不是问题的问题,继续磨合吧,要是想早点解决,自己去学习怎么磨合刹车。
3、排气管生锈。
:汽油车都有这个问题~~很正常。
要不你买柴油车去!4、油耗的问题带T的-自动挡大约在10L左右手动挡大约在8.5L左右不带T的-自动档大约在8L左右手动档大约在7L左右(这个油耗算是综合油耗油耗这东西主要还是得看你怎么开车还有道路的情况)5、A柱影响视线。
的A柱确实有点宽,但是它的好处在于安全!对于视线的问题,个人建议大家多动一下脖子,左右各一下!实际上这也是上汽的人性化设计,为了保护大家的颈椎,减少颈椎病!嘿嘿!6、总控响。
那是防盗系统的声音,当你锁好车门,或者通电后,很快就会消失。
7、U盘死机。
4G的金士顿很容易遇到,换一个小一点的就好了,装那么多歌你选起不累啊?8、手动挡熄火的问题。
的离合比较高,很多人不习惯,还有就是技术不到家,对自己的二老婆脾气不了解,找不准离合点,自己多感觉一下就好了,别一惊一乍的!9、电脑死机。
版本过老,去4S刷一下就好了,新车不存在这样的问题!10、关于550[/url]的发动机[荣威550[/url]装备的是]Kavachi 1.8T超高压耐久涡轮增压发动机,这款发动机同样装备在荣威7501.8T车型上使用/]Ka[/url]vachi 1.8T超高压耐久涡轮增压发动机是一款性能相当出众的涡轮增压发动机,其最大功率118千瓦,最大扭矩可达215牛米。
11、涡轮的问题。
发动车时,涡轮启动;1800转时,涡轮介入;2500~4500转时,涡轮进入98%的峰值状态,也就是加速最快的时候!至于涡轮的更换,厂家的说法是寿命与发动机相同,就算要更换也不算太贵,加上所有费用,6800一个而已,比大众厚道多了。
12、关于自动挡脚板油延迟的问题。
当你踩脚板油的时候,变速器会自动降一个档位,这个是需要时间的,所有会有0.5秒左右的延迟。
无威不至试驾荣威550作者:朱熙来源:《汽车之友》2013年第11期与以某多子大导演为传播重点的“印象”系列不同,我的这个“印象”主要是以接触不多为背景的。
话说个人对荣威这个品牌长时间保持了一个不咸不淡的状态,5年前一试之后,它似乎从没有进入过我们的日常选题,所以留下的也便只有印象罢了。
相信有不少人都亲身体验过不少大导演的“印象”系列,敢问能记住得是什么?恢弘的场面:灯光、舞美,还有其他吗?内容呢?看过也就过去了吧,不过人家不是也说了,本来就是印象系列嘛!不免说两句难听的吧,我们目前不少自主品牌是不是也自觉不自觉往人家大导演那边靠,首先追求看上去很美,“炫酷”总会成为从不打折扣的卖点,这无可厚非。
大量数字产品瞬间就能把车内装饰得科技感爆棚,这也算积极一面,花同样甚至更少的钱能得到更多配置当然好。
我们想说的是,这些能不能建立在把车本身做好的情况下。
谁都知道哪些事儿做起来容易,哪些难——诚然或许容易的还能更快见到效果,不过老生还是要长谈:车的根本目的还是用来开的,要在这方面达到一个较高水准,尤其对于我们的自主品牌来说,势必要经过一个潜心、挫折、沉淀,甚至是涅磐的过程,树木树人,树品牌,哪儿那么容易就瞬间百年啊!换句话说,人家多子大导演再怎么说也是艺术圈的人,三观都有着我们不可企及的高度。
脚踏实地造车的人们啊,跟人家学之前千万想想,造车和造人,那是有着根本区别的。
如能成为经典,哪儿有不为之理5年前第一次看到550的时候,没什么惊喜,看了一整天之后便觉得这造型还挺耐看的,挑不出什么地方是非改不可的,比较之下,符合国内绝大多数人的审美。
现在的550仍旧延续了这一经典造型,只在细节之处做了些类似提亮肤色的改动。
一眼能看到的基本就是前后灯和前杠,前杠的造型较原来有型、有冲击力,不过线条柔和,没有破坏整车的风格。
按照我的看法,前大灯的造型比之前更接近某款鞋的模具,然后在鞋帮上加了一些发光二极管装饰。
最值得肯定的还是尾灯变化,视宽部分使用了类似BMW的光导纤维,点亮之后感觉立马提升了档次。
EW-52 Owner’s ManualTable of Contents1.Instrument Panel (2)2.Music system operation (3)3.Before you op erate your scooter (4)4.Scooter initial operation (4)5. Technical s pecification (5)6. Cruis e Control (6)7.Mirror Assembly (6)8.Variable Speed Control (7)9.Twist Throttle (8)10.Emergency Brake handle (9)11.Seat La tch Release (10)12. General /Safety Instruction (11)13.Enviro nment Condition (12)14.Seat A djustment (13)15.Trunk (13)16.Key Fob (14)17.Clock Adjustment (14)18.Batteries and Charger………………………………………. 15-1619.Charger use (16)Turn Signal Indicator Hazard lightsClock FunctionSpeed (KPH)Turn Signal IndicatorTemperature Battery IndicatorCruise Control ReverseBright Light IndicatorLeft Turn SignalHornHigh Bean LightHornRight Turn Signal Slow SpeedLow BeamDrive 1Drive 2 Drive 3LED Indicator indicating Radio is on Volume upPower Volume DownPrevious Song / Previous StationPlay / Pause SongNext song or stationBefore you operate the scooterLocate the below listed materials in rear cargo box:∙Set of mirrors∙Electric charger∙Scooter Key (1: In Charger Box 2: Underneath seat)∙Owner’s manualIT IS VERY IMPORTANT TO READ OWNER’S MANUAL BEFORE SCOOTER OPERATIONScooter Initial Operation∙Read Owner’s manual∙Insert key into ignition (or activate the scooter’s remote start)∙Set digital speed D1 to lowest setting∙Turn lights on∙Adjust mirrors to desired positions∙Place both hands on black hand grips∙Twist the throttle slowly with your right hand∙Enjoy the ride!∙Turn off scooter by simply turning key to off positionTechnical SpecificationsCruise ControlThe Cruise control is located just under the digital dash, indicated by the “Cruise” button. Simply reach your desired speed while driving the scooter and press the “Cruise” button and the scooter speed will be fixed at your current speed until the brake pedal is pressed.Mirror AssemblyYour power scooter is shipped partially disassembled for protection during shipping. After unpacking, please check whether you have received the following main components as our standard specification (See Fig 1)1.MirrorsMirror PostFig 1To attach the mirrors simply place each mirror threaded end into the mirror post. Turn mirror clockwise and fasten mirror to scooter.Operation of Scooter:1.To prevent injury to yourself or others, always ensure that the poweris switched off when getting on or off the scooter and the emergency brake is on.Always check that the variable speed control is set to the desired speed setting.Variable Speed ControlThe EW-52 has several speed setting capabilities:1.The “S” button located just under the digital dash can be pressed andthe scooter will function at a slow speed.2.The “D” button located just under the digital dash can be pressed toset 3 different speed functions.-Press once for D1: Slow speed function-Press twice for D2: Moderate speed function-Press three times for D3: Fastest speed function3.Always check you have selected the correct forward or reverse buttonwhen about to drive. The reverse button is located below the dash.When the reverse button is pressed the reverse light will iluminateand the scooter will sound.4.Always reduce your speed when making sharp turns.5.Do not switch off the power when the scooter is still moving forwardTwist ThrottleTo operate the twist throttle simply place your hand on the throttle and twist the throttle towards you. The scooter speed is determined by how much you turn the throttle.Twist ThrottleRamps and Curbs1.Check that ramp surface is roughened to prevent slipping. Never driveacross a slope or turn sharply on a slope.2.When driving up curbs, always check the height of the curb to ensurethat it does not exceed 4” height.Emergency Brake HandleTo activate the emergency brake, first start by depressing the foot pedal to alleviate tension from the brake lines. Keep the brake pedal depressed while activating or releasing the emergency brake. Pull the handle out towards you while the handle is in the vertical position to activate.To deactivate, push the foot brake down again, and follow the instructions on the handle "Push Button and Turn" while pushing the handle pack into its housing.Seat Latch ReleaseTo release the seat latch, you need to start by inserting the key into the ignition. Without pushing inwards, turn the key counter clockwise (left). You should feel resistance while turning the key, until it hits a stopping point where it cannot turn anymore. If you do not feel any resistance, this means the key has been pushed inwards, which bypasses the seat latch release.While holding, the key turned counter clockwise at its stopping point, lift on the back of the seat. A good leverage point for lifting the seat is underneath the backrest. Once the latch is released, the entire seat assembly will lift towards the front column, and rest against the front tiller.General1.Always use a seatbelt, and keep your feet on the scooter all the time.2.Do not exceed maximum weight capacity of 500lbs. (includingaccessories and carry on)3.Do not attempt to lift or move a power scooter by any of itsremovable parts. Personal injury and damage to the power chair may result.4.Never try to use your scooter beyond its limitations as described in themanual.5.Do not operate your vehicle if it is not functioning properly.6.Do not connect any electrical or mechanical device to the scooter.Failure to obey this instruction may result in injury and will voidthe warranty.Use While Under the Influence of Medication or Alcohol1.Check with your physician if you are taking any medication that mayaffect your ability to operate your powered scooter safely.2.Do not operate your scooter while you are under the influence ofalcohol as this may impair your ability to operate your power scooter in a safe manner.Environment ConditionRain, Sleet and SnowIf exposed to water, your power scooter is susceptible to damage to electronic or mechanical components. Water can cause electronic malfunction or promote premature corrosion of electrical components and frame.WarrantyFor valid warranty claims E-Wheels will, at their discretion,replace/repair/refund items mutually agreed to be defective.E-Wheels warranty as following:1.Frame: (2) Year limited warranty2.Electronic component: (1) Year limited warranty3.Controllers: (3) Year limited warranty4.Batteries: Not warranted5.Consumables: Wheel, Tires, arm pads and seat cushions: Notwarrantedbor costs are NOT covered by warrantyAny damage or defect of any nature occurring from the misuse of the product is not to be covered. The warranty is to start from the date of arrival of our products.Seat Adjustment1.Locate forward/reverse seat push knob located on side of the seat2.Seat arm rest can be in an upright position or a down position.TrunkTo open trunk simply insert ignition key while turning the key counter clockwise, place your hand on the seat back and pull seat forward. You must keep key turned while pulling seat forward and back. Be sure to not push in on the key)Key FobPress once to deactivate alarm Panic ButtonPress once to activate alarm Press twice – remote startClock AdjustmentPress the “reset button” and this function will change from hours to minutes. Once at the desired location press the “select” button to change the digits.Once the digit is changed simply press “reset” button once again and the function will change to the next digit in line. Simply repeat the process or desired settings.Batteries and ChargerWe recommend that you use deep-cycle batteries that are sealed and maintenance free for your power scooter. Both are lead acid (SLA) and gel cell are Deep cycle batteries that are similar in performance. Deep-cycle batteries are specifically designed to provide power, drain down, and then accept a relatively quick charge. Lead acid batteries should be charged as often as possible.Specification of the battery that we recommend:Type: Deep Cycle Sealed lead acid or gel cellSize: 20 AHVoltage: 12 V Each (5) totalDepending on the use, terrain and driving conditions, the batteries will provide a range of 43 miles of travel. However, if the power scooter is not in use we recommend that the batteries be charged monthly.Note:-Do not use any automotive batteries, they are not designed to handlea long, deep discharge and are unsafe for use in power scooter.-The useful life of a battery is quite often a reflection of the care it receives.-Always charge your batteries in well ventilated areas.-The charger is intended for indoor use only.-For maximum performance, it is recommended that you replace all(5) batteries at the same time if the batteries are weak.-If the vehicle will not be used for a long period. Arrange to have the batteries recharged at least once every month to avoid deterioration. Recharge the Batteries only when the key is in off position and when the indicator is showing low status. This confirms batteries needs to be recharged.Charger Use1.Plug charger into Electric wall outlet2.Insert charger port into scooter charging plug which is located on thefront/side of scooter main body directly under seat.3.Red charger light indicates scooter is charging4.Green charger light indicated scooter is fully charged.5.Do not exceed (8) hours of charging time. If light is。