ActiveMessenger操作说明手册
- 格式:doc
- 大小:1.03 MB
- 文档页数:9

Active Messenger的功能介绍一、界面介绍二、即时消息的输入1.人员的在线状态信息。
用户可以清楚的知道单位的同事的当前状态。
比如是否在线或是否忙碌,从而决定是否跟其联系。
2.发送即时消息(有权限的人可以群发或公告),消息内容的文字可以用不同的字体及颜色来表示,以区别重要性;还可以做简单的排版,确定字符的对齐方式、确定是否需要增加简单的分节符号、增加表情等。
3.对于离线用户,仍然可以发送留言和附件,一旦该用户登录,将会收到这些留言和附件。
三、信息群发1、给所有在线用户群发:进入在线用户视图后,在顶行在线用户上单击鼠标器右键,在弹出菜单中选择群发,系统会自动将所有在线用户设定为接受信息者。
同样的方法也适合于给某个部门的用户群发信息,具体如下图所示:2、选择特殊用户群发信息:如果需要同时给多个上线的用户群发消息,有两种方法:方法一:按住键盘上的ctrl键,然后单击鼠标器左键选择需要接受信息的用户,可以选取多个用户,选取完毕后,单击鼠标器右键,选择菜单上的“群发”,系统会自动将所有在线用户设定为接受信息者。
具体如下图所示:方法二:对于经常需要同时联系的同事,可以在“我的视图”中定义专门的组,选中该组以后,选择增加成员,可将相关联系人同时加入到组中,然后就可以群发信息给了。
根据不同的需要,同一个联系人允许被加入到多个组中,对于阶段性的项目协同,这个方法可以很方便的与小组中的同事交换信息。
具体如下两图所示:四、常用语定义:为了提高及时通讯的效率,可以直接定义常用语,方法是点击通话菜单最右边的对话按钮,弹出以下窗口:在该窗口中可以定义快捷名称和内容,输入完毕后,点击“更新”按钮,信息会被记录下来,在收到信息的时候,可以直接使用。
五、文件传送功能在企业内部的协同过程中,同事之间经常需要传递文件Active Messenger对此作了特别的优化,让用户传递文件变得轻松快捷。
1.软件中提供多种发送文件的方式。


虹信OA项目E-MESSAGE安装及使用说明手册一、说明e-Message是泛微公司与OA系统ECOLOGY一起发布,配合OA使用的企业级即时通信工具。
e-Message拥有严谨的组织体系和权限体系,通过与泛微协同OA平台互通互联,实现工作信息的实时推送,同时让员工无需登录协同OA系统就可以进行一些便捷的操作。
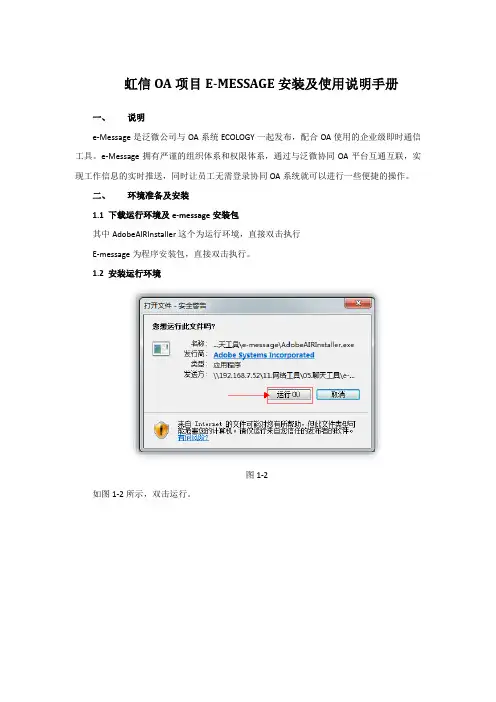
二、环境准备及安装1.1 下载运行环境及e-message安装包其中AdobeAIRInstaller这个为运行环境,直接双击执行E-message为程序安装包,直接双击执行。
1.2 安装运行环境图1-2如图1-2所示,双击运行。
图1-3如图1-3所示,点击我同意。
图1-4如图1-4所示,双击完成。
这样我们的运行环境就安装完成了。
1.3 运行环境的更新Adobe AIR运行的环境会自动进行更新。
图1-5如图1-5所示,双击立即更新。
图1-6如图1-6所示,双击更新。
图1-7如图1-7所示,双击完成。
运行环境的版本的更新不影响软件的使用,建议大家更新。
1.4 E-message的安装图1-8如图1-8所示,双击安装。
图1-9如图1-9所示,双击继续。
安装完毕后桌面会出现一个E-Message的图标1.5 E-Message的登录输入OA地址:(OA系统的访问地址)输入用户名:031000xxxx(员工编号)输入密码:(OA系统的登录密码)勾选记住密码勾选自动登录图1-10如图1-10所示,双击登录。
二、E-message软件使用说明图2-1如图2-1所示,是E-Message登录后的界面,可以看到与我们常用的聊天软件很像,客户端界面分为了以下几个部分:1、头像、姓名、组织结构组成了个人信息区;2、客户端状态,用来显示用户当前的状态,有在线、离开,电话中,出差中,请勿打扰五种选择;3、搜索框,可以通过姓名或者登录名搜索用户;4、相关人员,除了搜索外系统还提供了4种联系人的查找方式,分别是最近、同部门、群组、组织:5、办公集成,系统提供了2个办公集成的地方,一个是在组织后面有个办公的标签,点击后可以看到里面集成的办公功能模块,如图3-6所示,另外一个就是在搜索栏上方有快捷按钮,同样可以进入对应的功能。
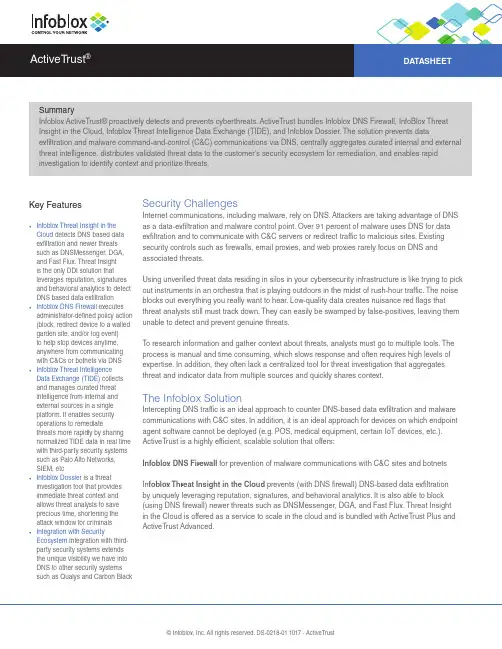
Key Features• Infoblox Threat Insight in the Cloud detects DNS based data exfiltration and newer threats such as DNSMessenger, DGA, and Fast Flux. Threat Insightis the only DDI solution that leverages reputation, signatures and behavioral analytics to detect DNS based data exfiltration• Infoblox DNS Firewall executes administrator-defined policy action (block, redirect device to a walled garden site, and/or log event)to help stop devices anytime, anywhere from communicating with C&Cs or botnets via DNS • Infoblox Threat IntelligenceData Exchange (TIDE) collects and manages curated threat intelligence from internal and external sources in a single platform. It enables security operations to remediatethreats more rapidly by sharing normalized TIDE data in real time with third-party security systems such as Palo Alto Networks, SIEM, etc• Infoblox Dossier is a threat investigation tool that provides immediate threat context and allows threat analysts to save precious time, shortening the attack window for criminals• Integration with Security Ecosystem Integration with third-party security systems extends the unique visibility we have into DNS to other security systems such as Qualys and Carbon Black Security ChallengesInternet communications, including malware, rely on DNS. Attackers are taking advantage of DNS as a data-exfiltration and malware control point. Over 91 percent of malware uses DNS for data exfiltration and to communicate with C&C servers or redirect traffic to malicious sites. Existing security controls such as firewalls, email proxies, and web proxies rarely focus on DNS and associated threats.Using unverified threat data residing in silos in your cybersecurity infrastructure is like trying to pick out instruments in an orchestra that is playing outdoors in the midst of rush-hour traffic. The noise blocks out everything you really want to hear. Low-quality data creates nuisance red flags that threat analysts still must track down. They can easily be swamped by false-positives, leaving them unable to detect and prevent genuine threats.T o research information and gather context about threats, analysts must go to multiple tools. The process is manual and time consuming, which slows response and often requires high levels of expertise. In addition, they often lack a centralized tool for threat investigation that aggregates threat and indicator data from multiple sources and quickly shares context.The Infoblox SolutionIntercepting DNS traffic is an ideal approach to counter DNS-based data exfiltration and malware communications with C&C sites. In addition, it is an ideal approach for devices on which endpoint agent software cannot be deployed (e.g. POS, medical equipment, certain IoT devices, etc.). ActiveT rust is a highly efficient, scalable solution that offers:Infoblox DNS Firewall for prevention of malware communications with C&C sites and botnetsIn foblox Threat Insight in the Cloud prevents (with DNS firewall) DNS-based data exfiltrationby uniquely leveraging reputation, signatures, and behavioral analytics. It is also able to block (using DNS firewall) newer threats such as DNSMessenger, DGA, and Fast Flux. Threat Insightin the Cloud is offered as a service to scale in the cloud and is bundled with ActiveTrust Plus and ActiveT rust Advanced.SummaryInfoblox ActiveT rust® proactively detects and prevents cyberthreats. ActiveT rust bundles Infoblox DNS Firewall, InfoBlox Threat Insight in the Cloud, Infoblox Threat Intelligence Data Exchange (TIDE), and Infoblox Dossier. The solution prevents data exfiltration and malware command-and-control (C&C) communications via DNS, centrally aggregates curated internal and external threat intelligence, distributes validated threat data to the customer’s security ecosystem for remediation, and enables rapid investigation to identify context and prioritize threats.ActiveTrust Standard ActiveTrust Plus ActiveTrust AdvancedAnnual SubscriptionLicensed by Appliance by model Organization-wide by number ofprotected usersOrganization-wide by number ofprotected usersInfoblox DNS Firewall Zones(RPZs)Standard (4)Standard (4) + Advanced (7) +SURBL (2)Standard (4) + Advanced (13) +SURBL (2)Infoblox Threat Insight inthe Cloud Not available Included IncludedInfoblox Data via ThreatIntelligence Data Exchange Not available One of:* Hostnames* IP Addresses* URLsAll of:R HostnamesR IP AddressesR URLsInfoblox Dossier No (threat lookup via CloudServices Portal only)32,000 queries/year(supports 2 analysts)65,000 queries/year(supports 4 analysts)Third-party Data viaInfoblox Threat IntelligenceData Exchange (TIDE)Not available Available a la carte Available a la carteHardware Requirements If you intend to use Infoblox DNS Firewall for RPZ-based policy enforcement, you need to buy:One or more Infoblox T rinzic (physical) or vNIOS (virtual) appliances with DNS with recursion enabled. Trinzic models:IB Series: IB-800, IB-1400, IB-2200, IB-4000, and IB-4030PT Series: PT-1400/1405, PT-2200/2205, and PT-4000TE Series (physical and virtual appliances): TE-100, TE-810/815/820/825, TE-1410/1415/1420/1425, TE-2210/2215/2220/2225, and TR-4010/TR-4010-10GESoftware Requirements • If you want Threat Insight in the Cloud, then you can purchase either ActiveTrust Plus or ActiveTrust Advanced license. If you will NOT deploy ActiveT rust threat intelligence data on third-party infrastructure, then buy an ActiveT rust Standard license, which is based on the T rinzic appliance models.• If you intend to deploy ActiveT rust threat intelligence data on third-party infrastructure (e.g. next-generationfi rewall, SIEM, Web proxy), then you can buy either ActiveT rust Plus or ActiveTrust Advanced license. The license is based on total number of protected users’ organization-wide (Grid-wide license). The two products vary based on the amount of data sets that can be applied and total number of annual Dossier threat indica-tor queries that can be transacted.Infoblox Threat Intelligence Data Exchange (TIDE) leverages highly accurate machine-readable threat intelligence (MRTI) datato aggregate and selectively distribute data across a broad range of security infrastructure. Our threat intelligence team curates, normalizes, and refines the high-quality threat data to minimize false positives. Our threat feeds begin with information gained from native investigations and harvesting techniques. We then combine them with verified and observed data from trusted partners including government agencies, academic institutions, several premier Internet infrastructure providers, and law enforcement. The end result is a highly refined feed with a very low historical false-positive rate.Infoblox Dossier threat indicator investigation provides rich threat context to prioritize incidents and respond quickly.Optional Services • Infoblox Threat Insight (on premises) for protection against DNS tunneling and sophisticated data ex fi ltration techniques is available as a separate standalone option for purchase for all AT customers.-Note: this only works on the following Infoblox models: PT-1405, TE-1415/V1415, TE-1425/V1425,TE-2210/v2210, 2215/v2215, TE-2220/v2220, 2225/v2225, PT-2200, PT-2205, IB-4010/v4010, V4015,TE-V4010/V4015, PT-4000, IB-4030-DCAGRID-AC/DC, IB-4030-DCAGRID-T1-AC/DC, IB-4030-DCA-GRID-T2-AC/DC, and IB-4030-DCAGRID-T3-AC/DC.• Infoblox Security Ecosystem license enables integration of Infoblox DNS RPZ/Firewall with third-party security systems: FireEye, Qualys and threat intelligence platforms.• Infoblox Dossier (portal, 65,700 queries package) 1-year subscription-ActiveTrust Standard customers can purchase if they want to perform threat investigation, since Dossier is not bundled with ActiveTrust Standard.-ActiveTrust Plus and ActiveT rust Advanced customers that need additional queries beyond what is provid-ed in the base product can also purchase this:-Third-party marketplace threat feeds-Prerequisite: ActiveTrust Plus or ActiveT rust Advanced must be purchased in order for customers topurchase and subscribe to one or more 3rd party marketplace threat feeds-Does NOT Include Maintenance/Support• Infoblox Reporting and Analytics (appliance) – provides rich reporting on Infoblox DNS Firewall (top RPZ hits, top malicious hostnames, users)Note: The SURBL (an Infoblox premium threat intelligence data partner) OEM license is bundled with the ActiveT rust Plus and ActiveT rust Advanced bundles for use by Infoblox DNS Firewall. The Infoblox ActiveT rust and SURBL data sets (Multi-domain and Multi Lite domain) are complementaryand if used together, can enable increased threat coverage. T o learn more about the Infoblox threat intelligence data, please refer to the solution note “Overview of Infoblox Threat Intelligence for ActiveT rust” on the Infoblox website.Key BenefitsWith Infoblox ActiveT rust, you get actionable network intelligence with flexible threat intelligence integrated into your DDI enthronement. this enables you to proactively detect, investigate, prioritize, remediate, and prevent cyber threats.Prevent DNS-based Data exfiltration at Scale in the CloudWith Threat Insight in the Cloud, you can detect and block (with DNS Firewall) DNS-based data exfiltration using a combination of reputation, signature, and behavioral analysis.Detect and Block DNSMessenger, DGA, and Fast FluxOffered as a service, Threat Insight in the Cloud can also detect and block (with DNS Firewall) new threats such as DNSMessenger, DGA, and Fast Flux.Stop DNS-based Malware C&C/botnet CommunicationsWith Infoblox DNS Firewall, you gain proactive network protection against fast-evolving, elusive malware threats that exploit DNS to communicate with C&C sites.Collect and Manage Curated Threat Intelligence from Internal and External Sources in a Single PlatformInfoblox TIDE enables you to aggregate, normalize, and manage internal and multiple third-party threat intelligence data in a single location, preventing siloed and disjointed threat intel.Improve Security Posture by Sharing Curated Threat Intelligence Data in Real Time with Security EcosystemsCreating custom API data feeds built for specific use cases is quick and easy. Combine threat data from all your sources, use contextual metadata to select the relevant subset, and leverage the right format such as JSON, STIX, CSV, CEF, and RPZ to RPZto improve the security posture and situational awareness of your existing security ecosystem, such as NGFW, IPS, web proxy,and SIEM.Extend the Unique Visibility Infoblox Provides into DNS such as Indicators of Compromise (IoCs) to Other Security Systems Infoblox provides the unique visibility into DNS data as the market-leading vendor of DDI that other vendors cannot match. DNS data such as indicators of compromise (IoC) can be shared with other security systems such as vulnerability scanners (Qualys and Rapid7) to kick off a scan when a new device comes on the network to determine whether it is malware infected.Expedite Threat Investigation to Free Up Security Personnel and Provide Timely Access to Context for Threat Indicators Use the Infoblox Dossier research tool as a single source of truth to rapidly understand the types of threats happening on your network, where they are coming from, and the risks they pose to your organization, including understanding the data source, threat severity, and priority. Gain insight into questionable activities related to inbound or outbound network communications. Furthermore, quickly learn about and understand what a variety of trusted sources report about the indicator in question to improve the operational efficiency of scarce security operations resources, saving you time and effort.About InfobloxInfoblox delivers Actionable Network Intelligence to enterprises, government agencies, and service providers around the world. As the industry leader in DNS, DHCP, and IP address management (DDI), Infoblox provides control and security from the core—empowering thousands of organizations to increase efficiency and visibility, reduce risk, and improve customer experience.Corporate Headquarters: +1.408.986.4000 1.866.463.6256(toll-free,U.S.andCanada)********************。

验证你的电子邮件。
D、检查一下你注册.NET Passport的Email信箱是否收到一封主题为“请验证您的 Microsoft .NETPassport 电子邮件地址”邮件,根据其中的提示直接点击对应的链接,来验证你的电子邮件地址,以后再登录MSN Messenger ,“(电子邮件未验证)”就不会再出现了。
第三步、打开MSN Messenger,点击登录,输入您刚才注册的passport,完成登陆后,你后可以开始使用MSN Messenger5.0开始聊天了。
更多关于如何使用MSN Messenger 5.0的内容,请访问MSN Messenger 5.0使用手册。
开始使用MSN Messenger 5.01、添加新的联系人要使用MSN Messenger与商务伙伴进行网上交流,首先要将对方添加到MSN Messenger的联系人列表中来。
用户可以在 MSN Messenger 主窗口(图1)中,单击“我想”下的“添加联系人”, 启动添加联系人向导。
在出现的界面选择“使用电子邮件地址或登录名”,然后填写您的联系人的Email地址,(图1:MSN Messenger主窗口)填写好之后点击“下一步”,就会出现一个成功添加的信息窗口(下图)。
(图2)如果您的联系人还没有使用MSN Messenger,你也可以点击上图右下角的“发送电子邮件” 按钮,给您的联系人发送电子邮件告诉他们MSN Messenger的卓越特性以及如何安装。
在对方收到邮件并安装使用MSN Messenger后,用户才可以将联系人添加到自己的联系人列表中。
对方在收到图3的消息后,点击确定,这样添加联系人的工作才算完成了。
(图3)2、发送即时消息如果用户想与联系人进行聊天,可以在Messenger主窗口(图1)中,双击联系人图标,打开“对话”窗口。
(图4),你只要将聊天内容填写到窗口左下端的对话框中,然后单击“发送”按钮或回车就可在对方和自己的对话窗口中显示交谈内容。

文 档 编 号 文档版本 V 1.4文档名称: WEBtalk 使用手册密级 共 74 页北京和欣运达科技有限公司编写:审核:武晓阳 杨士瑞日期:2019/4/22-1-目录概述 1 ................................................................................................................................... - 4 -操作指南 2............................................................................................................................ - 4 -快速入门 2.1........................................................................................................................... - 4 -安全使用 的注意事项 2.1.1Webtalk................................................................................. - 4 -客户端运行环境要求 2.1.2 Webtalk................................................................................... - 5 -登陆和退出 2.1.3Webtalk .................................................................................................. - 5 -了解 界面 2.1.4Webtalk ....................................................................................................- 7 -查看 软件版本 2.1.6Webtalk.......................................................................................... - 10 -工具介绍 2.2 WEBTALK.......................................................................................................... - 11 -建点工具 2.2.1.................................................................................................................. - 11 -串口工具 2.2.2.................................................................................................................. - 21 -脚本计算 2.2.3................................................................................................................... - 23 -报警配置 2.2.4.................................................................................................................. - 26 -网络配置 2.2.5.................................................................................................................. - 30 -备份还原 2.2.6.................................................................................................................. - 31 -第三方接口配置 2.2.7...................................................................................................... - 31 -小工具 2.2.8 Webtalk........................................................................................................ - 36 -系统配置 2.2.9.................................................................................................................. - 46 -组态文件管理 2.2.10........................................................................................................ - 48 -图片管理 2.2.11................................................................................................................ - 50 -批量复制 2.2.12................................................................................................................ - 51 -时间表配置 2.2.13............................................................................................................ - 59 -2.3 SETUP.................................................................................................................................. - 65 -和故障处理 3 FAQ................................................................................................................ - 67 -界面显示异常 3.1................................................................................................................. - 67 -无法连接 3.2 WEBTALK............................................................................................................ - 68 -不报警 3.3 WEBTALK................................................................................................................ - 70 --2-附录 4................................................................................................................................. - 71 -硬件配置 4.1 WEBTALK............................................................................................................ - 71 -系统默认配置 4.2................................................................................................................. - 71 --3-Webtalk 使用手册 1 概述Webtalk 系统是一款运行在工控机上的工业控制软件,他将现场操作、资源 管理、远程控制等融于一体,采用 Linux 操作系统,可安全有效的将各个层面的 信息汇集到监控站,极大的提高了使用者的生产效率。

Manual Activation GuideEpisodeFlip4MacScreenFlowSwitchWirecast2014 TelestreamIntroductionThis Manual Activation Guide is for Telestream customers wo have purchased Episode, Flip4Mac, ScreenFlow, Switch or Wirecast, and need to manually activate theur serial numberbecause their computer is not connected to the Internet.These instructions use Wirecast as an example. These instructions apply to each of Telestream’s products listed above. Since the activation is web-based, it doesn’t matter if you are using Windows or Mac, the steps are the same.Manually Activating Your ApplicationAfter you purchase an application, you’ll receive your Purchase Confirmation via email, so that you can activate your application. The the computer where the application is installed doesn’t have Internet access, follow these steps to activate it manually.1. Run the application and select Preferencces from the application’s main menu. For example, choose for WIrecast> Preferences on the Mac, File > Preferences on Windows.2. In the Preferences window click the Licenses icon to display the Licenses panel. On Mac, click the lock to make changes, or click the Plus (+) to add a Serial Number.3. Enter the Serial Number you received in your Order Confirmation email into the Serial Number field. Be sure to enter only zeroes (no captial letter O’s), capitalize all letters and include hyphens.4. Click Activate. When the application attempts to validate the serial number and fails because your computer is not connected to the Internet, you will see the following dialog window:5. Choose the option to Activate using a different computer and click Next.6. This window displays an auto-generated installation ID from the eSellerate Web site. NOTE: This is not your serial number. This is a separate ID that is specific to the computer it will be used on and cannot be used on other computers.7. Highlight the ID and right click and select Copy.8. Go to the website listed: .9. Paste the activation ID in the box indicated and click Submit.10. Once you have clicked Submit, the page will give you a unique activation key composed of groups of letters and numbers. You will be given the option to email this code.11. Back on the original computer you are trying to activate, click Next in the product activation page. Copy the Activation ID and paste it into these fields. Put your cursor in the first field and click Paste, the numbers will be entered into the correct fields. Click Activate.12. Once the Activation Key is validated, the application you purchased is activated. You will now be able to use the application with all of the features that you purchased, with none of the limitations of a trial/demo version.When you reopen the application and navigate to the License window in Preferences, your Serial Number will be embedded in the License field.Save your order confirmation with the Serial Number and the Activation Key in case you need tore-install and re-activate the application. Remember that the Activation ID is specific to the computer which it was activated on. If you need to move the license to a new computer, you will need to generate a new Installation ID and Activation Key for that new computer.。

1 JMS在介绍Act iveMQ之前,首先简要介绍一下JMS规范。
1.1 JMS的基本构件1.1.1 连接工厂连接工厂是客户用来创建连接的对象,例如Acti veMQ提供的Act iveMQ Conne ction Facto ry。
1.1.2 连接JMS Connec tion封装了客户与JMS提供者之间的一个虚拟的连接。
1.1.3 会话JMS Sessio n是生产和消费消息的一个单线程上下文。
会话用于创建消息生产者(produc er)、消息消费者(consum er)和消息(messag e)等。
会话提供了一个事务性的上下文,在这个上下文中,一组发送和接收被组合到了一个原子操作中。
1.1.4 目的地目的地是客户用来指定它生产的消息的目标和它消费的消息的来源的对象。
JMS1.0.2规范中定义了两种消息传递域:点对点(PTP)消息传递域和发布/订阅消息传递域。
点对点消息传递域的特点如下:•每个消息只能有一个消费者。
•消息的生产者和消费者之间没有时间上的相关性。
无论消费者在生产者发送消息的时候是否处于运行状态,它都可以提取消息。
发布/订阅消息传递域的特点如下:•每个消息可以有多个消费者。
•生产者和消费者之间有时间上的相关性。
订阅一个主题的消费者只能消费自它订阅之后发布的消息。
JMS规范允许客户创建持久订阅,这在一定程度上放松了时间上的相关性要求。
持久订阅允许消费者消费它在未处于激活状态时发送的消息。
在点对点消息传递域中,目的地被成为队列(queue);在发布/订阅消息传递域中,目的地被成为主题(topic)。
1.1.5 消息生产者消息生产者是由会话创建的一个对象,用于把消息发送到一个目的地。
1.1.6 消息消费者消息消费者是由会话创建的一个对象,它用于接收发送到目的地的消息。
FortiAuthenticator Interoperability GuideRevision 11st August 2012Copyright© 2012 Fortinet, Inc. All rights reserved. Fortinet®, FortiGate®, and FortiGuard®, are registered trademarks of Fortinet, Inc., and other Fortinet names herein may also be trademarks of Fortinet. All other product or company names may be trademarks of their respective owners.Performance metrics contained herein were attained in internal lab tests under ideal conditions, and performance may vary. Network variables, different network environments and other conditions may affect performance results. Nothing herein represents any binding commitment by Fortinet, and Fortinet disclaims all warranties, whether express or implied, except to the extent Fortinet enters a binding written contract, signed by Fortinet’s General Counsel, with a purchaser that expressly warrants that the identified product will perfo rm according to the performance metrics herein. For absolute clarity, any such warranty will be limited to performance in the same ideal conditions as in Fortinet’s internal lab tests. Fortinet disclaims in full any guarantees. Fortinet reserves the right to change, modify, transfer, or otherwise revise this publication without notice, and the most current version of the publication shall be applicable.Support will be provided to customers who have purchased a valid support contract. All registered customers with valid support contracts may enter their support tickets via the Fortinet Technical Support web site:https://About this Guide (4)Purpose of this document (4)Document Conventions (4)Integrating FortiAuthenticator with Clickatell SMS Gateway. (6)Creating and Configuring the Clickatell Account (6)Configuring the FortiAuthenticator (9)Appendix A – Available Variables (10)This document has been produced to aid the configuration of the FortiAuthenticator SMS Gateway with the Clickatell SMS Service.Fortinet do not endorse Clickatell in any way, neither should this guide be taken as any official configuration of the Clickatell system. The Clickatell system may change without notice so the website should be checked for the most current API configuration.FortiAuthenticator 1.0 MR4 ** Note that Custom SMS Gateways are not supported in FortiAuthenticator 1.0 MR3.When you read this manual, you will see that certain words are represented in different fonts, typefaces, sizes and weights. This highlighting is systematic; text is representedin a particular style to indicate its importance or meaning e.g.the same style to indicate their inclusion in a specific category. The types of words that are represented this way include the following:Processes which are to be followed such as browsing to the correct section of a web site are highlighted in italics and steps separated by arrows e.g.Browse to User User GroupText displayed on screen which may include configuration or be the result of executing a command is displayed in Courier New font e.g.Port 1 IP: 192.168.1.99Port 1 Netmask: 255.255.255.0Default Gateway: 192.168.1.1Paths and file locations are shown in Italic Courier New e.gEdit the file /etc/ssh/sshd_configCLI Commands which are to be executed by the user are shown in Italic Bold Courier New font e.gOpen the CLI and type exe factory resetGUI Commands which are to be executed by the user are shown in Italic Bold Arial font e.gUnder Configure SSL-VPN Users, click Add.Variables which should be replaced with the correct text such as passwords are displayed as a descriptor in Courier New font within angled brackets e.g.Username: <username>Password: <password><Token PIN>Links are highlighted in underlined blue text e.g.https://192.168.1.99Additional attention is brought to specific point by the use of interest using the following breakout box format:The Basic configuration of the FortiAuthenticator is shown below. Any deviations or change which are required from this configuration will be detailed in the relevant section. For more detail on he setup and configuration of the FortiAuthenticator see the Administration Guide at /auth.html.Create an account with Clickatell based on the Developers Central feature.Clickatell offer o free account with 10 free SMSes in certain regions. This can be utilised to prove the service.Once the account has been created, select the HTTP/S API to create an API Key andenable the service. SMTP is also supported however, HTTP/S provides response codes so should be used wherever possible.Once selected, click submit to acquire an API IDThe Clickatell web site displays the exact HTTP parameters required for a successful SMS. This string should be copied and replicated using the available variables on the FortiAuthenticatorThe HTTP API is of the format:/http/sendmsg?user=<username>&password=<password>&api_i d=<api_id>&to=<mobile_number>&text=<sms_message>The purpose of the configuration on the FortiAuthenticator is to replicate the required API format required by Clickatell and insert the correct variables. The available variables are defined in Appendix A.Once the correct parameters have been configured, verify that the URL Preview is the same as that displayed on the Clickatell web site.Once this has been configured, configure a user to use SMS tokens and verify the SMS is correctly sent.Note that with the 10 free Demo SMS do not display the correct content but rather generic replacement text. Once you have proven that the SMS can be triggered, you will need to purchase SMS credits to fully verify the solution.The following variables are available in creation of the POST URL:User Mobile Country Dialing code {{:country_code}} User Mobile number {{:mobile_number}} SMS Message to be sent containing the token {{:message}}。
Active Messenger服务端操作手册一、简介 (3)Active Messenger的主要功能 (3)二、安装Active Messenger服务器 (4)注意 (4)安装的软件要求 (4)安装服务端程序 (4)三、如何使用 (5)登陆及注册 (5)配置数据文件........................................................................................... 错误!未定义书签。
配置数据库............................................................................................... 错误!未定义书签。
创建组织结构及用户 (6)新建用户 (6)创建组织结构 (9)用户管理 (13)用户导入与导出 (18)AD用户导入.................................................................................... 错误!未定义书签。
用户组织机构调整 (14)用户查找 (24)权限设置........................................................................................... 错误!未定义书签。
其它设置................................................................................................... 错误!未定义书签。
服务端互联设置(只有多服务器互联的企业才需要设置)............. 错误!未定义书签。
关于通过服务器更新客户端................................................................... 错误!未定义书签。
S1新手入门教程作者:燕时间:2007-09-16 我要投稿一、常见问题解答 1、手机和电脑如何同步? S1是WM6系统,必须安装同步软件ActivcSyne 4.5 及以上版本,这是用于手机与电脑连接必装软件之一 2、Touch Flo界面的应用在待机桌面上,从最低下的(工具栏中间部分向上一划,就会呼出S1的3D界面,调出Touch后,左右滑动,可以实现翻页功能,在Touch Flo界面上从上到下一划来关闭Touch Flo 界面 3、如何将存储(TF卡上的MP3文件设置为铃声?在存储卡(Storage Card的根目录下建立My Documents文件夹,将Mp3放到里面,在铃声下面就可以找到了,不过,PPC系统也可以通过安装第三方软件,实现任意文件夹的铃声,和自定义铃声等,比如来电通和来电精灵等 4、如何将从蓝牙接收到的文件直接存放在Micro SD(TF卡上?“开始”――“设置”――“连接”――“蓝牙”――“FTP”选项卡,然后将共享目录设置在存储卡上,发过来的文件就会存储在TF卡上了 5、S1的闹钟Windows Mobile系统都不支持关机闹钟的,并且,默认的闹钟铃声必须为WAV格式,需将WAV格式的文件放在Windows目录下在列表中才能找到,但我们可以通过安装第三方软件,实现MP3闹钟,分组闹钟,自定义闹钟铃声等,比如:enAlarmPPC闹钟软件就是其中之一,安装此类软件,由于是随机启动的,所以,推荐安装在手机内存中 6、如何将图片设为背景后全透明的效果用“程序”里面的“图片和视频”将你要设为背景的图片打开,然后“菜单”――“设为今日背景”,就会出来“透明级别的设置”,在这里透明级别设为0%,就不会出现白的一层了,另外,推荐Resco.Picture.Viewer等图片软件,效果比自带的要强得多 7、校正屏幕准心方法“开始”――“设置”――“系统”――“屏幕”――“调整屏幕”,然后,根据屏幕显示的十字架,清晰而有力的点下,就可重新校正屏幕了 8、最便捷的横屏和竖屏的切换方法移动新机版本,本身提供了一个“dopodHome”插件,就是桌面最下面会有一行图标,第一个是电量(显示为一个具有四格的电池第二个是横屏和竖屏的调整(显示为一个手机上面有一支手写笔,第三个为通讯,第四个为内存,你点第二个图标就可以实现点击一下就会变横屏,再点一下会另一个方向横屏(也就是适应你的左右手习惯,所以有两种方向横屏,再点就会变回竖屏如果你的桌面没有这行图标你到“开始”――“设置”――“个人”――“今日”――“项目”里面把“dopodHome”这一项勾选上保存退出就可以了或者 HTC Home 插件里的启动器内也可以设置横屏和竖屏切换的快捷方式(默认就已添加,这个可以进行快速横竖屏切换,上述方法需要三步才能从竖屏调回竖屏,这个只需要两步就可以 9、收到新短信后不在屏幕上显示信息的内容“开始”――“设置”――“声音和提醒”――“通知”――在“事件:”中选择“信息:新短信”,然后将“在屏幕上显示信息”前面的勾去掉即可 10、设置来电铃声振动并响铃的方法“开始”――“设置”――“电话”在“铃声类型”里选择“振动并响铃”即可,短信及其它铃声设置方法相同 11、如何恢复出厂设置?“开始”――“设置”――“系统”――“清除内存”――然后输入:1234(PS:恢复出厂设置会完全删除个人主内存资料,恢复前最好备份重要资料,并保证右足够的电量完成硬启 12、硬启动方法按住接听和挂断和电源键后,点Reset,会出现硬启的英文界面,按确认键(导航键执行硬启动,按其他键取消硬启动,它的效果和恢复出厂设置是一样的 13、如何进入三色屏?电源键+相机键+捅PP 14、手机连接电脑时不对手机进行充电“开始”――“设置”――“系统”――“电源”――“高级”中,勾选“设备开启并连接到PC时请勿对电池进行充电”,连接电脑时就不会通过USB端口对手机进行充电了15、什么是WiFi? WIFI是一种无线上网方式,它可以通过与配备无线网卡的笔记本相连,或者与无线路由器相连来达到连入互联网的目的,也可以通过分布在城市中的“热点”进行互联网接入,不过对于中国来说无线“热点”的分布现在并不是很广现在只有水货配备了WiFi模块,行货由于政策上的原因,整个硬件被取消了,即使安装补丁,也无法启动 16、如何备份我手机里的联系人? a、安装Office2003版的Outlook; b、安装智能手机工作室,掌智手机助手等 c、在我的设备中,那个pim.pol文件,就是我们的联系人文件,备份它就行,还原的时候,就可以用它来覆盖 17、S1适合流媒体的播放器有那些?播放视频的软件有TCPMP和RealPlayer等等,TCPMP也被称作是WM手机系统里,全能的播放器,它可以播放除rm和rmvb之外的几乎所有常用视频格式,MP3的播放器有魔法小歌词、GSPlayer等等 18、移动新机版,被移动强行加锁了,如何才能解决?可以下载一个多普达的专用解锁工具,解锁完毕,你便可以删除移动那些垃圾软件了,也可以对系统文件进行修改和删除等操作 19、什么是手机的注册表修改工具?注册表修改工具也叫注册表编辑器,是专门用来修改手机注册表信息的工具,它分为PC端使用的和手机上使用的两种,有了它们,我们才能对系统的注册表信息进行修改和编辑,从而达到我们预期的目的 20、为什么我发到别人手机里的短信全是问号?答:打开短信~右键菜单~选项~账户~点击“信息” 将“必要时使用Unicode”前选勾即可 21、如何断开GPRS数据连接?答:回到系统的主界面后,可长按挂机键 22、软件如何删除?答:绿色软件可以直接删除,但要彻底删除,可能还得进入注册表中删除被修改的注册表信息,才算是删除得比较干净,但cab、和PC端安装的软件,则可以到开始~设置~系统~删除程序中来删除 23、如何设定背光关闭时间?直接点击电池图标,出来菜单后,就可调节亮度、关闭背光时间,以及关闭设备时间等 24、什么是飞行模式?简单的说,就是使手机关闭了电话功能,而保留了PDA功能,关闭电话功能后,手机的电池会更耐用,也实现了免打扰服务 26、使用蓝牙如何接收文件?开始~设置~连接~无线收发将里面的勾选上,然后打开手机的蓝牙,就可以用文件管理器发送文件了,同样也可以接受其它设备传送过来的文件,不过,使用完之后,强烈建议把勾取消,不让,会让手机白白浪费点更多的电量,用的时候在开启就是了 27、手机和电脑同步时,电脑提示需要输入密码是怎么回事?答:原因是你用了系统本身的密码验证,那个密码就是你手机的解锁密码,输入即可 28、手机屏幕上方的G是怎么回事?答:屏幕上方的那个空心“G”,表示你的SIM卡支持GPRS服务,一般要在开通GPRS业务后才会显示,这并不代表你的手机此时就有了GPRS数据流量,是不会收费的。
Jabra© 2019 GN Audio A/S. All rights reserved. Jabra® is a trademark of GN Audio A/S. The Bluetooth® word mark and logos are registered trademarks owned by the Bluetooth SIG, Inc. and any use of such marks by GN Audio A/S is under license.MADE IN CHINAMODEL: OTE0901. Welcome (4)2. Jabra Elite Active 45e overview 53. How to wear (6)4. How to charge (7)4.1 What the LEDs mean5. How to connect (9)5.1 Power on/off5.2 Pairing with a smartphone6. How to use (11)6.1 Calls & music6.2 Voice Assistant6.3 Multiple call handling6.4 Voice guidance6.5 How to reset6.6 Firmware update7. Jabra Sound+ app (17)8. Support (18)8.1 FAQ8.2 How to care for your earbuds1. WelcomeThank you for using the Jabra Elite Active 45e. We hope you will enjoy it!2. Jabra Elite Active 45e overviewRight(hold)(hold)USB charging cable4. How to chargeTo charge the earbuds, connect a USB charging cable to the USB charging port on the left earbud. It is recommended to charge the earbuds using the supplied Jabra charging cable, however it is possible to charge the earbuds using a compatible charger.It takes approx. 2 hours to fully charge the battery. If the earbuds are fully out of battery, 15 minutes of charging will give 1 hour of battery.N ote: Always clean and dry the USB charging port before charging the earbuds. It is recommended to recharge the earbuds at least once a month.FullMediumPower on Power off Pairing mode Resetting5. How to connect5.1 Power on/offOn: Press and hold (1 sec) the Multi-function button. The LED will flash green and you will hear a power on tone.Off: Press and hold (3 sec) the Multi-function button. The LED will flash red and you will hear5.2 Pairing with a smartphone1. Ensure the earbuds are powered off, andthen press and hold (3 sec) the Multi-function button until the LED flashes blue and you hear an announcement in the earbuds.2. Go to the Bluetooth menu on your smartphone and select the Jabra Elite Active 45e from the list of available devices.(hold)Right(hold)Power on Multi-function button Power off Press and hold (3 sec) thecall buttonReject call Double-press theMulti-function buttonAdjust volumePress the Volume up orVolume down button,when listening to music oron a callNext trackPress and hold (1 sec)the Volume up button(smartphone only)Press and hold twice toplay the previous track.Hearbattery andconnectionstatusPress the Volume up orVolume down button,when not listening to musicor on a callActivate Siri,Google Assistant Press the Voicemicrophone button, when on a call6.2 Voice AssistantThe Jabra Elite Active 45e enables you to speak to Siri or Google Assistant on your smartphonebutton.using the VoicePress the Voicebutton, when noton a call6.3 Multiple call handlingThe earbuds can answer or reject calls whenyou are already on a call.End current call andanswer incoming callPress theMulti-functionbuttonPut current call on Hold (1 sec) thebuttonReject incoming call,when on a callDouble-tap theMulti-functionbutton6.4 Voice guidanceVoice guidance are announcements intended to guide you, or give you earbud status updates (e.g. connection and battery status).Voice guidance is enabled by default.Hold (5 sec) the Voicebutton until you hearan announcement inthe earbudsAlternatively, use Jabra Sound+ on your smartphone to turn Voice guidance on or off.6.5 How to resetResetting the earbuds clears the list of paireddevices and all earbud settings.Reset the pairing list Ensure the earbuds are powered on and you are not on a call. Then simultaneously hold(5 sec) the Volume up button and the Multi-function button until the LED lights up purple. You will then need to re-pair the earbuds.6.6 Firmware updateFirmware updates improve performance, or add new functionality to Jabra devices. Download Jabra Sound+ for firmware updates.7. Jabra Sound+ appJabra Sound+8. Support8.1 FAQView the FAQs on /help/eliteactive45e 8.2 How to care for your earbuds• Always store the earbuds with the power off and safely protected.• Avoid storage at extreme temperatures (above 50°C/122°F or below -10°C/14°F). This can shorten battery life and may affect the earbuds.。
AM使用手册
使用前务必先阅读这个说明,且顺序不能错误,否则可能出现错误
1.安装服务端
2.停止AMServer服务,替换AMS.exe文件
3.启动AMServer服务
4.进入“人员管理模型”,开始注册,注册码为:
AMaym2jii-2-8ef0e52f30afbb513da78ef280ff2 1500 用户
APaym1jkb-2-85ff80efff13e02f80ff80ff80ff2 1500 用户
输入其中一个即可。
5.开始创建组织机构和用户
6.用户显示侧边栏的创建
只需要在服务器端创建即可。
只是创建完毕后,需要重启服务器上的AMServer服务,客户端再次连接服务器上是即可出现。
注册表如下:
Windows Registry Editor Version 5.00
[HKEY_LOCAL_MACHINE\SOFTWARE\ActiveSoft\Employee\ClientAddIn\ AMV AddIn\TASKX]
"DisplayName"="我的测试"
"Target"=""
"TargetType"=dword:00000002
使用方法见外面的注册表文件,双击注入即可。
具体含义,请到官方网站上下载二次开发手册。
本软件包所有资源均来自互联网,本人只是测试。
为了方便同行使用,特撰写本说明。
Active Messenger的功能介绍
一、界面介绍
二、即时消息的输入
1.人员的在线状态信息。
用户可以清楚的知道单位的同事的当前状态。
比如是否在线或是
否忙碌,从而决定是否跟其联系。
2.发送即时消息(有权限的人可以群发或公告),消息内容的文字可以用不同的字体及颜
色来表示,以区别重要性;还可以做简单的排版,确定字符的对齐方式、确定是否需要增加简单的分节符号、增加表情等。
3.对于离线用户,仍然可以发送留言和附件,一旦该用户登录,将会收到这些留言和附件。
三、信息群发
1、给所有在线用户群发:
进入在线用户视图后,在顶行在线用户上单击鼠标器右键,在弹出菜单中选择群发,系统会自动将所有在线用户设定为接受信息者。
同样的方法也适合于给某个部门的用户群发信息,
具体如下图所示:
2、选择特殊用户群发信息:
如果需要同时给多个上线的用户群发消息,有两种方法:
方法一:按住键盘上的ctrl键,然后单击鼠标器左键选择需要接受信息的用户,可以选取多个用户,选取完毕后,单击鼠标器右键,选择菜单上的“群发”,系统会自动将所有在线用户设定为接受信息者。
具体如下图所示:
方法二:对于经常需要同时联系的同事,可以在“我的视图”中定义专门的组,选中该组以后,选择增加成员,可将相关联系人同时加入到组中,然后就可以群发信息给了。
根据不同的需要,同一个联系人允许被加入到多个组中,对于阶段性的项目协同,这个方法可以很方便的与小组中的同事交换信息。
具体如下两图所示:
四、常用语定义:
为了提高及时通讯的效率,可以直接定义常用语,方法是点击通话菜单最右边的对话按钮,弹出以下窗口:
在该窗口中可以定义快捷名称和内容,输入完毕后,点击“更新”按钮,信息会被记录下来,在收到信息的时候,可以直接使用。
五、文件传送功能
在企业内部的协同过程中,同事之间经常需要传递文件Active Messenger对此作了特别的优化,让用户传递文件变得轻松快捷。
1.软件中提供多种发送文件的方式。
a)通过资源管理器中嵌入“新易发”的功能,直接发送;
b)通过资源管理器将文件,直接拖入到附件框内,进行发送;
c)通过发送界面中的附件按钮,增加附件方式,进行发送;
d)在word或excel系统中,有“易发”按钮,可以直接将编制完成的文档发送;
2.可以传送100M级别的大文件。
由于邮件系统对邮件大小的限制,在网络中传输大
文件变得很麻烦;
3.可以传送一个或多个文件,甚至是整个文件夹;
六、消息跟踪
Active Messenger可以让用户清楚的知道所发出的消息的状态。
比如接收者是否已阅读了该消息。
这就保证了消息的有效性。
Active Messenger不会有大量的垃圾信息,企业中的发送的每一条消息往往是包含一个事务,因此用户对消息的状态格外关注。
图例为消息的发送在自己的发件箱中查看已发信息的状态, 我们可以知道该消息有一个人已经签收了,还有两个没有打开消息。
七、签收功能
对于企业中一些重要的消息,发送者可以要求接收者输入自己的AM密码,表示本人确实收到本消息,这种签名的机制可以有效解决推委责任的问题。
发送者:
接收者:
发件者的数据库中有签收登记:
应用如:
⏹财务经理要将C产品的成本告诉销售经理。
而这样的信息是不允许随便让别的员工看到
的。
这样财务经理可以采用签收的方式发送该消息。
(就算消息到达的那段时间该销售经理不在,别人也不可能看到本消息。
因为打开本消息的时候,需要接受者输入自己的密码验证。
)
⏹工艺部门员工A,在审核设计部门B做的Y产品设计图纸中,发现该的设计是存在设计
缺陷。
此时可以通过签收的方式发送改进要求给B员工,告诉B改进的建议。
若B签收了消息后,在A的管理器中,可以看到B已经签收过本消息的历史记录。
进而A可以将此消息进行收藏,以备以后查询到。
这样可以避免部门间与员工间的相互推诿的问题。
八、会议功能
在企业内经常会出现为某一个主题,进行大家共同讨论交流的情况。
AM提供了会议功
能来满足用户的这一要求。
1.为某一个主题,邀请若干个人员进行会议;
2.会议结束后,主持人可以产生会议记录。
内容:主持人、邀请参会人员、到会人员、缺
席人员及会议内容等会议记录。
九、消息管理功能
AM作为企业内交流沟通的平台,对交流的历史记录的收藏与管理会是非常重要的一个功能。
在对消息的管理过程中提供了:
1.服务器与客户端的消息同步;
系统支持在任何客户端的机器中,将自己在别的机器上发送过的消息同步到本机上。
2.可以将重要的消息进行收藏:
进入信息管理器以后,除了常用的分类,可以按照自己的要求建立相应的分类目录,本图会议记录以下的分类均为自定义类别,具体如下图所示:
完成以后,在收到一个及时消息时,点击“收藏”按钮,会弹出菜单如下图所示:
选择合适的类别,这条信息就自动按照自定义的分类进入到管理器中去了。
3.收藏夹、待处理为系统提供的分类,可以直接使用;
4.可以对历史消息可进行内容查询,查询后可以快速定位到该记录;
5.可以记录会议的内容;。