DES客户端使用设置说明
- 格式:doc
- 大小:939.51 KB
- 文档页数:18

des数据加密标准
DES全称为Data Encryption Standard,即数据加密标准,是一种使用密钥加密的块算法。
它是在1970年代早期出现的,并在1976年11月被美国联邦政府的国家标准局确定为联邦资料处理标准(FIPS),授权在非密级政府通信中使用。
随后,该算法在国际上广泛流传开来。
DES加密/解密算法是一种可逆的对称加密算法,这类算法在加密和解密时使用相同的密钥,或是使用两个可以简单地相互推算的密钥,一般用于服务端对服务端之间对数据进行加密/解密。
值得注意的是,DES标准规定的区块长度为固定值64Bit。
此外,PKCS7标准是主流加密算法都遵循的数据填充算法,而DES标准也规定了这种数据填充方式。
以上内容仅供参考,如需更多信息,建议查阅相关文献或咨询专业人士。
DES客户端使用设置说明客户端通过IE浏览器访问DES系统,由于各IE版本的安全性设置不尽相同,对正常使用系统功能可能会有影响。
下面针对客户端浏览器的正确设置给出具体说明,以IE6.0设置为例,其他版本设置方式稍有不同。
1.客户端IE版本要求使用Microsoft Internet Explorer 6.0以上版本。
2.允许弹出窗口设置影响内容:登录DES页面后点击某些功能按钮需要打开新的IE窗口(例如点击报表编号执行报表),此时无反应。
设置方法:1)在IE工具栏中点击工具->Internet选项…:2)在选项窗口选择“隐私”标签,在“弹出窗口组织程序”中将复选框取消选中:3)如果希望仍然限制其他站点的弹出窗口,可在上一页面中仍然选中复选框,点击“设置”按钮,在输入地址的编辑框中输入DES登录页面的地址,并点击“添加”按钮:4)点击关闭完成设置。
3.信任站点设置影响内容:打开DES登录页面图片和输入框显示不正常;在DES登录页面输入正确的用户和密码后页面不跳转,返回登录页面;登录DES页面后在打开的新窗口中提示输入用户名和密码。
设置方法:1)在IE工具栏中点击工具->Internet选项…:2)在选项窗口选择“安全”标签,选中“受信任的站点”,再点击站点按钮:3)在输入网址的编辑框中输入所有服务器的地址依次添加,包括DES的应用服务器和报表服务器(包括集群的服务器地址),将窗口中的复选框取消选择,再点击添加按钮:4)点击关闭和确定后完成设置。
重新刷新页面。
4.隐私站点设置影响内容:登录DES页面后在打开的新窗口中提示输入用户名和密码。
设置方法:1)在IE工具栏中点击工具->Internet选项…:2)在选项窗口选择“隐私”标签,点击站点按钮:3)在输入网址的编辑框中输入所有报表服务器的地址依次添加(包括集群的服务器地址),再点击允许按钮:4)点击确定后完成设置。
关闭IE重新登录DES系统。
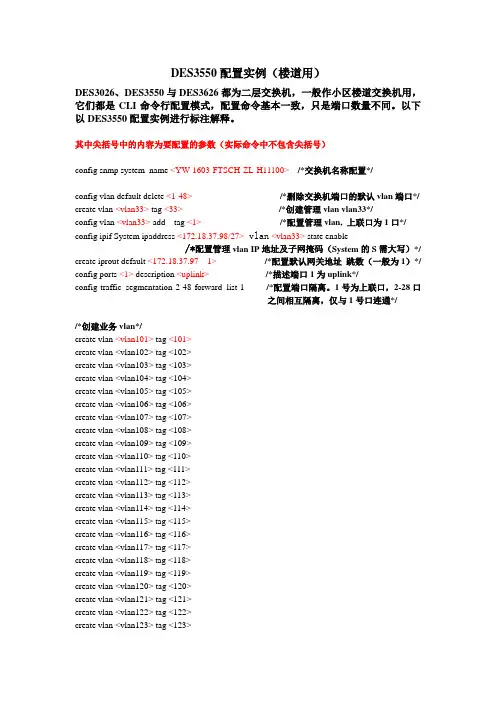
DES3550配置实例(楼道用)DES3026、DES3550与DES3626都为二层交换机,一般作小区楼道交换机用,它们都是CLI命令行配置模式,配置命令基本一致,只是端口数量不同。
以下以DES3550配置实例进行标注解释。
其中尖括号中的内容为要配置的参数(实际命令中不包含尖括号)config snmp system_name <YW-1603-FTSCH-ZL-H11100> /*交换机名称配置*/config vlan default delete <1-48>/*删除交换机端口的默认vlan端口*/ create vlan <vlan33> tag <33>/*创建管理vlan vlan33*/config vlan <vlan33> add tag <1>/*配置管理vlan, 上联口为1口*/ config ipif System ipaddress <172.18.37.98/27> vlan<vlan33> state enable/*配置管理vlan IP地址及子网掩码(System的S需大写)*/ create iprout default <172.18.37.97 1> /*配置默认网关地址跳数(一般为1)*/ config ports <1> description <uplink> /*描述端口1为uplink*/config traffic_segmentation 2-48 forward_list 1 /*配置端口隔离。
1号为上联口,2-28口之间相互隔离,仅与1号口连通*//*创建业务vlan*/create vlan <vlan101> tag <101>create vlan <vlan102> tag <102>create vlan <vlan103> tag <103>create vlan <vlan104> tag <104>create vlan <vlan105> tag <105>create vlan <vlan106> tag <106>create vlan <vlan107> tag <107>create vlan <vlan108> tag <108>create vlan <vlan109> tag <109>create vlan <vlan110> tag <110>create vlan <vlan111> tag <111>create vlan <vlan112> tag <112>create vlan <vlan113> tag <113>create vlan <vlan114> tag <114>create vlan <vlan115> tag <115>create vlan <vlan116> tag <116>create vlan <vlan117> tag <117>create vlan <vlan118> tag <118>create vlan <vlan119> tag <119>create vlan <vlan120> tag <120>create vlan <vlan121> tag <121>create vlan <vlan122> tag <122>create vlan <vlan123> tag <123>create vlan <vlan124> tag <124> create vlan <vlan125> tag <125> create vlan <vlan126> tag <126> create vlan <vlan127> tag <127> create vlan <vlan128> tag <128> create vlan <vlan129> tag <129> create vlan <vlan130> tag <130> create vlan <vlan131> tag <131> create vlan <vlan132> tag <132> create vlan <vlan133> tag <133> create vlan <vlan134> tag <134> create vlan <vlan135> tag <135> create vlan <vlan136> tag <136> create vlan <vlan137> tag <137> create vlan <vlan138> tag <138> create vlan <vlan139> tag <139> create vlan <vlan140> tag <140> create vlan <vlan141> tag <141> create vlan <vlan142> tag <142> create vlan <vlan143> tag <143> create vlan <vlan144> tag <144> create vlan <vlan145> tag <145> create vlan <vlan146> tag <146> create vlan <vlan147> tag <147> create vlan <vlan148> tag <148>/*为每个端口配置不同的端口*/ config vlan <vlan102>add untag <2> config vlan <vlan103> add untag <3> config vlan <vlan104> add untag <4> config vlan <vlan105> add untag <5> config vlan <vlan106> add untag <6> config vlan <vlan107> add untag <7> config vlan <vlan108> add untag <8> config vlan <vlan109> add untag <9> config vlan <vlan110> add untag <10> config vlan <vlan111> add untag <11> config vlan <vlan112> add untag <12> config vlan <vlan113> add untag <13> config vlan <vlan114> add untag <14> config vlan <vlan115> add untag <15> config vlan <vlan116> add untag <16> config vlan <vlan117> add untag <17> config vlan <vlan118> add untag <18>config vlan <vlan119> add untag <19> config vlan <vlan120> add untag <20> config vlan <vlan121> add untag <21> config vlan <vlan122> add untag <22> config vlan <vlan123> add untag <23> config vlan <vlan124> add untag <24> config vlan <vlan125> add untag <25> config vlan <vlan126> add untag <26> config vlan <vlan127> add untag <27> config vlan <vlan128> add untag <28> config vlan <vlan129> add untag <29> config vlan <vlan130> add untag <30> config vlan <vlan131> add untag <31> config vlan <vlan132> add untag <32> config vlan <vlan133> add untag <33> config vlan <vlan134> add untag <34> config vlan <vlan135> add untag <35> config vlan <vlan136> add untag <36> config vlan <vlan137> add untag <37> config vlan <vlan138> add untag <38> config vlan <vlan139> add untag <39> config vlan <vlan140> add untag <40> config vlan <vlan141> add untag <41> config vlan <vlan142> add untag <42> config vlan <vlan143> add untag <43> config vlan <vlan144> add untag <44> config vlan <vlan145> add untag <45> config vlan <vlan146> add untag <46> config vlan <vlan147> add untag <47> config vlan <vlan148> add untag <48>/*配置每个vlan的1口为上联口*/ config vlan <vlan102> add tag <1> config vlan <vlan103> add tag <1> config vlan <vlan104> add tag <1> config vlan <vlan105> add tag <1> config vlan <vlan106> add tag <1> config vlan <vlan107> add tag <1> config vlan <vlan108> add tag <1> config vlan <vlan109> add tag <1> config vlan <vlan110> add tag <1> config vlan <vlan111> add tag <1> config vlan <vlan112> add tag <1>config vlan <vlan113> add tag <1>config vlan <vlan114> add tag <1>config vlan <vlan115> add tag <1>config vlan <vlan116> add tag <1>config vlan <vlan117> add tag <1>config vlan <vlan118> add tag <1>config vlan <vlan119> add tag <1>config vlan <vlan120> add tag <1>config vlan <vlan121> add tag <1>config vlan <vlan122> add tag <1>config vlan <vlan123> add tag <1>config vlan <vlan124> add tag <1>config vlan <vlan125> add tag <1>config vlan <vlan126> add tag <1>config vlan <vlan127> add tag <1>config vlan <vlan128> add tag <1>config vlan <vlan129> add tag <1>config vlan <vlan130> add tag <1>config vlan <vlan131> add tag <1>config vlan <vlan132> add tag <1>config vlan <vlan133> add tag <1>config vlan <vlan134> add tag <1>config vlan <vlan135> add tag <1>config vlan <vlan136> add tag <1>config vlan <vlan137> add tag <1>config vlan <vlan138> add tag <1>config vlan <vlan139> add tag <1>config vlan <vlan140> add tag <1>config vlan <vlan141> add tag <1>config vlan <vlan142> add tag <1>config vlan <vlan143> add tag <1>config vlan <vlan144> add tag <1>config vlan <vlan145> add tag <1>config vlan <vlan146> add tag <1>config vlan <vlan147> add tag <1>config vlan <vlan148> add tag <1>/*配置snmp网管*/删除系统默认的public(ro)、private(rw)字符串,指定合法的字符串(rw)DHS-3618:4#delete snmp community publicDHS-3618:4#delete snmp community privateDHS-3618:4#create snmp community <合法字符串>view CommunityView <read_write |readonly >/*配置telnet和console*/设置超级用户aaa,并设置口令为bbbDHS-3618:4#create account admin <aaa>Command: create account admin <aaa>Enter a case-sensitive new password: <bbb>Enter the new password again for confirmation: <bbb>删除用户aaaDHS-3618:4#delete account <aaa>Command: delete account aaa在系统提示Are you sure to delete the last administrator account?(y/n) 时回答y。
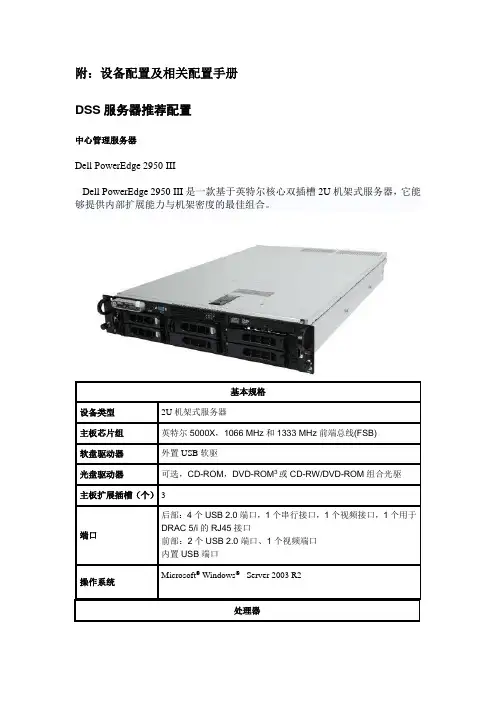
附:设备配置及相关配置手册DSS服务器推荐配置中心管理服务器Dell PowerEdge 2950 IIIDell PowerEdge 2950 III是一款基于英特尔核心双插槽2U机架式服务器,它能够提供内部扩展能力与机架密度的最佳组合。
基本规格设备类型2U机架式服务器主板芯片组英特尔5000X,1066 MHz和1333 MHz前端总线(FSB)软盘驱动器外置USB软驱光盘驱动器可选,CD-ROM,DVD-ROM3或CD-RW/DVD-ROM组合光驱主板扩展插槽(个)3端口后部:4个USB 2.0端口,1个串行接口,1个视频接口,1个用于DRAC 5/i的RJ45接口前部:2个USB 2.0端口、1个视频端口内置USB端口操作系统Microsoft® Windows®Server 2003 R2处理器数字监控系统DSS2.0分布式服务安装说明1.安装说明服务器安装1)运行“DSSServer_Distribute_V2.00.1_build_20091109_CHS.exe”进行数字监控系统分布式程序的安装,首先进入安装界面2)单击按键进入选择安装路径界面在此步骤可点击按键更改默认安装路径(默认为“C:\Program Files\DSS”)。
3)确认安装路径后,单击按键继续安装操作4)单击按键继续安装5)安装完成后,自动进入配置向导界面按照下述介绍逐步进行配置。
配置向导介绍表录像磁盘空间和报警录像磁盘空间。
根据需要可以添加多个存储路径。
6)选择按键完成安装,提示配置在下次服务程序启动后生效7)单击,提示安装成功9)单击,提示是否启动数字监控系统根据需要选择或者即可,至此数字监控系统分布式程序的安装全部完成。
配置分布式DSS 时,中心将各服务器打开,而在分中心则无需开启DMS,因为分布式部署只需要一个CMS 中心管理服务器,再分中心只需开启MTS与SS即可。
如图禁用DMS即可。

284459779.doc目录1.修改本地连接IP地址 (2)1.1 WIN 7(WIN8、WIN10通用)系统修改本地连接IP地址 (2)1.2 XP系统修改本地连接IP地址 (5)2. 网桥连接方式 (8)2.1 网桥连接方式 (8)2.2 网桥连接电脑进入设置系统 (9)3. 网桥桥接设置 (11)3.1 单台网桥发射信号设置 (11)3.2单台网桥接收信号设置 (14)3.3 网桥组网设置 (18)4. 进阶设置 (25)4.1 网桥修改网桥IP地址 (25)4.2网桥开启DHCP服务 (26)4.3网桥信号功率设置 (27)4.4网桥信号频段更改 (28)4.5网桥开启超宽频信号频段 (29)4.6网桥开启监控数据传输优化 (31)4.7网桥看门狗功能 (32)4.8网桥备份/恢复/复位设置 (33)4.9网桥AP管理软件 (37)5. 状态名词解释 (38)5.1 登陆指南 (38)5.2工作模式 (38)5.3按钮和修改 (39)5.4无线(接入点模式) (39)5.5无线(客户端模式) (40)5.6关联客户端(AP模式) (40)5.7其它状态 (41)6. 故障排查 (45)6.1 PC不能连接到网桥 (45)6.2无法连接AP (45)6.3能连上AP但无法上网 (45)6.4恢复出厂设置 (46)1.修改本地连接IP地址1.1 WIN 7(WIN8、WIN10通用)系统修改本地连接IP地址1.1.1 右键网络,打开属性1.1.2 点击本地连接右键网络点击属性点击1.1.3 打开本地连接点击属性1.1.4 选择Internet 协议版本4 (TCP/IPV4),双击双击1.1.5 修改本地IP地址:IP 地址:192.168.8.120子网掩码:255.255.255.0然后点击确定。
注意:返回本地连接属性需要再点击确定IP修改设置才会正式生效,再点击确定1.2 XP 系统修改本地连接IP 地址1.2.1 右键网络邻居,打开属性1.2.2 右键本地连接,打开属性1.2.3 选择Internet 协议版本4 (TCP/IP ),双击右键网络邻居点击属性1.2.4 修改本地IP 地址: IP 地址:192.168.8.120 子网掩码:255.255.255.0 然后点击确定。

DSS7016操作员使用手册V1.0.0浙江大华技术股份有限公司DSS7016 客户端 前言文档版本 1.0.0 (2013-04-01) i 前言概述本文档详细描述了DSS7016客户端的安装、配置和使用。
符号约定在本文中可能出现下列标志,它们所代表的含义如下: 符号 说明危险表示有高度潜在危险,如果不能避免,会导致人员伤亡或严重伤害。
警告表示有中度或低度潜在危险,如果不能避免,可能导致人员轻微或中等伤害。
注意表示有潜在风险,如果忽视这些文本,可能导致设备损坏、数据丢失、设备性能降低或不可预知的结果。
防静电 表示使用静电敏感的设备时,需防止产生静电。
电击防护表示高压危险。
激光辐射表示强激光辐射。
表示能帮助您解决某个问题或节省您的时间。
表示是正文的附加信息,是对正文的强调和补充。
目录1概述 (1)1.1 DSS7016客户端简介 (1)1.2配置要求 (1)2安装与卸载 (3)2.1安装DSS7016客户端 (3)2.2卸载DSS7016客户端 (5)3 配置 (7)3.1登录DSS7016客户端 (7)3.2本地配置 (8)3.3报警配置 (9)3.3.1 配置报警预案 (9)3.3.2 开启、导入和导出预案 (14)3.4轮巡任务 (15)4基本操作 (17)4.1预览 (17)4.1.1 实时预览 (17)4.1.2 将通道添加到收藏夹 (20)4.1.3 录像 (21)4.1.4 抓图 (22)4.1.5 云台设置 (23)4.2回放 (26)4.2.1 回放录像 (27)4.2.2 下载文件 (28)4.2.3 录像打标 (30)4.3报警管理 (31)4.4视频上墙 (32)4.5电子地图 (33)4.6语音对讲及广播 (34)4.6.1 语音对讲 (34)4.6.2 语音广播 (36)5扩展功能 (38)文档版本 1.0.0 (2013-04-01) ii5.1行为分析 (38)5.2人脸识别 (39)5.3智能跟踪 (39)5.4人数统计 (41)5.5录像标签 (41)5.6资源管理 (43)文档版本 1.0.0 (2013-04-01) iii1 概述1.1 DSS7016客户端简介DSS7016 客户端是一款用于管理安全防护监控设备的管理软件。

计算机与网络安全实验报告班级:计算机院卓越班学号:姓名:冉徐衎地点:EII-508时间:2014年6月对称密码基本加密实验【实验环境】ISES客户端Microsoft CLR Debugger 2005或其它调试器【实验步骤】一、DES在加密算法选项里选择DES,以下实验步骤保持算法不变。
(一)加解密计算(1)加密(2)解密(二)分步演示(1)点击“扩展实验”框中的“DES分步演示”按钮,进入DES分步演示窗口,打开后默认进入分步演示页面。
(2)密钥生成(3)加密过程二、3DES在加密算法选项里选择3DES,以下实验步骤保持算法不变。
(一)加解密计算选择明/密文和密钥的格式,输入明/密文和密钥;点击“加密”/“解密”按钮,进行加/解密计算;查看计算结果。
具体步骤可参照DES的加解密计算的实验步骤。
(二)查看轮密钥(1)点击“扩展实验”框中的“查看轮密钥”按钮,进入查看轮密钥窗体。
(2)输入明文、初始化向量和密钥,密钥长度为128位或192位,对应于原理中的两种情况,此处以输入128位密钥为例;选择工作模式和填充模式,点击“加密”按钮,使用3DES算法按照选定的工作模式和填充模式进行加密;在“密钥”框中查看各轮的密钥,在“密文”框中查看生成的密文。
具体如错误!未找到引用源。
所示。
【实验截图】DES加密DES解密三、AES-128/192/256AES-128/192/256的区别仅在于密钥长度的不同,此处以AES-128为例,AES-192/256可参照完成。
在加密算法选项里选择AES-128,以下实验步骤保持算法不变。
(一)加解密计算选择明/密文和密钥的格式,输入明/密文和密钥;点击“加密”/“解密”按钮,进行加/解密计算;查看计算结果。
具体步骤可参照DES的加解密计算的实验步骤。
(二)查看轮密钥3DES 加密查看轮转秘钥AES查看轮秘钥AES查看轮秘钥DESE盒拓展非对称加密实验【实验环境】ISES客户端Microsoft CLR Debugger 2005或其它调试器【实验步骤】一、RSA(一)加解密计算(1)打开实验实施,默认的选择即为RSA标签,显示RSA实验界面。
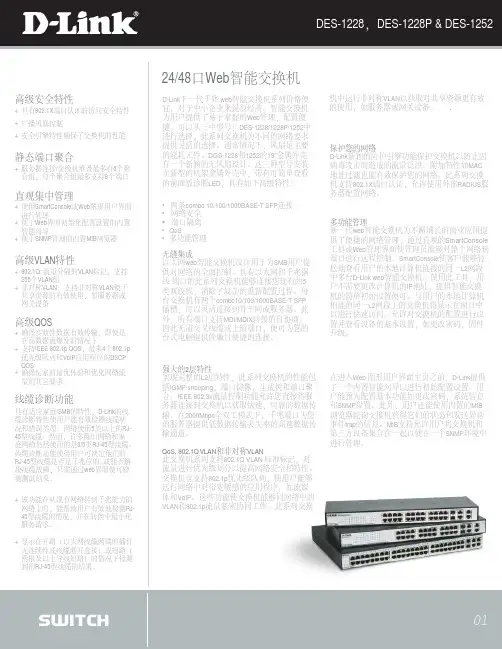


DES-3326S配置手册友讯电子(吴江)有限公司 2003-11一、引言 (3)端口 (3)性能 (3)管理 (4)二、交换机的WEB管理 (5)三、设备配置 (6)1、交换机IP地址 (6)Web页面 (6)命令行 (6)2、SNMP (6)Web方式 (7)命令行 (7)3、V LAN (7)Web方式 (7)命令行 (8)4、P ORT T RUNKING (8)Web方式 (8)命令行 (9)5、端口镜像 (9)Web方式 (9)命令行 (10)6、带宽控制 (10)Web方式: (10)命令行 (11)7、IGMP (11)Web方式 (11)命令行 (13)8、绑定 (13)MAC地址与端口绑定 (13)9、802.1X (14)Web方式 (14)命令行 (17)10、ACL (17)Web方式 (17)命令行 (22)11、软件升级 (22)Web方式 (22)命令行 (22)一、引言端口∙24个高性能自适应端口,自动识别平行线或交叉线(Auto-MDIX),以10/100 Mbps的速率与末端站点、服务器和集线器连接;∙所有的端口都支持10Mbps/100Mbps速率和半双工或全双工模式,以及半双工端口的流控制之间的自适应;∙提供一个前面板扩展模块接口,用于两端口1000BASE-SX, 1000BASE-LX, 1000BASE-T, 100BASE-FX, GBIC或一个端口的千兆接口转换器(GBIC)& 堆叠模块;∙RS-232 DCE诊断端口(控制端口)通过与控制终端或使用终端仿真程序的PC对交换机进行设置和管理。
性能∙24个集成10/100 Mbps端口;∙交换机堆叠配置:每个堆叠包含8个单元+8个GBIC端口;∙1个开放插槽,用于两个10/100Mbps端口;一个或两个可选快速以太网光纤,或是两个千兆端口(独立式配置);∙8.8Gbps的交换结构容量;∙MDI/MDIX自动上传,用于所有的双绞线端口;∙支持802.1Q VLAN, Internet 组管理协议(IGMP)监听,802.1p优先队列,以及端口镜像;∙多层访问控制列表(ACL)和服务质量(QoS)控制;∙网络管理员定义端口安全措施;∙最多可用于八个快速以太网端口的端口中继;∙802.1D屏蔽双绞线和802.1w快速生成树,用于冗余备份桥接路径;∙IEEE 802.3x流控制∙SNMP v.1, v.2, v.3网络管理,支持RMON(远程网络监控);∙802.1x端口访问控制;∙每端口(Per-port)带宽控制;∙支持IEEE 802.3z,用于所有的千兆端口(可选);∙支持IEEE 802.3x流控制支持,用于所有的千兆端口(可选)。
Android数据加密之Des加密详解Android DES加密的相关实现,简单的实现了⼀下,今天来总结⼀下:DES加密介绍:DES是⼀种对称加密算法,所谓对称加密算法即:加密和解密使⽤相同密钥的算法。
DES加密算法出⾃IBM的研究,后来被美国政府正式采⽤,之后开始⼴泛流传,但是近些年使⽤越来越少,因为DES使⽤56位密钥,以现代计算能⼒,24⼩时内即可被破解。
DES加密使⽤⽅式:1.)DesUtil常量类介绍private final static String HEX = "0123456789ABCDEF";private final static String TRANSFORMATION = "DES/CBC/PKCS5Padding";//DES是加密⽅式 CBC是⼯作模式 PKCS5Padding是填充模式private final static String IVPARAMETERSPEC = "01020304";////初始化向量参数,AES 为16bytes. DES 为8bytes.private final static String ALGORITHM = "DES";//DES是加密⽅式private static final String SHA1PRNG = "SHA1PRNG";//// SHA1PRNG 强随机种⼦算法, 要区别4.2以上版本的调⽤⽅法2.)动态⽣成秘钥长度不能够⼩于8位字节因为DES固定格式为128bits,即8bytes。
/** ⽣成随机数,可以当做动态的密钥加密和解密的密钥必须⼀致,不然将不能解密*/public static String generateKey() {try {SecureRandom localSecureRandom = SecureRandom.getInstance(SHA1PRNG);byte[] bytes_key = new byte[20];localSecureRandom.nextBytes(bytes_key);String str_key = toHex(bytes_key);return str_key;} catch (Exception e) {e.printStackTrace();}return null;}//⼆进制转字符public static String toHex(byte[] buf) {if (buf == null)return "";StringBuffer result = new StringBuffer(2 * buf.length);for (int i = 0; i < buf.length; i++) {appendHex(result, buf[i]);}return result.toString();}private static void appendHex(StringBuffer sb, byte b) {sb.append(HEX.charAt((b >> 4) & 0x0f)).append(HEX.charAt(b & 0x0f));}3.)处理秘钥Key的两种⽅式第⼀种:// 对密钥进⾏处理private static Key getRawKey(String key) throws Exception {KeyGenerator kgen = KeyGenerator.getInstance(ALGORITHM);//for androidSecureRandom sr = null;// 在4.2以上版本中,SecureRandom获取⽅式发⽣了改变if (android.os.Build.VERSION.SDK_INT >= 17) {sr = SecureRandom.getInstance(SHA1PRNG, "Crypto");} else {sr = SecureRandom.getInstance(SHA1PRNG);}// for Java// secureRandom = SecureRandom.getInstance(SHA1PRNG);sr.setSeed(key.getBytes());kgen.init(64, sr); //DES固定格式为64bits,即8bytes。
DES-3028P交换机试用记录目录一.前言 (3)二.DES-3028P交换机简介 (3)三、交换机的管理和配置 (7)3.1 Console本地管理 (7)3.2 WEB管理 (8)3.3 Telnet管理 (9)3.4 主要功能设置说明 (10)显示交换机基本信息 (10)■DES-3028P Web Management Tool ——显示交换机基本信息 (10)802.1x安全认证设置1 —全局设置 (12)■DES-3028P Web Management Tool (12)GVRP(通用VLAN注册协议)整机全局设置 (14)■“DES-3028P Web Management Tool” (14)IGMP Snooping(组播应用)整机全局设置 (15)■“DES-3028P Web Management Tool” (15)■Administration ——设备配置 (15)配置交换机管理IP地址和默认路由 (16)修改交换机管理VLAN (17)配置端口工作状态 (17)端口带宽限制设置1——打开端口流量控制Flow control (18)Syslog日志服务器设置 (19)SNTP交换机时钟同步设置 (20)交换机Firmware软件升级 (23)整机PoE以太网供电设置 (25)端口PoE以太网供电设置 (25)查看端口PoE供电情况 (26)单一IP集群管理设置 (27)■L2 Features二层设置 (29)802.1Q VLAN基本设置 (29)GVRP(通用VLAN注册协议)具体端口设置 (31)交换机组播设置(基于VLAN) (33)整机全局STP生成树设置 (34)端口STP生成树设置 (35)单端口环路检测LBD(Loop Back Detect) (36)■CoS服务级别设置 (40)端口带宽限制设置2——设置端口限速 (40)ACL设置(Access Control List) (41)■ACL (41)通过ACL设置来过滤典型病毒包 (42)通过ACL设置来限制ICMP包(ping包) (43)通过限制MAC的固定位来限制某厂商的设备上网 (43)过滤除PPPoE封包外的所有数据包 (45)在用户VLAN过滤除PPPoE封包外的所有数据包 (45)设置用户IP和交换机Port绑定 (46)■Security网络安全设置 (53)广播风暴抑制 (53)组播风暴抑制 (54)DLF风暴抑制 (55)端口隔离设置Traffic Segmentation (56)802.1x认证设置2 —具体参数设置 (58)■Monitoring ——设备状态监控 (61)保存交换机配置 (62)■Save Changes (62)一.前言DES-3028P交换机为高效可网管二层交换机,能为工作组或部门的网络连接提供理想的解决方案。
2015/04 Version 1.01Mobile Android App User GuideAbout This GuideThis guide provides information about the services and functions available with the Android App for the DL-302 and how to access them.The topics covered in this guide include:●Introducing the DL-302 App●Installing the DL-302 App●Understand the Navigation Panel●Accessing data from the DL-302 device●Understand the Monitor Screen●Searching for DL-302 devices●Setting a GroupIntroducing the DL-302 AppThe Android App for the DL-302 is designed to enable data from an ICP DAS DL-302 device to be remotely accessed and monitored. The App can be used to display real time CO2, temperature and humidity measurements from the DL-302 device that can be accessed either by entering a specific IP address, or by performing an automatic search for available devices.This App adheres to the Android human interface guidelines for a productivity App, so it can be used immediately without any complicated configuration. Technical SupportThe App is designed to be easy to use, so only includes functions related to device monitoring.●For details of more extensive functionality, refer to the DL302 Logger Utility thatcan be found at:/pub/cd/usbcd/napdos/dl-302/dl302_logger/●For more information related to the DL-302 device, refer to:/root/product/solutions/remote_io/rs-485/dl_series/dl-302.htmlInstalling the DL-302 AppThere are two methods of installing the DL-302 App.1. Use the QR Code App on a mobile device (e.g., Barcode Scanner) to scan the QR code shown below. This is the preferred method and ICP DAS strongly recommends using this approach.2. Alternatively, use the browser on the smartphone to access the following website to download and install the DL-302 App:/pub/cd/usbcd/napdos/dl-302/android_app/dl302.apkUnderstand the Navigation PanelThe APP uses a navigation panel that identifies the user location, and provides user actions and navigation modes. This offers users a familiar interface across applications that the system gracefully adapts for different screen configurations.Accessing data from the DL-302 device●Automatically record the last connectedIP addressThe IP address field automatically shows users’the last connected IP address. It helps usersnot have to enter the IP address again andagain when connecting to the same device.●Open connectionOn the Entering IP screen, enter the IP addressfor the DL-302 device to be monitored, andthen tap the "Start Monitor" button to connectto the device.Once a connection has been established, a pagewill be displayed that indicates the real timeCO2, temperature and humidity readings.Understand the Monitor Screen●Display alias and IP address of theconnected DL-302 in the title bar●Provides a visual reference of thecurrent CO2 levelsThe colors will change from green to redto indicate the different CO2 values.●Indicates the real time valuesIndicates the real time CO2, temperatureand humidity readings.The following is an overview of how rising CO2 levels affect the human body.Searching for DL-302 devices●SearchIf the IP address for the specific device isunknown, tap the search icon to searchfor all DL-302 devices that exist within thesame domain as the mobile devicesconnected through the Wi-Fi connection.●List all the discovered DL-302Once the search is complete, a list of thediscovered devices will be displayed. If nodevices are found, a message box will bedisplayed to advise that no devices havebeen found.●Viewing data for a specific deviceTap the name of a device to display the realtime data for the CO2, temperature andhumidity readings for that device.●Viewing the device informationTap the icon on the device listpage to view the information for aspecific module. Tap the "OK" buttonto close the popup message box.●Triggering an AlertThe DL-302 App can be used to trigger an alert on the DL-302 device. To enablethis function, tap the icon on the device list page to instruct the device to sound an alert. The green power LED on the DL-302 device will flash while the alert is sounding.Add devices to a new groupUsers can add the discovered DL-302 devices to a specific group. This helps user organize DL-302 device into logical groupings to simplify management, monitoring, and configuration.Step1. Tap the “Add devices to the group”button to open the select devices page,and then users can tick the check box toselect devices to a group.To select or unselect all devicesReturn to the previous search result pageStep2. Tap the “Select Group” button to open select group page.button to create a new group.creating a new group. After that, theApp will automatically switch to thegroup list page.Add to an existing groupStep3. If users had added groups before, the page will list all the groupnames. Users can tap on the group name to directly add the selecteddevices to the existing group.After adding the devices, theapplication will automatically open the group page, and list all the group names that users set.Setting a Group●List all groupsTap the group icon, and all the groupnames will show in the list.●Change the name of a groupTap the icon behind a selectedgroup name, enter a new group name inthe pop up dialog box, and then tap the“Ok” to finish.●Delete a groupTap the icon behind a selected group, and then tap the “Ok” button in the pop up alertdialog box to finish.●Display the name of the selected group inthe title bar●View all the devices information of theselected groupUsers can select a group name in thegroup list, and the application will open anew page to show all the devices of theselected group.●Show if a device is onlineAfter users select a group to view alldevices, the application will automaticallysearch for all DL-302 devices that if existwithin the same domain as the mobiledevices connected through the Wi-Ficonnection. The green light means onlineand grey light means offline.Delete devices in a selected groupStep1. In the device list of a selectedgroup page, users can tap the“Delete” button to open the page thatuses to select devices to delete.Step2. Users can tick the check box to select devices to delete from the group, and then tap the ”Delete” button to finish.Tap the “Cancel” button to cancel the delete setting, and then return to the last device list page.。
GS-DES加密软件客户使用说明GS-DES客户使用说明一目的:使用户对客户端上运行状态有基础的认知,了解客户端正常状态与非正常状态之间的区别。
那么所谓“正常状态”就是指我们可以在该状态下自由的打开、编辑拥有文件权限的加密文件。
1.1 客户端在电脑正常运行状态如图图1特征:1 右下锁图标为红色2 鼠标移到锁图标有提示(含有用户名字的提示)1.2 客户端在电脑非正常状态如图特征:右下角锁图标为灰黑色,说明客户端与服务器失去连接造成的此状态的原因如下:1 物理网线连接不正常2 客户端所设定的服务器IP地址错误3 服务器有异常二目的:当部门员工需要通过审批对一个或多个加密文件进行解密或者转密的时候的具体操作演示,使员工可以熟练的发送审批,审核的领导可以熟练的进行审核操作。
以下为审批申请与审批审核的具体实施步骤2.1 申请审批:1 从桌面找到如下图标,执行该程序2 弹出登陆对话框,输入申请审批用户的帐号和密码后点击‘登录’3 弹出操作界面4 点击左上角的“流程”,弹出菜单5 再点击“菜单”中的“新流程”6 弹出“选择流程类型”窗口7 从窗口中选择我们要执行的审批流程,因为我们将要申请“解密”,那么这里选择“文件解密审批流程”。
*这里要注意的是,当我们需要发起“转密”申请的时候选择“文件转密级审批流程”。
8 在弹出的“解密审批流程”操作界面中,依次填写“标题”“申请理由”等内容9 点击“添加文件”,将需要解密的加密文件添加到附件中。
10 添加成功后,点击下方的“提交”按钮,发送审批申请,那么整个的审批申请就完成了。
11 当我们需要查看自己曾经发送过哪些申请,可以通过“我的申请”来查找,并可以通过流程状态,查看我们发起流程是否已经被审核。
..2.2 当申请人发送完审批后,审核人可以通过登录用户,来查看申请人提交的申请单。
这里显示了一条需要审核的申请单。
1 审核人点击需要审核的申请单。
2 弹出该申请单的审批界面3 点击“下载文件”,查看审核申请人的文件。
目录1.1 Socket通信: (3)1.1.1 socket基本概念 (3)1.1.2 建立socket连接步骤 (3)1.1.3 通信实例 (3)1.1.4 使用Socket应注意问题: (13)1.2 Des之CBC加密解密 (13)1.2.1 DES简单介绍 (13)1.2.2 CBC加密实现的机理 (13)1.2.3 使用CBC和Base64加密解密关键代码: (14)1.2.4 使用DSE加密解密注意问题: (24)1.3 Socket通信及Des之CBC加密解密完整源码: (24)1.3.1 Java服务代码: (24)1.3.2 Android客户端代码: (31)1.1 Socket通信:1.1.1 socket基本概念套接字(socket)是通信的基石,是支持TCP/IP协议的网络通信的基本操作单元。
它是网络通信过程中端点的抽象表示,包含进行网络通信必须的五种信息:连接使用的协议,本地主机的IP地址,本地进程的协议端口,远地主机的IP地址,远地进程的协议端口1.1.2 建立socket连接步骤I. 简单介绍:建立Socket连接至少需要一对套接字,其中一个运行于客户端,称为ClientSocket ,另一个运行于服务器端,称为ServerSocket 。
套接字之间的连接过程分为三个步骤:服务器监听,客户端请求,连接确认。
II. 服务器监听服务器端套接字并不定位具体的客户端套接字,而是处于等待连接的状态,实时监控网络状态,等待客户端的连接请求。
III. 客户端请求指客户端的套接字提出连接请求,要连接的目标是服务器端的套接字。
为此,客户端的套接字必须首先描述它要连接的服务器的套接字,指出服务器端套接字的地址和端口号,然后就向服务器端套接字提出连接请求。
IV. 连接确认当服务器端套接字监听到或者说接收到客户端套接字的连接请求时,就响应客户端套接字的请求,建立一个新的线程,把服务器端套接字的描述发给客户端,一旦客户端确认了此描述,双方就正式建立连接。
EDS-408交换机使用说明1、IP地址的设置通过IE工具来Ping 交换机默认的IP地址,进入交换机配置界面后,直接点击确认后,进入交换机设置界面对话框,IP地址设置请选择\Main Meun\Basic Settings\Network,出现下列对话框在此对话框下,设置人员在Switch IP Address 和 Switch Subnet Mask 旁的空白处填写预定的IP地址(如:192.168.12.20),以及相应的子网掩码地址(如:255.255.255.0);其他的如Auto IP Configuration 设置为Disable方式,不要选择HDCP方式。
2、主站(Master)设置完成了IP方式的设置后,就需要对交换的通讯协议和交换机进行相应的设置,选择\Main Menu\Communication Redundancy(通讯冗余设置),进入对话框:在此对话框内,我们需要注意的是Settings标记下方的设置参量,而Current Status为相应的设置参量后交换机系统检测后的状态指示。
Redundancy Protocol (通讯协议设置):设置选择为Turbo Ring ,而非是IEEE802协议(快速生成树)方式;采用Turbo Ring方式的情况下,需要在网络交换机组中设置一个Master(主站),选择主站的方式是将Set as Master前的小方框内给予选中, 只需要选择确定后,点击Activate按钮即可生效。
(注意:在多个交换机组成网中只能有1个设置为Master,不可以多选;同时如果不对交换机进行Master设置,系统会自动设置交换机组中的1台为Master)。
Enable Ring Coupling (环间耦合端口定义)在实际的项目运用中不常运用到,在此不给予更多的描述。
需要提醒的是工程人员在设置过程中不要将Enable Ring Coupling前的小方格选中,同时要注意的是对应的Coupling Port和 Coupling Control Port后的端口与前面的Redundant Ports 1st Port和 2nd Port(冗余连接端口定义)设置的端口重复。
DES客户端使用设置说明
客户端通过IE浏览器访问DES系统,由于各IE版本的安全性设置不尽相同,对正常使用系统功能可能会有影响。
下面针对客户端浏览器的正确设置给出具体说明,以IE6.0设置为例,其他版本设置方式稍有不同。
1.客户端IE版本
要求使用Microsoft Internet Explorer 6.0以上版本。
2.允许弹出窗口设置
影响内容:
登录DES页面后点击某些功能按钮需要打开新的IE窗口(例如点击报表编号执行报表),此时无反应。
设置方法:
1)在IE工具栏中点击工具->Internet选项…:
2)在选项窗口选择“隐私”标签,在“弹出窗口组织程序”中将复选框取消
选中:
3)如果希望仍然限制其他站点的弹出窗口,可在上一页面中仍然选中复选
框,点击“设置”按钮,在输入地址的编辑框中输入DES登录页面的地址,并点击“添加”按钮:
4)点击关闭完成设置。
3.信任站点设置
影响内容:
打开DES登录页面图片和输入框显示不正常;
在DES登录页面输入正确的用户和密码后页面不跳转,返回登录页面;
登录DES页面后在打开的新窗口中提示输入用户名和密码。
设置方法:
1)在IE工具栏中点击工具->Internet选项…:
2)在选项窗口选择“安全”标签,选中“受信任的站点”,再点击站点按钮:
3)在输入网址的编辑框中输入所有服务器的地址依次添加,包括DES的应用
服务器和报表服务器(包括集群的服务器地址),将窗口中的复选框取消选择,再点击添加按钮:
4)点击关闭和确定后完成设置。
重新刷新页面。
4.隐私站点设置
影响内容:
登录DES页面后在打开的新窗口中提示输入用户名和密码。
设置方法:
1)在IE工具栏中点击工具->Internet选项…:
2)在选项窗口选择“隐私”标签,点击站点按钮:
3)在输入网址的编辑框中输入所有报表服务器的地址依次添加(包括集群的
服务器地址),再点击允许按钮:
4)点击确定后完成设置。
关闭IE重新登录DES系统。
5.允许文件下载
影响内容:
打开报表结果页面在页面无法显示报表结果;
在综合查询工具和报表设计工具中,点击页面的以Excel方式执行报表的按钮没有正常生成Excel文件。
设置方法:
1)在IE工具栏中点击工具->Internet选项…:
2)在选项窗口选择“安全”标签,选中“受信任的站点”,再点击自定义级
别按钮:
3)在打开的安全设置窗口中,找到“下载”一项设置,将其中的“文件下载”
和“文件下载自动提示”都设为启用:
4)点击确定后完成设置。
6.IE 8特殊设置
影响内容:
点击报表编号执行报表时在打开窗口中显示#。
设置方法:
1)在IE工具栏中点击工具->Internet选项…:
2)在选项窗口选择“安全”标签,选中“受信任的站点”,将安全级别调为
中低:(下图示例为英文版本)
3)点击确定后完成设置。
7.清单查询清单上传
影响内容:
法人借款凭证查询中的清单查询无法上传清单。
设置方法:
1)在IE工具栏中点击工具->Internet选项…:
2)在选项窗口选择“安全”标签,点击按钮:
3)在弹出的窗口中对
的选项进行设置,设置为启用或者提示
8.报表设计无法正常弹出以及报表保存为Excel格式无法
正常下载
一、综合查询(Query Studio)和报表设计(Report Studio)窗口无法弹出或者弹出后显示不正常以及将报表保存为Excel格式的时候不提示打开、保存弹出窗口直接消失的问题,大部分是由于IE本身或IE插件的安全机制造成的,遵循一下步骤更改IE对直通车站点的安全级别:
1. 将直通车前台服务器IP地址和Cognos主服务器IP地址加入隐私站点及可信任站点。
直通车前台的IP地址如下图所示:
Cognos主服务器IP地址如下图所示:一般为在直通车系统中新建一个“综合查询(Query Studio)”或者“报表设计(Report Studio)”的时候,弹出窗口上边标题栏显示的IP地址(大概只显示2-3秒钟,如果正常的话接下来会跳到数据包选择界面)。
2. 隐私站点的设置为,控制面板→Internet选项→隐私标签:将隐私设置为低,并反选“阻止弹出窗口(B)”:
3. 点击“站点”,将直通车前台IP地址和Cognos主服务器IP地址依次输入到“网络地址(W)”框中,并点击“允许(A)”后点击确定
4. 隐私站点的设置为,控制面板→Internet选项→安全标签→受信任的站点:将安全级别调制中低(不会影响您上网的安全性,因为调整的是您的信任站点的安全级别,一般您上网时浏览的站点都不在信任站点列表中)
5. 点击站点,反选“对该区域中的所有站点要求服务器验证(https:)(S)”,然后在“将该网站添加到区域中(D)”输入框中,依次输入直通车前台IP地址以及Cognos主服务器IP 地址,并点击添加,最后点击确定,返回上一层后点击确定。
6. 除了IE的拦截设置,还有一些浏览器的工具条,比如Google工具栏,baidu工具栏,soso 工具栏等也有拦截功能,您需要修改这些工具条的拦截设置,将直通车前台IP和Cognos主服务器IP加入白名单中。
不过如果您一般不用这些工具栏的话,也可以将其从控制面板 添加删除程序中将其删除。
7. 将以上6个步骤完成后,重新启动IE浏览器。
一般来说,IE浏览器(版本7.0以下)已经可以正常弹出综合查询(Query Studio)和报表设计(Report Studio)窗口了,也可以将报表以Excel格式进行打开了。
如果还是不正常,请检查您的浏览器下方位置的“窗口阻止程序”(IE中显示为叹号,其他浏览器可能显示为带叉的红圈)是否启动,在该图标上点击右键,选择查看弹出窗口阻止程序是否已经关闭(如果为360安全浏览器的话,就选择将当前站点加入白名单)
8. 如果此时将报表保存为Excel格式时,还是不提示打开、保存Excel文件弹出窗口过一会直接消失的情况,请将隐私站点以及受信任站点的安全级别降至最低。
二、Excel格式的报表已经保存到本地,但是打开后显示为空或者显示丢失
1. 请一定要区别,点击“以Excel格式查看”后,Excel文件根本就不提示打开、保存弹出的窗口直接消失和Excel文件可以打开、保存但是保存后打不开这两种情况的区别,前一种情况是由于IE浏览器设置的原因(解决改问题请参照本文“一”),后一种情况是由于office 和cognos产品的兼容性问题造成的。
2. 如果您打开的Excel报表已经下载到了本地电脑上,但是打开时报表显示为空,产生这个问题的原因是您的Excel与Cognos产品的兼容性问题,您可以尝试下图中的三种不同的方法将报表保存为Excel格式,保存的Excel结果都是一样的,选择一个您能够正常保存和打开Excel执行方式。
3. 现在已经测试出来的,有些版本的office 2003是无法将Cognos保存的Excel格式的报表打开的,请您卸载office 2003后,装一个新版本或者是老版本office再试一下。