www.manuallib 飞利浦 REMstar Auto A-Flex 用户手册
- 格式:pdf
- 大小:1.69 MB
- 文档页数:24
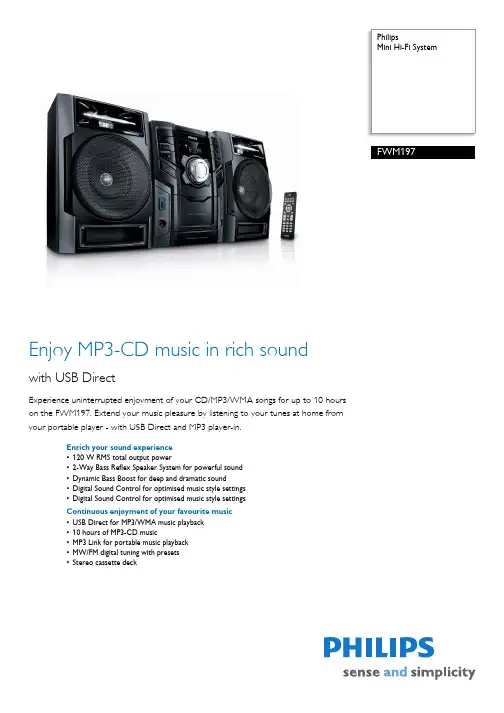
PhilipsMini Hi-Fi SystemEnjoy MP3-CD music in rich soundwith USB DirectExperience uninterrupted enjoyment of your CD/MP3/WMA songs for up to 10 hourson the FWM197. Extend your music pleasure by listening to your tunes at home fromyour portable player - with USB Direct and MP3 player-in.Enrich your sound experience•120 W RMS total output power•2-Way Bass Reflex Speaker System for powerful sound•Dynamic Bass Boost for deep and dramatic sound•Digital Sound Control for optimised music style settings•Digital Sound Control for optimised music style settingsContinuous enjoyment of your favourite music•USB Direct for MP3/WMA music playback•10 hours of MP3-CD music•MP3 Link for portable music playback•MW/FM digital tuning with presets•Stereo cassette deckHighlights120 W RMS total output power120 W RMS total output power2-Way Bass Reflex System2-Way Bass Reflex Speaker System for powerful soundStereo cassette deckStereo cassette deckUSB Direct-MP3/WMAWith the USB Direct mode, you can simply select the music on a USB device and playback all your content. All you have to do is plug in your USB device to playback music or export content from the device.MP3 Link for portable musicThe MP3 link connectivity allows direct playback of MP3 content from portable media players. Besides the benefit of enjoying your favourite music in the superior sound qualitydelivered by the audio system, the MP3 link isalso extremely convenient as all you have to dois to plug your portable MP3 player into theaudio system.10 hours of MP3-CD musicMP3 stands for "MPEG 1 Audio layer-3".MP3 isa revolutionary compression technology bywhich large digital music files can be made upto 10 times smaller without radically degradingtheir audio quality. MP3 has become thestandard audio compression format used onthe Internet, allowing quick and easy audio filetransfer.Dynamic Bass BoostDynamic Bass Boost maximises your musicenjoyment by emphasising the bass content ofthe music throughout the range of volumesettings - from low to high – at the touch of abutton! Bottom-end bass frequencies usuallyget lost when the volume is set at a low level.To counteract this, Dynamic Bass Boost can beswitched on to boost bass levels, so you canenjoy consistent sound even when you turndown the volume.Digital Sound ControlDigital Sound Control offers you a choice ofpre-set Optimal, Jazz, Techno and Rockcontrols you can use to optimise the frequencyranges for different musical styles. Each modeuses graphic equalizing technology toautomatically adjust the sound balance andenhance the most important soundfrequencies in your chosen music style.Ultimately, Digital Sound Control makes iteasy for you get the most out of your music byprecisely adjusting the sound balance to matchthe type of music you are playing.Issue date 2011-12-13 Version: 1.0.212 NC: 8670 000 58902 EAN: 87 12581 51992 6© 2011 Koninklijke Philips Electronics N.V.All Rights reserved.Specifications are subject to change without notice. Trademarks are the property of Koninklijke Philips Electronics N.V. or their respective owners. SpecificationsSound•Output power (RMS): 120 W•Sound Enhancement: Dynamic Bass Boost, Digital Sound ControlLoudspeakers•Main Speaker: 2" tweeter, 2-way, Bass Reflex Speaker System, 5.25" woofer•Number of Loudspeakers: 2Audio Playback•Number of Discs: 1•Loader Type:Tray•Playback Media: CD, CD-R, CD-RW, MP3-CD, WMA-CD•USB Direct Modes: Fast Reverse/Fast Forward, Play/Pause, Previous/Next, Programme Play, Repeat, Stop, Shuffle•Disc Playback Modes: Repeat/one/disc/ programme, Shuffle Play, Fast Forward/Reverse, Next/Previous Track Search, Repeat Play •Programmable Tracks: 20•Number of decks:1•Cassette Deck Technology: Mechanical •Cassette Playback Modes: Automatic Stop Audio Recording•Recording Media: Tape•Tape Recording Enhancement: CD Synchro-Start Recording Tuner/Reception/Transmission•Tuner Bands: FM Stereo, MW•Auto digital tuning•Auto store•Number of Pre-set Channels: 40 Convenience•Alarms: CD Alarm, USB alarm, Sleep timer •Clock: On main display•Display Type: LCD•Eco Power Standby: 1 wattConnectivity•Aux in: 3.5 mm stereo•USB: USB host•Audio Connections: RCA Aux in Accessories•Included accessories: Remote Control, Guarantee booklet, Quick Use Guide•User Manual: 16 LanguagesDimensions•Set dimensions (W x H x D): 220 x 292 x 285 mm •Packaging dimensions (W x H x D):730 x 348 x 275 mm•Weight incl. Packaging: 11.2 kgPower•Power supply: 200-240 V, 50 Hz•Standby power consumption: < 2 W。

/welcomeBrilliance328P6ZH 用户手册 1 客户服务与保修20故障排除和常见问题解答23目录1. 重要 (1)1.1 安全措施与维修 (1)1.2 标志说明 (2)1.3 产品和包装材料的废弃 (3)2. 设置显示器 (4)2.1 安装 (4)2.2 操作显示器 (6)2.3 MultiView (9)2.4 卸下底座装置 (11)3. 图像优化 (12)3.1 S martImage (12)3.2 S martContrast (13)4. HDR (14)5. 技术规格 (15)5.1 分辨率和预设模式 (18)6. 电源管理 (19)7. 客户服务与保修 (20)7.1 飞利浦平板显示器像素缺陷规定 (20)7.2 客户服务与保修 (22)8. 故障排除和常见问题解答 (23)8.1 故障检修 (23)8.2 一般常见问题解答 (24)8.3 MultiView常见问题解答 (26)1. 重要本电子用户指南面向飞利浦显示器的所有用户。
请在使用您的显示器之前花点时间阅读本用户手册。
它包含与使用显示器相关的重要信息和注意事项。
产品享受Philips保修须符合下列条件:产品适当用于其设计目的、符合操作说明、返修时提供原始帐单或付款收据,帐单或收据应载明购货日期、销售商名称、产品型号及生产号。
1.1 安全措施与维修警告使用本文档中未介绍的控制、调整或过程可能导致碰撞、电气危险和/或机械危险。
请阅读这些说明,并在连接和使用计算机显示器时遵照执行。
操作• 请使显示器远离阳光直接照射、明亮强光线、以及任何其他热源。
长期暴露于此类环境可能导致显示器褪色和损坏。
• 移开任何可能掉入通风孔的物品或者会妨碍显示器电子器件正常冷却的物品。
• 请勿堵塞机壳上的通风孔。
• 放置显示器时,确保电源插头和插座便于插拔。
• 如果通过拔掉电源线或直流电源线关闭显示器电源,则在重新连接电源线或直流电源线以进行正常操作之前,必须等待6秒钟。
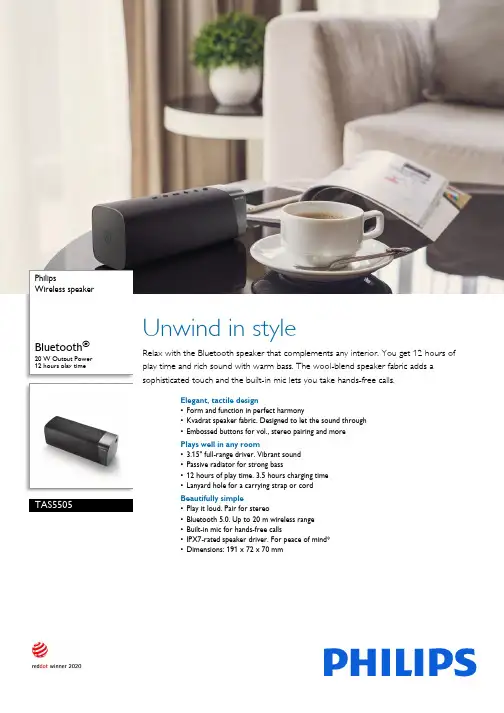
Philips Wireless speakerBluetooth®20 W Output Power 12 hours play timeTAS5505Unwind in styleRelax with the Bluetooth speaker that complements any interior. You get 12 hours of play time and rich sound with warm bass. The wool-blend speaker fabric adds a sophisticated touch and the built-in mic lets you take hands-free calls.Elegant, tactile design•Form and function in perfect harmony•Kvadrat speaker fabric. Designed to let the sound through•Embossed buttons for vol., stereo pairing and morePlays well in any room•3.15" full-range driver. Vibrant sound•Passive radiator for strong bass•12 hours of play time. 3.5 hours charging time•Lanyard hole for a carrying strap or cordBeautifully simple•Play it loud. Pair for stereo•Bluetooth 5.0. Up to 20 m wireless range•Built-in mic for hands-free calls•IPX7-rated speaker driver. For peace of mind*•Dimensions: 191 x 72 x 70 mmIssue date 2022-05-14Version: 8.2.212 NC: 8670 001 67231EAN: 48 95229 10870 7© 2022 Koninklijke Philips N.V.All Rights reserved.Specifications are subject to change without notice. Trademarks are the property of Koninklijke Philips N.V. or their respective Specifications Wireless speaker Bluetooth® 20 W Output Power, 12 hours play time HighlightsForm and function in harmony This speaker looks great wherever you place it. Embossed buttons let you control playback, Bluetooth and more. The built-in mic lets you take hands-free calls and you can thread a carrying strap through the speaker's lanyard hole.12 hours play time Go from working sessions to dinner parties with ease. You get 12 hours of play time from a single charge and the wireless range is 20 m. Charging the speaker takes 3.5 hours via the included USB-C cable.Kvadrat speaker fabric This speaker is covered with a premium speaker fabric created by high-end manufacturer Kvadrat. The beautiful wool-blend material is acoustically transparent, allowing the sound to flow freely from the speaker into the room.Play it loud. Pair for stereo A passive radiator delivers strong bass. The sound from the 3.15" full-range driver stays clear even at high volume. Want to make your music sound even bigger? Pair with an identical speaker for stereo sound.Sound •Output power (RMS): 20 W •Output power (MAX): 40 W •Sound System:Mono •Frequency response: 20 Hz – 20 KHzLoudspeakers •Number of sound channels: 1•Driver configuration: Full range •Number of full-range drivers: 1•Full-range driver diameter: 80 mmConnectivity •Bluetooth version: 5.0•Bluetooth profiles: A2DP, AVRCP, HFP, HSP •Bluetooth range: Line of sight, 20 m or 66 ft •DLNA Standard:No •Multiple speaker connection •Multiple speaker scenario: Stereo •Multiple speaker technology: TWS •Type of cable: USB charging cable (Type-C)Compatibility •Smartphone/tablet APP control: NoConvenience •Volume control: Digital up/down •Automatic power off •Water resistance: IPX7*•Built-in microphone •Hands-free calling •Call Management: Answer/End Call •Ease of Installation: Automatic pairing •Display screen: No •Light Effect: NoPower •Battery type: lithium (built-in)•Battery Capacity: 3.7 V, 4800 mAh•Operating time on battery: 12 hr •Charging time: 3.5 hr •Input: 5 V, 2 A •Power bank:No Accessories •Included accessories: Quick install guide, Warranty Card, World Wide Warranty leaflet •Cable: USB charging cable Design and finishing •Colour: Grey Product dimensions •Product dimensions (W x H x D): 19.1 x 7.2 x 7 cm •Product dimensions (W x H x D): 7.5 x 2.8 x 2.8 inch •Weight: 1.281 lb •Weight: 0.581 kg Packaging dimensions •Packaging dimensions (W x H x D): 24.6 x 8.6 x 12.2 cm •Packaging dimensions (W x H x D): 9.7 x 3.4 x 4.8 inch •Gross weight: 1.748 lb •Gross weight: 0.793 kg •Net weight: 0.628 kg •Net weight: 1.384 lb •Number of products included: 1•Packaging type: Box •Tare weight: 0.165 kg •Tare weight: 0.364 lb •EAN: 48 95229 10870 7UPC •UPC: 8 40063 20234 4*The IPX7 rating means the speaker driver can be submerged for up to 30 minutes at a depth of up to 1 m. The speaker fabric is notwaterproof but can withstand a drop of water.。


Important information leaflet 重要信息手册Register your product and get support at/welcome4239.000.8054.1introductionCongratulations on your purchase and welcome to Philips! T o fully benefit from the support that Philips offers,register your product at www.philips. com/welcome.importantRead this user manual carefully before you use the appliance and save it for future reference.Danger-Never immerse the appliance in water or any other liquid,nor rinse it under the tap.-Beware of hot steam that comes out of the steamer.Steam can cause burns.Warning-Check if the voltage indicated on the appliance corresponds to the local mains voltage before you connect the appliance.-Do not use the appliance if the plug,the mains cord or the appliance itself shows visible damage,or if the appliance has been droppedor leaks.-Always return the appliance to a service centre authorised by Philips for examination or repair.Do not attempt to repair the appliance yourself, otherwise the guarantee becomes invalid.-If the mains cord is damaged,you must have it replaced by Philips,a service centre authorised by Philips or similarly qualified persons inorder to avoid a hazard.-Never leave the appliance unattended when it is connected to the mains.-This appliance can be used by children aged 8 or above and by persons with reduced physical,sensory or mental capabilities or lack of experience and knowledge if they have been given instructions in safe use of the appliance or supervision to establish safe use and if they have been made aware of the hazards involved.-Do not allow children to play with the appliance.-Keep the appliance and its mains cord out of the reach of children younger than 8 when the appliance is switched on or is cooling down. -Children aged 8 or above are only allowed to clean the appliance under supervision.-The nozzle of the steamer head can become extremely hot and may cause burns if touched.-Always unplug the appliance before you clean it,attach or detach the brush attachment and before you refill the water tank.Caution-Only connect the appliance to an earthed wall socket.- Do not place the appliance on a surface with the steamer head touching the surface while the appliance is hot/connected to the mains. -Check the mains cord regularly for possible damage.-Do not let the mains cord come into contact with hot steam when it the appliance is in operation.- Do not use the appliance when the water tank is empty.-When you leave the appliance even for a short while,switch off and unplug the appliance.-When you have finished steaming,always switch off and unplug the appliance and let it cool down for 60 minutes before you clean it,attach or detach the brush attachment,empty the water tank or store it.-This appliance is intended for household use only.-Never drag or pull the appliance across the floor.-Steam may damage or cause discolouration of certain wall or door finishes.T ype of water to be used-Y our appliance has been designed to be used with tap water.In case you live in an area with very hard water,fast scale build-up may occur.Therefore,it is recommended to use distilled water to prolong thelifetime of your appliance.-Do not put perfume,vinegar,starch,descaling agents,ironing aids or other chemicals in the water tank,as your appliance is not designed to work with these chemicals.Electromagnetic fields (EMF)This Philips appliance complies with all standards regarding electromagnetic fields (EMF).If handled properly and according to the instructions in this user manual,the appliance is safe to use based on scientific evidence available today.Environment-Do not throw away the appliance with the normal household waste at the end of its life,but hand it in at an official collection point forrecycling.By doing this,you help to preserve the environment (Fig.1).guarantee and serviceIf you need service or information or if you have a problem,please visit the Philips website at or contact the Philips Consumer Care Centre in your country.Y ou find its phone number in the worldwide guarantee leaflet.If there is no Consumer Care Centre in your country,go to your local Philips dealer.简介感谢您的惠顾,欢迎光临飞利浦!为了您能充分享受飞利浦提供的支持,请在 /welcome 上注册您的产品。
IndiceAttenzione (1)Uso della TV (2)Telecomando (2)Notifiche, caratteristiche e accessori (3)Efficacia energetica (3)Pulsante di scorrimento TV (3)Accensione/Spegnimento (3)Prima installazione (3)Riprodurre i file multimediali da un disco USB (3)Menu Browser Multimediale (4)Registrazione di un programma (4)Registrazione timeshift (4)Registrazione Istantanea (4)Guardare programmi registrati (4)Modificare le impostazioni della TV (5)Opzioni di visualizzazione (5)Opzioni audio (5)Configurazione delle impostazioni parentali (5)Guida elettronica al programma (EPG) (5)Opzioni del programma (5)Aggiornare la TV (5)Risoluzione dei problemi (6)Specifiche..............................................................7‘Leggere e comprendere tutte le informazioni contenute nel Libretto di Sicurezza fornito in dotazione prima di installare e usare la TV. Nel caso in cui vengano provocati danni per il manco rispetto delle presenti istruzioni, la garanzia non vale.’Smaltimento di strumentazione vecchia e batterie Non smaltire questa TV o le batterie come normali rifiuti domestici. Se si desidera procedere allo smaltimento del prodotto o della batteria, cercare i sistemi o le strutture di raccolta disponibili per garantirne un opportuno riciclo.Avviso: L a dicitura Pb posta al di sotto del simbolo delle batterie indica che queste contengono piombo. chela batteria contiene piombo.Prodotti Batteria: La distanza di funzionamento è di circa 7 m / 23ft.. TelevideoPremere il pulsante TEXT per iniziare. Premere nuovamente per attivare la modalità mix. Premere ancora una volta per uscire. Seguire le istruzioni sullo schermo del televideo digitale. Televideo digitale (solo per trasmissioni nel Regno Unito)il pulsante TEXT perinformazioni sul televideo digitale.colorati i tasti colorati, i tasti cursore e il tasto metodo di funzionamento può variare a seconda del contenuto del teletext digitale. Seguire le istruzioni sullo schermo del televideo digitale.Per accendere l’apparecchio TVPer accendere la TV dalla modalità di standby è possibile:• Premere il tastoCH- o CH+ o un tasto • Premere l'interruttore di funzione laterale fino a che la TV non si riaccende dallo standby.Nota: Se la TV è stata lasciata accesa e non usata per 4 ore, passerà in standby. Alla successiva riaccensione, viene visualizzato il seguente messaggio: “Lo standby interrompe il funzionamento ” Premere OK per continuare.• Premere il tasto sul telecomando oppure stessa passi in modalità stand-by.Nota: Per spegnere completamente la TV, scollegare il cavo di alimentazione dalla presa di rete.Comparirà la finestra di selezione lingua alla prima accensione della TV. Selezionare la lingua preferita e premere OK.Sarà possibile configurare la TV seguendo le istruzioni della Prima installazione (FTI).Installazione AntennaSelezionare l'opzione ANTENNA dallo schermata Tipo di ricerca per la trasmissioni di TV digitale terrestre. Un elenco canali, generato da LCN (*), verrà visualizzatoa video al termine della ricerca. Selezionare “Sì” e premere OK per salvare l'elenco. Premere “” per uscire dall'elenco dei canali e guardare la TV.(*) LCN è il sistema Numero Logico di Canale che organizza le trasmissioni disponibili con una sequenza di canali riconoscibile (ove disponibile).Installazione CavoSelezionare CAVO e premere OK sul telecomando. Per l'installazione automatica selezionare SI e premere OK . Da questa schermata è possibile scegliere le gamme di frequenza.Inserire il numero del canale multiplex o la frequenza usando i tasti numerici.Nota: Il menu varia a seconda delle opzioni selezionate.È possibile riprodurre file fotografici, musicali e filmati archiviati in un disco USB collegando il disco alla TV e utilizzando la schermata del browser multimediale. Collegare un disco USB agli appositi ingressi posti al lato della TV. Premendo il pulsante“” mentre ci si trova in modalità Media Browser si accederà alle opzioni del menu Immagine, Suono eImpostazioni. Premere il pulsante Questa TV è stata progettata con funzioni di efficacia energetica:• Modalità di risparmio energetico: Sarà possibile applicare una combinazione di impostazioni per il risparmio energetico. Quando si guarda la TV, premere il pulsante Menu; le impostazioni di Risparmio energetico si trovano nella sezione "Immagine " del Menu Principale.• Modalità Immagine Off: Se si vuole unicamente ascoltare audio dalla TV, sarà possibile spegnere il display. Altre funzioni continuano a operare in modo corretto. Mentre si guarda la TV, premere Meni e selezionare Immagine; da qui selezionare "Immagine Off" dall'opzione Modalità di risparmio energetico.• Nota: Scollegare la TV dalla presa di corrente nel caso in cui la TV rimanga inattiva a lungo.Il pulsante di scorrimento TV sul lato della TV consente di controllare il volume, modificare i canalie mettere la TV in standby.Per modificare il il volume scorrendo verso l'alto. Diminuire il volume scorrendo verso il basso.Per cambiare i canali:1. Premere la parte centrale del pulsante di scroll , comparirà a video il banner contenente le informazioni sul canale.2. Scorrere fra i canali salvati premendo il pulsante su o giù.Per modificare la sorgente :1. Premere due volte la parte centrale del pulsante, comparirà a video l'elenco delle sorgenti.2. Scorrere fra le sorgenti disponibili premendo il pulsante su o giù.Per mettere a TV in standby: Premere la parte centrale del pulsante giù e tenerla premuta per alcuni secondi; la TV passa in modalità standby.riproduzionee attivareriproduzionecon OK e attivareriproduzionee attivareriproduzionecon OK/ e attivare“” per uscire dalla schermata.di dialogopreferenze di Browser media.Registrazione IstantaneaPremere il pulsante per avviare la registrazioneevento di unprogramma. Sarà possibile premere il pulsantedel telecomando nuovamente per registrare l'eventol’OSDBlocco bambini (opzionale): Quando il Blocco Bambini è impostato, l’apparecchio TV può solo essere controllato manualmente dal telecomando. In tal caso, i tasti del pannello frontale non funzioneranno. Imposta PIN : definisce un nuovo numero PIN.Nota: Se l’opzione Paese è impostata su Francia, sarà possibile usare il codice predefinito 4725.Alcuni canali, ma non tutti, inviano informazioni sugli eventi correnti e successivi. Premere il pulsante “” per visualizzare il menu EPG.Pulsanti Su/GiùDestro/Sinistro: Naviga EPG.OK: Visualizza le opzioni del programma.INFO: Visualizza, nel dettaglio, le informazioni sul programma selezionato.VERDE: Passa all'Elenco Programmi EPG.GIALLO: Passa alla Timeline Programmi EPG.BLU: Visualizza le opzioni di filtraggio.: la TV registrerà il programma selezionato. Sarà possibile premere nuovamente per interrompere la registrazione.Opzioni del programmaNel Menu EPG , premere il tasto OK per accedere al menu Opzioni Evento .Seleziona canaleNel menu EPG , utilizzando questa opzione, è possibile cambiare il canale selezionato.Registra / Elimina timer di registrazione Dopo aver selezionato un programma nel menu EPG , premere il pulsante OK . Selezionare l'opzione Registra e premere il pulsante OK . Dopo questa operazione, l'icona viene impostata sul programma selezionato.Funzione Timer / Elimina TimerDopo aver selezionato un programma nel menu EPG , premere il pulsante OK . Selezionare la funzione Imposta Timer su Evento e premere il pulsante OK . Sarà possibile usare la funzione timer per programmi futuri.Aggiornare la TVSpostarsi sul menu principale, scegliere le impostazioni, viene visualizzata la versione del software attuale. Attenzione: Non installare una versione inferiore di software rispetto a quella attualmente presente sul dispositivo. La TP Vision non può essere ritenuta o resa responsabile di eventuali problemi causati da un downgrade software.Modificare le impostazioni della TVPer accedere alle opzioni di seguito elencate;1. Premere il tasto Menu 2. Evidenzia la selezione 3. Premere OK per confermare Modalità: Modifica la modalità immagine su una delle seguenti opzioni: Cinema, Gioco, Sport, Dinamico e Naturale.Contrasto: Imposta i valori di luminosità e buio dell'immagine.Luminosità: Imposta il valore di luminosità dell'immagine.Nitidezza: Imposta il valore della nitidezza. Un elevato valore di nitidezza potrebbe compare un'immagine più chiara e più fresca, a seconda del contenuto.Colore: Imposta il valore del colore.Retroilluminazione: Controlla la luminosità della retroilluminazione.Riduzione del rumore: Riduce il livello di rumore dell'immagine.Volume: Regola il livello del volume.Equalizzatore: Modifica la modalità equalizzatore.Bilanciamento: Regola la provenienza del suono altoparlanti di destra o altoparlanti di sinistra.Cuffia: imposta il volume della cuffia.Modalità audio: imposta la modalità audio preferita.AVL: Imposta un limite all'output massimo del volume.Cuffia/Lineout: Questa opzione è impostata su cuffie se si dispone di cuffie oppure lineout nel caso in cui si abbia un amplificatore collegato al jack cuffie.Basso dinamico: Attiva o disattiva la funzione Bass dinamico. Aumenta il range dei bassi.Suono surround: La modalità surround audio può essere impostata su On od Off.Uscita digitale: imposta il tipo di audio in uscita.Questa funzione serbe a limitare l'accesso ai contenuti selezionati. È controllato da un numero di PIN definito dall'utente. Il valore predefinito è “0000”.Blocco menu (opzionale): l'impostazione Blocco menu attiva o disattiva l'accesso al menu.Blocco adulti (opzionale): Quando è impostata, questa opzione riceve le informazioni per adulti dalla trasmissione e se il livello adulti è disattivato viene disattivato l'accesso all'emittente.Aggiornamento con USBPrima di aggiornare il software, accertarsi di disporre di quanto segue:· Un dispositivo di archiviazione USB che ha almeno 256 megabyte di spazio di stoccaggio è formattato FAT o DOS e ha la protezione da scrittura disattivata. · L'accesso a un computer con un connettore USB e accesso a Internet.Accedere al sito /support, e attenersi alle istruzioni di aggiornamento software.Aggiornamento automatico da trasmissione digitaleQuando la TV è collegata a un segnale antenna. Nel caso in cui sia attivato il menu Ricerca Automatica nelle Opzioni di Aggiornamento, la TV si attiva alle ore 03:00 e ricerca canali di trasmissione per nuovi aggiornamenti software Nel caso in cui venga trovato e scaricato nuovo software, alla prossima accensione la TV si aprirà con una nuova versione software.Nota: Nel caso in cui la TV non si riavvii in 2 minuti, scollegare l’alimentazione e collegare nuovamente. Risoluzione dei problemiLa TV non si accendeAccertarsi che il cavo di alimentazione sia saldamente collegato alla presa a parete. Le batterie nel telecomando possono essere scariche. Premere il tasto Power sulla TV oppureImmagine di qualità scadente• E' stato selezionato il sistema TV corretto?• Il segnale di livello basso può provocare distorsioni dell'immagine.• Verificare di aver inserito la frequenza di canale corretta nel caso in cui sia stata eseguita la sintonizzazione manuale.• L a q u a l i tàd e l l’i m m a g i n e p uòr i s u l t a r e scadente quando vi sono due apparecchiature contemporaneamente collegate al televisore. In tal caso, scollegare una delle dispositivi. Nessuna immagine• L’assenza di immagine indica che il televisore non riceve alcuna trasmissione. Sono stati selezionati i tasti giusti sul telecomando? Provare ancora una volta. Assicurarsi di aver selezionato la fonte di ingresso corretta.• L’antenna è collegata correttamente?• Il cavo dell’antenna è connesso? • Sono state usate le spine giuste per collegare l'antenna?• In caso di dubbio, contattare il rivenditore. Nessun suono• È stato disattivato l'audio della TV? Per annullare, premere il pulsante? '''' o aumentare il livello del volume.• L'audio viene emesso solo da un altoparlante. Il bilanciamento è impostato solo ad un estremo? Vedere il Menu Suono.Telecomando - non funziona• Le batterie potrebbero essere state inserite in modo non corretto. Sostituire le batterie. Sorgenti di ingresso - non è stato possibile effettuare la selezione• Se non è possibile selezionare una fonte di ingresso è possibile che non sia collegato alcun dispositivo. • Controllare i cavi AV e le connessioni se si è cercato di collegare un dispositivo.Registrazione non disponibilePer registrare un programma, è necessario per prima cosa collegare un disco USB alla TV mentre questa è spenta. Successivamente accendere la TV per attivare la funzione di registrazione. Nel caso in cui non sia possibile registrare, provare a spegnere la TV, quindi reinserire il dispositivo.USB troppo lentoSe viene visualizzato il messaggio ''USB troppo lento'' sullo schermo durante l'avvio di una registrazione, provare a riavviare il processo. Nel caso in cui si abbia lo stesso errore, è possibile che il flash drive USB non sia compatibile con USB 2.0.SpecificheLa tabella che segue illustra alcune delle modalità di visualizzazione tipiche del video. La TV potrebbe non supportare tutte le risoluzioni. La TV supporta una。
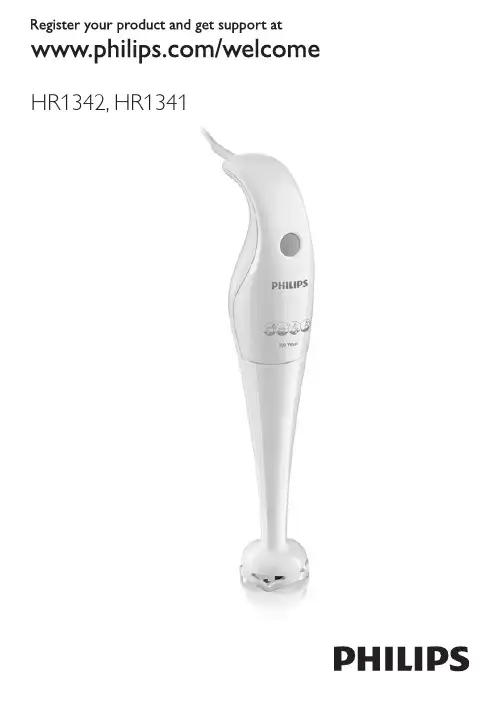
HR1342,HR13412ayuda que ofrece Philips,registre su producto en / welcome.ImportanteLea atentamente este manual del usuario antes de usar el artefacto y consérvelo para consultarlo en el futuro.Peligro-No sumerja la unidad del motor en agua u otros líquidos ni la coloque bajo el agua de la canilla.Utilice únicamente un pañohumedecido para limpiarla.Advertencia-Antes de enchufarlo,verifique que el voltaje indicado en el artefacto coincida con el de la red eléctrica local.-No utilice el artefacto si el enchufe,el cable de alimentación u otras piezas están dañados.-Si el cable de alimentación está dañado,deberá ser sustituido por Philips,un centro de servicio autorizado por Philips u otras personas autorizadas para evitar riesgos.-No deje que el artefacto funcione sin supervisión.-Este artefacto no debe ser utilizado por personas con capacidad física,mental o sensorial reducida (adultos o niños) o sin losconocimientos y la experiencia necesarios,a menos que seansupervisados o instruidos acerca del uso del artefacto por unapersona responsable de su seguridad.-Asegúrese de que los niños no jueguen con este artefacto.-No toque las cuchillas,sobre todo si el aparato está enchufado,ya que son extremadamente filosas.-Si las cuchillas se traban,desenchufe el artefacto antes de retirar los ingredientes que las obstruyen.EsPAñol5 Precauciones-Apague el electrodoméstico y desenchúfelo antes de cambiar los accesorios o de que entren en contacto las partes que se mueven durante el uso.-Este artefacto fue diseñado exclusivamente para uso doméstico.-No exceda las cantidades máximas ni los tiempos de preparación indicados en la tabla.-No procese más de una medida sin interrupción.Deje que el aparato se enfríe hasta alcanzar la temperatura ambiente antes de continuar procesando los ingredientes.-Deje que los ingredientes calientes se enfríen antes de picarlos o de verterlos en el vaso (temperatura máxima 80°C).Nivel de ruido:Lc= 87 dB [A]Campos electromagnéticos (CEM)Este artefacto de Philips cumple con todos los estándares sobre campos electromagnéticos (CEM).Si se emplea correctamente y de acuerdo con las instrucciones de este manual,el artefacto puede usarse sin riesgos según la evidencia científica disponible en la actualidad.1 Monte el aparato de manera correcta antes de enchufarlo en latoma de corriente (fig. 1).MixerEl mixer está diseñado para:-Mezclar líquidos tales como productos lácteos,salsas,jugos de fruta, sopas,mezclas de bebidas o batidos.-Mezclar ingredientes blandos,por ejemplo,masa para panqueques y mayonesa.-Hacer puré con ingredientes cocidos,como por ejemplo comida para bebés.1 Coloque la varilla del mixer en la unidad motora (“clic”) (fig. 1).2 Sumerja por completo el protector de cuchillas en los ingredientes.3 Encienda el artefacto y muévalo lentamente hacia arriba, hacia abajoy en círculos para batir los ingredientes (fig. 2).Picadora (sólo modelo HR1342)La picadora puede usarse para picar ingredientes como frutos secos, carne, cebolla, queso duro, frutos secos, chocolate, ajo, hierbas, pan seco, etc.Asegúrese de que la unidad de acoplamiento esté bien colocada en el vaso de la picadora.1 Coloque la unidad de cuchillas de la picadora en el recipiente de lapicadora (fig. 3). 2 Corte los ingredientes grandes en trozos de aproximadamente 2cm y colóquelos en el recipiente de la picadora. 3 Coloque la unidad de acoplamiento en el recipiente de lapicadora. (fig. 4) 4 Fije la unidad de motor en el recipiente de la picadora (debe hacer“clic”). Presione el botón de encendido (ON) para encender la unidad (fig. 5).,Si los ingredientes se adhieren a la pared del recipiente del picador,sepárelos con una espátula o añada líquido.EsPAñol6EsPAñol7*) No exceda los tiempos recomendados.limpieza1 Lave el vaso, la tapa, el recipiente de la picadora y la cuchilla en ellavavajillas o con agua tibia y jabón.Extraiga el anillo de goma de la picadora antes de limpiarla.2 Para lavar la varilla del mixer puede colocarla en el lavavajillas, bajola canilla o sumergirla en agua tibia con jabón y dejar funcionar el artefacto durante un tiempo.3 Limpie con un paño húmedo la unidad de motor del mixer y launidad de acoplamiento de la picadora. No la sumerja en agua.AccesoriosPuede adquirir la picadora en su distribuidor Philips habitual como un accesorio adicional para el modelo HR1341.Cuando utilice este accesorio,tenga en cuenta las cantidades y los tiempos recomendados.,Cuando finalice la vida útil del artefacto, no lo deseche junto con labasura normal del hogar. Llévelo a un sitio de recolección oficial para su reciclado y proteja el medioambiente (fig. 6).Si desea obtener más información o tiene dificultades, visite el sitio Web de Philips en o comuníquese con el centro de atención al cliente de Philips de su país (el número de teléfono figura en la garantía internacional). Si no existe un centro de atención al cliente de Philips en su país, diríjase al distribuidor local de Philips.leche de sojaEsta receta sólo puede prepararse con el mixer.Ingredientes:-100g de granos de soja -200 ml de agua1 Ponga los granos de soja en remojo durante 4 horas y deje que seescurran durante unos segundos antes de procesarlos. 2 Coloque los granos remojados en el vaso. Vierta 200 ml de agua ybata durante 30 segundos. 3 Con un tamiz, vierta la leche de soja en la olla.4 Deje que la leche de soja alcance el punto de ebullición. Acontinuación, añada azúcar y deje que hierva a fuego lento hasta que el azúcar se disuelva. 5 Sirva frío o caliente.EsPAñol89 u4222.002.7353.1。

S7980English 6简体中文 35IntroductionCongratulations on your purchase and welcome to Philips! To fully benefit from the support that Philips offers, register your product at/welcome or via the SkinAnalyst app.Introducing Philips’ first ever complete shaving and skincare system. Assess and measure thecondition of your skin, personalize your FaceSmart shaving and cleansing settings, and best of all,receive daily skincare advice tailored to you.General description (Fig. 1)1Protection cap for cleansing brush2Cleansing brush3Cleansing brush base4Shaving unit5On/off button6Handle7Socket for small plug8SkinAnalyst sensor9Notification symbol10Shaving unit detector11Cleansing brush detector12Cleaning reminder13Bluetooth® symbol14Travel lock symbol15Battery charge indicator16Pouch17Supply unit (adapter)6EnglishRead this important information carefully before you use the shaver, the Skinanalyst sensor and save it for future reference. The accessories supplied may vary for different products.Danger-Keep the supply unit dry.Warning -To charge the battery, only use the detachable supply unit (type HQ8505) provided with the shaver.-The supply unit contains a transformer. Do not cut off the supply unit to replace it with another plug, as this causes a hazardous situation.-The shaver and SkinAnalyst sensor can be used by children aged from 8 years and above and persons with reduced physical, sensory or mental capabilities or lack of experience and knowledge if they have been given supervision or instruction concerning use of bothappliances in a safe way and understand the hazards involved. Children shall not play with the shaver. Cleaning and user maintenance shall not be made by children without supervision.-Always unplug the shaver before you clean it under the tap.-Always check the shaver and SkinAnalyst sensor before you use it. Do not use it if it is damaged, as this may cause injury. Always replace a damaged part with one of the original type.7English-Do not open the shaver to replace the rechargeable battery.Caution -Never use water hotter than 80°C to rinse the shaver.-Never rinse the SkinAnalyst sensor under the tap.-Only use the shaver and the SkinAnalyst sensor for its intended purpose as shown in the user manual.-For hygienic reasons, the shaver should only be used by one person.-Never use compressed air, scouring pads,abrasive cleaning agents or aggressive liquids such as petrol or acetone to clean the shaver.-Water may drip from the socket at the bottom of the shaver when you rinse it. This is normal and not dangerous because all electronics are enclosed in a sealed power unit inside the shaver.-Do not use the supply unit in or near wallsockets that contain an electric air freshener to prevent irreparable damage to the supply unit.-Keep your iPhone away from water and moist environments.-The shortwave radio frequency signals of a Bluetooth shaver may impair the operation of other electronic and medical devices.8English-Do not use the shaver in medical facilities,aircraft, refuelling points, close to automatic doors, automatic fire alarms or otherautomatically controlled devices.-Switch off Bluetooth where it is prohibited.-Keep this shaver at least 20 cm frompacemakers and other medical devices. Radio waves may impair the operation of pacemakers and other medical devices.Electromagnetic fields (EMF)-This Philips shaver complies with all shaver standards and regulations regarding exposure to electromagnetic fields.General-This shaver is waterproof. It is suitable for use in the bath or shower and for cleaning under the tap. For safety reasons, the shaver cantherefore only be used without cord.-The shaver is suitable for mains voltages ranging from 100 to 240 volts.-The supply unit transforms 100-240 volts to a safe low voltage of less than 24 volts.-The frequency band in which the shaver operates is 2.4 GHz.-The maximum radio frequency power radiated in the frequency band in which the shaver operates is <10dBm.9EnglishThe displayThe shaver is equipped with a notification symbol.This symbol lights up when important advice isavailable in the app. Go to the app to obtain thisadvice. It reminds you to unplug the shaver beforeyou switch it on and to clean it for optimalperformance. It also reminds you to replace theshaving heads every two years or the cleansingbrush every three months.Attachment detection featureWhen you have paired your iPhone with theshaver, the attachment detection feature isactivated. Every time you switch on the shaver, thisfeature automatically recognizes the attachment(shaving unit/cleansing brush) that is attached tothe shaver handle and adapts the settingsaccordingly. Unpairing of your iPhone and theshaver deactivates this feature.Make sure your shaver is connected to youriPhone. The SkinAnalyst app also offers thepossibility to (de)activate the Attachmentdetection feature. You can do this by going to Myprofile, My shaver and switching off the Autoattachment detection. You can then manuallyselect the brush attachment, by switching on theshaver and press and hold the on/off button forone second.10EnglishShaving unit detectorThe shaving unit detector lights up to indicate thatthe shaving unit has been attached to the handle.Cleansing brush detectorThe cleansing brush detector lights up to indicatethat the cleansing brush has been detected.When you switch off the shaver, the cleaningreminder flashes to remind you to clean theshaver. Clean the shaver and the attachments aftereach use for optimal performance.The shaver is equipped with Bluetooth 4.0 toconnect your shaver to the app on your iPhone.Bluetooth is automatically activated when youswitch on the shaver for the first time. You can onlydeactivate it by switching on the travel lock. Travel lockYou can lock the shaver when you are going totravel. The travel lock prevents the shaver frombeing switched on by accident. The travel lock alsodeactivates Bluetooth.Activating the travel lock1Press the on/off button for 3 seconds to enterthe travel lock mode.While you activate the travel lock, the travel locksymbol flashes. When the travel lock is activated,the travel lock symbol lights up continuously.Deactivating the travel lock1Press the on/off button for 3 seconds.The travel lock symbol flashes and then goes out.The shaver is now ready for use and Bluetooth isactivated again.ChargingBattery charge indicatorCharging takes approx. 1 hour.Quick charge: When the battery is empty and youconnect the shaver to the wall socket, the batterycharge indicator flashes quickly. When the shavercontains enough energy for one shaving orcleansing session, the battery charge indicatorstarts flashing slowly..While the shaver continues to charge, the battery charge indicator flashes slowly until the battery is fully charged.When the battery is fully charged, the batterycharge indicator lights up blue continuously.Note: The shaver can only be used without cord.Note: When the battery is full, the display switchesoff automatically after 30 minutes. If you press theon/off button during charging, the notificationsymbol lights up blue to remind you that you haveto disconnect the shaver from the wall socket.When the battery is almost empty, the batterycharge indicator flashes orange.When the battery is completely empty, the batterycharge indicator flashes orange quickly. ChargingCharging takes approx. 1 hour.Charge the shaver before first use and when thedisplay indicates that the battery is almost empty.Note: You can charge the shaver after every use.This will not harm the battery.Charging with the supply unit1Make sure the shaver is switched off.2Insert the small plug into the shaver and put the supply unit in the wall socket.3After charging, remove the supply unit from the wall socket and pull the small plug out of theshaver.Preparing for usePairing the shaver and your iPhoneFor this shaver a special app is available. You candownload the SkinAnalyst app from the App store.By using the app, your skincare and shavingroutine will be personalized. The app gives youexpert advice based on your skin, shaving method,local weather conditions, etc. to support your dailyskincare and shaving routine.Note: The app is available for iPhone 6, iPhone 6Plus, iPhone 6S and iPhone 6S Plus equipped withiOS9 or higher.To create a secure and safe connection, first theshaver and your iPhone need to be paired once.1Download the SkinAnalyst app from the Appstore.2Make sure Bluetooth on your iPhone isswitched on.Open the app on your iPhone.Follow the instructions in the app. After youhave filled in the skin assessment, the app asksyou to pair your iPhone with the shaver.Switch on the shaver. Bluetooth is activatedautomatically.6In the app, the pop-up message 'press pair'appears. When your iPhone and the shaverhave been paired successfully, the Bluetoothsymbol flashes briefly and then goes out. If thisdoes not happen, please see 'Troubleshooting'.7Once the shaver and the app have been paired,the shaver automatically selects the rightpersonal settings depending on the attachmentyou have clicked on. During shaving orcleansing, you can open the app to see thesettings you are using and the duration of theshaving or cleansing session.Note: When you use the shaver, keep youriPhone and shaver within transmission range(no more than 5 meters from each other, in thesame room).Using the shaverUsing the SkinAnalyst sensor1Open the app before measuring your skin.2If you have an iPhone case, first remove the case from your iPhone.3Pull the clamp of the SkinAnalyst sensor outwards and gently place your iPhone into the holder with its camera pointing towards theopening on the inside of the holder. Be careful when you attach or remove the SkinAnalystsensor to prevent scratches on your iPhone.Note: The SkinAnalyst sensor can only be used on iPhone 6, iPhone 6 Plus, iPhone 6S andiPhone 6S Plus equipped with iOS9 or higher.4Insert the jack plug of the SkinAnalyst sensorinto your iPhone.Note: Keep the SkinAnalyst sensor placed onthe skin during measurement to avoid flashinginto your eyes.-Do not look into the sensor before and afterskin measurement.-When you take a picture of the skin, pleaseposition the sensor flat onto your skin so toensure it can take a clear picture of your skin. Connecting with the shaver1Make sure Bluetooth on your iPhone isswitched on.5Keep your iPhone and shaver close to each other in order to stay connected.Caution: Do not use your iPhone in moistsurroundings. Moisture and water can damage your iPhone.1To switch on the shaver, press the on/off button once.2To switch off the shaver, press the on/off button once.In order to benefit optimally from the treatments, you have to synchronize your treatments regularly. The shaver can store up to 15 shaves and/or cleansing treatments, so make sure you synchronize the shaver at least once after every 15 treatments. As an extra reminder, the notification symbol flashes every 9 treatments, without a connection between the shaver and the app, to tell you to connect with the app.1Open the app and make sure you are close to the shaver.2The app connects with the shaver automaticallyand synchronizes your last shaves or cleansing treatments.Using the attachmentsNote: Attach the cleansing brush on the cleansingbrush base first, before you place it on the shaver.Removing or attaching the attachments1Make sure the shaver is switched off.directly after shaving to prevent skin irritation. Forbetter shaving results, use the cleansing brushTracker and change the cleansing brush settings. You can adjust the settings and choose between four settings depending on your personal cleansing needs: sensitive, dry, normal or oily. Using the shaving unitNote: This shaver can only be used without cord. Skin adaptation periodYour first shaves may not bring you the result you expect and your skin may even become slightly irritated. This is normal. Your skin and beard need time to adapt to any new shaving system. We advise you to follow the advice provided by the app and shave regularly (at least 3 times a week) with this shaver for a period of 4 weeks to allow your skin to adapt to the new shaver.Dry shaving1Switch on the shaver.2Move the shaving heads over your skin in circular movements to catch all hairs growing in different directions. Make sure each shavinghead is fully in contact with the skin. Exertgentle pressure for a close, comfortable shave.Note: Do not press too hard, this can cause skin irritation.3Clean the shaver after use.Wet shavingYou can also use this shaver on a wet face with shaving foam or shaving gel.To shave with shaving foam or shaving gel, follow the steps below:1Apply some water to your skin.2Apply shaving foam or shaving gel to your skin.3Rinse the shaving unit under the tap to ensure that the shaving unit glides smoothly over your skin.4Switch on the shaver.5Move the shaving heads over your skin in circular movements to catch all hairs growing in different directions. Make sure each shavinghead is fully in contact with the skin. Exertgentle pressure for a close, comfortable shave.Note: Do not press too hard, this can cause skin irritation.Note: Rinse the shaving unit regularly to ensure that it continues to glide smoothly over yourskin.6Dry your face.7Clean the shaver after use.Note: Make sure you rinse all foam or shavinggel off the shaver.Shave settingsThe app has a feature that allows you topersonalize your shave settings. Go to the UsageTracker and change the shaving settings. You canadjust the settings and choose between threesettings depending on your personal shavingneeds: extra sensitive (xs), sensitive (s) and normal(n).Unpairing your shaver and iPhonePairing allows a connection between 1 shaver and 1iPhone. To remove this connection (e.g. when youhave a new iPhone 6, 6 Plus, 6S or 6S Plusequipped with iOS9 or higher), follow the stepsbelow:1Remove pairing from the app: open the app ->Go to the menu in the app -> Select 'Appsettings' and press 'Remove pairing from app'.2Unpair the shaver: press and hold the on/offbutton on the handle for approx. 10 seconds toremove the bond between shaver and app.Note: The unpairing of the shaver is successfulwhen the Bluetooth and notification symbolflash simultaneously (approx. 4 seconds).3Unpair your iPhone: choose Settings -> General-> Bluetooth -> Select the device by pressing (i)-> and press 'forget devices'.Cleaning and maintenanceIf the shaver and the app are paired, the cleaningreminder on the shaver lights up after each shaveas an extra reminder to tell you to clean theshaver.Cleaning the shaving unit under the tapClean the shaving unit after every shave for7Attach the shaving head holder to the bottom part of the shaving unit (‘click’).Clean the cleansing brush every time you have used it.1Switch off the shaver.2Detach the brush head from the attachment holder.3Clean the parts thoroughly with warm water and soap.4Dry the cleansing brush with a towel.Detach your iPhone from the SkinAnalystsensor.-Put the protection cap on the cleansing brushPut the protection cap on the SkinAnalystsensor to protect it from dirt accumulation.Replacement Replacing the shaving headsAs an extra reminder, the notification symbol also lights up when the shaving heads should be replaced. This advice is also available in the app. For maximum shaving performance, we advise you to replace the shaving heads every two years. Replace damaged shaving heads immediately. Always replace the shaving heads with original Philips shaving heads (see 'Ordering accessories'). 1Switch off the shaver.2Pull the shaving head holder off the bottompart of the shaving unit.3Turn the retaining rings anticlockwise and remove them. Place them aside in a safe place. 4Remove the shaving heads from the shavinghead holder.Discard the used shaving heads immediately to avoid mixing them with the new shaving heads.The brush head should be replaced every 3months or earlier if the brush hairs are deformed or damaged. As an extra reminder, the notification symbol also lights up when the brush head should be replaced. This advice is also available in theapp.Ordering accessoriesTo buy accessories or spare parts, visit/service or go to yourPhilips dealer. You can also contact the PhilipsConsumer Care Center in your country (see theinternational warranty leaflet for contact details).The following accessories and spare parts areavailable:-SH70 Philips shaving heads-HQ110 Philips shaving head cleaning spray-RQ560/RQ563 Philips cleansing brush-HQ8505 supply unitNote: The availability of the accessories may differby country.Recycling-Do not throw away the product with the normalhousehold waste at the end of its life, but handit in at an official collection point for recycling.By doing this, you help to preserve theenvironment.-This product contains a built-in rechargeablebattery which shall not be disposed of withnormal household waste. Please take yourproduct to an official collection point or aPhilips service center to have a professionalremove the rechargeable battery.-Follow your country’s rules for the separatecollection of electrical and electronic productsand rechargeable batteries. Correct disposalhelps prevent negative consequences for theenvironment and human health. Removing the rechargeable batteryBend the hooks aside and remove the powerunit.Warranty and supportIf you need information or support, please visit/support or read theinternational warranty leaflet. TroubleshootingThis chapter summarizes the most commonproblems you could encounter with the shaver,SkinAnalyst sensor and its accessories. If you areunable to solve the problem with the informationbelow, visit /support for a list offrequently asked questions or contact theConsumer Care Center in your country. Problem Possible cause SolutionI cannot connect the shaver to the app.You have notdownloaded the app.Download theSkinAnalyst app.The app is availablefor iPhone 6, iPhone6 Plus, iPhone 6Sand iPhone 6S Plusequipped with iOS9or higher.Your shaver is notswitched on.Make sure the shaveris switched on.You have not openedthe app.Make sure you openthe app.your iPhone cannotfind the shaver.The shaver isavailable for iPhone6, iPhone 6 Plus,iPhone 6S andiPhone 6S Plusequipped with iOS9or higher.Problem Possible cause SolutionBluetooth is not switched on.Make sure Bluetooth is enabled on the shaver and your iPhone.The shaver is not charged.Make sure the shaver is charged.I want to use the shaver without the app.You can also use the shaver without the app. However, only when you use the app together with the shaver, the app is able to provide tips and advice based on your usage. With the app you can set your shave settings. The app also reminds you when you need to replace the shaving heads, to clean the shaver, etc.I cannot change the shavesettings/cleansing brush settings on the shaver.Make sure there is a good connection between the shaver and your iPhone.You can select the attachment (shaving unit/cleansing brush) on the shaver. In the app, you can change the settings per attachment (shaving unit:normal/sensitive/extra sensitive, cleansing brush: dry skin/normal skin/oily skin/sensitive skin).31EnglishProblem Possible cause Solution The shaver does not shave as well as it used to.The shaving headsare damaged or worn.Replace the shaving heads (see 'Replacing the shaving heads').Hairs or dirt obstruct the shaving heads.Clean the shaving heads in the regular way or clean them thoroughly.To clean the shaving heads thoroughly,remove the shaving heads from the shaving head holder one by one (see 'Replacing the shaving heads'). Then separate the cutter from its guard and rinse each matching set under the tap.After rinsing, place the cutter back into its corresponding guard. Finally, put the shaving heads back into the shaving head holder (see 'Replacing the shaving heads').The cleansing brush does not clean as well as it used to.The cleansing brush is damaged or worn.Replace the cleansing brush (see 'Replacing the cleansing brush').32EnglishProblem Possible cause SolutionThe shaver doesn't detect the right attachment.The attachment isheavily polluted ordamaged.Try to clean theattachment (see'Cleaning andmaintenance'); if theissue persists, switchoff the detectionfeature from the appand select theattachment manuallyby pressing theon/off button for onesecond while theshaver is switchedon.The shaver does not work when I press the on/off button.The shaver is stillattached to the wallsocket. For safetyreasons, the shavercan only be usedwithout cord.Unplug the shaverand press the on/offbutton to switch onthe shaver.The rechargeablebattery is empty.Recharge the battery.The travel lock isactivated.Press the on/offbutton for 3 secondsto deactivate thetravel lock.The shaving unit issoiled or damaged tosuch an extent thatthe motor cannot run.Clean the shavingheads thoroughly orreplace them. Alsosee 'Hairs or dirtobstruct the shavingheads' for a detaileddescription of how toclean the shavingheads thoroughly.The shaver switches off when I select a different brush program.You cannot changethe brush programduring cleansing.Switch off the shaverbefore you select adifferent brushprogram.33EnglishProblem Possible cause Solution I get an error in the app during skin measurement.You did not place the SkinAnalyst sensor flat on your skin.Place the SkinAnalyst sensor flat on your skin.You did not insert the plug of the SkinAnalyst sensor into your phone properly.Remove the plug ofthe SkinAnalystsensor from yourphone and insert the plug into your phone again.Your phone did not recognize the SkinAnalyst sensor.Make sure that:-the cover/case of your iPhone is detached.-the camera lens of your iPhone is clean-the SkinAnalyst sensor is correctly attached to your iPhoneYour phone did not recognize the SkinAnalyst sensor.Make sure that yourvolume limit settings are reset to default settings (go to Settings > Music >Volume limit > slide to the max).Water is leaking from the bottom of the shaver.During cleaning,water may collect between the inner body and the outer shell of the shaver.This is normal and not dangerousbecause allelectronics are enclosed in a sealed power unit inside the shaver.34English说明感谢您的惠顾,欢迎光临飞利浦! 为了让您能充分享受飞利浦提供的支持,请在 /welcome 上或通过 SkinAnalyst 应用程序注册您的产品。
Philips Premium Airfryer XXLFat Removal technology Rapid Air technologyblack, 1.4 kgHD9650/91Maximum taste, minimum fat Crispy taste, reduces fat others leave behind*The Philips Airfryer XXL uses hot air to fry your favourite food with little or no added oil. New Fat Removal technology is designed to extract and capture fat from the food, making this a healthier way to fry for you and your family.Designed for your daily cooking•Time and energy efficient•QuickClean and dishwasher-safe for all removable parts•XXL family size fits a whole chicken or 1.4 kg of fries•Keep Warm mode for flexible serving time•Digital display with 5 preset cooking programsVariety of cooking possibilities•Fry. Bake. Grill. Roast. And even reheat.•Exclusive NutriU App•With grill bottom to perfectly grill fish, meat and moreA healthier way to fry*•Fat Removal technology separates and captures excess fat•Fry with little or no oil•Rapid Air technology for delicious crispier resultsHighlightsFat Removal technologyEat healthier dishes with excess fat removed from food. The Philips Airfryer has Fat Removal Technology that separates andcaptures excess fat. Enjoy delicious food that's crispy on the outside and tender on the inside with maximum taste and minimum fat.XXL family size mealsYes, you can cook family-size meals in the new Airfryer XXL. It's full-size capacity makes cooking a large, delicious meal easy. You can cook a whole chicken or even up to 1.4 kg of fries to satisfy hungry family or friends. Serve up to six portions with the large 7.3L capacity pan.Keep Warm mode With our handy Keep Warm mode, you can enjoy your meal when you're ready. It will keep your food warm and at the ideal temperature for up to 30 minutes.Rapid Air technologyPhilips' Rapid Air technology creates 7x faster airflow for deliciously crispy results**. Enjoy healthier and tasty snacks and meals that are crisped to perfection yet tender on the inside.Time and energy efficientPhilips Airfyers work more efficiently to save you time and energy by cooking delicious meals with up to 70% less energy and up to 50% faster than a traditional oven.****QuickClean & dishwasher-safeClean-up is fast and easy thanks to the Airfryer QuickClean basket with removable non-stick mesh insert. Both the basket and removable drawer with non-stick coating are also dishwasher-safe for no-fuss cleaning.Fry with little or no oilThe Airfryer uses hot air to cook your favorite food with little or no added oil, so you can fry with up to 90% less fat***. Enjoy great-tasting, crispy results like deep fried, with the least amount of fat.Digital display with 5 presetsThe digital interface is easy to use with preset cooking programs for one-touch cooking of frozen fries, meat, fish, whole chicken and chicken drumsticks. A QuickControl dial sets both temperature and cooking time.Issue date 2023-08-14 Version: 4.4.1EAN: 87 10103 83619 3© 2023 Koninklijke Philips N.V.All Rights reserved.Specifications are subject to change without notice. Trademarks are the property of Koninklijke Philips N.V. or their respective owners.SpecificationsTechnical specifications •Power: 2200 W•Capacity basket: 1.4 kg•Basket capacity: 0.8 kg of fries, 1.4 kg •Fat Removal technology•Instant on/no pre-heat •Interface:Digital•Keep warm button•Pre-set button•Programs: 5 presets•Save your cooking settings: No Design•Color:BlackWeight and dimensions •Dimensions of product (LxWxH): 433x321x315 mm•Weight of product: 7.99 kg General specifications•Cord storage•Automatic shut-off•Power-on light•Integrated cord storage •Dishwasher safe •Cool wall exterior•Temperature control: 40 - 200 °C•Product features: Automatic shut-off, Cordstorage, Digital touchscreen, Dishwasher safe,Ready signal, Temperature control, Keep warmfunction, NutriU App, Preset program,QuickClean basket, Advanced Rapid Heat•Technology: Fat Removal technology•Ready signal•Time control: Up to 60 minutes•On/off switch•Preset cooking functionDesign and finishing•Material of main body: Plastic•Color of control panel: BlackService•2-year worldwide guaranteeAccessories included•Patented Rapid AirSustainability•Packaging: > 90% recycled materials•User manual: 100% recycled paper*Compared to fat content of chicken and pork versus a deep fat fryerand wok frying**Rapid Air Technology increases the airflow speed in the basket by7 times, compared to airflow speed in a Philips Viva Airfryer with flatbottom***Compared to fresh fries prepared in a Philips conventional fryer****Energy cost of cooking one chicken breast (AF setting 160C nopreheat) or salmon filet (200C, no preheat) vs. using an A class oven.Average percentage based on internal lab measurement withproducts HD9280, HD9650, HD9860, HD9270, HD9285, HD9252,HD9200, HD9255, HD9880. Results might vary per product.。
Philips Signage Solutions D-Line Display50"4K UHD 500cd/m²50BDL4550DChasing innovationpowered by AndroidAmaze your guests with a smarter, faster, signage display. With integrated WiFi and designed for running Android apps, it's the next evolution in signage solutionsInnovative solutions for any signage application •Save and play content with internal memory •Integrated dual-band WiFi•Android SoC processor. Native and web appsMaximizing the impact of your message •CMND: Take control of your displays•Manage settings of multiple displays with CMND & Control •Create and update content with CMND & Create •Connect and control your content via the cloudCare about you, your business and your audience •Keep your content up and running with FailOver•Ensure your content is running with automatic screenshots •SmartPower for energy saving Expand your viewing experience •ADS wide-view panel displayHighlightsPowered by Android 8Control your display via an Internet connection. Android-powered Philips Professional Displays are optimized for native Android apps, and you can install web apps directly to the display too. A new Android 8 ensures the software is kept secure and remain to the latest specification for longer.Internal MemorySave and play content with internal memory. Upload your media into the display and playback content immediately. Working in conjunction with the internal browser, it also serves as a memory cache when streaming online content. If the network ever fails, the internal memory keeps content running by playing a cachedversion of the content, ensuring that your media stays up even if the network goes down.Proof of PlayContent is king, and with the automaticscreenshot feauture, you can make sure that your content is up and running at all times. Screenshots are taken throughout the day, which are then stored in the FTP server. From there, the screenshots can be viewed no matter when, or where you are.FailOver Keeping your content up and running is critical for demanding commercial applications. While it is unlikely you will face a content disaster, FailOver provides content protection with a revolutionary technology that plays back-up content on screen in the event of a media player failure. FailOver automatically kicks in when the primary input fails. Simply select a primary input connection and a FailOver connection and your ready for instant protection.SmartPowerThe backlight intensity can be controlled and pre-set by the system to reduce the power consumption by up to 50%, which saves substantially on energy costs.CMNDA robust display management platform, CMND puts the power back into your hands. Update and manage content with CMND & Create or control your settings with CMND & Control. It's all possible with CMND.CMND & CreateDesign and create compelling content with CMND & Create, a powerful authoring tool. With a drag and drop interface, preloaded templates, and integrated widgets, you'll be able to amaze your customers with compelling content. Available in portrait and landscape mode.CMND & ControlWith CMND & Control, easily manage multiple displays in a central location. With real time display monitoring, setting and software updates from a remote location, and the ability to customize and configure multiple displays at once, such as video wall or menu board displays, controlling your suite of displays has never been easier.ADS wide-view panel displayBe seen from any angle with ADS wide-view technology. Advanced Super Dimension Switch delivers faster on-display picture processing for smoother content transitions, remarkable image accuracy, and superior colour reproduction with 180 degree viewing.SmartBrowserConnect and control your content via the cloud with the integrated HTML5 browser. Using the Chromium based browser, design your content online and connect a single display, or your complete network. Show content in both landscape and portrait mode, with fullHD resolution. Simply connect the display to the internet using WiFi or with an RJ45 cable, andenjoy your own created playlists.SpecificationsPicture/Display•Diagonal screen size: 49.5 inch / 125.7 cm •Panel resolution: 3840 x 2160•Optimum resolution: 3840 x 2160 @ 60Hz •Brightness: 500 cd/m²•Contrast ratio (typical): 4000:1•Dynamic contrast ratio: 500,000:1•Aspect ratio: 16:9•Response time (typical): 8 ms•Pixel pitch: 0.2854 x0.2854 mm•Display colors: 1.07 Billion•Viewing angle (H / V): 178 / 178 degree •Picture enhancement: 3/2 - 2/2 motion pull down, 3D Combfilter, Motion compens. deinterlacing, 3D MA deinterlacing, Dynamic contrast enhancement, Progressive scan•Operating system: Android 8.0•Panel technology: VAConnectivity•Video input: Display Port1.2 (x1), DVI-I (x 1), HDMI 2.0 (x2), USB 2.0 (x2)•Video output: DisplayPort 1.2 (x1), HDMI 2.0 (x1)•Audio input: 3.5 mm jack•Audio output: 3.5mm jack•External control: RJ45, RS232C (in/out) 2.5 mm jack, IR (in/out) 3.5 mm jack•WiFi: dual antenna 2,4Ghz and 5Ghz•4G/LTE antenna connectors: mPCIe Supported Display Resolution •Computer formatsResolution Refresh rate1920 x 1080 60Hz1024 x 768 60Hz1280 x 1024 60Hz1280 x 720 60Hz1440 x 900 60 Hz1600 x 900 60Hz1680 x 1050 60Hz3840 x 2160 30, 60Hz640 x 480 60Hz800 x 600 60Hz•Video formatsResolution Refresh rate1080i 50, 60Hz576i 50Hz576p 50Hz480p 60Hz480i 60Hz1080p 50, 60Hz2160p 24, 30, 60Hz720p 50,60 HzDimensions•Set dimensions (W x H x D):1128.4 x 649.0 x 63.5 mm•Set dimensions in inch (W x H x D):44.43 x 25.55 x 2.50 inch•Bezel width: 14.9 mm (Even bezel)•Product weight (lb): 32.52 lb•Product weight: 14.75 kg•Wall Mount: 400 (H)x 400 (V) mm, M6Convenience•Placement: Landscape (24/7), Portrait (24/7)•Tiled Matrix: Up to 10 x 15•Keyboard control: Hidden, Lockable•Signal loop through: RS232, IR Loopthrough,DisplayPort, HDMI•Network controllable: RS232•Energy saving functions: Smart Power•Screen saving functions: Pixel Shift, Low Bright•WiFi protocol: a b g n, 802.1xPower•Standby power consumption: <0.5 W•Mains power: 100 ~ 240 VAC, 50 ~ 60 Hz•Consumption (Typical): 100 W•Consumption (Max): 132 W•Energy Label Class: GOperating conditions•Temperature range (operation): 0 ~ 40 °C•Temperature range (storage): -20 ~ 60 °C•Altitude: 0 ~ 3000 m•MTBF: 50,000 hour(s)•Humidity range (operation)[RH]: 20 - 80% RH (Nocondensation)•Humidity range (storage) [RH]: 5 - 95% RH (Nocondensation)Sound•Built-in speakers: 2 x 10W RMSAccessories•Included accessories: Quick start guide, RS232 cable,AC Power Cord, IR sensor cable (1.8M), RemoteControl & AAA Batteries•Included Accessories: RS232 daisy-chain cable,Philips logo (x1), AC Switch Cover, USB Cover (x1),Screws•Stand: BM05922(Optional)Multimedia Applications•USB Playback Audio: AAC, HEAAC, MPEG•USB Playback Picture: BMP, JPEG, PNG•USB Playback Video: MPEG, H.263, H.264, H.265Miscellaneous•On-Screen Display Languages: English, French,German, Spanish, Polish, Turkish, Russian, Italian,Simplified Chinese, Traditional Chinese, Arabic,Japanese, Danish, Dutch, Finnish, Norwegian,Portuguese, Swedish•Regulatory approvals: CE, CCC, RoHS, BSMI, CB,VCCI, CU, EMF, EnergyStar 8.0, ETL, FCC, Class A,PSB•Warranty: 3 year warrantyInternal Player•CPU: 2 x A53 + 2 x A73•GPU: ARM Mali G51•Memory: 3GB DDR•Storage: 32 GB eMMcIssue date 2022-11-04 Version: 9.0.112 NC: 8670 001 68908 EAN: 87 12581 76921 5© 2022 Koninklijke Philips N.V.All Rights reserved.Specifications are subject to change without notice. Trademarks are the property of Koninklijke Philips N.V. or their respective owners.。
Audio T oll Free Help LineLigne d'assistance en service libre Linea de ayuda telefónica sin cargo 800-531-0039Return your Warranty Registration card today to ensure you receive all the benefits you’re entitled to.• Once your Philips purchase is registered, you’re eligible to receive all the privileges of owning a Philips product.• So complete and return the Warranty Registration Card enclosed with your purchase at once,and take advantage of these important benefits.Warranty Verification Registering your product within 10days confirms your right to maximum protection under the terms and conditions of your Philips warranty.OwnerConfirmationY our completed WarrantyRegistration Card servesas verification of owner-ship in the event of prod-uct theft or loss.ModelRegistrationReturning your WarrantyRegistration Card rightaway guarantees you’llreceive all the informationand special offers whichyou qualify for as theowner of your model.This “bolt of lightning” indi-cates uninsulated material within your unit may cause an elec-trical shock.For the safety of every-one in your household,please do not remove product covering.The “exclamation point” callsattention to features for which you should read the enclosed literature closely to prevent operat-ing and maintenance problems.WARNING:TO PREVENT FIRE OR SHOCK HAZARD,DO NOT EXPOSE THIS EQUIPMENT TO RAIN OR MOISTURE. CAUTION:T o prevent electric shock,match wide blade of plug to wide slot,and fully insert.For Customer UseEnter below the Serial No.which is locat-ed on the rear of the cabinet.Retain this information for future reference.Model No.________________________Serial No.________________________Know theses a f e t y symbolsC A U T I O NRISK OF ELECTRIC SHOCKDO NOT OPENCAUTION: TO REDUCE THE RISK OF ELECTRIC SHOCK, DO NOTREMOVE COVER (OR BACK). NO USER-SERVICEABLE PARTSINSIDE. REFER SERVICING TO QUALIFIED SERVICE PERSONNEL.MAC5097CLASSICMOZARTVERDIPOPBLURREGGAELIMITED WARRANTYPORT ABLE COMPACT DISCOne Y ear Free ExchangeThis product must be carried in for an exchange.WHO IS COVERED?Y ou must have proof of purchase to exchange the product.A sales receipt or other document showing that you purchased the product is considered proof of purchase. Attach it to this owner’s manual and keep both nearby.WHAT IS COVERED?Warranty coverage begins the day you buy your product.For one year thereafter,a defective or inoperative product will be replaced with a new,renewed or comparable product at no charge to you.A replacement product is covered only for the original warranty period.When the warranty on the original product expires,the warranty on the replacement product also expires.WHAT IS EXCLUDED?Y our warranty does not cover:•labor charges for installation or setup of the product,adjustment of customer controls on the product,and installation or repair of antenna systems outside of the product.•product repair and/or part replacement because of misuse,accident,unauthorized repair or other cause not within the control of Philips Consumer Electronics Company.•reception problems caused by signal conditions or cable or antenna systems outside the unit.•a product that requires modification or adaptation to enable it to operate in any country other than the country for which it was designed,manufactured,approved and/or authorized,or repair of products damaged by these modifications.•incidental or consequential damages resulting from the product.(Some states do not allow the exclusion of incidental or consequential damages,so the above exclusion may not apply to you.This includes,but is not limited to,prerecorded material,whether copyrighted or not copyrighted.)•a product that is used for commercial or institutional purposes.WHERE IS EXCHANGE AVAILABLE?Y ou may exchange the product in all countries where the product is officially distributed by Philips Consumer Electronics Company.In countries where Philips Consumer Electronics Company does not distribute the product,the local Philips service organization will attempt to provide a replacement product (although there may be a delay if the appropriate product is not readily available).BEFORE REQUESTING EXCHANGE...Please check your owner’s manual before requesting an exchange.Adjustments of the controls discussed there may save you a trip.Philips Service Solutions Group,P.O.Box 2976,Longview,T exas 75606,(903) 242-4800EXCHANGING A PRODUCT IN U.S.A.,PUERTO RICO OR U.S.VIRGIN ISLANDS...Contact your dealer to arrange an exchange.Or,ship the product,insured and freight prepaid,and with proof of purchase enclosed,to the address listed below.Small Product Service CenterPhilips Service Company907 Snapps Ferry Road,Plant 2,Building 6Greeneville,TN 37743(In U.S.A.,Puerto Rico and U.S.Virgin Islands,all implied warranties,including implied warranties of merchantability and fitness for a particular purpose,are limited in duration to the duration of this express warranty.But,because some states do not allow limitations on how long an implied warranty may last,this limitation may not apply to you.) EXCHANGING A PRODUCT IN CANADA...Please contact Philips at:1-800-661-6162 (French Speaking)1-800-363-7278 (English Speaking)(In Canada,this warranty is given in lieu of all other warranties.No other warranties are expressed or implied,including any implied warranties of merchantability or fitness for a particular purpose.Philips is not liable under any circumstances for any direct,indirect, special,incidental or consequential damages,howsoever incurred,even if notified of the possibility of such damages.)TO GET OUT-OF-WARRANTY EXCHANGE...In U.S.A.,Puerto Rico or U.S.Virgin Islands,contact Philips Service Company at (800) 531-0039 to obtain the cost of out-of-warranty exchange.Then carefully pack the product and ship it to the Small Product Service Center (address listed above).In Canada,call the phone number listed above under “Exchanging a Product in Canada” to obtain the cost of out-of-warranty exchange.REMEMBER...Please record the model and serial numbers found on the product below.Also,please fill out and mail your warranty registration card promptly.It will be easier for us to notify you if necessary.MODEL#____________________________________SERIAL#____________________________________This warranty gives you specific legal rights.You may have other rightswhich vary from state/province to state/province.EL4967E005 / MAC 4110 / 1-97。
tendrá que configurarinterruptores de límite - jamás• Seguridad - sistema dereversa eléctronico y mécanicoincorporado• Tablero de control conmicroprocesador avanzadoesta equipado coninterruptores que ponen enmodo de operación y tienepuertos para los circulos dedetección que simplifican elcableado• Cubierto de poliuterano todoslos componentes criticos sonprotegidos del ambiente• Montura G90 de acerogalvanizado previene oxidación• Con el sistema de "stop-Reverse" (parar-reversa) seelimina el daño que seencuentra comúnmente conoperadores de estilo dereversa instantáneoregresa el portón en contactooperación quefunciona bienel portón no da portazo al cerrartapadera queprotege la junturaayuda en eliminar puntos de pellizcosPORTONES BATIENTES montaje de posteMecánicoReducción Primaria: Polea/cinto con engranaje de gusano "tornillo sin fin"Velocidad:Rotación del portón 90°enaproximadamente 16-18 segundos Gabinete:G90 de acero galvanizado para preveniroxidación Brazo:Sistema mecánico que permite el brazo articulatorio de comienzodespacio/detenerse despacioMontura:Montaje en poste o plataforma- por favor when orderingDesconexión ManualSe puede regresar el embargue y permiteDesconexión de "fail-safe" (se desaseguran laspuertas cuando hay un corte del suministro eléctrico)Estándar de SeguridadSatisface las normas de seguridad de UL 325 y UL 991Listado ETLCaracterísticas AvanzadasLímites automáticos ajustablesT emporizador automático de cierre ajustable de 1 a 23 seg.Función que permite operar portones "batientes"vaivén dualesDiseñado con un sistema de prevención de atrapamiento primario y uno secundario Característica de detectar vandalismo Interruptor de encendido/apagado Interruptor de reinicioFunción de "lazo" (continuación)reversibles/seguimiento selectivo Enviar datos de cerradura magnética Dos enchufes 115VAC para accesorio de transformadorPuertos para enchufar dectectores para abrir o regresarSistema de "Gate Tacker"provee información importante sobre el operador(sistema de DKS acceso con tarjeta solamente)Temp de Operación10°F a 140°F -12°C a 62°CSe recomienda calentador para el ambiente más fríoPeso de EnvióAproximadamente 120-160 lbs.(54-73kg) Dependiendo el modelo y opciones selecionadas.GarantíaGarantía de fábrica limitada de 5 añosClase de Máximo Longitud Máximo Peso HP PotenciaConveniencia de operación de Portón *Weight *(caballos de fuerza)115 VAC, 60 Hz, 7.0A paquete abiertoI, II, III, IV 22 piez 800 libras 1 HP 60 ciclos/hr230 VAC, 60 Hz, 3.5A**Opcional6.7 m 362 kg servicio de continuo460 VAC, 60 Hz, 1.8A**6300 1 HP Especificaciones de potencia (caballos de fuerza)Especificaciones General* Asumir que el portón esta en buena condición y tiene que estar en una superficie aniveladoEquipo con la opción de apertura con corriente CC instalada en fábrica que abrirá el portón en caso quefalte la energía eléctricaClase de Máximo Longitud Máximo Peso HP PotenciaConveniencia de operaciónde Portón *Weight *(caballos de fuerza)115 VAC, 60 Hz, 5.4A paquete abiertoI, II, III, IV 18 piez 700 libras 1/2 HP 60 ciclos/hr230 VAC, 60 Hz, 2.7A**Opcional5.5 m 317.5 kg servicio de continuo460 VAC, 60 Hz, 1.4A**6300 1/2 HP Especificaciones de potencia (caballos de fuerza)Equipo con la opción de apertura con corriente CC instalada en fábrica que abrirá el portón en caso quefalte la energía eléctrica419mm W x 343mm H x 787mm DD O O R K I N G ,®I N C.120 Glasgow Avenue, Inglewood, California 90301 U.S.A. T el: 310-645-0023 FAX: 310-641-1586 Distribuido por:** Éstos operadores usan transformadores "step -down"(que se reduce el voltaje) para conseguir voltaje de operación 115VAC。
REMstar Auto A-Flex USER MANUAL© 2010 Koninklijke Philips Electronics N.V. All rights reserved.T able of ContentsIntended Use (2)Important (2)Warnings (2)Cautions (3)Contraindications (3)Symbol Key (3)System Contents (4)System Overview (4)Control Buttons (5)Available Therapies (5)Installing the Air Filters (6)Connecting the Breathing Circuit (6)Where to Place the Device (6)Supplying AC Power to the Device (6)Navigating the Device Screens (7)Starting the Device (7)Ramp Feature (8)Mask Fit Check Feature (8)Flex Screen (8)Setup Screen (9)Info Screen (10)Device Alerts (12)T roubleshooting (15)Accessories (16)T raveling with the System (17)Cleaning the Device (17)Cleaning or Replacing the Filters (17)Cleaning the T ubing (17)Service (17)Specifications (18)Disposal (20)How to Contact Respironics (20)Limited Warranty ...................................................................................................................................Back PageCauTion: U. S. federal law restricts this device to sale by or on the order of a physician.intended useThe Respironics REMstar Auto A-Flex system delivers positive airway pressure therapy for the treatment of Obstructive Sleep Apnea in spontaneously breathing patients weighing over 30kg (66 lbs). It is for use in the home or hospital/institutional environment. importantThe device is to be used only on the instruction of a licensed physician. The system can deliver CPAP therapy or Auto-CPAP therapy. For enhanced pressure relief in CPAP mode, the device can also deliver C-Flex or C-Flex+. For enhanced pressure relief in Auto mode, the device can deliver C-Flex or A-Flex. Your home care provider will make the correct pressure settings according to your health care professional’s prescription.When set in the Auto-CPAP therapy, the system will monitor your breathing as you sleep and automatically adjust the pressure to meet your needs. When in CPAP therapy, the system will deliver a continuous, set pressure during the night.Several accessories are available to make your OSA treatment with the REMstar Auto A-Flex system as convenient and comfortable as possible. To ensure that you receive the safe, effective therapy prescribed for you, use only Respironics accessories. WarningsA warning indicates the possibility of injury to the user or the operator.• This manual serves as a reference. The instructions in this manual are not intended to supersede the health care professional’s instructions regarding the use of the device.• The operator should read and understand this entire manual before using the device.• This device is not intended for life support.• The device should be used only with masks and connectors recommended by Respironics or with those recommended by the health care professional or respiratory therapist. A mask should not be used unless the device is turned on and operating properly. The exhalation port(s) associated with the mask should never be blocked. Explanation of the Warning: The device is intendedto be used with special masks or connectors that have exhalation ports to allow continuous flow of air out of the mask. Whenthe device is turned on and functioning properly, new air from the device flushes the exhaled air out through the mask exhalation port. However, when the device is not operating, enough fresh air will not be provided through the mask, and exhaled air may be rebreathed. Rebreathing of exhaled air for longer than several minutes can in some circumstances lead to suffocation.• If you are using a full face mask (a mask covering both your mouth and your nose),the mask must be equipped with a safety (entrainment) valve.• If you are using the optional Respironics 15 mm tubing,the device tubing type setting must be set to 15.If your device does not have the tubing type setting,you must use the Respironics 22 mm tubing.• When using oxygen with this system, the oxygen supply must comply with local regulations for medical oxygen.• Oxygen supports combustion. Oxygen should not be used while smoking or in the presence of an open flame.• When using oxygen with this system, turn the device on before turning on the oxygen. Turn the oxygen off before turning the device off. This will prevent oxygen accumulation in the device. Explanation of the Warning: When the device is not in operation and the oxygen flow is left on, oxygen delivered into the tubing may accumulate within the device’s enclosure. Oxygen accumulated in the device enclosure will create a risk of fire.• When using oxygen with this system, a Respironics Pressure Valve must be placed in-line with the patient circuit between the device and the oxygen source. The pressure valve helps prevent the backflow of oxygen from the patient circuit into the device when the unit is off. Failure to use the pressure valve could result in a fire hazard.• Do not connect the device to an unregulated or high pressure oxygen source.• Do not use the device in the presence of a flammable anaesthetic mixture in combination with oxygen or air, or in the presence of nitrous oxide.• Do not use the device near a source of toxic or harmful vapors.• Do not use this device if the room temperature is warmer than 35° C (95° F). If the device is used at room temperatures warmer than 35° C (95° F), the temperature of the airflow may exceed 43° C (109° F). This could cause irritation or injury to your airway.• Do not operate the device in direct sunlight or near a heating appliance because these conditions can increase the temperature of the air coming out of the device.• Contact your health care professional if symptoms of sleep apnea recur.• If you notice any unexplained changes in the performance of this device, if it is making unusual or harsh sounds, if it has been dropped or mishandled, if water is spilled into the enclosure, or if the enclosure is broken, disconnect the power cord and discontinue use. Contact your home care provider.• Repairs and adjustments must be performed by Respironics-authorized service personnel only. Unauthorized service could cause injury, invalidate the warranty, or result in costly damage.• Periodically inspect electrical cords and cables for damage or signs of wear. Discontinue use and replace if damaged.• To avoid electrical shock, always unplug the power cord from the wall outlet before cleaning the device. DO NOT immerse the device in any fluids.• If the device is used by multiple persons (such as rental devices), a low-resistance, main flow bacteria filter should be installed in-line between the device and the circuit tubing to prevent contamination.• Be sure to route the power cord to the outlet in a way that will prevent the cord from being tripped over or interfered with by chairs or other furniture.• This device is activated when the power cord is connected.• For safe operation when using a humidifier, the humidifier must always be positioned below the breathing circuit connection at the mask and the air outlet on the device. The humidifier must be level for proper operation.note: Please see the “Limited Warranty” section of this manual for information on warranty coverage.CautionsA Caution indicates the possibility of damage to the device.• Pins of connectors should not be touched. Connections should not be made to these connectors unless ESD precautionary procedures are used. Precautionary procedures include methods to prevent build-up of electrostatic charge (e.g., air conditioning, humidification, conductive floor coverings, non-synthetic clothing), discharging one’s body to the frame of the equipment or system or to earth or a large metal object, and bonding oneself by means of a wrist strap to the equipment or system or to earth. • Before operating the device, ensure that the SD card cover is replaced whenever any of the accessories such as the Link Module or Modem are not installed. Refer to the instructions that came with your accessory.• Condensation may damage the device. If this device has been exposed to either very hot or very cold temperatures, allow it to adjust to room temperature (operating temperature) before starting therapy. Do not operate the device outside of the operating temperature range shown in the Specifications.• Do not use extension cords with this device.• Do not place the device directly onto carpet, fabric, or other flammable materials.• Do not place the device in or on any container that can collect or hold water.• A properly installed, undamaged reusable foam inlet filter is required for proper operation.• Tobacco smoke may cause tar build-up within the device, which may result in the device malfunctioning.• Dirty inlet filters may cause high operating temperatures that may affect device performance. Regularly examine the inlet filters as needed for integrity and cleanliness.• Never install a wet filter into the device. You must ensure sufficient drying time for the cleaned filter.• When DC power is obtained from a vehicle battery, the device should not be used while the vehicle’s engine is running. Damage to the device may occur.• Only use a Respironics DC Power Cord and Battery Adapter Cable. Use of any other system may cause damage to the device. ContraindicationsWhen assessing the relative risks and benefits of using this equipment, the clinician should understand that this device can deliverpressures up to 20 cm H2O. In the event of certain fault conditions, a maximum pressure of 30 cm H2O is possible. Studies haveshown that the following pre-existing conditions may contraindicate the use of CPAP therapy for some patients:• Bullous Lung Disease• Pathologically Low Blood Pressure• Bypassed Upper Airway• Pneumothorax• Pneumocephalus has been reported in a patient using nasal Continuous Positive Airway Pressure. Caution should be used when prescribing CPAP for susceptible patients such as those with: cerebral spinal fluid (CSF) leaks, abnormalities of the cribriform plate, prior history of head trauma, and/or pneumocephalus. (Chest 1989; 96:1425-1426)The use of positive airway pressure therapy may be temporarily contraindicated if you exhibit signs of a sinus or middle ear infection. Not for use with patients whose upper airways are bypassed. Contact your health care professional if you have any questions concerning your therapy.Symbol KeySystem ContentsYour REMstar Auto A-Flex system includes the following items:• Device • Reusable gray foam filter• User manual • Disposable ultra-fine filter (optional)• Carrying case • Side cover panel• Power cord and power supply (Part# 1058190) • SD card• Flexible tubing, 22 mm (optional 15 mm tubing is also available) • Humidifier (optional)note: If any of these items are missing, contact your home care provider.System overviewThe REMstar Auto A-Flex is a CPAP (Continuous Positive Airway Pressure) device designed for the treatment of Obstructive Sleep Apnea (OSA). It can deliver CPAP therapy or Auto-CPAP therapy.When prescribed for you, the device provides several special features to help make your therapy more comfortable. The ramp function allows you to lower the pressure when you are trying to fall asleep. The air pressure will gradually increase until your prescription pressure is reached. You also have the option of not using the ramp feature at all. Additionally, the C-Flex, C-Flex+ and A-Flex comfort features provide you with pressure relief when you exhale during therapy.Several accessories are also available for use with your REMstar Auto device. Contact your home care provider to purchase any accessories not included with your system.Control ButtonsWheel/Push ButtonHumidifier Icon &Number Settingsavailable TherapiesThe REMstar Auto A-Flex device delivers the following therapies:• CPAP – Delivers Continuous Positive Airway Pressure; CPAP maintains a constant level of pressure throughout the breathing cycle.• CPAP with C-Flex – Delivers CPAP therapy with pressure relief upon exhalation to improve patient comfort based on patient needs.• CPAP with C-Flex+ – Delivers CPAP therapy with pressure relief taking place at the end of inhalation and at the start of exhalation to improve patient comfort based on patient needs.• Auto-CPAP – Delivers CPAP therapy while automatically adjusting the pressure level to meet the patient’s needs.• Auto-CPAP with C-Flex – Delivers Auto-CPAP therapy with pressure relief upon exhalation to improve patient comfort based on patient needs.• Auto-CPAP with A-Flex – Delivers Auto-CPAP therapy with pressure relief taking place at the end of inhalation and at the start of exhalation to improve patient comfort based on patient needs.Installing the Air FiltersCauTion: A properly installed, undamaged gray foam filter is required for proper operation.The device uses a gray foam filter that is washable and reusable, and a white ultra-fine filter that is disposable. The reusable filter screens out normal household dust and pollens, while the ultra-fine filter provides more complete filtration of very fine particles. The gray reusable filter must be in place at all times when the device is operating. The ultra-fine filter is recommended for people who are sensitive to tobacco smoke or other small particles.The reusable gray foam filter is supplied with the device. A disposable ultra-fine filter may also be included. If your filter is not already installed when you receive your device, you must at least install the reusable gray foam filter before using the device. To install the filter(s):1. If you are using the white disposable ultra-fine filter, insert it into the filter area first, mesh-side facing in, towards the device.2. Insert the required gray foam filter into the filter area after the ultra-fine filter.note: If you are not using the white disposable filter, simply insert the gray foam filter into the filter area. Connecting the Breathing CircuitTo use the system, you will need the following accessories in order to assemble the recommended circuit:• Respironics interface (nasal mask or full face mask) with integrated exhalation port, or Respironics interface with a separate exhalation device (such as the Whisper Swivel II)WaRninG: If you are using a full face mask (a mask covering both your mouth and your nose),the mask must be equipped with a safety (entrainment) valve.• Respironics 22 mm flexible tubing, 1.83 m (6 ft.) (optional Respironics 15 mm tubing for compatible devices)• Respironics headgear (for the mask)WaRninG: If the device is used by multiple persons (such as rental devices), a low-resistance, main flow bacteria filter should be installed in-line between the device and the circuit tubing to prevent contamination.To connect your breathing circuit to the device, complete the following steps:1. Connect the flexible tubing to the air outlet on the side of the device.WaRninG: If you are using the optional Respironics 15 mm tubing,the device tubing type setting must be set to 15.If your device does not have the tubing type setting,you must use the Respironics 22 mm tubing.note: If required, connect a bacteria filter to the device air outlet, and then connect the flexible tubing to the outlet of the bacteria filter.note:When using the bacteria filter, the device performance may be affected. However, the device will remain functional and deliver therapy.2. Connect the tubing to the mask. Refer to the instructions that came with your mask.3. Attach the headgear to the mask if necessary. Refer to the instructions that came with your headgear.Where to Place the DevicePlace the device on a firm, flat surface somewhere within easy reach of where you will use it at a level lower than your sleeping position. Make sure the filter area on the back of the device is not blocked by bedding, curtains, or other items. Air must flow freely around the device for the system to work properly. Make sure the device is away from any heating or cooling equipment (e.g., forced air vents, radiators, air conditioners).CauTion: Do not place the device directly onto carpet, fabric, or other flammable materials.CauTion: Do not place the device in or on any container that can collect or hold water.Supplying AC Power to the DeviceCauTion: Condensation may damage the device. If this device has been exposed to either very hot or very cold temperatures, allow it to adjust to room temperature (operating temperature) before starting therapy. Do not operate the device outside of the operating temperature range shown in the Specifications.WaRninG: Be sure to route the power cord to the outlet in a way that will prevent the cord from being tripped over or interfered with by chairs or other furniture.WaRninG:This device is activated when the power cord is connected.IMPORTANT: If you are using your device with a humidifier, refer to the instructions included with your humidifier for details on how to power the device and humidifier.Complete the following steps to operate the device using AC power:1. Plug the socket end of the AC power cord (included) into the power supply (also included).2. Plug the pronged end of the AC power cord into an electrical outlet that is not controlled by a wall switch.3. Plug the power supply cord’s connector into the power inlet on the back of the device.4. Ensure that all connections are secure.IMPORTANT:To remove AC power, disconnect the power supply cord from the electrical outlet. WaRninG: Periodically inspect electrical cords and cables for damage or signs of wear. Discontinue use and replace if damaged.CauTion: Do not use extension cords with this device.Navigating the Device ScreensT urn the wheel to toggle between options and settings on the screen. Press the wheel to choose an option or setting that is highlighted. If you choose “Back” on any screen, it will take you back to the previous screen.note: The screens shown throughout this manual are examples only. Actual screens may vary slightly. Examples are for reference only.Starting the Device1. Supply power to the device.2. The Home screen will appear, shown below.Home Screennote: “Flex” shown above will display as the current Flex mode chosen by the provider.note: The SD card icon will display next to “Info”, if the SD card is inserted.3. Put on your mask assembly.note: If you are having trouble with your mask, refer to the instructions supplied with the mask.4. T urn the wheel to toggle between the four options.Highlight “Therapy”.Press the wheel to turn on the airflow and begin therapy. The Therapy screen will appear which will show the current pressure setting being delivered (example shown below).Therapy Screennote: The SD card icon will display in the lower left corner if the SD card is inserted.note: If the Ramp feature is on, the Ramp icon will display in the lower right corner.5. Make sure that no air is leaking from your mask into your eyes. If necessary, adjust the mask and headgear until the air leak stops. See the instructions provided with your mask for more information.note: A small amount of mask leak is normal and acceptable. Correct large mask leaks or eye irritation from an air leak as soon as possible.6. If you are using the device in a bed with a headboard, try placing the tubing over the headboard. This may reduce tension on the mask.7. Press the wheel again to turn off therapy and return to the Home screen.Ramp FeatureThe device is equipped with an optional ramp feature that your home care provider can enable or disable. This feature reduces the air pressure when you are trying to fall asleep and then gradually increases (ramps) the pressure until your prescription setting is reached, allowing you to fall asleep more comfortably.If ramp is enabled on your device, after you turn on the airflow, press the RAMP ( ) button on the top of the device. You can use the RAMP button as often as you wish during the night.note: If the Ramp feature is on, the Ramp icon ( ) will display in the lower right corner of the Therapy screen. note: If the Ramp feature is disabled and airflow is on, nothing will happen when you press the RAMP button. note: If the airflow is off and you press the RAMP button, the mask fit check feature will start if it is enabled by your provider. note: If in Auto mode, there is no ramp at minimum pressure when starting. Ramp would only be useful if you wake in the middle of the night.Mask Fit Check FeatureIf available on your device, the optional mask fit check feature can be enabled or disabled by your home care provider. This feature allows you to check the fit of your mask prior to starting therapy. This is done by measuring the amount of leak.Put on your mask assembly. If mask fit check is enabled, before you turn on the airflow, press the RAMP ( ) button on the top of the device. Airflow will start and the mask fit check screen will appear, shown below.) or an .optimal performance of the device. The shows that the leak may affect device performance, however, the device will remain functional and deliver therapy.note:If you choose to try to improve your mask fit,you can stop therapy,adjust the fit of your mask,and rerun the Mask Fit Check.Please refer to the instructions that came with your mask and headgear for the proper fitting procedure. note: Mask Fit Check is only available when the device is in Auto-CPAP therapy mode.note: If Split night is enabled, Mask Fit Check will be disabled.Flex ScreenFrom the Home screen, highlight “Flex” and press the wheel. The following Flex screen will appear.Flex Screennote: “Flex” shown above will display as the current Flex mode chosen by the provider.• F lex - The Flex comfort feature allows you to adjust the level of air pressure relief that you feel when you exhale during therapy. Y our home care provider can enable or disable this feature. When your provider enables Flex, a level will already be set for you on the device. If this is not comfortable, you can increase or decrease the setting. The setting of “1” provides a small amount of pressure relief, with higher numbers providing additional relief. If the provider has disabled this feature, this setting will not display.note:This same setting is also available under the “Setup” screen.• Flex demo - The Flex setting allows you to set the Flex level prior to beginning therapy. The Flex demo setting allows you to try out the different Flex settings in real time. After a period of time of inactivity, the device will stop therapy and will use the last Flex demo setting as the new Flex setting for your device. When therapy is again started from the Home screen, the device will operate using the new Flex setting.Setup ScreenFrom the Home screen, highlight “Setup” and press the wheel. The following Setup screen will appear. The user can change settings in the Setup menu.Setup Screennote: The screen will only show 4 lines at a time. As you rotate the wheel to toggle over different options the screen will slide up and down accordingly. If the text is too long to completely fit on the screen,it will scroll horizontally across the screen when highlighted.• Flex - This displays the Flex level set by your home care provider. Y our home care provider will either enable or disable Flex. If Flex is enabled and the setting is not comfortable, you can increase or decrease this setting. If your provider has disabled Flex, you will not see this setting.note:This same setting is also available under the “Flex” screen.• SYSTEM ONE humidification - System One humidity control maintains a consistent mask humidity by monitoring and adjusting for changes in room temperature and room humidity. Y ou can enable or disable this feature. If the System One humidity control has been disabled, the classic style of basic temperature controlled heated humidification will be used. This will only display if the humidifier is attached.• Humidifier - This setting allows you to choose the desired humidity setting: 0, 1, 2, 3, 4 or 5. If the System One humidity control has been disabled, the classic style of basic temperature controlled heated humidification will be used and the display will show: 0, C1, C2, C3, C4 or C5 for these settings. This will only display if the humidifier is attached. Please refer to the humidifier manual if using a humidifier.• Ramp Start - This displays the ramp starting pressure. You can increase or decrease the ramp starting pressure in0.5 cm H2O increments. This is only available if Ramp time has been set to >0 and auto min or CPAP pressure >4cm H2O. This will not display if your provider enabled Split night on your device.• T ubing T ype - This setting allows you to select the correct size diameter tubing that you are using with the device.Y ou can choose either “22” for any Respironics 22 mm tubing,or “15” for the optional Respironics 15 mm tubing. WaRninG: If you are using the optional Respironics 15 mm tubing, the device tubing type setting must be set to 15. If your device does not have the tubing type setting, you must use the Respironics 22 mm tubing.• SYSTEM ONE resistance( ) - This setting allows you to adjust the level of air pressure relief based on the specific Respironics mask. Each Respironics mask may have a “System one” resistance control setting. Contact your home care provider if you cannot find this resistance setting for your mask. If your provider has locked the resistance setting into place, you can view the setting but cannot change it, and the screen will display a lock symbol. If your provider has disabled resistance, you will not see this setting.• Auto on - Y ou can enable this feature if you want the device to automatically turn the airflow on whenever you apply the interface (mask) to your airway. Y ou can also disable this feature.• Auto off - Y ou can enable this feature if you want the device to automatically turn the airflow off whenever you remove the interface (mask) from your airway. Y ou can also disable this feature.• Mask alert - Y ou can enable or disable the mask alert setting. If this feature is enabled, the mask alert will appear on the display screen when a significant mask leak is detected, and an audible alert will sound. Refer to the Device Alerts section for more information about the mask alert.• Humidifier LED Backlight (Ramp Backlight) - Y ou can enable or disable the LED backlight for the humidifier number settings and Ramp button on the device.note: If the humidifier is not attached, this feature will display as “Ramp Backlight” and control the LED backlight for the Ramp button only.note: If the Humidifier LED Backlight is enabled or disabled, the humidifier icon will always remains on (if humidifier is attached and heat is being applied), but will dim after 30 seconds of inactivity.• Language - This feature allows you to choose which language to display on the interface. Y ou can choose English (EN) or Spanish (ES).info ScreenFrom the Home screen, highlight “Info” and press the wheel. The following Info screen will appear. The user cannot change settings in the Info menu.note: These screens are only for reference. Y our home care provider may periodically ask you for this information.note: The screen will only show 4 lines at a time. As you rotate the wheel to toggle over different options the screen will slide up and down accordingly.• Status - This displays information sent from a peripheral (SD card , modem , etc.). If two peripherals are attached, two lines will appear with corresponding icons.note: This will not display if no peripherals are being used.• Phone-in - This screen displays the total therapy hours for the device, the total blower hours, and the total number of days used when the sessions were greater than 4 hours since the device was last reset by the home care provider. This screen also displays a compliance check number used by your home care provider to validate that the data provided by you is the data taken from this screen. This setting only appears if your provider has enabled this feature.• Compliance VIC (Visual Inspection Check) - This screen displays the start day and the total number of days used when the sessions were greater than 4 hours. This screen also displays a check code number used by your home care provider to validate that the data provided by you is the data taken from this screen. This setting only appears if your provider has enabled this feature.• Therapy hours - The device is capable of recognizing the difference between the time the patient is actually receiving therapy and the time when the blower is simply running. This screen displays the average amount of time the patient is actually receiving therapy on the device over a 7 day and 30 day time frame (provided the device has at least 7 or 30 days of data respectively). If the device has only 5 days of data to use for the calculation, the 5 day average value will be seen under the 7 day display.。