学会VLAN的基础配置
- 格式:docx
- 大小:66.91 KB
- 文档页数:7

交换机上配置静态VLAN1、创建VLAN(1)在全局模式下创建VLAN:switch>enable 进入特权模式switch#configure terminal 进入全局模式switch(config)#vlan vlan-ID创建VLAN号switch(config)#name vlan-name配置VLAN名称switch(config)#mtu mtu-size改变MTU大小(可选命令)switch(config)#end 退出switch(config)#show vlan {name vlan-name|ID vlan-id}验证查看vlanswitch(config)#copy running-config startup-config 保存配置(2)在VLAN数据库中创建VLAN(VLAN数据库模式目前已经过时IOS版本不在支持,推荐使用全局模式配置定义VLAN)switch#vlan datebase 进入VLAN配置状态switch(vlan)#vlan vlan-id name vlan-name创建VLAN号及VLAN名称switch(vlan)#vlan vlan-id mtu mtu-size 修改MTU大小switch(vlan)#exit 更新VLAN数据并退出switch(config)#show vlan {name vlan-name|ID vlan-id}验证查看vlanswitch(config)#copy running-config startup config 保存配置(3)在VLAN中添加、删除端口switch#configure terminal 进入配置状态switch(config)# interface interface-id 进入要分配的端口switch(config)#switchport mode access 定义二层端口switch(config)#switchport access vlan vlan-id把端口划分给某个VLANswitch(config)#end 退出switch#show running-config interface interface-ID验证端口号的VLAN号switch#show interfaces interface-id switchport 验证端口的管理模式和VLAN情况switch#copy running-config startup-config 保存配置使用default interface interface-id命令可以还原接口的默认配置状态(4)验证VLAN的配置switch#show vlan brief 查看VLAN信息的命令switch#show vlan vlan-id查看指定的某一个VLAN信息(5)删除VLAN用no vlan vlan-id命令Switch#configure terminalSwitch(config)#no vlan vlan-id++++++++++++++++++++++++++++++++++++++++++++++++++++++++++++++++++++ 2、Turnk的模式和协商接口的配置模式1、switchport mode access将接口设定为永久的非中继模式,并协商将链路转换为非中继链路,即使邻接端口是中继端口,此接口也会成为非中继接口2、switchport mode dynamic desirable 使得接口主动尝试将链路转换为中继链路。
实验一、交换机基本配置与升级一、Quidway S 系列中低端交换机配置方法1.实验内容:华为3ComQuidwayS系列中低端交换机配置方法2.实验目的:掌握QuidwayS系列中低端交换机几种常用配置方法3.实验环境:在实验中,我们采用华为3Com Quidway三层交换机S3526来组建实验环境(此处以S3526为代表,其它中低端交换机的配置命令基本一致)。
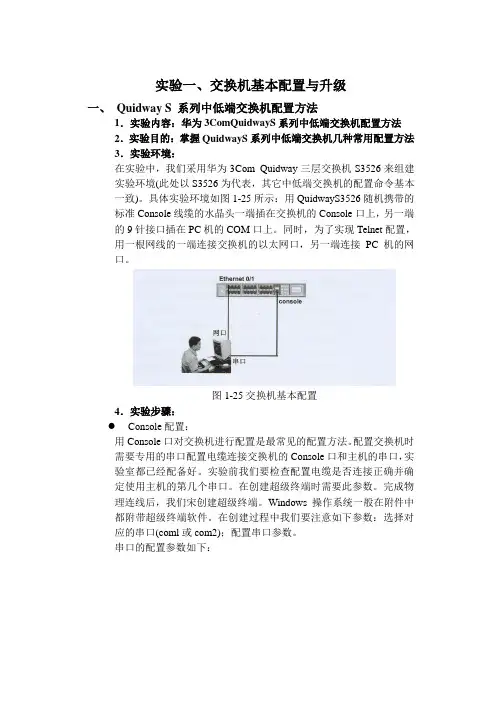
具体实验环境如图1-25所示:用QuidwayS3526随机携带的标准Console线缆的水晶头一端插在交换机的Console口上,另一端的9针接口插在PC机的COM口上。
同时,为了实现Telnet配置,用一根网线的一端连接交换机的以太网口,另一端连接PC机的网口。
图1-25交换机基本配置4.实验步骤:Console配置:用Console口对交换机进行配置是最常见的配置方法。
配置交换机时需要专用的串口配置电缆连接交换机的Console口和主机的串口,实验室都已经配备好。
实验前我们要检查配置电缆是否连接正确并确定使用主机的第几个串口。
在创建超级终端时需要此参数。
完成物理连线后,我们宋创建超级终端。
Windows操作系统一般在附件中都附带超级终端软件。
在创建过程中我们要注意如下参数:选择对应的串口(coml或com2);配置串口参数。
串口的配置参数如下:单击确定按钮即可正常建立与交换机的通信。
如果交换机已经启动,按Enter键即可进A交换机的用户视图。
若还没有启动,打开交换机电源我们会看到交换机的整个启动过程,启动完成后,同样进入用户视图,给出如下提示:User interface Aux 0/0 is availablePress ENTER to get started.<Quidway>Telnet配置如果交换机配置了IP地址,我们就可以在本地或者远程使用Telnet 登录到交换机上进行配置,和使用Console口配置的界面完全相同,这样大大的方便了我们的工程维护人员对设备的维护。
实验四、VLAN 的基础配置一、VLAN基本配置1.实验原理:VLAN(Virtual LAN),翻译成中文是“虚拟局域网”。
LAN可以是由少数几台家用计算机构成的网络,也可以是数以百计的计算机构成的企业网络。
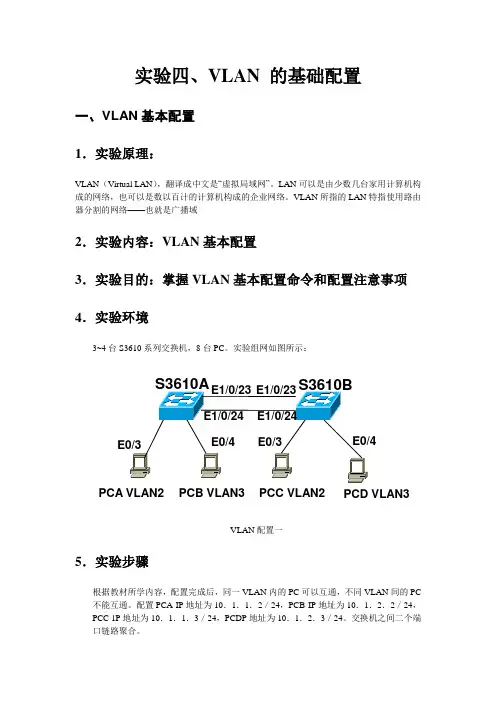
VLAN所指的LAN特指使用路由器分割的网络——也就是广播域2.实验内容:VLAN基本配置3.实验目的:掌握VLAN基本配置命令和配置注意事项4.实验环境3~4台S3610系列交换机,8台PC。
实验组网如图所示:PCA VLAN2 PCB VLAN3 PCC VLAN2 PCD VLAN3VLAN配置一5.实验步骤根据教材所学内容,配置完成后,同一VLAN内的PC可以互通,不同VLAN间的PC 不能互通。
配置PCA IP地址为10.1.1.2/24,PCB IP地址为10.1.2.2/24,PCC 1P地址为10.1.1.3/24,PCDP地址为10.1.2.3/24。
交换机之间二个端口链路聚合。
●配置链路聚合S3610A上的配置:设置交换机名称为S3610A:[H3C]sysname S3610A进入以太网端口Ethernet 0/0/23:[S3610A]interface e1/0/23配置Ethernet 0/0/23端口模式为全双工模式[S3610A-Ethernet1/0/23]duplex full配置Ethernet 0/0/23端口速率为100M:[S3610A-Ethernet1/0/23]speed l00进入以太网端口Ethernet 0/0/24:[S3610A-Ethernet1/0/23]intefface e1/0/24配置Ethernet 0/0/24端口模式为全双工模式:[S3610A-Ethernet1/0/24]duplex full配置配置Ethernet 0/0/24端口速率为100M:[S3610A-Ethernet1/0/24]speed l00退出端口视图:[S3610A-Ethernet1/0/24]quit配置链路聚合:[S3206A]link-aggregation Ethernet 1/0/23 to Ethernet 1/0/24 both S3610B上配置:(命令同上)[H3C]sysname S3610B[S3610B]interface e1/0/23[S3610B—Ethernet1/0/23]duplex full (全双工)[S3610B—Ethernet1/0/23]speed l00 (百兆速率)[S3610B—Ethernet1/0/23]interface e1/0/24tS3610B—Ethernet1/0/24]duplex full (全双工)[S3610B-Ethernet1/0/24]Speed l00 (百兆速率)[S3610B—Ethernet1/0/24] quit[S3610B]link-aggregation Ethernet1/0/23 to Ethernet 1/0/24 both ●配置每一台PC属于特定的VLAN创建(进入)Vlan2:[S3610A]Vlan2将Ethernet 0/9到Ethernet1/0/16端口加入到Vlan2:[S3610A-vlan2]port Ethernet 0/9 to Ethernet1/0/16创建(进入)Vlan3[S3610A-vlan2]vlan 3将Ethernet 0/7到Ethernet1/0/22端口加入到Vlan3:[S3610A—vlan3]port Ethernet0/7 to Ethernet1/0/22创建(进入)Vlan2:[S3610B] Vlan2将Ethernet 0/9到Ethernet1/0/16端口加入到Vlan2:[S3610B—vlan2]portEthernet0/9 to Ethernet1/0/16创建(进入)Vlan3[S3610B—vlan2] Vlan 3将Ethernet 0/7到Ethernet1/0/22端口加入到Vlan3:[S3610B-vlan3]port Ethernet 0/17 to Ethernet 0/22●配置交换机之间的端口为Trunk端口,并且允许所有VLAN通过[S3610A]interface e1/0/23[S3610A-Ethernet1/0/23] port link-type trunk允许所有VLAN通过Trunk端口[S3610A-Ethernet 1/0/23]port trunk permit vlan all[S3610A-Ethernet 1/0/23]interface E1/0/24[S3610A-Ethernet 1/0/24]port link-typet runk允许所有VLAN通过Trunk端口[S3610A-Ethernet1/0/24]port trunk permit vlan al1[S3610]interface e1/0/23[S3610B-Ethernet1/0/23] port link-type trunk允许所有VLAN通过Trunk端口[S3610B-Ethernet1/0/23]port trunk permit vlan all[S3610B-Ethernet1/0/23]interface e1/0/24[S3610B-Ethernet1/0/24]port link-type trunk允许所有VLAN通过Trunk端口[S3610B-Ethernet1/0/24]port trunk permit vlan all配置完成后,可以看到,同一VLAN内部的PC可以互相访问不同VLAN间的PC不能够互相访问。

vlan基本配置实验报告的总结
一、实验目的
本次实验的目的是理解并了解VLAN的基本配置,通过配置实现VLAN之间的通讯以及基于VLAN进行路由的转发功能,掌握VLAN和VLAN间通信的基本原理。
二、实验内容
1、创建VLAN:首先配置VTP模式,将路由器工作模式变为server 模式,把所有端口设置为trunk模式,然后在物理端口上划分VLAN,设置VLAN ID和VLAN名称,将需要划分的端口添加到相应的VLAN中,最后配置VLAN间通信转发功能,完成VLAN的划分。
2、VLAN接口和端口间的路由:完成VLAN的划分后,使用物理端口接口实现VLAN间的路由,设置交换机的端口进行路由转发,即设置端口属于哪个VLAN,激活接口,分发IP地址,设置默认路由,分发路由信息,开启端口,完成VLAN间的路由功能。
3、VLAN的广播控制:VLAN是一种以域的概念划分网络,对网络中的广播信息进行了控制,可以控制路由器对广播信息的转发,以达到限制不必要的网络流量,从而提高网络的性能和安全性。
三、实验结论
本次实验中,我们掌握了VLAN的基本配置,学会了在实际网络上划分VLAN,通过端口实现VLAN间的路由功能,并学会了对网络中的广播信息进行控制,从而提高网络的性能和安全性。
- 1 -。
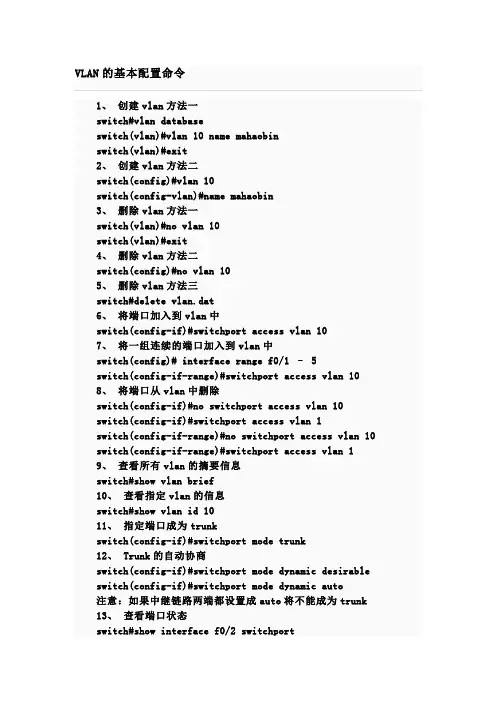
1、创建vlan方法一switch#vlan databaseswitch(vlan)#vlan 10 name mahaobinswitch(vlan)#exit2、创建vlan方法二switch(config)#vlan 10switch(config-vlan)#name mahaobin3、删除vlan方法一switch(vlan)#no vlan 10switch(vlan)#exit4、删除vlan方法二switch(config)#no vlan 105、删除vlan方法三switch#delete vlan.dat6、将端口加入到vlan中switch(config-if)#switchport access vlan 107、将一组连续的端口加入到vlan中switch(config)# interface range f0/1 – 5switch(config-if-range)#switchport access vlan 10 8、将端口从vlan中删除switch(config-if)#no switchport access vlan 10switch(config-if)#switchport access vlan 1switch(config-if-range)#no switchport access vlan 10 switch(config-if-range)#switchport access vlan 19、查看所有vlan的摘要信息switch#show vlan brief10、查看指定vlan的信息switch#show vlan id 1011、指定端口成为trunkswitch(config-if)#switchport mode trunk12、 Trunk的自动协商switch(config-if)#switchport mode dynamic desirable switch(config-if)#switchport mode dynamic auto注意:如果中继链路两端都设置成auto将不能成为trunk 13、查看端口状态switch#show interface f0/2 switchport14、在trunk上移出vlanswitch(config-if)#switchport trunk allowed vlan remove 20 15、在trunk上添加vlanswitch(config-if)#switchport trunk allowed vlan add 20。
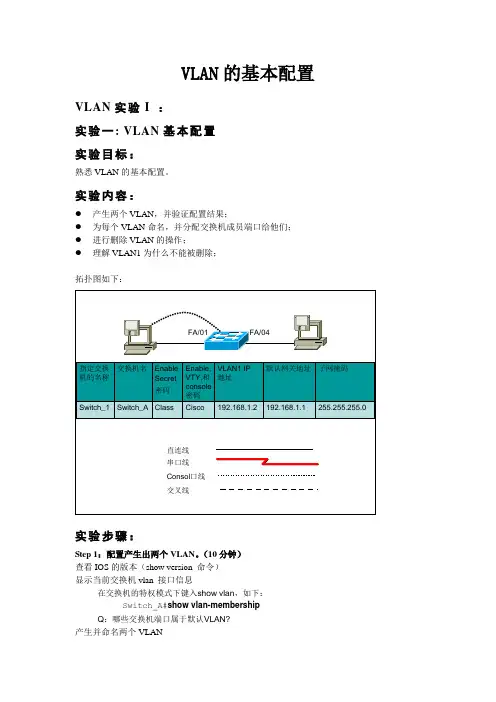
VLAN的基本配置VLAN实验I :实验一: VLAN基本配置实验目标:熟悉VLAN的基本配置。
实验内容:●产生两个VLAN,并验证配置结果;●为每个VLAN命名,并分配交换机成员端口给他们;●进行删除VLAN的操作;●理解VLAN1为什么不能被删除;拓扑图如下:实验步骤:Step 1:配置产生出两个VLAN。
(10分钟)查看IOS的版本(show version 命令)显示当前交换机vlan 接口信息在交换机的特权模式下键入show vlan,如下:Switch_A#show vlan-membershipQ:哪些交换机端口属于默认VLAN? ___________________产生并命名两个VLAN键入如下命令产生两个VLAN:Switch_A#config terminalSwitch_A(config)#vlan 2 name VLAN2Switch_A(config)#vlan 3 name VLAN3Step2:分配端口给VLAN2 (10分钟)分配端口给VLAN时必须在接口配置模式(interface mode)下进行。
输入如下命令将ports 4, 5 and 6 分配给VLAN 2.Switch_A#config terminalSwitch_A(config)#interface Ethernet 0/4Switch_A(config-if)#vlan static 2Switch_A(config-if)#interface Ethernet 0/5Switch_A(config-if)#vlan static 2Switch_A(config-if)#interface Ethernet 0/6Switch_A(config-if)#vlan static 2Switch_A(config)#end用show vlan 命令验证配置结果show vlan-membershipQ:端口4 ,5,6 是否已经分配给VLAN 2? _______________Step4:分配端口7,8,9给VLAN3 (5分钟)Switch_A#config terminalSwitch_A(config)#interface Ethernet 0/4Switch_A(config-if)#vlan static 3Switch_A(config-if)#interface Ethernet 0/5Switch_A(config-if)#vlan static 3Switch_A(config-if)#interface Ethernet 0/6Switch_A(config-if)#vlan static 3Switch_A(config)#end用show vlan命令验证配置结果Q:端口7-9 已经分配给VLAN 3了吗? ____________________Step5:测试VLAN (5分钟)在连接0/4的主机上ping 连接端口0/1的主机。
交换机基本配置及VLAN配置实验报告一、实验目的1、了解交换机的基本配置;2、了解 VLAN 的概念和配置方法。
二、实验环境1、软件:Packet Tracer、SecureCRT;2、硬件:Catalyst 2960 交换机、PC。
三、实验步骤1、交换机基本配置(1)进入交换机配置界面,设置主机名。
Switch> enableSwitch# configure terminalSwitch(config)# hostname Lab1(2)配置管理口 IP 地址,可远程管理交换机。
Lab1(config)# interface vlan 1Lab1(config-if)# ip address 192.168.1.100 255.255.255.0Lab1(config-if)# no shutdown(3)配置 Telnet 登录密码。
(4)保存配置。
Lab1# copy running-config startup-config2、交换机 VLAN 配置(1)创建 VLAN。
Lab1(config)# interface fastEthernet 0/1Lab1(config-if)# switchport mode accessLab1(config-if)# switchport access vlan 10Lab1(config-if)# exitLab1(config)# interface fastEthernet 0/2Lab1(config-if)# switchport mode accessLab1(config-if)# switchport access vlan 20Lab1(config-if)# exit(3)配置 VLAN 间的通信。
四、实验结果Lab1# show running-configBuilding configuration...Current configuration : 653 bytes!version 12.2no service timestamps log datetime msecno service timestamps debug datetime msecno service password-encryption!hostname Lab1!enable secret 5 $1$mERr$z1.tLakXthoRZezheDEZv1 !interface Vlan1no ip addressshutdown!interface Vlan10ip address 192.168.10.1 255.255.255.0no shutdown!interface Vlan20ip address 192.168.20.1 255.255.255.0no shutdown!ip default-gateway 192.168.1.1!line con 0!line aux 0!line vty 0 4password ciscologin!endLab1# show vlan briefVLAN Name Status Ports---- -------------------------------- ----------------------------------------1 default active Fa0/3, Fa0/4, Fa0/5, Fa0/6Fa0/7, Fa0/8, Fa0/9, Fa0/10Fa0/11, Fa0/12, Fa0/13, Fa0/14Fa0/15, Fa0/16, Fa0/17, Fa0/18Fa0/19, Fa0/20, Fa0/21, Fa0/22Fa0/23, Gi0/1, Gi0/210 VLAN10 active Fa0/1, Gi0/120 VLAN20 active Fa0/2, Gi0/21002 fddi-default act/unsup1003 token-ring-default act/unsup1004 fddinet-default act/unsup1005 trnet-default act/unsupInterface IP-Address OK? Method Status ProtocolVlan1 unassigned YES NVRAM administratively down down Vlan10 192.168.10.1 YES manual up up Vlan20 192.168.20.1 YES manual up up FastEthernet0/0 unassigned YES unset up up FastEthernet0/1 unassigned YES unset up up FastEthernet0/2 unassigned YES unset up up FastEthernet0/3 unassigned YES unset up up FastEthernet0/4 unassigned YES unset up up FastEthernet0/5 unassigned YES unset up up FastEthernet0/6 unassigned YES unset up upFastEthernet0/7 unassigned YES unset up upFastEthernet0/8 unassigned YES unset up up FastEthernet0/9 unassigned YES unset up up FastEthernet0/10 unassigned YES unset up up FastEthernet0/11 unassigned YES unset up up FastEthernet0/12 unassigned YES unset up up FastEthernet0/13 unassigned YES unset up up FastEthernet0/14 unassigned YES unset up up FastEthernet0/15 unassigned YES unset up up FastEthernet0/16 unassigned YES unset up up FastEthernet0/17 unassigned YES unset up up FastEthernet0/18 unassigned YES unset up up FastEthernet0/19 unassigned YES unset up up FastEthernet0/20 unassigned YES unset up up FastEthernet0/21 unassigned YES unset up up FastEthernet0/22 unassigned YES unset up up FastEthernet0/23 unassigned YES unset up upGigabitEthernet0/1 unassigned YES unset down downGigabitEthernet0/2 unassigned YES unset down downLab1# ping 192.168.20.2Type escape sequence to abort.Sending 5, 100-byte ICMP Echos to 192.168.20.2, timeout is 2 seconds:Success rate is 100 percent (5/5), round-trip min/avg/max = 1/2/8 ms五、实验心得本次实验通过配置交换机的基本配置及 VLAN 配置,实现了 VLAN 间的通信。
学会VLAN的基础配置学会VLAN的基础配置一、实验目的1、掌握VLAN的配置2、掌握Access 接口和Trunk接口的配置3、掌握将接口与VLAN关联的配置二、实验拓扑PC1与PC3属于默认的vlan1 PC2与PC4属于vlan2交换机之间的接口E0/0/3配置为trunk链路三、实验步骤1、VLAN口与Access接口的配置LSW1:syEnter system view, return user view with Ctrl+Z. [Huawei]sysname LSW1 [LSW1]info-center source DS channel 0 log state off trap state off [LSW1]user-interface console 0 [LSW1-ui-console0]idle-timeout 0 0 [LSW1-ui-console0]q [LSW1]vlan 2 //添加一个vlan2 [LSW1-vlan2]q [LSW1]int e0/0/2 //进入2接口[LSW1-Ethernet0/0/2]port link-type access //端口的链路类型为Access (连接计算机的端口),华为的设置默认接口是hybrid的模式[LSW1-Ethernet0/0/2]port default vlan 2 //将这个接口加入到vlan2中[LSW1-Ethernet0/0/2]qLSW2:syEnter system view, return user view with Ctrl+Z. [Huawei]sysname LSW2 [LSW2]info-center source DS channel 0 log state off trap state off [LSW2]user-interface console 0 [LSW2-ui-console0]idle-timeout 0 0[LSW2-ui-console0]q [LSW2]vlan 2 //添加一个vlan2[LSW2-vlan2]int e0/0/2[LSW2-Ethernet0/0/2]port link-type access //端口的链路类型为Access [LSW2-Ethernet0/0/2]port default vlan 2 //将这个接口加入到vlan2中[LSW2-Ethernet0/0/2]q? 在各交换机上用dis vlan这个命令来查看上面的e0/0/2接口是否已经加入到vlan2中 [LSW1]dis vlanThe total number of vlans is : 2--------------------------------------------------------------------------------U: Up; D: Down; TG: Tagged; UT: Untagged; MP: Vlan-mapping; ST: Vlan-stacking; #:ProtocolTransparent-vlan; *: Management-vlan;-------------------------------------------------------------------------------- VID Type Ports--------------------------------------------------------------------------------1 common UT:Eth0/0/1(U) Eth0/0/3(U) Eth0/0/4(D)Eth0/0/5(D)Eth0/0/6(D) Eth0/0/7(D) Eth0/0/8(D)Eth0/0/9(D)Eth0/0/10(D) Eth0/0/11(D) Eth0/0/12(D)Eth0/0/13(D)Eth0/0/14(D) Eth0/0/15(D) Eth0/0/16(D)Eth0/0/17(D)Eth0/0/21(D)Eth0/0/22(D) GE0/0/1(D) GE0/0/2(D) 2 common UT:Eth0/0/2(U) //已经属于vlan2了 VID StatusProperty MAC-LRN Statistics Description--------------------------------------------------------------------------------1 enable default enable disable VLAN 00012 enable default enable disable VLAN 0002[LSW2]dis vlanThe total number of vlans is : 2--------------------------------------------------------------------------------U: Up; D: Down; TG: Tagged; UT: Untagged; MP:Vlan-mapping; ST: Vlan-stacking; #:ProtocolTransparent-vlan; *: Management-vlan;-------------------------------------------------------------------------------- VID Type Ports--------------------------------------------------------------------------------1 common UT:Eth0/0/1(U) Eth0/0/3(U) Eth0/0/4(D)Eth0/0/5(D)Eth0/0/6(D) Eth0/0/7(D) Eth0/0/8(D)Eth0/0/9(D)Eth0/0/10(D) Eth0/0/11(D) Eth0/0/12(D)Eth0/0/13(D)Eth0/0/17(D)Eth0/0/18(D) Eth0/0/19(D) Eth0/0/20(D)Eth0/0/21(D)Eth0/0/22(D) GE0/0/1(D) GE0/0/2(D) 2 common UT:Eth0/0/2(U) //已经属于vlan2了 VID StatusProperty MAC-LRN Statistics Description--------------------------------------------------------------------------------1 enable default enable disable VLAN 00012 enable default enable disable VLAN 00022、Trunk接口的配置1上面的拓扑图和配置命令来看,交换机之间的e0/0/3接口默认是属于vlan1◇的,因此只能是PC1与PC3这两台主机是可以拼通的,要想实现PC2与PC4之间的互通,则需要将交换机之间相连的接口配置为trunk,命令如下:[LSW1]int e0/0/3 //进接口 [LSW1-Ethernet0/0/3]portlink-type trunk //接口链路类型为trunk [LSW1-Ethernet0/0/3]porttrunk allow-pass vlan all //允许所有的vlan通过,华为的设备默认是不允许任何vlan通过的,除了缺省的vlan1[LSW2]int e0/0/3 //进接口 [LSW2-Ethernet0/0/3]portlink-type trunk //接口链路类型为trunk [LSW2-Ethernet0/0/3]porttrunk allow-pass vlan all /允许所有的vlan通过2在各交换机上查看vlan的信息◇[LSW1]dis vlanThe total number of vlans is : 2--------------------------------------------------------------------------------U: Up; D: Down; TG: Tagged; UT: Untagged; MP:Vlan-mapping; ST: Vlan-stacking; #:ProtocolTransparent-vlan; *: Management-vlan;-------------------------------------------------------------------------------- VID Type Ports--------------------------------------------------------------------------------1 common UT:Eth0/0/1(U) Eth0/0/3(U) Eth0/0/4(D)Eth0/0/5(D)Eth0/0/6(D) Eth0/0/7(D) Eth0/0/8(D)Eth0/0/9(D)Eth0/0/10(D) Eth0/0/11(D) Eth0/0/12(D)Eth0/0/13(D)Eth0/0/14(D) Eth0/0/15(D) Eth0/0/16(D)Eth0/0/17(D)Eth0/0/18(D) Eth0/0/19(D) Eth0/0/20(D)Eth0/0/21(D)Eth0/0/22(D) GE0/0/1(D) GE0/0/2(D) 2 common UT:Eth0/0/2(U) TG:Eth0/0/3(U)VID Status Property MAC-LRN Statistics Description--------------------------------------------------------------------------------1 enable default enable disable VLAN 00012 enable default enable disable VLAN 0002[LSW2]dis vlanThe total number of vlans is : 2--------------------------------------------------------------------------------U: Up; D: Down; TG: Tagged; UT: Untagged; MP:Vlan-mapping; ST: Vlan-stacking; #:ProtocolTransparent-vlan; *: Management-vlan;-------------------------------------------------------------------------------- VID Type Ports--------------------------------------------------------------------------------1 common UT:Eth0/0/1(U) Eth0/0/3(U) Eth0/0/4(D)Eth0/0/5(D)Eth0/0/6(D) Eth0/0/7(D) Eth0/0/8(D)Eth0/0/9(D)Eth0/0/10(D) Eth0/0/11(D) Eth0/0/12(D)Eth0/0/13(D)Eth0/0/14(D) Eth0/0/15(D) Eth0/0/16(D)Eth0/0/17(D)Eth0/0/18(D) Eth0/0/19(D) Eth0/0/20(D)Eth0/0/21(D)Eth0/0/22(D) GE0/0/1(D) GE0/0/2(D) 2 common UT:Eth0/0/2(U) TG:Eth0/0/3(U)VID Status Property MAC-LRN Statistics Description--------------------------------------------------------------------------------1 enable default enable disable VLAN 00012 enable default enable disable VLAN 00023、接口与VLAN关联的配置1 当交换机需要与网络层的设备通信时,可以在交换机上创建基于VLAN的◇逻辑接口,即VLANIF接口。

vlan的配置方法VLAN(Virtual Local Area Network)是一种虚拟的局域网技术,可以将一个物理局域网划分为多个逻辑上的子网。
通过VLAN的配置,可以实现网络资源的合理分配和安全隔离。
本文将介绍VLAN 的配置方法。
一、VLAN的基本概念VLAN是一种逻辑上的划分,将一个物理局域网划分为多个虚拟的子网,每个子网相互隔离,互不干扰。
VLAN可以根据不同的需求进行划分,比如按部门、按功能等。
VLAN的划分可以基于端口、MAC地址或者子网等方式进行。
二、VLAN的配置方法1. 创建VLAN首先需要创建VLAN,可以通过交换机的管理界面或者命令行进行配置。
在交换机的管理界面中,找到VLAN配置的选项,点击创建新VLAN。
输入VLAN的ID和名称,点击确认即可创建。
2. 配置端口创建VLAN后,需要将端口划分到相应的VLAN中。
在交换机的管理界面中,找到端口配置的选项,选择要配置的端口,将其绑定到相应的VLAN中。
可以选择将端口设置为访问模式或者特定VLAN 模式。
3. 配置端口模式端口模式分为访问模式和特定VLAN模式。
访问模式下,端口只能属于一个VLAN,数据包只能在该VLAN中传输。
特定VLAN模式下,端口可以属于多个VLAN,数据包可以在多个VLAN之间传输。
根据需求选择相应的端口模式。
4. 配置VLAN间的互通不同VLAN之间默认是隔离的,无法直接通信。
如果需要实现不同VLAN之间的互通,可以通过三层交换机或者路由器进行配置。
在交换机或者路由器上配置虚拟接口,将不同VLAN的虚拟接口进行绑定,即可实现VLAN间的互通。
5. 配置VLAN间的安全为了增强网络的安全性,可以配置VLAN间的访问控制列表(ACL)或者端口安全。
ACL可以限制不同VLAN之间的通信,只允许特定的IP地址或者端口进行通信。
端口安全可以限制端口上的设备数量,防止未授权设备接入。
6. 配置VLAN的管理在配置VLAN时,还需要考虑VLAN的管理。
了解VLAN网络配置VLAN网络配置简介VLAN(Virtual Local Area Network)是一种将物理网络划分成多个逻辑上独立的虚拟网络的技术。
通过VLAN,可以将不同的主机和设备分组在不同的虚拟网络中,实现安全隔离和逻辑隔离。
本文将介绍VLAN网络的配置方法和相关概念。
一、VLAN的基本概念VLAN是一种逻辑划分网络的方法,将一个物理局域网分割成多个虚拟局域网。
每个VLAN都有一个唯一的标识符(VLAN ID),用于区分不同的虚拟网络。
VLAN可以跨越多个交换机,实现虚拟网络的扩展和连接。
二、VLAN的配置方式1. VLAN的创建在配置VLAN之前,需要先创建VLAN。
在交换机的命令行界面,使用创建VLAN的命令,例如:```Switch(config)# vlan 10Switch(config-vlan)# name Sales```上述命令创建了一个ID为10的VLAN,并设置它的名称为"Sales"。
2. VLAN的端口成员配置创建VLAN后,需要将交换机上的端口分配到对应的VLAN中。
可以通过以下命令将端口加入VLAN:```Switch(config)# interface gigabitethernet 1/0/1Switch(config-if)# switchport mode accessSwitch(config-if)# switchport access vlan 10```上述命令将交换机上的GigabitEthernet 1/0/1端口配置为访问模式,并将它加入到VLAN 10中。
3. 端口的Trunk配置如果需要通过一个交换机传输多个VLAN的数据,需要将交换机端口配置为Trunk模式。
Trunk可以在VLAN之间传递数据帧,实现VLAN的连接。
配置Trunk的命令如下:```Switch(config)# interface gigabitethernet 1/0/2Switch(config-if)# switchport mode trunk```上述命令将交换机上的GigabitEthernet 1/0/2端口配置为Trunk模式。
学会VLAN的基础配置一、实验目的1,掌握VLAN的配置2,掌握Access接口与Trunk接口的配置3,掌握将接口与VLAN关联的配置二、实验拓扑三、实验步骤根据拓扑和规划要求,实现同网段PC机互通的目的。
1、基础配置1)PC机配置略。
(按照地址规划设置IP和网关即可)2)SW1、SW2创建VLAN#<Huawei>system-view[Huawei]sysname SW1[SW1]vlan 12[SW1-vlan12]description FOR-PC1-PC2[SW1-vlan12]quit[SW1]vlan 34[SW1-vlan34]description FOR-PC3-PC4[SW1-vlan34]quit##<Huawei>system-view[Huawei]sysname SW2[SW2]vlan 12[SW2-vlan12]description FOR-PC1-PC2[SW2-vlan12]quit[SW2]vlan 34[SW2-vlan34]description FOR-PC3-PC4[SW2-vlan34]quit#3)SW上终端接入端口和SW互联端口类型设置#[SW1]interface Ethernet0/0/1[SW1-Ethernet0/0/1]description TO-PC1[SW1-Ethernet0/0/1]port link-type access[SW1-Ethernet0/0/1]quit#[SW1]interface Ethernet0/0/2[SW1-Ethernet0/0/2]description TO-PC3[SW1-Ethernet0/0/2]port link-type access[SW1-Ethernet0/0/2]quit#[SW1]interface GigabitEthernet 0/0/1[SW1-GigabitEthernet0/0/1]description TO-SW2-GE0/0/1 [SW1-GigabitEthernet0/0/1]port link-type trunk[SW1-GigabitEthernet0/0/1]quit##[SW2]interface Ethernet 0/0/1[SW2-Ethernet0/0/1]description TO-PC2[SW2-Ethernet0/0/1]port link-type access[SW2-Ethernet0/0/1]quit#[SW2]interface Ethernet 0/0/2[SW2-Ethernet0/0/2]description TO-PC4[SW2-Ethernet0/0/2]port link-type access[SW2-Ethernet0/0/2]quit#[SW2]interface GigabitEthernet 0/0/1[SW2-GigabitEthernet0/0/1]description TO-SW1-GE0/0/1 [SW2-GigabitEthernet0/0/1]port link-type trunk[SW2-GigabitEthernet0/0/1]quit#4)SW上配置接口与VLAN的关联#[SW1]interface Ethernet0/0/1[SW1-Ethernet0/0/1]port default vlan 12[SW1-Ethernet0/0/1]quit#[SW1]interface Ethernet0/0/2[SW1-Ethernet0/0/2]port default vlan 34[SW1-Ethernet0/0/2]quit#[SW1]interface GigabitEthernet 0/0/1[SW1-GigabitEthernet0/0/1]port trunk allow-pass vlan 12 34[SW1-GigabitEthernet0/0/1]quit[SW1]##[SW2]interface Ethernet 0/0/1[SW2-Ethernet0/0/1]port default vlan 12[SW2-Ethernet0/0/1]quit#[SW2]interface Ethernet 0/0/2[SW2-Ethernet0/0/2]port default vlan 34[SW2-Ethernet0/0/2]quit#[SW2]interface GigabitEthernet 0/0/1[SW2-GigabitEthernet0/0/1]port trunk allow-pass vlan 12 34[SW2-GigabitEthernet0/0/1]quit[SW2]#2、VLAN配置检查1)SW1上<SW1>disp vlan 12--------------------------------------------------------------------------------U: Up; D: Down; TG: Tagged; UT: Untagged;MP: Vlan-mapping; ST: Vlan-stacking;#: ProtocolTransparent-vlan; *: Management-vlan;--------------------------------------------------------------------------------VID Type Ports--------------------------------------------------------------------------------12 common UT:Eth0/0/1(U)TG:GE0/0/1(U)VID Status Property MAC-LRN Statistics Description--------------------------------------------------------------------------------12 enable default enable disable FOR-PC1-PC2<SW1>disp vlan 34--------------------------------------------------------------------------------U: Up; D: Down; TG: Tagged; UT: Untagged;MP: Vlan-mapping; ST: Vlan-stacking;#: ProtocolTransparent-vlan; *: Management-vlan;--------------------------------------------------------------------------------VID Type Ports--------------------------------------------------------------------------------34 common UT:Eth0/0/2(U)TG:GE0/0/1(U)VID Status Property MAC-LRN Statistics Description--------------------------------------------------------------------------------34 enable default enable disable FOR-PC3-PC42)SW2上<SW2>display vlan 12--------------------------------------------------------------------------------U: Up; D: Down; TG: Tagged; UT: Untagged;MP: Vlan-mapping; ST: Vlan-stacking;#: ProtocolTransparent-vlan; *: Management-vlan;--------------------------------------------------------------------------------VID Type Ports--------------------------------------------------------------------------------12 common UT:Eth0/0/1(U)TG:GE0/0/1(U)VID Status Property MAC-LRN Statistics Description--------------------------------------------------------------------------------12 enable default enable disable FOR-PC1-PC2<SW2>display vlan 34--------------------------------------------------------------------------------U: Up; D: Down; TG: Tagged; UT: Untagged;MP: Vlan-mapping; ST: Vlan-stacking;#: ProtocolTransparent-vlan; *: Management-vlan;--------------------------------------------------------------------------------VID Type Ports--------------------------------------------------------------------------------34 common UT:Eth0/0/2(U)TG:GE0/0/1(U)VID Status Property MAC-LRN Statistics Description--------------------------------------------------------------------------------34 enable default enable disable FOR-PC3-PC43、结果测试1)PC1上ping测试PC1可ping通PC2。
学会VLAN的基础配置一、实验目的1、掌握VLAN的配置2、掌握Access 接口和Trunk接口的配置3、掌握将接口与VLAN关联的配置二、实验拓扑PC1与PC3属于默认的vlan1PC2与PC4属于vlan2交换机之间的接口E0/0/3配置为trunk链路三、实验步骤1、VLAN口与Access接口的配置LSW1:<Huawei>syEnter system view, return user view with Ctrl+Z.[Huawei]sysname LSW1[LSW1]info-center source DS channel 0 log state off trap state off[LSW1]user-interface console 0[LSW1-ui-console0]idle-timeout 0 0[LSW1-ui-console0]q[LSW1]vlan 2 //添加一个vlan2[LSW1-vlan2]q[LSW1]int e0/0/2 //进入2接口[LSW1-Ethernet0/0/2]port link-type access //端口的链路类型为Access(连接计算机的端口),华为的设置默认接口是hybrid的模式[LSW1-Ethernet0/0/2]port default vlan 2 //将这个接口加入到vlan2中[LSW1-Ethernet0/0/2]qLSW2:<Huawei>syEnter system view, return user view with Ctrl+Z.[Huawei]sysname LSW2[LSW2]info-center source DS channel 0 log state off trap state off[LSW2]user-interface console 0[LSW2-ui-console0]idle-timeout 0 0[LSW2-ui-console0]q[LSW2]vlan 2 //添加一个vlan2[LSW2-vlan2]int e0/0/2[LSW2-Ethernet0/0/2]port link-type access //端口的链路类型为Access [LSW2-Ethernet0/0/2]port default vlan 2 //将这个接口加入到vlan2中[LSW2-Ethernet0/0/2]q在各交换机上用dis vlan这个命令来查看上面的e0/0/2接口是否已经加入到vlan2中[LSW1]dis vlanThe total number of vlans is : 2--------------------------------------------------------------------------------U: Up; D: Down; TG: Tagged; UT: Untagged;MP: Vlan-mapping; ST: Vlan-stacking;#: ProtocolTransparent-vlan; *: Management-vlan;--------------------------------------------------------------------------------VID Type Ports--------------------------------------------------------------------------------1 common UT:Eth0/0/1(U) Eth0/0/3(U) Eth0/0/4(D) Eth0/0/5(D)Eth0/0/6(D) Eth0/0/7(D) Eth0/0/8(D) Eth0/0/9(D)Eth0/0/10(D) Eth0/0/11(D) Eth0/0/12(D) Eth0/0/13(D)Eth0/0/14(D) Eth0/0/15(D) Eth0/0/16(D)Eth0/0/17(D)Eth0/0/18(D) Eth0/0/19(D) Eth0/0/20(D) Eth0/0/21(D)Eth0/0/22(D) GE0/0/1(D) GE0/0/2(D)2 common UT:Eth0/0/2(U) //已经属于vlan2了VID Status Property MAC-LRN Statistics Description--------------------------------------------------------------------------------1 enable default enable disable VLAN 00012 enable default enable disable VLAN 0002[LSW2]dis vlanThe total number of vlans is : 2--------------------------------------------------------------------------------U: Up; D: Down; TG: Tagged; UT: Untagged;MP: Vlan-mapping; ST: Vlan-stacking;#: ProtocolTransparent-vlan; *: Management-vlan;--------------------------------------------------------------------------------VID Type Ports--------------------------------------------------------------------------------1 common UT:Eth0/0/1(U) Eth0/0/3(U) Eth0/0/4(D) Eth0/0/5(D)Eth0/0/6(D) Eth0/0/7(D) Eth0/0/8(D) Eth0/0/9(D)Eth0/0/10(D) Eth0/0/11(D) Eth0/0/12(D) Eth0/0/13(D)Eth0/0/14(D) Eth0/0/15(D) Eth0/0/16(D) Eth0/0/17(D)Eth0/0/18(D) Eth0/0/19(D) Eth0/0/20(D) Eth0/0/21(D)Eth0/0/22(D) GE0/0/1(D) GE0/0/2(D)2 common UT:Eth0/0/2(U) //已经属于vlan2了VID Status Property MAC-LRN Statistics Description--------------------------------------------------------------------------------1 enable default enable disable VLAN 00012 enable default enable disable VLAN 00022、Trunk接口的配置◇1上面的拓扑图和配置命令来看,交换机之间的e0/0/3接口默认是属于vlan1的,因此只能是PC1与PC3这两台主机是可以拼通的,要想实现PC2与PC4之间的互通,则需要将交换机之间相连的接口配置为trunk,命令如下:[LSW1]int e0/0/3 //进接口[LSW1-Ethernet0/0/3]port link-type trunk //接口链路类型为trunk [LSW1-Ethernet0/0/3]port trunk allow-pass vlan all //允许所有的vlan通过,华为的设备默认是不允许任何vlan通过的,除了缺省的vlan1[LSW2]int e0/0/3 //进接口[LSW2-Ethernet0/0/3]port link-type trunk //接口链路类型为trunk [LSW2-Ethernet0/0/3]port trunk allow-pass vlan all /允许所有的vlan通过◇2在各交换机上查看vlan的信息[LSW1]dis vlanThe total number of vlans is : 2--------------------------------------------------------------------------------U: Up; D: Down; TG: Tagged; UT: Untagged;MP: Vlan-mapping; ST: Vlan-stacking;#: ProtocolTransparent-vlan; *: Management-vlan;--------------------------------------------------------------------------------VID Type Ports--------------------------------------------------------------------------------1 common UT:Eth0/0/1(U) Eth0/0/3(U) Eth0/0/4(D) Eth0/0/5(D)Eth0/0/6(D) Eth0/0/7(D) Eth0/0/8(D) Eth0/0/9(D)Eth0/0/10(D) Eth0/0/11(D) Eth0/0/12(D) Eth0/0/13(D)Eth0/0/14(D) Eth0/0/15(D) Eth0/0/16(D) Eth0/0/17(D)Eth0/0/18(D) Eth0/0/19(D) Eth0/0/20(D) Eth0/0/21(D)Eth0/0/22(D) GE0/0/1(D) GE0/0/2(D)2 common UT:Eth0/0/2(U)TG:Eth0/0/3(U)VID Status Property MAC-LRN Statistics Description--------------------------------------------------------------------------------1 enable default enable disable VLAN 00012 enable default enable disable VLAN 0002[LSW2]dis vlanThe total number of vlans is : 2--------------------------------------------------------------------------------U: Up; D: Down; TG: Tagged; UT: Untagged;MP: Vlan-mapping; ST: Vlan-stacking;#: ProtocolTransparent-vlan; *: Management-vlan;--------------------------------------------------------------------------------VID Type Ports--------------------------------------------------------------------------------1 common UT:Eth0/0/1(U) Eth0/0/3(U) Eth0/0/4(D) Eth0/0/5(D)Eth0/0/6(D) Eth0/0/7(D) Eth0/0/8(D) Eth0/0/9(D)Eth0/0/10(D) Eth0/0/11(D) Eth0/0/12(D) Eth0/0/13(D)Eth0/0/14(D) Eth0/0/15(D) Eth0/0/16(D) Eth0/0/17(D)Eth0/0/18(D) Eth0/0/19(D) Eth0/0/20(D) Eth0/0/21(D)Eth0/0/22(D) GE0/0/1(D) GE0/0/2(D)2 common UT:Eth0/0/2(U)TG:Eth0/0/3(U)VID Status Property MAC-LRN Statistics Description--------------------------------------------------------------------------------1 enable default enable disable VLAN 00012 enable default enable disable VLAN 00023、接口与VLAN关联的配置◇1当交换机需要与网络层的设备通信时,可以在交换机上创建基于VLAN的逻辑接口,即VLANIF接口。