
庆东锅炉说明书(GA·GAC)-宣传册
- 格式:ppt
- 大小:1.73 MB
- 文档页数:59

Serie 6, Forno con vapore daincasso, 60 x 60 cm, AcciaioHRA3380S1Accessori integrati1 x Griglia combinata, 1 x Leccarda universale smaltataAccessori opzionaliHEZ317000 Teglia per pizza, HEZ327000 Pietra per pane e pizza, HEZ531000 Leccarda bassa 455x375x30 mm (LxPxA), HEZ531010 Leccarda antiaderen 455x375x30mm (LxPxA), HEZ532000 Leccarda profonda 455x375x38 mm (LxPxA), HEZ532010 Leccarda antiaderen 455x400x38mm (LxPxA), HEZ538000 Guide telescopiche clip a 1 livello, HEZ629070 Teglia per grigliare adatta a pirolisi, HEZ634000 Griglia combinata 455x375x31 mm (LxPxA), HEZ638000 Guide telescopiche clip a 1 livello, HEZ660050 Accessory, HEZ664000 Griglia combinata 455x375x59 mm (LxPxA), HEZ915003 Pirofila in vetro con coperchio 5,4 l., HEZG0AS00 Cavo di collegamento 3m Forno con impulsi di vapore e programmi automatici AutoPilot: prepara automaticamente i tuoi piatti che saranno croccanti all'esterno e morbidi all'interno• Cottura a vapore: con l'aggiunta di vapore si ottengono risultati perfetti di cottura interna mantenendo la parte esterna croccante• 30 programmi automatici di cottura: cucinare sarà semplicissimo grazie ai programmi con impostazioni già preselezionate.• Controllo digitale LCD bianco: semplice da utilizzare grazieall'accesso diretto alle funzioni addizionali, suggerimenti di temperatura ed indicazioni di temperatura.• Comode manopole a scomparsa push-pull: per una pulizia piùsemplice del panello frontale.• Pulizia EcoClean su parete posteriore: un modo semplice, ecologico, sicuro ed economico per la pulizia della parete posteriore del forno durante la cottura, senza alcun detergente o agente chimico.Dati tecniciTipologia costruttiva del prodotto: .....................................Da incasso Sistema di pulizia: ..................................Idrolisi, 1 pannello catalitico Dimensioni del vano per l'installazione (AxLxP): 585-595 x 560-568 x 550 mmDimensioni (AxLxP): ............................................595 x 594 x 548 mm Dimensioni del prodotto imballato (AxLxP): .......660 x 690 x 660 mm Materiale del cruscotto: ...................................................acciaio inox Materiale porta: ..........................................................................vetro Peso netto: ..............................................................................34.4 kg Volume utile: .................................................................................71 l Metodo di cottura: ...........rigenerazione cibi, Scongelamento, Grill a superficie grande, Aria calda delicata, aria calda, Riscaldamento statico, Funzione pizza, Cottura a bassa temperatura, riscaldamento inferiore, grill ventilatoMateriale della cavità: .................................................................Altro Regolazione della temperatura: .........................................elettronica Numero di luci interne: (1)Lunghezza del cavo di alimentazione elettrica: .....................120.0 cm Codice EAN: .. (4242005151332)Numero di vani - (2010/30/CE): (1)Classe di efficienza energetica: .........................................................A Energy consumption per cycle conventional (2010/30/EC): ........0.97 kWh/cycleEnergy consumption per cycle forced air convection (2010/30/EC):0.81 kWh/cycleIndice di efficienza energetica (2010/30/CE): ..........................95.3 % Potenza: ..................................................................................3600 W Corrente: .....................................................................................16 A Tensione: .............................................................................220-240 V Frequenza: ...........................................................................50; 60 Hz Tipo di spina: ..........................................................................Schuko Accessori inclusi: .......1 x Griglia combinata, 1 x Leccarda universale smaltataSerie 6, Forno con vapore daincasso, 60 x 60 cm, AcciaioHRA3380S1Forno con impulsi di vapore e programmi automatici AutoPilot: prepara automaticamente i tuoi piatti che saranno croccanti all'esterno e morbidi all'interno Caratteristiche principali- Forno con 10 funzioni di cottura: MultiCottura HotAir 3D, Riscaldamento superiore e inferiore, Grill ventilato, Grill a superficie grande, Funzione pizza, Riscaldamento inferiore, Cottura a bassa temperatura, Scongelamento, Aria calda delicata, rigenerazione cibi- Funzioni combinabili con gli impulsi di vapore: aria calda 3D, grill ventilato, riscaldamento statico (resistenza inferiore e superiore)- Regolazione della temperatura da 30 °C a 275 °C- Volume cavità: 71 l- Guide telescopiche independenti FlexiClip, con funzione d'arresto integrata.Altre caratteristiche- Eco Clean: parete posteriore- Display digitale LCD bianco- Orologio elettronico con impostazione inizio e fine cottura- Programmi automatici: 30- Fuzioni addizionali:- decalcificare- Riscaldamento rapido- Illuminazione interna alogena, Illuminazione disinseribile- Generatore del vapore esterno al vano cotturaAccessori- Accessori: 1 griglia combinata, 1 leccarda universale profonda smaltataEtichetta energetica- Assorbimento massimo elettrico: 3.6 kW- Classe di efficienza energetica (acc. EU Nr. 65/2014): A(in una scala di classi di efficienza energetica da A+++ a D)- Consumo energetico per ciclo durante funzionamento convenzionale:0.97 kWh- Consumo energetico per ciclo durante funzionamento ventilato:0.81 kWh- Numero di cavità: 1 Tipo di alimentazione: elettrica Volume della cavità:71 l- Dimensioni nicchia (AxLxP): 560 mm - 568 mm x 585 mm - 595 mm x 550 mmSerie 6, Forno con vapore da incasso, 60 x 60 cm, Acciaio HRA3380S1。

燃油/燃气热水锅炉及其附属系统设备第一节总则1.1 说明本章说明有关燃油/燃气两用热水锅炉及有关之附属设备的供应、安装及调试所需的各项技术要求(包括但不限于)。
A.消声设备及其配件B.相应的自动控制系统C.锅炉排烟系统D.锅炉排污降温扩容器E.锅炉的燃气/燃油供应系统1.2 一般要求A. 有关设备,无论在运送、储存及安装期间应采取正确的保护措施,以确保设备在任何情况下不受破损。
B. 提供所有为安全运送和妥善安装有关设备所需的配备和附件。
C. 须按设备表所示要求,提供数量和功能相符的设备。
D. 热水锅炉的供应及安装须符合当地消防部门、质量技术监督局、燃气公司及其它政府部门所定的各项要求。
本承包单位须负责申请及提供所有有关政府部门对本锅炉设备或本锅炉系统安装的批准文件。
E. 锅炉的工作压力为常压,但设备需要进行压力为600kPa的水压试验。
F.锅炉及其附属设备所有组件不可含有任何石棉或石棉产品。
G.热水锅炉的气体泄漏警报应交予当地燃气公司负责,而本承包单位须负统筹及与燃气公司协调。
1.3 质量保证A.有关热水锅炉除须按照由美国机械工程师协会(ASME)所制定及获美国保险业研究所(UL)认同的锅炉及压力容器规范或BSEN12953-1所制定的相关认可标准进行设计、制造和承压试验外,仍须按照但不限于以下所列的中国所制定的标准和规范进行设计、制造、安装和承压试验。
『热水锅炉安全技术监察规程』『工业锅炉通用技术条件 – JB/T10094-2002』『锅炉受压组件焊接技术条件 – JB/T1613-93』『锅炉水压试验标准 – JB/T1612-94』『锅炉大气污染物排放标准 – GB13271-2001』『工业锅炉安装工程施工及验收规范 – GB50273-1998』『小型和常压热水锅炉安全监察规定』『常压热水锅炉通用技术条件– JB/T7985』B.热水锅炉的生产商必须具有生产及安装同类型及功能相约设备的经验,其所生产安装的设备必须为常规定型产品并具有五年以上成功运行的记录。
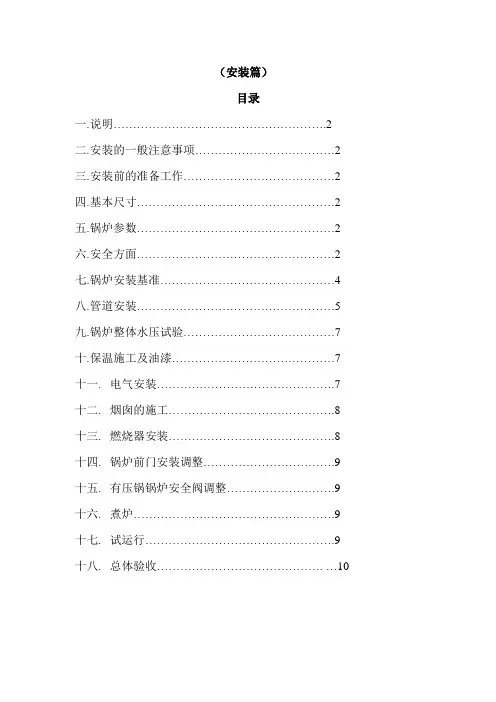
(安装篇)目录一.说明 (2)二.安装的一般注意事项 (2)三.安装前的准备工作 (2)四.基本尺寸 (2)五.锅炉参数 (2)六.安全方面 (2)七.锅炉安装基准 (4)八.管道安装 (5)九.锅炉整体水压试验 (7)十.保温施工及油漆 (7)十一.电气安装 (7)十二.烟囱的施工 (8)十三.燃烧器安装 (8)十四.锅炉前门安装调整 (9)十五.有压锅锅炉安全阀调整 (9)十六.煮炉 (9)十七.试运行 (9)十八.总体验收........................................... (10)一.说明1.该说明书目的是为了使用户了解青岛FERROLI公司烟油、燃气热水锅炉的正确安装方法。
2.锅炉的安装、使用、检验应符合《热水锅炉安全技术监察》GB5041《锅炉房设计规范》、GB50273-98《工业锅炉安装工程施工及验收规范》等相应的国家规定。
3.安装单位必须持有特种设备检查机构颁发的相应资质安装许可证.锅炉安装前,应当按照《特种设备安全监察条例》和相关安全技术规范的规定,在向锅炉使用地的直辖市或者社区的市级质量技术驾管部门书面告知后,向当地承担相应范围的监察机构申请监督检验,并附以下资料(或者复印件)各一份:(1)特种设备安装改造维修告知书:(2)施工合同;(3)施工计划:4.锅炉给水水质应符合GB1576-2001m《工业锅炉水质》的要求。
5.锅炉应按JBI612《锅炉水压试验技术条件》的要求进行水压试验。
二.安装的一般注意事项1.在没有阅读和理解本说明书之前,请不要安装锅炉,请不要安装锅炉。
请妥善保管本说明书,以便备查。
2.本说明书记载的事项和锅炉及附属设备中表示的注意事项并没有包含所有的危害事项.所以安装锅炉时,并不限于本说明书所记载的注意事项。
请根据安装现场的具体情况,充分考虑安全对策问题。
4.对于本说明书有疑问,或者需要详细的资料,请与本公司或公司所有办事处联络。

8U .52.60.03 /01.13 C h a n g e s r e s e r v e dHigh efficiency condensing gas boilerE75CN / E110CNE75CP / E110CPNotice! This manual must be retained for future reference.- Do not store or use gasoline or other flammablevapors and liquids in the vicinity of this or any other appliance.- WHAT TO DO IF YOU SMELL GAS - Do NOT try to light any appliance.- Do NOT touch any electrical switch. - Do NOT use any phone in your building.-Immediately call your gas supplier from a neighbor’s phone. Follow the gas supplier’s instructions.- If you cannot reach your gas supplier, call the firedepartment.WARNING!If you do not follow these instructions exactly, a fire or explosion may result causing property damage, personal injury or loss of life.Address: 103 International Drive, Peachtree City, GA, 30269Toll-free: 1-800-621-9419 • Fax: 678-829-1666 • User information manualWARNING!Installation and service must be performed by a licensed professional, service agency or the gas supplier.O p e r a t i n g i n s t r u c t i o n s R i n n a i E -S e r i e s2Contents of instructionsThese instructions contain important information for the safe use of Rinnai E-Series gas boilers.These user instructions are intended for the owner or responsible tenant of the premises where the boiler is installed.Subject to technical changesChanges may be made to the illustrations, process steps and technical data as a result of our policy of continuous improvement without prior notice.Updating of documentationPlease contact us if you have any suggestions for improvements or corrections.Find our contact details on the back of this manual.O p e r a t i n g i n s t r u c t i o n s R i n n a i E -S e r i e s3Please observe these instructions in the interest of your own safety.The boiler is designed to heat water for a central heating system and, if applicable, generating domestic hot water. The boiler is delivered with a burner controller pre-installed.The boiler can be fitted with a modulating outdoor reset control ARV12 (included), a room controller RS100 (optional), a zone controller (optional) or an On/Off thermostat or relay panel end switch(accessories).The following defined terms are used throughout the documentation to bring attention to the presence of hazards of various risk levels. Notices give important information concerning the operation of the product.DANGER:Indicates the presence of hazards that will cause severe personal injury, death or substantial property damage.WARNING:Indicates the presence of hazards that can cause severe personal injury, death or substantial property damage.CAUTION:Indicates presence of hazards that will or can cause minor personal injury or property damage.NOTICE:Indicates special instructions on installation, operation or maintenance that are important but not related to personal injury or propertydamage.CAUTIONWARNINGNOTICEiDANGERO p e r a t i n g i n s t r u c t i o n s R i n n a i E -S e r i e s4These operating instructions describe the operation of the Rinnai E-Series condensing gas boilers. This manual is for the end user. For installation and servicing there is a installation & servicing instructions manual for the installer.Read this manual fully before operating the boiler. In case of doubt or errors contact your installer. The manufacturer reserves the right to change the specifications and dimensions without prior notice.Work on the boiler must be carried out by a State licenced contractor, (Ref: Gas Safety Installation and Use ) using correctly calibrated instruments with current test certification.O p e r a t i n g i n s t r u c t i o n s R i n n a i E -S e r i e sO p e r a t i n g i n s t r u c t i o n s R i n n a i E -S e r i e s6Should overheating occur or the gas supply fail to shut off, do not turn off or disconnect the electrical supply to the pump. Instead, shut off the gas supply at a location external to the appliance.Protection for corrosionDo not use any sprays, chlorine containing agents, solvents, paint etc. around the boiler or around the air intake supply entrance of the boiler. These substances have negative influences on the boiler and can lead to corrosion resulting in failure ofthe boiler.WARNINGNOTICEiChecking the water pressureCheck the water pressure in the central heating installation regularly.Use only potable water for filling.Additives only after clearance by Rinnai.Contact your installer in case of doubt.Spray cans containing chloro-/fluorcarbons Ammonium and/or ammonium solutions Permanent wave solutions (hair product)Chlorinated waxes and/or cleanersSwimming pool chemicals based on chlorine Calcium chloride used for thawingSodium chloride used for water softening Refrigerant leaksPaint or varnish removersHydrochloric acid/muriatic acid Cements and gluesAntistatic fabric softeners used in clothes dryersChlorine-type bleaches, detergents, and cleaning solvents found in household laundry roomsAdhesives used to fasten building products and other similar productsDry cleaning/laundry areas and establishments Swimming poolsMetal fabrication plants Beauty shopsRefrigeration repair shops Photo processing plants Auto body shopsPlastic manufacturing plantsFurniture refinishing areas and establishments New building construction Remodeling areasGarages with workshopsDANGERO p e r a t i n g i n s t r u c t i o n s R i n n a i E -S e r i e s7integrated hot water facility.The boiler is provided with a integrated control system. Because an outdoor sensor is connected to the boiler, the boiler works weather dependantly. This means that the boiler control measures the outside temperature and flow temperature. With this data the boiler calculates the optimal flow temperature for the installation.When the boiler is connected to an RS100 room thermostat information can be retrieved from the boiler. For more information about the Rinnai thermostats. Please refer to the user manuals.On the bottom left side of the front panel there is a small door. Through the transparent panel you can see the boiler status on the display. After opening this door you will find the function buttons. On the following pages you will find the explanation of the function buttons and display messages.O p e r a t i n g i n s t r u c t i o n s R i n n a i E -S e r i e s8Only licensed professionals who are trained for these boilers are permitted to make alterations in the controller to program the boiler to the installation.1. Display .See following pages for further information.2. ON-OFF Switch (Placed separately next to the boiler). This switch turns the power supply to the boiler on or off.3. Central Heating program button.Switching the Central Heating on or off (Led on/off);4. Hot Water program button.Switching the Domestic Hot Water (DHW) facility on or off (Led on/off);5. Pump program button.When the pump program LED is ON, the pumpis switched into a continuous circulation mode. When the pump mode is switched OFF, LED is off the pump is control by the boiler processor. In most situations it is best to leave the pump mode OFF and let the boiler control cycle the pump as needed.During freezing temperatures it is possible (when there is no outside sensor connected), to manually place the circulation pump in constant circulation mode, thus reducing the chance of freezing pipes (garage, attic or other cold spaces / rooms) which are sensitive to frost.NOTICEiNOTICEi2O p e r a t i n g i n s t r u c t i o n s R i n n a i E -S e r i e s96 Mode-button.Only for Service personel 7 Step-button.After briefly pressing, the water pressure can be retrieved.After pressing for 5 seconds it switches from the Good-state to technical read out and vice versa (see following pages);8 Reset-button.When a fault occurs it will be shown by the flashing E (Error) with a number code after which the boiler is shut down. After pressing the reset key you can try to start the boiler again. If the error message keeps occurring contact your installer.DO NOT attempt to make repairs or remove any of the boiler panels. Contact a licensed professional to make necessary repairs oradjustments.WARNINGO p e r a t i n g i n s t r u c t i o n s R i n n a i E -S e r i e s10Two boiler displays, “Good or Technical” see below.Goodor standard read out.During this reading the display will only show what is necessary. Under normal circumstances the display will give a Good reading. In case of a fault this will be shown with, alternate display of Good, with an E or BL code. See further "Errors, maintenance and warranty" .TechnicalThe second way is a technical read out. In normal situations the following will be shown:• on the left the status in which the boiler is active (see bottom of this page);• on the right the supply temperature in °F; • the water pressure in the installation in PSI. When a message (E or BL code) is necessary this will be shown instead of the technical read out.Operation indication(in the first display position by technical read out)No heat demand Fan pre/post purge Ignition phaseBurner active on central heating Burner active on DHW Fan checkBurner off when room thermostat is demanding Pump overrun phase for central heating Pump overrun phase for hot waterBurner off because of to high flow temperatureAutomatic de-aeration program (Press no button for 17 min.)O p e r a t i n g i n s t r u c t i o n s R i n n a i E -S e r i e s11The installation will function optimally with a water pressure of between 16 and 18 PSI.If the water pressure drops below 16 PSI, the display will show FILL . During this message the boiler will remain functioning at a reduced level. After replenishing the system (see following chapter) just above 22 PSI the message FILL will disappear and the boiler will function normally again.When the water pressure drops below 10 PSI, the display will show a flashing FILL text.The boiler will shut down and will function normally again after replenishing the system to just above 22 PSI.To retreive the water pressure on the display from the Good reading:- Press the Step key once briefly. The water pressure will be shown.Press the Step key briefly to return to the Good reading .Water pressure is too high (>42 PSI), if HIGH indication remains continuously visible, the boiler is taken out of operation. The installation pressure needs to be decreased by draining water until thepressure is between 16 and 18 PSI.Message ' Water pressure too low' on your RS100 thermostat.On the display of the RS100 a low water pressure can be indicated. For further information see the relevantuser manual.O p e r a t i n g i n s t r u c t i o n s R i n n a i E -S e r i e s12The central heating installation needs to be filled with potable (drinking) water. For topping up the installation you use the filling loop according to the following procedure:Contact your licensed professional installer if your installation is not provided with a filling loop.1 Switch all functions off (heating, DHW and pump);2 Briefly push the 'STEP'-button: P x.x = water pressure in PSI;3 Slowly open the filling loop (Indication on display increases);4 Fill up slowly to between 16 and 18 PSI;5 STOP appears on the display;6 Close the filling loop;7 De-aerate the complete installation , start at the lowest point;8 Check the water pressure and if necessary top it up; 9 Close the filling loop;10 Activate functions required (heating, DHWand/or pump );11 If A xx appears on the display, wait for 17 minutes;12 Check the waterpressure and if necessary top it up to 16 to 18 PSI13 Close the filling loop;14 Press the ‘STEP’-button;15 Be sure that the filling loop is closed.After the automatic de-aeration programm (A xx) is finished the boiler will return to the Good reading or Technical reading.NOTICEiO p e r a t i n g i n s t r u c t i o n s R i n n a i E -S e r i e s13Holiday period:Adjust the thermostat* to the holiday period. See the user thermostat manual. The hot water facility can be switched off by means of the program button on the control panel.Re-setting the central heating system: , , when these are activated. Switch off the power supply. When the boiler is being drained one should take into account that a part of the heating water will remain in the boiler. When risk of freezing arises one should take care that the remaining central heating water in the boiler does not freeze.Holiday* If you have a RS100 thermostat it is provided with a holiday program. The holiday period can be adjusted on the thermostat itself. The central heating and DHW supply are switched off during that period. There is also the option that only the central heating is switched off. With all of these possibilities the freeze protection system is active.Check the water pressure regularly and top up the installation when necessary.The working pressure of the installation should be between 16 and 18 PSIO p e r a t i n g i n s t r u c t i o n s R i n n a i E -S e r i e s14If a fault is detected the boiler will be blocked. This will be reflected, by an alternate display of Good, with an E of Error or a BL of Blocking and a number code.You can try to reset the boiler by pressing the Reset key once. If the problem remains please contact your installer and inform them about the fault and give them the number code.If you discover any leaks from the boiler contact your installer.We advise you to obtain a service contract with your installer for regular maintance and adjustment to keep your boiler safe and in good condition.The casing of the boiler consists of plastic parts which can be cleaned with a normal non abrasive cleaning agent.Periodic cleaning of the condensate collection and disposal system must be carried out.Before putting the boiler into operation after periodic cleaning fill the condensate trap with 1.27 cups / 300 ml of water.Step 1: Condensate trap - first remove the screw (7);- pull the condensation cup (8) downwards, out of the condensate tray Check t his f or i mpurities. I f t here a re n o i mpurities it is not necessary to clean the condensate cup;- check the O-ring (9) of the cup and replace it if necessary;- clean the parts by flushing it with clean water;- grease the O-ring again with acid free O-ring grease to make fitting easier;NOTICEi NOTICEi NOTICEi NOTICEiO p e r a t i n g i n s t r u c t i o n s R i n n a i E -S e r i e s15- if there is a leak at the condensate trap (8) replace complete condensate trap by # 809000100;Step 2: Refitting is done in reverse order.Note that all gaskets seal completely.Maintenance or changes to the appliance may only be carried out by a licensed professional.You can find the warranty conditions in the warranty card which is supplied with the boiler.NOTICEiE. & O. E.T h i s r e n e w e d p u b l i c a t i o n c a n c e l s a l l p r e v i o u s i n s t a l l a t i o n i n s t r u c t i o n s . T h e c o m p a n y r e s e r v e s t h e r i g h t t o c h a n g e t h e s p e c i fi c a t i o n s a n d d i m e n s i o n s w i t h o u t p r i o r n o t i c e .Distributor for the USARinnai America Corporate • 103 International Drive • Peachtree City, GA 30269To l l F r e e : (800) 621-9419 • Te l : (678) 829-1700 • F a x : (678) 829-1666 • E -m a i l : i n f o @r i n n a i.u s • I n t e r n e t : w w w.r i n n a i.u s800000012 01/2013。