NV-500B(英文)说明书
- 格式:doc
- 大小:204.50 KB
- 文档页数:6

t e r y o u rn e w d e v i c eo nM y B o s c h no w a n dg e t f r e e b en e f i t s:b o sc h-h o me.c o m/w e l c o m e HobPKE6..CA.,PKF6..CA1.[en]User manual and installation instructions2Ø = cmPKE6..CA.PKF6..CA..Safety en3Futher information and explanations are available online:Table of contentsINFORMATION FOR USE1Safety (3)2Preventing material damage (4)3Environmental protection and saving en-ergy (5)4Familiarising yourself with your appliance (6)5Basic operation (6)6Cleaning and servicing (7)7Disposal (7)8Customer Service (8)9INSTALLATION INSTRUCTIONS (8)9.1Safe installation (8)1 SafetyObserve the following safety instructions.1.1 General information¡Read this instruction manual carefully.¡Keep the instructions, the appliance passand the product information safe for futurereference or for the next owner.¡Do not connect the appliance if it has beendamaged in transit.1.2 Intended useOnly a licensed professional may connect ap-pliances without plugs. Damage caused by in-correct connection is not covered under thewarranty.Only use this appliance:¡To prepare meals and drinks.¡Under supervision. Never leave the appli-ance unattended when cooking for shortperiods.¡In private households and in enclosedspaces in a domestic environment.¡Up to an altitude of max. 2000 m above sea level.Do not use the appliance:¡With an external timer or a separate remote control. This does not apply if operation with appliances included in EN 50615 is switched off.1.3 Restriction on user group This appliance may be used by children aged 8 or over and by people who have reduced physical, sensory or mental abilities or inad-equate experience and/or knowledge,provided that they are supervised or have been instructed on how to use the appliance safely and have understood the resulting dangers.Do not let children play with the appliance.Children must not perform cleaning or user maintenance unless they are at least 15 years old and are being supervised.Keep children under the age of 8 years away from the appliance and power cable.1.4 Safe use WARNING ‒ Risk of fire!Leaving fat or oil cooking on an unattended hob can be dangerous and may lead to fires.▶Never leave hot oil or fat unattended.▶Never attempt to extinguish a fire using wa-ter; instead, switch off the appliance and then cover with a lid or a fire blanket.The cooking surface becomes very hot.▶Never place flammable objects on the cooking surface or in its immediate vicinity.▶Never place objects on the cooking sur-face.The appliance will become hot.▶Do not keep combustible objects or aero-sol cans in drawers directly underneath the hob.Hob covers can cause accidents, for example due to overheating, catching fire or materials shattering.▶Do not use hob covers.en Preventing material damage4Food may catch fire.▶The cooking process must be monitored. Ashort process must be monitored continu-ously.WARNING ‒ Risk of burns!The appliance and its parts that can betouched become hot during use, particularlythe hob surround, if fitted.▶Caution should be exercised here in orderto avoid touching heating elements.▶Young children under 8 years of age mustbe kept away from the appliance.Hob protective grilles may cause accidents.▶Never use hob protective grilles.The appliance becomes hot during operation.▶Allow the appliance to cool down beforecleaning.WARNING ‒ Risk of electric shock!Incorrect repairs are dangerous.▶Repairs to the appliance should only becarried out by trained specialist staff.▶Only use genuine spare parts when repair-ing the appliance.▶If the power cord of this appliance is dam-aged, it must be replaced with a specialconnection cable, which is available fromthe manufacturer or his Customer Service.A damaged appliance is dangerous.▶Never operate a damaged appliance.▶If the surface is cracked, you must switchoff the appliance in order to prevent a pos-sible electrical shock. To do this, switch off the appliance via the fuse in the fuse box.▶Set the hotplate control to zero.▶Call customer service.▶Repairs to the appliance must only be car-ried out by trained and qualified personnel.An ingress of moisture can cause an electric shock.▶Do not use steam- or high-pressure clean-ers to clean the appliance.The insulation on cables of electrical appli-ances may melt if it touches hot parts of the appliance.▶Never bring electrical appliance cables intocontact with hot parts of the appliance.WARNING ‒ Risk of injury!Saucepans may suddenly jump due to liquid between the saucepan base and the hotplate.▶Always keep hotplates and saucepanbases dry.WARNING ‒ Risk of suffocation!Children may put packaging material over their heads or wrap themselves up in it and suffocate.▶Keep packaging material away from chil-dren.▶Do not let children play with packaging ma-terial.Children may breathe in or swallow small parts, causing them to suffocate.▶Keep small parts away from children.▶Do not let children play with small parts.2 Preventing material damageATTENTION!Rough pot and pan bases will scratch the ceramic.▶Check your cookware.Boiling pans dry may damage cookware or the appli-ance.▶Never place empty pans on a heated hotplate or al-low to boil dry.Incorrectly positioned cookware can cause the appli-ance to overheat.▶Never place hot pots or pans on the controls or thehob surround.Damage can occur if hard or pointed objects fall ontothe hob.▶Do not let hard or pointed objects fall onto the hob.Non heat-resistant materials will melt on heated hot-plates.▶Do not use oven protective foil.▶Do not use aluminium foil or plastic containers. 2.1 Overview of the most common damage Here you can find the most common types of damage and tips on how to avoid them.Damage Cause Measure Stains Food boiling over Remove boiled-over food immediately with a glass scraper.Stains Unsuitable cleaning products Only use cleaning products that are suitable for glass ceramic.Scratch es Salt, sugar or sand Do not use the hob as a work surface or storage space.Scratch es Rough pot or pan basesCheck your cookware.Discol-ourationUnsuitablecleaning products Only use cleaning products that are suitable for glass ceramic.Environmental protection and saving energy en5Damage CauseMeasure Discol-ouration Pan abrasion,e.g. aluminium Lift pots and pans to move on the hob.Damage Cause Measure Blisters Sugar or food with a high sugar content Remove boiled-over food immediately with a glass scraper.3 Environmental protection and saving energy3.1 Disposing of packagingThe packaging materials are environmentally compat-ible and can be recycled.▶Sort the individual components by type and disposeof them separately.3.2 Saving energyIf you follow these instructions, your appliance will useless energy.Select the cooking zone to match the size of yourpan. Centre the cookware on the hob.Use cookware whose base diameter is the same dia-meter as the hotplate.Tip: Cookware manufacturers often give the upperdiameter of the saucepan. It is often larger than thebase diameter.¡Unsuitable cookware or incompletely covered cook-ing zones consume a lot of energy.Cover saucepans with suitable lids.¡Cooking without a lid consumes considerably more energy.Lift lids as infrequently as possible.¡When you lift the lid, a lot of energy escapes.Use a glass lid.¡You can see into the pan through a glass lid without having to lift it.Use pots and pans with flat bases.¡Uneven bases increase energy consumption.Use cookware that is suitable for the quantity of food.¡Large items of cookware containing little food need more energy to heat up.Cook with only a little water.¡The more water that is contained in the cookware,the more energy is required to heat it up.Turn down to a lower power level early on.¡If you use an ongoing power level that is too high,you will waste energy.Take advantage of the hob's residual heat. Withlonger cooking times switch off the hotplate5-10 minutes before the end of cooking.¡Unused residual heat increases energy consump-tion.Product Information according (EU) 66/2014 can befound on the attached appliance pass and online onthe product page for your appliance.en Familiarising yourself with your appliance 64 Familiarising yourself with your applianceThe instruction manual is the same for various differenthobs. You can find the hob dimensions in the overviewof models. → Page 24.1 Control panel You can use the control panel to configure all functions of your appliance and to obtain information about theoperating status.Hotplate controls The hotplate controls are permanently fixed in place.They must not be removed. Forcibly removing the hot-plate controls leads to them being destroyed.4.2 Hotplates You can find an overview of the different activations ofthe hotplates here.Select the heat setting.Switching off: Turn the hot-plate switch to 0 and reset.Never turn the hotplateswitch past the symbol to0.Notes¡Dark areas in the glow pattern of the hotplate arepart of the technical design. They do not affect thefunctionality of the hotplate.¡The hotplate regulates the temperature by switchingthe heat on and off. The heat may also switch onand off when at the highest setting.–This protects easily damaged components fromoverheating.–The appliance is protected against electrical overload.4.3 Hotplate display and residual heatindicatorThe hob has a hotplate display and a residual heat in-dicator. The display lights up when a hotplate is warm.DisplayMeaning Hotplatedisplay Lights up during operation, shortly after switching on.Residualheat indic-ator Lit up after cooking when the hotplate is still warm.Note: You can keep small dishes warmor melt cooking chocolate.5 Basic operation5.1 Switching the hob on or off You can switch the hob on and off with the hotplateswitch.5.2 Setting the hotplates You can use the hotplate control to adjust the heat out-put of the hotplate.Heat setting 1Lowest setting9Highest setting The symbol in the display panel indicates the hotplate which the display refers to, e.g. for the right rear hot-plate.5.3 Recommended cooking settings You can find an overview of different foods with appro-priate power levels here.The cooking time varies depending on the type, weight,thickness and quality of the food. The ongoing power level depends on the cookware used.Cooking tips¡To bring food to the boil, use heat setting 9.¡Stir thick liquids occasionally.Cleaning and servicing en7¡Food that needs to be seared quickly or that initiallyloses a lot of liquid during frying should be fried insmall portions.¡Tips for saving energy when cooking. → Page 5MeltingFood Ongoing cooking setting Ongoingcookingtime inminutesButter, gelatine 1-Heating or keeping warm Stew, e.g. lentil stew 1-Milk 11–2-1Prepare the dish without the lid.Poaching or simmeringDumplings 123–420–30Fish 12310–15White sauce, e.g. béchamel 13–61Bring the water to the boil with the lid on.2Continue to cook the dish without a lid.Boiling, steaming or stewingRice with double the volume of water 315–301Bring the water to the boil with the lid on.2Continue to cook the dish without a lid.Unpeeled boiled potatoes 3–425–30Boiled potatoes 3–415–25Pasta, noodles 1256–10Stew, soup 3–415–60Vegetables, fresh or frozen 3–410–20Food in a pressure cooker 3–4-1Bring the water to the boil with the lid on.2Continue to cook the dish without a lid.BraisingRoulades 3–450–60Pot roast 3–460–100Goulash 3–450–60Frying with little oilFry food without a lid.Escalope, plain or breaded 6–76–10Chops, plain or breaded 16–78–12Steak, 3 cm thick 7–88–12Fish or fish fillet, plain or breaded 4–58–20Fish or fish fillet, breaded and frozen, e.g. fish fingers 6–78–12Stir fry, frozen 6–76–10Pancakes 5–6one by one 1Turn the dish several times.6 Cleaning and servicingTo keep your appliance working efficiently for a longtime, it is important to clean and maintain it carefully.6.1 Cleaning productsYou can obtain suitable cleaning products and glassscrapers from customer service, the online shop or aretailer.ATTENTION!Unsuitable cleaning products may damage the sur-faces of the appliance.▶Never use unsuitable cleaning products.Unsuitable cleaning products¡Undiluted detergent¡Detergent intended for dishwashers¡Abrasive cleaners¡Aggressive cleaning products such as oven sprayor stain remover ¡Abrasive sponges ¡High-pressure or steam jet cleaners6.2 Cleaning the glass ceramic Clean the hob after every use to stop cooking residues from getting burnt on.Note: Note the information on unsuitable cleaning products. → Page 7Requirement: The hob has cooled down.1.Remove heavy soiling using a glass scraper.2.Clean the hob with a cleaning product for glass ceramic.Follow the cleaning instructions on the product packaging.Tip: You can achieve good cleaning results using a special sponge for glass ceramic.7 Disposal7.1 Disposing of old applianceValuable raw materials can be reused by recycling.▶Dispose of the appliance in an environmentallyfriendly rmation about current disposal methods are available from your specialist dealer or local author-ity.en Customer Service8ment - WEEE).The guideline determines the frame-work for the return and recycling of used appliances as applicable throughout the EU.8 Customer ServiceFunction-relevant genuine spare parts according to the corresponding Ecodesign Order can be obtained from Customer Service for a period of at least 10 years from the date on which your appliance was placed on the market within the European Economic Area.Note: Under the terms of the manufacturer's warranty the use of Customer Service is free of charge.Detailed information on the warranty period and terms of warranty in your country is available from our after-sales service, your retailer or on our website.If you contact Customer Service, you will require the product number (E-Nr.) and the production number (FD) of your appliance.The contact details for Customer Service can be found in the enclosed Customer Service directory or on our website.8.1 Product number (E-Nr.) and production number (FD)You can find the product number (E-Nr.) and the pro-duction number (FD) on the appliance's rating plate. The rating plate can be found:¡on the appliance certificate.¡on the lower section of the hob.Make a note of your appliance's details and the Cus-tomer Service telephone number to find them again quickly.9 Installation instructionsObserve this information when installing the appliance. Follow these safety instructions when in-stalling the appliance.¡Electrical connection must only be carried out by licensed specialist staff. Incorrectconnection will invalidate the warranty.¡The safe operation of this appliance can only be guaranteed if it has been installed to a professional standard in accordancewith these installation instructions. The in-staller shall be liable for any damage result-ing from incorrect installation.9.2 Built-underDo not install refrigerators, dishwashers, non-ventilated ovens or washing machines underneath the appliance.¡If you fit an oven below the appliance, the worktop must be at least 20 mm thick, in certain cases even thicker. Observe the information in the oven installa-tion instructions.¡Make sure that projecting parts such as the mains housing or the mains cable do not collide, e.g. witha drawer.9.3 Intermediate floorIf the underside of the hob can be touched, an interme-diate floor must be fitted.¡Ask your specialist retailer for an intermediate floor as an accessory.¡If you use your own intermediate floor, the minimum distance to the mains connection of the appliance must be 10 mm.9.4 Preparing the unitsThe worktop must be level, horizontal and stable.¡The fitted units, including wall finishing strips, must be heat-resistant to at least 90 °C.¡Niche cladding within 50 mm of the back wall must not be combustible (e.g. tiles, stone).Installation instructions en9¡Seal the cut surfaces to make them heat-resistant.This prevents the worktop from swelling as a resultof moisture.9.5 Electrical connectionTo protect the appliance, do not remove it from the polystyrene trays until you press the appliance into the cut-out. Never lay the appliance down flat on its side.¡Check the household wiring before connecting the appliance.¡The appliance fulfils the requirements of protection class I and must only be operated in conjunction with an earth conductor.¡In the permanent electrical installation, a partition must be provided in the phases in accordance with the installation regulations.¡If appears on the appliance's display, it has not been connected correctly. Disconnect the appli-ance from the mains and check the connection.Connecting with a 3-wire cableEnsure that there is sufficient fuse protection for the household wiring.Observe the colour coding of the power cable.¡The protective conductor is green/yellow .¡The neutral conductor is blue.¡The phase (external conductor) is brown.¡If required, the cable must be replaced with a multi-phase power cable. When replacing the cable, ob-serve the following paragraph.Connecting without a pre-installed cableOnly connect the hob in accordance with the connec-tion diagram.¡If required, install the enclosed copper bridges.¡The power cable must correspond to type H05 VV-F or a higher rating.¡Use the current load to determine which wire cross-section you require. A cross-section of < 1.5 mm² is not permitted.Connecting with a pre-installed 5-wire power cableThe power cable must only be replaced by trained cus-tomer service personnel.9.6 Installing the hob Do not trap the power cable and do not route it over sharp edges.¡If the oven is a built-under type, route the cable along the rear corners of the oven to the mainssocket.¡The hob can also be installed in an existing cut-out that has a depth of 500 mm.¡It must protrude by the same distance at the frontand the rear.9.7 Removing the hob1.Disconnect the appliance from the power supply.2.Push out the hob from below.Thank you for buying aBosch Home Appliance!Register your new device on MyBosch now and profit directly from:•Expert tips & tricks for your appliance•Warranty extension options•Discounts for accessories & spare-parts•Digital manual and all appliance data at hand•Easy access to Bosch Home Appliances ServiceFree and easy registration – also on mobile phones:/welcomeLooking for help?You'll find it here.Expert advice for your Bosch home appliances, help with problemsor a repair from Bosch experts.Find out everything about the many ways Bosch can support you: /serviceContact data of all countries are listed in the attached service directory.。


AB变频器ABB变频器AMKLGLSLVDSEW 艾默生安川安华丹弗斯德力西东元东芝海利普汇川力普轮次电梯门机欧瑞派尼尔日立日业三菱三洋施耐德台安台达伟创西门子西威英威腾邦德1.台安(TAIAN)变频器说明书E2 N2 V2 SV300 N310 S310 EV300 K1/N1 K200/K400 9300JS E2-EN2.台达(DELTA)变频器说明书VFD-A VFD-B VFD-E VFD-F VFD-G VFD-L VFD-MVFD-S VFD-V VFD-VE VFD-EL VFD-B/P VFD-VL3.英威腾(INVT)变频器说明书G9/P9/GS/GL CHE CHF CHV CHV110 CHV160 CHV1804.汇菱(HUILING)变频器说明书H30005.信捷(XINJE)变频器说明书V5/F56.凯迪华能变频器说明书CD20007.酷马(QMA)变频器说明书Q5000 Q7000 Q90008.黎升同步控制器说明书SAD240 SAD280 SAD280i9.三品(SANPIN)变频器说明书SKJ SPRQ-33310.能士(NSA)变频器说明书NSA20 NSA8011.台凌(TAILING)变频器说明书TL80 TL100 TL100H12.力普变频器说明书LP10013.安普(AMPLE)变频器说明书AMP100014.誉强(YUQIANG)变频器说明书YQ3000-M YQ3000-A YQ3000-G YQ3000-A7(上) A7(中) A7(下) 15.格立特(GREAT)变频器说明书VF10 VF11 VF15 VC300 VC3100 VC320016.RICH(利佳/艾瑞克)变频器说明书EI-MINI EI-450 EI-450M EI-500 EI-550 EI-600 EI-700EI-7001 EI-8001 EI Super N17.汇川(INOVANCE)变频器说明书MD021 MD280 MD300 MD300A MD320 MD33018.远川(YCDZ)变频器说明书YC-G YC-P TE580 软启动器紫日(CHZIRI)变频器说明书ZVF7 ZVF9 ZVF9V ZVF11 软启动森兰(SENLAN)变频器说明书SB12 SB40 SB50 SB60/61 SB60+/61+ SB61Z SB61Z+ SB70 SB80 SB100 SB200 BT12 BT40安邦信(AMBITION)变频器说明书G7/P9 G9/P9 V11 G11 E11 Z9/Z11 HVI普传(POWTRAN)变频器说明书168 PI97G PI7000/7100 PI7600/7800 PI7660日业(SUNYE)变频器说明书SY3200 SY3300日拓变频器说明书HL3000华蓝变频器说明书HL2000 HL3000神源(SYRUNS)变频器说明书SY4000 SY5000 SY5000-P开拓变频器说明书KT-A6G/P山宇变频器说明书SY6000 SJR2创杰变频器说明书ACT-V6G/P/Z ACT-M7亚泰(YT)变频器说明书YTD-G传动之星(STAR@DRIVE)变频器说明书SD-5L-G/P/Y SD-5L-S SD-7L晓磊(CHXL)变频器说明书LEI2000 LEI2005 LEI3000 HJR2005 JKL JKL JKG JKW5C 星河(XINHE)变频器说明书SD-5L华科(HUANIC)变频器说明书HI3G/F HI5G/F HI9G/F HI12G/F方禾(FangH)变频器说明书TE280 F66-B F66-C群倍(QUNBEI)变频器说明书QLP5000蒙德(MODROL)变频器说明书IMS-GF IMS-GL2 IMS-DDM IMS-GF3 IMS-MF IMS-DS IMS-P3 IMS-F3 IMS-GL3韦尔变频器说明书AC30G/P/W/H高士达(GOLDSTAR)变频器GS200L赛普(SAPPHIRE)变频器说明书SAP500G SAP300西驰变频器说明书CFC1000 CFC4000 CMC-L CMC-M CMC-S CMC-SX CMC-P欧瑞(惠丰)变频器说明书F2000-P F2000-G E1000 F2000-M F3000 F1000-G F1000-M F1500-G F1500-P LT2000 LT3000 LT3300 K2000ZS1500-2000 HFV佳灵变频器说明书JB6C-T9时代变频器说明书TVF1000 TVF3000 TVF5000 TVF8000 TEFU爱迪生(Adsen)变频器说明书ADS-A阳冈变频器说明书G1/H1/P1 E1 S1九德松益变频器说明书CT-2000 CT-2000E CT-2000ES CT-2000EV CT-2000FCT-2000Plus CT-2000S CT-2000V乐邦变频器说明书LB60G LB90G VFDD日搏变频器说明书RB600 RB3000日普(RIPOW)变频器说明书RP3200日锋(RiFeng)变频器说明书RF200 RF9000 RF9900 MZ-P(1) MZ-P(2) MZ-P(3) MZ-P2(1) MZ-P2(2) MZ-P(3)RF-P3/G3(1) RF-P3/G3(2) RF-G3/P3(3)金肯(JINKEN)变频器说明书JK-G/P鹰垦(INK)变频器说明书SLX正阳(Zhengyang)变频器说明书ZY29/31/98 ZY-812米高变频器说明书Micovert2003 Micovert340N伟创(VEICH)变频器说明书AC20 AC32 AC60 AC61-Z AC62-L ACR-L ACR-P ACR-S 制动单元德莱尔变频器说明书DVA DVM DVS DV1000易能变频器说明书EDS700 EDS2860时运捷变频器说明书SuperBona-iF/iP DB-2100鸿宝变频器说明书HB-G9/P9 HB280-G HB280-P HB280-Z加能变频器说明书ACmaster-H7 IPC-MD IPC-DR IPC-RF微能变频器说明书WIN-HV WIN-9GV-T11 WIN-VA/VC WIN-VB WIN-9G WIN-9FWIN-9I WIN-9L WIN-9U-PFBWIN-9U-RDB正弦(SINEE)变频器说明书SINE003 SINE300 SINE303 SINE307 SINE308 SINE309 SINE311 SINE319 SINE320 SINE321四方变频器说明书C300 C320 E320 E350 E380 E520 H320贝西(B&C)变频器说明书BC-1000 BC-2000 BC-2300菱科(LINGKE)变频器说明书LK600-G/P/ZS LK800合康高压变频器说明书HIVERT通用HIVERT矢量吉纳变频器说明书MSC-3 MFI-Case00/CaseA/CaseB富凌(FULING)变频器说明书DZB60J DZB70B DZB100S DZB100H DZB100PP DZB100L DZB100T DZB100B-GZ DZB100B DZB100D DZB100DY DZB100M DZB200M DZB300B珠峰变频器说明书DLT-G11/P11/Z11/ZK易驱变频器说明书ED2003 ED2800 ED3000 ED300S ED3100威科达变频器说明书V6 V7 V8 VB中远变频器说明书MF6 MF5/20 MF30美之源(MZY)变频器说明书MZY-M/Y/Z/T/L威灵(WELLING)变频器说明书WELLING-G/P/F斑科(Bantek)变频器说明书BLDC基创变频器说明书E350腾龙变频器说明书VG3000-G/H德瑞斯(DIRISE)变频器说明书DRS1000-M DRS2000 DRS2800 DRS3000天正变频器说明书TVFS9 TVFG9/P9 TVFG11 TGS2 TGS3 TGCV5 TGCV5I TGCV6 雷诺尔变频器说明书RNB3000 SSD JJR1000 JJR2000 JJR5000科姆龙变频器说明书KV1900 KV2000德力西变频器说明书CDI9000 CDI9100-G CDI9100-S CDI9100-F 制动单元日虹变频器说明书CHRH-A CHRH-C CHRH-D赛普变频器说明书SAP900G SAP300V万谷(WANGU)变频器说明书VF2000世通(EACON)变频器说明书EC1000 EC3000 EC5000佛斯特(FIRST)变频器说明书FST-500 FST-550 FST-600 FST-700 FST-800 FST中频FST中压收获(Seoho)变频器说明书SOHO-VD SOHO-SMS威尔凯变频器说明书WKF WKS WKR5000哥伦(GRET)变频器说明书GD-V5东达变频器说明书TDS-F8 TDS-V8阿尔法(ALPHA)变频器说明书ALPHA2000G ALPHA2000P ALPHA2000Z ALPHA2800 ALPHA3300 ALPHA5000 ALPHA6000东元(TECO)变频器/伺服说明书7300EV 7300CV 7200MA 7300PA 7200GS 7200M3 G510 V33-EN F33-EN JSDE伺服说明书JSDA伺服说明书TSDA伺服说明书7200G3同安川616G3士林变频器说明书SH系列SS系列SB系列华腾变频器说明书V5-H V5-T V5-I V5-W V5-E V5-B E5-P V6-H V6-T麦孚变频器说明书VFD-F540 VCD1000 HD3000 MD204LV4海利普变频器说明书HOLIP-A/F/H/M HOLIP-C HOLIP-P HOLIP-V HOLIP-NV HOLIP-SV HOLIP-J HOLIP-SJHOLIP-C+/CP泓筌变频器说明书HC1-A HC1-M V5000隆兴变频器说明书LS200A LS600 LS800宁茂(赫力)变频器说明书RM3 RM5 RM5G RM5E正频(JPS)变频器说明书PDS PDA/H/E爱得利变频器说明书APXG3 AS ASN MS德弗(DOVOL)变频器说明书DV300 DV600 ST500 HL2000西林变频器说明书EH600A EH600M EH600W EH600Z百德福(BEDFORD)变频器说明书B500 B801三碁(三川)变频器说明书SA SE S100B S800 S1100 S2000 S2100 S3000 SPC3 SGP1康沃(博世力士乐)变频器说明书S1 G2 G3 ZC/ZS KVFC+ KVFC+mini XKDB春日(KASUGA)变频器说明书KVFC/KVFCP/KVFC-Z/KVFG-H KVFC+/KVFC+-P/KVFC+-H KVFC+Mini 三木(MIKI)变频器说明书V6优利康变频器说明书YD3000 YD5000尤尼康(UNICON)变频器说明书低速大扭矩****盘有码盘西尔康变频器说明书H3000深川变频器说明书SVF2000 SVF3000正泰(CHINT)变频器说明书NI01安川(YASKAWA)变频器说明书G3 G5 G7 E7 F7 J7 V7 PC3 P5/PC5 伺服SGDM三菱(MITSUBISHI)变频器说明书A500 E500 F500 S500 A700 E700 F700 D700 A024/A044 FX-20P-E Z200 A220/A240欧姆龙(OMRON)变频器说明书3G3JZ 3G3JV 3G3IV 3G3SV 3G3XV 3G3EV 3G3FV 3G3HV 3G3MV 3G3RV 3G3RV-ZV1 3G3RX 3G3MZ富士(FUJI)变频器说明书FVR-G7S FVR-E7S FRN-G9S/P9S FRN-G11S FRN-P11S E1S F1S FRN-Mini/C1S FVR-E11SFVR-MS5 FRN-VG7S FVR-C9S FRN-G3/P3 FVR-G5S FRN-G5/P5 FRN-G7/P7日立(HITACHI)变频器说明书SJ100 L100 SJ200 SJ300 SJ300-EL L200 L300P松下(PANASONIC)变频器说明书VF0(200V) VF0(400V) VF0C VF-8Z VF100 DV700/707 M1DM1X M2X A4伺服FPFP-X FP0 FPΣFP2/FP2SH FP-e GT GT01 GT32东芝(TOSHIBA)变频器说明书VF-nC1 VF-S7 VF-S9 VF-S11 VF-A5 VF-A7 VF-P7 VF-AS1VF-A3 VF-AS1 VF-FS1 VF-PS1东洋(TOYO)变频器说明书VF61R VF64 VF64SDS ED64ADS ED64SP住友(SUMITOMO)变频器说明书HF320 HF320a SF320 SF320a HF430 AF-500(同三肯MF/MS)三肯(SANKEN)变频器说明书SAMCO-i SAMCO-vm05 SAMCO-e MF/MS ES/ET/EF IHF/IPFSHF/SPF明电舍(MEIDEN)变频器说明书VT210S VT230S VT230SE VT240S VT240ELLG变频器说明书iS3 iH3 iG5 iS5 iH iV5 iP5 iG5A iC5现代(HYUNDAI)变频器说明书N50 N100 N300 J300三星(SAMSUNG)变频器说明书MOSCON-E5 MOSCON-E7 MOSCON-F7 MOSCON-F500 CSD3 CSDP 意科(IECCO)变频器说明书SINUS-N SINUS-PENTA-1 SINUS-PENTA-2 SINUS-PENTA-3佛朗克(FRANCK)变频器说明书FRS2000 FRB6000NORD(诺德)变频器说明书SK300E SK400E SK5xxE SK530E SK700E SK750EEATON(伊顿)变频器说明书SVX9000-CN SVX9000 SPX9000 MVX9000 GVX9000西门子(SIEMENS)变频器说明书MM410 MM420 MM430 MM440 G110 G120 G150 ET200S MICROMASTER MICROMASTER Eco/MIDIMASTER Eco Sinumerik 810D/840D/840DI SIMODRIVE 611 840D+611SIMODRIVE 611U 6RA28 6RA70 Simatic VS120 SINAMICS V10SINAMICS V60PE变频器说明书SD100 SD250 SD450 SD700 V2软启动器V5软启动器TMT变频器说明书PLUS VTC E IP55 PLUS IP55 EAB变频器说明书1336PLUS II PowerFlex 4 PowerFlex 40 PowerFlex 40P PowerFlex400 PowerFlex 70 PowerFlex 700 PowerFlex700H PowerFlex700S PowerFlex700DC PowerFlex 7000 SMC Flex PowerFlexL DriveLogix艾默生(华为)变频器说明书EV800 EV1000 EV2000 EV3000 EV3100 EV3500 TD900 TD1000 TD2000 TD2100 TD3000 TD3100 TD3200 TD3300 TD3400 SK ES179.ABB变频器说明书ACS50 ACS100 ACS140 ACS150 ACS350 ACS400 ACS500 ACS510 ACS550 ACS600 ACS800 ACS1000 DCS400 DCS500 DCS600DCS800180.伦茨(Lenze)变频器说明书8200/8210 8220/8240 8230 9300 Vector SMD 9300ES 9300EP 4800/4900181.AC Tech变频器说明书MC1000 QC SCF182.丹佛斯(Danfoss)变频器说明书FC51 FC100 FC200 FC300 VLT2000 VLT2800 VLT2900 VLT3000 VLT3500 HVAC VLT5000 VLT5000 FLUX VLT6000 HVAC VLT7000 VLT8000 AUQA MCD200 MCD3000183.VACON(瓦控)变频器说明书NX NXS NXL184.LUST(路斯特)变频器说明书Servo C CDD3000 CDE/CDB3000 CDS4000185.WEG变频器说明书CTW-04 CFW-08 CFW-09 CFW-10 CFW-11 SSW-03 SSW-04SSW-05 SSW-06 SSW-07 SCA-05186.BONFIGLIOLI(邦飞利)变频器说明书ACT200/400 ACU200/400 VCB400 SYN10S/T SPL200/400187.Drivecon变频器说明书XS XT XR VF5100HG VF51RG VFDB VF61C VF61 VF64VFK1/VFN1 VFN2188.CT变频器说明书Commander GP Unidrive SP Commander SE SK(A,B,C) SK(2-6) CDE/CDLE CD75-750 MD29 Mentor189.SIEI(西威)变频器说明书ARTDriveL ARTDriveG-EV190.KEB(科比)变频器说明书F4-S F4-F F5-M F5-M/S191.SEW变频器说明书MOVITRAC-31C MOVIDRIVE-60B/61B MOVITRAC-07MOVIRET-315/328/355/380/3150192.BERGES变频器说明书ACM-D2/S2/S3 ACM-COMPACT SE1 SW1 ACP3000 ACP6000 UD7000 WF2 X4 SWP193.施耐德变频器说明书ATV08 ATV11 ATV21 ATV28 ATV31 ATV38 ATV58 ATV61 ATV66 ATV68 ATV71 ATS01ATS46 ATS48 V690 17D Lexium 05 Lexium 23 ATV302194.pDRIVE变频器说明书MX-eco/pro/multi-eco/multi-pro-1MX-eco/pro/multi-eco/multi-pro-2195.斯德博(STOBER)变频器说明书FAS4000 FDS4000 MDS5000 SDS4000196.欧陆变频器/直流调速器说明书512C 590+ 590P 690+ 590C197.依尔通(Emotron)变频器说明书FDU VFX VSA VSC CDX CDU MSF198.葆德(BALDOR)变频器说明书BSC2000/3000 BTS10 DBTS10 BSC1000/1100 SBSC1000/1100 DBSC1000/1100 DBSC100 SBSC2000/3000 BTS15 VS1SD 10 11 12 14199.Moeller(金钟-默勒)变频器说明书DV6-340 DF51200.英泰(Invertek DRIVES)变频器说明书Optidrive Plus 3GV Optidrive Plus 3GV Compact Optidrive VTC Optidrive E Optidrive E1 Optidrive E2 Optidrive MEMA 4X 201.瑞恩(RELIANCE)变频器说明书202.派克汉尼汾(parker)变频器说明书203.Xtravert变频器说明书204.意科(IECCO)变频器说明书205.佛朗克(FRANCK)变频器说明书206.NORD(诺德)变频器说明书207.nikki伺服说明书208.安德利变频器说明书209.中颐变频器说明书210.申瓯变频器说明书211.宝米勒变频器说明书212.嘉信变频器说明书213.旭生变频器说明书214.德马格变频器说明书215.KBelectronics说明书。

Enterprises today face a continuous struggle to reduce infrastructure complexities, conserve valuable floor space, meet ever-changing business needs, whilekeeping their businesses up and running uninterrupted 24/7—with no downtime. Add to these requirements the concern of accelerating costs—from powerconsumption to cooling to datacenter space. Businesses are seeking a flexible, high-performance server platform that can provide a single solution to these challenges.The new HP Integrity NonStop NB50000c BladeSystemcan meet these needs. Combining the economies ofstandards-based, modular computing with the trusted24/7 fault-tolerant availability and data integrity of the NonStop architecture, the new HP Integrity NonStop NB50000c BladeSystem doubles performance in half the footprint for lower per-transaction cost. It delivers up to twice as much processing power per unit of floor space within the same power envelope. Increased manageability also saves on administration resources.As a result, the NB50000c BladeSystem has a much lower total cost of ownership (TCO). With excellent price/performance, the NB50000c BladeSystem makes an ideal choice for businesses with massive transaction volumes such as finance, healthcare, and telecommunications.The NB50000c BladeSystem uses the HP BladeSystem c-Class enclosure and the HP Integrity server blade,powered by dual-core Intel ®Itanium ®processors, as theprocessing engine. New NonStop Multi-core Architecture(NSMA) and NonStop Operating System release J06leverage powerful multi-core processing to achieve aThe HP Integrity NonStop NB50000c BladeSystemdelivers a high-performance platform with the efficiencies of a standards-based bladed form factor to drive down costs, while supporting more robust applications for business growth.HP Integrity NonStop NB50000c BladeSystemData sheetsignificant boost in performance. New standards-based NonStop I/O infrastructure also improves response time and throughput.Multi-core processing allows for both scale up and scale out. The NB50000c BladeSystem scale up provides twice as much processing power per logical processor at a lower per-transaction cost. As is typical with other NonStop systems, the NonStop NB50000c scales out through built-in clustering of logical processors—up to 4,080 logical processors (8,160 cores).Improved TCO makes the NonStop NB50000c a good choice for migration of existing business-critical applications. Applications running on the previous generation of the NonStop platform can migrate from existing rack-mount servers to the NB50000c with minimal effort. Migrating from earlier generationrack-mount systems will require replacing rack-mount processor components with a BladeSystem chassis and components and installing the new NonStop J-series operating system and NonStop J-series release software. In addition, the NonStop NB50000c supports existing modular I/O subsystem (IOAME, FCDM, FCSA, G4SA)—thereby protecting existing customer investments. Key features and benefits•Enable fault tolerance and 24/7 availability using continuously available software–Patented NonStop process-pair technology toprovide instant software take-over in the event ofsoftware or hardware fault–Improved middleware and NonStop operatingsystem enhances multiple failure fault tolerance,increases online manageability, and eases upgrades •Provide industry-leading data integrity–Leverages Intel’s improvements in chip-level dataintegrity and also prevents data corruption end-to-end •Build an ideal platform for Service-Oriented Architecture (SOA)–J-series OS supports multi-core processors greatlyimproving the computing capacity of the platformand extending the acknowledged linear scalability of NonStop systems to a new level–The new NonStop Operating System J-seriesrelease supports standards-based middleware and core Web services. This provides a strongfoundation for deploying SOA services on NonStop Blades to interoperate, both as a provider and as a consumer, with other SOA services–J-series OS supports SIM and other DistributedManagement Task Force (DMTF) manageabilitystandards making it possible for the NonStopBladeSystem to be managed under a unifiedmanagement structure•Double the performance and improve response time using multi-core and storage subsystem technology–Boosts performance by leveraging new multi-coreprocessor architecture–Advanced caching technology (Write CacheEnabled) improves response time while maintaining transactional integrityFigure 1. Multi-core processing power of the IntegrityNonStop NB50000c BladeSystemHP’s service solutions, built on the Solution Lifecycle (SLC) process,offer consistent quality and service levels for the Integrity NonStopservers. The SLC process helps achieve rapid productivity andmaximum availability by examining specific needs at each of fivedistinct phases (Plan, Design, Integrate, Install and Manage) andthen designing solutions around those needs. We offer three differentservice solutions designed to meet customer needs:HP Critical Service Solution•Startup and Deployment Services—build the solution to your exactspecifications, complete the installation, and make the solutionapplication-ready–Assessment and Design Services—define requirements andtranslate your business and technical needs into a solution thatmelds the necessary hardware and software–Deployment Management Services—upfront project coordinationfrom HP–Education Services—training curriculums relevant to needs andexisting expertise based upon a needs analysis•HP Critical Service—comprehensive, on-going supportdesigned to help minimize the business impact of downtime forbusiness-critical applicationsHP Proactive Service Solution•Startup and Deployment Services•HP Proactive 24 Service—integrated hardware and softwaresupport, including proactive and reactive services to improve stabilityand availability across your IT environmentHP Foundation Service Solution•Startup and Deployment Services•HP Support Plus 24 Service—integrated hardware & softwaresupport services designed specifically for your technologyFor more information, visit /services/nonstopHP ServicesProcessorsCacheRAM per logical processor IOAMEHot-swap ServerNet I/O adapters based on IOAMEIP CLIMsStorage CLIMsI/O adapters supported Fibre Channel disk modules connected to IOAME via FCSA SAS disk modulesDisk drives supported Standard features 2–16 logical processors per nodeIntel®Itanium®9100 series dual-core 1.66GHz processors18 MB L3Minimum: 8 GBMaximum: 48 GBMinimum: 0Maximum: 6Minimum: 10 per nodeMaximum: 60 per nodeMinimum: 1 (provides 5 gigabit/sec Ethernet ports)Maximum: 22(Note: Minumum=0 if only IOAME-based system)Minimum: 1Maximum: 22(Note: Minimum=0 if only IOAME-based system)Serial Attached SCSI (SAS), Fibre Channel, Gigabit Ethernet14 disks per module25 disks per moduleFC disks: 144 GB, 300 GBHP StorageWorks XP24000 XP20000 XP12000 XP10000 Disk Arrays SAS disks: 72 GB, 146 GBRedundant power suppliesRedundant fansDual power distribution unitsDual power cordsTechnical specificationsHP Integrity NonStop NB50000c BladeSystem•Greatly reduce per-transaction cost–Delivers lower per-transaction cost by means offaster processing and standard modular components –Enhances response time and throughput with new standards-based IP communications and NonStop I/O infrastructure with latest storage technology •Scale up and scale out for flexible growth–Scales up, to provide nearly double theprocessing power per logical processor at alower per-transaction cost–Provides highest linear scaling system in businesscritical computing—up to 4,080 logical processors per total system for massive scale out •Significantly reduce footprint and save datacenter facilities costs–Up to twice as much processing power per unitfloor space within the same power envelope–Room to expand processing power in the futurewithout increasing floor space–Only one extra server (N+1) is required forredundancy–Works with HP Smart Cooling technology •Increase manageability and save administrator time and resources–HP Systems Insight Manager (SIM) Blade Plug-inmonitors and manages entire bladed infrastructure through a single console–Seamless integration of NonStop Cluster Essentials with HP SIM improves management of systemswithin heterogeneous clusters–Built-in Integrated Lights-Out technology remotelymanages all servers–Onboard Administrator simplifies commonmaintenance in real timeHP Financial ServicesHP Financial Services provides innovative financing and financial asset management programs to help you cost-effectively acquire and manage your HP solutions. We offer flexible financing options and services customized for 100 percent availability.For more information about these services, contact your HP sales representative or visit/go/hpfinancialservicesFor more informationTo learn more about HP Integrity NonStop servers contact your local sales representative or authorized HP reseller, or visit /go/nonstopblade© 2008 Hewlett-Packard Development Company, L.P . The information contained herein is subject to change without notice. The only warranties for HP products and services are set forth in the express warranty statements accompanying such products and services. Nothing herein should be construed as constituting an additional warranty. HP shall not be liable for technical or editorial errors or omissions contained herein.Technology for better business outcomesAltitudeTemperatureHumidityDimensions(H x D x W)Weight Power supplyElectromagnetic interference Power line LF emissions Regulatory SafetyNote: This table represents a single 42U rack, 4 logical processors in a single C-Class chassis, without UPS. It includes 2 Storage CLIMs, 2 SAS drive enclosures, 50 SAS drives, 2 IP CLIMs,one rack mount console and monitor, one maintenance LAN switch.HP Integrity NonStop NB50000c BladeSystemEnvironmental specificationsOperating: 10,000 ft (3,000 m) maximum Non-operating: 30,000 ft (9,144 m) maximumOperating: 50˚F to 100°F (10˚C to 35°C)Non-operating: –40˚F to 150°F (–40˚C to 66°C)Maximum rate of temperature change: 36°F (20°C) per hour Operating: 20% to 80% relative non-condensing maximum Non-operating: 95% maximum at 150°F (66°C)78.7 x 46.65 x 24 in (1.99.9 x 118.5 x 60.96 cm)752.5 lb (342.5 kg)Typical power dissipation: 6,239 VA Input current: 28 A @ 208 VACAC input power: 200–240 V, 50–60 HzComplies with FCC rules and regulations, Part 15, as a Class A Digital Device; manufacturer’s declaration to EN 55022 Level A EN 61000-3-2 (Europe); EN 61000-3-3 (Europe)Certifications are for individual modulesCompliant with UL 60950-1/CSA C22.2 NO. 60950-1-03 and EN 60950Minimum configuration 2 processors 8 GB/processorMaximum single-node system configuration 16 processors 768 GB main memoryMaximum configuration 255 nodes191 TB main memorySystem configurations。

u Rated to an industry leading IP68uMultiple camera programming through Camset softwareu Many mounting and viewing optionsuEasy set-up and configuration through the powerful on-screen display uMulti-protocol operationThe MIC Series 500 Professional combines cutting-edge technology with the latest production techniques to provide a class-leading feature set in an economical package. The MIC Series 500 Professional range takes high quality surveillance to new levels of excellence.As a best-fit camera for virtually any security application, it can be installed in the harshest of environments. Thanks to its IP68-rated aluminum casing, the MIC Series 500 Professional functions perfectly in the most demanding conditions. This tough casing provides protection from the elements and physical attack. Coupled with an optically perfect flat viewing window, integrated long life silicone wiper, and a reversible rain shield, ensures highquality images regardless of the installed environment.The brushless-motor technology offers ultra-reliable,whisper-quiet operation with full 360º continuous rotation pan and 267º tilt control for exceptional viewing capability. Small increment pan/tilt speeds from just 0.2º per second to 120º per second gives the user precise control. This speed control isespecially important when used with video analytic systems, particularly for tracking subjects when fully zoomed in.On-screen menus allow camera set-up from the control room via a remote keyboard. The MIC Series 500Professional is compatible with all leading control systems and has a wide choice of protocols available.A choice of true day/night camera modules offering up to 36x optical zoom (12x digital) are available,providing 540 TV lines (PAL) or 520 TV lines (NTSC).Preset positions, preset tours and random tours ensure flexible surveillance options.The integrated privacy card provides over 900individual privacy masks, with a choice of mask styles,for use in high density residential applications. Each mask changes size smoothly and quickly to ensure the covered target cannot be seen.The MIC Series 500 Professional features twist-lock canting functionality. This allows the camera to be securely canted on-site at 45º for pole mount applications allowing the base of the pole to be viewed. The sheer flexibility of mounting optionsallows the camera to be installed upright, inverted or canted to achieve the perfect field of view.Rated to an industry leading IP68Subjected and certified to rigorous IP68 dust and immersion tests, the MIC Series 500 Professional is perfectly suited for installation in even the most unforgiving environments.Brushless motor technologyUltra-reliable brushless motors provide whisper-quiet operation and smooth control.Host of mounting and viewing optionsFaultless operation in upright, inverted or canted positions gives the user a host of mounting and viewing possibilities. The twist-lock canting feature allows the MIC Series 500 Professional to be canted to 45º on site. This allows, for example, the base of the pole to be viewed in upright pole-mounted applications.Sophisticated privacy maskingThe integrated privacy card allows for over 900 individual privacy masks, with a choice of mask styles, to be programmed.Easy set-upCamera settings can be adjusted via the on-screen menu from a control room via a remote keyboard. Multi-protocol operationCompatible with virtually any control equipment available today, the MIC Series 500 Professional seamlessly integrates with the vast majority of security systems.Applications:•General CCTV•Town centers•ANPR systems•Vandalism prone areas•Extreme environments•Rapid deployment•High security•Prestigious developments•Broadcast•Marine/costal•ArchitecturalFront Detail, 90° (straight) Side Detail, 90° (straight)Front Detail, 45° (canted)Side Detail, 45° (canted) Technical specifications Camera Module18x Optical Zoom Module36x Optical Zoom Module OperationalCommunication and ProtocolsConnectivityAlarmsMechanicalElectricalOptionsEnvironmentalConstructionDimensions (W x H x D)Ordering informationMIC‑500‑ALB18N MIC Series 500 Professional 18x NTSC Camera, Black18x, NTSC, PTZ camera, black, with an integrated wiper, heater, and privacy functionOrder number MIC-500-ALB18NMIC‑500‑ALB18P MIC Series 500 Professional 18x PAL Camera, Black18x, PAL, PTZ camera, black, with an integrated wiper,heater, and privacy functionOrder number MIC-500-ALB18PMIC‑500‑ALB36N MIC Series 500 Professional 36x NTSC Camera, Black36x, NTSC, PTZ camera, black, with an integrated wiper, heater, and privacy functionOrder number MIC-500-ALB36NMIC‑500‑ALB36P MIC Series 500 Professional 36x PAL Camera, Black36x, PAL, PTZ camera, black, with an integrated wiper,heater, and privacy functionOrder number MIC-500-ALB36PMIC‑500‑ALW18N MIC Series 500 Professional 18x NTSC Camera, White18x, NTSC, PTZ camera, white, with an integrated wiper, heater, and privacy functionOrder number MIC-500-ALW18NMIC‑500‑ALW18P MIC Series 500 Professional 18x PAL Camera, White18x, PAL, PTZ camera, white, with an integrated wiper, heater, and privacy functionOrder number MIC-500-ALW18PMIC‑500‑ALW36N MIC Series 500 Professional 36x NTSC Camera, White36x, NTSC, PTZ camera, white, with an integrated wiper, heater, and privacy functionOrder number MIC-500-ALW36NMIC‑500‑ALW36P MIC Series 500 Professional 36x PAL Camera, White36x, PAL, PTZ camera, white, with an integrated wiper, heater, and privacy functionOrder number MIC-500-ALW36PAccessoriesMIC-24PSU-UL 24 VAC Camera Power Supply24 VAC, 50/60 Hz power supply for MIC Series camerasOrder number MIC-24PSU-ULMIC-115PSU-UL 115 VAC Camera Power Supply115 VAC, 60 Hz power supply for MIC Series cameras Order number MIC-115PSU-ULMIC-240PSU-UL 240 VAC Camera Power Supply230 VAC, 50 Hz power supply for MIC Series cameras Order number MIC-240PSU-ULMIC-ALM Alarm and Washer Pump Drive Card8 Input alarm and washer pump drive card for PSU (Not for IR PSU)Order number MIC-ALMMIC-BP4 Biphase ConverterBiphase converter for non-IR versions of MIC series power supply unitsOrder number MIC-BP4MICUSB485CVTR2 USB to RS485 Signal Converter USB to RS485 signal converter to allow MIC Series cameras to connect to a PC, supplied with each cameraOrder number MICUSB485CVTR2MIC-501KBD Keyboard ControllerKeyboard controller with 3-axis joystick for 1 camera (FV PROTOCOL ONLY)Order number MIC-501KBD MIC-516KBD Keyboard ControllerKeyboard controller with 3-axis joystick for 1 to 16 cameras (FV PROTOCOL ONLY)Order number MIC-516KBDMIC-WKT Washer KitWasher kit for non infrared MIC models (includes washer pump drive card, washer nozzle and mounting brackets for wall and 4 in. PCD base)Order number MIC-WKTHAC-WAS05-20 24 VAC Washer24 VAC washer inst. 4M 25LOrder number HAC-WAS05-20HAC-WAS30-50 230 VAC Washer230 VAC washer inst. 30M 25LOrder number HAC-WAS30-50MIC-DCA-WD Deep Conduit Adapter, WhiteDeep conduit adapter for 4 in. PCD base, white sand finish (RAL9010)Order number MIC-DCA-WDMIC-DCA-BD Deep Conduit Adapter, BlackDeep conduit adapter for 4 in. PCD base, black sand finish (RAL9005)Order number MIC-DCA-BDMIC-SCA-WD Shallow Conduit Adapter, White Shallow conduit adapter for a MIC-WMB, a MIC-PMB, or a MIC-SPR mount, white sand finish (RAL9010) Order number MIC-SCA-WDMIC-SCA-BD Shallow Conduit Adapter, Black Shallow conduit adapter for a MIC-WMB, a MIC-PMB, or a MIC-SPR, black sand finish (RAL9005)Order number MIC-SCA-BDMIC-SPR-WD Spreader Plate, WhiteAluminum spreader plate suitable for brickwork surface mounting, white sand finish (RAL9010) Order number MIC-SPR-WDMIC-SPR-BD Spreader Plate, BlackAluminum spreader plate suitable for brickwork surface mounting, black sand finish (RAL9005) Order number MIC-SPR-BDMIC-CMB-WD Corner Mount Bracket, WhiteCorner mount bracket, white sand finish (RAL9010) Order number MIC-CMB-WDMIC-CMB-BD Corner Mount Bracket, BlackCorner mount bracket, black sand finish (RAL9005) Order number MIC-CMB-BDMIC-WMB-WD Wall Mount Bracket, WhiteWall mount bracket, white sand finish (RAL9010) Order number MIC-WMB-WDMIC-WMB-BD Wall Mount Bracket, BlackWall mount bracket, black sand finish (RAL9005)Order number MIC-WMB-BDMIC-PMB Pole Mount BracketPole mount bracket (includes 2 x 455 mm stainlesssteel banding straps for pole diameters 75 to 145 mm)Order number MIC-PMBMIC-2M-S 2 m Shielded Composite CableShielded Composite 2 m cable that provides power,telemetry and video connection from a MIC Seriescamera to a MIC Series power supplyOrder number MIC-2M-SMIC-10M-S 10 m Shielded Composite CableShielded Composite 10 m cable that provides power,telemetry and video connection from a MIC Seriescamera to a MIC Series power supplyOrder number MIC-10M-SMIC-20M-S 20 m Shielded Composite CableShielded Composite 20 m cable that provides power,telemetry and video connection from a MIC Seriescamera to a MIC Series power supplyOrder number MIC-20M-SMIC-25M-S 25 m Shielded Composite CableShielded Composite 25 m cable that provides power,telemetry and video connection from a MIC Seriescamera to a MIC Series power supplyOrder number MIC-25M-SRepresented by:Americas:Europe, Middle East, Africa:Asia-Pacific:China:America Latina:Bosch Security Systems, Inc. 130 Perinton Parkway Fairport, New York, 14450, USA Phone: +1 800 289 0096 Fax: +1 585 223 9180***********************.com Bosch Security Systems B.V.P.O. Box 800025617 BA Eindhoven, The NetherlandsPhone: + 31 40 2577 284Fax: +31 40 2577 330******************************Robert Bosch (SEA) Pte Ltd, SecuritySystems11 Bishan Street 21Singapore 573943Phone: +65 6571 2808Fax: +65 6571 2699*****************************Bosch (Shanghai) Security Systems Ltd.201 Building, No. 333 Fuquan RoadNorth IBPChangning District, Shanghai200335 ChinaPhone +86 21 22181111Fax: +86 21 22182398Robert Bosch Ltda Security Systems DivisionVia Anhanguera, Km 98CEP 13065-900Campinas, Sao Paulo, BrazilPhone: +55 19 2103 2860Fax: +55 19 2103 2862*****************************© Bosch Security Systems 2013 | Data subject to change without notice 2324202123 | en, V2, 04. Oct 2013。
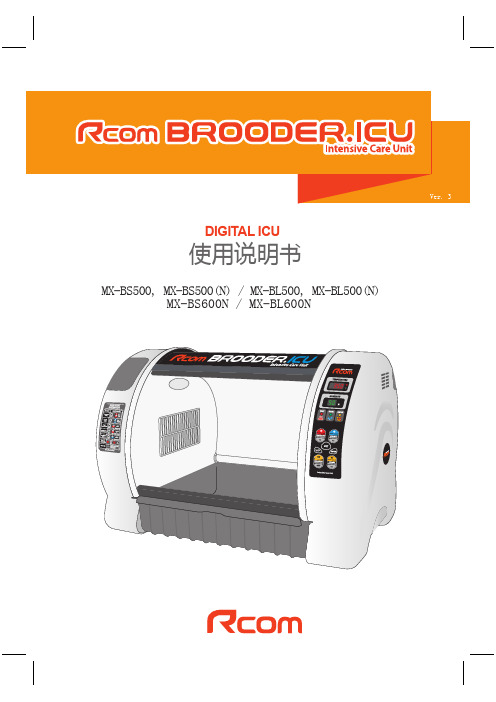
DIGITAL ICU使用说明书MX-BS500, MX-BS500(N) / MX-BL500, MX-BL500(N)MX-BS600N / MX-BL600N(4) 操作部件的名称和功能(3) 部件和结构识别(3)如何开启/关闭阴离子(5) 如何调节摄氏温度/华氏温度(6) 如何开/关声音(4) 如何调节核磁共振亮度(调光器)(3) 关闭说明(4) 结露结 构监 护产品信息功能设置清洗方式Rcom动物用重症监护仓简介对于人为原因,例如不仔细、私自改装、改变产品用途、产品寿命结束等,造成任何的宠物健康或者财产损失,与生产厂家和卖家无关。
为了避免以上问题,请在使用前仔细阅读使用手册。
Rcom 动物用重症监护仓Rcom 动物用重症监护仓的特点[主要功能]* 通过使用碳膜供热系统中的PTC内存元素,革新性的提高稳定性和改善集中供热系统* 内置抗菌/脱臭外部空气过滤器* 内置阴离子激活功能* 水泵用于加湿* 对比市场上功能类似的产品,节能40%。
[安全功能]* 雾化器和氧气瓶可用于监护仓(500(N) model only)仅限500N * 无刷直流电扇用于内部条件的最佳控制* 高雅的外观设计和最适宜的内部空间分配* 警报功能,用于防止温度异常。
* 可以通过堆栈来提供有效的空间(监护仓-选项)[简易功能]* 自动温度/湿度调节* 隐藏式的托盘,便于清洗* 用于室内照明的十级调光器* 旋转门* PTC加热加湿系统能杀死细菌* 大幅度降低室内风扇噪音,提供了更舒适的环境(69分贝)首先,我们真诚的感谢您购买Rcom 的产品。
为了达到自动调节监护环境,Rcom 监护仓采用了最优的设计,该设计通过诠释监护仓内的空气流通来创造最佳的监护环境,此外还采用了融合了最新科技的计算机仿真技术。
Rcom 监护仓的设计旨在满足监护所需的所有条件。
为了监护成功和良好的使用该产品,请您在使用前仔细阅读使用说明。
阴离子:当我们在森林里或者山间为什么会感觉到清新,原因就是那里有很多的阴离子,自然元素受到了电荷的影响。
纳加全自动录播机NLB-500SH使用手册REV688南京纳加软件股份有限公司版权所有,不得翻印目录1硬件规格 (1)1.1清单配件 (1)1.2选购配件 (1)1.3设备参数 (2)1.4接口图 (2)1.4.1正面接口 (2)1.4.2背面接口 (2)2安装调试 (3)3远程互动教育录播系统(VJES1.1) (6)3.1监视 (7)3.2通道 (7)3.3输出 (17)3.4调音台 (32)3.5导播规则 (33)3.6云教室 (38)3.7云台 (40)3.8字幕 (42)3.9角标 (43)3.10CG (44)3.11切换控制 (46)3.12切换特技 (47)3.13上传 (47)4桌面采集客户端(VJTEACHER) (49)4.1安装 (49)4.2运行 (51)4.3桌面采集 (51)4.4远程控制 (52)4.5手写板 (53)4.6音频设置 (53)4.7开始/停止课件录制 (55)4.8录播机开机/关机 (55)4.9课件信息设置 (56)4.10图像质量设置 (56)5课件录制 (57)5.1课件格式 (57)5.2本地播放 (58)5.3网络在线播放 (58)5.4课件播放器 (58)5.4.1界面布局 (58)5.4.2显示模式 (59)5.4.3PPT索引 (60)5.4.4笔记 (60)6互动教学系统 (61)6.1互动部署图 (61)6.2互动系统构成 (61)6.3互动管理平台 (62)6.3.1添加互动服务 (62)6.3.2创建互动课程 (62)6.3.3创建互动教室 (62)6.3.4创建互动角色 (62)6.4互动录播机 (63)6.4.1直播推流设置 (63)6.4.2采集互动画面 (64)6.4.3互动导播规则 (64)6.4.4互动软件操作 (65)7附录 (66)7.1录播操作台NDCP-L使用说明 (67)7.2片头、片尾的制作方式和关联使用说明 (70)7.3O NVIF测试工具及方法 (75)7.4VNC远程控制录播机 (77)7.5还原出厂设置 (78)7.6常见问题 (78)1硬件规格1.1清单配件1.2选购配件导播键盘名称/型号包装规格件数实发数量备注设备主体航空箱内包装NLB-500S 11电源线航空箱内包装国标11SDI 转接线航空箱内包装纳加定制44DVI 转VGA 航空箱内包装纳加定制11DVI 转HDMI 航空箱内包装纳加定制11DVI 转分量复合线航空箱内包装纳加定制113.5mm 转RCA 线航空箱内包装纳加定制22使用手册航空箱内包装纳加定制11保修卡合格证航空箱内包装纳加定制11互动遥控器航空箱内包装纳加定制111.3设备参数机箱黑色2U机架式机箱外形尺寸400mm x430mm x89mm重量7.3公斤供电115VAC~220VAC,功率300W运输箱纸箱工作温度-10°C-50°C贮存温度-20°C-70°C工作湿度10~90%无凝露抗振动10-100Hz1.25g海拔4000米以下1.4接口图1.4.1正面接口序号说明序号说明1电源按键4电源指示灯2重启按键5USB2.0接口3硬盘指示灯1.4.2背面接口序号说明序号说明1电源插头12 3.5麦克风输入接口2电源散热风扇13 3.5音频输出接口3PS/2接口14SDI输入接口4PS/2接口15HDMI/VGA/DVI输入接口5USB2.0接口16DP显示接口6USB3.0接口17HDMI显示接口7HDMI显示接口18DVI显示接口8VGA显示接口194路SDI输入接口9DVI显示接口20遥控接收器10USB2.0接口21COM接口11 3.5音频线路输入接口2安装调试1.打开纸箱,取出互动录播主机,将主机平放在平稳的台面上。
ACP-2020GMIC-770 V3+MIC-75GF10SKY-MXM-A4500SKY-MXM-A4500-6SDASKY-MXM-A500SKY-MXM-A500-4SHASKY-MXM-RTX3000SKY-MXM-R3000-6HDASKY-MXM-T1000SKY-MXM-T1000-4HDBNVIDIA RTX 6000 AdaNVIDIA RTX A6000NVIDIA RTX A2000 12GBSKY-QUAD-T1000-8-BNVIDIA T1000 8GBSKY-TESL-L4-24PNVIDIA L4NVIDIA A40Industrial GPU SolutionsNVIDIA Elite PartnerDelivers a wide range of Industrial GPU Solutions with early authorized access andexclusive technical support.RTX GPU Cards in IndustrialComprehensive offerings for image processing and Edge AI acceleration in manufacturing, transportation, and medicalindustries.Qualified and Certified SystemsNVIDIA-qualified and certified systems ensure hardware stability and softwarecompatibility.☞Qualified System Catalog☞NVIDIA MXM GPU cards: supported, – : not supported, : optionalAdvantech MXM series are compact in size and rugged in design with a small form factor and low power consumption. They fit perfectly in the limited spaces of applications such as surgery, gaming, and autonomous driving.☞NVIDIA Quadro GPU cards: supported, – : not supported, : optionalDesigned and built to accelerate any professional workflow, NVIDIA RTX professional GPU cards feature large memory, advanced enterprise features, optimized drivers, and certification for industrial applications.ADALOVELACEADALOVELACE☞NVIDIA Quadro GPU cards: supported, – : not supported, : optional☞☞NVIDIA T4: supported, – : not supported, : optionalNVIDIA Tesla GPU cardsAccelerating the most demanding HPC and hyperscale data center workloads, delivering the horsepower needed to run bigger simulations faster than ever before, and for supporting the highest performance and user density applications.☞。
Instruction ofNV-500B Portable DiamondDermabrasion UnitPrefaceThe Micro-crystal Dermabrasion was designed by Italian Florence's Mattioli at first, until now had over 20 years’ history. This kind of technology only supplies to the dermatology expert and doctor at first uses, but more and more SPA House & Beauty Saloon also gradually uses, it was called the best method of medical beauty. This method successfully has developed in Europe for several years, cures patient thousands of examples, and has obtained the extremely satisfactory effect.Now we want to introduce the Diamond Dermabrasion, it is a creative improvement of the Micro-crystal Dermabrasion. The Diamond Dermabrasion provided a non-surgical skin refinish procedure, by using sterile diamond heads to abrade or rub off the top skin layer, then Vacuuming out the particles along with any dirt1 Supplies and AccessoriesDiamond Dermabrasion Machine x 1 PVC vacuum hose 6*4 x 1Diamond pen x 3Pens box & foam x1Diamond Head x 9Heads box & foam 1O-rings x 3Cotton Filter x 1packagePower cord x 1Fuse x3Manual x1SpecificationsVoltage: 240V/50/60Hz □220V/50/60Hz □115V/60Hz □Power: 65 VA Fuse: 2A106. Do not modify or attempt to repair the machine, contact the technician for maintenance.Trouble ShootingIf the machine does not function properly, please follow these procedures before requesting maintenance.1. Low suction power/ low vacuum pressure:Please check again the vacuum hose should be connected well to the socket and then hand pieces. And then turn the Vacuum Regulator to the maximum, and then start the Diamond Dermabrasion, and then use finger to block the hole of the hand pieces. Normally the vacuum Gauge can reach the 24 inch Hg.** Please check the O ring in the Diamond pens & O ring in the socket!If you cannot settle the problem finally, please contact your distributor. Don’t open the machine by yourself without the technician guidance.2. No response when turn on the power.Please exchange the fuse. And connect the power cord correctly. If cannot settle the problem, please contact to your distributor.9 and dead skin back up. This procedure removes skin debris, imperfections, blemishes, wrinkles and unwanted pigmentation on the skin. Moderate usage of Diamond Dermabrasion, accompany with skin products that penetrate through top skin layer that reach the dermis level, helps to replenish natural nutrients, restore cell activity, and promote skin health. The results after Micro Dermabrasion treatment is usually a healthy, glowing, beautifulskin.2*** Preparation before treatment1. A consultation included the examination of the skin, a plan for treatment.2. Operator should wear vinyl gloves and a facemask.3. On oily or acne skin, a steamer may be used prior to the treatment, or a degreasing lotion may be applied prior to the cleanser.4. Cleansing the skin with Cleansing gel or water, then wipe off with cotton pad. Allow the skin to dry.Operating Instruction for Diamond Dermabrasion1. Push in the movable ring of copper nozzle at the hand piece, and pull out the 6x4 size vacuum hose. Then push in the black plastic ring on the vacuum hose.2. Put a drop of cream or milk lotion on the vacuum hose nozzle, push in the movable ring and insert in the vacuum hose to the limit.3. Insert a cotton swab into the Diamond Head, then tight up the Diamond Head on the hand piece. Remove the cotton swab after every treatment.4. Turn on the power switch.5. Adjust the Vacuum intensity by Vacuum Regulator according to the following reference table, the intensity displays on Vacuum gauge and check with the client for comfort.3 11. Had major surgery within the past year.12. Asthma13. Cold, Flu, or Upset Stomach14. Any serious illness or disease not listed above.Do not use on these areas:1. Sensitive Skin2. Skin Rash3. Damaged, Inflamed, or Infected Skin.4. Surgical scar less than 12 months old.5. Skin Swollen.6. The probes can not point to Eye ball.7. Genitals.1. Always begin treatment conservatively and observe the effects by the touch and appearance of the skin. A vacuum power that is too high or too big may cause an inflammatory response.2. Edema and erythema can occur following treatment, but will resolve in few hours.3. Overly aggressive techniques can cause mild flaking over the next 3-4 days. Epidermis that is treated too aggressively can lead to bleeding in the superficial dermis.4. Diamond Dermabrasion should not be used on sensitive areas such as eyelids. The eyelids should be closed at all times during the procedure and may be covered with damp cotton pads.5. The following areas are considered inappropriate for treatment: Skin tumor, moles, birthmark, angioma, lips, eyes, herpes, skin cancer, and liver spots.8*Please follow direction of arrows.9. After treatment, brush off all remaining dead skin with a soft brush and rinse with damp sponges or damp cool towel.10. Allow skin to dry then apply desired skin product.11. To clean the Diamond Head, use toothbrush or cotton swab damped with a little alcohol to wipe off the dirty impurity, and then use UV light or high temperature for sterilization.Safety WarningImportant Notice of Caution before using this machine: Never operate this equipment on a person has or suffers from the following medical conditions described below. (The salon or operator may consider having a client sign a waiver to the effect that he/she is free of any poor health conditions.)1. Heart Disease2. Heart Murmur or Irregular Heart Rate3. Has a Pacemaker or other type of heart rate balancer.4. Pregnancy5. Epilepsy6. Alcoholism7. Ulcers8. Disease of Stomach, Intestine, Liver, or Pancreas.9. Breast Cancer.10. Undergoing treatment for any form of Cancer.7 Recommended Vacuum intensity on treatment areaTreatment Area Normal Skin(inHg)Sensitive Skin(inHg)Face 12-22 8-12Forehead 12-22 10-12Chest 15-20 15-18Nose 10-15 10-14Neck 18-18 10-15Near Eye Area 8-12 8-10Treatment Schedule TableTreatment Frequency (days) Total Visits Face Peeling 6-10 3-5Fine Lines 7-13 6-8Neck 12-14 3-5Acne Scars 7-12 8-10 Hyperpigmentation 7-12 8-106 Use the incline area of Hand piece to contact with the skin surface. Proceed with a slow sliding motion. Do not place the hand piece at one spot for too long, doing so will cause harm to the skin.7. Adjust the crystal flow rate by the Vacuum Regulator slowly from minimum to maximum. For commonly use, do not set the flow rate to maximum unless it is of necessity. This is for better4comfort intensity.8. Gently stretch the skin with thumb and finger and glide the Hand-piece 2 to 3 times over the area being treated. Then cross again in different directions to prevent streaking lines as in the reference picture. Brush strokes or polishing motions may be used in different sites.DIAGRAM OF SUGGESTED MOVEMENTSAND AREAS FOR DERMABRASION56Instruction ofNV-500B PortableDiamond Dermabrasion Unit。