SketchUp2017实用插件
- 格式:docx
- 大小:14.52 KB
- 文档页数:2
快成一道闪电!让你设计效率疾速提升的免费Sketch插件尽管Bohemian Coding团队一直在尽力更新提高Sketch的易用性,完善功能和特性,但依然无法满足设计师和开发者的全部需求和愿望。
好在开发者社区並沒有坐以待毙,而是积极地开始为Sketch开发各种各样地插件。
有些开发者打算用自己开发的插件替代系统预制的组件,旨在让GUI、图标和原型地设计拥有更大地定制空间,还有一些开发者则选择试图开发出提高工作效率,完善工作流程地组件,解决各种尚未完善地问题。
如果你打算借助Sketch从零开始设计一个项目,那么下面介绍地许多插件和工具应该能给你极大地帮助。
这些免费地插件不仅简化了复杂的技术,加速了基本的流程,提升了原型开发速度,使得整个设计过程比原来提升了不止一星半点。
打开你的Mac吧,下面的15个Sketch插件中,总有一款能帮你走的更快,设计得更好。
Sketch Mate不想看常常的Sketch说明书?那么这款插件就是你的菜了。
Sketch Mate 可以帮你熟悉Sketch相关的术语和功能,让你在简单上手过程中就可以了解画板、智能对齐、排版和文本等工具的具体功能。
Dynamic Reposition这个插件的名字已经非常形象了,动态重新定位插件,它可以帮你动态调整对象的大小和位置而不用破坏其内容,还能保持对象的比例。
使用之前,你可以事先设置位置和尺寸,方便后续操作。
这款插件和Sketch 3完美兼容,并且配有相应快捷键。
Sketch Framer如果你想使用交互良好的原型展示给客户,那么这款插件可以帮你达成这个愿望。
这款插件能够帮你将Sketch中设计的原型输出到FramerJS中,生成可交互的原型,便于执行和展示。
Sketch Toolbox这个名为Sketch Toolbox的工具可以帮你更为方便地组织管理Sketch插件目录。
它不仅可以帮你组织管理插件,还可自动更新已安装的插件,只需几次点击,你还能获取更多可用、易用的Sketch插件。

给SketchUp插上个性的翅膀——SketchUp插件漫谈对喜爱SketchUp的人来说,学习了解和掌握SketchUp插件也是一件非常有意思的事情。
很难想象如果没有SketchUp插件,仅靠SketchUp本身要完成一个像样的建筑模型该是一件多么费力的事,使用SketchUp插件可以大大提高建模的效率,甚至完成一些以前无法完成的工作,那么到底什么是SketchUp插件呢?2004年在SketchUp发布4.0版本的时候,增加了针对Ruby语言的接口,这是一个完全开放的接口,任何人只要熟悉一下Ruby语言就可以自行扩展SketchUp的功能。
Ruby语言由日本人松本行弘所开发的,是一种为简单快捷面向对象编程(面向对象程序设计)而创的脚本语言,掌握起来比较简单,容易上手。
这就使得SketchUp的插件如同雨后春笋一般发展起来,到目前在为止,SketchUp的插件数量已不下千种。
正是由于SketchUp插件的繁荣才给SketchUp 带来了无尽的活力。
SketchUp的软件开发者们对待插件的态度是完全开放的,他们并没有走其它三维软件开发的老路,一看到好的优秀插件就直接吞并整合到软件自身里面,而是鼓励它们自由发展。
可以对比一下,三维建模软件3ds Max在2002年发布5.0的时候还不到500M,而2012版的中文安装文件已经到了3G之多,而同一时期推出的SketchUp仅仅只有十几兆,到去年推出的SketchUp8.0的安装文件也仅有60多兆,容量上只占是3ds Max的1/50。
SketchUp在保持了自身苗条身材的同时,开放了插件端口,这就把自由选择的权利完全交给了使用者,使得每个软件应用者都可以按自己的需要安装甚至开发适合自己的插件,按自己的需求去拓展SketchUp的功能,因此SketchUp也就变得越来越具有个性化。
插件英雄大部分的SketchUp插件都是由个人开发的,他们自身也都是SketchUp的疯狂粉丝,而这些插件也大都以共享软件的方式免费公开发布。

福利:sketchup2017下载体验展开全文SketchUp Pro 2017是一套直接面向设计方案创作过程的设计工具,是三维建筑设计方案创作的优秀工具。
此次带来新版的SketchUp Pro 2017在渲染方式上有了重大的突破和提升,它可以让我们在SketchUp、my.SketchUp、SketchUp Mobile Viewer、LayOut 以及3D Warehouse 中渲染出相同的效果,以及带来其它一些能令人兴奋的效果,想要了解更多的SketchUp Pro 2017新功能,那就赶紧下载过去试试。
新功能:1、Next Gen Graphics Pipeline 下一代的图像渲染管线在此版本中,我们对SketchUp 的渲染方式进行了重大改进。
我们希望您能留意到这种改进所带来的一些性能提升,但更主要目的是,这种基础引擎的进化是为了SketchUp 未来的全面发展,它可以让我们在SketchUp、my.SketchUp、SketchUp Mobile Viewer、LayOut 以及3D Warehouse 中渲染出相同的效果,以及带来其它一些能令人兴奋的效果。
2、High DPI Modeling 高分辨率建模我们自豪地宣布SketchUp 2017支持高DPI显示器了(如苹果的Retina 显示器)。
这意味着在高DPI显示器上的使用SketchUp 2017 的捕捉和推断会更加准确细腻和流畅,所以如果你有一台高DPI 显示器那就不要暴殄天物了,也把SketchUp 升级到2017吧,来体验更多乐趣。
3、Transparency Improvements 透明显示改进随着我们图像渲染管线的提升,我们对SketchUp 的透明显示效果也做了重大改进,在场景中的透明物体不仅能以更高的质量和更高的帧速率渲染,SketchUp现在可以更好地渲染多个透明面,在几个透明面叠加的显示效果上提供更逼真的层次感。
《老怪SketchUp插件与曲面教程》(101—200)目录与内容索引此文件与视频教程同样重要请妥善保存,你还可以在这里做笔记以方便再次使用按住Ctrl 点击以下链接可快速抵达最常用插件曲面造型常用插件组件材质风格动画类插件导入dwg问题的专用插件其它功能插件插件应用实例(曲面建模)闲谈SketchUp 老怪原创教程SCF工具条共158个工具(注意:8.0以上SketchUp版本,部分工具不能用)SCF是一组常用插件,有七个工具条,其中标准工具和常用工具可用代替SU自带的近二十个工具条,非常方便。
超级工具功能更加强大,也可用调出来常驻。
剩下的建筑、绘图、选择和对齐工具条,可以在需要的时候调出来。
离不开这些工具的用户,可安装新老两个版本的SU软件。
35'45 1031SketchUp自带顶部工具条,(JHS STANDARDJHS基本工具条)60个工具,号称可完美替代不推荐笔记本电脑用户(小屏幕)常驻。
大多数的功能是SU自带或无太大价值的,16'00104个工具(大多比较实用,可常驻)JHS powerbar (超级工具条)3940'36105个工具(建筑业可常驻)221001bit_pro v2.1 第一部分,共点线图层相关的六个工具:定义面上的点,寻找圆心,分割线段,对齐所选实体,把当前实体所在图层设为工作图层,把当前选择对象放入新图层;沿路径和截面放样,画垂直线,绘制和成型相关的八个工具:三点画面,创建最佳适合面沿路径放样,,,由已知边创建旋转面;锥形推拉,推拉已选面到目标平面,创建编辑修改相关的八个工具:移动端点,倒圆角,倒切角,延伸线段,偏移线段,分割水平面106 26'06斜坡,多重缩放;2个工具:共21个工具,第一部分,前8Fredo6 T ools (Fredo6工具箱)工具列表,角度检测,自动翻面,标记法线,分割动画,统计面类型,曲线坡道,沿着画108 25'121891边线检修器)Edge Inspector (Fredo6工具箱)第二部分,(介绍Fredo6 Tools109 21'05共介绍三个工具,图元统计,标注顶点,推导移动Fredo6Fredo6 Tools (工具箱)第三部分110 12'46老怪原创教程327'53) 联合推拉JointPushPull Interactive(112 15'41非常重要的一组插件,共7个工具造型工具Fredo Scale 重要113 15'039个工具自由比例缩放+弯曲扭曲共) 建议常驻RoundCorner(倒角插件,114 09'08重要造型工具共3个工具(重要)17个工具Projection 垂线和投影共虚线擦,辅助点,辅助线和边线,法线辅助线,交错面辅助线,等距辅助线,等分辅助线,定角辅助线,井型辅助线,以点成线,投射参考点,面投影,实体投影,投影推拉,矢量推拉,法线推拉,拉线成面,115 22'14Select Curve选连续线(建议常驻)116 5'50承担重任并无可替代的小家伙个工具共的罪了。

实现CAD绘图多功能的插件推荐CAD(Computer-Aided Design)是一种广泛应用于工程设计领域的计算机辅助设计软件,它能够帮助工程师们通过电脑来进行各种设计和制图工作。
为了让CAD软件的功能更加强大和多样化,很多插件应运而生。
本文将为大家推荐一些实现CAD绘图多功能的插件,帮助您提高工作效率。
1. AutoCAD插件– CADtoolsCADtools是一款功能丰富的AutoCAD插件,它为用户提供了一系列实用的工具,例如自动标注、尺寸线创建、图纸管理等。
CADtools不仅可以简化绘图流程,还可以提高绘图的准确度和效率。
它还具有强大的编辑功能,能够对绘图进行各种修改和优化。
无论是初学者还是专业人士,CADtools都是一款非常值得推荐的插件。
2. SketchUp插件– ArtisanArtisan是一款专为SketchUp设计的插件,它为用户提供了一系列高级绘图工具,例如表面细化、形状编辑、光影效果等。
Artisan可以让用户在SketchUp中实现更加精确和复杂的绘图效果,为设计师们提供了更大的创作空间。
无论您是建筑师、室内设计师还是景观设计师,Artisan都能够帮助您打造出令人惊艳的作品。
3. SolidWorks插件– CAMWorksCAMWorks是一款为SolidWorks设计的先进的制造软件,它能够将CAD模型和CAM程序紧密结合,实现高效的制造流程。
CAMWorks具有智能特征识别和自动化加工的功能,能够大大简化NC 编程的过程。
它还支持多轴加工和刀具路径优化,提高了加工效率和质量。
如果您需要在SolidWorks中进行复杂的制造任务,CAMWorks绝对是一个不可缺少的插件。
4. Revit插件– EnscapeEnscape是一款支持实时渲染的Revit插件,它能够快速将设计模型转化为高质量的渲染图像和动画。
Enscape不仅能够提供逼真的光影效果,还支持虚拟现实和全景漫游。
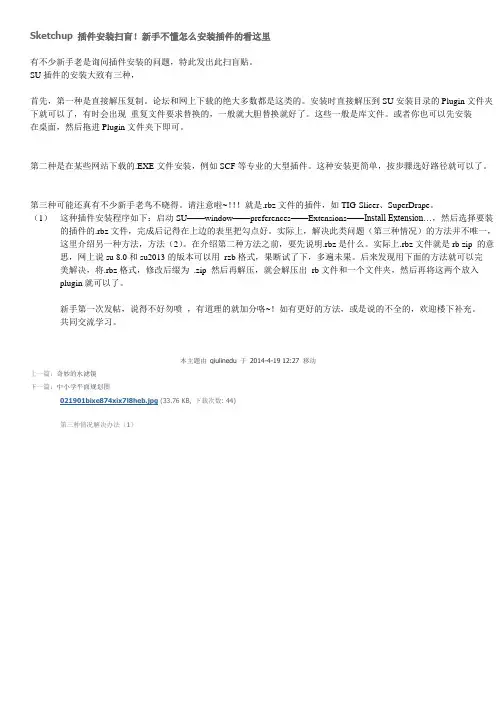
Sketchup 插件安装扫盲!新手不懂怎么安装插件的看这里有不少新手老是询问插件安装的问题,特此发出此扫盲贴。
SU插件的安装大致有三种,首先,第一种是直接解压复制。
论坛和网上下载的绝大多数都是这类的。
安装时直接解压到SU安装目录的Plugin文件夹下就可以了,有时会出现重复文件要求替换的,一般就大胆替换就好了。
这些一般是库文件。
或者你也可以先安装在桌面,然后拖进Plugin文件夹下即可。
第二种是在某些网站下载的.EXE文件安装,例如SCF等专业的大型插件。
这种安装更简单,按步骤选好路径就可以了。
第三种可能还真有不少新手老鸟不晓得。
请注意啦~!!!就是.rbz文件的插件,如TIG-Slicer、SuperDrape。
(1)这种插件安装程序如下:启动SU——window——preferences——Extensions——Install Extension…,然后选择要装的插件的.rbz文件,完成后记得在上边的表里把勾点好。
实际上,解决此类问题(第三种情况)的方法并不唯一,这里介绍另一种方法,方法(2)。
在介绍第二种方法之前,要先说明.rbz是什么。
实际上.rbz文件就是rb zip 的意思,网上说su 8.0和su2013的版本可以用rzb格式,果断试了下,多遍未果。
后来发现用下面的方法就可以完美解决,将.rbz格式,修改后缀为.zip 然后再解压,就会解压出rb文件和一个文件夹,然后再将这两个放入plugin就可以了。
新手第一次发帖,说得不好勿喷,有道理的就加分咯~!如有更好的方法,或是说的不全的,欢迎楼下补充。
共同交流学习。
本主题由qiulinedu 于2014-4-19 12:27 移动上一篇:奇妙的水滤镜下一篇:中小学平面规划图021901bixe874xix7l8heb.jpg(33.76 KB, 下载次数: 44)第三种情况解决办法(1)QQ截图20130823205723.jpg(15.39 KB, 下载次数: 39)第三种情况解决办法(2)。
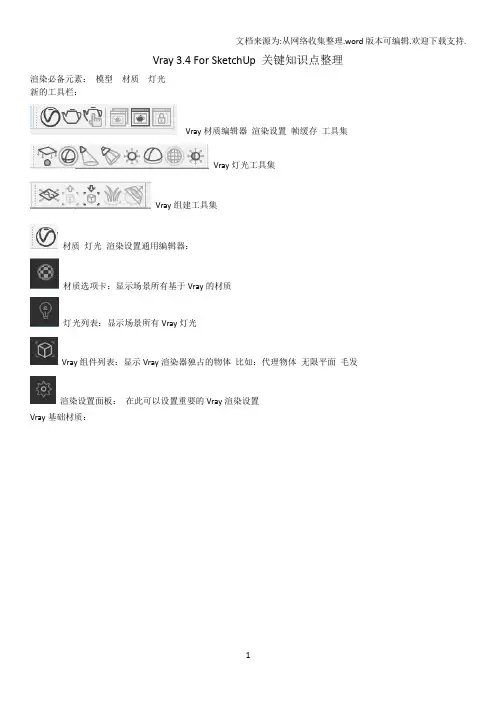
Vray 3.4 For SketchUp 关键知识点整理渲染必备元素:模型材质灯光新的工具栏:Vray材质编辑器渲染设置帧缓存工具集Vray灯光工具集Vray组建工具集材质灯光渲染设置通用编辑器:材质选项卡:显示场景所有基于Vray的材质灯光列表:显示场景所有Vray灯光Vray组件列表:显示Vray渲染器独占的物体比如:代理物体无限平面毛发渲染设置面板:在此可以设置重要的Vray渲染设置Vray基础材质:点击下面新建材质按钮选择Generic 通用材质即为以前的VrayMtl 如下图:强烈建议你调整材质之前将材质名称更改成你期望的右侧的工具栏为Vray材质的详细参数Vray材质预览快速设置选项卡:用快速设置vray材质的常用参数左侧扩展工具为预制材质库里面预制了常用的材质和贴图,强烈推荐直接使用以节省时间。
Vray材质的重点参数:漫反射:材质本身颜色按B打开SU默认的材质窗框直接可以把材质赋予所选面;拾色器可以直接拾取任意颜色作为漫反射颜色;点击在弹出的贴图指定窗口内部在下拉菜单里面找到然后拾取任意图片调整纹理大小:更改可以更改纹理大小;:粗糙度Roughness=0Roughness=1 此参数实际意义不大,增大此参数可以是漫反射受光面到背光处的过度急剧变化。
反射部分::反射强度、当拾色器里面颜色是黑色代表反射是没有的当颜色是白色代表反射最强反射颜色为黑色无反射反射颜色为白色最强菲涅尔反射:模拟现实中一种真实存在的反射衰减一般情况下是勾选上的只有去做不锈钢或者镜子才会把这个钩去掉不勾选菲涅尔反射衰减可以模拟现实中的镜子和不锈钢效果:反射光泽度默认1.0代表完全光滑没有高光点如果这个值越接近1 代表这个物体越光滑反之则越粗糙光泽度为0.9光泽度为0.6注意:光泽度下降也会导致物体反射强度下降锁定菲涅尔反射值到折射率;如果你需要在开启菲涅尔反射衰减的情况下进一步增强反射强度可以去掉此选项菲涅尔反射率:数值越大反射越强此为此为此参数增大会产生非现实效果最大反射深度:默认为5次即可基本已经接近真实反射要求光线反射到最大深度值的时候即将消失时候的颜色默认黑色即可反射影响通道:可以影响颜色或者透明度以及两者全部影响通常不做修改折射部分:折射:颜色也是代表折射强度白色代表完全折射折射率:Index Of Refraction常见物体折射率:水:1.33 玻璃:1.6 默认是玻璃左侧是玻璃右侧是水雾气效果:此处添加颜色可以影响玻璃颜色次数值非常敏感建议不要设置颜色饱和度过高雾气倍增:控制玻璃颜色强度雾气为白色雾气为蓝紫色控制阳光:打开阴影面板开启场景阴影显示;模拟真实太阳光时间;调整太阳光亮度:打开Vray综合设置窗口点击渲染设置按钮找到展开找到曝光数值此数值越大画面越亮反之越暗关闭太阳光方法:点击灯光管理:选择阳光展开右边属性栏:关闭阳光开关这样可以关闭太阳的黄色主光源颜色另外还要关闭天空颜色:点击渲染设置:找到环境面板去掉环境贴图后面的钩选项Vray灯光矩形片灯:点击打开通用设置面板:点击灯光分类控制:选择你创建的灯光来到右侧属性栏为灯光具体参数此特性较2.X版本有较大变化:灯光开关;灯光发射的颜色灯光的功率亮度亮度单位建议默认是否使用纹理颜色进行发射形状调整有矩形和椭圆提供选择是否开启天光入口勾选后可以继承太阳光的颜色强度和亮度重新以此片灯的形状重新投射太阳光常用于室内设计这样可以减少室内噪点不可见选项隐藏发光源非常实用是否双面方向发射光源是否影响漫反射、高光、反射开关;一般情况下渲染玻璃时可以把影响反射关闭以便去掉玻璃物体上的白色光源点保存发光贴图;当你GI一次照明设置为发光贴图时,可将此灯光的发光贴图信息保存为缓存从而加快速度焦散细分精度;控制开启焦散效果后的焦散线质量一般设置为默认因为焦散使用频率比较低是否启用阴影;不要关闭此选项球体光源除了灯光形状不同灯光属性和片灯基本一致聚光灯;SU内部独有的Vray灯光没有发光体积模拟舞台灯效果可以当射灯使用特别的参数:聚光灯属性:锥形开口大小;光圈边缘虚化强度;IES 光域网灯光;模拟自带焦散的射灯效果强烈建议射灯和室内筒灯使用独立属性:IES灯光颜色光域网文件路径IES等亮度点光源;一个没有体积的点光源半球灯;模拟无限大的穹顶照明常用于夜景和IBR照明(图片照明)也可以用于产品表达是否使用贴图照明可以只用网络上的HDR贴图模拟各种不同环境照明效果照明贴图分辨率成图推荐为2048目标和发射光源半径值;可以影像物体阴影虚化强度和细节模型灯光:将SU内部模型转化为发光体此模型必须成组后在转化为发光源交互式调整灯光强度工具;在灯光物体上面长按鼠标左键拖动可以直接交互式调整该灯光亮度Vray渲染设置点击此进入渲染全局设置渲染器总体设置:实时交互式渲染:实时观察渲染结果注意此选项容易造成机器死机不建议使用全局无尽渲染;类似maxwell渲染器非偏差采样方式渲染全局由模糊变为清晰不建议使用此方式你无法观察到图像何时渲染完成显卡加速;仅使用无尽渲染的时候才能开启快速整体渲染质量调整相机设置:不建议更改参数默认即可是否开启景深效果暗角和垂直畸变变形功能渲染输出面板:安全框显示;不被渲染的内容被灰色盖住建模工作时建议关闭3.4版本新加的功能非常实用渲染图像宽度和高度单位是像素以及像素宽高比默认为最常见的16:9 宽屏显示是否在渲染完成之后自动保存图像保存格式建议使用PNG格式环境面板:自定义渲染环境面板默认有Vray天空贴图环境雾气开关;3.4版本新加功能推荐人视角使用覆盖材质;将整个场景赋予一种材质一般用于渲染分析图白模型的时候使用采样精度;控制整个图像质量精度噪点阈值;数值越小质量越高噪点越少但是渲染时间会成倍上升最小最大细分采样;只调整最大值即可Vray会自动采样区间值全局照明面板:默认推荐的两次照明引擎是比较理想的搭配灯光缓存参数;只用调整细分值即可草图预览设置为1000左右成图3500左右AO 灰尘效果产生物体和物体之间的暗部信息关闭效果开启注意物体和地面衔接处暗部细节更多。

一、介绍su坯子库插件的功能和作用su坯子库插件是一款用于在SketchUp软件中进行曲面拉伸和厚度处理的插件。
它可以帮助用户快速、方便地对曲面进行加工和设计,提高设计效率和精度。
二、su坯子库插件的安装和使用方法1. 下载su坯子库插件的安装包,解压文件并将插件文件复制到SketchUp安装目录的插件文件夹中。
2. 打开SketchUp软件,在菜单栏中找到“插件”菜单,点击“加载插件”,选择su坯子库插件文件进行加载。
3. 安装完成后,在SketchUp软件的工具栏中会出现su坯子库插件的图标,用户可以通过点击图标来启动插件。
三、su坯子库插件的主要功能和特点su坯子库插件可以实现以下主要功能:1. 曲面拉伸:用户可以利用su坯子库插件对选定的曲面进行拉伸和变形,实现曲面造型的调整和优化。
2. 厚度处理:插件还可以对曲面进行加厚处理,用户可以自定义加厚的厚度和方式,以达到设计的要求。
3. 参数设置:su坯子库插件提供了丰富的参数设置选项,用户可以根据需要进行调整,并实时预览效果,方便进行精准的设计。
4. 多种曲面形状支持:su坯子库插件支持对各种曲面形状的处理,包括球面、圆柱面、自由曲面等,适用范围广泛。
四、su坯子库插件在设计和建模中的应用案例su坯子库插件适用于建筑、工业设计、产品设计等多个领域,在实际的设计和建模中有着广泛的应用案例:1. 在建筑设计中,su坯子库插件可以帮助设计师对建筑外观的曲面进行调整和加工,实现建筑外观的个性化和优化。
2. 在工业设计中,su坯子库插件可以用于产品表面的设计和加工,实现产品的外观美化和功能优化。
3. 在雕塑和艺术设计中,su坯子库插件可以帮助艺术家对雕塑作品进行曲面处理,保持作品的美观和精致。
五、su坯子库插件的发展和未来展望su坯子库插件作为一款在建模领域具有重要意义的工具,在未来的发展中有着广阔的前景和机遇。
随着设计和建模技术的不断向前发展,su坯子库插件也将不断进行功能和性能的优化升级,以满足用户日益增长的需求。

第四讲:sketchup插件讲解1. 气泡插件:通过闭合的线创建曲面的插件,在操作前要将系统的时间改为2007年。
具体操作:画完一条不在一个平面上的封闭的曲线,选中闭合曲线,点击气泡工具将自动生成曲面,然后根据需要改变网格的密度以及网格的起伏高度。
实例:制作土坡挡土墙2. 封闭面插件:将两个不在同一平面的面封闭起来。
具体操作:画两个不在同一平面的面,选中两个平面,点击封闭面工具自动将两个不在同一平面的面封闭起来3. 曲面编辑插件:工具栏→extrude line →将曲线自动生成曲面曲面编辑插件可以在曲面中任意画直线,曲线,方块,多边形等曲面偏移工具:同偏移工具一样,可以将曲面内的线段进行偏移曲面橡皮工具:能够擦除曲面中的线段,如果用橡皮工具擦除容易产生破面现象4. B ezier曲线插件:用于cad图导入sketchup中或者在sketchup中画一些自由的曲线具体操作:点击插件自由画曲线,在快画完时点击右键(done and switch to edition),然后按F8,用直线将曲线连接起来。
用此插件画完的曲线是一条完整的线,不存在有线段组成的痕迹,常用于做地形等高线。
当cad中pl曲线导入sketchup中时,一条闭合的曲线可能是由多条线段组成的5. 缩放插件:与缩放工具不同的是缩放插件可以随意改变缩放的方向具体操作:当一物体与XYZ轴重合时,其缩放是在物体本身上缩放的,当一物体偏移原点不在XYZ轴上时,其缩放就不会随着物体本身缩放,如果用缩放插件则使偏离原点的物体也可以在其自身上进行缩放,另外,当选取不同方向的线段时,物体的缩放可以随着线段的方向进行缩放。
6. 推拉曲面插件:运用推拉曲面插件,可以自由推拉曲面,它是在垂直方向上的推拉。
7. 工具栏中的插件:工具栏→make face →用于cad导入建模中,将环绕的线生成面工具栏→Hide all unselected →隐藏选中物体以外的东西工具栏→clean up→将3d中的模型导入sketchup中时易有三角面和无用的线出现,用此插件可以简单的将无用的线擦除工具栏→profile builder→用于画踢脚线踢脚线的具体操作:具有放样的功能,在路径里有各种截面,也可以自己创建截面,在画踢脚线时也可以改变X轴Y轴的数值,改变所画踢脚线的位置。
《SketchUp实用教程》教学教案第1章第2章练习2:利用并集工具创建模型如图所示利用【并集】工具,依次选择两个长方体,将其组合成一个模型,用来表示台阶。
第3章练习2:调整车辆尺寸本例利用【卷尺】工具调整卡车的尺寸,使其恢复正常的比例。
为了方便凸显卡车的体积,在车辆旁边放置了一个人物组件。
练习3:利用样式工具查看模型打开配套资源提供的【别墅露台.skp】文件,如图3-118所示,利用样式工具从不同的角度观察模型。
第4章4.5SketchUp组件工具4.5.1删除组件4.5.2锁定与解锁组件4.5.3实例—锁定车辆模型4.5.4编辑组件4.5.5实例—创建吊灯4.5.6实例—替代树木模型4.5.7插入组件4.6案例演练—创建标记管理新增模型4.7提升—在群组中删除模型4.8温故知新—独立编辑桌椅模型小结1、如何在组件模型中独立编辑模型?2、如何在模型中创建标记?3、如何在群组中删除模型?课后练习练习1:案例演练——创建标记管理新增模型本练习将在场景中新增模型后,创建标记管理新增模型,如打开、关闭、移动和删除等,方便用户进行后续的绘图、编辑操作。
练习2:提升练习——在群组中删除模型打开模型后,双击进入编辑群组状态。
选择要删除的模型右击,在弹出的快捷菜单中选择【删除】选项,即可将选中的模型删除,如图所示。
在虚线框外单击退出群组,结束操作。
练习3:温故知新——独立编辑桌椅模型如果不希望编辑组件的结果影响其他模型,则可以将其【设定为唯一】。
选择椅子右击,在弹出的快捷菜单中选择【设定为唯一】选项,双击进入组件的编辑状态执行修改操作,如图所示,操作结果只影响被编辑的椅子。
第5章课后练习练习1:案例演练——添加扶手本练习将使用【线转栏杆】插件,可以在直线的基础上轻松生成栏杆。
定义栏杆的参数,可以将创建结果应用至各种场景。
练习2:提升练习——创建屋顶选择顶面,执行【扩展程序】|【房间屋顶】|【生成屋顶】|【坡屋顶】命令,打开【参数设置】对话框。
SketchUp怎么生成报告
SketchUp是一款非常强大的3D建模软件,它可以用于设计、建筑、
工程、室内设计等领域。
除了可以创建出精美的3D模型之外,SketchUp
还可以生成详细的报告,帮助用户进一步展示和解释设计概念。
下面我将
介绍一下SketchUp如何生成报告。
首先,SketchUp并不直接提供报告生成的功能,但你可以通过一些
插件和工具来实现这个目标。
以下是一些常用的插件和工具:
2. SketchFX: SketchFX是一款SketchUp插件,它可以为你的模型
添加一些艺术化的效果,如水彩画、素描、铅笔线等。
这些效果可以让你
的报告更具艺术感和表现力,并且可以通过调整参数来控制效果的强度。
3. Builder: Builder是一款专门为SketchUp设计的报告生成工具,它可以将你的模型转化为带有文字和图像的专业报告。
你可以在Builder
中创建自定义的模板,并通过填写表单或选择参数来生成相应的报告。
除了上述插件和工具,你还可以使用SketchUp的内置功能来生成报告。
以下是一些技巧和建议:
2. 利用场景和视图: SketchUp可以创建不同的场景和视图,你可以
使用它们来展示不同的设计方案和视角。
在生成报告时,你可以通过在不
同的场景和视图之间切换来展示设计的多个方面。
3. 使用制图工具: SketchUp内置了一些制图工具,如绘图工具、填
充工具和渲染工具。
你可以使用它们来添加符号、颜色和纹理,以增加报
告的可视化效果。
sketch插件(sketch插件)The significance of the SketchUp plug-in needless to say it, a variety of digital modeling, shaped building, rely on the developed tool, without them, you will be modeling these plug-ins, can't do anything, this is like a martial secret, get them, must be ordinary people can not lord it over a district. Say, on the..40 M plug-in package, very complete below is the plug-in function: (a) Windowizer (window plugin) right click menu position > Windowizer > function when we need to open a window or open window weighing scheme in the surface, the window should be some more efficient expression. This plug-in solves this need, lets us select the surface (curved surface) to become the window the function, express express quickly, causes us to save the more time to use in the design elaboration.Two) Bezier curve menu position Draw > Bizier > Bizier Curves function when other software used Bezier curve convenient drawing space curve, @Last is not far behind, the launch of the Bezier curve of the plug-in.(three) Push Pull faces along Z (along the Z axis Hand-Pulled Noodle position right click menu push) > > Push Push Pull Tools Pull faces along Z, the building is generally perpendicular to the ground (horizontal) into the sky, perpendicular to the surface of the operation, we can use the Push Pull tools. But the operation of the slope perpendicular to the ground is not so easy to implement. This plug-in can be implemented conveniently in SketchUp parallel to the Z axis.(four) Push Pull in any direction (Hand-Pulled Noodle push along any direction) right click menu location > > Push PushPull Tools Pull in any direction introduced the function limitations along the Z axis of the push Hand-Pulled Noodle (only along the Z axis) the author introduced along any direction to push Hand-Pulled Noodle plugin, there is no limit in this direction. Flexible application will achieve the general Push can not achieve the effect.(five) Curve Stitcher (curve cover) right click menu location > Line/Curve/Face Toos > Curve Stitcher features a SketchUp problem in the headache is the cover of a space curve, the space curve formed the most stupid (the most common) way is through the curve of the node with the line tool connected into a triangle, then the "Soften/Smooth". But the drawback is that it is too mechanical and time consuming. With this plug-in, we can easily and quickly solve the problem of curve making, so that we have more time to consider the program. But plugins can sometimes be less than satisfactory, and we can work them out flexibly.Face Stitcher (double stapler) right click menu location > Line/Curve/Face Toos > Face Stitcher features sometimes we want the polygon and the circular surface connected to the body, only stupid method to find control points are connected into a closed triangle, we put this plug-in mechanical operation to computer.Seven) Weld Objects (solder knot object) menu location right > Line/Curve/Face Toos > Weld Objects function introduction, sometimes we want to execute the space curve cover line has become a broken line,Such lines produce spatial curves that are not different fromthe ones we use to join triangles. If we want to re - curve the broken line, it is difficult in the existing SketchUp environment. This plug-in solves our difficult problem of breaking a disconnected line into a complete curve by means of a computer. Readers can analyze their source files, and it is not complicated to find ways to implement them.Eight) Rotix Step, 90, random (Plugins> Rotix menu position rotating object) Step, 90, random function is introduced to sometimes rotate 90 degrees to the group or component, is not easy to find the control direction, but can carry out the operation through the switch view. If the reader is not used to switching views to achieve rotation, you can use this plug-in.I think what we need to learn about this plug-in is its keyboard and mouse control.(nine) Helix (spiral) menu position Draw > Helix > Draw Helix function introduction, spiral line in SketchUp is not too easy to achieve, especially the radius of both ends is different. At this point, we can refer to using this plug-in to complete the work at hand, such as drawing a revolving staircase.(ten) Stairs Straight (straight staircase) Menu > Stairs > Stairs position Plugins Straight features simple implementation method of staircase novel, which realize the positioning and material is also worth learning place.(eleven) Stairs Spiral (curve stairs) Plugins / Stairs / Spiral menu Stairs function curve based on the curve of the plug-in node stairs, according to the parallel and perpendicular to the horizontal plane that automatic drawing step width (horizontalprojection distance of two nodes) and high (vertical projection distance of two nodes). Analysis of the principle, we can according to their own needs, modify the number of nodes of the curve to draw.(twelve) [TBD] Desel (TBD select tool) menu location right > [TBD] Desel >Thirteen) Circle Slopes 1 (circular slope) Plugins > Circle Slopes 1.04 menu features sometimes plotted in Figure ramp, implementation method of mobile surface in SketchUp, it will pull the surface deformation. With traditional methods, complex models take at least more than 10 minutes or more. With this plug-in, you can make the surface of the slope very smooth in the shortest possible time.(fourteen) Cab (cabinet) menu position Plugins > Cab introduction this plug-in fusion point line surface and material, method of using Ruby to achieve accurate and complete object, analyzing the principle which readers are interested in, then the realization method of analogy.(fifteen) Lines/curves to walls (line / curve change wall) menu right position > Line/Curve/Face Toos > Lines/Curves to walls function introduce traditional painting wall method, I don't say everyone is clear about its steps. This plugin is somewhat like the command of the axis wall in the day, but this command is three-dimensional modeling in SketchUp.Sixteen) Screw 2.1 (around Z axis rotation body position of Plugins / Screw) menu function is introduced at first, somewhat similar to the Front along the Z axis rotating object principle (front view) in Follow Me (Loft) painting section, and then use the Polygon tool to draw out path (polygon) in the top view, setting out and the formation of Soften/Smooth the operation can control the number of Polygon (Steps). But the lofting can not be on the line, so the source code is not implemented by this method, but by calculating the vector points of the line segment to calculate. Therefore, the plug-in is not supported on the opposite side and operates only on the line or line plus components, so that the components can be rotated in a certain degree. Among them, the use of multiple parameters API example, is also worth learning a good tutorial. It is worth noting that the result is the Soften/Smooth parameter is too high, so we can three hit the mouse, select the object, then adjust its parameters in reverse.(seventeen) Helicoidal Ramp 1 (production ramp two curve surface) right click menu location > Line/Curve/Face Toos > Helicoidal Ramp function is introduced due to the limitation of the production of circular slope, this plug-in is more flexible. You can only select two curves, and then enter the maximum length (Height) and the minimum length (Low), you can generate ramp.(eighteen) Export model to POV-Ray (output model to POV-Ray software), Plugins Export model to Menu > POV-Ray features I personally appreciate the author, because such plug-ins are generally the authors the development of this software, but D.B POV-Ray users. Rendering should be a weakness for SketchUp, andfor existing versions that support daylight only SketchUp, we can only output it as a generic 3DS format, ATL (Artlantis format), and render it to other software. However, this approach seems difficult for, which uses open source rendering software, POV-Ray, which has a long history and a wide spectrum of open source features. Thus, the output to the POV-Ray plug-in accordingly produced. The plug-in converts the model and material information in SketchUp to the scene description language in POV-Ray through programming language, and gives a procedural rendering model. With the lights of plug-in components, such as: the point light source(su2pov_pointlight), poly (su2pov_spotlight) and the area of light (su2pov_arealight), light (su2pov_sun) and other components, including 3D tree pictures, SketchUp material files and English help file, the reader can from the CD with the book (SketchUp Plug-ins > Ruby Plug-ins > SketchUp 4 To POV-Ray directory) to find the corresponding content. The plug-in's approach to converting Pov scene information to SketchUp is also worth learning.(nineteen) Create, 3DTopo, from, Contour (using contour lines to create terrain), menu locations, Plugins > Create, 3DTopo, from, Contour functions, terrain modeling is also difficult to implement in SketchUp 4. SketchUp 5 has a powerful plug-in tool for Sandbox. Use this plug-in in SketchUp 4,The Surge (special terrain software), SketchUp AutoCAD mapping contour input or the establishment of contour in SketchUp, you can use this plug-in to automatically generate terrain, of course is a more accurate method in other software to create good terrain, import SketchUp.(twenty) Extend, Trim (extension, trim line) right click menu location > > Extend / Trim function used AutoCAD extension, trim, SketchUp in the use of two-dimensional operation, always feel unsatisfactory. Because the line segment extends only to move its vertices to another line with the Move command, the clipping also uses only the line segment to describe its intersections and removes unnecessary parts. The emergence of this plug-in, although not flexible AutoCAD commands, but at least make up for this defect for us.(twenty-one) Delete lonely Edges (eliminate independent line segments) and Delete Coplanar Edges (delete redundant edges) function of the AutoCAD model import and sometimes separate surface in SketchUp on the line there is no excess too much time to clean up, only use the Soften command to stealth. But this will increase the number of edges and the number of faces in the model (increasing the amount of information in the model). Using this plug-in can eliminate this security risk and reduce the burden for SketchUp.(twenty-two) Hide All Unselected (hide unselected objects) right click menu location > Hide All Unselected features SketchUp provides a choice for us to hide the object of convenient observation and operation, for no choice there is no way to directly hidden objects. Sometimes we can use Todd's reverse selection plugin to reverse the selection and then hide it later. Tips: select, or Shift click no hidden objects, and then execute the hide command. However, you should thank Todd for using this plug-in to allow you to use more simple methods to hide objects that are not selected.(twenty-three) Windows (Windows) menu position Draw > Windows function is introduced in SketchUp without modification of the concept of process modification objects is built of objects, because it is in the same order. This plugin is to modify the beginning of at least I thought the concept of the equivalent of Lizheng building, the doors and windows for the same style change. In SketchUp, you can also create and swap styles for windows and doors, which play a leading role in the flexible replacement of windows and doors style sets later. This method and the skills similar to AutoCAD multiple replication are also worth learning.(twenty-four) Shapes (geometry) menu position Draw > Shapes features we can create the geometry with the most simple method (Box, Cylinder, Cone, Torus, Tube, Prism, Pyramid and Dome), if the method of creating geometry @Last in earlier versions directly to you when the max is similar to 3DS now, reflect the flexibility of SketchUp skills will be greatly reduced. The three-dimensional world was originally simple, but a combination of dots, lines, and planes. It was the basic and flexible application that made up the rich and colorful 3D world,Add light to the object to disintegrate, forming a color and adding luster to the world. SketchUp let us find the essence of things, so use it to feel particularly flexible.(twenty-five) Label Stray Lines (Mark thread) position Plugins> Label Stray Lines menu function of the reasons for introducing 2D AutoCAD graphics can not only cover the line isnot closed, if you try to cover not distress after using this plugin you will appreciate it bring comfort, because it can not find the end closure line for you. Although it generates too many numbers, you can use the following plug-ins to separate the annotation layer from the object and eventually delete the numbers on the text layer.(twenty-six) Dispatch Objects (object Plugins> Dispatch Objects hierarchical menu) location function is introduced in the AutoCAD if you tried without words, lines and other consequences of the consequences after stratification (after only one by one of these objects to be placed to create a layer), will regret committed no good management object error. You might even do this in the SketchUp before the plug-in came into existence (as the group and component capabilities plus the layer are really similar to the AutoCAD layer management). Unfortunately, there is no regret medicine; although it says, but this plugin gives us a kind of regret after remedial measures: text, annotation, profile, auxiliary line (point), so you have a choice of each category, into their own space (layer), so that you can be very convenient to the different objects to hide or delete.(twenty-seven) Layer Manager (layer management) Tools > Layer manager > menu features a simple layer manager (non image), here you can layer management simple operation, such as: all the layer is visible or not visible, the conversion layer, isolation layer or the current selection set and save or display or open layer configuration. The plug-in uses Ruby to express the concept of the layer, and the flexible skills in the RB file are worth learning.(twenty-eight) Create Geodesic (create a polyhedron) menu position Draw>Geodesic can introduce AITOP has introduced a create 32 surface body posts, readers may refer to the method of production, and then used to create surface by combining Ruby algorithm to achieve the plugin to create, for comparison, can reflect the @Last two development the charm of SketchUp.(twenty-nine) Apply Definition (Convert to, brush assembly format) xLines (converted to auxiliary line) position (1) right click Menu > > Component Definitions (2) Convert to xLines right click > 1) used AutoCAD+ Tengen 6 format in brush function, the most satisfying is to put different objects of doors and windows brush into an object of the same type. This plug-in is similar to this feature, which can transform two different two components into the same specified component, which brings convenience to our modification. (2) in the actual modeling process,Sometimes, the auxiliary lines are drawn in straight lines (lines with auxiliary modeling can be called auxiliary lines). The drawback of a line as an auxiliary line is that it is not easy to remove (the model is large and the number of auxiliary lines is large), and if you develop good habits, the plug-in is convenient and fast. Convert the line to a SketchUp auxiliary line, not an infinite line. The plug-in automatically creates a secondary point at the node's location.(thirty) Film & Stage Plug-in (Film & stage plug-in) Camera / Create Camera menu (Look Through Camer, Show All, Select Camera Type) function of the movie camera animation simulation stage,and can provide a real film camera type and stage, each with computer animation staff engaged in the pursuit of the. SketchUp introduced the purpose of this plugin is to imitate the reality of the shooting should be similar to the film and stage effect camera type, by controlling the height of the camera and various types of movie screen (with a variety of camera components simulation in the model), and the effects of various kinds of aerial camera camera switching control in real time, combined with the page. The output video animation tools, achieve flawless.(thirty-one) Add pages orthographically (linear menu page) View > Add pages position orthographically features using Page animation or sometimes browse a page animation to extend the time, need to increase the number of pages. For example: from far and near into the animation, and the increase is very difficult. This plugin makes it easy for us to add a lot of consistent linear animation to a page. Just set a few control parameters for this.(thirty-two) [CASF] Fun Shapes (fun graphics) Menu > [CASF] Shapes > Fun Plugins features some very interesting graphics, at least from here we can see the image function by using some mathematical algorithm combined with Ruby to create a powerful. This plug-in is designed to give you an overview of how it was created and how it was created.(thirty-three) Control Model (control model) Plugins > Control Model > menu position function introduced in the management method of SketchUp should belong to the most convenient group (component) and layer, if we can make full use of group(component) and layer, we can make the model structured orderly. Transferring to other software for rendering is also very convenient. But what should I do if I forget grouping (components) and layering? Without this plugin, we would have used the stupidest (most commonly used) method to select different types of objects, re grouping (components), and layering. Now with this plugin, you can safely model without worrying about grouping (components) and layering.(thirty-four) the Mirror (mirror) menu position, right-click > Mirror function, the habit of the mirror tool in AutoCAD, will feel comfortable with its fast. After you use this plug-in, you may be less accustomed to the mirror image of space. Because this plugin allows you to view objects at one, two, three, and for reference.Plug-ins include groups and groups (not including components and components in a group, or groups in a component).(thirty-five) Page output, input menu location View > Page > function introduction, sometimes we have done a few programs, in SketchUp, each file in the same coordinate position. But in SketchUp, it's not easy to set the same camera angle (Page page), and this plugin solves this problem. It can export Page from this file to a file, or import many of the files that have been exported. Very fast, let us compare the same view, or export animation.(thirty-six) Show All Entities (show all entities) Plugins > Show All > menu location features we sometimes operate in SketchUp hidden in SketchUp group or component entities in theimperceptibly, when exiting the group or component, then Edit > Unhide > All life will find the hidden entities will not show it. The only way to do this is to go back into the group or component of the hidden object and display it with the Unhide command. This plug-in solves this problem by executing all hidden entities (including entities hidden in a group or component) at once.Thirty-seven) Copy, along, Path (copy along path), menu location, Plugins > Copy, along, Path > function introduction, everyone uses array tools, and the only thing that feels inadequate is that you can't make arrays along the curves. This plug-in solves this problem.。
SU种树秒杀Lumion?没有这两款插件,想都别想!(附su植物神器)⽂末附两款SU三维植物渲染插件由于su种树太丑就只好使⽤lumion但是电脑跑不动我们的⽇常就是⼀边种树⼀边疯狂地想砸电脑贫穷勤俭节约的我们就只能够卡顿和丑当中抉择吗?当然是不!有了这两款su植物神器让你⽤su做出lumion的效果看到这些效果图是不是觉得不像是su制作的呢这就是这两款su植物插件的厉害之处接下来就让⼩编为⼤家介绍这两款su插件吧01LaubwerkPlantsKitFreebieSU树⽊插件这是来⾃德国的⼀款三维植物神器适⽤于SketchUp的3ds Max,Maya,Cinema 4D,Houdini和SketchUp以及V-Ray的全功能演⽰⽽且使⽤直接⽣成代理⽂件。
树⽊简化树可以简化成⼀个简单的图块防⽌⽂件太⼤su卡死还可以可以配合skatter插件迅速散布树⽊⾃定义插件内的每⼀棵树,都可以⾃定义3种形态,3种树龄和4种季节⾃定义密度不仅如此甚⾄连叶⼦的⼤⼩,疏密程度等都可以⾃定义023darcstudiotree植物⽣成器(中⽂版)这是su平台上的树⽊植物⽣成插件可以⽣成多种类型的树⽊既可⼀键⽣成随机树⽊也可以通过多种参数对树⽊进⾏调整操作⾮常简单点击⼏下即可创建三维树⽊并把它们添加到你的模型场景中有多种预设好的树和植物模板可直接选择有了这两款su植物神器就可以向在lumion中种树的痛苦时光say bye了限SU2014⾄su2018。