ACD4最新操作与调试手册
- 格式:pdf
- 大小:3.87 MB
- 文档页数:82

AUTOCHIEF4(MANBW版本)中文操作说明-需要的拿走前言本文是为首次使用AUTOCHIEF4的使用者提供的初级版本,同时提供了和AUTOCHIEF4远程控制系统用于B&W MC engines (AC/4B&W)一样关于NORCONTROL自动装置的一般应用信息,也提供了安装,试车,操作和维护AUTOCHIEF4系统的程序。
本文描叙AC4 远程控制系统的不同应用,它的一些基本的设计和操作。
提供所有的必要正常操作信息。
安装:提供足够的信息安装AC4系统,以及不同应用的连接线路。
试车:安装后,提供足够的资料使AC4完全运行。
维护:提供所有的必要定期检修的资料以使整体保持良好的工作条件,包括故障检测信息。
替换部件:提供一个主要的替换部分单子。
基本介绍目录1.1绪论1.2系统结构/配置1.3功能说明书1.3.1基本功能1.3.21.1绪论(AC/MAN B&W)是为控制MAN B&W低速推进装置设计的,有固定的推进器。
这个系统得到很多权威部门的认证,MAN B&W 柴油机已经把它作为标准的装置。
AC4适合最新的微处理器技术,其硬件和软件都以挪康的统一自动化概念为基础。
1.2系统结构AUTOCHIEF4远程控制系统的B&W版本的结构如下图:车钟手柄连接操纵和车钟手柄,连接远程控制系统的手柄内有一个电位计和限制开关,用于正车和倒车用。
车钟系统描叙在一个单独的文档中,只有在AC4用于液压调速器中时才传递速度设置单元,当数字调速器系统DGS-800运行时,速度设置单元将被终止运行。
1.3 功能说明1.3.1 基本功能1.3.1.1 禁止运行当呈现一个或多个下面的状态时,自动启动主机将被禁止运行1)启动空气压力低 2)RPM检波器失效3)引擎关闭4)燃油没消耗完5)未连接调节器6)启动空气阀阻塞7)启动空气分配器堵塞8)旋转齿轮啮合9)辅助设备没有准备好。
GECB板LED灯说明序号名称说明1 INS 检修状态下灯亮,闪烁为TCI-Lock2 DW 厅门锁通时灯亮3 ES 安全回路通时灯灭4 NOR 电梯在正常状态下灯亮板输入状态代号esDWDFCSETCI<M><1>1><1><2><GOON>检查参数检修系统参数(SYSTEM PARAMETERS调整参数称范围设定1-31LOBBY 0-31 0BOTTOM 0-31 0<1> <1><3><1>检修检查参数司机模式消防员类型(设“检修<1><1><3><4> <GO ON>检查参数楼层使能参数设定CUDE PR0000 000000 000000 00<M><1><1><3><3><1> 检查参数称地址位置:操纵厢05-107-1轿顶检修按钮07-2<M><1><1><3><2>检查参数安装参数(SETUP PARAMETERS <2><3>检修16)PARAMETERS)的设置需要的最短长度,建议在此基础上增加检修正常<2><4><1><GOON><1><打检修><ENTER><ENTER>……<GOON>井道自学习完成检修正常<1><1><3> <GOON><5><ENTER><GOON><GOON><GOON><GOON>准备正常运行检修正常<1>><1><1>描述参考值1 2 3 4 5 6<1><1><2><1> <GO ON>检查参数class reasontotal number of runs since last power onminutes since last power onNo CAN connection to the SPBOCSS is not available dueThe elevator is performing a park run for moreEQAR start was not permitted by drive for 60Drive stuck in ReadyToRun(NoAbl)The drive package has been powered onES Safety chain wiring fault (PES not wired inexpectationPLS1 input has been activatedDW or DFC was not low during the last door cycle, thatGSM input error Rear doorFor Compass, the primary GCB has failed andSafety Operated Switch Up triggeredThe BCB published a task timing problem.ARO were initialized<2><2><1> <GO ON>ACD-4系统采用五点式称重,分别为10%、30%、50%、满载、超载(实物如上图)。
Gen2 Core with ACD4 MR调试手册Contents1.要求 (4)2.初步检查 (4)2.1安全测试 (4)2.2检查电缆的防护连接 (4)2.3绝缘电阻检查 (5)2.4电压检查 (6)2.5GECB-AP板上的发光二极管检查 (7)2.6CSPB发光二极管检查 (8)3.检修运行 (9)3.1参数检查 (9)3.2编码器调整=LRT (锁定转子试验) (11)3.3轿厢运行方向检查 (12)4.准备第一次正常运行 (13)4.1DSBD的位置(连接4T 和5T) (14)4.2检查井道信号(有RLEV/ADO) (15)4.3检查井道信号(没有RLEV/ADO) (16)4.4启动NAPA CLASSIC DOOR (17)4.5自学习运行 (30)4.6DCS-Door 检查步骤 (33)楼层分配 (33)4.7负载称重调整(LW11) (35)5.最后的调整 (36)5.1平层调整 (36)5.2减少启动震动和倒溜 (37)5.3检查ADO 和RLV (选项) (38)5.4位置指示设置 (39)5.5安全测试(继电器粘连试验) (40)5.6移交测试(Turnover) (42)6.特殊功能设置: (43)6.1钢带检测装置设置 (43)6.2设置再生能量指示灯 (43)7.故障处理 (44)8.参考文献 (44)9.附录 (45)1. 要求Gen2 Core电梯的调试工作必须由经过培训的专业持证人员进行井道调试安装工作(以及依照WWJSSS的无脚手架安装工作) 。
2. 初步检查1: 安装必须达到能够安全运行的水平2: 必须认真执行WWJSSS要求的锁闭程序2.1 安全测试保证主开关关闭,转换到ERO 状态.测量控制柜(TB2)中L1, L2 和L3之间的线电压,应该测量无电压。
检查DSBD 跨接线(连接4T 与6T)2.2 检查电缆的防护连接首先,检查CAN总线,以确保正确连接电缆两端的屏蔽层,确保控制柜侧的屏蔽层排扰线连接到PE汇流排中。

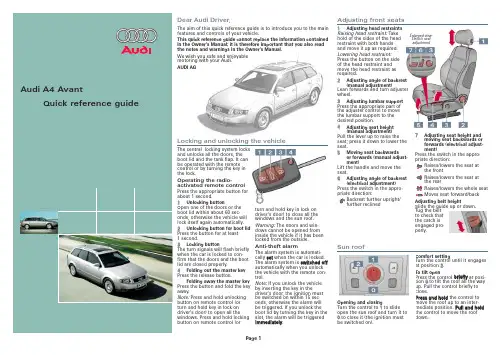
Dear Audi Driver,The aim of this quick reference guide is to introduce you to the main features and controls of your vehicle.This quick reference guide cannot replace the information contained in the Owner's Manual; it is therefore important that you also read the notes and warnings in the Owner's Manual.We wish you safe and enjoyablemotoring with your Audi.AUDI AGThe central locking system locksand unlocks all the doors, theboot lid and the tank flap. It canbe operated with the remotecontrol or by turning the key inthe lock.Operating the radio-activated remote controlPress the appropriate button forabout 1 second.1Unlocking buttonOpen one of the doors or the boot lid within about 60 sec-onds, otherwise the vehicle will lock itself again automatically.2Unlocking button for boot lid Press the button for at least1 second.3Locking buttonThe turn signals will flash briefly when the car is locked to con-firm that the doors and the boot lid are closed properly.4Folding out the master key Press the release button.Folding away the master key Press the button and fold the key away.Note: Press and hold unlocking button on remote control (orturn and hold key in lock on driver’s door) to open all the windows. Press and hold locking button on remote control (or turn and hold key in lock on driver’s door) to close all the windows and the sun roof. Warning: The doors and win-dows cannot be opened from inside the vehicle if it has been locked from the outside.Anti-theft alarmThe alarm system is automati-cally s e t when the car is locked. The alarm system is s s w i t c h e d o f f automatically when you unlock the vehicle with the remote con-trol.Note: If you unlock the vehicle by inserting the key in the driver’s door, the ignition must be switched on within 15 sec-onds, otherwise the alarm will be triggered. If you unlock the boot lid by turning the key in the slot, the alarm will be triggered i m m e d i a t e l y.Locking and unlocking the vehicle7Adjusting seat height andmoving seat backwards orforwards (electrical adjust-ment)Press the switch in the appro-priate direction:Raises/lowers the seat atthe frontRaises/lowers the seat atthe rearRaises/lowers the whole seatAdjusting belt heightSlide the guide up ordown.Tug the beltto check thatthe catch isengaged pro-perly.Adjusting front seatsEnlarged view:Electric seatadjustment1Adjusting head restraintsRaising head restraint: Takehold of the sides of the headrestraint with both handsand move it up as required.Lowering head restraint:Press the button on the sideof the head restraint andmove the head restraint asrequired.2Adjusting angle of backrest(manual adjustment)Lean forwards and turn adjusterwheel.3Adjusting lumbar supportPress the appropriate part ofthe adjuster control to movethe lumbar support to thedesired position.4Adjusting seat height(manual adjustment)Pull the lever up to raise theseat; press it down to lower theseat.5Moving seat backwardsor forwards (manual adjust-ment)Lift the handle and move theseat.6Adjusting angle of backrest(electrical adjustment)Press the switch in the appro-priate direction:Backrest further upright/further reclined1Coolant temperature gauge2Rev counter3Warning and indicatorlampsFault in engine management system 1)Airbag system 1)Electronic immobilizer Cruise control system Trailer turn signalsAnti-lock brake system 1)Seat belt reminder Turn signals,hazard warning lightsElectronic stability program (ESP)Alternator 1)Main beam headlights Side lights/headlights Engine management 1)or Glow plugs(on diesel models)1)Fault in brake system or handbrake engaged 4Speedometer 5Fuel gauge6Adjuster buttons for:•Digital clock and dateKeep pressing the MODE button until the display flashes. Press the ”-” and ”+”buttons to set.•Instrument lightingPress the ”-” and ”+” buttons to regulate the brightness of the lighting.7Digital clock and date 8Driver information sys-tem display•Warning symbols andauto-check control No faults detected Fault in brake system Fault in cooling systemIf one of the red symbols lights up while you are driving, stop the car, switch off the engine and refer to the Owner's Manual.Fuel level lowCheck engine oil level Engine oil sensor faulty 1)Brake pads worn 1)Speed warning 1 or 2 (km/h or mph)Dynamic headlight range control faulty 1)Washer fluid level lowBattery voltage too high or too low 1)Bulb failure 1)Door or boot lid openK u r z a n l e i t u n g A u d i A 4 A v a n t e n g l i s c h 5.02231.562.677.2010Check button•To activate mileage recorderdisplay and clockPress the button when the igni-tion is switched off.•To start auto-checkprocedurePress the button with the igni-tion switched on and the vehicle stationary.•To call up driver information Press the button briefly if a red symbol lights up or if the bulb monitor detects a bulb failure.•To set speed warning 1Press the button briefly when the desired speed is reached. To can-cel the speed warning, press the button for at least one second while the vehicle is moving.11Service indicatorbuttonPress the button briefly with the ignition switched on and the vehicle stationary.12Reset button for triprecorder1)If one of these warning symbols lights up while you are driving,please take the vehicle to an Audi workshop straightaway.© 2002 AUDI AGAUDI AG reserves the right to alter any part of the vehicle, its equipment and technical specifications. No legal commitment can be implied by the information, illustrations or descriptions in this publication. No part of this publication may be reprinted, reproduced or translated without the written permission of AUDI AG. All rights under the laws of copyright are expressly reserved by AUDI AG. Subject to change. Printed in Germany. Concept and layout:Pfriemer Kataloge GmbH.Instruments and warning/indicator lamps•Radio/telephone information •Outside temperature•On-board computer (with 2 separate memories)Fuel range Driving timeAverage fuel consumption Average speedInstantaneous fuel consumption •Navigation/telematicsinformation •Selector lever position(on vehicles with automatic gearbox)•Service indicatorShortly before a service is due,the display will briefly show theword ss e r v i c e !, together with the number of miles/km until the service is due.9Mileage recorder Top display: trip recorderBottom display: total mileage SafetySeat belts must be worn on every journey, even on short trips in town. This applies to the front and rear seats. To ensure that the seat belts, belt tensio-ners and airbags are fully effec-tive, note the following points: Children under 12 should travel on the rear seat. They must beprotected by a child restraint system which complies with the European standard ECE R 44 and is suitable for the child’s weight and height. The safest place for the child restraint system is behind the front passenger ’s seat. Make sure that the system is properly secured. The retractor mechanism of the seat belts can be locked to secure a child safety seat.Please observe the notes in the Audi Owner ’s Manual and refer to the manufacturer's instruc-tions for the child seat.Category 0 or 0+: For babies up to about 9 months/10 kg and infants up to about 18 months/13 kg.Category 1: For small children up to about 4 years of age/18 kg.Category 2: For children up to about 7 years/25 kg.Category 3: Children over 7 years of age but less than 1.5 metres tall are best protected by a booster cushion in conjunction with the three-point seat belt.Adjust seat and sit in correct positionThe front seats should not be positioned too close to the steer-ing wheel or dashboard. Main-tain a distance of at least 25 cm from the steering wheel. It is im-portant to sit in a normal, up-right position and set the back-rest so it is fully against your back. The top of the headrestraint should be at eye level (or higher). Put your feet in a comfortable position in the foot-well.Wear the seat belt correctlyMake sure that the shoulder section of the belt is positioned over the centre of the shoulder,and move the lap section as far down over the hips as possible.The belts should always be worn so that they fit tightly (see illus-tration).Safety of children in the vehicleCategory 1Category 2Category 0Filling the tankOpening the tank flapOpen the flap, unscrew the tank cap by turning anti-clockwise and hook onto the flap (see illustration).Sticker for:1Fuel gradeNote:The sticker listing the tyre pressures is located on the passenger ’s door pillar.Overview1Electric windowsPress or lift the switch as far as the f f i r s t s t o p and hold it until the window has moved to the desired position.”O n e-t o u c h”f u n c t i o nPress or lift the switch as far as the s s e c o n d s t o p; the window will automatically open or close all the way.Note: You can use the s s a f e t ys w i t c h to disable the window switches in the rear doors.2Electric adjustment forexterior mirrorsSelector knob:Left exterior mirrorI OffRight exterior mirrorRetract both exterior mirrorsPress the adjuster to move themirror surface in the desireddirection. The mirrors are heatedwhen the ignition is on.3Door handle4Central locking switchPress the appropriate side ofthe switch to lock or unlock thevehicle centrally from the inside:n l o c k e dl o c k e d5Air outlets withthumbwheels6Light switchLights offSide lightsMain or dipped beamheadlightsTurn switch to dipped beamposition. Then pull out to1s t s t o p:Front fog lights2n d s t o p:Front fog lightsandRear fog light7Headlight rangecontrolPress the knob lightly and turnto the required setting:0Front seats occupied1All seats occupied2All seats occupied, luggagecompartment loaded3Driver only, luggagecompartment loaded8Light switch; turnsignal and headlightdip lever1Right turn signals(With ignition off:right parking light on)2Left turn signals(With ignition off:left parking light on)3Main beam headlights4Headlight flasher9Instruments and warn-ing/indicator lamps See also overleaf.11Windscreen wiperand washer leverWindscreen:0Off1Brief wipe2Intermittent wipeMove control A A to alter the wiperintervals.3Slow wiper speed4Fast wiper speed5Automatic wash and wipePull lever towards you and hold.Rear window:6Intermittent wipePress lever towards dashboard.7Automatic wash and wipePress lever as far as it will gotowards dashboard and hold.Function selector switchfor on-board computerPress the top or bottom of rockerswitch B B to show the various dis-plays in turn. Press and hold but-ton C C to reset display to zero.Function selector fordisplay modesPress button C C repeatedly toselect the following displays:on-board computer(single jour-ney memory and total journeymemory), navigation system andtelematics, or to switch thedisplay off.13Switch for ESP(electronic stabilityprogram)12Ignition lock15Switch for hazardwarning lights14Switch for acousticparking aidThe parking aid is automaticallyactivated when reverse gear isengaged. Press the switch toactivate the parking aid manu-ally if you are driving forwardsinto a tight space.16Cup holderPress the symbol to use the cupholder.17Radio or navigationsystem18Lockable glove box19Air conditionercontrolsTemperature selectionfor left and right sides ofvehicle(buttons on left and right)Blower speed(buttons in centre)Automatic modeS t a n d a r d s e t t i n g f o r a l l s e a s o n s:Select a temperature between18 °C and 29 °C and switch theautomatic mode on.23Thumbwheel forseat heating (frontleft seat) and steer-ing wheel heating21Switch for rearwindow heater20Thumbwheel forseat heating (frontright seat)22Switch for defrostingwindscreen24Gear lever/selector leverSelector lever positions onvehicles with automatic gearboxP-Parking lockR-Reverse gearN-NeutralD-DriveS-Sport(not on vehicles with Multi-tronic)To move the selector lever out ofposition P P or N, or into positionP or R, press the interlock buttonon the selector lever handle andthe brake pedal simultaneously.Note: Use the foot brake to holdthe vehicle when stationary withthe engine running (in all selec-tor lever positions other than P P).Warning: Do not move the selec-tor lever to positions P P or Rwhen the vehicle is moving.Manual gear selection (Tiptronic)The Tiptronic program enablesyou to change gear manually.To do this, move the selectorlever out of position D D into theTiptronic gate on the right. Pressthe selector lever forwardsbriefly to shift up a gear, or pushthe lever back to shift down agear.26Cigarette lighter/electrical socket28Handbrake29Compartment forService Wallet30Lever for adjustablesteering columnPull lever down and adjust theposition of the steering columnas required. Then push the leverback up as far as it will go.25AshtrayPress front of ashtray to open.27Storage compart-ment or controls for:Driver information systemmenusTo call up the main menu, pressthe MENU button when thevehicle is stationary. Turn thepushbutton to move the selectorarrow to the option you wish toselect, and press the pushbut-ton to confirm. This activatesthe submenu. Proceed by turn-ing and pressing the pushbuttonuntil the required function hasbeen performed.Navigation system or telematicPlease refer to the Operatinginstructions.31Switching on:33Switches in driver’sdoor compartmentThis switch deactivates theinterior monitor for the anti-theft alarm system.Deactivating the tow-awaymonitor10Horn。
ProDesk-4™使用指南目录一、ProDesk-4™单声道输入通道的控制部分·······························1-41.单声道输入通道前置放大控制部分 (1)2.道输入通道均衡控制部分 (2)3.单声道输入辅助发送控制部分 (3)4.单声道输入哑音、独奏、音量和输入信号分配控制部分 (4)二、ProDesk-4™立体声输入通道的控制部分·······························5-81.立体声信号输入源选择控制部分 (5)2.立体声输入均衡控制部分 (6)3.立体声通道输入信号的辅助发送控制部分 (7)4.立体声输入通道信号分配控制部分 (8)三、ProDesk-4™矩阵输出控制部分 (9)四、ProDesk-4™辅助输出控制部分 (10)五、roDesk-4™编组输出控制部分 (11)六、ProDesk-4™主输出控制部分 (12)七、ProDesk-4™立体声节目输入控制部分 (13)八、ProDesk-4™立体声录音输出控制部分 (14)九、ProDesk-4™监听输出控制部分 (15)十、ProDesk-4™独奏的控制和监听 (16)十一、ProDesk-4™对讲系统控制部分 (17)十二、ProDesk-4™后面板的接口部分·····································18-211.单声道输入连接器部分 (18)2.立体声输入接口部分 (19)3.辅助、编组、矩阵、主输出的后面板接口 (20)4.立体声PGM输入和立体声录音输出的后面板连接接口 (21)APB-DynaSonics' ProDesk-4™紧凑型扩声调音台,它优质的专业音频特性继承了APB公司Spectra 系列调音台专业的特点。


奥的斯ACD4操作与调试首先,在使用奥的斯ACD4之前,需要首先了解它的基本组成部分。
奥的斯ACD4由主机、调试面板、信号源、测试设备和控制软件等组成。
其中,主机是整个系统的核心部分,负责控制和调试过程的执行;调试面板用于输入和输出信号;信号源用于产生测试信号;测试设备用于接收和分析测试信号;控制软件用于配置调试参数和监控调试过程。
接下来,我们将详细介绍奥的斯ACD4的操作和调试步骤。
第一步,连接硬件设备。
将主机、调试面板、信号源和测试设备依次连接好,并确保连接稳定。
第二步,安装并打开控制软件。
将控制软件安装在电脑上,并打开软件。
在软件中选择相应的设备,并进行连接。
第三步,设置测试参数。
在软件中选择需要测试的设备和信号源,然后设置测试参数,如输出电流、电压、频率等。
这些参数将根据实际需求进行设置。
第四步,开始调试。
在软件中点击“启动调试”按钮,系统将开始执行调试程序。
在调试过程中可以实时监控设备的各种参数,并根据需要进行调整。
第五步,分析测试结果。
在调试完成后,可以通过软件中的分析工具对测试结果进行分析和处理。
可以查看波形图、频谱图、数据表等,以评估设备的性能。
第六步,针对问题进行优化。
如果在调试过程中发现问题,可以通过软件中的优化工具对设备进行优化。
可以调整参数、修改电路等,以改善设备的性能。
第七步,保存和导出数据。
在调试完成后,可以将测试数据保存在本地或导出成文件。
这些数据可以用于日后的分析和比对。
最后,对于初次使用奥的斯ACD4的用户,建议参考官方提供的用户手册和教程,以更好地理解和掌握系统的使用方法。
此外,也可以参加相关培训课程或请专业工程师进行指导,以提高操作和调试的效果。
总结起来,奥的斯ACD4的操作和调试方法主要包括连接硬件设备、安装控制软件、设置测试参数、启动调试、分析测试结果、优化设备性能、保存和导出数据等步骤。
通过熟练掌握这些方法,可以实现对各种电气设备的高效操作和准确调试。
D4用户手册目录声明 (5)声明/担保与赔偿 (5)安全操作概要 (5)安装安全概要 (6)第一章产品简介 (7)1.1随附配件 (7)1.2产品概述 (8)1.2.1前面板 (9)1.2.2后面板 (11)1.2.3外形尺寸图 (12)第2章产品安装 (13)2.1插入信号源 (13)2.2插入电源 (13)2.3设备上电 (13)第3章产品使用 (14)3.1使用菜单键 (14)3.2菜单结构 (14)3.3使用菜单 (15)3.3.1输出设置 (15)3.3.2输入设置 (20)3.3.4测试模版 (22)3.3.5保存&调保存 (22)3.3.6系统设置 (23)3.3.7工厂复位 (26)3.3.8技术支持 (26)3.4使用快捷按键 (27)3.4.1Scale缩放键 (27)3.4.2PIP画中画按键 (28)3.4.3DIMMER透明度键 (28)3.4.4HDR键..........................................................................错误!未定义书签。
第4章订购编码 (30)4.1产品 (30)4.2选配模块 (30)4.2.1输入模块 (30)4.2.2输出模块 (30)第5章技术支持 (31)5.1联系我们 (31)第6章附录 (32)6.1规格 (32)6.2术语和定义 (36)首先感谢您选购我们的产品!为了让您迅速掌握如何使用这款视频处理器,我们为您送上了详细的产品使用手册。
您可以在使用视频处理器之前阅读产品介绍以及使用方法,请仔细阅读我们所提供给您的所有信息,以便于您正确地使用我们的产品。
声明声明/担保与赔偿声明该设备经过严格测试,符合电子类数码设备的标准,根据FCC第15部分的规定,这些限制是为了合理地防止设备在商业环境中操作时的有害干扰。
如果没有安装和使用规定的指导手册,该设备的产生、使用和放射无线电频率,可能会对无线电通讯造成有害干扰。
GECB板LED灯说明序号名称说明1 INS 检修状态下灯亮,闪烁为TCI-Lock2 DW 厅门锁通时灯亮3 ES 安全回路通时灯灭4 NOR 电梯在正常状态下灯亮板输入状态代号esDWDFCSETCI<M><1>1><1><2><GOON>检查参数检修系统参数(SYSTEM PARAMETERS调整参数称范围设定1-31LOBBY 0-31 0BOTTOM 0-31 0<1> <1><3><1>检修检查参数司机模式消防员类型(设“检修<1><1><3><4> <GO ON>检查参数楼层使能参数设定CUDE PR0000 000000 000000 00<M><1><1><3><3><1> 检查参数称地址位置:操纵厢05-107-1轿顶检修按钮07-2<M><1><1><3><2>检查参数安装参数(SETUP PARAMETERS <2><3>检修16)PARAMETERS)的设置需要的最短长度,建议在此基础上增加检修正常<2><4><1><GOON><1><打检修><ENTER><ENTER>……<GOON>井道自学习完成检修正常<1><1><3> <GOON><5><ENTER><GOON><GOON><GOON><GOON>准备正常运行检修正常<1>><1><1>描述参考值1 2 3 4 5 6<1><1><2><1> <GO ON>检查参数class reasontotal number of runs since last power onminutes since last power onNo CAN connection to the SPBOCSS is not available dueThe elevator is performing a park run for moreEQAR start was not permitted by drive for 60Drive stuck in ReadyToRun(NoAbl)The drive package has been powered onES Safety chain wiring fault (PES not wired inexpectationPLS1 input has been activatedDW or DFC was not low during the last door cycle, thatGSM input error Rear doorFor Compass, the primary GCB has failed andSafety Operated Switch Up triggeredThe BCB published a task timing problem.ARO were initialized<2><2><1> <GO ON>ACD-4系统采用五点式称重,分别为10%、30%、50%、满载、超载(实物如上图)。