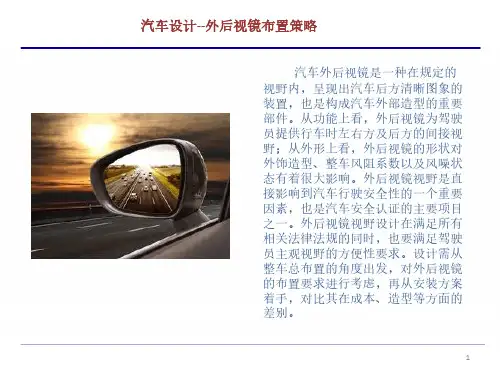
汽车内外后视镜设计开发指南
- 格式:pdf
- 大小:1.31 MB
- 文档页数:43
汽车内后视镜设计指导1、简要说明1.1前言作为最主要的现代化交通工具之一,汽车在人类日常生活中扮演着越来越重要的角色,人们对于汽车的安全性要求也越来越高。
汽车要安全运行,于驾驶员接受信息正确与否、信息输入装置的多少和快慢有着重要影响,汽车在行驶过程中,有80%的信息是靠视觉得到的,确保良好的视野是预防汽车事故的必要条件,所谓的视野是驾驶员行车时的视线范围,人们根据不同的目的来定义和使用不同的视野概念。
一般情况下,按视野获得方式分为直接视野和间接视野直接视野是驾驶员在驾驶位置时,直接透过前风档玻璃、车门玻璃和后风档玻璃所能直接、清晰的看到的道路范围的大小。
间接视野即驾驶员通过内外后视镜看到的车辆后方情况的清晰图象,图象所反映的范围即为得到的视野。
后视镜是驾驶员间接视野的主要保证,因而后视镜的合理布置与设计是提高汽车主动安全性的重要因素之一。
本文主要介绍轿车后视镜系统的开发要点、开发过程中应该注意的问题以及与其他相关零部件的关联性以及未来发展的趋势。
通过该设计指南的介绍,为XX公司后视镜系统的开发提供参考,并规范XX公司轿车后视镜系统的开发工作。
后视镜系统现阶段的开发过程是:公司根据整车造型需要,确定可行的产品外形(A面满足工艺和法规视野要求),定义具体的连接和紧固方式和产品具体的功能定义、性能参数、主要材料定义。
由后视镜生产厂家根据产品外形数据和功能定义和性能参数来完成镜体的内部结构设计。
产品开发过程中我方负责后视镜产品形面设计,结构布置以及功能定义、性能参数定义,以及产品最终数据校核和确认。
产品开发外形面数据专利权归我公司所有。
1.2产品分类1.2.1分类汽车后视镜按照功能主要分为内后视镜、主外后视镜、广角外后视镜、补盲外后视镜、下视镜等。
A.内后视镜按照功能分为普通内后视镜、普通防眩目内后视镜、电致变色自动弱光内后视镜。
B.外后视镜按照功能分为普通手动调节外后视镜、电动调节外后视镜、电动调节电加热除霜外后视镜、电动调节电动折叠外后视镜。
外后视镜设计指南编制:审核:批准:1、简要说明在轿车上后视镜主要分为内视镜和外视镜,属于法规件和安全件,用于实现整车视野功能。
在后视镜中,镜片属于关键件,镜片的合理选用是保证外后视镜视野范围的有力保证。
主要采用平面镜、球面镜和双曲率镜三大系列。
例如:S11车左镜片采用平面镜:优点在于后视物体无失真,能真实反映车后物体的真实外形及实际距离;缺点是后视范围较小,造成过多的视觉盲区。
A11车左镜片采用球面镜,曲率半径>1200mm:特点是后视物体缩小,后视范围增大,但不能真实的反映车后物体的大小及实际距离。
国家规定当确定曲率半径>1200mm时,失真误差应小于0.15Ra。
B11车左镜片采用双曲率镜:它弥补了平面镜后方视野过小,球面镜反映视野不真实的不足,它的球面部分采用较大的曲率半径的设计,一般选用SR2000基本上解决了失真问题,即满足了国家法规要求,又解决了盲区问题。
在镜片的设计上采用分界线的办法来警示司机变曲率仅供观察车后大致情况。
制造工艺较为复杂,制造成本较高。
内视镜的镜片选用,可采用非防眩目的平面镜和可遮蔽的光楔镜两种。
其中可遮蔽的光楔镜设计有楔形角,用于调节后视镜反射光线的反射角,以此达到防止光线过强刺眼的问题。
一般情况,楔形角按图纸要求,若图纸没有说明按3°±10′。
2、设计构想1、后视镜是车身的安全法规件,其开发周期如下表:2、后视镜安装点布置应该注意的问题1)后视镜安装点的布置要根据内外钣金来定,距离周边倒圆角(圆角半径是8毫米)的地方距离最少是5毫米。
2)螺栓安装点之间的距离最少是40-50毫米3)螺栓的高度最少是15-20毫米,如果加嵌件的话,应该最少是20毫米,最大是30毫米,如果太高的话,最好在下面掏空,(S11三角块的螺栓为例)以防止缩水,(另外三角块的设计,在安装点上也有类似的高度,为了防止缩水,下面的料厚少一点),后视镜的安装面最好是在同一个平面上,这样有利于钣金面制作4)目前后视镜的安装方式是:B11用M6螺栓(B11-8202011)T11用Q1840616螺栓。
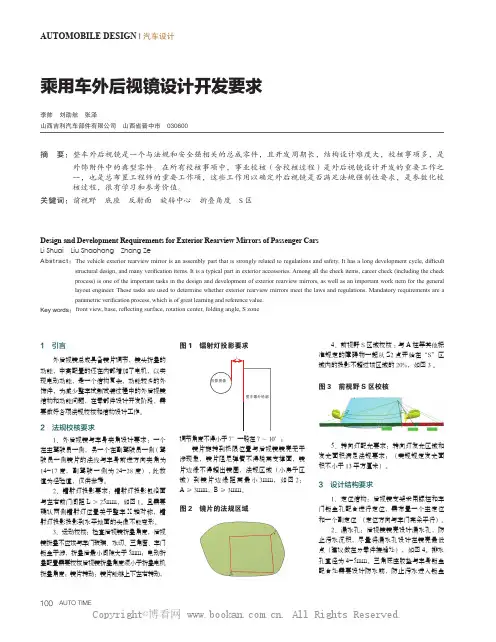
100AUTO TIMEAUTOMOBILE DESIGN | 汽车设计乘用车外后视镜设计开发要求李帅 刘劭航 张泽山西吉利汽车部件有限公司 山西省晋中市 030600摘 要: 整车外后视镜是一个与法规和安全强相关的总成零件,且开发周期长,结构设计难度大,校核事项多,是外饰附件中的典型零件。
在所有校核事项中,事业校核(含校核过程)是外后视镜设计开发的重要工作之一,也是总布置工程师的重要工作项,这些工作用以确定外后视镜是否满足法规强制性要求,是参数化校核过程,很有学习和参考价值。
关键词:前视野 底座 反射面 旋转中心 折叠角度 S 区1 引言外后视镜总成具备镜片调节,镜头折叠的功能,中高配置的还在内部增加了电机,以实现电动功能,是一个结构复杂,功能较多的外饰件,为减少整车试制试装过程中的外后视镜结构和功能问题,在零部件设计开发阶段,需要做好各项法规校核和结构设计工作。
2 法规校核要求1、外后视镜与车身夹角设计要求:一个在主驾驶员一侧,另一个在副驾驶员一侧(驾驶员一侧镜片的法线与车身前进方向夹角为14-17度,副驾驶一侧为24-28度),此数值为经验值,仅供参考。
2、镭射灯投影要求:镭射灯投影包络面与左右前门间距L >25mm,如图1。
且需要确认两侧镭射灯位置关于整车X 轴对称,镭射灯投影投影到水平地面的头像不能变形。
3、运动校核:检查后视镜折叠角度,后视镜折叠不应该与车门玻璃、水切、三角窗、车门钣金干涉,折叠后最小间隙大于5mm;电动折叠配置需要校核后视镜折叠角度须小于折叠电机折叠角度;镜片转动:镜片能够上下左右转动,调节角度不得小于7°一般在7~10°;镜片旋转到极限位置与后视镜镜壳无干涉现象,镜片阻尼弹簧不得脱离支撑面,镜片边缘不得超出镜圈,法规区域(小房子区域)到镜片边缘距离最小3mm,如图2:A ≥3mm,B ≥3mm。
4、前视野S 区域校核:与A 柱等其他标准规定的障碍物一起从Z2点开始在“S”区域内的投影不超过该区域的20%,如图3。
后视镜系统开发设计指南前言后视镜分为外后视镜和内后视镜。
外后视镜一般汽车左、右两侧都有,其功用主要是让驾驶员观察到汽车左右两侧后方的行人(包括上、下车人员)、车辆以及其它障碍物的情况,确保行车或倒车的安全。
内后视镜的主要功能是供驾驶员观察和注视车室内成员及物品的情况,同时也可以供驾驶员观察车辆正后方情况。
按后视镜镜面的形状可分为平面镜、凸面镜及棱形镜等。
平面镜可以获得与目视相同大小的成像,常用作内后视镜(出口美国车辆主驾侧外后视镜必须为平面镜);凸面镜成像较目视小,但视野范围较平面镜大,常用作外后视镜。
如何实现后视镜的功能,充分满足驾驶员在驾驶过程中的人机操作舒适度及视野要求,布置安装要求,法规校核,工艺材料选取等。
本文将从这几个方面介绍汽后视镜的布置设计车开发。
本文仅供个人参考学习,请勿做商业用途。
目录1后视镜系统简要说明 (1)1.1后视镜系统的发展 (1)1.1.1后视镜简介 (1)1.1.2后视镜发展趋势 (1)1.2后视镜系统分类 (2)1.3后视镜系统功能 (4)1.4后视镜系统结构组成 (5)2后视镜系统设计流程 (8)2.1输入条件 (8)2.2设计步骤 (8)3后视镜系统设计可行性分析 (11)3.1后视镜视野 (11)3.1.1后视镜视野测定 (11)3.1.2后视镜的反射率 (11)3.1.3外后视镜的基本要求 (12)3.1.4后视镜的正确使用位置 (12)3.1.5视野死角 (12)3.2后视镜布置设计 (12)3.2.1内后视镜满足风窗玻璃透明区域要求 (12)3.2.2内后视镜考虑雨量传感器的使用要求 (13)3.2.3内后视镜防炫目检查 (13)3.2.4外后视镜视野干涉检查 (13)3.2.5外后视镜侧车窗除雾区域校核 (13)3.2.6外后视镜侧转型灯位置及几何可见度 (13)3.2.7外后视镜后视镜三角座对A柱障碍角的影响 (13)3.2.8后视镜镜面边界的确定方法 (14)3.2.9后视镜安装点布置 (14)3.3后视镜的调节 (15)3.4后视镜相关法规要求 (15)3.4.1后视镜曲面形状及尺寸 (15)3.4.2后视镜转轴位置 (16)3.4.3后视镜驾驶员视野舒适性 (16)3.4.4后视镜外伸量 (16)3.4.5后视镜视野 (16)3.5后视镜人机工程分析 (16)3.5.1外后视镜布置方法及流程 (17)3.5.2镜面位置及尺寸的确定 (18)3.5.3内后视镜布置方法及流程 (20)3.6后视镜间隙、台阶、公差分析 (20)3.7后视镜制造工艺可行性 (20)3.8后视镜装配工艺可行性 (21)3.9后视镜风险分析 (21)4.1后视镜术语和定义 (22)4.2视镜技术要求 (23)4.3视镜的尺寸要求 (23)4.3.1内视镜(Ⅰ类) (23)4.3.2主外视镜(Ⅱ、Ⅲ类) (23)4.3.3广角外后视镜(Ⅳ类) (24)4.3.4补盲外后视镜(Ⅴ类) (24)4.3.5前视镜(Ⅵ类) (24)4.3.6至少驾驶室被部分封闭的L类机动车辆所适用的视镜(Ⅶ类) (24)4.4反射面和反射率 (24)4.4.1反射面要求 (24)4.4.2曲率半径要求 (24)4.5视镜的安装要求 (24)4.6视镜的位置要求 (25)4.7视镜的调节要求 (25)4.8视镜的视野要求 (26)4.8.1内视镜(I类) (26)4.8.2主外视镜(II类) (26)4.8.3主外视镜(Ⅲ类) (26)4.8.4广角外视镜(Ⅳ类) (27)4.8.5补盲外视镜(V类) (27)4.8.6其他视镜 (28)4.9视镜障碍物 (29)4.9.1内视镜(Ⅰ类) (29)4.9.2外视镜(Ⅱ类、Ⅲ类、Ⅳ类、Ⅴ类、Ⅵ类、Ⅶ类) (29)5后视镜总成技术条件 (30)5.1后视镜基本国家法规要求 (30)5.2后视镜外观要求 (30)5.3后视镜性能 (30)5.3.1后视镜基本能要求 (30)5.3.2后视镜防眩目性能要求 (32)5.3.3后视镜总成性能试验 (33)5.3.4后视镜整车/机试验 (34)5.4后视镜检验规则 (34)5.4.1后视镜基本要求 (34)5.4.2后视镜出厂检验 (34)5.4.3后视镜型式检验 (34)5.5后视镜标识、包装、运输及储存 (35)5.5.1后视镜标识 (35)5.5.2后视镜包装 (35)5.5.3后视镜运输 (35)5.5.4后视镜贮存 (35)5.5.5后视镜质量保证 (35)6.1后视镜建模 (36)6.2后视镜具体结构设计分析 (36)6.2.1镜托板及转向器范围分析要求 (36)6.2.2外镜折叠范围分析要求 (36)6.2.3外镜折叠销轴的范围要求 (37)6.2.4外后视镜的DTS要求或GD&T要求 (37)6.2.5外后视镜镜片设计要求 (38)6.2.6镜片及托板的设计要求(零件组成) (38)6.2.7镜托板的设计要求 (39)6.2.8镜托板与转向器旋转中心配合 (39)6.2.9折拢销轴处零件结构设计要求 (40)6.2.10折拢销轴处零件结构设计易出现问题 (41)6.2.11设计要求检查 (41)6.2.12后视镜总结 (42)7后视镜相关法规 (43)8参考文献 (43)1后视镜系统简要说明1.1后视镜系统的发展1.1.1后视镜简介针对车身的安装位置,轿车后视镜分为内镜和外镜。
外饰件开发篇一、后视镜在轿车上后视镜主要分为内视镜和外视镜,属于法规件和安全件,用于实现整车视野功能。
在后视镜中,镜片属于关键件,镜片的合理选用是保证外后视镜视野范围的有力保证。
主要采用平面镜、球面镜和双曲率镜三大系列。
S11车左镜片采用平面镜:优点在于后视物体无失真,能真实反映车后物体的真实外形及实际距离;缺点是后视范围较小,造成过多的视觉盲区。
A11车左镜片采用球面镜,曲率半径>1200mm:特点是后视物体缩小,后视范围增大,但不能真实的反映车后物体的大小及实际距离。
国家规定当确定曲率半径>1200mm时,失真误差应小于0.15Ra。
B11车左镜片采用双曲率镜:它弥补了平面镜后方视野过小,球面镜反映视野不真实的不足,它的球面部分采用较大的曲率半径的设计,一般选用SR2000基本上解决了失真问题,即满足了国家法规要求,又解决了盲区问题。
在镜片的设计上采用分界线的办法来警示司机变曲率仅供观察车后大致情况。
制造工艺较为复杂,制造成本较高。
内视镜的镜片选用,可采用非防眩目的平面镜和可遮蔽的光楔镜两种。
其中可遮蔽的光楔镜设计有楔形角,用于调节后视镜反射光线的反射角,使光线从正反射变成漫反射,以此达到防止光线过强刺眼的问题。
一般情况,楔形角按图纸要求,若图纸没有说明按3°±10′。
国家法规中,后视镜属于强检项目。
主要有一下几点:A.外视镜视野要求:驾驶员一侧外后视镜的视野驾驶员介助外后视镜应能在水平路面上看见一段宽度至少为2.5m的视野区域,其右边与汽车纵向基准面平行,且与汽车左边最外侧点相切,并从驾驶员的眼点后10m处延伸至地平线。
乘客一侧外后视镜的视野驾驶员借助外后视镜应能在水平路面上看见一段宽度至少为4m的视野区域,其左边与汽车纵向基准面平行,且与汽车右边最外侧点相切,并从驾驶员的眼点后20外延伸至地平线。
B.内视镜视野要求:驾驶员借助内后视镜必须能在水平路面上看见一段宽度至少为20m的视野区域,其中心平面为汽车纵向基准面,并从驾驶员的眼点后60m处延伸至地平线。

外后视镜设计规范目录目录 (IV)1零件综述 (23)1.1系统定义、功能简介、各部分组成 (23)1.2常用类型简介 (23)2开发流程 (24)2.1整体沿用开发流程 (24)2.2部分沿用开发流程 (25)2.3全新开发流程 (26)3性能要求 (26)3.1法规要求 (26)3.2专利规避要求 (27)3.3配置要求 (27)3.4平台化、模块化分析 (27)3.5成本、重量要求 (28)3.6安全性要求 (28)3.7可靠耐久性要求 (28)3.8环境适应性要求 (28)3.9精致性 (28)3.10NVH要求 (28)3.11装配维修性要求 (29)4结构设计 (30)4.1造型分析 (30)4.2主断面设计 (38)4.3安装点、定位点布置 (38)4.4周边件配接 (40)4.5结构设计要点 (41)4.6常见问题及规避措施 (42)5试验验证 (43)1 零件综述1.1 系统定义、功能简介、各部分组成1.1.1 系统定义外后视镜是驾驶员观察后方、侧方和下方信息的必备功能件。
1.1.2 功能介绍外后视镜为满足不同人群对视野的需求,镜片必须满足上下左右都能调整至少8°,调整方式为手动或电动;为满足整车最小通过性和碰撞过程中对人员或物品的最小伤害,外后视镜应当能够前后折叠。
1.1.3 各部分组成图1-1外后视镜爆炸图1、镜片2、加热片3、镜片托4、镜框5、镜片调整机构6、机芯支架7、转向灯8、镜体9、镜座支架 10、镜座 11、镜座垫 12、折叠机构支架 13、弹簧 14、垫片 15、折叠机构 16、线束1.2 常用类型简介1.2.1 从整车转向功能考虑,外后视镜上有集成转向灯和不带转向灯。
1.2.2 镜头折叠分为手动折叠和电动折叠。
1.2.3 镜片调整分为手动调整和电动调整。
1.2.4 镜片有普通镜片和带除霜、亲水功能的镜片。
1.2.5 从镜片曲率上分为单曲率和双曲率外后视镜。
整车技术部设计指南123第 14 章内外后视镜校核指南14.1概论14.1.1指南的主要目的目的主要有两个方面:1)把握内外后视镜校核需要做得法规校核包括那些内容;2)把握内外后视镜法规校核的主要步骤。
14.1.2指南的相关内容主要内容有以下三个方面:1)内外后视镜校核引用的法规标准和要求2)内外后视镜校核解析3)内后视镜的前方视野校核14.2内外后视镜校核14.2.1内外后视镜校核引用的法规标准和要求1)相关标准a)GB/15084-2022 机动车辆内外后视镜性能和安装要求欧洲机动车辆内外后视镜法规b)ECE462)相关术语a〕驾驶员眼点:通过汽车制造厂确定的驾驶员设计乘坐位置中心,做一个平行于汽车纵向基准面的平面,从该位置座椅 R 点向上 635mm,做垂直于该平面的直线段,在直线段和平面的交点的两侧各 32.5mm 做两个点,即驾驶员眼点。
如图 14.1:b〕双眼总视野:左右单眼视野重合而获得的总视野。
如图 14.2:图 14.1整车技术部设计指南124图 14.23)技术要求a〕国标内后视镜:驾驶员借助内后视镜必需看到水平面宽度至少为 20220mm 视野范围,其中心平面为汽车纵向基准面,并从驾驶员眼点后 60000mm后延长到地面;在测试视野时,允许遮阳板,头枕,后风窗刮水器,S3 类制动灯,或车身构件〔如纵向基准面四周对开门的后窗立柱等部件遮挡局部视野〕当阻挡局部投影在汽车纵向基准面垂直的铅垂面上时,其总和应在规定的总视野的 15%以下,遮挡程度是在遮阳板处于收回位置,头枕在最低位置。
如图 14.3:欧标内后视镜:跟国标内后视镜的法规校核一样。
b〕国标左外后视镜:驾驶员借助外后视镜可以看到至少为 2500mm 的视野区域,其右侧与汽车纵向基准面平行,且切过汽车左侧最外侧点的平面为基准,并从驾驶员眼点后10000mm 后延长到地面,如图14.4:欧标左外后视镜:驾驶员借助外后视镜可以看到至少4000mm 的视野区域,1.其右侧与汽车纵向基准面平行,且切过汽车最外测点的平面沿Y的负方向1000mm,并从驾驶员眼点后4000mm 后延长到地面;2.其右侧与汽车纵向基准面平行,且切过汽车最外侧点的平面为基准,并从驾驶员眼点后20220mm 后延长到地面;如图14.5:c〕国标右外后视镜:对于M1 类和最大质量不超过2022kg 的N1 类车辆,驾驶员借助后视镜必需能看到水平面宽度至少为4000mm 的视野范围,其左侧与汽车纵向基准面平行,且切过汽车右侧最外测点的平面为基准,从驾驶员眼点后20220mm 后延长到地面。
乘用车内后视镜设计开发要求作者:李帅田和伟来源:《时代汽车》2022年第02期摘要:很多车主都觉得内后视镜起不了什么大的作用,要么当成化妆镜,要么看后排乘客,其实,乘用车安装内后视镜是为驾驶员无需太多变换向前的视线即可确认后方视野内情景的镜子,是一个保证行车安全的重要零件,因为有时外后视镜不能很清晰的显示后方车辆的距离,但通过内后视镜,就可以较清楚的进行判断,保证安全。
因此,内后视镜属于整车中的关重件。
关键词:镜片有效范围曲率半径雨量传感器护罩内后视镜护罩顶棚Abstract:Many car owners think that the inner rearview mirror can't play a big role, either as a vanity mirror, or to look at the rear passengers. In fact, the installation of the inner rearview mirror in a passenger car is to prevent the driver from changing the forward line of sight too much. The mirror that can confirm the scene in the rear view is an important part to ensure driving safety,because sometimes the outside rearview mirror cannot clearly display the distance of the rear vehicle, but through the inside rearview mirror, it can be judged more clearly to ensure safety. Therefore, the inner rearview mirror is a key part of the vehicle.Key words: lens effective range, radius of curvature, rain sensor shield, inner rearview mirror shield, ceiling1 引言本文我們通过校核计算、结构设计和装配操作三个模块介绍低配、高配车型的内后视镜和周边零部件的配合关系。
汽车外后视镜造型设计分析摘要:对于整个小汽车而言,外后视镜是设计的重难点。
对此,本文研究以汽车外后视镜造型设计为切入点,重点分析了其功能、结构与造型之间的关系,并提出了具体设计方案,以此来更好地指导实践工作。
关键词:汽车;后视镜;功能;造型;设计对于外后视镜而言,其属于确保行车安全以及为驾驶提供便利的主要汽车外观构成件之一,涉及多项功能。
外后视镜造型设计时,需要将产品功能结构作为基础。
同时,由于产品功能结构存在着多样性的特点,所以其造型也较为复杂,在研究复杂造型的过程中,需重点对其内在逻辑关系进行明确,掌握构成功能结构的零件的联系。
1.外后视镜造型分析1.1产品功能与造型关系在人机交互进一步发展的背景下,消费者不只是重视产品整体外观,还十分关注其可用性。
对于可用性而言,与功能性相似,特殊造型通常设计特殊的功能需求。
所以,因为产品在功能性质方面存在差异,所以其功能和造型之间的关系也存在着不同。
例如外后视镜面尺寸偏小,会扩大视野盲区范围,过大则会导致车身轴间距变宽,容易与其他车发生剐蹭的情况。
1.2产品结构与造型关系结构设计属于产品设计过程中的关键环节,结构和外观之间存在着紧密的联系。
在设计过程中,让结构和外观实现统一,属于获取独特造型的主要条件。
例如,对于外后视镜结构载体基座而言,其与其他部件之间的连接,主要采取卡扣与扣锁的方法,通过机械连接的方法取代静态螺帽连接,除了能够减少设计成本之外,还能够将结构隐藏到内部,有利于产品美观度。
总而言之,外后视镜功能系统与结构体系之间存在着紧密的联系,结构系统又与外观造型设计相关,外后视镜功能限制了其结构体系,结构体系又决定其外观造型。
2.外后视镜设计实例2.1功能结构与造型分析2.1.1外观模块对于后视镜外观模块而言,其由基座、外壳以及三角窗连接处构成。
为了能够提高造型的安全性能,这里外壳选择使用较为醒目的黄金色金属漆;为了能够预防风阻及路面不平整造成的抖动与磨损,也为了预防车身纵轴距较长,外壳最远两点之间的尺寸不得大于250mm。
Keep the inside and outside mirrors clean and adjusted for best visibility.Be sure to adjust the mirrors before you start driving.Move the selector switch to L (driver’s side)or R (passenger’s side).Push the appropriate edge of the adjustment switch to move the mirror right,left,up,or down.1.2.MirrorsAdjusting the Power MirrorsInstruments and Controls99When you finish, move the selector switch to the center (off)position. This turns off the adjustment switch so you can’t move a mirror out of position by accidentally bumping the switch.Depending on the position of the selector switch, the left or right side mirror will pivot downward slightly when you shift the transmission into reverse. In the left position, the left mirror pivots. In the right position,the right mirror pivots. This gives you a better view of that side of the vehicle while parallel parking. The mirror returns to its original position when you take the transmission out of reverse. To turn this feature off,leave the switch in the center position.Outside mirror positions can be stored in the driving posi tion memory system (see page ).3.101Mirrors100Two seat and outside mirrorpositions can be stored in separate memories. You select a memorized position by pushing the appropriate button or using the appropriate remote transmitter (Driver 1 or Driver 2).Adjust the outside mirrors for best visibility (see page ).Adjustthe seat to a comfortable position (see page ).Turn the ignition switch to ON (II).You cannot add a new driving position in the memory unless the ignition switch is in the ON (II)position.You can recall a memorized position with the ignition switch in any position.Store a driving position only when the vehicle is parked.Your vehicle has a memory feature for the driver’s seat and outside mirror positions.Press and release the MEMObutton on the driver’s door.You will hear a beep.Immediatelypress and hold one of the memory buttons (1or 2)until you hear two beeps.The indicator in thememory button will come on.The current positions of the driver’s seat and outside mirrors are now stored.3.1.2.9699CONTINUEDDriving Position Memory SystemStoring a Driving Position inMemoryInstruments and Controls101Doing any of the following after pressing the MEMO button will cancel the storing procedure.Not pressing a memory button within 5seconds.Readjusting the seat position.Readjusting the outside mirror position.Each memory button stores only one driving position.Storing a newposition erases the previous setting stored in that button’s memory.If you want to add a new position while retaining the current one,use the other memory button.The system will move the seat and outside mirrors to the memorized positions.The indicator in the selected memory button will flash during movement.When theadjustments are complete,you will hear two beeps,and the indicator will remain on.If the parking brake is not set,you must press and hold the memory button until the adjustment is complete.You cannot select a memorized position if the transmission is in reverse.Shift to another gear,then select.Notes for vehicles with M/TDriving Position Memory System102To stop the system’s automaticadjustment,do any of these actions:Press any button on the control panel:MEMO,1,or 2.If desired,you can use theadjustment switches to change the positions of the seat or outside mirrors after they are in theirmemorized position.If you change the memorized position,theindicator in the memory button will go out.To keep this driving position for later use,you must store it in the driving position memory.Push any of the adjustment switches for the seat.Shift out of Park (automatic transmission),or into reverse (manual transmission).Adjust the outside mirrors.Driving Position Memory SystemInstruments and Controls103Follow these precautions whenever you use the seat heaters:Both front seats are equipped with seat heaters.The passenger seat only has heaters in the seat bottom because of the side airbag system.The ignition switch must be in the ON (II)position to use them.Push the HI side of the switch to rapidly heat up the seat.After the seatreaches a comfortable temperature,push the LO side of the switch.This will keep the seat warm.In HI,the heater turns off when the seat gets warm,and turns back on after the seat temperature drops.In LO,the heater runs continuously.It does not cycle with temperature changes.Use the HI setting only to heat the seats quickly,because it draws large amounts of current from the battery.If the engine is left idling for an extended period,do not use the seat heaters even on the LOsetting.It can weaken the battery,causing hard starting.Seat Heaters104Turn the ignition switch to ON (II)to raise or lower any window.To open the window,push the switch down and hold it.Release the switch when you want the window to stop.Pull back on the switch and hold it to close the window.The windows will operate for up to 10minutes after you turn off the ignition switch.Opening either front door cancels this function.If the MAIN switch is off,the passenger’s windows cannot be raised or lowered.Keep the MAIN switch off when you have children in the vehicle so they do not injure themselves by operating the windows unintentionally.CONTINUEDPower WindowsInstruments and Controls105If your vehicle’s battery isdisconnected or goes dead,or a front window fuse is removed,the AUTO function is disabled.The power window system needs to be reset after reconnecting the battery or installing the fuse.Start the engine.Push down and hold the front window switch until the window is fully open.Pull and hold the front window switch to close the windowcompletely,then hold the switch for a second or two more.If the power windows do not operate properly after resetting,have your vehicle checked by your dealer.If either front window runs into any obstacle while it is closing automatically,it will reversedirection,and then stop.To close the window,remove the obstacle,then use the window switch again.Auto reverse stops sensing when the window is almost closed.You should always check that all passengers and objects are away from the window before closing it.To open/close either front window,push the window switch firmly down or pull back on to the second detent,and release it.The window will automatically go up or down all the way.To stop the window,pull/push on the window switch briefly.1.2.Power WindowsAuto ReverseAUTO106You can open all of the windows and the moonroof from outside with the remote transmitter.Turn the key clockwise again,and hold it.All four windows and moonroof start to open.To stop the windows and the moonroof,release the key.To open the windows andmoonroof further,turn and hold the key again (within 15seconds).NOTE:If the windows and moonroof stop before the desired position,repeat steps 2and 3.To close the windows andmoonroof further,turn and hold the key again (within 15seconds).Turn the key counterclockwise again,and hold it.All fourwindows and the moonroof start to close.To stop the windows and moonroof,release the key.Turn the key counterclockwise,then release it.Insert the key in the driver’s door lock.To close:Press the UNLOCK button once to unlock the driver’s door.Press the UNLOCK button a second time,and hold it.The passenger’s doors unlock,and all four windows and moonroof start to open.To stop the windows and moonroof,release the button.To open the windows and moonroof further,press the button again and hold it.If the windows and the moonroof stop before the desired position,repeat steps 1and 2.You cannot close the windows or the moonroof with the remote transmitter.1.2.3. 1.2.3.4.3.4.Opening the Windows and Moonroof with the Remote TransmitterPower WindowsInstruments and Controls107。