思科路由器rv042
- 格式:pdf
- 大小:175.90 KB
- 文档页数:4

思科路由器rv042 1.简介1.路由器概述2.路由器特点3.适用场景2.硬件配置1.路由器外观2.路由器接口说明3.路由器安装步骤4.路由器重置3.路由器基本设置1.路由器登录2.路由器网络设置3.路由器管理设置4.防火墙设置1.防火墙概述2.防火墙设置步骤3.防火墙安全性配置5.VPN设置1.VPN概述2.VPN类型3.VPN设置步骤6.安全设置1.路由器密码设置2.端口转发设置3.DMZ配置7.功能扩展1.DHCP服务器设置2.VLAN配置3.QoS配置8.故障排除1.路由器常见问题解决方法2.联系技术支持9.附件1.路由器规格表2.路由器安装图示法律名词及注释:1.路由器:网络设备,用于连接多个局域网或广域网,并将信息包转发到目标网络的设备。
2.VPN:虚拟专用网络,通过公共网络建立安全的连接,进行远程访问和数据传输。
3.防火墙:网络安全设备,用于监控和控制数据包在网络间的流动,防止未授权访问和攻击。
4.DHCP:动态主机配置协议,用于自动分配IP地质、子网掩码等网络配置信息给客户端设备。
5.VLAN:虚拟局域网,通过逻辑方式将网络设备划分为不同的虚拟网络,提高网络管理和安全性。
6.QoS:服务质量,用于根据网络协议或业务类型对数据流进行优先级和带宽分配。
附件:1.路由器规格表:详细列出思科路由器RV042的硬件参数和功能特点。
2.路由器安装图示:提供安装路由器所需要的步骤和示意图。
本文档涉及附件,可在相关章节中提及并附上或详细说明。
法律名词及注释已在上述章节中给出。

管理站路由器配置指引1.在IE浏览器中输入:192.168.1.1,用户名与密码均为admin,进入路由器配置界面。
2.选择“Setup”中“Network”页面:●“Host Name”中填入路由器名称,命名规则如下:GW_XXNO_XXXX XXXX表示管理站名称表示区域简称●“Domain Name”表示连入区域名称,应该填入公司域名图1为汉口管线所古田管理站命名示意图●“Device IP Address”中填入10.27.XXX.1,其中XXX为已分配好的地址●在“W AN 1”中,选择静态地址Static IP选项“Specify WAN IP Address”中填入已分配好的地址“Subnet Mask”中填入规定好的子网掩码“Default Gateway Address”中填入已分配好的地址●点击页面下方“Save Settings”保存界面,关闭浏览器。
3.由于已经修改了路由器的本地IP,为了获取修改后的IP地址,需要在桌面上右键“网络邻居”——“属性”——“本地连接”——“支持”——“修复”。
修复完成后,点击关闭。
图2为本地连接状态“修复”示意图4.再次打开IE浏览器,输入修改后的IP地址:10.27.XXX.1,输入用户名与密码,进入路由器配置界面。
5.选择“DHCP”中“Setup”页面:●“Dynamic IP”中,在“Range Start”内填入81,在“Range End”内填入100,为了方便公司对于网络地址管理,一般定义动态IP地址的范围为81——100图3为汉口管线所古田管理站IP地址范围示意图●在“DNS Server 1”中填入10.27.25.11,在“DNS Server 2”中填入10.27.25.14DNS Server 1为公司DNS服务器地址,DNS Server 2为备用DNS服务器地址●“WINS Server”中填入10.27.25.11●点击页面下方“Save Settings”保存界面6.选择“System Management”中“Bandwidth Management”页面:●将表格中“W AN1”与“W AN2”中的数字全部由512改为2048,该项表示最大带宽宽度,管理站均为2M网络,故将流量值均改为2048图4为带宽修改后示意图●点击页面下方“Save Settings”保存界面7.选择“Setup”中“Advanced Routing”页面:●“Working Mode”中选择“Router”选项,Router表示路由模式●点击页面下方“Save Settings”保存界面8.选择“Firewall”中“General”页面:●“Firewall”中选择“Disable”选项,即关闭防火墙,在公司计算机网络中,防火墙的开启可能会影响网络的正常使用,故应关闭防火墙。


路由器品牌:其它品牌:M ercury(水星)路由器N uQX(欣向)路由器V igor 路由器锐捷网络路由器K ingnet(金浪)路由器M AIPU(迈普)路由器博达(BDCOM)路由器H illstone(山石网科路由器N ateasy(欣联)路由器A DNS 路由器中怡数宽路由器H ardlink(理想固网)路由器A lcatel-Lucent 路由器I NMI(英迈)路由器A llied Telesyn(安奈路由器安网路由器T P-LINK TL-R402+参数(家用或网吧系列)基本特征路由器类型SOHO宽带路由器端口结构非模块化网络标准IEEE 802.3、IEEE 802.3u、IEEE 802.3x网络协议TCP/IP、DHCP、ICMP、NAT、PPPoE、SNTP传输速率10/100Mbps固定的广域网接1个口固定的局域网接4个口接口介质10Base-T:3类或3类以上UTP、100Base-TX:5类UTP包转发率10Mbps:14,800pps、100Mbps:148,800ppsLED指示端口:端口(1-4)、WAN,其它:M1、M2(系统状态指示灯)内置防火墙是Qos支持不支持支持VPN支持网络管理支持远程和Web管理、全中文配置界面、配备简易安装向导(Wizard)电源电压外置电源适配器输出:9V 50Hz 0.8A认证纠错CE、FCC Class A产品尺寸160*102*30mm适用环境工作温度:0℃-40℃、存储温度:-40℃-70℃、工作湿度:10%-90% RH不凝结、存储湿度:5%-90% RH不凝结TP-LINK TL-R1660+参数TP-LINK SOHO (非模块化)价格范围70-340元带管理功能思科(非模块化:1050--3850元,模块化:10000--30000左右)思科Cisco 3800 系列路由器(中档)思科Cisco 3800 系列路由器,是思科Cisco公司的中档价格的路由器,可以用于中型企业的上网接入路由器或大型企业的远程接入服务。
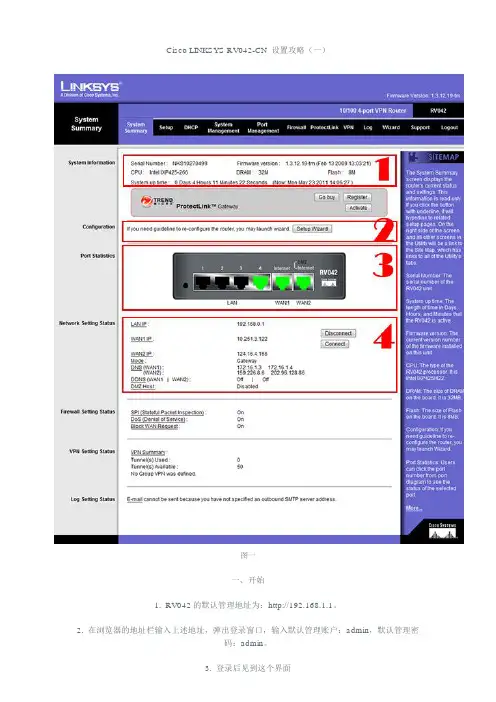
Cisco LINKSYS RV042-CN 设置攻略(一)图一一、开始1. RV042的默认管理地址为:http://192.168.1.1。
2. 在浏览器的地址栏输入上述地址,弹出登录窗口,输入默认管理账户:admin,默认管理密码:admin。
3. 登录后见到这个界面3.1 方框1:这里是设备信息,包括SN、固件版本、CPU、RAM、FLASH大小,以及设备目前已运行的时间。
3.2 方框2:这里是设置向导的链接。
后面会专门讲到。
3.3 方框3:这里是设备目前的端口状态。
这里要注意一下,RV042的WAN1口的位置比较特别,你只要记住标注着”Internet”的那个口就是WAN1口。
3.4 方框4:这里是设备的端口设置概要。
3.4.1 LAN IP:是局域网的网关,也就是RV042本身的地址。
3.4.2 WAN1 IP:宽带1的外网IP。
3.4.3 WAN2 IP:宽带2的外网IP。
3.4.4 MODE:设备运行模式。
一般为网关模式。
3.4.5 DNS:分别显示每条宽带设定的DNS。
3.4.6 DMZ Host:DMZ主机,默认为关闭。
二、网络设置1. 设置向导。
点击图一方框2的按钮。
图二1.1 方框1:基本设置1.1.1 第一步:设置双WAN模式或者DMZ直连主机模式,默认双WAN模式。
这里第一条宽带为4M ADSL,第二条宽带为5M光纤。
1.1.2 第二步:给RV042设置主机名及域名。
默认为空。
1.1.3 第三步:设置WAN1转接方式,默认为动态IP。
这里选了PPPoE。
1.1.4 第四步:输入PPPoE的账号和密码。
1.1.5 第五步:选择PPPoE的连接模式。
1.1.5.1 按需连接,最大空闲时间分钟。
1.1.5.2 保持连接,重拨期秒,存活时间间隔秒,断线重拨次数次。
1.1.6 第六步:设置WAN2口为静态IP。
1.1.7 第七步:设置光纤接入的静态IP,掩码及网关。
1.1.8 第八步:设置WAN2口的DNS。
思科路由器设置方法和常见配置命令思科路由器设置方法和常见配置命令思科路由器怎么设置,是我们经常遇到的问题,下面店铺准备了关于思科路由器设置方法和常见配置命令,欢迎大家参考学习!一、基本设置方式一般来说,可以用5种方式来设置Cisco思科路由器:1.Console口接终端或运行终端仿真软件的微机;2.AUX口接MODEM,通过电话线与远方的终端或运行终端仿真软件的微机相连;3.通过Ethernet上的TFTP服务器;4.通过Ethernet上的TELNET程序;5.通过Ethernet上的SNMP网管工作站。
但Cisco思科路由器的第一次设置必须通过第一种方式进行,一般用超级终端通过com口进行控制。
此时终端的硬件设置如下: 波特率:9600数据位:8停止位:1奇偶校验: 无二、命令操作Cisco思科路由器所用的操作系统是IOS.共有以下几种状态:1、router>在router>提示符下,Cisco思科路由器处于用户命令状态,这时用户可以看Cisco思科路由器的连接状态,访问其它网络和主机,但不能看到和更改Cisco思科路由器的设置内容。
此时输入?并回车,可以查看到在此状态下可以用的命令。
(IOS允许你在任何时候用这种方式查看在某种状态下可以用的命令)。
在敲入enable并回车后,按照系统提示输入密码,(在新的Cisco思科路由器第一次进行调试的时候不需要输入密码,直接回车即可)进入#提示符,就可以对Cisco思科路由器进行各种操作了。
2、router#Cisco思科路由器进入特权命令状态router#后,不但可以执行所有的用户命令,还可以看到和更改Cisco思科路由器的设置内容。
此时就可以对Cisco思科路由器的名字、密码等进行设置。
3、router(config)#在router#提示符下键入configure terminal,出现提示符router(config)#,此时Cisco思科路由器处于全局设置状态,这时可以设置Cisco思科路由器的全局参数。


计算机网络课程设计报告班级:信息管理与信息系统1001 指导教师:高学号: 0811xxxxxx姓名: ahhfyinyun一. 课程设计的目的及要求...................................................................................................... - 3 -1.1 设计目标...................................................................................................................... - 3 -1.2设计依据....................................................................................................................... - 3 -1.2.1 可行性分析...................................................................................................... - 3 -1.2.2 客户需求分析.................................................................................................. - 4 -1.2.3校园局域网特点............................................................................................... - 4 -1.3设计意义....................................................................................................................... - 5 -二. 网络拓扑结构....................................................................................................................... - 5 -2.1 网络拓扑图.......................................................................................................................... - 5 -2.1.2总体结构安排................................................................................................... - 5 -2.1.2办公,教学区安排........................................................................................... - 6 -2.1.3学生居住区安排............................................................................................... - 6 -2.2 网络拓扑说明............................................................................................................ - 7 - 三.项目使用的硬件配置.......................................................................................................... - 7 -3.1服务器(配置单)....................................................................................................... - 7 -3.2客户端(配置单)........................................................................................................... - 8 -3.3网络连接设备(设备列表)....................................................................................... - 9 - 四.网络解决方案.................................................................................................................. - 10 -4.1总布线规划................................................................................................................. - 10 -4.2详细布线说明............................................................................................................. - 10 -4.3 IP地址分配与子网划分方案................................................................................... - 12 - 五.项目使用的网络平台........................................................................................................ - 15 -5.1服务器端操作系统:Windows server 2003........................................................... - 15 -5.2服务器端网络服务..................................................................................................... - 17 -5.2.1 DHCP的安装与配置....................................................................................... - 17 -1.目的及意义................................................................................................ - 17 -2 实现方法.................................................................................................... - 17 -5.2.2 DNS服务器安装与配置................................................................................. - 21 -1.目的及意义................................................................................................ - 21 -2. 实现方法.................................................................................................. - 21 -5.2.3 Web服务器安装与配置................................................................................. - 27 -1. 目的及意义.............................................................................................. - 27 -2. 配置步骤.................................................................................................. - 27 -5.3客户端操作系统:Windows7家庭高级版................................................................ - 31 - 六.校园网的安全和维护........................................................................................................ - 31 -6.1 校园网的安全............................................................................................................ - 31 -6.1.1 问题................................................................................................................ - 31 -6.1.2 解决方法........................................................................................................ - 31 -6.2 校园网的维护............................................................................................................ - 32 -七. 心得.................................................................................................................................. - 32 -组建校园局域网摘要:针对组建校园的可行性进行分析,用户需求分析,基于需求分析,进行网络规划,详细描述组网过程,并进行相关安全维护服务,确保网络顺畅运行。

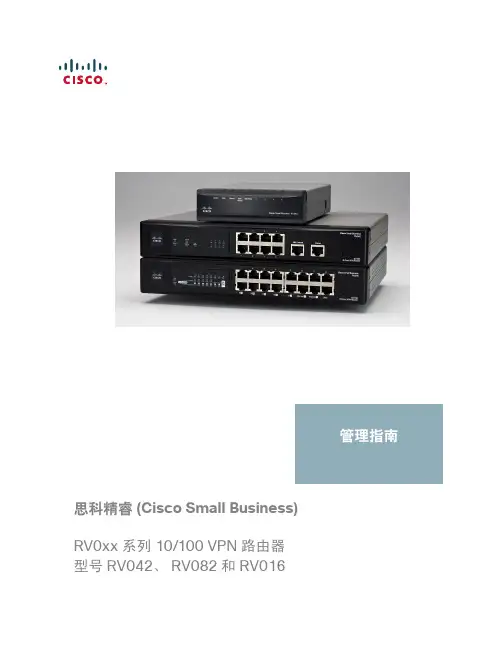
思科精睿 (Cisco Small Business)RV0xx 系列 10/100 VPN 路由器型号 RV042、RV082 和 RV016管理指南Cisco 和 Cisco 徽标是 Cisco Systems, Inc. 和/或其附属公司在美国和其他国家/地区的商标。
/go/trademarks上提供了 Cisco 商标的列表。
提及的第三方商标为其相应所有人的财产。
使用“合作伙伴”一词并不暗示思科和任何其他公司之间存在合作伙伴关系。
(1005R)第 1 章: 简介7 RV0xx 系列路由器特征7端口8LED8其他硬件特征9默认设置10安装选项10安放提示10桌面安放10壁挂11机架安装 RV082 或 RV01612连接设备12配置入门14故障排除提示14用户界面特征15第 2 章: 查看系统摘要信息18第 3 章: 设置24设置网络25更改管理员用户名和密码34设置系统时间35设置 DMZ 主机36设置端口转发和端口触发37设置通用即插即用 (UPnP)41设置一对一 NAT44复制路由器的 MAC 地址45为 WAN 接口分配动态 DNS 主机名47设置高级路由49第 4 章: DHCP52设置 DHCP 服务器或 DHCP 中继52查看 DHCP 状态信息58第 5 章: 系统管理60设置双 WAN 和多 WAN 连接60管理带宽设置66设置 SNMP69使用 Bonjour 启用设备发现70使用内置诊断工具71恢复出厂默认设置72升级固件73重新启动路由器75备份和恢复设置75第 6 章: 端口管理78配置端口设置78查看端口的状态信息79第 7 章: 防火墙81配置常规防火墙设置81配置防火墙访问规则84使用内容过滤器控制 Internet 访问90第 8 章: Cisco ProtectLink Web93 Cisco ProtectLink Web 入门93为许可 URL 和客户端指定全局设置94许可 URL 和许可客户端95为 URL 过滤启用 Web Protection96更新 ProtectLink 许可证98第 9 章: VPN100 VPN 简介100VPN 示例102查看 VPN 概要信息104设置网关对网关(站点到站点)VPN107为 VPN 客户端设置远程访问隧道113管理 VPN 用户和证书120设置 VPN 通道122设置 PPTP 服务器123第 10 章: 记录系统统计信息125设置系统日志和警报125查看系统日志128第 11 章: 向导130附录 A: 故障排除132附录 B: 用于 Windows 的 Cisco QuickVPN134简介134Cisco QuickVPN Client 安装和配置135使用 Cisco QuickVPN 软件135附录 C: 网关到网关 VPN 隧道137综述137使用静态 IP 地址为远程网关进行配置137使用动态 IP 地址为远程网关进行配置139附录 D: IPSec NAT 遍历141综述141附录 E: 带宽管理144创建新服务144创建新带宽管理规则145附录 F: 规格147 RV042147Cisco RV082149Cisco RV016151附录 G: 快速索引1541简介感谢您选择 RV0xx 系列 VPN 路由器。

Quick Start GuideCisco Small BusinessRV0xx Series RoutersRV042 Dual WAN VPN RouterRV042G Gigabit Dual WAN VPN RouterRV082 Dual WAN VPN RouterRV016 Multi-WAN VPN RouterPackage Contents•VPN Router•Power Adapter (Cisco RV042 and RV042G) or AC Power Cable (Cisco RV082 and RV016)•RJ45 Ethernet Cable•Rack Mounting Kit (Cisco RV016 and RV082 only)•Quick Start Guide•Product CD2RV0xx Series Routers Quick Start GuideWelcomeThank you for choosing a RV0xx Series Router. These routers provide advanced connection-sharing for your small business, and allow your remote workers to securely access your on-site network resources.This guide helps you to install your router and to get started using the web-based configuration utility.RV0xx Series Router FeaturesCisco RV0xx Series dual WAN and multi-WAN VPN routers offer highly secure, high-performance, reliable connectivity. All of these routers can support a second Internet connection to ensure continuous connectivity or to increase available bandwidth and balance traffic. Three models are available. A comparison is provided below.N OTE RV042, RV042G, and RV082 have one dedicated Internet port and a DMZ/Internet port. RV016 has two dedicated Internet ports, onededicated DMZ port, and five dual-function ports that can be configured as LAN or Internet ports.RV042 and RV042G Ports Model LAN Ports WAN/DMZ Ports RV042 and RV042G4 2 RV08282RV0168-132-7Internet1DMZ1RV0xx Series Routers Quick Start Guide 3RV042 and RV042G Status LightsRV082 Ports and Status Lights RV016 Ports and Status LightsPorts PortDescription Internet (RV042 andRV082) or Internet1-2 (RV016)Use this port to connect the router to a broadband network device. DMZ/Internet(RV042 and RV082)Use this port to connect the router to either a second broadband network device or a DMZhost such as a web server or FTP server. A DMZallows public Internet traffic to access a specifiedcomputer on your network without exposing yourLAN.DMZ (RV016)Use this port to connect the router to a DMZ hostsuch as a web server or FTP server. A DMZallows public Internet traffic to access a specifiedcomputer on your network without exposing yourLAN.4RV0xx Series Routers Quick Start GuideStatus Lights 1-4 (RV042 andRV042G) or 1-8(RV082 and RV016)Use these numbered ports to connect computers and other local network devices. 9-13 and 3-7 DualFunction Ports(RV016)Use these numbered ports as LAN ports (numbered 9-13) or configure them for use as Internet ports (numbered 3-7). The status isshown on the corresponding status lights: LAN/Act 9-13 or Internet/Act 3-7.Light DescriptionDIAGLit—The router is preparing for use. Unlit—Therouter is ready for use.System Steady—The router is powered on. Flashing—The router is running a diagnostic test.Internet (RV082,RV042, RV042G) or Internet 1-2 (RV016)Steady—A device is connected to the Internet port. Flashing—There is network activity over the Internet port.DMZ/Internet(RV082, RV042,RV042G) or DMZ(RV016)Steady—A device is connected to the DMZ/Internet or DMZ port. Flashing—There is network activity over the port.DMZ Mode (RV082, RV042, RV042G)Lit—The DMZ/Internet port is configured as a DMZ. Unlit—The DMZ/Internet port is configuredas a secondary Internet connection.1-4, 1-8Steady—A device is connected to the numberedLAN port. Flashing—There is network activityover the numbered port.RV042G Gigabit Ports For the Internet, DMZ/Internet, and numbered ports, the color indicates the speed. Green—Gigabit. Amber—10/100M.RV016 Dual-Function Ports:LAN/Act 9-13Lit if the port is configured as a LAN port.Steady—A device is connected to the port.Flashing—There is network activity over theport.Internet/Act 3-7 (RV016)Lit if the port is configured as an Internet port. Steady—A device is connected to the port.Flashing—There is network activity over theport.PortDescriptionOther Hardware FeaturesFeature DescriptionReset The Reset button is an indented black button. Onthe back panel of the RV042 and RV042G, lookfor this button near the port labeled 1. On the frontpanel of the RV082 and RV016, look for thisbutton near the Internet and DMZ ports .•To restart the router or restoreconnectivity: If the router is having problemsconnecting to the Internet, use the tip of a pento press and hold the Reset button for onesecond.•To restore factory default settings: If you areexperiencing extreme problems with therouter and have tried all other troubleshootingmeasures, press and hold the Reset button for30 seconds to restore the factory defaultsettings. All previously entered settings willbe abandoned.Security Slot Use the security slot on the side panel to attach alock to protect the router from theft.Power•RV042 and RV042G: Connect the providedpower adapter to the power port on the sidepanel.•RV082 and RV016: Connect the providedAC power cable to the power port on theback panel.Default SettingsParameter Default ValueUsername adminPassword adminLAN IP192.168.1.1DHCP Range192.168.1.100 to 149Netmask255.255.255.0RV0xx Series Routers Quick Start Guide56RV0xx Series Routers Quick Start GuideMounting OptionsPlacement Tips•Ambient Temperature —T o prevent the router from overheating, do not operate it in an area that exceeds an ambient temperature of 104°F (40°C).•Air Flow —Be sure that there is adequate air flow around the router.•Mechanical Loading —Be sure that the router is level and stable to avoid any hazardous conditions.Desktop Placement Place the router on a flat surface near an electrical outlet.W ARNING Do not place anything on top of the router; excessive weightcould damage it.Wall MountingThe router has two wall-mount slots on the bottom panel. T o mount the router on a wall, you need mounting hardware (not included). Suggested hardware is illustrated below (not true to scale).W ARNING Insecure mounting might damage the router or cause injury. Cisco is not responsible for damages incurred by insecure wall-mounting.2Suggested Hardware forRV042 and RV042G Suggested Hardware for RV082 and RV01620-22 mm 16.5-18.5 mmW ARNING For safety, ensure that the heat dissipation holes are facing sideways.S TEP1Drill two pilot holes into the surface.•RV042 and RV042G: 58 mm apart•RV082 and RV016: 94 mm apartS TEP2Insert a screw into each hole, leaving a gap between the surface and the base of the screw head of 1 to 1.2 mm.S TEP3Place the router wall-mount slots over the screws and slide the router down until the screws fit snugly into the wall-mount slots. Rack Mounting RV082 or RV016You can mount the RV082 or RV016 in a standard size, 19-inch (about 48 cm) wide rack. The router requires 1 rack unit (RU) of space, which is 1.75 inches (44.45mm) high. Mounting brackets are provided.C AUTION Do not overload the power outlet or circuit when installingmultiple devices in a rack.S TEP1Place the router on a hard, flat surface.S TEP2Attach one of the supplied rack–mount brackets to one side of the router with the supplied screws. Secure the bracket tightly.S TEP3Follow the same steps to attach the other bracket to the opposite side.RV0xx Series Routers Quick Start Guide78RV0xx Series Routers Quick Start GuideS TEP 4Use suitable screws to securely attach the brackets to any standard 19-inch rack.Connecting the EquipmentS TEP 1Make sure that all network devices are powered off, including therouter, PCs, Ethernet switches, and broadband network device(DSL or cable modem).S TEP 2T o connect to your Internet service:•RV042, RV042G, and RV082: Connect an Ethernet cable fromthe broadband network device to the Internet port of the router.RV042 and RV042G Internet PortRV082 Internet Port3RV0xx Series Routers Quick Start Guide 9•RV016: Connect an Ethernet cable from the broadbandnetwork device to the Internet 1 port of the router.RV016 Internet 1 PortS TEP 3T o connect a secondary Internet service:•RV042, RV042G, and RV082: Connect an Ethernet cable from the DMZ/Internet port to a second broadband network device.•RV016: Connect an Ethernet cable from the Internet 2 port toa second broadband network device.S TEP 4T o connect a computer or server that will be a DMZ host:•RV042, RV042G, and RV082: Connect an Ethernet cable fromthe DMZ/Internet port to the DMZ host.•RV016: Connect an Ethernet cable from the DMZ port to theDMZ host.S TEP 5T o connect other network devices, such as computers, printservers, or Ethernet switches, connect an Ethernet cable from a numbered LAN port to the network device.S TEP 6Power on the broadband network device(s).S TEP 7Use the power adapter (RV042 and RV042G) or the power cable(RV082 and RV016) to connect the router to a power outlet. The System status light is green.S TEP 8Power on the other network devices.Getting Started with the Configuration S TEP 1Connect a computer to a numbered LAN port on the router. Your PCwill become a DHCP client of the router and will receive an IPaddress in the 192.168.1.x range.S TEP 2Start a web browser. T o use the configuration utility, you need a PCwith Internet Explorer (version 6 and higher), Firefox, or Safari (for Mac).4S TEP3In the address bar, enter the default IP address of the router: 192.168.1.1S TEP4When the login page appears, enter the default user name admin and the default password admin (lowercase).S TEP5Click Login. The System Summary page appears.The router’s default settings are sufficient for many smallbusinesses. Your Internet Service Provider may require additionalsettings. On the System Summary page, check the WAN Status tosee if the router was able to receive an IP Address. If not, continueto the next step.S TEP6T o use the setup wizard to configure your Internet connection, click Setup Wizard on the System Summary page, or click Wizard inthe navigation tree. In the Basic Setup section, click Launch Now.Follow the on-screen instructions.If your web browser displays a warning message about the pop-up window, allow the blocked content.S TEP7T o configure other settings, use the links in the navigation tree.Cisco strongly recommends setting a strong administratorpassword to prevent unauthorized access to your router. For moreinformation about all settings, refer to the online Help and the CiscoSmall Business RV0xx Series VPN Router Administration Guide.Troubleshooting TipsIf you have trouble connecting to the Internet or the web-based configuration utility:•Verify that your web browser is not set to Work Offline.•Check the Local Area Connection settings for your Ethernet adapter.The PC needs to obtain an IP address through DHCP. Alternatively, it can have a static IP address in the 192.168.1.x range with the defaultgateway set to 192.168.1.1 (the router’s default IP address).•Verify that you entered the correct settings in the Wizard to set up your Internet connection, including the username and password if required. •Try resetting the modem and the router by powering off both devices.Next, power on the modem and let it sit idle for about 2 minutes. Then power on the router. You should now receive a WAN IP address.•Check the DHCP IP address range of your modem. If the modem uses the 192.168.1.x range, disconnect the cable from the modem to therouter, and then launch the router configuration utility. In the navigation tree, choose Setup > Network. Enter a new Device IP Address, such as 10RV0xx Series Routers Quick Start Guide10.1.1.1 or 192.168.0.1. Alternatively, if you have a DSL modem, leave allsettings as is and instead ask your ISP to put the DSL modem intobridge mode.Where to Go From HereSupportCisco Small BusinessSupport Community/go/smallbizsupportCisco Small BusinessSupport and Resources/go/smallbizhelpCisco Small Business Firmware Downloads /go/smallbizfirmware Enter the model number to find the latest firmrware..Product DocumentationCisco Small BusinessRouters/go/smallbizroutersCisco Small BusinessCisco Partner Central forSmall Business (PartnerLogin Required)/web/partners/sell/smbCisco Small Business Home /smb5RV0xx Series Routers Quick Start Guide11Americas HeadquartersCisco Systems, Inc.170 West T asman DriveSan Jose, CA 95134-1706USASmall Business Support, Global: /go/sbsc78-19481-01 B0 Cisco and the Cisco logo are trademarks or registered trademarks of Cisco and/or its affiliates in the U.S. and other countries. To view a list of Cisco trademarks, go to this URL: /go/trademarks. Third-party trademarks mentioned are the property of their respective owners. The use of the word partner does not imply a partnership relationship between Cisco and any other company. (1110R)© 2010-2012 Cisco Systems, Inc. All rights reserved.。
思科路由器怎么进入思科路由器怎么设置思科路由器怎么进入?要进入思科路由器设置需要满足2个条件一是,思科路由器与电脑正确连接。
二是,需要输入正确的思科路由器登陆地址,一般思科路由器默认登陆地址是192.168.1.1(您可以查看思科路由器底部的铭牌标注确认),如果这个地址无法进入,那么可能是您之前修改正登陆地址。
如果忘记了登陆地址,只能通过重置路由器,也就是将思科路由器恢复到出厂设置(教程:路由器怎样恢复设置路由器恢复出厂设置指南),然后重新使用默认的登陆地址进入就可以了。
思科路由器根本配置教程在第一次进行思科路由器配置的时候,我们需要从console端口来进行配置。
以下就是如何连接到控制端口及设置虚拟终端程序的方法:(1)使用rollover线和一个RJ45和DB9或者DB25的转换适配器连接路由器控制端口和终端计算机。
如何连接到思科路由器的控制端口:控制端口(consoleport)和辅助端口(AU某port)是思科路由器的两个管理端口,这两个端口都可以在第一次进行思科路由器配置时使用,但是我们一般都推荐使用控制端口,因为并不是所有的路由器都会有AU某端口。
(2)当路由器第一次启动时,默认的情况下是没有网络参数的,路由器不能与任何网络进行通信。
所以我们需要一个RS-232ASCLL终端或者计算机仿真ASCLL终端与控制端口进行连接。
(3)连接到端口的方法连接线缆:连接到console端口我们需要一根rollover线缆和RJ-45转DB-9的适配器。
一般在思科路由器的产品附件中我们可以见到。
无线路由器终端仿真软件:PC或者终端必须支持VT100仿真终端,通常我们在WindowsOS环境下都使用的是HyperTerminal软件。
这里我们以主机名为riga 为例,在全局模式下输入hostnameriga,然后按回车键执行命令,这时,主机提示符前的主机名变为riga,说明设置主机名成功。
一.思科路由器安装思科路由器安装与其他品牌无线路由器安装一样,主要是需要将猫、与Linksys无线路由器通过网线按照要求连接好就可以了。
思科产品型号分析在思科产品中,路由器是公司的基础产品,交换机是生产最多的产品,还有防火墙产品。
现在我就对这三个主要的思科产品的型号进行分析,方便大家了解!Cisco路由器Cisco路由的命名规则都是以Cisco开头比如:Cisco1841,Cisco2801,Cisco2901,Cisco3745。
这些都是路由器。
比如:Cisco2821 其中Cisco:是品牌,后面的前两位数字是系列号,这款产品属于2800系列,后两位是具体的型号。
其中Cisco路由器有以下几个系列:Cisco2500系列:Cisco2501、Cisco2502、一直到Cisco2514,这些都是国内能见到的设备,再往上就是国外的了,国内很少见到。
Cisco1700:1720、1721、1751、1760Cisco1800:1821、1841Cisco2600系列:2610、2611、2620、2621、2651Cisco2600XM系列:2610XM、2611XM、2620XM、2621XMCisco3600:3620、3640、3660Cisco3700:3725、3745Cisco3800:3825、3845Cisco7200:7204、7206、7204VXR、7206VXR这些都是机箱,使用当中需要引擎的支持(NPE-225、NPE-300、NPE-400、NPE-G1、最新的是NPE-G2)和业务模块的支持。
Cisco7500:7507、7513 同样也需要引擎的支持(RSP2、RSP4、RSP8、RSP16)和业务模块的支持,7200上的业务模块都能在75上使用,需要一块VIP卡的支持。
往上就是12000系列:12008,12016这些是目前最高端的。
同样也需要引擎和业务模块的支持。
思科路由器主要型号介绍:700系列ISDN路由器-76x型: 1E(10baseT)+1*BRI(NT1)-77x型: 4E(10baseT)+2个模拟电话端口(NT1)-支持30个用户---------------------------------------------------------------------800系列采用CiscoIOS技术的ISDN,IDSL和串行路由器-1*BRI(可选的NT1)、IDSL或1端口串行-可选的4端口以太网集线器和2个模拟电话端口(NT1型号)-增强的安全特性----------------------------------------------------------------------1000系列固定配置桌面访问路由器-1E-1*BRI(可选的NT1)或1端口同步或异步串行1400系列ADSL路由器-1E(10baseT)和1A TM-25(1401),或1E和1ADSL(DMT-2)(1417)-旨在提供高达8Mbps的DSL访问-Cisco端到端DSL解决方案的一部份----------------------------------------------------------------------1600系列模块化桌面访问路由器-1E or 2E(10baseT)-1*BRI(可选的NT1)或1端口同步或异步串行-1WIC槽----------------------------------------------------------------------1700系列灵活、安全的模块化访问路由器-1FE-模块化插槽支持广泛的广域网和模拟语音接口卡-支持安全的Internet、Lan、Wan访问以及新广域网应用,包括VPN、集成化语音/V oip和宽带----------------------------------------------------------------------2500系列固定配置及模块化配置访问路由器和服务器-单或双Lan,EtherNet or TokengRing-路由器/集线器或访问服务器-单、双串行或高密度串行模型----------------------------------------------------------------------2600系列模块化访问路由器、语音数据网关和拨号访问服务器-单或双Lan,EtherNet or TokenRing-与1600,1700和3600系列共享Wan Interface和网络模块。
四个思科路由器配置方面推荐文章•思科高档路由器配置参数不当导致的故障热度:•以思科路由器为例的密码恢复步骤热度:•思科路由器的口令恢复类型及步骤热度:•思科路由器的OSPF的深层理解热度:•思科路由器启动具体解析热度:四个思科路由器配置方面在思科路由器的安装过程和维护过程中我们需要注意很多问题,下面是店铺整理的一些关于四个思科路由器配置方面的相关资料,供你参考。
四个思科路由器配置方面一、控制口连接先将CISCO2500/1000系列路由器附件中的控制电缆RJ45的一端连接到CISCO的CONSOLE口上,CISO7000/4000系列路由器则将MODEM电缆的DB25的一端接到CISCO的CONSOLE口上,DB9的一端连接到PC的COM1/2上。
在PC上设置仿真终端程序:比如用WINDOWS中的TERMINAL 程序,使用COM1/2,9600BPS,8DATA BIT,2STOP BIT。
其余使用默认值。
做好控制口连接后,打开路由器的电源开关。
二、初始安装一般建议使用机器安装,这样既美观又便于维护。
注意:路由器必须使用带有有效地的电源。
一般要求使用的电源的零地间的电压<4V,零火/地火的电压就为220V。
地线保护基本上要求上网的设备需有保护地线,这些设备包括主机、工作站、HUB、交换器、路由器及连接路由器的MODEM等。
配置路由器的终端或PC 机也必须使用带有有效地的电源。
CISCO的同步串行接口是多用的,通过不同的电缆可引出不同的接口,如RS232、V.35等。
并且CISCO的同步串行接口电缆的电缆是特别预制的。
第一次安装时系统会自动进入DIALOG SETUP。
依次回答路由器名称,加密超级登录密码,超级登录密码,远程登录密码,动态路由协议,各个接口的配置等。
之后回答YES保存该配置。
然后等2分钟,按回车数下。
出现路由器名称。
打入ENABLE命令,回答超级登录密码。
出现路由器名称#。
思科路由器的六种模式及配置-路由交换路由器的六种模式:Router>普通模式查看有限的路由器信息Router>enaRouter#特权模式详细地查看、测试、调试和配置命令Router#conf tRouter(config)#全局模式Router(config)#interface e0/0Router(config-if)#端口模式Router(config)#line console 0Router(config-line)#线路模式Router(config)#router ripRouter(config-router)#路由引擎模式在路由器上绑定一个IP、MAC地址:Router(config)#arp 192.168.10.1 1820.0000.0F59 arpa如果在路由器上禁一台计算机的IP:Router(config)#arp 192.168.10.1 0000.0000.0000 arpa(将MAC地址全部写为零)(IP地址为PC机IP)查看接口情况:Router#show ip int b在这个信息中,最重要的是显示0x2102(正常启动)0x2142(非正常启动)改变路由器记录缓冲区的大小:(保存10条用过命令)Router#terminal history size 10在路由器中设置密码:1、控制密码2、telnet密码3、使能密码(普通模式进入特权模式的密码)明文4、使能密码(普通模式进入特权模式的密码)加密给路由器改名字Router(config)#hostname mbf加入欢迎词Router(config)#banner motd #..............#给一个端口配置IP地址Router(config)#interface e0(指向以太网接口,S为广域网接口)Router(config-if)#ip address IP地址MAC地址Router(config-if)#ip address IP地址MAC地址 secRouter(config-if)#no shutdown进入广域网,设置时钟频率:Router(config)#interface s0/1Router(config-if)#clock rate ?Router(config-if)#clock rate 5600保存配置:Router#write恢复出厂设置:Router#erase startRouter#reload(重新加载,选n)查看Router#show ip int b查看IP端口情况Router#show run查看系统配置我们系统的对一台路由器进行配置如下图:我们对RouterA的配置入下:RouterA>enaRouterA#show ip int bRouterA#conf tRouterA(config)#interface e0/0RouterA(config-if)#ip address 192.168.10.1 255.255.255.0 RouterA(config-if)#no shRouterA(config-if)#exitRouterA(config)#interface e0/1RouterA(config-if)#ip address 192.168.3.1 255.255.255.0 RouterA(config-if)#no shRouterA(config)#interface s0/0RouterA(config-if)#ip address 10.1.1.1 255.0.0.0RouterA(config-if)#clock rate 5600RouterA#writeRouterB>enaRouterB#show ip int bRouterB#conf tRouterB(config)#interface s0RouterB(config-if)#ip address 10.1.1.2 255.0.0.0RouterB(config-if)#no shRouterB(config)#interface e0RouterB(config-if)#ip address 192.168.2.1 255.255.255.0 RouterB#write(加静态路由表)RouterA>enaRouterA#conf tRouterA(config)#ip route 192.168.2.0 255.255.255.0 10.1.1.2 RouterB(config)#IP route 192.168.3.0 255.255.255.0 10.1.1.1RouterB(config)#ip route 192.168.10.0 255.255.255.0 10.1.1.1(使用动态路由rip协议)RouterA(config)#router ripRouterA(config-router)#network 192.168.10.0RouterA(config-router)#network 192.168.3.0RouterA(config-router)#network 10.0.0.0RouterB(config)#router ripRouterB(config-router)#network 192.168.2.0RouterB(config-router)#network 10.0.0.0(使用动态路由OSPF协议)RouterA(config)#router ospf 1RouterA(config-router)#network 192.168.10.0 0.0.0.255 area 0 RouterA(config-router)#network 192.168.3.0 0.0.0.255 area 0 RouterA(config-router)#network 10.0.0.0 0.255.255.255 area 0 RouterB(config)#router ospf 1RouterB(config-router)#network 192.168.2.0 0.0.0.255 area 0 RouterB(config-router)#network 10.0.0.0 0.255.255.255 area 0 在上面上设置中,我们已经将路由器A和路由器B的几个使用的端口配置上了IP地址,而且打开了。