Informix11.5 for linux5安装步骤
- 格式:pdf
- 大小:844.37 KB
- 文档页数:18

linux 安装教程Linux是一个自由开源的操作系统,它的安装过程相对于其他操作系统来说稍显复杂。
本文将为你介绍Linux的安装教程。
第一步:选择适合的发行版Linux有许多不同的发行版,例如Ubuntu、Fedora、Debian等等。
你需要根据自己的需求和水平选择最适合自己的一款发行版。
如果你是一个初学者,推荐选择Ubuntu,因为它有着友好的用户界面和丰富的支持文档。
第二步:准备安装媒体在安装Linux之前,你需要准备一个安装媒体,可以选择光盘、USB闪存驱动器或者虚拟光驱。
确保你的计算机可以从你选择的安装媒体引导启动。
第三步:设置BIOS在计算机启动时,按下相应的按键(通常是Del或F2)进入BIOS设置界面。
然后找到启动选项,在启动顺序中将你选择的安装媒体放在首位。
第四步:启动计算机并开始安装重新启动计算机,此时应该会从你选择的安装媒体启动。
在启动界面选择“Install”或者“安装”选项,进入安装向导。
第五步:语言和位置设置选择你想使用的语言和位置,然后点击“继续”按钮。
第六步:磁盘分区在磁盘分区界面,你可以选择自动分区或者手动分区。
如果你是一个新手,推荐选择自动分区,让系统自动为你分区。
如果你对磁盘分区有一定的了解并且想要精确控制,可以选择手动分区。
第七步:设置用户名和密码在设置用户名和密码界面,输入你的用户名和密码。
记住这个密码,因为你以后会用到它。
第八步:等待安装完成点击“继续”按钮,等待系统将文件复制到磁盘,并进行相应的配置。
这个过程可能需要一段时间,所以请耐心等待。
第九步:重启计算机安装完成后,系统会提示你重新启动计算机。
点击“重启”按钮,然后移除安装媒体。
第十步:欢迎界面重新启动后,系统会进入欢迎界面。
你需要根据界面上的指示完成一些配置,例如选择时区、更新软件等等。
至此,你已经成功安装了Linux操作系统。
接下来,你可以根据自己的需求和兴趣进一步配置和使用Linux。
总结:Linux的安装过程相对来说较为复杂,但只要按照上述步骤逐一操作,就可以顺利完成安装。
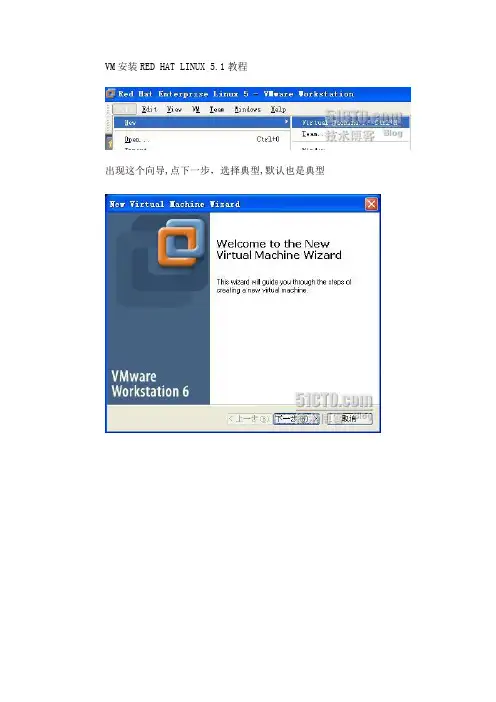
VM安装RED HAT LINUX 5.1教程出现这个向导,点下一步,选择典型,默认也是典型下一步,选择LINUX,版本选择Red Hat Enterprise Linux5输入虚拟机名字及存放位置注意:放虚拟文件的分区至少要10G以上剩余空间下一步,选择默认的桥接网络下一步,虚拟机分配硬盘空间,我们都用30G吧,下面的分页文件大小2G的,要选中,完成了。
如果你物理机器内寸是1G或者以上的,分512给虚拟机。
如果物理机是512的,分256就可以了下面点CD-ROM,点使用ISO镜象,把你们的RHEL5放进去三角符号,是启动的意思这样我们就到了RHEL5安装界面,点回车是以图形截面安装,输入linux text是用CLI安装这里我们选语言为英语,如果选中文的话,在CLI状态下会出现中文乱码的情况这里选美式键盘US这里可以输入RHEL5.1的序列号,也可以跳过不填,对安装应用没关系。
SKIP跳过提示要初始化硬盘,选YES继续。
这里分区我们选择自定义我们进行硬盘分区:New 就是建立新的分区EDIT 就是更改已有的分区DELETE 就是删除已建立的分区RESET 就是把你刚才的设定全部取消。
恢复到现在的样子RAID 是磁盘阵列LVM 是逻辑卷RAID知识点:RAID0、RAID1、RAID0+1、RAID5原理介绍RAID是通过磁盘阵列与数据条块化方法相结合, 以提高数据可用率的一种结构。
IBM早于1970年就开始研究此项技术。
RAID 可分为RAID级别1到RAID级别6, 通常称为: RAID 0, RAID 1, RAID 2, RAID 3,RAID 4,RAID 5,RAID6。
每一个RAID级别都有自己的强项和弱项. “奇偶校验”定义为用户数据的冗余信息, 当硬盘失效时, 可以重新产生数据。
RAID 0: RAID 0 并不是真正的RAID结构, 没有数据冗余。
RAID 0 连续地分割数据并并行地读/写于多个磁盘上。

我在公司,不能用QQ,我尽量帮你查,下面是informix5安装的一般步骤: 二、安装步骤:第一步:建立INFORMIX数据库系统用户安装INFORMIX数据库系统之前, 必须首先建立INFORMIX用户, 其用户名为informix, 用户组为informix。
Informix用户的建立步骤如下:1)以超级用户root注册;2)输入如下命令:#sysadmsh3)按顺序选择如下菜单:Accounts—User—Create4)系统出现输入画面时,依次输入(或选择)如下内容:Username后输入:informixComment可不输Modify defaults?选择yes5)系统出现另一个画面,此时依次输入(或选择)如下内容:Login group时选择Specify 后输入:informix(**如果系统中没有informix用户组,系统会提示:Do you wish to create it?: 选择yesGroup ID: 选择Default**)系统出现一个提示框,里面有两个用户组:group 和informix将光标停在group上面,输入一个空格,再打回车。
Login shell选择:DefaultHome directory选择:Default、Create homeUser ID number选择:DefaultType of user选择:Default6)系统提示:Are you sure you wish to create this new user account?Please choose one of: 选择:Yes7)当系统提示:Press to continue:时,输入回车键。
接着系统提示:Assign first password :选择:NowForce change at first login: 选择No然后,在提示:Setting password for user:informixPassword change is forced for informix.Choose passwordYou can choose whether you pick a password,Of have the system create one for you.1. Pick a password2. Prounceable password will be generated for youEnter choice (default is 1): 直接输入回车Please enter new password:New password : 输入新口令Re-enter password: 重新输入新口令Press to continue:输入回车键8)退出实用程序sysadmsh,则新用户informix就已经按照要求建立起来了。

青海农信核心业务主机安装过程一:准备环境:创建VG的命令mkvg –f –vg applvg hdisk1文件系统是建立在lv(逻辑卷)上的,lv(逻辑卷)是建立在vg(卷组)上的Jfs(raw/jfs2)←lv←vg1、用smitty建立/usr/informix文件系统。
空间为1G。
2、chown -R informix:informix informixMount /Informix 激活文件系统3、用smitty建立informix用户,令informix用户的主目录为/usr/informix。
4、编辑/usr/informix目录下的.profile文件写入脚本。
ONCONFIG=onconfig.qhnxINFORMIXSERVER=qhnxonlineINFORMIXDIR=/usr/informixINFORMIXBINDIR=$INFORMIXDIR/binTERMCAP=$INFORMIXDIR/etc/gtmp/termcapDBEDIT=viDBLANG=english_us.8859LIBPATH=$INFORMIXDIR/lib:$INFORMIXDIR/lib/esql:$INFORMIXDIR/lib/tools:/usr/lib:. DBDATE=Y4MDINFORMIXSTACKSIZE=128KAIOOFF=1TERM=vt100PATH=/usr/bin:/etc:/usr/sbin:/usr/ucb:$HOME/bin:/usr/bin/X11:/sbin:.PATH=$PATH:$INFORMIXBINDIRexport ONCONFIG INFORMIXSERVER DBDATE DBEDIT DBLANG LIBPATH INFORMIXSTACKSIZE KAIOOFF INFORMIXBINDIR TERM PATH INFORMIXDIR PATH TERMCAPif [ -s "$MAIL" ] # This is at Shell startup. In normalthen echo "$MAILMSG" # operation, the Shell checksfi # periodically.PS1='[229:$LOGNAME]:$PWD>'export PS1alias 'l=ls -l'set -o vi或者可以将2.1 2.3 2.6 2.7的/usr/Informix 下的.profile 文件拷贝过来。

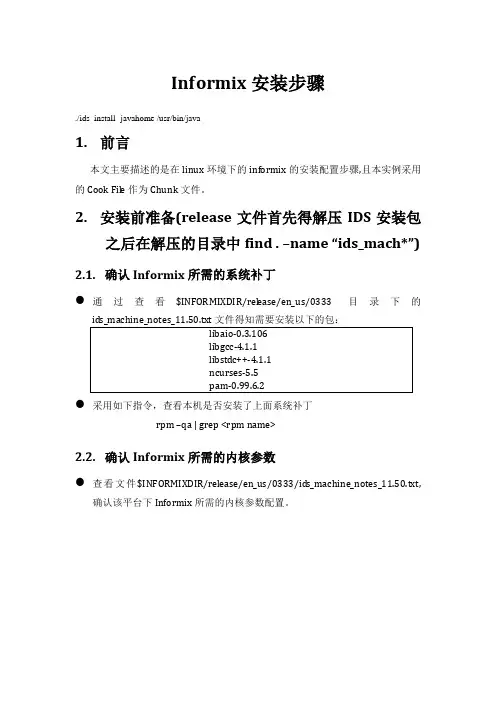
Informix安装步骤./ids_install -javahome /usr/bin/java1.前言本文主要描述的是在linux环境下的informix的安装配置步骤,且本实例采用的Cook File作为Chunk文件。
2.安装前准备(release文件首先得解压IDS安装包之后在解压的目录中find . –name“ids_mach*”)2.1.确认Informix所需的系统补丁通过查看$INFORMIXDIR/release/en_us/0333目录下的ids_machine_notes_11.50.txt文件得知需要安装以下的包:libaio-0.3.106libgcc-4.1.1libstdc++-4.1.1ncurses-5.5pam-0.99.6.2采用如下指令,查看本机是否安装了上面系统补丁页脚内容1rpm –qa | grep <rpm name>2.2.确认Informix所需的内核参数查看文件$INFORMIXDIR/release/en_us/0333/ids_machine_notes_11.50.txt,确认该平台下Informix所需的内核参数配置。
SHMMAX: 33554432SHMMIN: 1SHMMNI: 128SHMSEG: 128SHMALL: 4194304SEMMNI: 128SEMMSL: 250SEMMNS: 32000SEMOPM: 32SHMBASE 0x44000000L请参考如下步骤进行内核参数修改:以root的身份登录页脚内容2修改文件/etc/sysctl.conf执行“sysctl –p”,使更改生效2.3.确认DISK剩余空间充足请确保磁盘剩余空间>1G,由于本实例采用cook file作为chunk文件,所以建议至少大于2G的磁盘空间2.4.创建Informix用户及组以root用户执行如下指令,创建所需的user和groupgroupadd informix;useradd informix –g informix3.安装informix软件3.1.创建安装环境在/home/informix目录下创建install目录,并将informix的安装包放在其目录下3.2.解压安装包tar -xvf IDS.11.50.FC5.Linux.x86.CZ5IZEN.tar3.3.执行安装指令页脚内容3su – rootexport INFORMIXDIR=/home/informix/ids1150 安装目录cd /home/informix/install/./ids_install下面出现的是安装过程中需要选择的一些信息:是否选用图形界面安装Do you want to run installer in GUI mode [y/n] : n 确认安装选项1. Release Notes2. Installation Guide3. Launch Information Center4. Begin InstallationPlease select one of these options [4] 4确认继续执行安装页脚内容4Press 1 for Next, 3 to Cancel or 4 to Redisplay [1] 1确认安装版本Welcome to the InstallShield Wizard for IBM Informix Dynamic Server Version 11.50 BundleThe InstallShield Wizard will install IBM Informix Dynamic Server Version 11.50 Bundle on your computer.To continue, choose Next.Press 1 for Next, 2 for Previous, 3 to Cancel or 4 to Redisplay [1] 1确认接受使用许可协议并继续Press Enter to continue viewing the license agreement, or, Enter "1" to accept the agreement, "2" to decline it or "99" to go back to the previous screen, "3" Print, "4" Read Non-IBM Terms.1Press 1 for Next, 3 to Cancel or 4 to Redisplay [1] 1确认安装目录继续页脚内容5IBM Informix Dynamic Server Version 11.50 Bundle Install Location Please specify a directory or press Enter to accept the default directory. Directory Name: [/home/informix/ids1150]Press 1 for Next, 3 to Cancel or 4 to Redisplay [1] 1确认安装的产品并继续Select the products you would like to install:To select/deselect a product or to change its setup type, type its number: Product Setup Type------------------------------------------------ ------------------------1. [ ] IBM Informix IConnect Version 3.502. [x] IBM Informix Client-SDK Version3.50 Typical3. [x] IBM Informix Dynamic Server Version 11.50 Typical4. [x] IBM Informix JDBC Driver Version 3.50Other options:0. Continue installingEnter command [0]页脚内容6Press 1 for Next, 2 for Previous, 3 to Cancel or 4 to Redisplay [1] 1确认是否进行角色分离Do you want to enable role separation for auditing procedures? [ ] 1 - Yes[X] 2 - NoTo select an item enter its number, or 0 when you are finished: [0]If you enable role separation, you can assign existing groups of users to specific roles.If you do not enable role separation, the database server administrator performs all administration tasks.Press 1 for Next, 2 for Previous, 3 to Cancel or 4 to Redisplay [1] 1确认是否建立IDS示范数据库服务器实例并继续Do you want to create an IDS demonstration database server instance? [ ] 1 - Yes[X] 2 - No页脚内容7To select an item enter its number, or 0 when you are finished: [0]You can use a demonstration database server instance to verify that IDS is installed correctly and that the hardware is configured correctly. You can also configure the demonstration database server instance to use it as a production instance.Press 1 for Next, 2 for Previous, 3 to Cancel or 4 to Redisplay [1] 1确认安装信息并继续IBM Informix Dynamic Server Version 11.50 Bundle will be installed in the following location:/home/informix/ids1150with the following features:IBM Informix Client-SDK Version 3.50IBM Informix Dynamic Server Version 11.50IBM Informix JDBC Driver Version 3.50for a total size:446.5 MB页脚内容8Press 1 for Next, 2 for Previous, 3 to Cancel or 4 to Redisplay [1] 1开始安装Installing IBM Informix Client-SDK Version 3.50. Please wait...0 % complete10 % complete20 % complete30 % complete40 % complete50 % complete60 % complete70 % complete80 % complete90 % complete100 % complete……确认是否读安装文本并继续页脚内容9Press ENTER to read the text [Type q to quit] qPress 1 for Next, 3 to Cancel or 4 to Redisplay [1] 1确认成功安装The InstallShield Wizard has successfully installed IBM Informix Dynamic Server Version 11.50 Bundle. Choose Next to continue the wizard.Press 1 for Next, 3 to Cancel or 4 to Redisplay [1] 11. Release Notes2. Installation Guide3. Launch Information Center4. Finish InstallationPlease select one of these options [4] 4Finishing installation...Press 3 to Finish or 4 to Redisplay [3]rmix实例配置4.1.环境变量的设置页脚内容10su – Informix 切换至informix用户vi setenv1150 建立一个脚本写环境变量INFORMIXSERVER=pc100_ids1150INFORMIXDIR=/home/informix/ids1150 INFINFORMIXSQLHOSTS=$INFORMIXDIR/etc/sqlhostsONCONFIG=onconfig.$INFORMIXSERVERPATH=$INFORMIXDIR/bin:$PATHexport INFORMIXSERVER INFORMIXDIR INFORMIXSQLHOSTS ONCONFIG PATH 将脚本写到.bash_profile中. /home/informix/setenv1150执行. ./.bash_profile4.2.配置SQLHOSaobTS文件页脚内容114.3.配置ONCONFIG文件页脚内容124.4.建立chunk目录并建立文件4.5.初始化实例oninit –i5.日志的移动5.1.分别建立一个物理的和逻辑的chunk文件并更改权限页脚内容13touch llogdbs.chkchmod 660 plogdbs.chkchmod 660 llogdbs.chk5.2.分别建立物理和逻辑的dbspaceonspaces -c -d plogdbs -p /home/informix/ids1150/chunk/plogdbs.chk -o 0 -s 50000onspaces -c -d llogdbs -p /home/informix/ids1150/chunk/llogdbs.chk -o 0 -s 500005.3.移动物理日志将物理日志从rootdbs下移动到plogdbsonparams -p -s 49000 -d plogdbs5.4.逻辑日志的增加onparams -a -d llogdbs -s 5000注意:此操作执行10次,但是在最后一次的时候会报错,是因为空间已经不够了。
Informix生产系统安装及配置一、ApplicationDB数据库安装与配置1、创建用户和用户组创建informix用户和informix组Informix用户挂载点/Informix2、修改环境变量修改informix用户的.profile文件,Vi .profile 添加以下内容:INFORMIXDIR=/Informix;PATH=$INFORMIXDIR/bin:$PATH;ONCONFIG=onconfig.loan;INFORMIXSERVER=loandb;export INFORMIXDIR PATH ONCONFIG INFORMIXSERVERexport TERM=vt100TERMINFO=$INFORMIXDIR/etc/typetab;TERMCAP=$INFORMIXDIR/etc/termcap;DBDATE=Y4MD-;Export TERMINFOR TERMCAP DBDATE3、安装数据库及组件Csdk安装:1)Cd /opt/Informix_setup/csdk2)Chmod 777 installclientsdk3)./installclientsdk4)根据安装向导填写安装路径/informix,其他选项按默认值选择,之后开始安装IDS安装:1)Cd /opt/Informix_setup/server2)Chmod 777 installserver3)./installserver4)根据安装向导填写安装路径/informix,其他选项按默认值选择,之后开始安装4、更改磁盘设备信息属组及权限并链接设备文件将所有为AppliactionDB数据库创建的裸设备的字符型设备文件(c类型)的属组更改为informix:InformixCd /devChownInformix:Informixrloan* rflow* rtemp* rphy* rlog*将所有为AppliactionDB数据库创建的裸设备的字符型设备文件(c类型)的权限更改为660Chmod 660 rloan* rflow* rtemp* rphy* rlog*Su –InformixMkdir data将所有为AppliactionDB数据库创建的裸设备的字符型设备文件(c类型)软链接到该目录下,例如:Ln –s /dev/rloan_rootdbsloan_rootdbs链接所在目录:Loan_data_01:/Informix/data/loan_data/Loan_data_02:/Informix/data/loan_data/Loan_index_data:/Informix/data/loan_index/Flow_data_01:/Informix/data/flow_data/Flow_data_02:/Informix/data/flow_data/Flow_index_data:/Informix/data/flow_index/Tempdbs:/Informix/data/temp_data/Rootdbs:/Informix/data/Phy_loan_log:/Informix/data/Log_loan_log:/Informix/data/5、创建onconfig脚本Su –InformixCd etcCponconfig.stdonconfig.loanOnconfig参数修改:################################################################### # Licensed Material - Property Of IBM## "Restricted Materials of IBM"## IBM Informix Dynamic Server# Copyright IBM Corporation 1996, 2009. All rights reserved.## Title: onconfig.std# Description: IBM Informix Dynamic Server Configuration Parameters ## Important: $INFORMIXDIR now resolves to the environment# variable INFORMIXDIR. Replace the value of the INFORMIXDIR# environment variable only if the path you want is not under# $INFORMIXDIR.## For additional information on the parameters:# /infocenter/idshelp/v115/index.jsp####################################################################################################################################### Root Dbspace Configuration Parameters#################################################################### ROOTNAME - The root dbspace name to contain reserved pages and # internal tracking tables.# ROOTPATH - The path for the device containing the root dbspace # ROOTOFFSET - The offset, in KB, of the root dbspace into the# device. The offset is required for some raw devices. # ROOTSIZE - The size of the root dbspace, in KB. The value of # 200000 allows for a default user space of about# 100 MB and the default system space requirements.# MIRROR - Enable (1) or disable (0) mirroring# MIRRORPATH - The path for the device containing the mirrored# rootdbspace# MIRROROFFSET - The offset, in KB, into the mirrored device## Warning: Always verify ROOTPATH before performing# disk initialization (oninit -i or -iy) to# avoid disk corruption of another instance###################################################################ROOTNAME rootdbsROOTPATH $INFORMIXDIR/data/loan_rootdbs(修改到rootdbs所在目录)ROOTOFFSET 256 (偏移量256K)ROOTSIZE 4000000(大小4G)MIRROR 0MIRRORPATH $INFORMIXDIR/tmp/demo_on.root_mirrorMIRROROFFSET 0#################################################################### Physical Log Configuration Parameters#################################################################### PHYSFILE - The size, in KB, of the physical log on disk. # If RTO_SERVER_RESTART is enabled, the# suggested formula for the size of PHSYFILE# (up to about 1 GB) is:# PHYSFILE = Size of BUFFERS * 1.1# PLOG_OVERFLOW_PATH - The directory for extra physical log files# if the physical log overflows during recovery # or long transaction rollback# PHYSBUFF - The size of the physical log buffer, in KB###################################################################PHYSFILE 39000000PLOG_OVERFLOW_PATH $INFORMIXDIR/tmpPHYSBUFF 128################################################################### # Logical Log Configuration Parameters################################################################### # LOGFILES - The number of logical log files# LOGSIZE - The size of each logical log, in KB# DYNAMIC_LOGS - The type of dynamic log allocation.# Acceptable values are:# 2 Automatic. IDS adds a new logical log to the# root dbspace when necessary.# 1 Manual. IDS notifies the DBA to add new logical # logs when necessary.# 0 Disabled# LOGBUFF - The size of the logical log buffer, in KB###################################################################LOGFILES 250LOGSIZE 10000DYNAMIC_LOGS 2LOGBUFF 64################################################################### # Long Transaction Configuration Parameters################################################################### # If IDS cannot roll back a long transaction, the server hangs# until more disk space is available.## LTXHWM - The percentage of the logical logs that can be# filled before a transaction is determined to be a # long transaction and is rolled back# LTXEHWM - The percentage of the logical logs that have been # filled before the server suspends all other# transactions so that the long transaction being# rolled back has exclusive use of the logs## When dynamic logging is on, you can set higher values for# LTXHWM and LTXEHWM because the server can add new logical logs# during long transaction rollback. Set lower values to limit the # number of new logical logs added.## If dynamic logging is off, set LTXHWM and LTXEHWM to# lower values, such as 50 and 60 or lower, to prevent long# transaction rollback from hanging the server due to lack of# logical log space.## When using Enterprise Replication, set LTXEHWM to at least 30%# higher than LTXHWM to minimize log overruns.###################################################################LTXHWM 70LTXEHWM 80################################################################### # Server Message File Configuration Parameters################################################################### # MSGPATH - The path of the IDS message log file# CONSOLE - The path of the IDS console message file###################################################################MSGPATH $INFORMIXDIR/online_loan.logCONSOLE $INFORMIXDIR/tmp/online.con################################################################### # Tblspace Configuration Parameters################################################################### # TBLTBLFIRST - The first extent size, in KB, for the tblspace # tblspace. Must be in multiples of the page size. # TBLTBLNEXT - The next extent size, in KB, for the tblspace# tblspace. Must be in multiples of the page size. # The default setting for both is 0, which allows IDS to manage# extent sizes automatically.## TBLSPACE_STATS - Enables (1) or disables (0) IDS to maintain# tblspace statistics###################################################################TBLTBLFIRST 0TBLTBLNEXT 0TBLSPACE_STATS 1################################################################### # Temporary dbspace and sbspace Configuration Parameters################################################################### # DBSPACETEMP - The list of dbspaces used to store temporary# tables and other objects. Specify a colon# separated list of dbspaces that exist when the# server is started. If no dbspaces are specified,# or if all specified dbspaces are not valid,# temporary files are created in the /tmp directory# instead.# SBSPACETEMP - The list of sbspaces used to store temporary# tables for smart large objects. If no sbspace# is specified, temporary files are created in# a standard sbspace.###################################################################DBSPACETEMP tempdbsSBSPACETEMP################################################################### # Dbspace and sbspace Configuration Parameters################################################################### # SBSPACENAME - The default sbspace name where smart large objects # are stored if no sbspace is specified during# smart large object creation. Some DataBlade# modules store smart large objects in this# location.# SYSSBSPACENAME - The default sbspace for system statistics# collection. Otherwise, IDS stores statistics# in the sysdistrib system catalog table.# ONDBSPACEDOWN - Specifies how IDS behaves when it encounters a# dbspace that is offline. Acceptable values# are:# 0 Continue# 1 Stop# 2 Wait for DBA action###################################################################SBSPACENAMESYSSBSPACENAMEONDBSPACEDOWN 2################################################################### # System Configuration Parameters################################################################### # SERVERNUM - The unique ID for the IDS instance. Acceptable # values are 0 through 255, inclusive.# DBSERVERNAME - The name of the default database server# DBSERVERALIASES - The list of up to 32 alternative dbservernames, # separated by commas###################################################################SERVERNUM 0DBSERVERNAME loandbDBSERVERALIASES loandbshm################################################################### # Network Configuration Parameters################################################################### # NETTYPE - The configuration of poll threads# for a specific protocol. The# format is:# NETTYPE <protocol>,<# poll threads> # ,<number of connections/thread># ,(NET|CPU)# You can include multiple NETTYPE# entries for multiple protocols.# LISTEN_TIMEOUT - The number of seconds that IDS# waits for a connection# MAX_INCOMPLETE_CONNECTIONS - The maximum number of incomplete# connections before IDS logs a Denial # of Service (DoS) error# FASTPOLL - Enables (1) or disables (0) fast# polling of your network, if your# operating system supports it.###################################################################NETTYPE s octcp,8,500,NET (网络协议用户4000)NETTYPE ipcshm,2,50,CPU (内存通道用户100)LISTEN_TIMEOUT 60MAX_INCOMPLETE_CONNECTIONS 1024FASTPOLL 1################################################################### # CPU-Related Configuration Parameters################################################################### # MULTIPROCESSOR - Specifies whether the computer has multiple # CPUs. Acceptable values are: 0 (single# processor), 1 (multiple processors or# multi-core chips)# VPCLASS cpu - Configures the CPU VPs. The format is:# VPCLASS cpu,num=<#>[,max=<#>][,aff=<#>]# [,noage]# VP_MEMORY_CACHE_KB - Specifies the amount of private memory# blocks of your CPU VP, in KB, that the# database server can access.# Acceptable values are:# 0 (disable)# 800 through 40% of the value of SHMTOTAL# SINGLE_CPU_VP - Optimizes performance if IDS runs with# only one CPU VP. Acceptable values are:# 0 multiple CPU VPs# Any nonzero value (optimize for one CPU VP) ###################################################################MULTIPROCESSOR 1VPCLASS cpu,num=8,noageVP_MEMORY_CACHE_KB 0SINGLE_CPU_VP 0################################################################### # AIO and Cleaner-Related Configuration Parameters################################################################### # VPCLASS aio - Configures the AIO VPs. The format is:# VPCLASS aio,num=<#>[,max=<#>][,aff=<#>][,noage] # CLEANERS - The number of page cleaner threads# AUTO_AIOVPS - Enables (1) or disables (0) automatic management # of AIO VPs# DIRECT_IO - Specifies whether direct I/O is used for cooked# files used for dbspace chunks.# Acceptable values are:# 0 Disable# 1 Enable direct I/O# 2 Enable concurrent I/O####################################################################VPCLASS aio,num=1CLEANERS 8AUTO_AIOVPS 1DIRECT_IO 0################################################################### # Lock-Related Configuration Parameters################################################################### # LOCKS - The initial number of locks when IDS starts. # Dynamic locking can add extra locks if needed. # DEF_TABLE_LOCKMODE - The default table lock mode for new tables.# Acceptable values are ROW and PAGE (default). ###################################################################LOCKS 1000000DEF_TABLE_LOCKMODE row################################################################### # Shared Memory Configuration Parameters################################################################### # RESIDENT - Controls whether shared memory is resident.# Acceptable values are:# 0 off (default)# 1 lock the resident segment only# n lock the resident segment and the next n-1# virtual segments, where n < 100# -1 lock all resident and virtual segments# SHMBASE - The shared memory base address; do not change# SHMVIRTSIZE - The initial size, in KB, of the virtual# segment of shared memory# SHMADD - The size, in KB, of additional virtual shared# memory segments# EXTSHMADD - The size, in KB, of each extension shared# memory segment# SHMTOTAL - The maximum amount of shared memory for IDS,# in KB. A 0 indicates no specific limit.# SHMVIRT_ALLOCSEG - Controls when IDS adds a memory segment and# the alarm level if the memory segment cannot# be added.# For the first field, acceptable values are:# - 0 Disabled# - A decimal number indicating the percentage# of memory used before a segment is added# - The number of KB remaining when a segment# is added# For the second field, specify an alarm level# from 1 (non-event) to 5 (fatal error).# SHMNOACCESS - A list of up to 10 memory address ranges# that IDS cannot use to attach shared memory.# Each address range is the start and end memory # address in hex format, separated by a hyphen. # Use a comma to separate each range in the list. ###################################################################RESIDENT 0SHMBASE 0x700000010000000SHMVIRTSIZE 32656SHMADD 8192EXTSHMADD 8192SHMTOTAL 0SHMVIRT_ALLOCSEG 0,3SHMNOACCESS################################################################### # Checkpoint and System Block Configuration Parameters################################################################### # CKPINTVL - Specifies how often, in seconds, IDS checks# if a checkpoint is needed. 0 indicates that# IDS does not check for checkpoints. Ignored # if RTO_SERVER_RESTART is set.# AUTO_CKPTS - Enables (1) or disables (0) monitoring of# critical resource to trigger checkpoints# more frequently if there is a chance that# transaction blocking might occur.# RTO_SERVER_RESTART - Specifies, in seconds, the Recovery Time# Objective for IDS restart after a server# failure. Acceptable values are 0 (off) and# any number from 60-1800, inclusive.# BLOCKTIMEOUT - Specifies the amount of time, in seconds,# for a system block.###################################################################CKPTINTVL 1800AUTO_CKPTS 1RTO_SERVER_RESTART 0BLOCKTIMEOUT 3600################################################################### # Transaction-Related Configuration Parameters################################################################### # TXTIMEOUT - The distributed transaction timeout, in seconds# DEADLOCK_TIMEOUT - The maximum time, in seconds, to wait for a# lock in a distributed transaction.# HETERO_COMMIT - Enables (1) or disables (0) heterogeneous# commits for a distributed transaction# involving an EGM gateway.###################################################################TXTIMEOUT 300DEADLOCK_TIMEOUT 60HETERO_COMMIT 0################################################################### # ontape Tape Device Configuration Parameters################################################################### # TAPEDEV - The tape device path for backups. To use standard# I/O instead of a device, set to stdio.# TAPEBLK - The tape block size, in KB, for backups# TAPESIZE - The maximum amount of data to put on one backup# tape. Acceptable values are 0 (unlimited) or any# positive integral multiple of TAPEBLK.###################################################################TAPEDEV /dev/nullTAPEBLK 32TAPESIZE 0################################################################### # ontapeLogial Log Tape Device Configuration Parameters################################################################### # LTAPEDEV - The tape device path for logical logs# LTAPEBLK - The tape block size, in KB, for backing up logical # logs# LTAPESIZE - The maximum amount of data to put on one logical# log tape. Acceptable values are 0 (unlimited) or any # positive integral multiple of LTAPEBLK.###################################################################LTAPEDEV /dev/nullLTAPEBLK 32LTAPESIZE 0################################################################### # Backup and Restore Configuration Parameters#################################################################### BAR_ACT_LOG - The ON-Bar activity log file location.# Do not use the /tmp directory. Use a# directory with restricted permissions.# BAR_DEBUG_LOG - The ON-Bar debug log file location.# Do not use the /tmp directory. Use a# directory with restricted permissions.# BAR_DEBUG - The debug level for ON-Bar. Acceptable# values are 0 (off) through 9 (high).# BAR_MAX_BACKUP - The number of backup threads used in a# backup. Acceptable values are 0 (unlimited)# or any positive integer.# BAR_RETRY - Specifies the number of time to retry a# backup or restore operation before reporting # a failure# BAR_NB_XPORT_COUNT - Specifies the number of data buffers that# eachonbar_d process uses to communicate# with the database server# BAR_XFER_BUF_SIZE - The size, in pages, of each data buffer.# Acceptable values are 1 through 15 for# 4 KB pages and 1 through 31 for 2 KB pages.# RESTARTABLE_RESTORE - Enables ON-Bar to continue a backup after a# failure. Acceptable values are OFF or ON.# BAR_PROGRESS_FREQ - Specifies, in minutes, how often progress# messages are placed in the ON-Bar activity# log. Acceptable values are: 0 (record only# completion messages) or 5 and above.# BAR_BSALIB_PATH - The shared library for ON-Bar and the# storage manager. The default value is# $INFORMIXDIR/lib/ibsad001 (with a# platform-specific file extension).# BACKUP_FILTER - Specifies the pathname of a filter program# to transform data during a backup, plus any# program options# RESTORE_FILTER - Specifies the pathname of a filter program# to transform data during a restore, plus any # program options# BAR_PERFORMANCE - Specifies the type of performance statistics# to report to the ON-Bar activity log for backup # and restore operations.# Acceptable values are:# 0 = Turn off performance monitoring (Default) # 1 = Display the time spent transferring data # between the IDS instance and the storage # manager# 2 = Display timestamps in microseconds# 3 = Display both timestamps and transfer # statistics###################################################################BAR_ACT_LOG $INFORMIXDIR/tmp/bar_act.logBAR_DEBUG_LOG $INFORMIXDIR/tmp/bar_dbug.logBAR_DEBUG 0BAR_MAX_BACKUP 0BAR_RETRY 1BAR_NB_XPORT_COUNT 20BAR_XFER_BUF_SIZE 31RESTARTABLE_RESTORE ONBAR_PROGRESS_FREQ 0BAR_BSALIB_PATHBACKUP_FILTERRESTORE_FILTERBAR_PERFORMANCE 0################################################################### # Informix Storage Manager (ISM) Configuration Parameters################################################################### # ISM_DATA_POOL - Specifies the name for the ISM data pool# ISM_LOG_POOL - Specifies the name for the ISM log pool###################################################################ISM_DATA_POOL ISMDataISM_LOG_POOL ISMLogs################################################################### # Data Dictionary Cache Configuration Parameters################################################################### # DD_HASHSIZE - The number of data dictionary pools. Set to any# positive integer; a prime number is recommended. # DD_HASHMAX - The number of entries per pool.# Set to any positive integer.###################################################################DD_HASHSIZE 31DD_HASHMAX 10################################################################### # Data Distribution Configuration Parameters#################################################################### DS_HASHSIZE - The number of data Ddstribution pools.# Set to any positive integer; a prime number is# recommended.# DS_POOLSIZE - The maximum number of entries in the data# distribution cache. Set to any positive integer.###################################################################DS_HASHSIZE 31DS_POOLSIZE 127################################################################### User Defined Routine (UDR) Cache Configuration Parameters################################################################### PC_HASHSIZE - The number of UDR pools. Set to any# positive integer; a prime number is recommended.# PC_POOLSIZE - The maximum number of entries in the# UDR cache. Set to any positive integer.###################################################################PC_HASHSIZE 31PC_POOLSIZE 127#################################################################### SQL Statement Cache Configuration Parameters#################################################################### STMT_CACHE - Controls SQL statement caching. Acceptable# values are:# 0 Disabled# 1 Enabled at the session level# 2 All statements are cached# STMT_CACHE_HITS - The number of times an SQL statement must be# executed before becoming fully cached.# 0 indicates that all statements are# fully cached the first time.# STMT_CACHE_SIZE - The size, in KB, of the SQL statement cache# STMT_CACHE_NOLIMIT - Controls additional memory consumption.# Acceptable values are:# 0 Limit memory to STMT_CACHE_SIZE# 1 Obtain as much memory, temporarily, as needed # STMT_CACHE_NUMPOOL - The number of pools for the SQL statement# cache. Acceptable value is a positive# integer between 1 and 256, inclusive.###################################################################STMT_CACHE 0STMT_CACHE_HITS 0STMT_CACHE_SIZE 512STMT_CACHE_NOLIMIT 0STMT_CACHE_NUMPOOL 1################################################################### # Operating System Session-Related Configuration Parameters################################################################### # USEOSTIME - The precision of SQL statement timing.# Accepted values are 0 (precision to seconds)# and 1 (precision to subseconds). Subsecond# precision can degrade performance.# STACKSIZE - The size, in KB, for a session stack# ALLOW_NEWLINE - Controls whether embedded new line characters # in string literals are allowed in SQL# statements. Acceptable values are 1 (allowed) # and any number other than 1 (not allowed).# USELASTCOMMITTED - Controls the committed read isolation level.# Acceptable values are:# - NONE Waits on a lock# - DIRTY READ Uses the last committed value in # place of a dirty read# - COMMITTED READ Uses the last committed value # in place of a committed read# - ALL Uses the last committed value in place # of all isolation levels that support the last # committed option###################################################################USEOSTIME 0STACKSIZE 64ALLOW_NEWLINE 0USELASTCOMMITTED NONE################################################################### # Index Related Configuration Parameters################################################################### # FILLFACTOR - The percentage of index page fullness# MAX_FILL_DATA_PAGES - Enables (1) or disables (0) filling data# pages that have variable length rows as# full as possible# BTSCANNER - Specifies the configuration settings for all # btscanner threads. The format is:# BTSCANNER num=<#>,threshold=<#>,rangesize=<#>, # alice=(0-12),compression=[low|med|high|default] # ONLIDX_MAXMEM - The amount of memory, in KB, allocated for# the pre-image pool and updator log pool for# each partition.###################################################################FILLFACTOR 90MAX_FILL_DATA_PAGES 0BTSCANNER num=1,threshold=5000,rangesize=-1,alice=6,compression=default ONLIDX_MAXMEM 5120#################################################################### Parallel Database Query (PDQ) Configuration Parameters#################################################################### MAX_PDQPRIORITY - The maximum amount of resources, as a# percentage, that PDQ can allocate to any# one decision support query# DS_MAX_QUERIES - The maximum number of concurrent decision# support queries# DS_TOTAL_MEMORY - The maximum amount, in KB, of decision# support query memory# DS_MAX_SCANS - The maximum number of concurrent decision# support scans# DS_NONPDQ_QUERY_MEM - The amount of non-PDQ query memory, in KB.# Acceptable values are 128 to 25% of# DS_TOTAL_MEMORY.# DATASKIP - Specifies whether to skip dbspaces when# processing a query. Acceptable values are:# - ALL Skip all unavailable fragments# - ON <dbspace1><dbspace2>... Skip listed# dbspaces# - OFF Do not skip dbspaces (default)###################################################################MAX_PDQPRIORITY 100DS_MAX_QUERIESDS_TOTAL_MEMORYDS_MAX_SCANS 1048576DS_NONPDQ_QUERY_MEM 128DATASKIP#################################################################### Optimizer Configuration Parameters# OPTCOMPIND - Controls how the optimizer determines the best# query path. Acceptable values are:# 0 Nested loop joins are preferred# 1 If isolation level is repeatable read,# works the same as 0, otherwise works same as 2# 2 Optimizer decisions are based on cost only# DIRECTIVES - Specifies whether optimizer directives are# enabled (1) or disabled (0). Default is 1.# EXT_DIRECTIVES - Controls the use of external SQL directives.# Acceptable values are:# 0 Disabled# 1 Enabled if the IFX_EXTDIRECTIVES environment# variable is enabled# 2 Enabled even if the IFX_EXTDIRECTIVES# environment is not set# OPT_GOAL - Controls how the optimizer should optimize for# fastest retrieval. Acceptable values are:# -1 All rows in a query# 0 The first rows in a query# IFX_FOLDVIEW - Enables (1) or disables (0) folding views that# have multiple tables or a UNION ALL clause.# Disabled by default.# AUTO_REPREPARE - Enables (1) or disables (0) automatically# re-optimizing stored procedures and re-preparing# prepared statements when tables that are referenced # by them change. Minimizes the occurrence of the# -710 error.####################################################################OPTCOMPIND 2DIRECTIVES 1EXT_DIRECTIVES 0OPT_GOAL -1IFX_FOLDVIEW 0AUTO_REPREPARE 1#################################################################### Read-ahead Configuration Parameters####################################################################RA_PAGES - The number of pages, as a positive integer, to# attempt to read ahead#RA_THRESHOLD - The number of pages, as a postive integer, left# before the next read-ahead group。

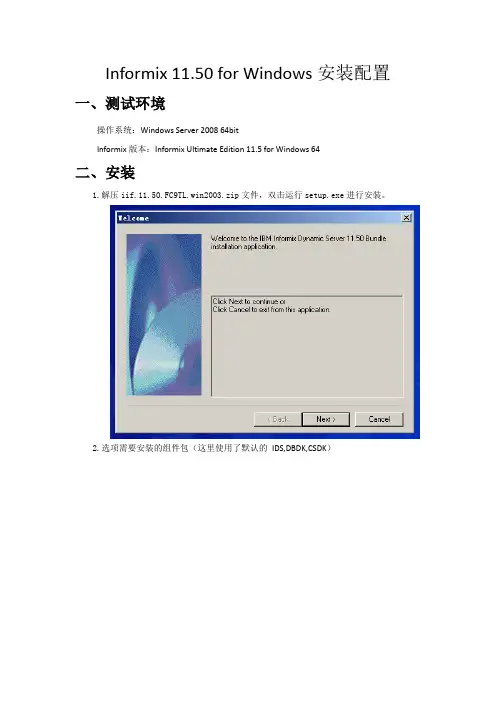
Informix 11.50 for Windows安装配置一、测试环境
操作系统:Windows Server 2008 64bit
Informix版本:Informix Ultimate Edition 11.5 for Windows 64
二、安装
1.解压iif.11.50.FC9TL.win2003.zip文件,双击运行setup.exe进行安装。
2.选项需要安装的组件包(这里使用了默认的IDS,DBDK,CSDK)
3.点击Next继续执行
4.阅读并接受协议,点击Next
5.选择Typical方式进行安装
6.选择安装目录,这里安装路径设置为“E:\informix11.5”。
7.设置informix 用户密码
8.确认安装信息,点击“Next”
9.等待IDS安装结束,点击“Finish”。
10.自动加载DBDK安装程序
11.点击Next执行安装
12.设置DBDK安装目录
13.点击Done完成DBDK安装
14.自动加载CSDK安装程序
15.选择接受许可协议
16.设置本地信息,默认Windows用户
17.选择Custom进行安装
18.为Client-SDK设置路径
19.点击Next后,进行安装
20.完成CSDK 安装
21.全部完成安装后,程序组里增加了IDS,DBDK,CSDK 三组,在IDS 的程序组里:以数据库服务名(ids1150)为标题的链接可视为informix 的console 接口,server instance manager 可以管理instance,modifyinstallation 可以管理informix 安装组件。
Informix安装步骤./ids_install -javahome /usr/bin/java1.前言本文主要描述的是在linux环境下的informix的安装配置步骤,且本实例采用的Cook File作为Chunk文件。
2.安装前准备(release文件首先得解压IDS安装包之后在解压的目录中find . –name “ids_mach*”)2.1.确认Informix所需的系统补丁●通过查看$INFORMIXDIR/rel ease/en_us/0333目录下的●采用如下指令,查看本机是否安装了上面系统补丁rpm –qa | grep <rpm name>2.2.确认Informix所需的内核参数●查看文件$INFORMIXDIR/release/en_us/0333/ids_machine_notes_11.50.txt,确认该平台下Informix所需的内核参数配置。
请参考如下步骤进行内核参数修改:以root的身份登录修改文件/etc/sysctl.conf执行“sysctl –p”,使更改生效2.3.确认DISK剩余空间充足请确保磁盘剩余空间>1G,由于本实例采用cook file作为chunk文件,所以建议至少大于2G的磁盘空间2.4.创建Informix用户及组以root用户执行如下指令,创建所需的user和group3.安装informix软件3.1.创建安装环境在/home/informix目录下创建install目录,并将informix的安装包放在其目录下3.2.解压安装包3.3.执行安装指令下面出现的是安装过程中需要选择的一些信息:●是否选用图形界面安装●确认安装选项●确认继续执行安装●确认安装版本●确认接受使用许可协议并继续●确认安装目录继续●确认安装的产品并继续●确认是否进行角色分离Do you want to enabl e rol e separation for auditing procedures? [ ] 1 - Yes[X] 2 - NoTo select an item enter its number, or 0 when you are finished: [0]If you enabl e rol e separation, you can assign existing groups of users to specific rol es.If you d o not enabl e rol e separation, the database server administrator performs all administration tasks.Press 1 for Next, 2 for Previous, 3 to Cancel or 4 to Redisplay [1] 1●确认是否建立IDS示范数据库服务器实例并继续●确认安装信息并继续●开始安装●确认是否读安装文本并继续●确认成功安装rmix实例配置4.1.环境变量的设置su – Informix 切换至informix用户vi setenv1150 建立一个脚本写环境变量将脚本写到.bash_profil e中执行. ./.bash_profile4.2.配置SQLHOSaobTS文件4.3.配置ONCONFIG文件4.4.建立chunk目录并建立文件4.5.初始化实例oninit –i5.日志的移动5.1.分别建立一个物理的和逻辑的chunk文件并更改权限5.2.分别建立物理和逻辑的dbspace5.3.移动物理日志将物理日志从rootdbs下移动到pl ogdbs5.4.逻辑日志的增加注意:此操作执行10次,但是在最后一次的时候会报错,是因为空间已经不够了。

Informix安装步骤./ids_install —javahome /usr/bin/java1.前言本文主要描述的是在linux环境下的informix的安装配置步骤,且本实例采用的Cook File作为Chunk文件。
2.安装前准备(release文件首先得解压IDS安装包之后在解压的目录中find . –name “ids_mach*")2.1.确认Informix所需的系统补丁●通过查看$INFORMIXDIR/rel ease/en_us/0333目录下的●采用如下指令,查看本机是否安装了上面系统补丁rpm –qa | grep <rpm name>2.2.确认Informix所需的内核参数●查看文件$INFORMIXDIR/rel ease/en_us/0333/ids_machine_notes_11。
50.txt,确认该平台下Informix所需的内核参数配置。
请参考如下步骤进行内核参数修改:➢以root的身份登录➢修改文件/etc/sysctl。
conf➢执行“sysctl –p”,使更改生效2.3.确认DISK剩余空间充足请确保磁盘剩余空间〉1G,由于本实例采用cook file作为chunk文件,所以建议至少大于2G的磁盘空间2.4.创建Informix用户及组➢以root用户执行如下指令,创建所需的user和group3.安装informix软件3.1.创建安装环境在/home/informix目录下创建install目录,并将informix的安装包放在其目录下3.2.解压安装包3.3.执行安装指令下面出现的是安装过程中需要选择的一些信息: ●是否选用图形界面安装●确认安装选项●确认继续执行安装●确认安装版本●确认接受使用许可协议并继续●确认安装目录继续●确认安装的产品并继续●确认是否进行角色分离Do you want to enabl e rol e separation for auditing procedures?[ ] 1 - Yes[X] 2 — NoTo select an item enter its number,or 0 when you are finished:[0] If you enabl e rol e separation, you can assign existing groups of users to specific rol es.If you d o not enabl e rol e separation,the database server administrator performs all administration tasks.Press 1 for Next,2 for Previous,3 to Cancel or 4 to Redisplay [1] 1●确认是否建立IDS示范数据库服务器实例并继续●确认安装信息并继续●开始安装●确认是否读安装文本并继续●确认成功安装rmix实例配置4.1.环境变量的设置➢su – Informix 切换至informix用户➢vi setenv1150 建立一个脚本写环境变量➢将脚本写到.bash_profil e中➢执行. ./。
Informix安装指南1、使用一个其他用户登陆后,切换到root用户(root用户无法直接登陆);2、创建Informix用户组;# groupadd informix3、创建Informix用户,并是其归属informix用户组;# useradd –g informix –d /opt/Informix –s /usr/bin/csh –m informix 4、配置/opt/informix/.cshrc文件,至少包括一下几行:setenv INFORMIXDIR /opt/informixsetenv INFORMIXSERVER ifx_netsetenv ONCONFIG onconfigsetenv PATH ${PATH}:${INFORMIXDIR}/bin:/opt/langtools/bin5、将安装包ids.7.31.UD6W5.SOL-26.tar复制到/opt/informix目录下,解包安装;# tar –xvf ids.7.31.UD6W5.SOL-26.tar6、将root用户的当前Shell切换到C Shell状态# csh7、使上面定义的环境变量生效# cd /opt/informix# source .cshrc8、开始执行安装程序# ./installserver(以root用户身份执行)按照提示输入SERIAL NUMBER:AAC#J794613 KEY: NNXSKP。
9、配置/etc/system文件,修改之前注意备份原有文件为system.bak,以防不测;配置内容如下(这是一个system文件的副本,其中省略了注释):* for install Informix 7.3.1set tune_t_gpgslo=250set tune_t_minarmem=100set tune_t_minasmem=250set msgsys:msginfo_msgmap=512set msgsys:msginfo_msgmni=256set msgsys:msginfo_msgtql=256set msgsys:msginfo_msgseg=4096set msgsys:msginfo_msgmnb=65535set shmsys:shminfo_shmmax=2048000000set shmsys:shminfo_shmseg=14096set semsys:seminfo_semvmx=32767set semsys:seminfo_semmap=2048set semsys:seminfo_semmni=10000set semsys:seminfo_semmns=8192set semsys:seminfo_semmnu=4096set semsys:seminfo_semmsl=2048set semsys:seminfo_semume=256set pln:pln_enable_detach_suspend=1set soc:soc_enable_detach_suspend=1*set noexec_user_stack=1*set noexec_user_log=1set shmsys:shminfo_shmmni = 0x100010、配置/opt/informix/etc/sqlhosts文件,包括如下内容(注释省略):sct onipcshm sct sqlexecsct_net ontlitcp sct sqlexec_net第一项:DBS名称,;第二项:使用网络协议名称(注意:SUN和其他机型支持的TCP协议名称是不同的,Sun的协议名称为ontlitcp,HP、IBM和Linux支持的协议名称为onsoctcp);第三项:主机名称;第四项:服务名称;注意:保证DBS名称不要与其他发生重复。
Informix数据库AIX平台安装指南主机Informix产品安装指南∙此安装指南包括如下产品的安装:∙Client SDK∙IDS.2000(二)创建Informix组、用户和目录创建用户组、用户: informix。
∙组号和用户号应大于等于100∙Informix用户要属于Informix组∙设置Informix主目录, /informix∙为Informix用户设置口令(二)设置UNIX环境设置Informix产品安装时,至关重要的两个环境变量:INFORMIXDIR和PATH。
∙修改/informix/.profile,在其中增加:INFORMIXDIR=/informixPATH=$INFORMIXDIR/bin:$PATHexport INFORMIXDIR PATH∙执行新的环境变量$ su - informix(三)安装产品安装顺序:1. Client SDK2. IDS.20001.安装ClientSDK以informix用户身份安装(1)安装介质∙进入informix主目录:$ cd∙安装product code$ cpio –icdumvB < /cdrom/CLISDK/clntsdk.cpi∙弹出介质# umount /mnt(2)执行安装脚本$ ./installclientsdk对“是否与9版本数据库一起使用”的问题问答“yes”。
输入产品的License 和 Key。
当屏幕出现“请以root身份执行/informix/RUN_AS_ROOT. clientsdk”并返回命令行状态后,继续操作。
$ su# /informix/RUN_AS_ROOT.clientsdk2.安装IDS.2000以informix用户身份安装(1)安装介质∙进入informix主目录:$ cd∙安装product code$ cpio –icdumvB < /cdrom/IDS/IDS2000.cpi∙弹出介质# umount /mnt(2)执行安装脚本$ ./installserver输入产品的License 和 Key。
INFORMIX FOR LINUX 安装使用手册(ONLINE分册)高伟达软件技术有限公司2003年2月19日Informix 数据库的安装、配置及检查使用一:Informix Online for Linux的安装方法 (2001-05-10 20:39:08)1、创建INFORMIX用户组和informix用户。
home=/usr/informix2、给informix加密码。
3、展开informix安装文件:rpm -i ******************.rpm(共三个)4、修改root的profile,增加INFORMIXDIR=/usr/informixexport INFORMIXDIR执行profile5、数据库安装,安装的原则是先装低版本的软件,后装高版本的软件,最后装online。
a、 #cd /usr/informixb、 #./installclientsdkc、 #./installonline6、增加文件系统online。
用户可以定义别的文件系统。
mount /online文件系统。
创建数据文件onlinedbs。
#cd /online#>onlinedbs#chmod 660 onlinedbs7、修改/online和/online/onlinedbs的权限#chown informix /online#chgrp informix /online#chown informix /online/onlinedbs#chgrp informix /online/onlinedbs8、以informix注册cd /usr/informix/etc9、将onconfig.std文件拷贝到onconfig或别的文件名。
vi onconfig中的参数a、ROOTPATH /online/onlinedbsb、ROOTSIZE 100000c、CONSOLE /dev/nulld、TAPDEV /dev/null或用户定义e、LTAPDEV /dev/nullf、DBSERVERNAME db(此项可自己定义但要求与sqlhosts中的定义一致。
Informix12.1 for linux 安装一、软件包下载下载安装包:iif.12.10.FC1IE.linux-x86_64.tar二、安装1.创建informix用户和组[root@informix ~]# groupadd informix[root@informix ~]# useradd -g informix -m informix[root@informix ~]# passwd informix[root@informix ~]# id informix[root@informix ~]# chown informix:informix /oracle2.将安装包上传到服务器使用infomix用户将iif.12.10.FC1IE.linux-x86_64.tar上传到服务器:/oracle下。
3.解压软件[root@informix informix]# tar xvf iif.12.10.FC1IE.linux-x86_64.tar /oracle4.设置INFORMIXDIR和DISPLAY变量.bash_profile添加如下内容exportLANG=zh_CN.GB2312exportPATHunsetUSERNAME exportINFORMIXDIR=/oracle exportPATH=$PATH:$INFORMIXDIR/bin exportINFORMIXSERVER=info exportONCONFIG= exportDBDATE=y4md;5.安装软件过程以root用户执行:1)进入软件目录执行安装程序ids_install [root@informix ~]# cd /usr/informix [root@informix informix]# ./ids_installEnter1EnterEnterEnterEnterEnterEnter1EnterEnterEnter三、配置IDS(以下使用informix用户登陆)1. 设置环境以informix 用户身份登录[root@informix informix]# su - informix2. 编辑环境文件ids.env(1)新建一个名为ids.env 的环境文件[informix@informix ~]$ vi ids.envexport INFORMIXDIR=/oracleexport INFORMIXSERVER=infoexport PATH=$INFORMIXDIR/bin:$PATH保存文件并退出编辑器。
Informix11.5 for linux 安装一、软件包下载下载安装包:iif.11.50.UC2TL.Linux-RHEL4.tar二、安装1.创建informix用户和组[root@informix ~]# groupadd informix[root@informix ~]# useradd -g informix -m informix[root@informix ~]# passwd informix[root@informix ~]# id informix[root@informix ~]# mkdir /usr/informix[root@informix ~]# chown informix:informix /usr/informix2.将安装包上传到服务器使用infomix用户将iif.11.50.UC2TL.Linux-RHEL4.tar上传到服务器:/usr/informix下。
3.解压软件[root@informix informix]# tar xvf iif.11.50.UC2TL.Linux-RHEL4.tar /usr/informix 4.设置INFORMIXDIR和DISPLAY变量export INFORMIXDIR=/usr/informix5.安装软件过程以root用户执行:1)进入软件目录执行安装程序ids_install[root@informix ~]# cd /usr/informix[root@informix informix]# ./ids_installDo you want to run installer in GUI mode [y/n] : yEntering GUI Mode.2)单击next3)单击next4)选择目录位置/usr/informix(默认),单击next........三、配置IDS(以下使用informix用户登陆)1. 设置环境以informix 用户身份登录[root@informix informix]# su - informix2. 编辑环境文件ids.env(1)新建一个名为ids.env 的环境文件[informix@informix ~]$ vi ids.envexport INFORMIXDIR=/usr/informixexport INFORMIXSERVER=ochefexport PATH=$INFORMIXDIR/bin:$PATH保存文件并退出编辑器。
象以Informix用户和潜在用户为主]Informix11.5 for linux as4 u2安装一、软件包下载在IBM网站上注册并下载安装包:iif.11.50.UC2TL.Linux-RHEL4.tar二、安装1.创建informix用户和组[root@vmbank ~]# groupadd informix[root@vmbank ~]# useradd -g informix -m informix[root@vmbank ~]# passwd informixChanging password for user informix.New UNIX password:BAD PASSWORD: it is based on a dictionary wordRetype new UNIX password:passwd: all authentication tokens updated successfully.[root@vmbank ~]# id informixuid=1002(informix) gid=1003(informix) groups=1003(informix) [root@vmbank ~]# mkdir /usr/informix[root@vmbank ~]# chown informix:informix /usr/informix2.将安装包上传到服务器使用infomix用户将iif.11.50.UC2TL.Linux-RHEL4.tar上传到服务器:/usr/Informix/insta目录下。
3.解压软件软件被放在/home/soft/目录下[root@vmbank informix]# tar xvf iif.11.50.UC2TL.Linux-RHEL4.tar /usr/Informix/insta象以Informix用户和潜在用户为主]4.设置INFORMIXDIR和DISPLAY变量export INFORMIXDIR=/usr/informix[root@vmbank informix]# export DISPLAY=88.42.63.237:0.0 Windows客户端IP 88.42.63.237,使用xmanager软件把安装界面拉到客户端。
也可以在服务器上操作。
5.安装软件过程以下操作以root用户执行:1)进入软件目录执行安装程序ids_install[root@vmbank opt]# cd /usr/informix[root@vmbank informix]# ./ids_installDo you want to run installer in GUI mode [y/n] :yEntering GUI Mode.Initializing InstallShield Wizard........Launching InstallShield Wizard........Dec 22, 2008 11:35:43 AM java.util.prefs.FileSystemPreferences$2 runINFO: Created user preferences directory.Dec 22, 2008 11:35:43 AM java.util.prefs.FileSystemPreferences$3 runINFO: Created system preferences directory in java.home.2)单击next3)单击next象以Informix用户和潜在用户为主]4)选择I accept both the IBM and the non-IBM terms5)选择目录位置/usr/informix(默认),单击next象以Informix用户和潜在用户为主]象以Informix用户和潜在用户为主]不选择IConnect Version3.50,因为安装Client-SDK时IConnect Version3.50就会被自动安装6)单击next象以Informix用户和潜在用户为主]是否启用角色分离,默认为no,单击next7)是否创建demonstration数据库服务器实例,默认为no,单击next象以Informix用户和潜在用户为主]8)总结界面,9)单击next象以Informix用户和潜在用户为主]象以Informix用户和潜在用户为主]对话框内容如下:Set required environment variablesSet $INFORMIXDIR to the directory where the IDS server is installed.Set $PATH to include $INFORMIXDIR/binSet $INFORMIXSERVER to the name of the database serverSet $ONCONFIG to the name of the active onconfig configuration file.If using a sqlhosts file other than $INFORMIXDIR/etc/sqlhosts Set $INFORMIXSQLHOSTSIf using a locale/language other than the defaultSet $CLIENT_LOCALESet $DB_LOCALESet $SERVER_LOCALESet $DBLANGPrepare connectivity filessqlhosts/etc/hosts/etc/servicesPrepare configuration file象以Informix用户和潜在用户为主]Set SERVERNUMSet ROOTNAMESet ROOTPATHSet ROOTSIZEInitialize database serverAs informix or root, run oninitIf initializing a new server for the FIRST time, run oninit -iThis will overwrite any existing data, so use caution on an existing setupFor more information please refer to the IBM Informix Dynamic Server Getting Started Guide10)单击next11)单击finish象以Informix用户和潜在用户为主]三、配置IDS(以下使用informix用户登陆)1.设置环境以informix 用户身份登录,则将用户ID 切换为informix:[root@vmbank informix]# su - informix2.编辑环境文件ids.env(1)新建一个名为ids.env 的环境文件,例如:gedit ids.env [informix@vmbank ~]$ vi ids.env将以下命令行(总计3行)添加到ids.env 文件:export INFORMIXDIR=/usr/informixexport INFORMIXSERVER=demo_onexport PATH=$INFORMIXDIR/bin:$PATH保存文件并退出编辑器。
(2)修改informix用户配置文件[informix@vmbank ~]$ vi .bash_profile象以Informix用户和潜在用户为主]修改文件内容:INFORMIXDIR=/usr/informixINFORMIXSERVER=demo_onPATH=$PATH:$HOME/bin:$INFORMIXDIR/binexport PATH INFORMIXDIR INFORMIXSERVER3.使IDS 设置环境生效:[informix@vmbank ~]$ . ./ids.env (使环境变量生效)(键入:点空格点斜杠ids.env)每次需要访问该IDS 实例时,您可以再次从此文件设置环境。
4.创建和编辑IDS 配置文件:cd $INFORMIXDIR/etccp onconfig.std onconfigcp sqlhosts.std sqlhosts操作日志:[root@vmbank informix]# su - informix[informix@vmbank ~]$ vi ids.env[informix@vmbank ~]$ vi ids.env[informix@vmbank ~]$ . ./ids.env (使环境变量生效)[informix@vmbank ~]$ cd $INFORMIXDIR/etc[informix@vmbank etc]$ pwd/usr/informix/etc[informix@vmbank etc]$ ls[informix@vmbank etc]$ cp onconfig.std onconfig [informix@vmbank etc]$ cp sqlhosts.std sqlhosts5.编辑文件onconfig更改参数:1)实际配置ROOTPATH /usr/informix/dbspaces/online_root象以Informix用户和潜在用户为主]LTAPEDEV /dev/tapedev 改为/dev/null DBSERVERNAME 默认为空改为demo_on2)找到机器网络节点的主机名:[informix@vmbank etc]$ uname -nvmbank3)用选择的编辑器(如上所示)编辑文件sqlhosts,更改命令行:[informix@vmbank etc]$ vi sqlhostsdemo_on onipcshm on_hostname改为vmbank(linux主机名)on_servername 改为demo_on(数据库服务器名)操作日志:修改后内容:#***************************************************** *********************## Licensed Material - Property Of IBM## "Restricted Materials of IBM"## IBM Informix Dynamic Server# (c) Copyright IBM Corporation 1996, 2004 All rights reserved. ## Title: sqlhosts.demo# Description:# Default sqlhosts file for running demos.##***************************************************** *********************# IANA () assigned port number/service names for Informix:# sqlexec 9088/tcp# sqlexec-ssl 9089/tcpdemo_on onipcshm vmbank demo_ondemo_se seipcpip se_hostname sqlexec象以Informix用户和潜在用户为主]6.创建日志目录和数据空间目录[informix@vmbank etc]$ mkdir /usr/informix/logs[informix@vmbank etc]$ mkdir /usr/informix/dbspaces[informix@vmbank etc]$ cd /usr/informix/dbspaces/[informix@vmbank dbspaces]$ touch online_root[informix@vmbank dbspaces]$ lsonline_root[informix@vmbank dbspaces]$ chmod 660 online_root7.启动和关闭informix1)启动并初始化配置的IDS 实例操作日志:[informix@vmbank dbspaces]$ cd ..[informix@vmbank ~]$ oninit -ivThis action will initialize IBM Informix Dynamic Server;any existing IBM Informix Dynamic Server databases will NOT be accessible -Do you wish to continue (y/n)? yChecking group membership to determine server runmode...succeededReading configuration file '/usr/informix/etc/onconfig'...succeeded Creating /INFORMIXTMP/.infxdirs...succeededCreating infos file "/usr/informix/etc/.infos.demo_on"...succeeded Linking conf file "/usr/informix/etc/.conf.demo_on"...succeeded Checking config parameters...succeededWriting to infos file...succeededAllocating and attaching to shared memory...succeededCreating resident pool 10570 kbytes...succeededAllocating 100016 kbytes for buffer pool of 2K page size...succeeded Initializing rhead structure...succeeded象以Informix用户和潜在用户为主]Initializing ASF...succeededInitializing Dictionary Cache and SPL Routine Cache...succeeded Bringing up ADM VP...succeededCreating VP classes...succeededOnlining 0 additional cpu vps...succeededOnlining 2 IO vps...succeededForking main_loop thread...succeededInitializing DR structures...succeededForking 1 'ipcshm' listener threads...succeededStarting tracing...succeededInitializing 8 flushers...succeededInitializing log/checkpoint information...succeededInitializing dbspaces...succeededOpening primary chunks...succeededOpening mirror chunks...succeededValidating chunks...succeededCreating database partition...succeededInitialize Async Log Flusher...succeededStarting B-tree Scanner...succeededInitializing DBSPACETEMP list...succeededChecking database partition index...succeededInitializing dataskip structure...succeededChecking for temporary tables to drop...succeededForking onmode_mon thread...succeededCreating periodic thread...succeededStarting scheduling system...succeededVerbose output complete: mode = 52)关闭实例[informix@vmbank ~]$ onmode -ky四、相关命令1.初始化环境变量用infomix用户登陆[informix@vmbank ~]$ . ./ids.env (使环境变量生效)(键入:点空格点斜杠ids.env)象以Informix用户和潜在用户为主]2.启动实例采用informix用户:[informix@vmbank ~]$ oninit -iv3.关闭实例onmode -ky五、测试1.运行测试程序dbaccessdemo7[informix@vmbank ~]$ dbaccessdemo7DBACCESS Demonstration Database Installation Script Dropping existing stores_demo database ....Creating stores_demo database ....Lockmode set.Database created.Database closed.Database selected.Lockmode set.Table created.Table created.Table created.Table created.Table created.Table created.Table created.Table created.Index created.Table created.Database closed.Loading data ...Database selected.象以Informix用户和潜在用户为主]28 row(s) loaded.23 row(s) loaded.9 row(s) loaded.74 row(s) loaded.67 row(s) loaded.52 row(s) loaded.5 row(s) loaded.7 row(s) loaded.Statistics updated.Permission granted.Database closed.Database selected.Lockmode set.74 row(s) loaded.Database closed.Database selected.Routine executed.Table created.1 row(s) inserted.Table created.1 row(s) inserted.1 row(s) inserted.1 row(s) inserted.1 row(s) inserted.Table created.1 row(s) inserted.1 row(s) inserted.1 row(s) inserted.1 row(s) inserted.Row type created.Table created.1 row(s) inserted.Statistics updated.Permission granted.Database closed.The creation of the demonstration database is now complete. The remainderof this script copies the examples into your current directory. Press "Y" to continue, or "N" to abort.象以Informix用户和潜在用户为主]2.输入yNow copying SQL command files ....End of DBACCESSDEMO script.3.进入控制程序dbaccess[informix@vmbank ~]$ dbaccess菜单栏为:Query-language Connection Database Table Session Exit DBACCESS: Query-language Connection Database Table Session ExitUse SQL query language.。