VIA Mini-ITX EPIA-VE900
- 格式:pdf
- 大小:700.35 KB
- 文档页数:11

当12核猛龙遇上超级迷你雕作者:来源:《电脑报》2020年第32期技嘉B550I AORUS PRO AX定位就是一款mini-ITX豪华版B550,同时拥有B550的次旗舰规格与mini-ITX板型的迷你身材,非常适合发烧级玩家打造性能級迷你主机,同时小巧的身材也可以适配各种MOD主机,发挥玩家的创造力。
之所以技嘉B550I AORUS PRO AX能够稳定支持发烧级的锐龙9 3900X处理器,就是因为它在供电设计方面完全向大板旗舰看齐。
它搭载了8相(6+2)直出式供电,相比倍相和并联方案,能够提供更高的响应速度。
MOS管部分,它搭载了来自Intersil的ISL99390整合式芯片,拥有更低的内阻和更强的供电能力,单颗能够承载高达90A的电流负荷,因此总输出能力达到了720A,足以满足第三代锐龙旗舰级处理器的供电需求,同时也为下一代 ZEN3锐龙处理器做好了准备。
PWM芯片部分,它采用了RAA229004(ISL229004)数字PWM控制器,这是一颗原生8相的PWM控制器,正好与主板的8相直出式供电相对应,电压控制更加精准可靠。
除了供电规格强悍,技嘉B550I AORUS PRO AX还采用了2盎司铜8层PCB,相比传统消费级的4层PCB设计来说,具备更高的电气性能,能为主板提供更好的稳定性和散热能力,从而确保发烧级处理器稳定工作。
此外,对于mini-ITX主板来说,工作温度和散热能力也非常重要。
技嘉B550I AORUS PRO AX的VRM散热装甲也采用了新一代设计方案,M.2散热装甲、VRM散热器通过两组高效热管进行连接,配合额外散热开槽并辅以高效导热垫,散热装甲的厚度也大大提升,从而提供了超强的散热能力,保证在超频状态下,VRM电路的温度也保持在安全范围内。
特别值得一提的是,这次B550I AORUS PRO AX的M.2散热装甲非常人性化。
在很多主板上,主板M.2散热装甲与NVMe固态硬盘自带的散热装甲是冲突的,只能二选一,但技嘉B550I AORUS PRO AX很好地解决了这个问题,它提供的堆叠式散热装甲可以与M.2散热装甲共存,主板散热装甲整体视觉效果完全不受影响。


搭配酷睿i3-4130的最佳配置推荐现在越来越多的迷你机箱打着“性能小钢炮”的旗号吸引用户,其实这些机箱往往兼容支持多卡互连的大主板,甚至还能放下超大冷排一点都不迷你。
真正的迷你主机应该是专为性价比玩家打造的,不仅体积小巧,性能也不差。
今天店铺就为大家带来一套基于酷睿i3-4130的迷你主机配置。
首先,我们先来一同了解一下这套配置的具体信息:选择组装迷你主机的用户更注重机箱本身的品质,比如显卡限长、散热方案、美观与否等,综合各种因素选择了Ti Core V1这款迷你机箱。
接下来就是主板了,该机箱支持仅ITX型主板,目前ITX型号并没有多少售价也普遍较高,最终选择一款479精品小板——映泰Hi-Fi B85N 3D。
选择B85 ITX板搭配酷睿i3级别的处理器也是非常合适的。
由于该机箱最高支持285mm长的显卡,用户无需纠结显卡的长度,目前的千元级显卡均能装的下,考虑到处理器和价格因素最终选择了盈通R9 270-2048GD5游戏高手这款显卡。
其余配件均可以自由选择,该配置总价格只有3315元,由于迷你机箱的硬性要求,所以价格并不是很低,但仍有降低空间比如选择单条8G内存和H81 ITX主板等。
下面就一起看看核心硬件的具体信息。
产品:酷睿i3 4130(盒) Intel CPUIntel 酷睿i3-4130是一款偏主流的处理器,其默认频率3.4GHz 内置两颗物理核心,支持超线程技术。
还内置HD4400核芯显卡是组建娱乐办公低配机的首选,但由于超线程技术的存在,搭配一款千元级独立显卡游戏性能十足。
目前该处理器的市场售价为695元,感兴趣的用户不妨重点关注一下。
Intel 酷睿i3-4130采用22纳米工艺制程,插槽类型为LGA 1150,处理器默认主频高达3.4GHz,原生内置物理双核心,可实现四线程同时处理任务。
同时,该处理器带有3MB三级高速缓存,使得CPU在调用数据时提高了命中率,并且使软件加载时间大大缩短。

Manuals+— User Manuals Simplified.Lupine Piko TL MiniMax Flashlights User Manual Home » LUPINE » Lupine Piko TL MiniMax Flashlights User Manual1800 lmPIKO TLRead this manual before usingContents1 Safety instructions:2 Charging3 Operation4 Programming5 Special functions6 Piko TL Charger7 Accessories8 Product care andstorage9 Troubleshooting10 Technical data11 Miscellaneous12 Documents /Resources12.1 References13 Related PostsSafety instructions:Warning! Avoid looking directly into the light emitted by the light or shining the light into your own eyes or the eyes of another person. If the light accidentally shines into your eyes, close your eyes and move your head out of the light beam. Do not use any strongly focusing optical device to look at the light beam. In cases where the light is used in a public or commercial setting, users should be provided with training concerning the safety measures for laser light. This device may then be used by children 8 years of age or older, persons with limited physical, sensory or mental capabilities, as well as persons with no previous experience in handling such devices, if they are supervised by a person responsible for their safety .Attention! Risk group 2: Proven optical radiation! Do not look into the lamp for a long time during operation. May be harmful to the eyes. Danger of glare: The strong glare of the lamp can be temporary Recharge you battery before using the light. Carry a spare light with you at all times, as the product can potentially fail unexpectedly at any time. In the event of any physical or internal battery failure, do not attempt to repair. No user-servicable parts! Heat generation: The housing of Piko TL may heat up; so make sure that you always keep the light at a safe distance to any combustible or flammable materials. Could cause fire or death! However, quiescent operation (without cooling the light housing) is possible at any time and will not damage the product. When the light is being used in a stationary state, the light will be dimmed after a few minutes to reduce the light’s temperature. Continuous operation at 16 watts is only possible with air flowing over the housing! Water resistance: All Piko TL components are waterproof and can of course be used under extremely severeconditions. The lamp complies with IP protection class 67 but is NOT a diving lamp and is NOT suitable for use under water. Eyesight and afterimages feel dying Irritation, authorizations or treatment commands can. ChargingSwitching on:Pressing the button with a quick doubleclick will switch on the lamp at maximum power. The blue LED is on.The doubleclick can be deactivated, to turn on the light by only pushing the button once.Switching:A quick push of the button switches between power settings.Note: When operating the lamp at maximum power, the power may be reduced continuously depending on the ambient temperature to avoid overheating of the LEDs and the electronics.Switching off:Hold the button down (for more than one second) to switch off the lamp.Note: The Piko TL control electronics not only controls high and low beam; it also protects the rechargeable battery against deep discharge and includes a low battery indicator.Discharged battery capacity:When you shut off the lamp, the discharged battery capacity is shown by flashing of the blue LED and then the red LED. This information will only be set back once you give the light a full charge.The blue LED blinks once for each Ah (ampere hour); and then the red LED blinks once for each 1/10 of an Ah.Example: The blue LED flashes once and then the red LED flashes twice. This indicates that 1.2 Ah have been drawn from the battery.Flashlight and charger are ready for use upon delivery, however, the battery is merely partly charged. Before seriously using your flashlight for the first time, the battery requires charging to ensure maximum capacity.The charging socket can be found at the the backside of the flashlight.OperationBattery warning:If the battery voltage decreases below a certain value, the red LED will turn on (the lamp itself also flashes once) and then additionally, shortly before the capacity is entirely exhausted, it will start flashing.Note: The battery life remaining after the red LED has come on, is dependent on the overall capacity, the temperature and the battery’s age. As a Li-Ion battery’s voltage curve is not proportional to the remaining capacity, you will have to learn to interpret the indicators in relation to your battery.Warning! When the battery is almost entirely discharged (the red LED has been flashing for some minutes), the lamp will flash several times (the red and the blue LED flash) and is then switched off.Caution!Note: When permanently operating the lamp at maximum power, the battery warnings may be issued in very quick sequence.Reserve power:When the battery is discharged (the red LED has been flashing for some minutes), the red and the blue LED will flash alternately; the lamp itself also flashes. After switching the light on again (double click!), reserve power will be available. Depending on the age of the battery, some more minutes of light will be provided. To make reserve power last as long as possible, only light below 2 W will be provided. To indicate that reserve power has been activated, the red and the blue LED will flash in turn. As soon as the battery is entirely discharged then, the lampwill be switched off automatically. Therefore: Caution!Note: When operating the lamp only with 2 W or less, no reserve power will be available.Warning: Do not switch on the light when the battery is discharged, as this will invariably damage the battery. Recharge the battery as soon as possible to avoid a deep discharged battery and do not attempt to store your flashlight with no charge left.ProgrammingLight levels:By default, the Piko operates in the 2-step mode, several other light programs are available.They are very easy to select by simply keeping the button pressed until the button’s red LED (or blue LED) flashes once, twice, etc. When taking your finger off the button accordingly, the setting will be saved.Special functionsLow start (Low Start):The lamp will not start at maximum power as by default, but at the lowest stage.Double click (Dbl Click):The lamp may only be switched on with a quick double click. Useful for anybody who wants to avoid that the lamp is switched on accidentally in particular during transport (e. g. in a backpack).Stealth mode (Stealth):The discharged battery capacity and battery warning, usually indicated by the button’s LEDs, are partly deactivated.The LED indications will be reduced to a minimum.Alpine SOS and SOS:The light will continue with SOS until the battery is empty. The switch will glow pink.Note: The SOS sign is an emergency signal! Misuse may be prosecuted!Disorientation Flash 15hz: (3-step Flash)This mode is extremely irritating and may by no means be misused.RVLR: (3-step RVLR)This mode includes an additional slow flash mode.Police-Mode (Special-Mode):The lamp only lights up, while the button is kept pressed. The lamp stops shining, when you get off the button.To prevent an activation by mistake, this mode is chosen in a special way. Press the button 8 times quickly during 2.5 – 3 seconds. To change back to the standard mode, press the button again 8 times quickly.Piko TL ChargerConnecting:Plug the included Piko TL charger into an outlet and connect it to the battery.Charging:Charging starts automatically. The battery can be left plugged into the charger for an indefinite period.Although this will not damage the battery, it is not advisable for Li-Ion batteries since they do notrequire conservation charging. When kept in a cool place, the annual self-discharging rate for suchbatteries is 15 %.LED display:LED red on: chargingLED green on: battery is fully chargedWarning! This charger is to be used to charge rechargeable Li-Ion batteries only.It is NOT suitable for charging NiMH batteries!Do NOT use non-rechargeable batteries. – Risk of explosion!This charger may be opened ONLY by the manufacturer!AccessoriesAdapter cable:Holster:Piko TL Tool Free MountThis special mount can be attached to the light without any tool.Have a look at: www.lupine.de (Art No. 782) Hint: At first mount the Toolfree mount to your Piko TL.For particularly thick handlebars, it is recommended to use the included larger o-ring.Lateral adjustment:(Piko TL Mount/Tool Free Mount)To adjust the lamp to freeride or downhill handlebars, you may rotate the handlebar mount to either side. Always ensure to loosen the handlebar mount screw if you want to rotate the lamp.Product care and storageCleaning:Only clean the light with closed charging socket. If required, use warm water and add some dishwashing detergent. After cleaning, open the charging socket in order to make it possible to dry out, just in case water has entered.Transport:Attention! When transporting in a backpack or suitcase, activate the double click function to prevent the lamp is started accidentally.The uncontrolled heat buildup could cause a fire or melt adjacent plastic material.Storage:When the lamp will not be used for a longer period, fully charge the battery and store it at a cold place (basement etc.). You can also leave it connected to the charger.TroubleshootingProblem:Ursache:Solution:The light does not come on and the button’s LEDs do not flash. Deep discharged batteryCharge the battery The power LEDs do not come on, the button’s LEDs flash.Faulty LED unitReplace the LED unit The battery life is too short.Discharged batteryVery low temperaturesFaulty chargerCharge the battery Replace the battery Keep the battery warm Replace the charger The light does only work if I keep the button pressed.Police mode enabledsee page 27Technical dataLight output:Battery life: Piko TL Max:Piko IL MiniMax.16 W 8 W 6 W 3 W 03 W1800 lumens 1 h 30 min. 1 h 900 lumens 720 lumens 370 lumens 3h 4h 8h 1 h 452 h 20 min.4 h 45min.40 lumens80 h47 hDefault settingBattery life may vary depending on battery age, condition, and temperature.Battery capacity/nominal voltage:Piko TL Max: 3.3 Ah/7.2 V Li-Ion Piko TL MiniMax: 2.0 Ah/7.2 V Li-Ion Charging time:Piko TL Max: 3 h Piko TL MiniMax: 2 hPiko TL charger:100 – 240 V~, 50 – 60 Hz Input voltage: Charging current: up to 1.2 A Compatible batteries: Li-Ion 7.2 V Display: charging control via one LED Lens beam angle:Piko TL Max: 22°Piko TL MiniMax: 22°Weight:Piko TL Max: 180 g Piko TL MiniMax: 145 g Operating temperature:–25 °C to +55 °CMiscellaneousThe laws governing the allowable application domain for this lighting system may vary from one country to another. We recommend that you inform yourself about the relevant laws in this domain in your country.Warranty:The product’s two year warranty applies to all components, as well as any manufacturing defect. The warrantydoes not include the battery, however. In addition, any modification or improper use of the product will void the warranty.ChangesRights for improvements and modifications of our products reserved.More informations at www.lupine.deEC Declaration of Conformity: www.lupine.de/ce/Lupine lighting systems GmbHIm Zwiesel 9, 92318 Neumarkt, GermanyPhone: +49 (0) 91 81 – 50 94 90Fax: +49 (0) 91 81 – 50 94 915E-Mail: **************www.lupine.deDocuments / ResourcesLupine Piko TL MiniMax Flashlights [pdf] User ManualPiko TL MiniMax Flashlights, Piko TL, MiniMax Flashlights, Flashlights ReferencesLupine Lighting Systems - We are the LightLupine Lighting Systems - CE-DokumenteManuals+,。
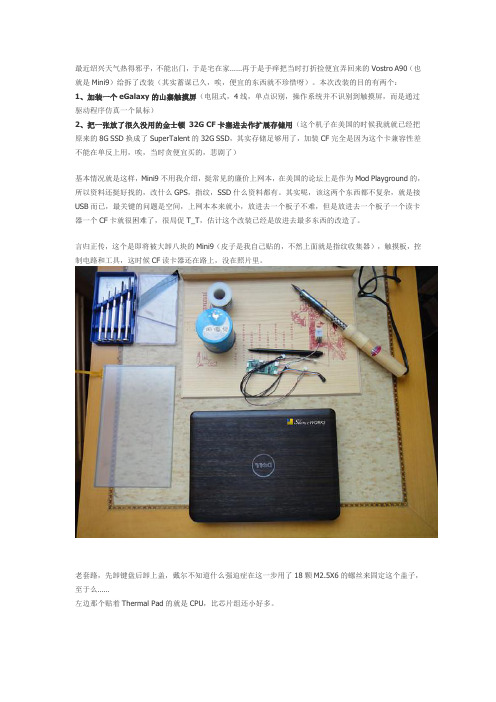
最近绍兴天气热得邪乎,不能出门,于是宅在家……再于是手痒把当时打折捡便宜弄回来的Vostro A90(也就是Mini9)给拆了改装(其实蓄谋已久,唉,便宜的东西就不珍惜呀)。
本次改装的目的有两个:1、加装一个eGalaxy的山寨触摸屏(电阻式,4线,单点识别,操作系统并不识别到触摸屏,而是通过驱动程序仿真一个鼠标)2、把一张放了很久没用的金士顿32G CF卡塞进去作扩展存储用(这个机子在美国的时候我就就已经把原来的8G SSD换成了SuperTalent的32G SSD,其实存储足够用了,加装CF完全是因为这个卡兼容性差不能在单反上用,唉,当时贪便宜买的,悲剧了)基本情况就是这样,Mini9不用我介绍,挺常见的廉价上网本,在美国的论坛上是作为Mod Playground的,所以资料还挺好找的,改什么GPS,指纹,SSD什么资料都有。
其实呢,该这两个东西都不复杂,就是接USB而已,最关键的问题是空间,上网本本来就小,放进去一个板子不难,但是放进去一个板子一个读卡器一个CF卡就很困难了,很局促T_T,估计这个改装已经是放进去最多东西的改造了。
言归正传,这个是即将被大卸八块的Mini9(皮子是我自己贴的,不然上面就是指纹收集器),触摸板,控制电路和工具,这时候CF读卡器还在路上,没在照片里。
老套路,先卸键盘后卸上盖,戴尔不知道什么强迫症在这一步用了18颗M2.5X6的螺丝来固定这个盖子,至于么……左边那个贴着Thermal Pad的就是CPU,比芯片组还小好多。
上盖内面特写屏幕框架卸除,与上盖相反,屏幕完全是用卡子卡住的,没有一颗螺丝,徒手就能打开。
触摸屏就直接贴在液晶屏上面,对准就行,由于是膜对膜的触摸屏,所以正反都可以,出于布线方便,我选择了让屏线从左边出来。
装好屏幕以后屏线从这里绕出来,这里屏线需要小心布置,因为这里会转动,要是直接拉出来,柔性电路估计很快会被扭断,所以我让它在转轴上绕了一圈,这样像弹簧一样让它有个余量。
.高级用户指南为每个PC搭建者精心打造的梦幻机箱,Razer隆重推出雷蛇战斧 Mini-ITX游戏机箱,具备绝佳的流动风道,便与布线管理,还有充足的硬件拓展空间和强大的雷蛇幻彩灯效支持。
目录1. 内含物品 (3)2. 简要介绍 (5)3. 技术规格 (6)4. 驱动程序安装 (7)5. 配置 TOMAHAWK MINI-ITX (8)7. 安全与维护 (15)8. 法律声明 (16)1. 内含物品▪Razer Tomahawk Mini-ITX 游戏机箱型号 RZ21-014USB Type C 端口(最高 3.2 Gen 2)3.5 毫米麦克风插孔3.5 毫米音频组合插孔电源按钮重启按钮USB Type A 端口(最高 3.2 Gen 1)可拆卸式顶部面板可拆卸式玻璃旋转门可拆卸式前面板采用 Razer Chroma 雷蛇幻彩 RGB 技术的炫酷底光效果▪其他附件*主板安装螺钉 x6用于固定 2.5 英寸固态硬盘/3.5 英寸硬盘驱动器的防振环 x12 用于固定电源 (PSU) 的螺钉 x4用于固定 2.5 英寸固态硬盘的螺钉 x12用于固定 3.5 英寸硬盘驱动器的指旋螺钉用于固定风扇的螺钉 x24钩环带 x6* 作为备件随附的其他品项2. 简要介绍你现在拥有了一台很棒的笔记本电脑,并且附带一年有限制造商保修*和一年的有限电池保修。
即刻通过/cn-zh在线注册,充分发挥设备的所有功能,并获得 Razer 雷蛇的独家福利。
产品的序列号位于此处。
*保修可能因地区而异,并受当地适用法律的约束。
如果遇到问题,请通过/cn向 Razer 雷蛇支持团队提出问题。
3. 技术规格4. 驱动程序安装通过 Razer Synapse 雷云,你可以为 Tomahawk Mini-ITX 和其他支持的 Razer 雷蛇外围设备下载驱动程序或固件更新。
此外,你还可以自定义 Razer 雷蛇设备的所有高级设置和灯光效果。
数字家庭主板M2NDH-支持AMD®SocketAM2Athlon64FX/Athlo64X2/Athlon64/Sempron -AMDLive!™Ready-强大扩充能力:1xPCI-Ex16、2xPCI-E、3xPCI-华硕WiFi-APSolo-华硕DHRemote™-华硕MP3-In™-华硕Q-Connector-高保真音频中央处理器支持AMD®SocketAM2Athlon64FX/Athlo64X2/Athlon64/Sempron 支持AMDCool'n'Quiet™技术AMD64架构,同时兼容32位和64位计算AMDLive!™Ready芯片组NVIDIAnForce®430MCP前端总线2000/1600MT/s内存双通道内存架构4x240-pinDIMM内存插槽,支持最大容量高达8GB的DDR2800/667/533ECC和non-ECC、un-buffered内存扩充插槽1xPCI-Expressx16插槽2xPCI-Expressx1插槽3xPCI2.2插槽存储装置/RAID-1xUltraDMA133/100/66/33-4xSerialATA3.0Gb/s-NVIDIAMediaShield™RAID通过SerialA TA设备支持RAID0、1、0+1、5和JBOD网络功能NVIDIAnForce®430内建GigabitMAC,支持externalAttansicPHY无线局域网:54MbpsIEEE802.11b/g(华硕WiFi-APSolo)音频功能ADI6声道高保真音频CODEC背板S/PDIF数字音频输出USB高达8个USB2.0/1.1接口M2N-VMDH-AMDSocketAM2-NVIDIAGeForce6100/nForce430-双通道DDR2800/667/533-1xPCIExpressx16+1xPCIExpressx1+2xPCI-双VGA:DVI-D和D-Sub-8声道高保真音频-2x1394a接口中央处理器支持AMD®SocketAM2Athlon64X2/Athlon64FX/Athlon64/Sempro nAMDCool'n'Quiet™技术AMD64架构,兼容32位和64位计算AMDLive!™Ready芯片组NVIDIAGeForce6100/nForce430前端总线2000/1600MT/s 内存双通道内存架构4x240-pinDIMM插槽,支持最大容量为8GB的DDR2800/667/533non-ECC,un-buffered内存显卡集成GeForce6100GPU高清晰视频处理,最高分辨率可达1920x1440(@75Hz)支持RGB显示;UXGA1600x1200(@60Hz)支持DVI-D显示支持双VGA输出:DVI-D和RGB注意:DVI-D不能用来输出RGB信号至CRT。
NotesA. Performance and quality attributes and conditions not expressly stated in this specification document are intended to be excluded and do not form a part of this specification document.Operating Temperature -40°C to 85°C Storage Temperature -55°C to 100°C DC Power:Max. voltage 5.7V Max. current 120mA Internal Power Dissipation 0.73W Input Power +18dBmCASE STYLE: HN1173Notes:1. The negative slope indicates that Output Voltage decreases as Input Power increases. See "Output Voltage vs Input Power" graph below.2. Temperature sensor output provides a DC Output Voltage which increases linearly with temperature rise.Recommended minimum load for this port is 2 kΩ. 3. Recommended minimum load at DC out port is 100 Ω. See maximum ratings for no damage.Connectors ModelSMA ZX47-55-S+SMA ZX47-55LN-S+Maximum RatingsElectrical Specifications (T AMB = 25°C)• Low Noise (Output Ripple) for ZX47-55LN+, 20mVp-p Typ. @ 10MHz • High Dynamic Range • Wide Bandwidth• Single Supply Voltage: +5V • Stability Over Temperature • Built-in Temperature Sensor• Protected by US patent 6,790,049Features• RF/IF Power Measurements• Low Cost Power Monitoring System • RF Leakage Monitors• Fast feedback Levelling Circuits • RF Power Control• Receiver RF/IF Gain Control • RSSI measurementsApplicationsZX47-55+ ZX47-55LN+Power Detector50Ω, -55dBm to +10dBm, 10 to 8000 MHzCoaxialo 0.40.60.81.01.21.41.61.82.02.2-55-45-35-25-15-5515Input Power (dBm)O u t p u t V o l t a g e (V )Outline DrawingSimplified Functional DiagramRF IN 1DC OUT 5Vcc (+5V) 2TEMPERATURE SENSOR 4GROUND 3Coaxial ConnectionsFREQ.(MHz)DYNAMIC RANGE AT ±1dB ERROR (dBm)OUTPUT VOLT.RANGE (V)SLOPE(mV/dB)(Note 1)VSWR(:1)PULSE RESPONSETIME(nSec)Typ.TEMP.SENSOR OUTPUT SLOPE(mV/°C)(Note 2)DCOPERATING POWERVcc (Volts)Note 3Current (mA)Min.Max.Typ.Typ.Typ.Typ.ZX47-55+ZX47-55LN+Typ.Min.Typ.Max.Typ.Rise Fall Rise Fall101000-50 to +50.50 - 2.10-251.0540010800400 2.00 4.5 5.0 5.510010005000-55 to 0 1.4050006000-50 to +5 1.5060008000-45 to +101.30Permanent damage may occur if any of these limits are exceeded.TEMP SENSOROUTTEMPERATURE SENSOR A B C D E F G H J K 1.20 .69 .46 1.12 .04 .34 .46 .28 .33 .21 30.48 17.53 11.68 28.45 1.02 8.64 11.68 7.11 8.38 5.33 Outline Dimensions ( )inchmmL M N P Q R S T wt. .18 .14 .94 .50 .35 .18 .106 .60 grams 4.57 3.56 23.88 12.70 8.89 4.57 2.69 15.24 31.8.NotesA. Performance and quality attributes and conditions not expressly stated in this specification document are intended to be excluded and do not form a part of this specification document.0.50.70.91.1 1.3 1.5 1.71.92.1Output Voltage (V)-60-50-40-30-20-10010200.50.70.91.1 1.3 1.5 1.71.92.1Output Voltage (V)I n p u t P o w e r (d B m )-4-3-2-101234P .I n d e v . f r o m I d e a l (d B )Power Input Deviation from Ideal Vs -60-50-40-30-20-1001020I n p u t P o w e r (d B m )-4-3-2-101234P .I n d e v . f r o m I d e a l (d B )-30-20-10010203040010002000300040005000600070008000Frequency (MHz)O u t p u t V o l t a g e C h a n g e (%)-30-20-10010203040010002000300040005000600070008000Frequency (MHz)O u t p u t V o l t a g e C h a n g e (%)0.50.70.91.1 1.3 1.5 1.71.92.1Output Voltage (V)NotesA. Performance and quality attributes and conditions not expressly stated in this specification document are intended to be excluded and do not form a part of this specification document.-35-25-15-55-55-45-35-25-15-5515Input Power (dBm)S l o p e (m V /d B )-30-25-20-15-1010002000300040005000600070008000Frequency (MHz)S l o p e (m V /d B )-35-25-15-55-55-45-35-25-15-5515Input Power (dBm)S l o p e (m V /d B )-30-25-20-15-1010002000300040005000600070008000Frequency (MHz)S l o p e (m V /d B )-35-25-15-55-55-45-35-25-15-5515Input Power (dBm)S l o p e (m V /d B )-30-25-20-15-1010002000300040005000600070008000Frequency (MHz)S l o p e (m V /d B )NotesA. Performance and quality attributes and conditions not expressly stated in this specification document are intended to be excluded and do not form a part of this specification document.1.01.21.41.61.82.010002000300040005000600070008000Frequency (MHz)V S W R0.30.40.50.60.70.80.9-60-40-20020406080100Ambient Temperature (degC)S e n s o r V o l t a g e (V )-50-40-30-20-10010203040506070-55-45-35-25-15-5515Input Power (dBm)O u t p u t V o l t a g e C h a n g e (m V )。
VIA Desktop Mini-ITX Board Sales KitSeptember, 2011VIA ConfidentialVIA Desktop Mini-ITX Board Spec.n n n nCPU: Nano X2 1.4G Chipset: VIA VX900 (no HDCP) Audio: VIA VT1708S LAN: Realtek RTL8111E 10/100/1000M Fast EthernetFeatures On board I/O n 2 SATA pin header n 2 DDR3 1066 SODIMM slots n 2 USB2.0 pin headers for 4 ports n 1 LPT pin header n 1 PCI slotRear I/O n 1 PS/2 K/B & M/S port n 1 HDMI port n 1 VGA port n 1 Serial port n 1 GigaLAN port n 4 USB 2.0 ports n 3 audio jacks for line-out/in/mic-inOS & Driver Support n Windows XP/7VIA ConfidentialPlacementLPT Front audioUSB2.0 PCI SATA VX900Nano X2 CPUDDR3 DIMMATX Power Front panelVIA ConfidentialGiftbox outlookVIA ConfidentialDifference of Desktop & EmbeddedVIA Embedded VIA Desktop EPIA series Longevity Support Operating Temp. Giftbox Packing Bulk Packing Win XP Win 7 Operating System WES WES 7 Win CE Linux FliteDeck Software Service ACE-CNX Hardware Customized service Software BIOS Warranty X X X X 1 year* O Project base Project base Project base 1 year O Project base Project base Project base 1 year X O O X X X X X O O O O O O O O O O O O O O O O X 0~45C O 3+ years 0~60C** O VB series X 0~60C** O* The Desktop RMA policy and location is not the same as Embedded one . No option to extend to the 2nd or 3rd year warranty. ** 0~60C is for majority. Some products might have different spec. such as the WT products.VIA ConfidentialMarket ComparisonModel Manufacture Photo VIA Desktop Mini-ITX board VIA D525MW Intel D510MO IntelCPUNano x2 1.4GIntel Atom D525 1.8GIntel Atom D510 1.66GChipset Memory SATA Graphic USB Ethernet DisplayVIA VX900 DDR3 up to 8GB 2 DX9 8 1 1 x VGA 1 x HDMI 1 x PCINM10 DDR3 up to 4GB 2 DX9 7 1 1 x VGANM10 DDR2 up to 4GB 2 DX9 7 1 1 x VGAExpansion1 x PCI 1 x mini-PCIe 1xPS2 K/B & M/S 1x Parallel 1xCOM, 1xVGA 4xUSB2.0, 1xGbE 3xAudio jacks1 x PCI 1 x mini-PCIe 1xPS2 K/B & M/S 1xVGA 4xUSB2.0, 1xGbE 3xAudio jacksRear I/O1xPS2 K/B & M/S 1x HDMI 1xCOM, 1xVGA 4xUSB2.0, 1xGbE 3xAudio jacksVIA ConfidentialPerformance Comparison (I)-CPU BenchmarkPlatformProcessor FSB Chipsets Memory Graphics Display resolution OS Power settingVIA PlatformVIA Nano™ X2 U4050 (1.4GHz) 800MHz VX900 DDR3 1066MHz 2G VIA Chrome9HD 1280X1024 Windows 7 High PerformanceIntel D525MWIntel Atom D525 (1.8GHz) 800MHz Atom+NM10 DDR3 1333MHz 2G Intel GMA 3150 1280X1024 Windows 7 High PerformanceNuclearus Multi Core v.2.0.0CPU Free BenchMark 2.2 58.2466.14(Lower is better)CPUMark 2.1MT 4644.82537.141873583FPU18731633CPUMark 99 V1.0154127Total Score334229350100020003000400050000100020003000400050007VIA ConfidentialPerformance Comparison (II)-System BenchmarkPCMark Vantage V1.0.2.0HDD Communications Music Gaming TV and Movies Memories Overall Score 0 1000826 887 1727PassMark V7.0 (Build 1015)45974603Disk Graphics 3D Graphics 2D CPU PassMark Rating 0 200371 73.4906.1909.224262701105.2 128128.8 770.3275515751704870.1416.7 600 800 10001753580583 2259400CrystalMark 2004R3 [0.9.126.452]2417 OGL 4000 5000 D2D GDI2051 5303838 485520003000PCMark 05 V120Graphic CPU Overall 0 500 1000 1500 2000 859 2568252812022487323410887ALU Mark 011230479862530 30005047425001000020000300004000050000600008VIA ConfidentialPerformance Comparison (III)- 3D Performance3DMark2006 V1.20(1280x1024)125SM 2.0 Score 81272Overall Score 1770501001502002503009VIA ConfidentialSpecial NoticeIt’s a VIA Desktop Mini-ITX board, please differentiate from VIA Embedded. Brand Visibility & Volume Quantity is the main focus of this product line. This product line is mainly B2C. It is better to differentiate the customers and channel from existing embedded ones to avoid any channel confusion. Warranty is 1 year, NO option to extend the 2nd or 3rd year. The MOQ is 5K. No partial shipment allowed from HK. This will be dropped ship to US/EU or other regions directly. Accessory list:- 2x SATA cables - 1x I/O bracket - 1x QSG (quick setup guide) - 1x driver CDVIA ConfidentialVIA Confidential © 2008 VIA Technologies, Inc All Rights Reserved.•VIA reserves the right to make changes in its products without notice in order to improve design or performance characteristics.•This publication neither states nor implies any representations or warranties of any kind, including but not limited to any implied warranty of merchantability or fitness for a particular purpose. No license, express or implied, to any intellectual property rights is granted by this document. •VIA makes no representations or warranties with respect to the accuracy or completeness of the contents of this publication or the information contained herein, and reserves the right to make changes at any time, without notice. VIA disclaims responsibility for any consequences resulting from the use of the information included herein. •VIA C7®, VIA C7®-D, VIA C7®-M, and VIA Eden TM are trademarks of VIA Technologies, Inc. Thank You。