触动你的听觉 感受它的魅力聆听Exposure 3010S2 CD机、3010S2合并功放与CANTON Vento 820书架音箱的组
- 格式:pdf
- 大小:1.36 MB
- 文档页数:4

kef音箱说明书篇一:从音箱入门到高手必看知识从音箱入门到高手必看知识(万字强帖)著名的国际品牌:如美国的BOSE(博士)、JBL、INFINITY(燕飞利仕)、Westlake Audio、PolkAudio(音乐之声):英国的ATC(皇牌)、B&W、T annoy、MonitorAudio (猛牌)、KEF、HARBETH(雨后初晴):丹麦的(皇冠)DYNAUD10(丹拿)、DALI(丹尼)、Jamo:德国的Heco、密力、ELAC (意力);法国的梦幻之声(VIS10NACOUSTIQUE)、JMLab:1.试听前对音箱的初步了解对于一对音箱的最初了解,可用“观、掂、敲、认”的步骤来鉴别:即一观工艺,二掂重量、三敲箱体、四认铭牌。
外观工艺就是从音箱外表的第一部象来判断该次和品质优劣:用天然原木精工打造的音箱当然最好,许多天价级的世界名牌至尊音箱,包括意大利的Chario(卓丽)、Guarneri Homage(名琴)等,但此类好箱因环保、资源匮乏加工工艺难度大,时间长等因素,故常见的音箱均是以MDF 中密度纤维板表面敷以一层薄薄的木皮做装饰:敷真木皮精工外饰的音箱,尤其是如酸枝、雀眼、花梨、胡桃、桢楠、红橡等珍稀木皮,其天然木纹视觉效果极好,手感滑腻舒适。
尤其以对称蝴蝶花纹真木皮经多层涂复打磨钢琴亮漆者,大多均可视为中高档音箱,仿冒品极少。
用PVC塑料贴皮的箱子属大路货,虽做工精细,最好也只能算中低档货色。
而以本纹纸贴面装饰的箱子虽然看上去极时应多注意箱体背后的贴皮接缝和喇叭安装位挖扎工艺是否精确到位。
假冒伪劣产品一般都不会注意这些细节,因而稍加用心即可正确判断。
DEBUG评论:实际上,真正的原木箱子我们就算在HI-FI 箱子上,几乎也是见不到的。
因为能够满足制造音箱要求的木料极为罕见,如Chario在很多顶级产品上使用的木料,是生长40年以上的顶级意大利红橡木,按照意大利的环保法律,每砍伐一棵此类树种,购买者必须在木料价格外另补种10棵同类树苗。

IEM ( In - Ear Monitoring ) 耳內監聽吳榮宗主筆前言:在前一篇的文章裡我們提到一些迴授的因素,也簡述舞台上Wedge 的基本聆聽位置。
然而實際的應用下,現場狀況可能不如我們想像的那麼的好,最簡單的解釋即有兩個團體,有兩個聲音工程師,他們全都須要使用同一套的系統來完成工作,或當節目是在室內的空間演出,又環境殘響惡劣,或表演人須要不斷的移動,種種的因素,這樣的狀況會使得一些基本物理條件派不上用場,現場節目的革新創造是不斷的,總不能因為硬體的約束而箝制其未來發展性,多元化的表演場合裡,為迎應個人表演上的監聽需求,個人專用監聽系統從固定位置的提供,到現今已是高品質的無線電系統了。
原則上我們要認識這IEM ( I n –E ar M onitoring ) 的系統要拜謝heavy metal bands ( 重金屬搖滾樂團)。
早在1960 ~ 1970 年代,舞台上的監聽演化裡,他們因節目內容的須要,不斷的嘗試及更改舞台上的聆聽環境。
早期由於場子不會很大,光是以PA 的泛音及樂手彼此間的距離近,尚可聆聽。
以前沒有所謂的Wedge 時,外場喇叭內緣都會適時的調整角度供舞台上的表演者聆聽,當然問題也是一堆,當時比較受矚目的披頭四在一場大型演唱會裡,他們發現很難在舞台上聽到彼此的聲音……,漸漸的Wedge 的地位形成一直在這表演領域突顯出重要性,隨著年份及節目製作的變化,表演內容愈加豐富,系統也愈多,有時一套鼓組可能在 1 M 高的檯子上,各個樂器組合的間距愈來愈大,獨立的Wedge 監聽調整也就迎應而生,匹配一套舞台上的聆聽環境是每位soundman 必經的過程,從最簡陋的系統條件到繁瑣的龐大系統,演化至今,一個小小的Pub or Club,聲音硬體系統裡最少也會擁有兩組獨立的舞台監聽模式。
專業的演唱會甚至多達12 ~ 14 組,然而人的聲音單靠那前方的幾支斜背喇叭跟本壓不過那比人還高的Marshall TM牆,一整排堆埵起來的Guitar / Bass amplifiers,對一個聲音調整的物理原則完全派不上用場,任何soundman 都會碰到“ 我的聲音再大一點“,講是容易,實際上在電器物理特性上已是沒有所謂再大一點的空間了,要知道的是沒有多少藝人是會想去瞭解什麼原因的,當然你可以再將自己的監聽喇叭增加到足量的數目,天啊!這所影響不止是舞台上,現場的擴音( FOH ) 將會因為舞台上直接音的音壓值升高而困難平衡音樂的內容,這種狀況幾乎都發生在各位的身上,尤其是室內的場子,你的House 甚至可以不用開啟Guitar or Bass 甚至是小鼓,僅以Vocal 的SPL 來匹配這些舞台上的直接噪音電平,是麼,而就成音的轉播上,過大的舞台噪音將使得Vocal 麥克風接受到更大的環境噪音值,如此的現象,最快的解釋說明就是這成音的內容將不會得到清楚的唇齒聲音。


OPERATING MANUAL CD-10 – CD-20 – CD-30* non contractual picturesDear Customer,Thank you for purchasing one of the 3 Micromega CD players: CD-10, CD-20, CD-30. These players are mainly different by their audio characteristics. This manual is then common for the 3 models.This unit provides ease of use and sonics of the highest quality. Please pay close attention to this instruction manual, and read it fully before attempting to operate. It is designed to ensure you maximise your pleasure of CD player and familiarise you with its many unique functions .CHECKINGCheck that the carton has no damage. Should you have any doubt about its condition,The standby LED lightens up indicating that the unit is in standby mode.Press once the CD key of the remote control or the STANDBY key of the unit.If there is a disc, reading starts and its content is displayed. Otherwise it indicates:DISPLAY OFFYou can choose to minimize the display by pressing the key Display ▼ of the remote or by a long pressure on the DISC key of the unit.To come back to normal mode, press again on the MODE key. The display shows:In stop mode, after reading the content of the disc, the unit will display the name of the artist and the title of the albumBecause the display has 10 characters only, if the content is larger than this number, the display will scroll the text.DIGITAL OUPUTYou can activate the Digital output by executing a long pressure on the MODE key at any moment. This is necessary if you wish to use a separate Digital to Analog converter or if you wish to make a Digital recording. When activated, the display indicates:An optional DB9 female connector could be installed on the rear panel of CD player allows controlling it via RS232 interface. It accepts the following format:Baud Rate : 19200 Bauds Data bits : 8 Parity bit : None Stop bits : 1 Flow control : NoneYou will find complete instructions concerning this interface in the separate RS232 CD manual.AUDIS sarl. 13-15, rue du 8 mai 1945, ZA de la Haie Griselle, 94470 Boissy Saint Léger FRANCE TEL: +33 (0)1 4382 8860 - FAX: +33 (0)1 4382 6129 - INTERNET: TECHNICAL CHARACTERISTICS CD-XXDiscs supported ……………………………………………………………………………………..…… CD, CD-R, CD-RWAudio characteristicsBandwidth ( - 0.5dB )…………………………………………………………………………………….………… DC – 20Khz Linearity at –90dB………………………………………………………………………………………….……………. < 0.5dB Signal/Noise + THD…………………………………………………………………………………………….. < -96dB à1kHz Crosstalk………………………………………………………………………………..…………………….… >100dB at 1kHz D/A conversion type………………………………………………………………………………………………..………….. ∑∆ Oversampling (CD-10, CD-20)…………………………………………………………………………………..………… none Oversampling (CD-30)…………………………………………………………………………………….…………. 132.3 kHz Output impedance ……………………………………………………………………………………..………………….. 600 Ω Output level ………………………………………………………………………………………………………… 2Vrms / 0dBPowerPower consumption (Max) CD-10………………………………………………………………………………………... 20 W Power consumption (Max) CD-20, CD-30……………………………………………………………………………….. 40 WDimensions : ( L x P x H mm)………………………………………………………………………………... 430 x 250 x 70Weight CD-10……………………………………………………………………………………………….…….……….. 4.6 kg CD-20, CD-30…………………………………………………………………………………………….…….…. 5.6 kgWARRANTYThis warranty will start from the date of purchase of the Micromega product.Statutory warranty regulations apply in the country where the Micromega product was purchased. In case of complaints please contact the dealer who supplied your Micromega product.WARNING: Warranty will be nulled if the unit is not shipped back in its original packing or if the serial number has been modified or erased.Warranty Certificate Dealer's StampDate of PurchaseSerial Number。


8 Channel High Power Stereo Speaker SelectorPSS8Read all documentations carefully before operating the equipment.Retain this manual for future reference. Congratulations for purchasing the PSS88 Channel High Power Stereo Speaker Selector. It lets you connect up to eight separate pairs of speakers to your stereo receiver/ampli er. The control center is especially convenient if you have speaker sets in di erent rooms and want to turn them on and o independently.You can enjoy the convenience and exibility o istening to multiple speaker pairs simultaneously.Terminal Buttons Protection ButtonsThe control center lets you use one to eight sets of speakers at a time, and is designed to operate with a stereo receiver/ampli er that has a maximum of 100 watts per channel, and with speaker systems that have a minimum impedance of 8 ohms (see "Impedance Chart" on page 5)PREPARATIONS• Use the PYLE PRO Speaker Selectors only with amplifiers rated at 100 watts perchannel or less.• Your PYLE PRO Speaker Selector is designed to accept any size cable up to 14 gauge non-terminated speaker wire. If you're using non-terminated speaker wire, do not use any speaker wire that is larger than 14 gauge. The lower the gauge number, the larger the cable (e.g., 12 gauge is larger in actual physical size than 14 gauge).• Do not hook the outputs of one selector into the inputs of another speakerselector together.2 3MAKING THE CONNECTIONSThe control center divides the power from your receiver/ampli er di erently to its speaker terminals. (This is especially noticeable when you connect only one pair of speakers. If you connect more than one pair of speakers, see "Impedance Chart " on page 5 to selector the best terminals to connect.) For the best performance, make the connections based on how frequently you use each set of speakers. Cautions:To avoid damaging your speakers or receiver/ampli er:• Be sure your receiver/amplifier's power is turned off before you make the connections.• Never let the speaker wire's bare ends touch each other or the adjacent terminals on the control center.• Do not connect more than one pair of sepakers to each set of terminals.Press open the desired SPK terminals on the control center. Insert the speakers' positive (+) wires in the positive (red) terminals, and negative (-) wires into thenagative (black) terminals, according to the respective L (left) and R (right) terminals.Then press the tabs to close them.Press open the AMP terminals on the control center, then insert your receiver/ampli- er's positive (+) wires into the positive (red) terminals, and negative (-) wires in the nagative (black) terminals. Then press the tabs to close them.Notes:• If your receiver/ampli er has more than one set of speaker terminal (A and B),connect only one or the other to the control center.• For the best results, we recommend 14-gauge, two conductor speaker wire (notsupplied) for most connections. If you plan to located the speakers further than 80 feet from the control center, use a heavier gauge of wire.OPERATIONCautions:• To avoid damaging your receiver/ampli er, set its volume to the lowest settingbefore changing the control center's settings.• To turn on a pair of speakers connected to the control center, simply press in the desired button. For example, to turn on the set of speakers connected to SPKA,press A.• To turn o a pair of speakers, press the button again so it is in the "out" position. Note:If no speakers are connected to a set of terminals, do not press in the corresponding control button.IMPEDANCE CHARTImpedance is a measurement of the load placed on your receiver/ampli er by the speakers. The load placed on your receiver/ampli er from the control center will vary depending on how many pairs of speakers you turn ON at one time, and on which speakers you turn ON. The chart below shows the impedance for all possible combinations of 8-ohm speakers.4IMPEDANCE CHART56This products can expose you to a chemical or group of checmicals, which may include ”Nickel Carbonate” which is known in the state of California to cause cancer, birth defects, or other reproductive harm. For more info, go to https:///.7Features:• Multi-Channel High Powered Ampli er• Individual Speaker Volume Control• Support Two Stereo Ampli ers• Rugged & Durable Housing Construction, Cabinet Heatsink• Control Powered 8 Channel Ampli er• Plug and Play Easy Install• Up To 8 Separate Speakers Pair To Your Stereo System.• Accepts Speaker Wires Up To 14-Gauge.• Handles 100 Watts Per Channel With Speaker Systems That Have A Minimum • Protection Circuitry Keeps It Running SmoothlyWhat’s in the Box:• Power Stereo Speaker SelectorTechnical Specs:• Power Output:8 x 25 Watts• Minimum Impedance: 4 Ohms• Frequency Response: 20Hz - 20KHz• Speaker Terminal Wire Size: 14-22 gauge• Max. Amplifier Input: 100W RMS, 150W AVG• Max. Output per Speaker: 18W RMS, 50W AVG• Dimensions 12.8'' X 2.04'' X 6.12'' -inchesQuestions? Issues?We are here to help! Phone: (1) 718-535-1800Email: *******************。

HS SERIES MANUAL惠威HS系列室内/室外扬声器配件--阻抗匹配音量控制器:注:3种配件有各种不同的功率选择,在本手册中只做了一个通用性的安装介绍,具体的功率选择请根据您的需要向我们订安装及连接3. 请勿将产品安装过于靠近热源(如火炉,散热器或其他的散热设备)。
4. 对于室外安装,接好线后,请用绝缘胶布包住接线柱,以避免雨水造成的不良影响。
警告:用户未经生产商许可对此产品所作的一切修改与操作都是无效且未经授权的。
我们不承担任何责任。
2欧姆1X1X2X2X4X 4X4X4X4X8X8X8X8X8X8X8X8欧姆6欧姆4欧姆功放最小负载阻抗2欧姆8欧姆6欧姆4欧姆2欧姆8欧姆6欧姆4欧姆功放最小负载阻抗功放最小负载阻抗1X 2X 4X 4X 4X8X 8X 8X 8X 8X 16X 16X 16X 16X 16X 16X 123456789101112131415162X 4X 8X 8X 16X 16X 16X 16X 16X 8X 16X 16X 16X 16X 2X 4X 4X 8X 8X 8X 8X 16X 16X 16X 16X 16X 16X 16X 16X 16X 16X 16X 1234567891011121314151612345678910111213141516对于8Ω扬声器的跳线设置/扬声器的数量(对)对于6Ω扬声器的跳线设置/扬声器的数量(对)对于4Ω扬声器的跳线设置/扬声器的数量(对)2X 4X 4X 4X 8X 8X 8X 16X 16X 16X 16X 16X 16X 16X 16X 16X 1X 2X 4X 4X 4X 8X 8X 8X 8X 8X 16X 16X 16X 16X 16X 16X 1X 2X 2X 4X 4X 4X 4X 8X 8X 8X 8X 8X 16X 16X 16X 16X 1X 1X 1X 1X2X2X 4X 4X 4X 4X 4X 4X 8X 8X 8X 8X 1X 2X 4X 4X 4X 8X 8X 8X 8X 8X 16X 16X 16X 16X 16X 16X 1X 2X 4X 4X 4X 4X 8X 8X 8X 8X 8X 16X 16X 16X 16X 16X 1X 1X 2X 2X 4X 4X 4X 4X 4X 8X 8X 8X 8X 8X 8X 8X 1X1X1X1X2X2X 2X 2X 4X 4X 4X 4X 4X 4X 4X 4X图2附录 A阻抗匹配音量控制器的使用:阻抗匹配音量控制器的用途就是补偿由于多个喇叭和一个功放连接所造成的阻抗减少。

Owner’s GuideBrugervejledningBedienungsanleitungGuía del usuarioNotice d’utilisationManuale di istruzioniGebruiksaanwijzingBruksanvisningenFPOThank youCongratulations on your purchase of Bose® 301® Series IV Direct/Reflecting® speakers. Their integrated system of advanced Bose technologies delivers superior sound reproduction from a bookshelf design.For your recordsSerial numbers are located on the back of each 301 speaker.Serial numbers: ____________________________and _________________________________ Dealer name: ____________________________________________________________________ Dealer phone: _________________________________ Purchase date: ____________________ We suggest you keep your sales slip and warranty card together with this owner’s guide.2Where to find...Setting UpBefore you begin (4)Unpack the carton (4)Select the locations for your 301® speakers (5)Choose the cord (6)Prepare the cord (6)Make the connections (6)Check the connections (7)Test the speakers (7)Using and Maintaining Your 301® Series IV SpeakersEnjoying sound in a variety of ways (8)Cleaning the speakers (8)Warranty period (8)Troubleshooting (9)Customer service (9)Product InformationTechnical information (10)Optional accessories (10)Bose® Corporation ...................................................................................inside back cover34Before you beginY our 301® Series IV Direct/Reflecting ® speakers re-create a natural balance of reflected and direct sound energy for an open, spacious performance. They are designed at Bose ® to bring you high-quality listening pleasure.The Direct/Reflecting ® tweeter inside each speaker creates a pattern of sound similar to what you experience at a live concert. In addition, the Stereo T argeting ® tweeters help establish the natural balance of sound, for full enjoyment of stereo even when you move around the room. These distinct left and right speakers also feature tuned port enclosures that contribute to their deep, room-filling bass. An advanced crossover design adds to the realism and clear definition of both musical instruments and voices.Y our 301 Series IV speakers are significantly different from conventional speakers, so be sure to read this owner’s guide. It will help you set up and use your speakers properly, for the greatest enjoyment.Unpack the cartonCarefully unpack the carton and save all packing materials for possible future use. Check the carton contents (Figure 1).If either speaker appears damaged, do not use them. Instead, repack both speakers in the original carton and notify your authorized Bose dealer immediately.Note: Now is a good time to record the speaker serial numbers on page 2 of this guide and on your warranty card.CAUTION:To avoid danger of suffocation, keep the plastic bags that wrap these speakers out of the reach of children.Select the locations for your 301® speakersBose® 301 speakers are designed to fit horizontally on a table or shelf (Figure 2). Be sure to choose a stable and level surface for each speaker.Place the left and right speakers (marked on the back of each one) on the left and right sides of your room, as you face them. Exactly where you put them depends on the size and style of your room and where you think they sound best. Feel free to experiment to find a location that is both convenient and provides the sound you prefer.Note: Because the grilles on the front of each speaker protect the drivers inside, we recommend that you do not remove the grilles.Here are some basic guidelines:• Place the speakers 4 to 12 feet (1 to 4 m) apart.• Choose a stable and level surface for each speaker, and attach the rubber feet.• Leave at least 12 inches (30 cm) of space from the end of a speaker to the side wall. • Leave at least 18 inches (45 cm) from the speakers to the floor or ceiling.• Leave at least 24 inches (60 cm) from the speakers to any TV screens or monitors.• Keep the back of the speakers within 18 inches (45 cm) of the wall behind them.• Do not place the speakers exactly halfway between the floor and ceiling or any other sound-reflecting hard surface.• Do not put the speakers in a vertical position.Note: Bose speaker stands or wall brackets can extend your placement options. See “Optional accessories” on page 10. CAUTION:301 speakers are designed specifically for placement on a stationary shelf, table, or stand. On smooth surfaces like marble, glass or highly polished wood, vibrations may cause the speak-ers to slide.So be sure to attach the self-adhesive rubber feet to the bottom surface of each speaker for added stability and protection. The feet go in the corners of the flat surface, inside the seam.Do not use these speakers ina moving vehicle.To mount the speakers on a wall, use only the Bose WB-3 wall mounting bracket. Please follow the mounting instructions that come with these brackets. Im-properly mounted speakers may fall, causing injury and damage.Figure 2Placement guidelinesCAUTION:For the most realistic sound im-age, make sure the left speaker is placed on the left and the right speaker is on the right side of your room, as you face them.5CAUTION:Never use broken or frayed wir-ing, which can result in electrical shock or damage.Choose the cordIt is important to use the proper gauge (thickness) of speaker cord. Standard zip cord (2-conductor, 18-gauge wire) works for most applications. Y ou can find this wire at most electrical and hardware stores.Y ou will need thicker wire if your speakers will be more than 30 feet (9 m) from a receiver (or amplifier). Refer to the wire recommendations under “T echnical information” on page 10, or contact your authorized Bose ® dealer for more information.Note: Before running speaker cord through a wall or under a floor, check your local building code requirements and safety regulations. You may want to contact an electrical installer for this information.Prepare the cordSpeaker cord consists of two insulated wires. The insulation around one wire is marked (striped, collared, or ribbed). This marked wire is always positive (+). The plain wire is always negative (–). These wires correspond to the red (+) and black (–) terminals on the speakers and the receiver.At the ends of each cord, strip approximately 1⁄2 inch (12 mm) of insulation from both wires. T wist the bare end of each wire so loose strands will not touch across terminals. Be sure to connect each wire to the proper terminal (positive to positive and negative to negative).Note: It is sometimes difficult to distinguish wire markings. Inspect both wires carefully.Make the connectionsJust press the terminal tab on the back of each speaker to insert the appropriate wire (Figure CAUTION:Before making any connec-Check the connectionsCheck to be sure all connections are made positive to positive (+ to +) and negative to negative (– to –) (Figure 4). Make sure that no loose strands of wire touch across terminals. Bridged wires can short circuit and damage the amplifier. Tighten any loose connections before you plug in the receiver and turn it on.T est the speakersT o make sure your speakers operate correctly:1. Place the speakers less than 6 inches (15 cm) apart, facing each other.2. Turn on your receiver. Set the receiver to MONO (monophonic), if that is an option onyour receiver.3. Make sure that all special effects (such as surround sound) are turned off.4. Set the balance control to normal (center position).5. Play some deep bass passages of music through the speaker.The sound should seem to come from a point between the two speakers. The bass should be full and natural. If it is not, one of the connections may be reversed, causing the speakers to play out of phase (refer to “Make the connections” on page 6).T o correct the problem, make sure all the wires are connected positive to positive (+ to +) and negative to negative (– to –). Then repeat steps 1 through 5 above to re-testthe speakers.Figure 4Completed connections78Enjoying sound in a variety of waysBose ® 301® Series IV Direct/Reflecting ® speakers are designed to work with a variety of stereo receivers and amplifiers. The open, spacious performance of these speakers also makes them an ideal choice for home theater, or for listening to CD’s, tapes, or radio broadcasts (Figure 5).Figure 5301® Series IV Direct/Reflecting ® speaker sound path301 Owner’s GuideCleaning the speakersClean the surface of your speakers with a soft damp cloth. Do not use any sprays near the system or allow liquids to spill into any openings. Also, do not use any solvents, chemicals, or cleaning solutions containing alcohol, ammonia, or abrasives.The speaker grille panels require no special care. Y ou may vacuum them carefully to remove dust.Warranty periodBose 301 Series IV Direct/Reflecting ® speakers are covered by a limited 5-year transferable warranty. Details of the coverage are provided on the warranty card that came with your speakers. Please fill out the information section on your card, detach, and mail to Bose.T roubleshootingProblem What to doNo sound • Make sure the receiver is plugged in and turned on.• Check to be sure the AC power (mains) outlet is working.• Disconnect any headphones plugged into the headphone jack.• Make sure the receiver is not set to MUTE.• Refer to the owner’s guide that came with your receiver.• Check connections to both the speakers and the receiver.Refer to “Make the connections” on page 6. Correct any connec-tion errors.No sound from • Disconnect the working speaker from the receiver.one speaker • Switch the cord of the “faulty” speaker from its original receiverjacks to the other set of jacks (the working speaker was originallyattached to those jacks).– If the speaker now works, the problem is in your receiver.– If the speaker does not work, continue below.• Remove the cord from the working speaker and connect it to the“faulty” speaker and either set of receiver jacks.– If the speaker now works, the problem was in the originalspeaker cord.– If the speaker does not work, the problem is in the speaker.One speaker • Follow the same procedure for the problem of no sound fromsounds distorted one speaker, as outlined above.Not enough • Adjust the bass and treble controls on the receiver.bass or treble • Check the connections to make sure they are correctly in phase(+ to + and – to –). Refer to “Make the connections” on page 6.• Move the speakers closer to or farther from the side walls or othersound-reflecting hard surfaces.Customer serviceIf the troubleshooting guidelines above do not solve your problem, contact your authorizedBose® dealer to arrange for service. T o obtain information or service directly from Bose, referto the listing at the end of this guide. Bose Corporation will make every effort to correct anyproblem within the terms of your warranty.910T echnical informationFeaturesDirect/Reflecting ® speaker design Stereo T argeting ® tweeters Tuned port enclosureSyncom ® computer quality control Driver complementOne (1) 8-inch (20 cm) wooferOne (1) 3-inch (7.6 cm) high-sensitivity tweeter One (1) 2-inch (5 cm) high-sensitivity tweeterCompatibility/ImpedanceCompatible with amplifiers and receivers rated from 10 to 150 watts per channel. Rated 8 ohmsWire recommendationsBased on a maximum frequencies response deviation of ± 0.5 dB Gauge Length18 (0.75 mm 2) 30 ft (9 m) maximum 16 (1.5 mm 2) 45 ft (14 m) maximum 14 (2.0 mm 2)70 ft (21 m) maximumEnclosurePolymer and vinyl veneer over wood construction with black, rosewood, or gray finish Size/WeightSpeaker: 101⁄4”H x 163⁄8”W x 91⁄2”D (26 x 42 x 24 cm)Each speaker, unpacked: 11.6 lb (5.2 kg)Speaker pair in shipping carton: 27.7 lb (12.5 kg)Optional accessoriesBose ® AS-3 speaker stands and WB-3 wall mounting brackets are designed for use with 301® Series IV Direct/Reflecting ® speak-ers. For information, or to order accessories, contact your autho-rized Bose dealer. T o contact Bose directly, refer to the listing at the back of this owner’s guide.Figure 6Bose ® AS-3 speaker stand andWB-3 wall mounting bracketsItaliaBose S.p.A., Via della Magliana 876 00148 Roma www.bose.iTTEL 06-65670802 FAX 06-65680167JapanBose K.K., Shibuya YT Building 28-3 Maruyama-cho Shibuya-ku, T okyo 150 TEL 3-5489-0955 FAX 3-5489-0592NederlandBose B.V ., Nijverheidstraat 81135 GE Edam TEL 0299-390111 FAX 0299-390109NorgeBose A/S, Solheimsgate 11 N-2001, Lillestrøm TEL 63-817380 FAX 63-810819ÖsterreichBose Ges.m.b.H., Vienna Business Park Wienerberg-strasse 7 (10.OG)A-1100 Vienna TEL 01-60404340 FAX 01-604043423SchweizBose AG, Rünenbergerstrasse 134460-Gelterkinden TEL 061-9815544 FAX 061-9815502SverigeBose A/S, Blandsädsgatan 2D S-43146 Mölndal TEL 31-878850 FAX 31-274891United KingdomBose Limited1 Ambley GreenGillingham Business Park Gillingham, Kent ME8 ONJTEL 0870-741-4500 FAX 0870-741-4545From other locationsBose Customer Service, 1 New Y ork Ave. Framingham, MA 01701-9168 USATEL (508) 766-1900 FAX (508) 766-1919World Wide WebUSABose Corporation, The Mountain Framingham, MA 01701-9168 1-800-367-4008Phone hours - ET (eastern time): Weekdays 8:30 a.m. to 8 p.m. Saturdays 9 a.m. to 3 p.m.CanadaBose Ltd., 1-35 East Beaver Creek RoadRichmond Hill, Ontario L4B 1B3 1-800-465-2673Phone hours - ET (eastern time): Weekdays 9 a.m. to 5 p.m.European OfficeBose Products B.V ., Nijverheidstraat 81135 GE Edam, Nederland TEL 0299-390111 FAX 0299-390114AustraliaBose Pty Limited, 1 Sorrell StreetParramatta NSW, 2150TEL 02 9204-6111 FAX 02 9204-6122Belgique/BelgiëBose N.V ., Limesweg 2, B-3700 T ongerenTEL 012-390800 FAX 012-390840DanmarkBose A/S, Industrivej 7, 2605 BrøndbyTEL 4343-7777 FAX 4343-7818DeutschlandBose GmbH, Max-Planck-Straße 36dD-61381 FriedrichsdorfTEL 06172-71040 FAX 06172-710419FranceBose S.A., 6, rue Saint Vincent78100 Saint Germain en Laye TEL 01-30616363 FAX 01-30614105IndiaBose Corporation India Private Limited W-16, Greater Kailash-II New Delhi 110 048TEL (011) 648 4462 FAX (011) 648 4463IrelandBose CorporationCarrickmacross, Co MonaghanTEL (042) 9661988 FAX (042) 9661998©2000 Bose CorporationThe Mountain, Framingham, MA 01701-9168 USA AM181869 Rev.05。

EDUFmENT REVIEW点指兵兵精致小巧的身材甜美动人的声音Exposure力宝声XMCD播放机文/晨光产品代理:新汉建业鸣谢海印广场巴洛音响提供器材试听6祕師前建n:i m POWERo STOP PLAY/PAUSE|«在开始这篇测评文章之前,想了解一下各位读者朋友现时主要的音源是采用什么载体?用最流行最方便的网络串流?跟着“复古”潮流玩黑胶?还是坚实的CD党?相信无论是音响发烧友还是音乐爱好者,家中还是有不少CD收藏的,但现在市面上可以选择的CD机十分之少,不是入门级的产品,就是直接去到好几万的中高端产品,而想找一些中端产品,则非常少。
来自英国的Exposure(力宝声),近日推出了XM CD播放机,以满足一些年轻音乐爱好者的需求。
为什么这样说?其实,力宝声是一家非常保守的厂家。
Exposure于1974年成立,一直致力于在合适的价位上设计实用的Hi-Fi系统,专注于CD播放机和放大器的生产。
公司的创立人John Farlowe曾在录音棚里与David Bowie和Pink Floyd这样的大牌明星共事,并被专业的录音和重放设备深深吸引!因此创立自己的品牌,让音乐爱好者能够听到录音室里真实的声音。
多年来,Exposure的产品线只有1010,2010以及3010三个不同级别的CD机和合并功放,除了CD机和合并功放外,2010系列增加了后级和解码器、3010系列则又增加了前级、唱放以及后级供用家选择。
因此Exposure的产品仅有10余款,而且对应不同价位带的需求都有清晰的产品对应。
直到2017年才推出了两个全新的系列——5010旗舰系列与XM系列。
新的突破而在近两年,随着CD播放机的销量逐年减少,Exposure厂方也停产了部分系列的CD机,但由于市面上对CD的需求依然十分之大,因此厂方推出了全新的XM CD播放机。
而XM CD播放机所属的XM系列,外观方面依旧采用了简洁设计的拉丝面板,但是身形却比以往的产品缩小了一半,因此XM系列可定义为桌面系统。

20款主流多媒体2.0音箱集中评测前言中高端有源2.0音箱(俗称为“PC Hi-Fi”或者“准Hi-Fi 音箱”)的蓬勃发展是中国大陆的一个特有现象,不仅拥有众多的此类音箱品牌,还拥有数量惊人并且在不断增加的庞大消费群体。
伴随着数字音乐品质的提升,数字音响市场出现爆炸性的增长,MP3等多媒体数字音乐正在成为最大众化的娱乐方式。
人们的欣赏水平也开始出现了变化,即数字音乐Hi-Fi 化的趋向越来越清晰了。
充斥于音响低端市场上的2.1多媒体音箱已经满足不了这部分用户的需求,所以音质相对出色、但价格又在可承受范围内的中高端(数百元以上的)有源2.0音箱就成了今日最大群体的年轻一代数字音乐爱好者(也是潜在的Hi-Fi发烧友)的最佳听音媒介。
回顾国内中高端有源2.0音箱的发展轨迹,有几款产品起到了至关重要的作用:发布于上世纪90年代末的惠威M200,是第一款真正意义上的PC Hi-Fi产品,在千元价位上取得了相当大的成功;其次是发布于2002年的惠威T200A,这是一款代表着国产有源多媒体音箱最高水准的产品,在工业设计和音质表现方面,都具备了业界“标准”这样的水准。
而它的真正意义还在于将Hi-Fi概念及实质性的东西植入到了多媒体音箱的领域,让多媒体音箱的电声指标、听感第一次有了一个虽不是标准、但是具有标杆意义的参考样板,也提升了整个多媒体音箱的品质水平、产品质量,间接地树起了一个民间广泛认可的多媒体音箱行业的“新标准”。
另一款,确切的说应该是一个系列产品,就是“漫步者”的R1900T系列多媒体音箱,这个系列的产品在音质等方面虽谈不上有多么大的建树,但其有别于传统多媒体音箱的整体品质提升(电声指标、声音、外观设计等)及在市场上获得的巨大成功,有力地推动了中端有源2.0多媒体音箱市场的繁荣。
正是有了惠威、漫步者等等这样的“标准”引领者及市场催生者的示范作用,使得多媒体音箱市场近年来产品品质提升的脚步加快。
综观当前国内的中高端有源2.0音箱市场,那些有传统Hi-Fi功底和高端扬声器设计经验的厂家更容易占领制高点,如惠威、极典等。
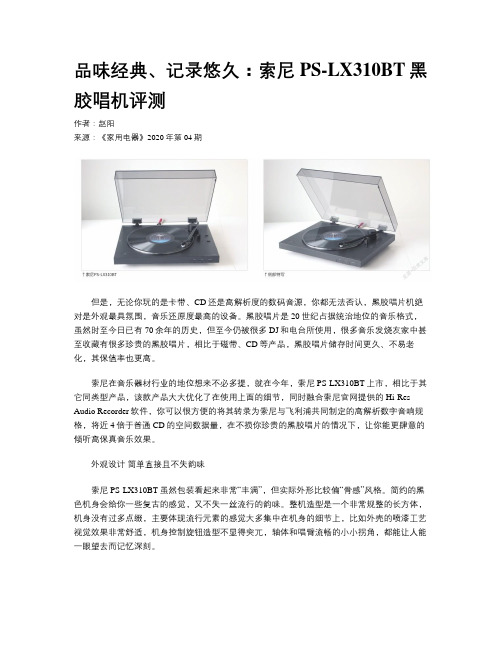
品味经典、记录悠久:索尼PS-LX310BT黑胶唱机评测作者:赵阳来源:《家用电器》2020年第04期但是,无论你玩的是卡带、CD还是高解析度的数码音源,你都无法否认,黑胶唱片机绝对是外观最具氛围,音乐还原度最高的设备。
黑胶唱片是20世纪占据统治地位的音乐格式,虽然时至今日已有70余年的历史,但至今仍被很多DJ和电台所使用,很多音乐发烧友家中甚至收藏有很多珍贵的黑胶唱片,相比于磁带、CD等产品,黑胶唱片储存时间更久、不易老化,其保值率也更高。
索尼在音乐器材行业的地位想来不必多提,就在今年,索尼PS-LX310BT上市,相比于其它同类型产品,该款产品大大优化了在使用上面的细节,同时融合索尼官网提供的Hi-Res Audio Recorder软件,你可以很方便的将其转录为索尼与飞利浦共同制定的高解析数字音响规格,将近4倍于普通CD的空间数据量,在不损你珍贵的黑胶唱片的情况下,让你能更肆意的倾听高保真音乐效果。
外观设计简单直接且不失韵味索尼PS-LX310BT虽然包装看起来非常“丰满”,但实际外形比较偏“骨感”风格。
简约的黑色机身会给你一些复古的感觉,又不失一丝流行的韵味。
整机造型是一个非常规整的长方体,机身没有过多点缀,主要体现流行元素的感觉大多集中在机身的细节上,比如外壳的喷漆工艺视觉效果非常舒适,机身控制旋钮造型不显得突兀,轴体和唱臂流畅的小小拐角,都能让人能一眼望去而记忆深刻。
整机的零部件非常简单,甚至不需要说明书也可以轻松进行操作,并没有给安装造成什么困难。
除了主机身之外,主要零部件还有防尘罩、金属的黑胶转台、手感舒适的转台衬垫、防尘罩铰链、唱盘转换器、电源适配器几种。
盖上转台和衬垫、连接好转台上固定好的皮带,通过铰链把防尘罩装好,就完成了该机的全部安装步骤。
可以看到该机皮带轮采用了黄铜制作,在运转过程中能提供更好的支撑和耐久。
動态均衡的L型唱臂外观非常流畅,采用铝合金材质,轻巧耐用。
唱头针压为3g,输出电平2.5mV,唱头顶端有一个白色的保护套,在使用时记得摘下。
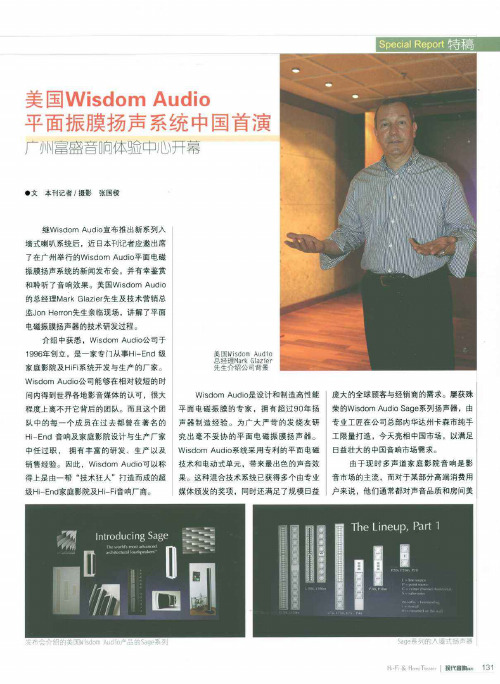
广州富盛音响体验中心开幕●女本W记者/摄影张国棵继W i s dom A udi o宣布推出新系列入墙式喇叭系统后.近日本刊记者应邀出席了在广州举行的W i s dom A udi o平面电磁振膜扬声系统的新闻发布会.井有幸鉴赏和聆听了音响效果。
美国W i s dom A ud i o的总经理M ark G l az i er先生及技术营销总监Jon H e r r en先生亲临现场.讲解了平面电磁振膜扬声器的技术研发过程。
介绍中获悉.W i sdom A udi o公司于1996年创立.是一家专门从事H i E nd级家庭影院及H i Fi系统开发与生产的厂家一W i s dom A udi o公司能够在相对较短的时间内得到世界各地影音媒体的认可.很大程度上离不开它背后的团队。
而且这个团队中的每一个成员在过去都曾在著名的H i E nd音口自及家庭影院设计与生产厂家中任过职.拥有丰富的研发、生产以及销售经验。
因此,W i sdom A udi o可以称得上是由一帮“技术狂^”打造而成的超级H i E nd家庭影院及H i—Fi音响厂商一其目W i sdom A i J d{oi l#然{黢‘W i s dom A udi o是设计和制造高性能平面电磁振膜的专家.拥有超过90年扬声器制造经验。
为广大严苛的发烧友研究出毫不妥协的平面电磁振膜扬声器。
W i s dom A udi o系统栗用专利的平面电磁技术和电动式单元,带来最出色的声音效果。
这种混台技术系统已获得多个由专业媒体颁发的奖项.同时还满足了规模日益庞大的全球顾客与经销商的需求。
屡获殊荣的W i s dom A udi o Sage系列扬声器,由专业工匠在公司总部内华达州卡森市纯手工限量打造.今天亮相中国市场,以满足日益壮大的中国音响市场需求。
由于现时多声道家庭影院音响是影音市场的主流.而对于某部分高端消费用户来说,他们通常都对声音品质和房间美学有着极高的要求.所以人墙式音箱是最好的解抉方案。

NoteSave all packing materials.If you need to ship the S-350 in the future, repack the unit in its original packaging to prevent shipping damage.S-350CD/DVD PlayerQUICK SETUP GUIDEGetting StartedThank you for your purchase of the Krell S-350. The S-350 CD/DVD Player is a modular design featuring reference caliber CD playback as well as an optional state-of-the-art video engine that provides stunning 1080p performance and video processing controls.The S-350 can be outfitted with different outputs to match the requirements of any high performance audio or home theater system.Configurations include:• S-350a - High performance CD player with balanced analog outputs • S-350av - Complete package including audio and video optionsPlease contact your authorized dealer, distributor, or Krell if you have any questions not addressed in the owner’s reference.Do not place the compact disc player where it could be exposed to dripping or splashing. Do not remove or bypass the ground pin on the end of the AC cord. This may cause radio frequency interference (RFI) to be introduced into your playback system.The ventilation grids on the top and bottom of the S-350 must be unobstructed at all times during operation. Do not place flammable material on top of or beneath the component.Turn off all systems' power before connecting the S-350 to any component. Make sure all cable terminations are of the highest quality, free from frayed ends, short circuits, or cold solder joints. Caution: Visible and invisible laser radiation. When the cover is open, avoid exposure to beam. This unit employs a laser. To prevent possible eye injury, only a qualified service person should remove the cover or attempt to service this device. Use of controls or adjustments or performance of procedures other than those specified herein may result in hazardous radiation exposure.THERE ARE NO USER-SERVICEABLE PARTS INSIDE ANY KRELL PRODUCT.1.Open the shipping box and remove the top layer of foam. You see these items:2.Grasp the underside of the foam end-caps that encase the S-350 and lift it straight out of the shipping box.3.Place the S-350 in a safe location and remove the protective plastic wrapping.Place the S-350 on a firm, level surface, away from excessive heat, humidity, andmoisture. The S-350 requires at least two inches (5 cm) of clearance on each side and at least two inches (5 cm) of clearance above and below the component to provide adequate ventilation. Installations inside cabinetry may need extra ventilation. Do not place the S-350 near hum sensitive components such as preamplifier phono stages or turntables. Although the S-350 is well shielded, placing it near these components could create interference and cause hum.The S-350 has superb regulation and does not require a dedicated AC circuit. Avoid connections through extension cords or multiple AC adapters. Highquality 15 amp grounded AC strips are acceptable. High quality AC line conditioners may be used if they are grounded and meet or exceed the unit's power supply rating of 50V A.WARNINGSKrell S-350 1UnpackingKrell Industries, LLC., 45 Connair Road,Orange, CT 06477-3650 USA TEL 203-799-9954, FAX 203-891-2028, E-MAIL *********************WEB SITE Connecting the S-350 to Your SystemFollow these steps to connect the S-350 to your system.1.Make sure all power sources and components are off before connecting inputs and outputs.2.Neatly organize the wiring between the S-350 and all system components.Separate AC wires from audio cables to prevent hum or other unwanted noises from being introduced into the system.3.Balanced outputs use three-pin XLR connectors. Single-ended outputs use RCA connectors. Maintain the correct left/right orientation of these outputs.4.T o play DVD discs (S-350av), connect desired video output to preamp/processor or display's video input. For use with apreamplifier/processor, connect digital audio output to digital audio input. 5.For two-channel compact disc playback only, connect the S-350 digital audio outputs to the D/A convertor or preamplifier/processor digital input orbalanced/single-ended analog audio outputs to the preamplifier balanced or single-ended analog audio inputs.6.Plug the AC power cord into the IEC power connector on the back panel.Then plug the AC power cord into the wall socket.Press the back panel power switch (35) labeled “1”. When the S-350 is initialized and in the stand-by mode, the red stand-by LED (2) on the front panelilluminates. Then press the power button on the front panel or the power key (1)on the remote control, to place the S-350 in the operational mode. When the blue power LED (2) illuminates, the S-350 is in the operational mode. 1. Insert disc into the slot2. Press the play button or key. The format type is visible in the front paneldisplay. The format type disappears and the front panel display reads TRACK 1 and the track time, as the disc begins playing.3.Adjust the volume level through your system volume control.4.Press the stop button or key to end disc playback.5.Press the play button or key (6) to begin playback again, from the first track.6.T o return the S-350 to the stand-by mode, press the power button or key (1).1. Do not install near any heat sources such as radiators, heat registers, stoves,or other apparatus (including amplifiers) that produce heat.2. Unplug this apparatus during lightning storms or when unused for long periods of time.3. Refer all servicing to qualified service personnel. Servicing is required when the apparatus has been damaged in any way, such as a power-supply cord or plug is damaged, liquid has been spilled or objects have fallen into the apparatus, the apparatus has been exposed to rain or moisture, does not operate normally, or has been dropped.4. The ventilation grids on the top of the apparatus and the space underneath it must be unobstructed at all times during operation. Do not place flammable material above or beneath the apparatus.5. Before making connections to the Evolution 505, ensure that the power is off and other components are in mute or stand-by mode. Make sure all cable terminations are of the highest quality, free from frayed ends, short circuits, or cold solder joints.Please contact Krell if you have questions not addressed in this guide.4 Krell S-350Licensing attributions:Manufactured under license from Dolby Laboratories.Dolby is a trademark of Dolby Laboratories.Manufactured under license under U.S. Patent #'s:5,451,942; 5,956,674; 5,974,380; 5,978,762;6,487,535 & other U.S. and worldwide patents issued & pending. DTS and the Symbol are registered trademarks & DTS Digital Surround and the DTS logos are trademarks of DTS, Inc. Product includes software. ©DTS, Inc. All Rights Reserved.Safety notices:This CLASS I apparatus must be connected to a MAINS socket outlet with a protective earthing connection.Operating the S-350This product complies with the EMC directive (89/336/EEC)and the low-voltage directive (73/23/EEC).1 S-350 1 S-350 remote control1 IEC connector (AC power) cord2 AAA batteries1 12 VDC (12 V trigger) cable1 T-10 T orx wrench 1 Quick Setup GuidePlacementAC POWER GUIDELINESP/N 310784v 1.0Krell recommends using balanced interconnect cables. Balancedinterconnect cables not only can minimize sonic loss but are also immune to induced noise, especially with installations using long cables. Balanced connections have 6dB more gain than single-endedconnections. When level matching is critical, keep this gain value in mind. Pin assignments for XLR connectors:Pin 1Shield (ground)Pin 2Non-inverting (hot) (0°)Pin 3Inverting (cold) (180°)NoteThe S-350 reads data discs. For example, if you prepare a CDR or DVR containing MP3 audio files,you can play the discs on the S-350. The following terminology appears in the front panel display, to help you navigate a data disc:ROOT = The beginning of the disc. F = A closed folder. TOP = An open folder.Press the enter button or key (11) to open a folder,move to the previous folder, or play a track.Press the up and down arrows or keys (10) to move between tracks in a folder.S-350MODELSERIALNUMBERFigure 1 The S-350 Front PanelFigure 3 The S-350 RemoteFigure 2 The S-350 Back PanelKrell ®is a registered trademark of Krell Industries, LLC, and is restricted for use by Krell Industries, LLC. its subsidiaries, and authorized agents. T osLink ®is a trademark of T oshiba Corporation. All other trademarks and trade names are registered to their respective companies.©2006 by Krell Industries, LLC, All rights reservedBack Panel2 Krell S-350Krell S-350 3。

E口UPiTiENT REVELU 点指兵兵打磨细致的音乐光泽____________________________ BEYD AS (贝达诗)EX P LO R CD-R1 C D播放器文/司徒 图/小路、司徒 产品零售价:¥12,600元/台46祝J iff前违飞碟型的外观设计,极具典雅气息虽然说现在很多音乐爱好者都未必会买实体唱片,但 相信他们家中依旧还有不少的唱片收藏,随着近年不少的 厂家都停产了CD播放机,因此不少的玩家、收藏家都在寻 找高品质、性能稳定耐用、性价比高的CD播放器。
今天我 们介绍的是英国品牌BEYDAS的EXPLOR CD-R1探索者CD播放器。
>重量级的机身抵御外来震动EXPLOR CD-R1是BEYDAS最新推出的揭盖式CD 机。
唱机外型以铝合金车制切割而成,坚固的外壳设计为 飞碟形状,机身有银色和黑色两款,表面采用磨砂处理。
屏幕位于面板中央,控制按钮则设置在顶板的CD仓前。
CD-R1除了有厚重的顶板外,配合四只铝合金支柱,特别 定制的实心铜脚钉和支柱固定装置,CD仓顶盖的提手同样 采用实心铜制作,这样能够借助机器自身的重量来抵御外界震动,减轻外部震动对其工作时的影响。
同时,顶置式 的设计省去了传统的出入仓结构,减少出入仓机构引入的震动,让机芯能够工作在稳定的状态之下,光头能够拾取 到更加准确的信息。
>丰富的接口提供多种玩法再来看看CD-R1的机背,提供了XLR、RCA模拟输出各一组,数码输出则设有同轴和光纤输出。
同时还有一组USB输入,可以通过USB线来连接个人电脑播放音乐,这 是与时俱进的做法。
厂方在接插件方面毫不含糊,采用了 美国CM C的制品,品质有保障。
>稳定耐用的原装三洋机芯EXPLOR CD-R1内部分为3个区域,分别为电源变压器和电源滤波电路板、CD机芯和伺服电路板、解码和模拟 输出部分。
机芯是一台CD机的心脏,机芯方面采用了原装三洋EP-C101机芯,三洋的机芯和光头以读碟稳定、耐用 著称,并辅以飞利浦SAA7824芯片伺服,让机芯和光头工作在稳定的状态下。

刘汉盛《好声歌》刘汉盛榜单100碟曲目及讲解刘氏好声歌--刘汉盛喇叭八法摆,好位绝对有;空间分三段,前硬中吸后扩散。
器材重搭配,阴阳要调和;电源弄干净,清静透明有层次。
接头勤拂拭,线头要锁紧;沙发买真皮,好坐好声又耐用。
薄板钉不得,伤财又伤声。
家具正常摆,扩散吸收自然来。
听音响听了那么多年,办杂志也办了那么多年,我所累积的音响经验其实已经不少。
而这些经验我也一再的透过各种方式讲了那么多年。
有意思的是:很多读者、朋友、音响迷的老问题也重复问了那么多年。
许多我认为音响迷们应该会知道的一些基本常识,有时候很多人竟然不知道。
为什么会这样呢?难道音响是那么难以了解的大学问吗?要设计、制造音响当然不容易。
不过,我们只是要用音响器材而已,要让自己家里的音响听起来入耳并不是那么困难的事啊!音响空间的学问当然大。
不过,我们并不是要设计音乐厅。
我们只是想让声音听起来平衡而已。
而这些基本的要求竟然是那么难以做到。
为什么会这样呢?我想了再想,理出一个答案:以前一定一次写太多、讲太多了,所以读者们没有办法吸收。
这就好像在学校上课一般,讲台上老师讲得口沫横飞,讲台下学生倒了一大片。
一篇文章五千字,读者们看过记得起来的恐怕不会超过五百字。
那么,如果我把一些音响的基本知识写成像唐诗那么短呢?大家从小到大都「念念」不忘「床前明月光,疑是地上霜…」,如果我能够编一首歌,将我所认为最基础的常识溶入歌中,读者们是否会印象深刻呢?在这种想法之下,我编了这首歌。
这首歌总共88个字,虽然比五言绝句还多,不过我想应该不难朗朗上口才对。
当然,为了让读者们了解这些歌词的真意,以下我还是要费些篇幅来解释。
喇叭八法摆,好位绝对有我们在摆喇叭时,千万不要认为喇叭只是一个与空间不相干的个体而已。
事实上,喇叭所发出来的声音绝对与空间脱离不了关系。
我可以这么说:喇叭怎么摆,声音就会怎么样。
我的意思是:喇叭摆在不同的地方就会有不同的声音表现。
而更重要的是:每个空间中至少会有一个地方能够让喇叭发出好听的声音。


质优价廉的THX Select2认证影音放大器——ONKYO
TX—SR703
舒怀
【期刊名称】《音响世界》
【年(卷),期】2006(000)002
【摘要】许多AV爱好者在组建家庭影院时常常都会为影音放大器的选择而烦恼,尤其是囊中不甚宽裕的普通发烧友,更需要精打细算。
一个有经验的影音发烧友,选择器材的时候不仅会关注其是否能兼容各种主流的解码格式,以及机器的功能配置,还会把是否符合THX认证标准作为考虑的重要因素。
只是以往的THX认证机型大都身价不菲,注定它难以效力于大众人群。
随着环绕声技术的普及,THX标
准的制订者美国卢卡斯公司为了拓宽影音市场。
【总页数】2页(P38-39)
【作者】舒怀
【作者单位】无
【正文语种】中文
【中图分类】TN722
【相关文献】
1.感受经典,聆听天籁——ONKYO TX-NR1000 Integra旗舰影音放大器试听印
象 [J], 周建疆
2.安桥(ONKYO)TX—NR900数码影音放大器 [J],
3.首获THX Ultra2认证的先锋Elite VSX-49TX A/V接收机 [J], 天生
4.HDMI与THX Select2助阵安桥TX-SR803 AX功放 [J], 猫猫;刘远举;Zoom (图)
5.世界首台ISF和THX双认证安桥TX-NA906AV放大器 [J],
因版权原因,仅展示原文概要,查看原文内容请购买。

Multi-function basics•Plays MP3 and WMA digital audio•8 hours of digital voice memo recordings •Digital FM tuner with 10 presets•Custom Equalizer setting for enhanced sound experience Durable data storage •128MB built-in memory•Expandable memory up to 384MB •MMC/SD memory card slot Styled for motion•Versatile wearability with neck-strap and armband •Easy navigation via Tri-Color Backlight displayMP3 in Full Motion128MB Digital Audio PlayerStandard product informationDigital audio playback•MP3 Playback•WMA Playback•ID3 T ag supportFM tuner•Frequency range87.5 - 108 MHz•10 station presetsVoice recorder•Up to 8 hours voice recording•Built-in microphoneSystem•Storage128MB internalmemory•MMC/SD memory card slot•Output power 2 x 5mW •Frequency response20Hz - 20KHz Display•T ri-Color Backlight LCD•T rack number,time,title and artist display •Volume indication•Battery level indication•Play mode indicationSound•Custom Equalizer setting + 6 presets Connections•Headphone/ line out stereo,3.5 mm•PC interface USB plugPower supply•Battery 1 x 1.5V,typeAAA/LR03•Battery playing time10 hours(alkaline battery)•Automatic power offGeneral•Material Polystyrene •Weight (g)50•Product dimensions53 W x 76 H x 20 D (mm)•Packaging dimensions230 W x 166 H x 70 D (mm)•Master carton dimensions225 W x 330 H x 142 D (mm)•Master carton quantity4•Country of origin China Accessories•In-ear phones•USB cable (AY3480)•Armband (AY3280)•Neck-strap (AY3290)•CD ROM (AY3492)•AAA batteryCustom Equalizer setting + 6 presetsEnjoy not only preset deep,rich Bass 1 and Bass 2sound,but also Rock,Pop,Jazz and Classic equalizersettings tailored for specific musical styles.You can alsocreate and personalize the equalizer setting of yourchoice,with Custom Setting.Tri-Color Backlight displayFor easy navigation even in the dark,the multi-linegraphical LCD display features a uniquefunction-specific color backlight (orange for digitalaudio,green for FM radio,and red for voice).One touch digital voice recordingMakes multiple voice recordings for meetings,reminders and important discussions.Enjoy up to 8hours of digital voice recording available when usingthe full 128MB capacity.Upgradeable/ futureproofFutureproof technology which allows you to upgradethe playback software in your player to accommodatenew audio compression standards.Automatic power offPower-saving feature which automatically switches offthe player if it's not actively in use.Memory expansion slotSupports MMC/SD memory card so you can expandthe memory size,up to 384 MB.MP3/ WMA/ WAV playbackSupports MP3 and Windows Media Audio (WMA) formusic playback and .wav for voice memo playback.100% ShockproofEnjoy total,skip-free music playback.My FavoriteCreate your own playlist of favorite songs.HoldLocks all buttons and prevents changes in programsettings so you can enjoy uninterrupted musicplayback.Single EAN:87 10895 78584 6Master EAN:87 10895 79894 5Printed in Hong Kong,Jun 2003Specifications subject to modificationwithout notice2003 © Koninklijke Philips Electronics N.V.All rights reserved。

多彩流金,在岁月中尽显活力试用Tivoli Audio(流金岁月)
iPAL便携收音机
刘裕宏
【期刊名称】《中国电子商情:视听前线》
【年(卷),期】2012(000)001
【摘要】“Tivoli Audio”,这不是一个熟悉的字符,而其中文名字叫“流金岁月”,这个对大多数电声、无线电爱好者来说都是再熟悉不过的名字,而我更是经常把“流金岁月”的名字牢记成了“岁月留声”,虽意指同一,但这样一来就天壤之别了。
是什么原因导致我弄错了这个小问题的呢?流金岁月让我印象最深刻的就是她那复古的小外形,说实话,
【总页数】2页(P68-69)
【作者】刘裕宏
【作者单位】不详
【正文语种】中文
【中图分类】TN722.75
【相关文献】
1.充满音乐的生活更多姿多彩Tivoli Audio(流金岁月)Music System一体化发烧
音响 [J], 陈奕
2.TIVOLI流金岁月Model One收音机 [J], 无;
3.可以引领音响虚拟社区的网络收音机 Tivoli Audio(流金岁月)Networks网络
收音机 [J], 徐春笙;阿龙(摄影)
4.生活有你更精彩:流金岁月(Tivoli Audio)NetWorks网络收音机 [J], 阿怿
5.Tivoli Audio (美国流金岁月) [J], 视听前线
因版权原因,仅展示原文概要,查看原文内容请购买。