Ch25HullOFOD10thEdition
- 格式:pptx
- 大小:317.90 KB
- 文档页数:37

产品介绍套装系列 (4)VEX机器人基本套装 (4)控制器套装M ICROCONTROLLER K IT (4)升级W I F I无线遥控套装N ET U PGRADE K IT (5)马达套装M OTOR K IT (5)双线加强马达套装H IGH S TRENGTH M OTOR K IT (6)伺服器套装 S ERVO K IT (6)遥控接收套装T RANSMITTER &R ECEIVER K IT (7)晶振套装A C RYSTAL U PGRADE K IT A (7)晶振套装B C RYSTAL U PGRADE K IT B (8)碰撞开关套装B UMPER S WITCH K IT (8)行程开关套装L IMIT S WITCH K IT (9)巡线传感器套装L INE T RACKER K IT (9)光敏传感器套装L IGHT S ENSOR K IT (10)超声波传感器套装U LTRASONIC R ANGE F INDER K IT (10)编码器套装O PTICAL S HAFT ENCODER K IT (11)双向编码器套装B IDIRECTIONAL O PTICAL S HAFT ENCODER K IT (11)探照灯套装F LASHLIGHT K IT (12)角度传感器套装P OTENTIOMETER K IT (12)信号分频器套装S IGNAL S PLITTER K IT (13)单向气泵套装VEX P NEUMATIC P ARTS K IT 1 (13)双向气泵套装VEX P NEUMATIC P ARTS K IT 2 (14)9.6V两电一充电池套装P OWER P ACK K IT (14)美国原装电池套装VEX P OWER P ACK (15)9.6V一电一充电池套装9.6V P OWER K IT (15)7.2V电池套装7.2V P OWER K IT (16)电源扩展器套装P OWER E XPANDER K IT (16)程序套装P ROGRAMMING P ARTS K IT (17)结构件套装H ARDWARE K IT (17)高级五金件套装A DVANCED M ETAL P ACK (18)铝金属件套装A LUMINUM M ETAL K IT (18)加长铝金属件套装L ONG A LUMINUM M ETAL K IT (19)齿条架套装R ACK B RACKET P ACK (19)蜗轮架套装W ORM B RACKET P ACK (20)差速架套装B EVEL B RACKET P ACK (20)滑动架套装L INEAR S LIDE P ACK (21)齿轮套装G EARS K IT (21)加强齿轮套装H EAVY G EARS K IT (22)高级齿轮套装A DVANCED G EAR P ACK (22)马达齿轮套装M OTOR G EARS K IT (23)金属小齿轮套装M ETAL G EARS K IT (23)车轮套装W HEEL K IT (24)万向轮套装O MNI-DIRECTIONAL W HEEL K IT (24)大万向轮套装L ARGE O MNI-DIRECTIONAL W HEEL K IT (25)腿轮套装W HEEL L EGS K IT (25)自组螺丝套装B EARING R IVETS P ACK (26)链轮套装S PROCKET AND C HAIN K IT (26)加强链轮套装H IGH S TRENGTH S PROCKET AND C HAIN K IT (27)履带套装T ANK T READ K IT (27)加强履带套装T ANK T READ U PGRADE K IT (28)电池扎带套装B ATTERY H OLD-DOWN K IT (28)扎带套装H OLD-DOWN K IT (29)防护眼镜S AFEGUARD G LASSES (29)工具包T OOLS K IT (30)竞赛系列 (31)高地战斗比赛场地 (31)高地战斗竞赛机器人范例......I型. (32)高地战斗竞赛机器人范例......II型.. (32)高地战斗竞赛机器人范例......III型.. (33)大获全胜比赛场地----中间隔墙 (33)大获全胜比赛场地----围板 (34)大获全胜比赛场地----场地纸 (34)大获全胜比赛场地----比赛用球 (35)大获全胜全套比赛场地 (35)大获全胜美国原装进口全套场地 (36)大获全胜场地控制器 (36)大获全胜竞赛机器人范例----Ⅰ型 (37)大获全胜竞赛机器人范例----Ⅱ型 (38)大获全胜竞赛机器人范例----Ⅲ型 (38)大获全胜竞赛机器人范例----Ⅳ型 (39)VEX LCD显示模块VEX LCD D ISPLAY (40)橡皮筋套装R UBBER B AND (40)网布A NTI-SLIP M AT (41)英文版程序套装E ASY C (41)套装系列VEX 机器人基本套装产品编号:产品 说明 含主控制器套装1套、遥控接收套装1套、马达套装3套、伺服器套装1套、碰撞开关套装1套、行程开关套装1套、车轮套装1套、齿轮套1套、五金件套装1套、工具套装1套、扎带1包 特性1. 高端质量、丰富齐全的零部件,为无限创意提供可能。
目录文件字体规则 (1)系统设定指令 (2)SIZE (2)GAP (3)BLINE (4)OFFSET (5)SPEED (6)DENSITY (7)DIRECTION (8)REFERENCE (9)COUNTRY (10)CODEPAGE (11)CLS (12)FEED (13)FORMFEED (14)HOME (15)PRINT (16)SOUND (17)CUT (18)LIMITFEED (19)卷标内容设计指令 (20)BAR (20)BARCODE (21)BITMAP (25)BOX (26)ERASE (27)DMATRIX (28)MAXICODE (29)PDF417 (32)PUTPCX (34)REVERSE (35)TEXT (36)询问打印机状态指令 (38)<ESC>!? (38)~!A (40)~!T (41)~!C (42)~!I (43)~!F (44)~!@ (45)信息传递协议 (46)<ESC>! (46)<ESC>& (46)~# (47)WINDOWS DRIVER驱动程序指令 (48)!B (48)!J (49)!N (50)档案管理指令 (51)DOWNLOAD (51)REDRAW (59)EOP (60)FILES (61)KILL (62)MOVE (63)UPDATBIOS (64)BASIC 指令及函式 (65)ABS( ) (65)ASC( ) (66)CHR$( ) (67)END (68)EOF( ) (69)OPEN (71)READ (73)SEEK (75)LOF( ) (77)FREAD$( ) (77)FOR...NEXT.. (79)IF...THEN...ELSE (81)GOSUB...RETURN. (83)GOTO (85)INPUT (88)REM (90)OUT (91)GETKEY( ) (92)INT( ) (93)LEFT$( ) (94)LEN( ) (95)MID$( ) (96)RIGHT$( ) (97)STR$( ) (98)VAL( ) (99)BEEP (100)打印机外围功能设定指令 (101)SET COUNTER (101)SET CUTTER (103)SET KEY1 (105)SET KEY2 (105)SET LED1, LED2, LED3 (107)SET PEEL (108)SET DEBUG (109)SET GAP (110)SET RIBBON (111)SET COM1 (112)@LABEL (114)PEEL (115)LED1, LED2, LED3 (116)KEY1, KEY2 (117)YEAR (118)MONTH (119)DATE (120)WEEK (121)HOUR (122)MINUTE (123)SECOND (125)文件字体规则本文件使用以下字体规则文件规则描述[表示内容] 在`中括号内表示该参数为选项<ESC> <ESC>代表ASCII 27 字符,当打印机收到以该控制字符为启始之指令将立即响应(即使打印机在错误状态时也将实时回应)~ (ASCII 126), 该字符启始的指令用于询问打印机的状态注: 200 DPI: 1 mm = 8 dots 粗斜体Arial,字型,用于表300 DPI: 1 mm = 12 dots 示批注DOWNLOAD “TEST.BAS”当所列出的内容为程序SET COUNTER @1 1 时以Curier 字型表示@1=”0001”TEXT 10,10,”3”,0,1,1,@1PRINT 3,2EOP系统设定指令SIZE说明该指令用于设定卷标纸的宽度及长度指令语法(1) 英制系统(英寸)SIZE m, n(2) 公制系统(公厘)SIZE m mm, n mm参数说明m 标签纸的宽度 (不含背纸)n 标签纸的长度 (不含背纸)Note: 200 DPI: 1 mm = 8 dots*300 DPI: 1 mm = 12 dots范例(1) 英制系统 (英寸)SIZE 3.5, 3.00(2) 公制系统 (公厘)SIZE 100 mm, 100 mmGAP说明该指令定义两张卷标纸间的垂直间距距离指令语法(1) 英制系统 (英寸)GAP m, n(2) 公制系统 (公厘)GAP m mm, n mm参数说明m 两标签纸中间的垂直距离0 ≤ m ≤ 1 (英寸), 0 ≤ m ≤ 25.4 (公厘)n 垂直间距的偏移[-]n ≤标签纸张长度 (英寸或公厘)Note: 200 DPI : 1 mm = 8 dots300 DPI : 1 mm = 12 dots范例一般垂直间距设定(1) 英制系统 (英寸)GAP 0.12,0(2) 公制系统 (公厘)GAP 3 mm,0特殊垂直间距设定(1) 英制系统 (英寸)GAP 0.30,-0.10(2) 公制系统 (公厘)GAP 7.62 mm, -2.54 mmBLINE说明该指令用于设定黑标的高度及偏移位置指令语法(1) 英制系统 (英寸)BLINE m, n(2) 公制系统 (公厘)BLINE m mm, n mm参数说明m 黑标的高度,以英寸或公厘表示0.1 ≤m ≤1 (英寸), 2.54 ≤m ≤ 25.4 (公厘)n 黑标偏移量 0 ≤n ≤标签纸张高度范例(1) 英制系统 (英寸)BLINE 0.20,0.50(2) 公制系统 (公厘)BLINE 5.08 mm,12.7 mmOFFSET说明该指令用于控制在剥离模式时(pee-off mode)每张卷标停止的位置,该指令仅适用于剥离模式。

多媒体用户指南© Copyright 2009 Hewlett-Packard Development Company, L.P.Windows 是 Microsoft Corporation 在美国的注册商标。
本文档中包含的信息如有更改,恕不另行通知。
随 HP 产品和服务附带的明确有限保修声明中阐明了此类产品和服务的全部保修服务。
本文档中的任何内容均不应理解为构成任何额外保证。
HP 对本文档中出现的技术错误、编辑错误或遗漏之处不承担责任。
第二版:2009 年 8 月第一版:2009 年 8 月文档部件号:539995-AA2产品通告本用户指南介绍大多数机型的常用功能。
您的计算机上可能未提供某些功能。
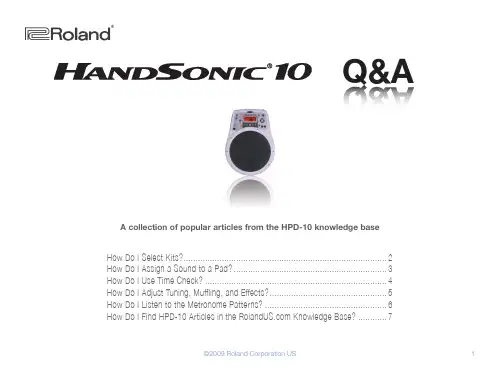
目录1 多媒体功能识别多媒体组件 (2)使用 DVD 按钮(仅限某些机型) (3)调节音量 (4)使用介质活动功能 (6)使用介质活动热键 (6)2 多媒体软件使用 DVD Play 软件 (7)使用其它预装多媒体软件 (7)从光盘中安装多媒体软件 (7)3 音频连接外接音频设备 (9)检查音频功能 (9)4 视频连接外接显示器或投影机 (10)连接 HDMI 设备 (11)配置 HDMI 音频 (12)5 光驱识别安装的光驱 (13)使用光盘 (14)选择正确的光盘 (15)CD-R 光盘 (15)CD-RW 光盘 (15)DVD±R 光盘 (15)DVD±RW 光盘 (15)LightScribe DVD+R 光盘 (16)蓝光光盘 (16)播放音乐 (17)观看影片 (18)更改 DVD 的区域设置 (19)创建或刻录 CD 或 DVD (20)取出光盘(CD 或 DVD) (21)iii6 网络摄像头(仅限某些机型)网络摄像头提示 (23)调整网络摄像头属性 (23)7 故障排除打不开光盘托盘,无法取出 CD 或 DVD (24)笔记本计算机检测不到光驱 (25)光盘无法播放 (26)光盘无法自动播放 (26)DVD 影片停止、跳过或无法正常播放 (27)在外接显示器上看不见 DVD 影片 (27)光盘刻录过程无法启动,或者在完成之前停止 (27)在 Windows Media Player 中播放的 DVD 没有声音或不显示图像 (28)必须重新安装设备驱动程序 (28)获取最新的 HP 设备驱动程序 (29)获取最新的 Windows 设备驱动程序 (29)索引 (30)iv1多媒体功能笔记本计算机包含多媒体功能,您可以欣赏音乐、观看影片和查看图片。
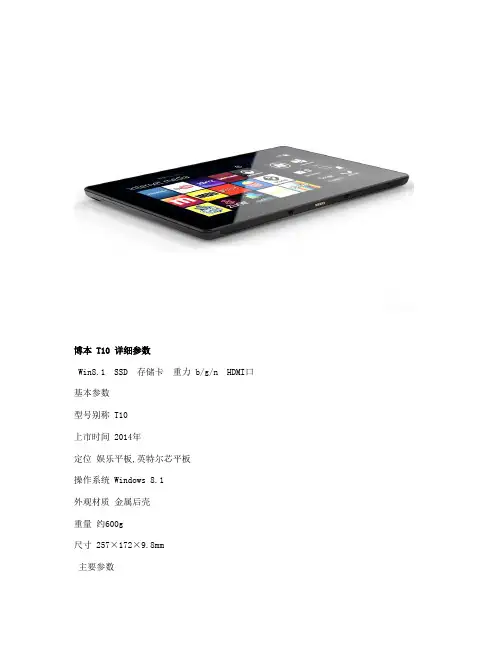
博本 T10 详细参数Win8.1 SSD 存储卡重力 b/g/n HDMI口基本参数型号别称 T10上市时间 2014年定位娱乐平板,英特尔芯平板操作系统 Windows 8.1外观材质金属后壳重量约600g尺寸 257×172×9.8mm主要参数处理器 Intel Atom Z3770处理器类型四核处理器主频 1.46-2.39GHz系统内存 2GB,(选配:4G)存储容量 32GB硬盘类型 SSD固态硬盘存储扩展支持TF卡(microSD卡),最大支持64GB扩展显卡芯片 Intel HD Graphics传感器重力传感器,三轴传感器屏幕参数屏幕尺寸 10.1英寸分辨率 1280×800显示比例 16:10屏幕特性 IPS屏屏幕描述多点触控,电容式触摸屏网络通讯网络通信 WCDMA(选配)WiFi功能 802.11 b/g/n蓝牙功能 4.0GPS功能 GPS导航(可选)媒体功能摄像头前置200万后置200万录音支持录音,内置麦克风扬声器内置扬声器音频功能内置音效芯片格式支持音频格式 MP3视频格式 MP4图片格式 JPEG,BMP,PNG文本格式 TXT应用功能预装软件随机软件应用扩展支持微软Windows Store接口按键USB 内置USB接口其它接口 Mini HDMI接口,3.5mm耳机插孔,直流电源插孔,Micro SD卡插槽按钮电源按键,音量按键,Win8功能键,锁屏键其它续航时间约6-8小时,具体时间视使用情况而定电池类型 8000mAh电源适配器 100V-240V 自适应交流电源供应器。
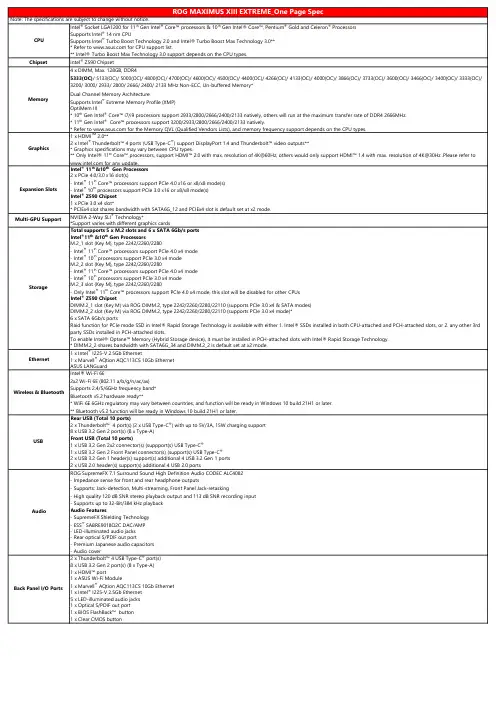
Intel ® Socket LGA1200 for 11th Gen Intel ® Core™ processors & 10th Gen Intel® Core™, Pentium ® Gold and Celeron ® ProcessorsSupports Intel ® 14 nm CPUSupports Intel ® Turbo Boost Technology 2.0 and Intel® Turbo Boost Max Technology 3.0*** Refer to for CPU support list.** Intel® Turbo Boost Max Technology 3.0 support depends on the CPU types.Chipset Intel ® Z590 ChipsetDual Channel Memory ArchitectureSupports Intel ® Extreme Memory Profile (XMP)OptiMem III* 10th Gen Intel ® Core™ i7/i9 processors support 2933/2800/2666/2400/2133 natively, others will run at the maximum transfer rate of DDR4 2666MHz.* 11th Gen Intel ® Core™ processors support 3200/2933/2800/2666/2400/2133 natively.* Refer to for the Memory QVL (Qualified Vendors Lists), and memory frequency support depends on the CPU types.1 x HDMI TM 2.0**2 x Intel ® Thunderbolt™ 4 ports (USB Type-C ®) support DisplayPort 1.4 and Thunderbolt™ video outputs*** Graphics specifications may vary between CPU types.** Only Intel® 11th Core™processors,supportHDMI™2.0withmax.resolutionof4K@60Hz,otherswouldonlysupportHDMI™******************************************** for any update.Intel ® 11th &10th Gen Processors 2 x PCIe 4.0/3.0 x16 slot(s)- Intel ® 11th Core™ processors support PCIe 4.0 x16 or x8/x8 mode(s)- Intel ® 10th processors support PCIe 3.0 x16 or x8/x8 mode(s)Intel ® Z590 Chipset 1 x PCIe 3.0 x4 slot** PCIEx4 slot shares bandwidth with SATA6G_12 and PCIEx4 slot is default set at x2 mode.NVIDIA 2-Way SLI ® Technology**Support varies with different graphics cardsTotal supports 5 x M.2 slots and 6 x SATA 6Gb/s portsIntel ®11th &10th Gen Processors M.2_1 slot (Key M), type 2242/2260/2280- Intel ® 11th Core™ processors support PCIe 4.0 x4 mode- Intel ® 10th processors support PCIe 3.0 x4 mode M.2_2 slot (Key M), type 2242/2260/2280- Intel ® 11th Core™ processors support PCIe 4.0 x4 mode- Intel ® 10th processors support PCIe 3.0 x4 mode M.2_3 slot (Key M), type 2242/2260/2280- Only Intel ® 11th Core™ processors support PCIe 4.0 x4 mode, this slot will be disabled for other CPUsIntel ® Z590 Chipset DIMM.2_1 slot (Key M) via ROG DIMM.2, type 2242/2260/2280/22110 (supports PCIe 3.0 x4 & SATA modes)DIMM.2_2 slot (Key M) via ROG DIMM.2, type 2242/2260/2280/22110 (supports PCIe 3.0 x4 mode)*6 x SATA 6Gb/s ports Raid function for PCIe mode SSD in Intel® Rapid Storage Technology is available with either 1. Intel® SSDs installed in both CPU-attached and PCH-attached slots, or 2. any other 3rd party SSDs installed in PCH-attached slots.To enable Intel® Optane™ Memory (Hybrid Storage device), it must be installed in PCH-attached slots with Intel® Rapid Storage Technology.* DIMM.2_2 shares bandwidth with SATA6G_34 and DIMM.2_2 is default set at x2 mode.1 x Intel ® I225-V 2.5Gb Ethernet1 x Marvell ® AQtion AQC113CS 10Gb Ethernet ASUS LANGuardWireless & Bluetooth Intel® Wi-Fi 6E2x2 Wi-Fi 6E (802.11 a/b/g/n/ac/ax)Supports 2.4/5/6GHz frequency band*Bluetooth v5.2 hardware ready*** WiFi 6E 6GHz regulatory may vary between countries, and function will be ready in Windows 10 build 21H1 or later.** Bluetooth v5.2 function will be ready in Windows 10 build 21H1 or later.Rear USB (Total 10 ports)2 x Thunderbolt™ 4 port(s) (2 x USB Type-C ®) with up to 5V/3A, 15W charging support 8 x USB 3.2 Gen 2 port(s) (8 x Type-A)Front USB (Total 10 ports)1 x USB 3.2 Gen 2x2 connector(s) (suppport(s) USB Type-C ®1 x USB 3.2 Gen 2 Front Panel connector(s) (support(s) USB Type-C ®2 x USB 3.2 Gen 1 header(s) support(s) additional 4 USB 3.2 Gen 1 ports2 x USB 2.0 header(s) support(s) additional 4 USB 2.0 portsROG SupremeFX 7.1 Surround Sound High Definition Audio CODEC ALC4082- Impedance sense for front and rear headphone outputs- Supports: Jack-detection, Multi-streaming, Front Panel Jack-retasking- High quality 120 dB SNR stereo playback output and 113 dB SNR recording input- Supports up to 32-Bit/384 kHz playbackAudio Features- SupremeFX Shielding Technology- ESS ® SABRE9018Q2C DAC/AMP - LED-illuminated audio jacks- Rear optical S/PDIF out port- Premium Japanese audio capacitors- Audio cover2 x Thunderbolt™ 4 USB Type-C ® port(s)8 x USB 3.2 Gen 2 port(s) (8 x Type-A)1 x HDMI™ port1 x ASUS Wi-Fi Module1 x Marvell ® AQtion AQC113CS 10Gb Ethernet1 x Intel ® I225-V 2.5Gb Ethernet 5 x LED-illuminated audio jacks1 x Optical S/PDIF out port1 x BIOS FlashBack™ button1 x Clear CMOS button Back Panel I/O PortsNote: The specifications are subject to change without notice.CPU Memory Graphics Expansion Slots Multi-GPU Support Storage Ethernet USB Audio 4 x DIMM, Max. 128GB, DDR45333(OC)/ 5133(OC)/ 5000(OC)/ 4800(OC)/ 4700(OC)/ 4600(OC)/ 4500(OC)/ 4400(OC)/ 4266(OC)/ 4133(OC)/ 4000(OC)/ 3866(OC)/ 3733(OC)/ 3600(OC)/ 3466(OC)/ 3400(OC)/ 3333(OC)/3200/ 3000/ 2933/ 2800/ 2666/ 2400/ 2133 MHz Non-ECC, Un-buffered Memory*Fan and Cooling related1 x 4-pin CPU Fan header(s)1 x 4-pin CPU OPT Fan header(s)2 x 4-pin Chassis Fan header(s)2 x 4-pin Radiator Fan header(s)2 x W_PUMP+ header(s)1 x WB_SENSOR header(s)1 x 2-pin Water In header1 x 2-pin Water Out header1 x 3-pin Water Flow headerPower related1 x 24-pin Main Power connector2 x 8-pin +12V Power connector1 x 6-pin PCIe Graphics Card connectorStorage related3 x M.2 slots (Key M)1 x DIMM.2 slot supports 2 x M.2 slots (Key M)6 x SATA 6Gb/s portsUSB1 x USB 3.2 Gen 2x2 connector (support(s) USB Type-C ®)1 x USB 3.2 Gen Gen 2 connector (support(s) USB Type-C ®)2 x USB 3.2 Gen 1 header(s) support(s) additional 4 USB 3.2 Gen 1 ports 2 x USB 2.0 header(s) support(s) additional 4 USB 2.0 portsMiscellaneous3 x AURA Addressable Gen 2 header(s)1 x AURA RGB header(s)1 x BIOS Switch button1 x FlexKey button1 x Front Panel Audio header (AAFP)1 x LN2 Mode jumper8 x ProbeIt Measurement Points1 x ReTry button2 x RSVD switch1 x RSVD header1 x Safe Boot button1 x Slow Mode switch1 x Speaker header1 x Start button1 x V_LATCH switch1 x 10-1 pin System Panel header1 x Thermal Sensor headerExtreme OC Kit- FlexKey button- LN2 Mode- Probelt- ReTry button- Safe boot button- Start button- Slow ModeExtreme Engine Digi+- 10K Black Metallic Capacitors- MicroFine Alloy ChokeASUS Q-Design- Q-Code- Q-Connector- Q-DIMM- Q-LED (CPU [red], DRAM [yellow], VGA [white], Boot Device [yellow green])- Q-SlotASUS Thermal Solution - M.2 heatsink backplate- M.2 heatsink- VRM heatsink designASUS EZ DIY- BIOS FlashBack™ button- Clear CMOS button- ProCool II- Pre-mounted I/O shield- SafeSlotAURA Sync- ROG AURA sync backplate- AURA RGB header(s)- Addressable Gen 2 RGB header(s)Dual BIOSOLED 2"ASUS HYDRANODE - 2 x Chassis fan support* (CHA_FAN1P,CHA_FAN2P)- 2 x USB2.0 port support* (USB_EP1,USB_EP2)* Visit ASUS Website for the latest compatibility list.Internal I/O Connectors Special FeaturesROG Exclusive Software - Mem Tweakit - RAMCache III - ROG CPU-Z - GameFirst VI - Sonic Studio III + Sonic Studio Virtual Mixer - Sonic Radar III - DTS ® Sound Unbound - Overwolf - BullGuard Internet Security (1-year full version)ASUS Exclusive Software Armoury Crate - AIDA64 Extreme (1 year full version)- AURA Creator - AURA Sync - Two-Way AI Noise Cancelation - OLED Display AI Suite 3- 5-Way Optimization with AI Overclocking TPU EPU Digi+ Power Control Fan Xpert 4 Turbo app - EZ update AI Charger DAEMON Tools MyAsus WinRAR UEFI BIOS MemTest86AI Overclocking Guide ASUS EZ DIY - ASUS CrashFree BIOS 3 - ASUS EZ Flash 3 - ASUS UEFI BIOS EZ Mode BIOS2 x 256 Mb Flash ROM, UEFI AMI BIOS Manageability WOL by PME, PXE Cables 1 x 1-to-3 ARGB splitter cable 2 x 1-to-4 fan splitter cable 1 x RGB extension cable 3 x ROG weave SATA 6G cables 1 x 3-in-1 Thermistor cables pack ROG Fan Controller 1 x ROG Fan Controller 1 x Fan EXT PWR cable 1 x ARGB input cable 1 x USB input cable 1 x ROG Fan Controller 3M Mounting tape 1 x Fan Controller manual ROG DIMM.2 with Heatsink 1 x ROG DIMM.2 with heatsink 1 x M.2 pad for ROG DIMM.22 x M.2 screw package for ROG DIMM.2Miscellaneous 1 x ASUS Wi-Fi moving antennas 1 x Q-connector 1 x ROG CLAVIS DAC 1 x ROG key chain 1 x ROG logo plate stickers 1 x ROG screwdriver 1 x ROG stickers 1 x ROG thank you card 1 x ROG Graphics card holder Installation Media 1 x USB drive with utilities and drivers Documentation 1 x User manual Operating System Windows ® 10 64-bit EATX Form Factor12 inch x 10.9 inch ( 30.5 cm x 27.7 cm )Software FeaturesAccessories Form Factor。
显示器用户指南©2010Hewlett-Packard Development Company,L.P.Microsoft、Windows 和 Windows Vista 是Microsoft Corporation 在美国和/或其他国家的商标或注册商标。
HP 产品和服务的所有保修限于这些产品与服务所附带的明确保修声明。
本文的任何条款都不应视作构成保修声明的附加条款。
HP 不对本文的技术性错误、编印错误或疏漏承担任何责任。
本文档包含的所有权信息受版权保护。
未经Hewlett-Packard Company 事先书面许可,不得将本文档的任何部分影印、复制或翻译成其他语言。
第二版(2010 年 1 月)文档部件号:594300-AA2关于本指南本指南提供与安装显示器、安装驱动程序、使用屏幕显示菜单、故障排除和技术规范有关的信息。
警告!此格式的文字表示:如果不按照指示操作可能导致人身伤害,甚至死亡。
注意:此格式的文字表示:如果不按照指示操作可能致使设备损坏或信息丢失。
注:此格式的文字提供重要的附加信息。
iiiiv 关于本指南目录1 产品特性 (1)HP LCD 显示器 (1)2 安全和维护准则 (3)重要安全信息 (3)安全预防措施 (4)维护准则 (5)清洁显示器 (5)装运显示器 (5)3 安装显示器 (6)打开显示器包装 (6)安装显示器 (6)连接显示器电缆 (10)高带宽数字内容保护 (HDCP) (11)连接音频电缆 (12)连接电源线 (13)调整显示器的倾斜角度 (13)调整扭转角度 (14)键盘存放 (15)4 操作显示器 (16)CD 软件和实用程序 (16)安装驱动程序 (16)使用自动调整功能 (17)前面板控制按钮 (18)使用屏幕显示 (OSD) (19)选择视频输入接口 (23)识别显示器状况 (23)调整屏幕质量 (24)省电功能 (24)v附录 A 故障排除 (26)解决常见问题 (26)从 获取支持 (27)准备致电技术支持 (27)查找额定值标签 (28)附录 B 技术规格 (29)HP LCD 显示器 (29)预设视频模式 (33)LCD 显示器质量和像素策略 (35)附录 C 机构规定注意事项 (36)(美国)联邦通信委员会注意事项 (36)修改 (36)电缆 (36)标有 FCC 徽标的产品的一致性声明(仅适用于美国) (36)适用于加拿大的注意事项 (37)Avis Canadien (37)欧盟规程通告 (37)德国人机工程学通告 (38)适用于日本的注意事项 (38)适用于韩国的注意事项 (38)电源线配件要求 (38)适用于日本的电源线要求 (38)产品环境注意事项 (39)废弃物品的处理 (39)日常处理废旧器件的注意事项(适用于欧盟) (39)化学物质 (39)HP 回收办法 (39)有害物质的限制 (RoHS) (39)土耳其 EEE 法规 (40)vi1产品特性HP LCD 显示器HP LCD(液晶显示)显示器采用具备有源矩阵和下列特性的薄膜晶体管 (TFT) 屏幕:●大尺寸屏幕●最大图像分辨率:◦1910m:1366x768@60 赫兹◦2010f:1600x900@60 赫兹◦2010i:1600x900@60 赫兹◦2010m1600x900@60 赫兹◦2210i:1920x1080@60 赫兹◦2210m:1920x1080@60 赫兹◦2310i:1920x1080@60 赫兹◦2310m:1920x1080@60 赫兹◦2510i:1920x1080@60 赫兹◦2710m:1920x1080@60 赫兹◦且支持较低分辨率的全屏显示●VGA 模拟信号●DVI 数字信号●高清晰度多媒体接口 (HDMI)(适用于部分型号)●反应迅捷,玩核心游戏和图形制作时可获得更佳效果●视角宽广,无论是坐着、站着还是从显示器的两侧,均易于观看●动态对比度,提供更深的黑度和更亮的白度以实现出众的色差效果,令玩游戏和观看电影更具特色●倾斜度调整●扭转角度调整HP LCD 显示器1●可拆卸式的底座和符合视频电子标准协会 (Video Electronics Standards Association,VESA) 标准的安装孔,便于进行灵活的安装(包括墙上安装)●安全锁定插槽,用于连接安全锁定电缆(需要单独购买安全电缆)●即插即用功能(如果您的计算机系统支持此功能)●屏幕显示 (OSD) 可调,便于设置和优化屏幕(可选择英文、简体中文、繁体中文、法文、德文、意大利文、西班牙文、荷兰文、日文或巴西葡萄牙文)●内置立体声低音炮扬声器●键盘存放装置●节能装置,有助于减少能源消耗●“快速查看”设置显示●DVI 和 HDMI 输入具有 HDCP(高带宽数字内容保护)(适用于部分型号)●软件和实用程序 CD,其中包含以下内容:◦驱动程序◦自动调整软件◦相关文档2第 1 章 产品特性2安全和维护准则重要安全信息本显示器已附带电源线。
Installation GuideNighthawk SX10 Pro GamingConnect the Switch to Your NetworkFor Gigabit connections, use Category 5e (Cat 5e) or higher-rated Ethernet cables terminated with RJ-45 connectors.1. Connect LAN port 1 (UPLINK) on the switch to a LAN port on a router that isconnected to the Internet.2. Connect your gaming device to port 10, your high-speed device to port 2,and all other devices (including additional gaming and streaming devices) to the remaining ports 3–9.3. Connect the power adapter to the switch.The Power LED on the top of the switch lights and the port LEDs for connected devices light.Sample connection Cables and SpeedsThe following table describes the network cables that you can use for the switch connections and the speeds that these cables can support, up to 328 feet (100 meters).SpeedCable Type100 MbpsCategory 5 (Cat 5) or higher rated 1 Gbps, 2.5 Gbps, or 5 Gbps Category 5e (Cat 5e) or higher rated 10 GbpsCategory 6A (Cat 6A) or higher ratedPort LED Connection SpeedThe port LEDs indicate the connection speed for powered-on devices that are cabled to the switch. The default port LED colors and their associated speeds are shown in the following table.Default Port LED Color *Connection Speed1G 2.5G 5G 10G* Customer configurable colorsFor information about how to log in to the switch and customize the port LED colors, see the Nighthawk SX10 Pro Gaming Switch User Manual (GS810EMX), available at /support .Nighthawk GS810EMX switchNetwork routerMain media streaming deviceInternetOther network devicesNETGEAR, Inc.350 East Plumeria DriveSan Jose, CA 95134, USA NETGEAR INTL LTDBuilding 3, University Technology Centre Curraheen Road, Cork, Ireland© NETGEAR, Inc., NETGEAR and the NETGEAR Logo are trademarks of NETGEAR, Inc. Any non‑NETGEAR trademarks are used for reference purposes only.SupportThank you for purchasing this NETGEAR product. You can visit/support to register your product, get help, access the latest downloads and user manuals, and join our community. We recommend that you use only official NETGEAR support resources.Si ce produit est vendu au Canada, vous pouvez accéder à ce document en français canadien à /other/.(If this product is sold in Canada, you can access this document in Canadian French at /other/.)For the current EU Declaration of Conformity, visit/11621.For regulatory compliance information, visit/about/regulatory/.Do not use this device outdoors. If you connect cables or devices that are outdoors to this device, see /000057103 for safety and warranty information.See the regulatory compliance document before connecting the power supply.Access the SwitchWhen you access the switch, make sure that you are running the latest firmwareversion on your device. To find documentation, firmware, software, or other files,visit /support.Access the Switch From a Windows-Based Computer1. Open Windows Explorer.2. Click the Network link.3. If prompted, enable the Network Discovery feature.4. Under Network Infrastructure, locate the switch.5. Double-click Nighthawk SX10 (xx:xx:xx:xx:xx:xx) (where xx:xx:xx:xx:xx:xxis the MAC address of the switch).The login page of the web management interface opens.6. Enter the default switch password, which is password.The Home page displays the IP address of the switch.Access the Switch From the NETGEAR Discovery ToolThe NETGEAR Switch Discovery Tool lets you discover the switch in your networkand access the local browser interface of the switch from a Mac or a 64-bitWindows-based computer. Download the Switch Discovery Tool by visiting/support/product/netgear-switch-discovery-tool.aspx.Note: If you encounter an installation problem or cannot discover the switch,you may need to temporarily disable the firewall, Internet security, or antivirusprograms. Make sure to reenable the security services on your computer afterinstalling and discovering the switch.For information about how to access the switch by using the NETGEAR DiscoveryTool, see the GS810EMX switch user manual.May 2018Access the Switch From the NETGEAR Insight Mobile AppDuring initial setup, you must connect the switch to a WiFi network so that youcan access the switch from your mobile device with a local WiFi connection.1. On your iOS or Android mobile device, visit the app store, search forNETGEAR Insight, and download the app.2. Connect your mobile device to the WiFi network of the access point that isconnected to the switch.3. Open the NETGEAR Insight app on your mobile device.4. If you do not have a NETGEAR account, tap CREATE MYNETGEARACCOUNT and follow the onscreen instructions.5. To log in to your NETGEAR account, tap LOG IN and enter your credentials.6. Name your network and specify a device admin password that applies to alldevices that you add to this network.7. Tap the NEXT button.8. Add the switch with one of the following options:• Enter the serial number• Scan the barcode• Scan your networkNote: You might be prompted to connect the switch to power and toan uplink. Since you already did this (see Connect the Switch to YourNetwork), tap the NEXT button.The NETGEAR Insight app discovers the switch and registers it on thenetwork that you named in Step 6. If the app does not discover the switch,make sure that your mobile device and the switch are connected to the sameWiFi network.Insight9. In the NETGEAR Insight app, select the switch and tap the Visit WebInterface link.The login page of the local browser interface opens.10. Enter the switch password.The default password is password. The password is case-sensitive.The HOME page displays.。
产品编号61DB-MAR1-WW合规IDA19250WT0第一版(2019年2月)© 版权所有 Lenovo 2019。
LENOVO 产品、数据、计算机软件、及服务基于专项资金开发,作为48 C.F.R. 2.101定义的商品销售给政府机构,并授予政府机构有限的受限制的使用、复制和公开权利。
受限制的有限权利声明:如果产品、数据、计算机软件、或服务按照总务管理器“GSA”合约交付,则其使用、复制、或公开须遵循在合约号GS-35F-05925中制定的限制。
目录安全事项. . . . . . . . . . . . . . . . . . . . . . . . . . . . . . . . . . . . . . . . . . . . . . . . . . . . . . . . . . . . . . . . . . . . . . . . . . . . . iii 一般安全原则 . . . . . . . . . . . . . . . . . . . . . . . . . . . . . . . . . . . . . . . . . . . . . . . . . . . . . . . . . . . . . . . . . . . . . . . . . . . . . . . . . . . . . . . . . . . . iii 第1章开始使用. . . . . . . . . . . . . . . . . . . . . . . . . . . . . . . . . . .1-1物品清单 . . . . . . . . . . . . . . . . . . . . . . . . . . . . . . . . . . . . . . . . . . . . . . . . . . . . . . . . . . . . . . . . . . . . . . . . . . . . . . . . . . . . . . . . . . . . . . . 1-1使用注意事项 . . . . . . . . . . . . . . . . . . . . . . . . . . . . . . . . . . . . . . . . . . . . . . . . . . . . . . . . . . . . . . . . . . . . . . . . . . . . . . . . . . . . . . . . . . . 1-2产品概述 . . . . . . . . . . . . . . . . . . . . . . . . . . . . . . . . . . . . . . . . . . . . . . . . . . . . . . . . . . . . . . . . . . . . . . . . . . . . . . . . . . . . . . . . . . . . . . . 1-3调整类型 . . . . . . . . . . . . . . . . . . . . . . . . . . . . . . . . . . . . . . . . . . . . . . . . . . . . . . . . . . . . . . . . . . . . . . . . . . . . . . . . . . . . . . . . . . . . 1-3倾斜 . . . . . . . . . . . . . . . . . . . . . . . . . . . . . . . . . . . . . . . . . . . . . . . . . . . . . . . . . . . . . . . . . . . . . . . . . . . . . . . . . . . . . . . . . . . . . . . . 1-3旋转 . . . . . . . . . . . . . . . . . . . . . . . . . . . . . . . . . . . . . . . . . . . . . . . . . . . . . . . . . . . . . . . . . . . . . . . . . . . . . . . . . . . . . . . . . . . . . . . . 1-3高度调整 . . . . . . . . . . . . . . . . . . . . . . . . . . . . . . . . . . . . . . . . . . . . . . . . . . . . . . . . . . . . . . . . . . . . . . . . . . . . . . . . . . . . . . . . . . . . 1-4监视器枢轴 . . . . . . . . . . . . . . . . . . . . . . . . . . . . . . . . . . . . . . . . . . . . . . . . . . . . . . . . . . . . . . . . . . . . . . . . . . . . . . . . . . . . . . . . . . 1-4监视器控制 . . . . . . . . . . . . . . . . . . . . . . . . . . . . . . . . . . . . . . . . . . . . . . . . . . . . . . . . . . . . . . . . . . . . . . . . . . . . . . . . . . . . . . . . . . 1-5线缆锁槽 . . . . . . . . . . . . . . . . . . . . . . . . . . . . . . . . . . . . . . . . . . . . . . . . . . . . . . . . . . . . . . . . . . . . . . . . . . . . . . . . . . . . . . . . . . . . 1-5设置监视器 . . . . . . . . . . . . . . . . . . . . . . . . . . . . . . . . . . . . . . . . . . . . . . . . . . . . . . . . . . . . . . . . . . . . . . . . . . . . . . . . . . . . . . . . . . . . . 1-6连接和打开监视器电源 . . . . . . . . . . . . . . . . . . . . . . . . . . . . . . . . . . . . . . . . . . . . . . . . . . . . . . . . . . . . . . . . . . . . . . . . . . . . . . . . 1-6注册您的选件 . . . . . . . . . . . . . . . . . . . . . . . . . . . . . . . . . . . . . . . . . . . . . . . . . . . . . . . . . . . . . . . . . . . . . . . . . . . . . . . . . . . . . . . . . . 1-11第2章调整和使用显示器. . . . . . . . . . . . . . . . . . . . . . . . . . . . . . .2-1舒适和辅助功能 . . . . . . . . . . . . . . . . . . . . . . . . . . . . . . . . . . . . . . . . . . . . . . . . . . . . . . . . . . . . . . . . . . . . . . . . . . . . . . . . . . . . . . . . . 2-1安排您的工作区域 . . . . . . . . . . . . . . . . . . . . . . . . . . . . . . . . . . . . . . . . . . . . . . . . . . . . . . . . . . . . . . . . . . . . . . . . . . . . . . . . . . . . 2-1放置显示器 . . . . . . . . . . . . . . . . . . . . . . . . . . . . . . . . . . . . . . . . . . . . . . . . . . . . . . . . . . . . . . . . . . . . . . . . . . . . . . . . . . . . . . . . . . 2-1关于健康工作习惯的小技巧 . . . . . . . . . . . . . . . . . . . . . . . . . . . . . . . . . . . . . . . . . . . . . . . . . . . . . . . . . . . . . . . . . . . . . . . . . . . . 2-2辅助功能信息 . . . . . . . . . . . . . . . . . . . . . . . . . . . . . . . . . . . . . . . . . . . . . . . . . . . . . . . . . . . . . . . . . . . . . . . . . . . . . . . . . . . . . . . . 2-2调整显示器图像. . . . . . . . . . . . . . . . . . . . . . . . . . . . . . . . . . . . . . . . . . . . . . . . . . . . . . . . . . . . . . . . . . . . . . . . . . . . . . 2-3使用直接访问控件 . . . . . . . . . . . . . . . . . . . . . . . . . . . . . . . . . . . . . . . . . . . . . . . . . . . . . . . . . . . . . . . . . . . . . . . . . . . . . . . . . . . . 2-3使用On-Screen Display (OSD,屏幕显示)控件. . . . . . . . . . . . . . . . . . . . . . . . . . . . . . . . . . . . . . . . . . . . . . . . . . . . . . . . . . . . 2-4选择受支持的显示模式 . . . . . . . . . . . . . . . . . . . . . . . . . . . . . . . . . . . . . . . . . . . . . . . . . . . . . . . . . . . . . . . . . . . . . . . . . . . . . . . . 2-7了解电源管理. . . . . . . . . . . . . . . . . . . . . . . . . . . . . . . . . . . . . . . . . . . . . . . . . . . . . . . . . . . . . . . . . . . . . . . . . . . . . . . . 2-8保养显示器. . . . . . . . . . . . . . . . . . . . . . . . . . . . . . . . . . . . . . . . . . . . . . . . . . . . . . . . . . . . . . . . . . . . . . . . . . . . . . . . . . 2-9卸下监视器底座和支撑臂 . . . . . . . . . . . . . . . . . . . . . . . . . . . . . . . . . . . . . . . . . . . . . . . . . . . . . . . . . . . . . . . . . . . . . . . . . . . . . . . . . 2-9壁挂(可选) . . . . . . . . . . . . . . . . . . . . . . . . . . . . . . . . . . . . . . . . . . . . . . . . . . . . . . . . . . . . . . . . . . . . . . . . . . . . . . . . . . . . . . . . . . . 2-9第3章参考信息. . . . . . . . . . . . . . . . . . . . . . . . . . . . . . . . . . .3-1显示器规格 . . . . . . . . . . . . . . . . . . . . . . . . . . . . . . . . . . . . . . . . . . . . . . . . . . . . . . . . . . . . . . . . . . . . . . . . . . . . . . . . . . . . . . . . . . . . . 3-1故障排除 . . . . . . . . . . . . . . . . . . . . . . . . . . . . . . . . . . . . . . . . . . . . . . . . . . . . . . . . . . . . . . . . . . . . . . . . . . . . . . . . . . . . . . . . . . . . . . . 3-3手动图像设置 . . . . . . . . . . . . . . . . . . . . . . . . . . . . . . . . . . . . . . . . . . . . . . . . . . . . . . . . . . . . . . . . . . . . . . . . . . . . . . . . . . . . . . . . 3-4手动安装显示器驱动程序 . . . . . . . . . . . . . . . . . . . . . . . . . . . . . . . . . . . . . . . . . . . . . . . . . . . . . . . . . . . . . . . . . . . . . . . . . . . . . . 3-5在Windows 7系统中安装显示器驱动程序 . . . . . . . . . . . . . . . . . . . . . . . . . . . . . . . 3-5在Windows 10系统中安装显示器驱动程序. . . . . . . . . . . . . . . . . . . . . . . . . . . . . . . 3-6获得进一步帮助 . . . . . . . . . . . . . . . . . . . . . . . . . . . . . . . . . . . . . . . . . . 3-6服务信息. . . . . . . . . . . . . . . . . . . . . . . . . . . . . . . . . . . . . . . . . . . . . . . . . . . . . . . . . . . . . . . . . . . . . . . . . . . . . . . . . . . . 3-7客户责任 . . . . . . . . . . . . . . . . . . . . . . . . . . . . . . . . . . . . . . . . . . . . . . . . . . . . . . . . . . . . . . . . . . . . . . . . . . . . . . . . . . . . . . . . . . . . 3-7维修部件 . . . . . . . . . . . . . . . . . . . . . . . . . . . . . . . . . . . . . . . . . . . . . . . . . . . . . . . . . . . . . . . . . . . . . . . . . . . . . . . . . . . . . . . . . . . . 3-7附录A. 服务和支持 . . . . . . . . . . . . . . . . . . . . . . . . . . . . . . . . . . . . . . . . . . . . . . . . . . . . . . . . . . . A-1注册您的选件 . . . . . . . . . . . . . . . . . . . . . . . . . . . . . . . . . . . . . . . . . . . . . . . . . . . . . . . . . . . . . . . . . . . . . . . . . . . . . . . . . . . . . . . . . . . A-1在线技术支持 . . . . . . . . . . . . . . . . . . . . . . . . . . . . . . . . . . . . . . . . . . . . . . . . . . . . . . . . . . . . . . . . . . . . . . . . . . . . . . . . . . . . . . . . . . . A-1电话技术支持 . . . . . . . . . . . . . . . . . . . . . . . . . . . . . . . . . . . . . . . . . . . . . . . . . . . . . . . . . . . . . . . . . . . . . . . . . . . . . . . . . . . . . . . . . . . A-1附录B. 声明. . . . . . . . . . . . . . . . . . . . . . . . . . . . . . . . . . . . . . . . . . . . . . . . . . . . . . . . . . . . . . . . . B-1回收信息 . . . . . . . . . . . . . . . . . . . . . . . . . . . . . . . . . . . . . . . . . . . . . . . . . . . . . . . . . . . . . . . . . . . . . . . . . . . . . . . . . . . . . . . . . . . . . . . B-2商标 . . . . . . . . . . . . . . . . . . . . . . . . . . . . . . . . . . . . . . . . . . . . . . . . . . . . . . . . . . . . . . . . . . . . . . . . . . . . . . . . . . . . . . . . . . . . . . . . . . . B-2电源线和电源适配器. . . . . . . . . . . . . . . . . . . . . . . . . . . . . . . . . . . . . . . . . . . . . . . . . . . . . . . . .. . . . . . . . . . . . . . . . . . . . . . . . . B-3《废弃电器电子产品回收处理管理条例》提示性说明 . . . . . . . . . . . . . . . . . . . . . . . . . . . . . . . . . . . . . . . . . . . . . . . . . . . . . . . . . B-3中国环境标志产品认证提示性说明 . . . . . . . . . . . . . . . . . . . . . . . . . . . . . . . . . . . . . . . . . . . . . . . . . . . . . . . . . . . . . . . . . . . . . . . . . B-3中国能源效率标识 . . . . . . . . . . . . . . . . . . . . . . . . . . . . . . . . . . . . . . . . . . . . . . . . . . . . . . . . . . . . . . . . . . . . . . . . . . . . . . . . . . . . . . . B-3有害物质 . . . . . . . . . . . . . . . . . . . . . . . . . . . . . . . . . . . . . . . . . . . . . . . . . . . . . . . . . . . . . . . . . . . . . . . . . . . . . . . . . . . . . . . . . . . . . . . B-4安全事项一般安全原则有关安全使用计算机方面的提示,请访问:/safetyBefore installing this product, read the Safety Information.第1章开始使用本用户指南为用户提供详细的操作说明。
© 2023 Micro-Star Int'l Co.Ltd. MSI is a registered trademark of Micro-Star Int'l Co.Ltd. All rights reserved.Intel, the Intel logo, the Intel Inside logo and Intel Core are trademarks of Intel Corporation or its subsidiaries in the U.S. and/or other countries. SPECIFICATIONSSOWindows 10 HomeWindows 10 ProFREE Upgrade to Windows 11*CPU Up to 10th Gen Intel® Core™ i7-10700 processorsChipset Intel® H410Memória 2 x DDR4 2666MHz SO-DIMM, up to 64GBVGA Up to MSI GeForce® RTX 2060 8GB GDDR6Sem fio Intel® WiFi6 AX200Armazenamento1 x M.2 2280 SSD (SATA/PCIe Combo)1 x 2.5" Driver Bay1 x 3.5" Driver BayBluetooth 5.1LAN (RJ45)Intel I219-VSistema de refrigeração Air CoolerE/S (Traseiros)1 x HDMI™ out (1.4)4 x USB 3.2 Gen 1 Type A1 x S/PDIF1 x RJ452 x USB 2.0 Type A5 x Audio jacks*Tips: The display function is only available onnon F series processors.Audio7.1 Channel HD Audio (ALC1220)E/S1 x USB 2.0 Type A1 x USB 2.0 Type C1 x Mic-in1 x Headphone-outFonte de alimentação350W 80 Plus Bronze Certified PSU450W 80 Plus Bronze Certified PSUTamanho10L / 21.13ptDimensões128 x 348 x 244 mm5.03 x 13.70 x 9.61 inchPeso6.4kg /7.4kg14.11 lbs / 16.31 lbsAcessórios1 x Manual (optional)1 x Quick guide1 x Warranty card1 x Power cordSoftwareDragon CenterBurnRecoveryMSI Remind ManagerNorton SymSilentNorton Internet Security (60-day Trial)several separated chambers for component cooling.Easy to upgradeEasy to access and upgrade components to keep the system upto date with the latest hardware.Vertical graphics designVertical placed graphics card to prevent bending of the card ordamage to the PCIe slot during transport.Mystic LightMake your build look on fire or cold as ice. You are in control.Customize colors and effects with RGB LED.Compact sizeThe same performance as a big gaming rig but in a powerfulsmall sized chassis so you can take it anywhere.CONNECTIONS1. 1 x USB2.0 Tyoe C3. 1 x Headset out / Mic in5. 2 x USB 3.2 Gen 1 Type A7. 1 x HDMI™2. 1 x USB 2.0 Type A4. 5 x Audio jacks / 1x S/PDIF6. 2 x USB 3.2 Gen 1 Type A / 1 xRJ458. 2 x USB 2.0 Type AGenerated223-3-31,checkforthelatestversionwww.msi.com/datasheet.Theinformationprovidedinthisdocumentisintendedforinformationalpurposesonlyandissubjecttochangewithoutnotice.。
先锋10号金属片解析先锋W10采用一体成型机身,设计简洁严密。
左侧的开孔自上而下依次设计有麦克风拾音口,3.5mm耳机接口,TF卡槽,Micro HDMI 接口以及Micro USB接口。
正面被一层钢化玻璃盖板保护着,那么我们拆解的第一步便是在屏幕与机身背壳接驳处的缝隙利用撬棒与卡片将二者分离。
需要注意由于屏幕与背壳接驳的十分紧密,我们需要用些力气才能将撬棒刺入缝隙,但力量不可过大,否侧屏幕会因为局部受力过大而导致碎屏。
和大多数平板电脑一样,先锋W10的芯片均设计在主板的正面,而不像大部分手机主板将芯片设计在两面。
这是因为平板电脑的内部空间更大,所以主板可以做的更大,使芯片不至于挨得过于紧密,散热效果的提升令机器性能得以更充分的发挥。
Intel Z3735F四核片上系统,拥有四核四线程处理器,主频1.33GHz,睿频后可达1.83GHz,采用22nm工艺,功耗为2.2W。
仅支持单通道内存,但容量最高可支持2GB。
而随该芯片一同封装的还有Intel Gen 7图形处理核心,常态主频为311MHz,峰值主频达646MHz。
封装尺寸为17mm*17mm。
四颗三星K4B4G1646Q-HYK0 DDR3L 内存,就此推断单片512M容量。
AXP288电源管理IC(PMIC)。
来自X-powers,并与intel一同研发的电源管理芯片,是移动处理片上系统的御用电源管理芯片。
三星KLMAG2GE4A-A001闪存芯片,容量达到64GB。
ALC5640音频解码器。
这是一颗高功效低能耗的独立音频解码器,内置无电容耳放,可为用户带来出色的影音体验。
运行功耗仅5mW。
来自正基科技的AP6330 WiFi模块,该模块也应用在小米盒子等产品上。
我们可以感受到先锋在平板电脑的设计上,还是有其绝活的,比如将前后置摄像头以及光线感应器集成在一个排线上。
不仅节约了机内空间,而且为机身便携性做出了贡献;而采用先锋自家的电池,不仅成本节约了,而且还带来了5V 2.5A的超快充电效率;一体成型的超薄机身也是一大亮点。