兄弟DCP9020CDN 彩色激光一体机使用说明书(高级功能)
- 格式:pdf
- 大小:818.38 KB
- 文档页数:37
云南九九彩印有限公司
“一点课程”教案
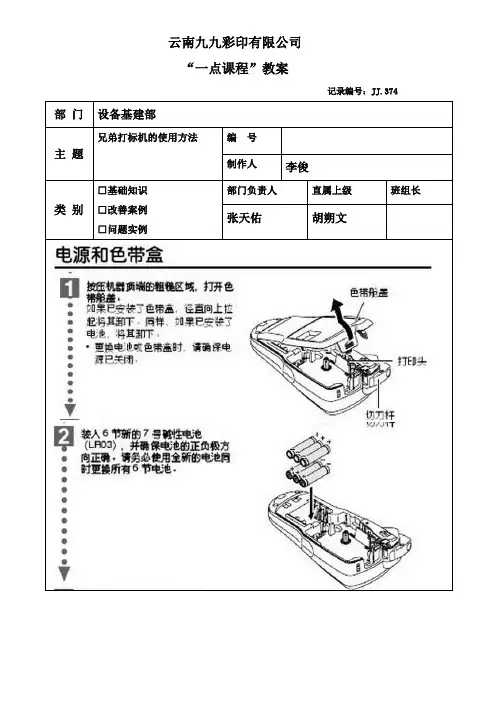
记录编号:JJ.374 部门设备基建部
主题兄弟打标机的使用方法编号
制作人李俊
类别□基础知识
□改善案例
□问题实例
部门负责人直属上级班组长
张天佑胡朔文
安装色带:
1. 根据使用的兄弟标签机型号选择可使用色带类型,安装色带前关闭标签机电源,确保色带的末端正确穿过导带槽,如果色带松动,则用您的手指沿色带盒上箭头的方向转动齿形轮。
2. 安装说明书正确安装好色带,按下标签机电源按钮,按下送带/剪切按钮以清除色带松弛现象。
3. 您只可在打印机的滚轴组件松开时取出色带盒。
如果您按下打印机正面的电源按钮,或在打印标签之后10 分钟之内未执行其他操作,则它将自动松开。
创建打印标签:
1. 启动P-touch Editor软件,在P-touch Editor中输入标签文字等信息。
编辑完毕后,可按预览键,将显示预览画面(打印内容、所装入的色带宽度及打印长度)。
2. 确认无误后,按直接打印便可把标签打印出来。
培训纪录
培训日期
讲师
受培训者评价
备注:评价分数1)知道但不会做—“评分1”;2)在别人的帮助下会做—“评分2”;3)能独立进行操作—“评分3”;4)不仅会操作,还能教育别人—“评分4”。
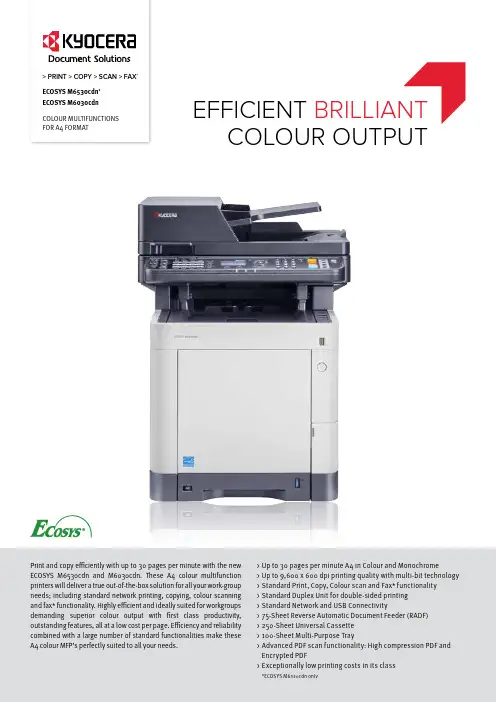
Print and copy efficiently with up to 30 pages per minute with the new ECOSYS M6530cdn and M6030cdn. These A4 colour multifunction printers will deliver a true out-of-the-box solution for all your work-group needs; including standard network printing, copying, colour scanning and fax* functionality. Highly efficient and ideally suited for workgroups demanding superior colour output with first class productivity, outstanding features, all at a low cost per page. Efficiency and reliability combined with a large number of standard functionalities make these A4 colour MFP’s perfectly suited to all your needs.> Up to 30 pages per minute A4 in Colour and Monochrome> Up to 9,600 x 600 dpi printing quality with multi-bit technology > Standard Print, Copy, Colour scan and Fax* functionality > Standard Duplex Unit for double-sided printing > Standard Network and USB Connectivity> 75-Sheet Reverse Automatic Document Feeder (RADF)> 250-Sheet Universal Cassette > 100-Sheet Multi-Purpose Tray> Advanced PDF scan functionality: High compression PDF and Encrypted PDF> Exceptionally low printing costs in its class*ECOSYS M6530cdn only> PRINT > COPY > SCAN > FAX *ECOSYS M6530cdn *ECOSYS M6030cdn COLOUR MULTIFUNCTIONS FOR A4 FORMATEFFICIENT BRILLIANT COLOUR OUTPUTstands for ECOlogy, ECOnomy and SYStem-printing. With long-lifecomponents, ECOSYS devices are designed to maximise durability and minimise the total cost of ownership with regard to maintenance, administration and consumables. The cartridge-free system means that only the toner has to be replaced regularly, and the drum units every 100,000 pages. The modular design concept allows you to add workflow-enhancing functions as required. Integrated system software provides long-term cross-network compatibility. Kyocera’s long-life components cost you and the environment less.PRESCRIBE IIcWith the Kyocera page design and control language PRESCRIBE IIc, even complex graphics, logos and forms (multipart forms) can be created independently on the system and saved and updated in the printer. Consequently, integration into print files no longer applies. They are only accessed as required and therefore relieve the load on the network.The KYOCERA NetViewerThe KYOCERA NetViewer enables complete monitoring and control of all ECOSYS printers and digital Kyocera multifunction units from any Windows© PC and thus provides ideal network administration. It also supports the standardised SNMP protocol.Status Monitor and Command CentreThe Status Monitor shows the current printers condition and gives direct access to the Command Centre for the modification of settings that are not contained in the drivers (e.g. network settings, adjustment of sleep mode or blocking of the control panel).USB Host Interface for USB Flash MemoryPDF files can be printed directly from a USB Flash Memory (e.g. USB stick) via the USB host interface. Documents are selected directly via the printer’s control panel. No computer is required.KYOCERA Document Solutions Australia Pty. Ltd ABN 77 003 852 44405/2015GENERALTechnology: Kyocera ECOSYS Colour Laser Control panel display: 5 line LCD displayEngine speed: Up to 30 pages per minute A4 in Colour and MonochromeResolution: 600 x 600 dpiMulti-Bit Technology for print quality of up to 9,600 x 600 dpiOperating systems: All current Windows operating systems, MAC OS 9.X, MAC OS X, Linux, as well as other operating systems on requestWarm-up time: Approx. 26 seconds or less from power on 17 seconds from sleep modeTime to first print: Approx. 8.5 seconds or less in Colour. Approx. 7 seconds or less in Monochrome Time to first copy: Approx. 12 seconds or less in Colour.Approx. 10 seconds or less in Monochrome CPU: PowerPC 465S / 1GhzMemory: Standard 1GB, max. 2GB RAM (single DIMM slot as an option)Standard interface: Gigabit Ethernet 10/100/1000 Base-TX for IPv4/IPv6, 1x USB 2.0 (Hi-Speed), 2x USB Host interface, 1 x SD Card slotIntegrated accounting: 100 department codes Dimensions: (W x D x H): 475 x 558 x 616 mm Weight: Approx. 34.7 kgPower source: AC 220 - 240V, 50 Hz Power consumption:Printing (ECOSYS M6530cdn / ECOSYS M6030cdn): 510W / 502WReady (ECOSYS M6530cdn / ECOSYS M6030cdn): 57W / 57WSleep (ECOSYS M6530cdn / ECOSYS M6030cdn): 2.1W / 2.1WSafety standards: TUV/GS, CE, AS/NZS CISPR22This unit is manufactured according to ISO 9001 quality standard and ISO 14001 environmental standard.PAPER HANDLINGAll paper capacities quote are based on 80gsm paper, thickness of max 0.11mm. Please use paper recommended by Kyocera under normal environmental conditions.Input capacity: 100-sheet multi-purpose tray, 60-220 g/m2, A4, B5, A5, A6 Letter, Legal, Folio, Envelopes, Custom (70 x 148 to 216 x 356 mm) 250-sheetuniversal paper cassette, 60–163 g/m2, A4, A5, B5, A6, Letter, Legal, Folio, Custom (105 x 148 to 216 x 356 mm)Max. input capacity with options: 1,850 sheets Duplex unit: Duplex as standard supports 60–163 g/m2, A4, A5, B5, Letter, Legal, Custom (105 x 148 mm to 216 x 356 mm)Reverse Automatic Document Feeder (RADF): 75sheet, Simplex scan 50–120 g/m2, Duplex scan 50–120 g/m2, custom (105 x 148 to 216 x 356 mm)Output capacity: 250 sheets face-down PRINT FUNCTIONSController language: PRESCRIBE lleEmulations: PCL 6 (5c/XL), KPDL 3 (PostScript3-compatible), Prescribe , XPS , PDF Direct Print v1.7Fonts / barcodes: 93 outline fonts (PCL 6, HPcompatible) 8 (Windows Vista), 93 (KPDL3), 1 bitmap font, 45 types of one-dimensional barcodes, 1 type of two- dimensional barcode (PDF417)Features: PDF Direct Print, IPP printing, e-mail printing, WSD print, secure printing via SSL, IPsec, SNMPv3, MP Tray priority, AirPrint, Mopria certified, 3 tier colour coverage counter COPY FUNCTIONSMax. original size: A4 / Letter Continuous copying: 1–999Zoom range: 25–400% in 1% steps Preset magnification ratios:7 Reductions / 5 Enlargements (7R/5E)Digital features: Scan-once-copy-many, electronic sort, 2in1, 4in1, ID-card copy, job reserve, priority print, program, auto duplex copy, split copy,continuous scan, auto cassette change, copy density control, quiet mode, eco print, colour selection, skip blank pageExposure mode: Auto, manual: 7 stepsImage adjustments: Text + photo, text, photo, graph/map, printed document SCAN FUNCTIONSFunctionality: Scan-to-Email, Scan-to-FTP, Scan-to- SMB, Scan to USB Host, TWAIN, WSD, WIAScan speed: 40 ipm (300 dpi, A4, Mono) 30ipm (300 dpi, A4, Colour), 30 ipm (600 dpi, A4, Mono) 20ipm (600 dpi, A4, Colour),Scan resolution: 600, 400, 300, 200, 200x400, 200x100 dpi (256 greyscales)Max. scan size: A4, legalOriginal recognition: Text, photo, text + photo, light text/fine line mode, text (for OCR)Network protocol: TCP /IP, FTP, LPR, Apple Bonjour, NetBEUIFile types: TIFF, PDF, PDF/A, JPEG, XPS, High compressed PDF, Encrypted PDF, Open XPS Compression method: MMR/JPEGFeatures: Colour scan, integrated address book, LDAP support, Encrypted data transfer, multi-send (e-mail, fax, SMB/FTP folder, print) at onceFAX FUNCTIONS (ECOSYS M6530cdn only)Compatibility: ITU-T SuperG3Modem speed: Max. 33.6 kbps Transmission speed: 3 seconds or less Scanning speed: 2.5 seconds or less Address book: 200 entries One touch dial: 22 numbersScanning density:Normal: 8 dot/mm x 3.85 line/mm (200x100 dpi)Fine: 8 dot/mm x 7.7 line/mm (200x200 dpi)Superfine: 8 dot/mm x 15.4 line/mm (200x400 dpi)Ultrafine: 16 dot/mm x 15.4 line/mm (400x400 dpi)Maximum original size: A4, legalCompression method: MMR, MR, MH, JBIGFeatures: Network fax, duplex transmission and reception, encrypted transmission and reception,polling transmission and reception, broadcast, remote diagnosis OPTIONSPF-5100 Paper Feeder (max 3 units): 500 sheets;60–220 g/m2, A4, B5, A5, Letter, Legal, Custom (148 x 210 mm to 216 x 356 mm)MS-5100 Stapler: 20 sheets, one position semi-automatic stapling, includes 1,500 staples Memory:DIMM 1GBE: 1,024MB HD-6: 32GB HDD HD-7: 128GB HDD Card Authentication Kit:USB Card Reader (HID or Mifare) to access the device SD Card: 1 slot (maximum 32 GB) for printing forms, fonts, logosUSB Flash Memory: Supports direct printing of PDF, XPS, TIFF, JPEG files via USB Host InterfaceOptional Interface:IB-50: Gigabit Ethernet:10BaseT/100BaseTX/1000BaseT IB-51: Wireless LAN (802.11b/g/n)CONSUMABLESTK-5144K Toner-Kit: Micro-Particle toner black for 7,000 pages A4 in accordance with ISO/IEC 19798TK-5144C, TK-5144M, TK-5144Y Toner-Kits: Micro-Particle toner cyan, magenta, yellow for 5,000 pages A4 each in accordance with ISO/IEC 19798 Capacity of starter toner is black 3,500 pages, and cyan, magenta, yellow is 2,500 pages each in accordance with ISO/IE C 19798MK-5144 Maintenance Kit: Installed every 200,000pages* KYOCERA Document Solutions New Zealand is the trading name of the New Zealand branch of KYOCERA Document Solutions Australia Pty Ltd a corporation incorporated in Australia.Kyocera does not warrant that any specifications mentioned will be error-free. Specifications are subject to change without notice. Information is correct at time of going to press. All other brand and product names may be registered trademarks or trademarks of their respective holders and are hereby acknowledged.KYOCERA Document Solutions Australia Ph: 13 KYOCERA (596 2372).au KYOCERA Document Solutions New Zealand* Ph: 0508 KYOCERA (596 2372)。
brother DCP-9010CN彩色数码多功能一体机
卢小雷
【期刊名称】《个人电脑》
【年(卷),期】2010(016)007
【摘要】@@ 在我们所测试过的众多一体机中,尽管它们的主要功能相差无几,但
却又都表现出各自独到的特质,比如有些机型注重于操作的易用性,它们通常提供了丰富的快捷键,可以轻松地调整设置和转换功能;还有一些机型则侧重于高品质的输出质量,它们可能在速度和操控上表现一般,但精彩的打卬效果定会给你留下深刻的卬象.
【总页数】2页(P18-19)
【作者】卢小雷
【作者单位】
【正文语种】中文
【相关文献】
1.富士施乐彩色办公阵营再添新将——智能化彩色数码多功能一体机新品上市 [J],
2.彩色商务brother彩色激光多功能一体机 [J],
3.巧控彩色输出成本的彩色数码多功能一体机 [J], 富士施乐(中国)有限公司
4.富士施乐DCC400/320彩色数码多功能一体机一机四用彩色全能 [J], 刘梅
5.富士施乐彩色办公智能化彩色数码多功能一体机新品上市 [J],
因版权原因,仅展示原文概要,查看原文内容请购买。
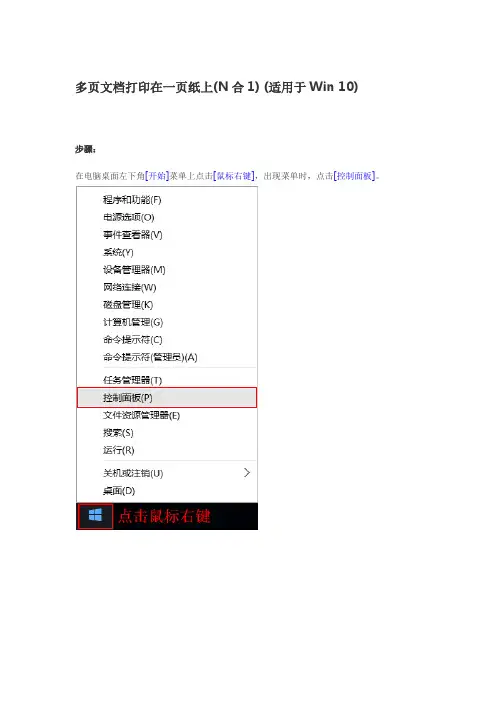
多页文档打印在一页纸上(N合1) (适用于Win 10)步骤:在电脑桌面左下角[开始]菜单上点击[鼠标右键],出现菜单时,点击[控制面板]。
手动调整扫描深浅(适用于ControlCenter4标准模式)操作步骤:对于WindowsXP、Windows Vista、Windows7从[开始]菜单,依次选择[所有程序]→[Brother]→[MFC-XXXX/DCP-XXXX]→[ControlCenter4]对于Windwos8、Windows8.1、Windows10点击[Brother Utilities]。
点击左侧导航栏中的[扫描],然后点击[ControlCenter4]手动调整扫描深浅(适用于ControlCenter4高级模式)说明:通过设置扫描的亮度和对比度,就可以手动调整扫描深浅操作步骤:对于WindowsXP、Windows Vista、Windows7从[开始]菜单,依次选择[所有程序]→[Brother]→[MFC-XXXX/DCP-XXXX]→[ControlCenter4]对于Windwos8、Windows8.1、Windows10点击[Brother Utilities]。
点击左侧导航栏中的[扫描],然后点击[ControlCenter4]重置硒鼓单元计数器说明:当设备提示[更换硒鼓]或[硒鼓停止工作],建议您更换兄弟原装硒鼓,并重置硒鼓单元计数器。
操作步骤:1、打开前盖,按[清除/返回(Clear/Back)键]。
2、按[▲]键。
3、屏幕显示接受,合上前盖。
恢复出厂设置操作步骤:1、按[功能]键。
2、按[↑]或[↓]键选择到[常规设置],按[OK]键。
3、按[↑]或[↓]键选择[重置],按[OK]键。
4、按[OK]键。
按[↑]键选择[重置]。
5、按[↑]键选择[是]。
6、设备将自动重启。
开启墨粉继续运行模式说明:当液晶屏幕显示[更换墨粉/更换墨粉盒]时,可以开启墨粉继续运行模式进行打印。
Brother 激光打印机使用说明书HL-2140 HL-2150N HL-2170W 对于视障的用户您可以使用“ 文本发声” 软件阅读本使用说明书。
在您使用打印机之前,您必须设置硬件并安装驱动程序。
请使用快速安装指南设置打印机。
包装箱内有印刷副本。
请在使用打印机之前,仔细阅读使用说明书。
将随机光盘放置在方便的地方,以便随时迅速查询。
请访问。
您可以获取更多产品支持信息、最新的打印驱动程序和实用程序、常见问题解答FAQs 和技术问题等。
版本B SCHN使用本说明书本说明书使用的符号本使用说明书使用以下图标:此图标警告您避免可能造成的人身伤害。
此图标警告您避免可能发生的触电伤害。
此图标警告您不要触摸烫热的设备部件。
此图标说明了您必须遵守或避免的一些步骤以防止损坏打印机或其他物品。
此图标提醒您与打印机不兼容的设备和操作。
此图标提醒您如何对应可能出现的情况或提供有关当前操作如何与其它功能工作的提示。
i安全注意事项安全使用打印机请妥善保存说明书以备日后参考,进行任何维护之前请仔细阅读。
警告打印机内部有高压电极。
清洁打印机内部之前,务必关闭电源开关,并将打印机插头从电源插座中拔出。
不要用湿手插拔插头,否则可能会导致触电伤害。
始终确保插头完全插入。
不要使用吸尘器清洁打印机中泄漏的墨粉,否则可能导致吸尘器内部墨粉阻塞,引起火灾。
使用干燥的无绒毛布清除残余墨粉,并根据当地法规处理废弃的墨粉。
不要使用易燃物品或任何类型的喷雾清洁设备的内部或外部。
否则可能引起火灾或触电伤害。
关于如何清洁设备,请参阅第73 页上的清洁。
ii在您刚使用过打印机后,打印机内部的一些零件温度会非常高。
当您打开打印机的前盖或后盖后出纸托板时,不要触摸图中所示的阴影部分。
打印机内部打印机内部前视图后视图塑料袋用于包装设备。
请将这些塑料袋放于儿童不易触及的地方,以免儿童误吞而窒息。
清洁打印机的外部: 请确保已经从交流电源插座上拔下打印机插头。
请使用中性清洁剂。
DCP-115C DCP-120C编辑及出版声明本说明书在兄弟工业株式会社监督下编辑出版,说明书中包括最新产品的说明和产品规格。
本说明书内容及产品规格如有更改,恕不另行通知。
Brother公司保留对包含在本说明书中的产品规格和内容做出更改的权利,恕不另行通知,同时由于使用本说明书包含的内容所造成的任何损坏(包括后果),包括但不限于本出版及其他错误,Brother公司将不承担任何责任。
请使用Brother原装墨盒Brother多功能一体机使用特定墨水工作,建议使用原装Brother墨盒以便取得最佳效果。
如果使用其他品牌墨水盒,将不保证取得最佳效果。
不推荐使用除Brother原装墨盒以外的其他墨盒,也不推荐使用其他来源的墨水来填充Brother墨盒。
如果由于使用与本机不兼容或非Brother原装墨盒而对打印头或其他部件造成损坏,都不在保修范围之内。
iii 安全注意事项安全使用本设备请参照此说明,以备日后查阅和维修设备。
警告本使用说明书中大部分图例基于DCP-115C 。
警告本设备必须安装在容易触及的电源插座附近。
在遇到紧急情况时,必须将电源线从电源插座上拔下以完全切断电源。
注意为保持最佳打印质量,我们推荐您使用On/Off(开/关)键来关闭设备。
除非要挪动设备或对设备进行维护,否则请勿将电源线从电源插座上拔下。
如确需切断设备电源,请重新设定设备上的日期和时间。
(请参见快速设置指导手册)iii选择安装位置将设备放置在一个平整、牢固而不易受到振动和撞击的表面上,如桌子。
将设备放置在标准的、已接地的电源插座附近。
同时还应将本设备安装在温度介于10°C至35°C的地方。
注意■避免将设备放置在人员往来频繁的地方。
■避免将设备放置在地毯上。
■请勿将设备放置在加热器、空调、流体、化学制品或冰箱的附近。
■请勿将设备暴露在阳光直射、过热、潮湿或多尘的地方。
■请勿将设备连接到由墙上开关或自动定时器控制的插座上。
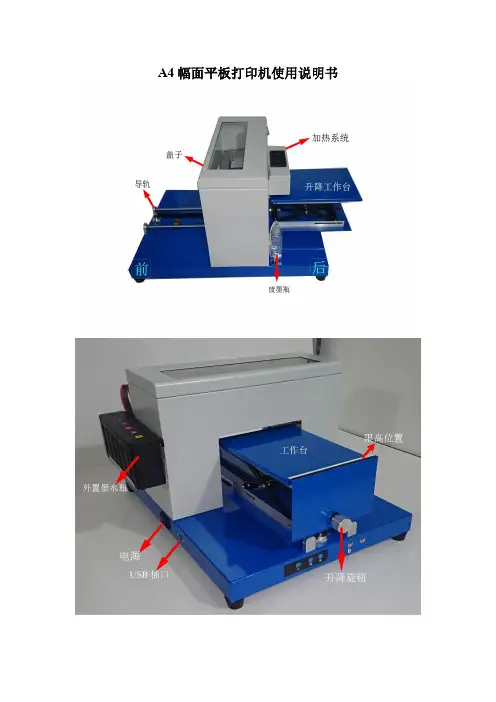
A4幅面平板打印机使用说明书一、先把机器托盘用手拉出前面位置拉到尽头位置即可(托盘用手可以前后拉动,手拉托盘时候请拉“旋钮”位置)二、先加墨水,外置墨水瓶按颜色加满,再抽吸一下打印机内小墨盒,内小墨盒要抽满墨水为止,详情参照下面1、连续供墨外置墨水瓶2、输墨管线3、内置墨盒4、墨水添加口5、出气口(打印必须打开)6、正确抽吸墨水(墨盒出水口朝上)7、不准斜着抽吸墨水新机外置墨水瓶子加满墨水、打开6个小出气口、拿出墨盒用针筒轻轻插入墨盒出水口,抽吸真空(外置瓶墨水引到内盒里,抽满为止)外置墨水瓶子墨水保持不能低于3厘米容量,低于马上添加三、电源打开、安装驱动1、插好电源、连接好USB接口、打开打印机开关,安装打印机驱动。
2、安装打印机驱动系统(电脑系统要与打印机安装驱动系统要一致,分别XP W732位W764位)。
3、安装好驱动,打开打印机驱动属性点击进行打印头清洗打印头清洗点击进行自动清洗,清洗完毕点喷嘴检查喷嘴检查线打印出来,看下线条是否完整,如图第二排有断线情况下,再次点击打印头清洗直到线条完整后(如图第一排)即可进行打印。
四、打印流程:(1)打印物件放入工作台面上,调节好高度(不要超过限高位置)(2)用手把托盘推到最后面尽头位置。
(3)、打印机自检正常(打印机开关绿灯不闪烁,如有红灯亮属于错误是无法进行打印)按下“打印键”打印工作指示灯亮起,再从电脑设计好图像点击打印,打印完毕托盘自动出来停止后再取出打印物件,每次打印之前都要按下“打印键”注:需要加热打印请按下“加热键”指示灯亮起(加热用途:可以迅速让墨水吸收,打印物件色彩更鲜艳饱和)五、打印质量设置:打印质量选项:优质照片纸张选项—类型:高光相纸、照片级喷墨打印纸、照片纸注意事项:*限高位置不准改动、涂改上面信号检测白条否则无法打印。
六、保养:(1)、超过3天不使用打印机,保湿垫请注些酒精进去,再从后面废墨瓶子管线用针筒抽吸一下,这样重复清洗2-3遍,主要是要把管道里面残留墨水清洗干净,否则墨水干燥硬化在管道内就无法进行清洗,清洗完毕请把喷嘴墨架移回停机位置尽头。
安装完成!快速设置指导手册DCP-115C DCP-120C在使用本多功能一体机之前,您必须安装硬件和软件。
请仔细阅读此“快速设置指导手册”以便获取正确的安装步骤以及安装说明。
将此“快速设置指导手册”、“使用说明书”及随机光盘保存在适宜的地方,以便随时快捷查询。
版本 A安全使用本设备目录1开始纸箱内组件.................................................................................................................................................. 2控制面板 (3)安装本设备移除保护部件 ...............................................................................................................................................4装入纸张 ......................................................................................................................................................4安装电源线 ..................................................................................................................................................5选择语言 ......................................................................................................................................................6安装墨盒...................................................................................................................................................... 6打印质量检测 ...............................................................................................................................................9设置日期和时间 .. (10)随机光盘“MFL-Pro Suite ”随机光盘“MFL-Pro Suite ” (11)安装驱动程序和软件用于USB 接口电缆用户(适用于Windows ® 98/98SE/Me/2000 专业版/XP ) (14)用于USB 接口电缆用户适用于Mac OS ®X10.2.4或更高版本 (17)耗材更换耗材.....................................................................................................................................................20墨盒 .. (20)Windows ®Macintosh ®开始2 1纸箱内组件国家不同,纸箱内组件可能不同。
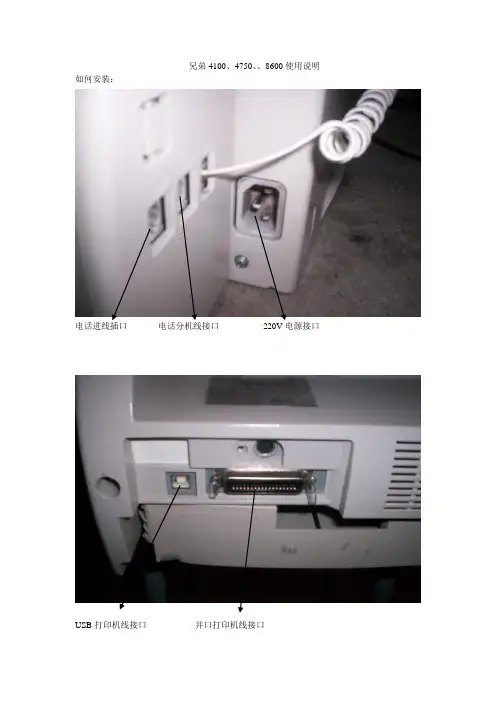
兄弟4100、4750、、8600使用说明如何安装:
电话进线插口电话分机线接口220V电源接口
USB打印机线接口并口打印机线接口
送纸稿台
机器放纸纸盒
打印晒鼓晒鼓前门
走纸后盖
兄弟8600的软件安装,本机的所有驱动软件是所以XP系统自带的,不需用按装的,只有把机器的打印机线连接到你的电脑上再连接上220V电源,电脑系统就可以自动找到新硬件,即就可以自动安装软件。
如何传真:请把你要传真的文件放入送纸稿台(一定要放进去),打通对方的传真电话,在听到对方的传真信号后按一下传真件就可以了。
如何收传真:当你在接听到对方的传真电话时,听到对方给出的传真信号后,请按一下传真键即可。
如何使用无纸接收:当你的打印机纸、机器碳粉用完时,如果你有传真需要接收,这时请你步要着急,你按正常收传真时一样,给对方传真信号,这时虽然你所收到的传真不可以打印出来,但机器可以将你收到的传真记忆在自身的内存里面,(一次最多可以无纸接收550页左右),后在你将打印机纸买回、碳粉加好后,你装好了之后机器就可以自动打印出你所收到的传真出来。
如何使用扫描:将你要扫描的文件放如送纸稿台,将你要扫描的面向下,再打开我的电脑里面的扫描仪和照相机下面的扫描仪图标,双击扫描仪图标后面根据你需要选择你所扫描的文件是到文档还是照片里面保存。
如图:
:
请将打印机设为默认打印机,如图:
这是所以机器的说明如果有不详之处请联系我们,
机器的面板主要功能键介绍:
免提键功能键确定键选择键音量大键音量小键接收方式选择键
重拨键停止键传真键复印键。
彩色打印机使用文档目录目录 (1)一、彩色打印机简介 (2)二、打印机安装组图 (5)三、打印机安装建议 (10)1、硬件安装建议 (10)2、软件安装建议 (10)3、解决网络问题 (11)四、打印机安装 (12)1、在连接设备之前安装软件(推荐) (12)2、在网络上安装设备 (13)3、在客户机上安装设备软件 (13)4、使用“添加打印机”安装打印机驱动程序 (13)5、在纯 IPV6 网络环境中安装设备 (14)6、在 Windows XP 上安装设备驱动器 (14)7、在本地共享网络上共享设备 (14)五、装入介质 (15)1、为纸盘 1(主纸盘)装入介质 (15)2、装入小尺寸介质 (16)3、要在后端手动进纸槽中装入介质 (17)六、打印机设置 (18)1、更改软件设置 (18)2、更改打印设置 (18)3、配置设备 (18)4、自定义打印尺寸 (19)5、打印并检查网络配置页 (25)6、使用后端手动进纸槽打印 (28)七、更换墨盒和打印头 (28)八、打印机常见问题 (33)1、安装驱动程序的过程中提示文件找不到,怎么办? (33)2、清除未完成的打印作业 (34)3、电脑上显示"Paper Jam"(卡纸)错误信息,怎么办? (42)4、提示"堵纸"或者"Paper jam......",怎么办?. (45)5、电脑上显示"缺纸"错误信息,怎么办? (49)6、打印重影、模糊、不清晰,怎么办? (53)九、使用 HP 解决方案中心 (Windows) (57)一、彩色打印机简介产品打印机的主要功能:实现计算机数据输出到万能打印机——直接在物体上喷印!1.可在任何材质上喷印图片,如:金银铜铁铝板、水晶材质、木板、玻璃板、皮革、布料、石材等;2.可在不规则曲面上喷印图片。
如:手机、电话机、U盘、玻璃杯、花瓶、钢笔等;3.可喷印圆柱体物体。
一体机使用手册一、产品概述一体机,又称多功能一体机,是一种集打印、扫描、复印等多种功能于一身的办公设备。
它具有体积小巧、使用便捷、功能强大等特点,是现代办公环境中不可或缺的重要工具。
本手册将详细介绍一体机的组成结构、功能操作、常见故障处理等内容,以便用户能够更好地使用和维护一体机。
二、产品结构1. 主机:一体机的主体部分,包括操作面板、打印机、扫描仪、复印机等功能模块。
2. 纸盒:用于装载打印纸张的组件,一体机通常设有纸盒和手动送纸槽两种纸张装载方式。
3. 扫描仪上盖:用于覆盖和保护扫描仪的组件,方便用户在扫描时放置文件并保护镜头。
三、功能操作1. 打印(1)打印准备:将纸张正确装入纸盒,打开电源开关,待一体机启动后,进入打印模式。
(2)选择打印文件:通过计算机连接、U盘插入或无线连接等方式选择要打印的文件。
(3)设置打印参数:根据需要设定打印的纸张尺寸、打印质量、单双面打印等参数。
(4)开始打印:确认参数设置正确后,按下打印按钮,一体机即开始打印所选文件。
2. 扫描(1)纸张摆放:打开扫描仪上盖,并将要扫描的文件放置在扫描玻璃上,并盖上扫描仪上盖。
(2)选择扫描方式:根据需要选择扫描到计算机、扫描到U盘、扫描到电子邮件等扫描目标。
(3)设置扫描参数:根据文件的大小、清晰度等要求,设置扫描分辨率、文件格式等参数。
(4)开始扫描:确认参数设置正确后,按下扫描按钮,一体机即开始扫描所选文件。
3. 复印(1)摆放原件:将要复印的文件放置在进纸托盘上,并调整好对齐。
(2)设置复印参数:根据需要设置复印的张数、放大缩小比例、单双面等参数。
(3)开始复印:确认参数设置正确后,按下复印按钮,一体机即开始进行复印操作。
四、常见故障处理1. 纸张卡纸:当一体机出现纸张卡纸情况时,应先按照提示将纸张取出,检查纸盒是否装载正确,再重新放置纸张并关闭纸盒。
2. 打印质量差:若打印质量较差,可先检查打印机喷头是否堵塞,清理喷头后进行打印测试,如问题仍未解决,建议更换墨盒。
HL-B2050DN/ HL-B2000D/ HL-2595DW/ DCP-B7500D/ DCP-7090DW/DCP-L2535DW/ DCP-B7520DW/ DCP-B7530DN/ DCP-7190DW/DCP-L2550DW/ DCP-B7535DW/ DCP-7195DW/ MFC-B7700D/ MFC-B7720DN/MFC-7895DW兄弟工业株式会社日本名古屋市瑞穗区苗代町 15 番 1 号 邮编:467-8561尝试操作本产品或执行任何维修前,请仔细阅读这本手册。
未能遵循其中的说明可能会增加火灾、触电、烧伤或窒息发生的概率,造成人身伤害或财产受损。
对于因用户未遵循本手册中的说明而导致的任何损坏,Brother 概不承担任何责任。
如何使用本手册:1.使用设备前,请先通读整本手册。
请妥善保管好本手册,以便日后查阅。
2.请认真遵循本手册中的说明,并始终确保遵循产品上标注的所有警告事项与说明进行操作。
3.如果阅读本手册后对产品使用方法仍有疑虑,请联系 Brother 呼叫中心或您当地的 Brother 经销商。
4.为确保您能理解所有说明,请仔细阅读本手册中使用的符号和惯例。
5.注意:使用本产品前,请仔细阅读这些说明,以确保正确操作。
提示如需了解更多信息和产品规格,请访问以下网站阅读高级说明书:目录本手册中使用的符号和惯例 (3)编辑及出版说明 (3)选择安放产品的位置 (4)安全连接产品 (7)安全使用产品 (8)重要安全说明 (15)产品保修和责任 (16)商标 (19)开放源代码许可备注 (20)版权与许可 (20)关于复印的法律限制 (仅限带扫描功能的产品) (20)本手册中使用的符号和惯例本手册中使用的符号和惯例如下。
请遵循本产品上标注的所有警告事项和说明进行操作。
警告警告图标表示可能导致死亡或重伤的潜在危险情况。
注意注意图标表示可能导致轻微或中度伤害的潜在危险情况。
重要事项重要事项图标表示可能导致财产损失或产品损坏的潜在危险。
o not open either of the ink bottles until you are ready to fill the ink tank. The ink bottles are vacuum packed to maintain reliability.nly one ink bottle is needed to fill the ink tank at initial printer set emove all protective materials from the product.10 Lower the scanner unit.11 P ress and hold the help button for 5 seconds. Thenpress thestart button to start charing the ink.Note:Caution: Do not turn off the product or lift the scanner unit whilethe product is charging or you’ll waste ink.12 P ress13 Fquality.Note:• Y ou need to load paper before you can adjust the print quality.See “Load paper” below for details.• You can change these settings later using the product’scontrol panel.See the online User’s Guide for information about loading capacity, available paper types and sizes, and loading envelopes and legal-size paper.1 Mdone charging the ink, thenopen the front cover and pullout the paper cassette until itstops.Note: The paper cassette cannotbe removed.Note: If you are using a Mac or your computer does not have aCD/DVD drive, an Internet connection is required to obtain the product software.1 M ake sure the product is NOT CONNECTED to yourcomputer.Windows ®: If you see a Found New Hardware screen, click Cancel and disconnect the USB cable.2 I nsert the product CD (Windows only) or download andrun your product’s software package. For the latestsoftware, visit: .jm/support/m2120.3 F ollow the instructions on the computer screen to run thesetup program.4 W hen you see the Select Your Connection screen, selectone of the following:• W ireless c onnec tionIn most cases, the software installer automaticallyattempts to set up your wireless connection. If setup is unsuccessful, you may need to enter your network name (SSID) and password.• D irect USB connectionMake sure you have the USB cable ready.Mobile printingConnect wirelessly from your smartphone, tablet, or computer.Print documents and photos from across the room or around the world:• Print directly from a smartphone or tablet using iOS orAndroid™ with Epson iPrint™. Simply connect your printer and device to the same network and tap the action icon to select the print option.• Print from wherever you are, next to your printer orremotely, with Epson Connect™. Learn more at .jm/connect .• Print directly from your Android™ (v4.4 or later) device*.Simply connect your printer and device to the same network and tap the menu icon to select the print option.• Use Epson Print Enabler (free from Google Play™) with Android devices (v4.4 or later). Then connect your printer and device to the same network and tap the menu icon to select the print option.* M ay require the Epson Print Enabler or Mopria Print Service app from Google Play.2 S queeze the tab on the right edge guide and slide theedge guides all the way out.3 I nsert paper with the glossy or printable side facedown,against the front of the cassette. Then slide the edgeguides against the paper, but not too tightly.Note: Do not load paper above the arrow mark on the sideedge guide.4 Keep the cassette flat as you slide it in until it stops.Note: Do not push in the paper after sliding in the papercassette; it may cause a paper feed problem. If the paper ispushed in, align the paper to the paper size line on the paper tray.5 Extend the output tray and raise the paper stopper.6 Select the paper settings on the product’s control panel.EPSON is a registered trademark, EPSON Exceed Your Vision is a registered logomark, and Epson Connect and Epson iPrint are trademarks of Seiko Epson Corporation.Designed for Excellence is a trademark of Epson America, Inc.Mac is a trademark of Apple Inc., registered in the U.S. and other countries.Windows is a registered trademark of Microsoft Corporation in the United States and/or other countries.Android and Google Play are trademarks of Google LLC.General Notice: Other product names used herein are for identification purposes only and may be trademarks of their respective owners. Epson disclaims any and all rights in those marks.This information is subject to change without notice. © 2019 Epson America, Inc., 11/19CPD-58089Technical supportVisit .jm/support/m2120 to download drivers, view manuals, get FAQs, or contact Epson.You can also speak to a service technician by calling one of these numbers:Argentina(54 11) 5167-0300 Guatemala * 1-800-835-03580800-288-37766Mexico 01-800-087-1080Bolivia * 800-100-116Mexico City (52 55) 1323-2052Chile(56 2) 2484-3400Nicaragua * 00-1-800-226-0368Colombia 018000-915235Panama * 00-800-052-1376Bogota (57 1) 592-2200Paraguay 009-800-521-0019Costa Rica 800-377-6627Peru 0800-10-126DominicanLima (51 1) 418-0210Republic * 1-888-760-0068Uruguay 00040-5210067Ecuador * 1-800-000-044Venezuela (58 212) 240-1111El Salvador * 800-6570 * C ontact your local phone company to call this toll-free number from a mobile phone.If your country does not appear on the list, contact your nearest Epson sales office. Toll or long distance charges may apply.Need paper and ink?Ensure brilliant results with Epson specialty and plain papers, engineered specifically for Epson printers. You can purchase them from an Epson authorized reseller. To find the nearest one, visit .jm or contact Epson as described in “Any questions?” on this sheet.M2120 replacement ink。