Microsoft-Project-2010教程
- 格式:ppt
- 大小:1.06 MB
- 文档页数:55


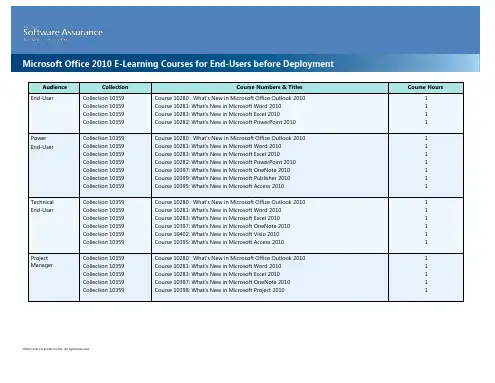
Microsoft Project 2013Microsoft Project 是一个国际上享有盛誉的通用的项目管理工具软件,凝集了许多成熟的项目管理现代理论和方法,可以帮助项目管理者实现时间(进度)、资源、成本的计划、控制,还可以帮助您实现工作管理、团队协作。
Project 2013是微软最新版本的项目管理产品。
一、启动Project 2013 程序如果您已经安装好Project 2013,启动Project是一件非常容易的工作:✧ 常规方式打开Project单击Windows 【开始】菜单, 单击【所有任务】/【Microsoft Office 2013】/【Project 2013】打开Project 2013的应用程序。
✧ 快捷方式打开Project在Windows 【开始】菜单中,单击【运行】(或使用“Win+R”快捷键),输入“winproj”点击确定。
二、开始一个新项目1 创建一个新的项目文件✧ 创建一个新的空项目选中【文件】选项卡,单击【新建】,然后选择【空白项目】。
✧ 从模板创建一个新项目选中【文件】选项卡,单机【新建】,在“搜索联机模板”框中输入关键字,搜索互联网上的模板,或选择【根据Excel工作薄新建】从Excel导入项目计划,您还可以选择Project已经列出的模板。
✧ 利用SharePoint 2013上的任务列表创建一个新项目如果您已使用Project Professional 2013,且SharePoint 2013环境也已就绪。
选中【文件】选项卡,单机【新建】,点击【根据SharePoint新建任务列表】将存在SharePoint 2013上面的任务转化为一个项目计划。
✧ 利用Project Server 2013中的企业项目模板创建一个新项目如果您的Project Server 2013环境也已就绪。
且已使用Project Professional 2013连接至Project Server 2013选中【文件】选项卡,单机【新建】,点击【企业】,选择已经保存在Project Server 2013上面的企业项目模板。


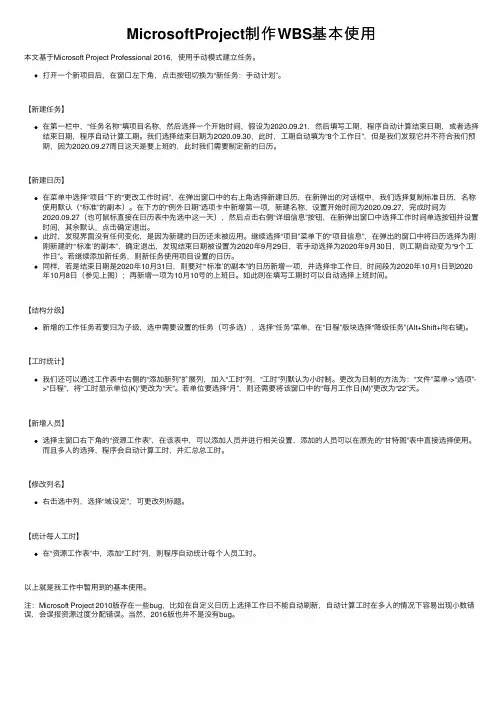
MicrosoftProject制作WBS基本使⽤本⽂基于Microsoft Project Professional 2016,使⽤⼿动模式建⽴任务。
打开⼀个新项⽬后,在窗⼝左下⾓,点击按钮切换为“新任务:⼿动计划”。
【新建任务】在第⼀栏中,“任务名称”填项⽬名称,然后选择⼀个开始时间,假设为2020.09.21,然后填写⼯期,程序⾃动计算结束⽇期,或者选择结束⽇期,程序⾃动计算⼯期。
我们选择结束⽇期为2020.09.30,此时,⼯期⾃动填为“8个⼯作⽇”,但是我们发现它并不符合我们预期,因为2020.09.27周⽇这天是要上班的,此时我们需要制定新的⽇历。
【新建⽇历】在菜单中选择“项⽬”下的“更改⼯作时间”,在弹出窗⼝中的右上⾓选择新建⽇历,在新弹出的对话框中,我们选择复制标准⽇历,名称使⽤默认(“标准”的副本)。
在下⽅的“例外⽇期”选项卡中新增第⼀项,新建名称,设置开始时间为2020.09.27,完成时间为2020.09.27(也可⿏标直接在⽇历表中先选中这⼀天),然后点击右侧“详细信息”按钮,在新弹出窗⼝中选择⼯作时间单选按钮并设置时间,其余默认,点击确定退出。
此时,发现界⾯没有任何变化,是因为新建的⽇历还未被应⽤。
继续选择“项⽬”菜单下的“项⽬信息”,在弹出的窗⼝中将⽇历选择为刚刚新建的“‘标准’的副本”,确定退出,发现结束⽇期被设置为2020年9⽉29⽇,若⼿动选择为2020年9⽉30⽇,则⼯期⾃动变为“9个⼯作⽇”。
若继续添加新任务,则新任务使⽤项⽬设置的⽇历。
同样,若是结束⽇期是2020年10⽉31⽇,则要对“‘标准’的副本”的⽇历新增⼀项,并选择⾮⼯作⽇,时间段为2020年10⽉1⽇到2020年10⽉8⽇(参见上图);再新增⼀项为10⽉10号的上班⽇。
如此则在填写⼯期时可以⾃动选择上班时间。
【结构分级】新增的⼯作任务若要归为⼦级,选中需要设置的任务(可多选),选择“任务”菜单,在“⽇程”版块选择“降级任务”(Alt+Shift+向右键)。

Microsoft Project 2013操作手册Microsoft Project 2013 操作手册Microsoft Project是微软公司推出的一款专业项目管理软件,在企业日常工作中得到广泛的应用。
本文主要介绍Microsoft Project 2013的操作手册,帮助读者快速入门并掌握基本使用技巧。
一、基础操作在开始使用Microsoft Project 2013之前,需要先了解该软件的基础操作。
1. 新建项目打开Microsoft Project 2013后,点击“文件”选项卡,在弹出的菜单中选择“新建”。
在“新建项目”对话框中,输入项目名称、起始日期和截止日期等相关信息,然后点击“创建”。
2. 添加任务和里程碑在左侧任务窗格中,点击“新任务”按钮,或者在某个任务行上点击右键,选择“插入任务”即可添加新的任务。
里程碑是项目中的一个重要节点,通常表示项目中一个重要的阶段或完成一个重要的任务。
在Microsoft Project 2013中,添加里程碑与添加任务类似,只需要在任务名称后面添加“MS”即可。
3. 设置任务属性在任务窗格中,可以设置任务的各种属性,例如任务名称、负责人、起始日期、截止日期、工期、完成百分比等。
在设置任务属性时,需要根据项目实际情况来确定。
4. 设置任务依赖关系任务依赖关系指的是前置任务和后续任务之间的关系。
在Microsoft Project 2013中,可以通过拖拽任务行来设置任务的前置任务和后续任务。
在拖拽任务行时,需要按住Shift键来防止误操作。
5. 设置资源属性在资源窗格中,可以设置资源的各种属性,例如资源名称、资源类型、计量单位、标准费率、加班费率等。
在设置资源属性时,需要根据项目实际情况来确定。
6. 分配资源在任务窗格中,可以将任务分配给对应的资源,并设置该资源的工作量、工作时间等信息。
在分配资源时,需要确保资源的可用性和工作量的合理分配。
7. 设定基准计划基准计划是指项目开始前制定的计划,通常包括各个任务的起始日期、截止日期、工期等信息。

SERENA®DIMENSIONS® RM 2010 R1 Integration Guide for Microsoft® Project Serena Proprietary and Confidential InformationCopyright © 2001–2010 Serena Software, Inc. All rights reserved.This document, as well as the software described in it, is furnished under license and may be used or copied only in accordance with the terms of such license. Except as permitted by such license, no part of this publication may be reproduced, photocopied, stored in a retrieval system, or transmitted, in any form or by any means, electronic, mechanical, recording, or otherwise, without the prior written permission of Serena. Any reproduction of such software product user documentation, regardless of whether the documentation is reproduced in whole or in part, must be accompanied by this copyright statement in its entirety, without modification.This document contains proprietary and confidential information, and no reproduction or dissemination of any information contained herein is allowed without the express permission of Serena Software.The content of this document is furnished for informational use only, is subject to change without notice, and should not be construed as a commitment by Serena. Serena assumes no responsibility or liability for any errors or inaccuracies that may appear in this document.TrademarksSerena, TeamTrack, StarTool, PVCS, Collage, Comparex, Dimensions, RTM, Change Governance, and ChangeMan are registered trademarks of Serena Software, Inc. The Serena logo, Professional, Version Manager, Builder, Meritage, Command Center, Composer, Reviewer, Mariner, and Mover are trademarks of Serena Software, Inc.All other products or company names are used for identification purposes only, and may be trademarks of their respective owners.U.S. Government RightsAny Software product acquired by Licensee under this Agreement for or on behalf of the U.S. Government, its agencies and instrumentalities is "commercial software" as defined by the FAR. Use, duplication, and disclosure by the U.S. Government is subject to the restrictions set forth in the license under which the Software was acquired. The manufacturer is Serena Software, Inc., 1900 Seaport Blvd., Redwood City, CA 94063. Publication date: September 2010ContentsPreface . . . . . . . . . . . . . . . . . . . . . . . . . . . . . . . . . . 5Objective . . . . . . . . . . . . . . . . . . . . . . . . . . . . . . . . . . . . . . . . . . . . .5Audience. . . . . . . . . . . . . . . . . . . . . . . . . . . . . . . . . . . . . . . . . . . . . .5Manual Organization . . . . . . . . . . . . . . . . . . . . . . . . . . . . . . . . . . . . .5Integrating Dimensions RM and Microsoft Project. . . . . . . 7Exporting Data from Microsoft Project . . . . . . . . . . . . . . . . . . . . . . . . .7Configuring a Schema in Dimensions RM . . . . . . . . . . . . . . . . . . . . . . .8Importing Data into Dimensions RM. . . . . . . . . . . . . . . . . . . . . . . . . . .11Importing Data from the CSV File with RM Browser. . . . . . . . . . . . .11Importing Data from the CSV File with RM Concept. . . . . . . . . . . . .11Integration Guide for Microsoft® Project34Serena® Dimensions® RM 2010 R1PrefaceThis document describes the Serena® Dimensions® RM integration with Microsoft®Office Project Professional.The instructions in this document outline how to import data from Microsoft Project intothe Dimensions RM database, update project data in Dimensions RM, and export the databack into Microsoft Project. These instructions assume that you are familiar with MicrosoftProject. If not, consult the documentation provided by Microsoft. These instructions alsoassume that you know how to manipulate Dimensions RM project information. If not,consult the Serena Dimensions RM User’s Guide and the Serena Dimensions RMAdministrator’s Guide.These instructions assume that both Microsoft Project and Dimensions RM are alreadyinstalled on your system. See the Serena Dimensions RM Installation Guide forinformation on installing Dimensions RM.The instructions in this document are provided by Serena Software, Inc. for illustrativepurposes only. The instructions have been verified only for Microsoft Office ProjectProfessional 2003 as made available to Serena. Other versions of Microsoft Project mayintegrate with Dimensions RM in a similar manner, or a different manner, or not at all.Serena makes no representations or warranties regarding Microsoft Project, that theinstructions are valid, or that the instructions are applicable to any other version ofMicrosoft Project.The instructions do not replace the documentation provided by Microsoft for MicrosoftProject. The documentation for Microsoft Project should be your primary source ofinformation regarding Microsoft Project.ObjectiveThe purpose of this book is to describe how to integrate Dimensions RM with MicrosoftProject.AudienceThis document is intended for members of project teams who use Dimensions RM tocreate, manage, and track requirements during the lifecycle of a project. Manual OrganizationThe single chapter in this document describes how to integrate Dimensions RM andMicrosoft Project.Integration Guide for Microsoft® Project56Serena® Dimensions® RM 2010 R1Integration Guide for Microsoft ® Project 7Integrating Dimensions RM and Microsoft ProjectIntegrating Serena® Dimensions ® RM and Microsoft® Project lets you show traceability between the schedule information in your project and the other data that is stored in Dimensions RM.The integration provides the following capabilities:⏹Tracing a particular task through its entire life cycle ⏹Justifying a particular life cycle activity by showing its relationship to a currently scheduled task⏹Performing detailed schedule tracking and impact analysis The integration includes the following steps:1"Exporting Data from Microsoft Project" on page 72"Configuring a Schema in Dimensions RM" on page 83"Importing Data into Dimensions RM" on page 114"When the the update object process finishes, click Finish." on page 14Exporting Data from Microsoft ProjectTo export data from Microsoft Project:1Start Microsoft Project and open an existing project that contains data that is ready to be transferred to Dimensions RM.2Select File > Save As . The Save As dialog opens.3Enter a file name in the File name list.4Select CSV (Comma delimited) in the Save as type list.5Click Save . The Export Wizard starts. Click Next .6Select New Map and click Next . 7The Map Options screen opens. Do the following:⏹Under Select the types of data you want to export , select Tasks .⏹Under Text file options , select the Export includes headerscheck box.IMPORTANT! Before you can save to a CSV file, you may need to set an option to allow Microsoft Project to save to legacy file formats. To do this, select Tools | Options. Then, on the Security tab, select the Allow loading files with legacy or non default file formats option under Legacy Formats .8Serena ® Dimensions ® RM 2010 R18Click Next . The Task Mapping screen opens.9Map the items in the From: Microsoft Office Project Field column to the corresponding items in the To: Text File Field column. These names are exported as the titles of the data columns on the first row of the CSV file.10Click Next . The End of Map Definition screen opens. 11Click Save Map . 12In the Map Name field, enter a name for the map. 13Click Save .14Click Finish when you have finished mapping items. The exported data is saved in a CSV file.You can view the CSV file in any text editor , or in Microsoft® Excel.15Close Microsoft Project. If you are prompted to save changes to the project, click Yes .Configuring a Schema in Dimensions RMTo configure a schema in Dimensions RM:1In RM Manage, select an existing project or create a new project.2Select File > Define Project Schema . The Class Definition tool opens.3Add a Schedule class to the project. 4Activate the Schedule class, if not already activated. To do so, perform the following steps:a Right-click an empty space in the schema diagram.b Select Add Class > Manage class types . The Manage Class Types dialog opens.c Select Schedule and then click OK .5Add relationships between the Schedule class and other pertinent classes.For example, you could create a relationship between the Schedule class and the Tests class. Relationships are intended to show the schedule requirements (cost,duration, task name, and resource) for the products the tasks are associated with.NOTE The mapping should include all columns in your Microsoft Project project, plusthe Unique ID item.IMPORTANT! You may need to set an option to allow Microsoft Project to save to legacy file formats. To do this, select Tools | Options. Then, on the Security tab, select the Allow loading files with legacy or non default file formats option under Legacy Formats .Configuring a Schema in Dimensions RMIntegration Guide for Microsoft ® Project 9The following illustration shows a portion of the schema diagram that contains the Schedule class and its relationship to the Tests class.6Double-click the Schedule class in the schema diagram. The Definition of class dialog opens.7Add attributes to the Schedule class that correspond to the fields in the CSV filegenerated from Microsoft Project, and delete attributes that do not correspond to10Serena ® Dimensions ® RM 2010 R1fields in the CSV file. These are the attributes into which data will be mapped from fields in the CSV file.8Change the date format to match the Microsoft Project date format. To do so, perform the following steps:a In the Definition of class dialog, double-click the Start Date attribute.b Click the Date tab.c In the Display Format field, type DY MM/DD/YYYY .d Repeat this procedure for the Finish Date attribute, and for any other attributes that contain date data.9Edit the Schedule class attribute list to add an Alpha Numberic attribute (A1) with the name Unique ID, as well as any other attributes to store additional Microsoft Project data. The Unique ID field will store the Project Unique ID to allow for consistent data exchange with Mcirosoft Project.10Select File > Saveto save the project schema.NOTE Use alphanumeric (not numeric) attributes wherever a numeric value is to be stored. This prevents Dimensions RM from transforming numeric decimal values into mathematical equivalents that may not be recognized correctly by Microsoft Project during future transfers. An example of such an attribute is an Outline_Numberattribute with a value of 1.2.Importing Data into Dimensions RMImporting Data from the CSV File with RM Browser To import data from the CSV file:1On the Home view, click the CSV Import button. The CSV Import dialog box appears.2In the File Name field, enter or browse to find the CSV file you want to import.3To create new requirements, select Create from the Import Mode list. You can also replace attributes in existing requirements with values from the CSV file. For more on import options for CSV files, see the Dimensions RM User’s Guide.4From the Field Separator list choose Comma .5To limit the range of rows to import, select From from the Rows to Be Imported option and enter the range. Otherwise, leave All selected to imported data from all rows in the file.6Select the File has header row option.7From the Log Level list you can choose the level of detail in the summary report that displays after you start the import. Choose Terse or Verbose .8Under the RM Mapping heading, you must enter criteria to define how data from the CSV file will be imported to Dimensions RM. When you use the Create Import mode, you must map columns from the CSV file to requirements attributes in RM. Data from the columns you select will be imported to the attributes you map the columns to, in the new requirements. First select the requirements class from the RM Class field. Then, select the column from the CSV Column List field and the corresponding attribute from the RM Attribute field. Click the right arrow button to add the mapped pair to the Mapped List field.9Click Import when you have completed the mapping.Importing Data from the CSV File with RM Concept To import data from the CSV file:1In RM Concept, select File > Import CSV Data . The CSV Wizard starts.2In the first wizard screen, do the following:NOTE In the procedures in this section, all data will be imported into the same class. However , subsets of project data from the same CSV file can be imported into different DimensionsRM classes.NOTE Make sure that the Schedule class is not currently in use by other Dimensions RM users. If it is, some class objects could be locked, resulting in import problems.a In the Input File box, browse to the CSV file you saved earlier in MicrosoftProject. Select the file and then click Open. Make sure that File has header row is selected.b In the Import data into drop-down list box, select the Schedule class.c Under Import Mode, select Update/Create when no match found.d Select the Ignore rows matching multiple objects check box.3Click Next to advance to the next wizard screen.4Select Unique ID to identify a unique search key to find matching Dimensions RM objects, and click in the associated Maps to Attribute cell to select theDimensions RM attribute that will map to Name.5Click Next to advance to the next wizard screen.6The mapping between the CSV file columns and the associated object attributes are displayed. If this is not the desired mapping, adjust it by selecting the correctDimensions RM attributes in the Maps to Attribute column.7Click Next to advance to the next wizard screen.8Enter a value in the Default Value column for each mandatory field. Mandatory fields are indicated by a green icon.9Click Next to advance to the next wizard screen.10Click Update Objects.11When the the update object process finishes, click Finish.NOTE Errors in the import process are recorded in a temporary log file. Click View Log File to open the log file.。
MicrosoftProject中显示语言中文设置为英语的方法
工作需要或者原因,电脑中安装的中文版Project需要编制版的进度方案文件。
任务工程设置为英语后,图例、工期天数也可以在Project中修改。
也可以下载语言包修改Project软件的显示语言。
1、在设置前可以先尝试通过设置系统语言为英语后,统一设置Project显示语言为英语。
系统设置完成后,翻开Project,点击“文件”开始设置。
2、点击文件---选项。
3、点击语言,设置按钮、选项卡和帮助的语言与系统一致,重启project后即可显示英语。
因为安装的版本不同,该方法并不适用于一些中文版的Project,但是这个方法操作简便,可以试一下。
4、对于无法通过高级设置进展语言更改的Project,只能通过Project内部的设置,完成大局部显示语言的修改。
首先翻开选项---高级,设置工期天数为英语。
5、打印预览,页面设置,设页眉,页脚为英语。
6、在甘特图的位置,右键---条形图样式,设置图例内容为英语。
7、在条形图样式中,将相应图例的名称改为英语。
以上可以修改页面中的大局部显示语言为英语,其他可以在转为PDF后修改,如开始时间、完成时间。
Microsoft Office Project 2021操作手册目录目录1、启动阶段 (3)1.1、前期准备 (3)、新建工程文件 (3)、设置工程信息 (3)2、方案阶段 (3)2.1、定义资源 (3)2.2、建立任务 (4)、任务列表 (4)、插入周期性任务 (5)、任务日历 (6)、任务工期 (6)2.、建立限制条件 (6)2.2.6、建立依赖关系 (6)2.3、资源分配 (6)3、跟踪阶段 (7)3.1、比拟基准 (7)3.2、跟踪完成进度 (7)4、报告与分析 (7)4.1、盈余分析 (7)5、多工程管理 (7)5.1、创立共享资源 (7)5.2、使用共享资源 (7)6、其它 (7)6.1、如何在“跟踪甘特图〞中显示其它比拟基准 (7)、基准保存技巧 (7)6.4、如何进展方案的调整 (8)6.5、查询可以调整的时间 (8)6.6、关于加班 (8)1、启动阶段1.1、前期准备1.1.1、新建工程文件选择菜单,选择工程模版:1.1.2、设置工程信息自定义日历选择“Project〞下的“Change Working Time〞菜单:工程信息定义在“Project〞中选择“Project Information〞,翻开工程信息窗口,在这个窗口中有几个重要信息要设置:开场日期、排序方法、工程日历:2、方案阶段2.1、定义资源在“Task〞中选择将视图切换为“Resource Sheet〞:资源分三类,分别为“work〞、“Material〞、“Cost〞,三种类型均可以设置为费率;但是只有“Work〞类型有可用数量限制;可以双击翻开资源进展详细设置,比如分时费用,核算方式,可用时间等等。
2.2、建立任务2.2.1、任务列表回到“Task〞的“Gantt Chart〞,输入任务名称建立任务:使用升级与降级的按钮设定任务级别,形成层次关系从而展示任务分解构造,完整的工程可以参见下列图。
2.2.2、插入周期性任务点击“Task〞中“Task〞图标的下拉按钮,选择插入“Recurring Task〞翻开周期性任务对话框:在周期性任务对话框中输入任务名称、周期间隔等信息:2.2.3、任务日历您可以根据任务情况,设定任务的日历。