Odyssey 红外荧光扫描成像系统培训手册1
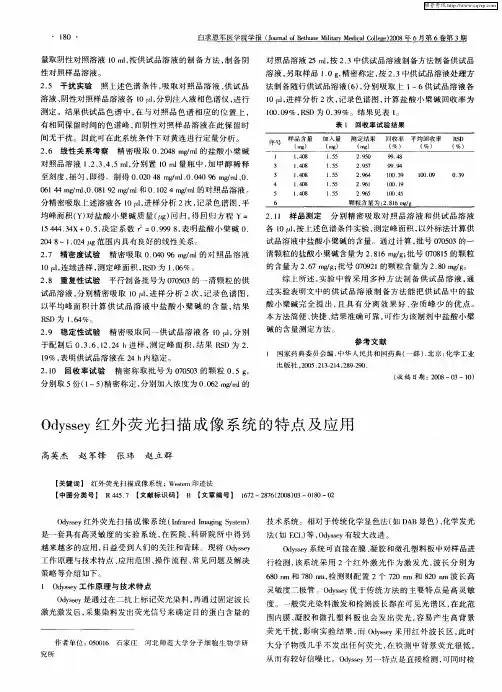
- 格式:pdf
- 大小:1.38 MB
- 文档页数:19

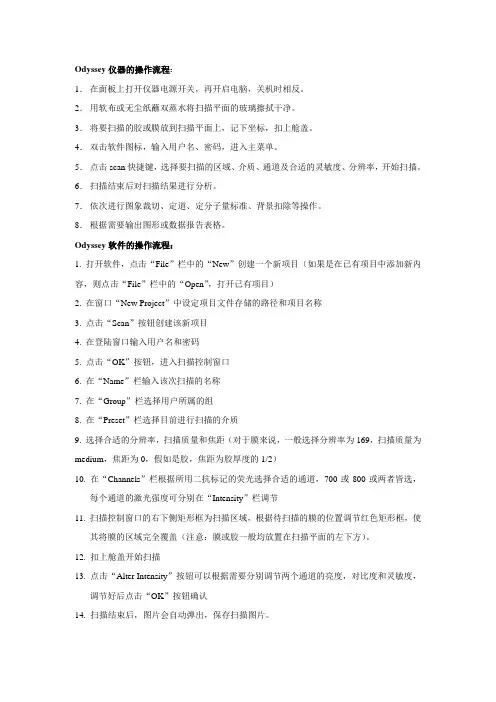
Odyssey仪器的操作流程:1.在面板上打开仪器电源开关,再开启电脑,关机时相反。
2.用软布或无尘纸蘸双蒸水将扫描平面的玻璃擦拭干净。
3.将要扫描的胶或膜放到扫描平面上,记下坐标,扣上舱盖。
4.双击软件图标,输入用户名、密码,进入主菜单。
5.点击scan快捷键,选择要扫描的区域、介质、通道及合适的灵敏度、分辨率,开始扫描。
6.扫描结束后对扫描结果进行分析。
7.依次进行图象裁切、定道、定分子量标准、背景扣除等操作。
8.根据需要输出图形或数据报告表格。
Odyssey软件的操作流程:1. 打开软件,点击“File”栏中的“New”创建一个新项目(如果是在已有项目中添加新内容,则点击“File”栏中的“Open”,打开已有项目)2. 在窗口“New Project”中设定项目文件存储的路径和项目名称3. 点击“Scan”按钮创建该新项目4. 在登陆窗口输入用户名和密码5. 点击“OK”按钮,进入扫描控制窗口6. 在“Name”栏输入该次扫描的名称7. 在“Group”栏选择用户所属的组8. 在“Preset”栏选择目前进行扫描的介质9. 选择合适的分辨率,扫描质量和焦距(对于膜来说,一般选择分辨率为169,扫描质量为medium,焦距为0,假如是胶,焦距为胶厚度的1/2)10. 在“Channels”栏根据所用二抗标记的荧光选择合适的通道,700或800或两者皆选,每个通道的激光强度可分别在“Intensity”栏调节11. 扫描控制窗口的右下侧矩形框为扫描区域,根据待扫描的膜的位置调节红色矩形框,使其将膜的区域完全覆盖(注意:膜或胶一般均放置在扫描平面的左下方)。
12. 扣上舱盖开始扫描13. 点击“Alter Intensity”按钮可以根据需要分别调节两个通道的亮度,对比度和灵敏度,调节好后点击“OK”按钮确认14. 扫描结束后,图片会自动弹出,保存扫描图片。


Odyssey红外荧光扫描成像系统的特点及应用【关键词】红外荧光扫描成像系统 Western印迹法Odyssey红外荧光扫描成像系统(Infrared Imaging System)是一套具有高灵敏度的实验系统,在医院、科研院所中得到越来越多的应用,日益受到人们的关注和青睐。
现将Odyssey工作原理与技术特点、应用范围、操作流程、常见问题及解决策略等介绍如下。
1 Odyssey工作原理与技术特点Odyssey是通过在二抗上标记荧光染料,再通过固定波长激光激发后,采集染料发出荧光信号来确定目的蛋白含量的技术系统。
相对于传统化学显色法(如DAB显色)、化学发光法(如ECL)等,Odyssey有较大改进。
Odyssey系统可直接在膜、凝胶和微孔塑料板中对样品进行检测,该系统采用2个红外激光作为激发光,波长分别为680 nm和780 nm,检测则配置2个720 nm和820 nm波长高灵敏度二极管。
Odyssey优于传统方法的主要特点是高灵敏度。
一般荧光染料激发和检测波长都在可见光谱区,在此范围内膜、凝胶和微孔塑料板也会发出荧光,容易产生高背景荧光干扰,影响实验结果,而Odyssey采用红外波长区,此时大分子物质几乎不发出任何荧光,在检测中背景荧光很低,从而有较好信噪比。
Odyssey另一特点是直接检测,可同时检测两种IRDyes染料的荧光信号。
IRDyes染料最大吸收值与Odyssey两个激发波长相匹配,其发射波长又与Odyssey两个检测波长相匹配,同时发射波长峰值相隔100 nm,这使Odyssey有较大灵敏度和较小信号交叉。
Odyssey系统检测不需要曝光和底物显色,也不需要X光片,操作简便,另外配有功能全面的软件支持,结果分析如生物大分子分子量确定、定量及图像处理也很容易。
Odyssey系统操作简单,双色检测,可一次同时检测两种目的分子,这样更直观、更省时。
由于采用二极管激光器和固态检测器,Odyssey具有更长使用寿命,且维护要求也低。
![Odyssey红外激光成像系统 —蛋白研究的多功能平台[知识荟萃]](https://uimg.taocdn.com/3706d986360cba1aa811dace.webp)

一. Odyssey红外成像系统技术特点一般的荧光染料的激发和检测波长都位于可见光谱区,在此波长范围内,化学高分子物质(膜、胶、微孔塑料板等)也会发出荧光,因此易产生高背景的荧光干扰,从而不能有效用于膜上蛋白或者核酸的直接荧光成像。
而在红外波长区这些大分子物质几乎不发出任何荧光信号,使得红外荧光染料在长波下检测时背景荧光很低,具有很好的信噪比,这一特点使得核酸和蛋白的膜上荧光检测成为可能。
LI-COR根据红外荧光的这一特点开发出Odyssey红外成像系统,独特的采用2个红外激光作为激发光源,以扫描成像方式对样品进行检测。
样品载体可以是膜、凝胶和微孔板。
该系统配置的2个红外激光激发光源,激发光波长分别为680nm和780nm,配置的2个高灵敏度光敏二极管可以分别检测720nm和820nm 的发射荧光,因而Odyssey可同时检测两种IRDyes染料的荧光信号。
IRDyes染料的最大吸收值与Odyssey的两个红外激光器680nm和780nm激发波长相匹配,其发射光波长又与Odyssey的两个光敏二极管检测波长相匹配,与同时IRDye700和IRDye800的发射波长峰值相隔100nm,因此Odyssey可以给出最大的灵敏度和最小的信号交叉。
同时由于采用二极管激光器和固态检测器,Odyssey具有很长的使用寿命(激光器使用寿命约4-6万小时),而系统维护的要求却很低。
该系统可广泛应用于信号传导,蛋白磷酸化分析,In-Cell-Western分析等蛋白领域研究。
主要特点1.高灵敏度,效果同于或者好于化学发光法,但不需信号放大步骤,信噪比高。
2.直接检测,无需曝光和显色底物,不需要X光片,不需要暗房,没有放射性废料产生。
3.双色检测,可以在一次杂交中同时检测两种目的分子,直观,省时。
4.宽广的线性范围,可用于高准确性定量。
5.背景低,图像清晰,激光强度可调,不会丢失弱的信号6.强有力的软件支持,结果分析如确定分子量和定量及图象处理编辑很容易7.系统操作和维护简单Odyssey的应用应用领域:蛋白质研究,核酸研究具体包括:Western分析,In-Gel Western分析,蛋白质定量分析,双色磷酸化分析,考马司亮兰胶的扫描,蛋白双向电泳,双色 EMSA,双色微孔板分析,BD PowerBlot Analysis,Northern Blot,Southern Blot等二.系统安装条件1.位置要求:稳定水平的操作平台放置设备,远离热源,避免阳光直射2.空间及载重要求:操作平台尺寸(长×宽×高):80×70×80cm操作平台载重:40kg3.温度要求:15-25℃4.湿度要求:不超过60%5.电源:90-250V AC,47-63Hz。
付立叶红外光谱仪简易操作手册一、仪器准备打开光学台,预热仪器10分钟,光学台自动调整仪器完毕后→再打开计算机→进入红外光谱测定程序(方法:双击桌面上图标)。
二、背景的测定1、背景的准备将高纯度溴化钾在红外灯下干燥10分钟,取少量放入玛瑙研钵,仔细研磨均匀,直至成粉末状,将少量粉末装入压片机,加压,压力不可大于30MPa,否则将损坏模具,加压至25MPa,静候1min,取出锭片(厚度大概0.8mm),放入样品夹,进行背景扫描。
2、背景的扫描a. 设置背景扫描。
点击“采集”中的“实验设置”,如下图:b.设置背景扫描方式。
进入背景设置界面,选择“指定背景使用时间”,设置使用时间参数,根据自己所测样品时间设置,即在此时间内,背景有效,其余参数可不做变化,如图,点击确定。
背景扫描。
三、样品的测定 1、样品的准备a 、固体样品:取约150mg 干燥的KBr 和1~2mg 待测样品于玛瑙研钵中混合均匀,充分磨细,压成薄片。
b 、液体样品:取少量KBr 研磨,压成薄片后,在表面均匀滴上一滴待测样品。
2、样品的扫描a.将压好的样品放入红外仪,点击“样品扫描”可进行样品扫描,如下图。
b.更改谱图名称。
在对话框里输入文件名可更改谱图名称,然后点击“确定”,如图:更改谱图名称c.如下图红箭头标示,为样品采集状态:d.查看采集状态。
点击对话框中“是”将谱图加到window 1临时窗口查看谱图。
e.将透过率转化为吸光度。
点击“Abs”图标,可将谱图以吸光度表示。
f.校正基线。
点击“自动基线校正”图标,进行基线校正(此步骤只可在吸光度下进行)。
g.下图中,紫色谱图为基线调整前的图。
掉多余的谱图。
i.以透过率表示谱图。
点击“透过率”图标,将谱图装化为透过率,如下图:的效果。
k.根据谱图的具体情况,选择需要平滑的点数,点数越大,平滑的效果越好。
l.选中没用的谱图,将其删去。
m.标峰。
点击“标峰”——“替代”,可对谱图进行自动标峰,也可点击坐下角的“T”图标,进行手动标峰。
Odyssey 红外荧光扫描成像系统培训手册二oo三年九月目录一、Odyssey红外成像系统技术特点二、系统安装条件三、Western实验所需试剂设备及样品四、培训程序及时间安排五、仪器及试剂系统介绍六、Western实验操作流程介绍七、软件使用培训八、常见问题处理九、注意事项一、Odyssey红外成像系统技术特点一般的荧光染料的激发和检测波长都位于可见光谱区,在此波长范围内,化学高分子物质(膜、胶、微孔塑料板等)也会发出荧光,因此易产生高背景的荧光干扰,从而不能有效用于膜上蛋白或者核酸的直接荧光成像。
而在红外波长区这些大分子物质几乎不发出任何荧光信号,使得红外荧光染料在长波下检测时背景荧光很低,具有很好的信噪比,这一特点使得核酸和蛋白的膜上荧光检测成为可能。
LI-COR根据红外荧光的这一特点开发出Odyssey红外成像系统,独特的采用2个红外激光作为激发光源,以扫描成像方式对样品进行检测。
样品载体可以是膜、凝胶和微孔板。
该系统配置的2个红外激光激发光源,激发光波长分别为680nm和780nm,配置的2个高灵敏度光敏二极管可以分别检测720nm和820nm的发射荧光,因而Odyssey可同时检测两种IRDyes染料的荧光信号。
IRDyes染料的最大吸收值与Odyssey的两个红外激光器680nm和780nm激发波长相匹配,其发射光波长又与Odyssey的两个光敏二极管检测波长相匹配,与同时IRDye700和IRDye800的发射波长峰值相隔100nm,因此Odyssey可以给出最大的灵敏度和最小的信号交叉。
同时由于采用二极管激光器和固态检测器,Odyssey具有很长的使用寿命(激光器使用寿命约4-6万小时),而系统维护的要求却很低。
该系统可广泛应用于信号传导,蛋白磷酸化分析,In-Cell-Western分析等蛋白领域研究。
主要特点1.高灵敏度,效果同于或者好于化学发光法,但不需信号放大步骤,信噪比高。
Scout II®Series Thermal Imager Operator’s Manual© 2015 FLIR Systems, Inc. All rights reserved worldwide. No parts of this manual, in whole or in part, may be copied, photocopied, translated, or transmitted by any electronic medium or in machine readable form without the prior written permission of FLIR Systems, Inc.Names and marks appearing on the products herein are either registered trademarks or trademarks of FLIR Systems, Inc. and/or its subsidiaries. All other trademarks, trade names, or company names referenced herein are used for identification only and are the property of their respective owners.This product is protected by patents, design patents, patents pending, or design patents pending.If you have questions that are not covered in this manual, or need service, contact FLIR Systems, Inc. customer support at 805.964.9797 for additional information prior to returning a camera.This documentation is subject to change without notice.Proper Disposal of Electrical and Electronic Equipment (EEE)The European Union (EU) has enacted Waste Electrical and Electronic Equipment Directive 2002/96/EC (WEEE), which aims to prevent EEE waste from arising; to encourage reuse, recycling, andrecovery of EEE waste; and to promote environmental responsibility.In accordance with these regulations, all EEE products labeled with the “crossed out wheeled bin”either on the product itself or in the product literature must not be disposed of in regular rubbish bins, mixed with regular household or other commercial waste, or by other regular municipal waste collection means. Instead, and in order to prevent possible harm to the environment or human health, all EEE products (including any cables that came with the product) should be responsibly discarded or recycled.To identify a responsible disposal method where you live, please contact your local waste collection or recycling service, your original place of purchase or product supplier, or the responsible government authority in your area. Business users should contact their supplier or refer to their purchase contract.Important Instructions and Notices to the User:Modification of this device without the express authorization of FLIR Commercial Systems, Inc. may void the user’s authority under FCC rules to operate this device.Note 1: This equipment has been tested and found to comply with the limits for a Class B digital device, pursuant to Part 15 of the FCC rules. These limits are designed to provide reasonable protection against harmful interference in a residential installation.This equipment generates, uses, and can radiate radio frequency energy and, if not installed and used in accordance with the instructions, may cause harmful interference to radio communications. However, there is no guarantee that the interference will not occur in a particular installation. If this equipment does cause harmful interference to radio or television reception, which can be determined by turning the equipment off and on, the user is encouraged to try to correct the interference by one or more of the following measures:• Reorient or relocate the receiving antenna;• Increase the separation between the equipment and receiver;• Connect the equipment into an outlet on a circuit different from that of the receiver; and/or• Consult the dealer or an experienced radio/television technician for help.Industry Canada Notice:This Class B digital apparatus complies with Canadian ICES-003.Avis d’Industrie Canada:Cet appareil numérique de la classe B est conforme à la norme NMB-003 du CanadaFLIR Systems, Inc.Table of ContentsIntroduction. . . . . . . . . . . . . . . . . . . . . . . . . . . . . . . . . . . . . . . . . . 4 Scout II Series Camera Features. . . . . . . . . . . . . . . . . . . . . . 5 Getting Started . . . . . . . . . . . . . . . . . . . . . . . . . . . . . . . . . . . . . . . 6 Charging the Camera. . . . . . . . . . . . . . . . . . . . . . . . . . . . . . . 7Using USB/Analog Video Adapter Cable—Scout II 320 only8Scout II Series Power Management . . . . . . . . . . . . . . . . . . . 8Scout II/LS-X/LS-XR/Ocean Scout End User Tool. . . . . . . . 9 Operating Your Scout II Series Camera . . . . . . . . . . . . . . . . . . 10 Camera Features and Controls . . . . . . . . . . . . . . . . . . . . . . 10Buttons and Controls . . . . . . . . . . . . . . . . . . . . . . . . . . . . . . 10Battery. . . . . . . . . . . . . . . . . . . . . . . . . . . . . . . . . . . . . . . . . . 12Auto Shutdown Operation . . . . . . . . . . . . . . . . . . . . . . . . . . 12 Technical Data . . . . . . . . . . . . . . . . . . . . . . . . . . . . . . . . . . . . . . 13 Scout II Series Model Features . . . . . . . . . . . . . . . . . . . . . . 13Important Safety Instructions•DO NOT DISASSEMBLE THE DEVICE.•Read and follow all instructions•Heed all warnings•Only use the attachments/accessories specified by themanufacturer•All service must be provided by the manufacturer Battery Safety InformationThe Scout II Series camera is a sealed unit with sensitive electronics and contains no user-serviceable parts. Service or repair is to be performed only by the manufacturer. The camera unit must not be opened or modified by the user or owner in any manner or for any reason.The battery used in this device may present a risk of fire or chemical burn if mistreated. Do not disassemble the camera, store above 60°C, or incinerate. The battery is factory replaceable only; return the camera to the manufacturer for battery replacement.1Introduction1IntroductionFLIR’s Scout II Series thermal handheld cameras give hikers, hunters, and outdoorsmen the abilityto see clearly in total darkness, providing a wealth of information during any nighttime excursion.The Scout II Series camera enables the outdoorsman to:•See animals and difficult terrain in reduced visibility or total darkness•See through smoke, dust, and light fog•See camouflage and foliage in any lighting conditions•See more—and see farther—than with low-light night vision gogglesThe Scout II Series camera makes images from heat, not light, a feat impossible for the naked eyeor even image intensified (I2) night vision devices, which means you can see clearly even withoutany visible light at all. People, animals, and objects all make their own heat and their own contrast,and are clearly seen by the Scout II Series camera in even the most adverse conditions.Visible ImageScout II Series Camera Image1Introduction1–1Scout II Series Camera Features•Rugged design—Built to withstand the demands of outdoor use.•Microbolometer sensor for excellent image quality and clarity•336×256 pixel resolution, 17° horizontal field of view—Scout II 320•240×180 pixel resolution, 24° horizontal field of view—Scout II 240•Palm-Sized Portability and Light Weight—Only 12 Ounces•Embedded LED T ask Light•USB Cable for battery charging•USB/Video Adapter Cable for video out—Scout II 320 only.•Rechargeable Internal Li-Ion battery—Provides up to 5 hours of camera operation on asingle chargeCaution!Do not disassemble the camera enclosure. Disassembly can cause permanent damageand will void the warranty.Do not point the camera directly at extremely high-intensity radiation sources, such asthe sun, lasers, arc welders, etc.Be careful not to leave fingerprints on the camera’s infrared optics. Clean only with lowpressure fresh water and a lens cloth.2G etting Started2Getting StartedThe Scout II Series camera is available with the features, options, and accessories described in this manual.Refer to the packing list enclosed with your camera shipment to determine the actual contents of your camera package.In addition to the camera and Quick Start card; the following items are included in the camera package:The following optional accessories are available for the Scout II Series cameras.USB CableWristLensUSB/Video AdapterCoverStrapCable—Scout II 320 onlyMolle-CompatibleBelt Holster USB Power Adapter SetFloating LanyardCamera Carrying Pouch2–1Charging the CameraCaution!The camera battery should be fully charged prior to use. To charge the camera, lift the cover from the USB port, plug in the USB cable provided with the camera, and plug other cable end into a USB power source.•When charging correctly, the charging indicator will be lit orange.•When fully charged, the charging indicator will light solid green. The initial charge time is approximately 5 hours.To assure proper charging, Scout II Series cameras should be turned OFF throughout the charging cycle. Charging MUST only be done when the camera temperature is from 0 to 40°C (32 to 104°F), or battery damage may B portPlug in USB Charger Charging indicator greenCharging indicatorwhen fully chargedorange when charging2–2Using USB/Analog Video Adapter Cable—Scout II 320 onlyTo obtain analog video out, insert the adapter cable into the USB connector. The camera will detect the adapter cable and provide the video stream. Use an RCA cable to connect to a monitor or a video recorder.When using the USB/Analog Video Adapter cable to record video or supply video to a remote monitor, it may be useful to turn off the Auto Shutdown feature of the camera.2–3Scout II Series Power ManagementY our Scout II Series camera is equipped with a power management system that provides up to five hours of continuous operation. When left in the Off state the battery will hold a charge for up to two months. To make the best use of the camera it is important to understand the basic power states of the camera.•When the camera is turned on from the Off state, it takes about five seconds to become operational. During the Bootup process, the FLIR splash screen is shown and then the software version is displayed briefly. Pressing the Power button will toggle the camera between On and Off.•The camera shuts down after about five minutes if no buttons are pushed. Auto shutdown 30s , is shown in the display, and after counting down for 30 seconds the camera will shutdown.Camera StateHow do you know?OffThe display is off and the T ask Light comes on when the Brightness button is pressed.On The display is on and the LED T ask Light is disabled. If the image appears blank, make sure the lens cover is removed.USB/VideoCustomer suppliedadapter cableRCA cable2–4Scout II/LS-X/LS-XR/Ocean Scout End User ToolThe Scout II/LS-X/LS-XR/Ocean Scout end user tool is a graphical user interface (GUI) that is used with the following FLIR handheld thermal imaging cameras:•Scout II Series•LS Series•Ocean ScoutThese cameras are similar in design and may be referred to generally as “Cayman” cameras. The software allows a user to make minorconfiguration changes to one of thesecameras. For example, a user can turncamera sounds on or off, or change theamount of time before the camera shutsdown automatically. The tool can also beused to perform a camera firmwareupgrade if one becomes available in thefuture.To download the GUI, go to http://id=53129, select the end user toolunder Software to download.Select Configuration to read camerasetting and make changes to availablecamera features.3Operating Y our Scout II Series Camera3Operating Your Scout II Series Camera3–1Camera Features and Controls3–2Buttons and ControlsPower ButtonTurn the camera On and Off.Display Brightness ButtonUse this button to cycle through the five levels of display brightness. Each press of the button advances to the next level of brightness.When the highest brightness level is reached, subsequent button presses advance to the next lower brightness levels. When the lowest brightness level is reached, subsequent button presses advance to the next higher brightness level. One of the following icons is displayed for approximately 3 seconds after the button is pressed indicating the current brightness level:NoteWhen the Scout II Series camera is powered Off, the Display Brightness button, when held on, turns on the LED Task Light.Power2× zoom/White hot/Display Brightness/EyepieceAdjustable LED Task Light USB/Charging/Analog video out of USB port (Scout II 320 only)(Task Light On/Offwhen Camera is off)Freeze Frame DiopterBlack hot/Instalert HighestLowestWhite Hot/Black Hot/InstAlert™ ButtonUse this button to toggle between the two video and the four InstAlert™ colorpalettes. In the default White Hot palette, hotter objects appear as white or light grey.In Black Hot, hotter objects appear as black or dark grey. In the InstAlert™ palettesthe hottest objects in the scene are highlighted in red to simplify detection ofanimals, people, and objects. There are four pre-set levels of InstAlert™ that you can select based on the specific scene being viewed. All of the InstAlert™ palettes are based on the white hot palette.While white hot is the most commonly used and visually intuitive method of viewing thermal imagery; black hot can often enhance contrast of certain objects or provide better visual perspective in some conditions. When switching between palettes, the appropriate icon is displayed for approximately 3 seconds.Zoom Button—Scout II 320 onlyUse this button to switch the camera between no zoom (full resolution) and 2×zoom. The central part of the image is magnified twice its normal size when 2× isselected.When zoom has been selected the icon is continuously shown in the display:Freeze Frame Button—Scout II 240 onlyUse this button to freeze the video so that a single frame may be inspectedclosely.Diopter ControlsThe diopter adjustment lever allows you to adjust for optimum image sharpness in the eyepiece. When the diopter adjustment lever is pointing straight away from the front of the camera, it is in the neutral position. Adjust the diopter setting for the sharpest image in the viewfinder.Black hotWhite hot InstAlert™ 1 – 4Adjustable Diopterneutral position3–3BatteryY our Scout II Series camera is equipped with a sophisticated power system using a rechargeable internal Li-Ion battery.Battery Status IndicatorWhile the camera is On, a battery status indicator is always shown in the corner of the display image. This indicator provides an estimation of the remaining battery charge. 3–4Auto Shutdown OperationAuto Shutdown is a feature of the Scout II Series camera that helps to guard against draining the battery prematurely by inadvertently leaving the camera on.Auto Shutdown turns the camera off if the following conditions are met:•The camera is On•No buttons have been pressed for about five minutes.Once these conditions are met you will see the following message in the display: Auto shutdown 30s , and after counting down for 30 seconds the camera will shutdown.Press any button during this countdown to terminate Auto Shutdown and resume normal operation. NotePressing any button during an Auto Shutdown countdown will only terminate the countdown and abort the shutdown. The normal function of the button will not occur.full charge half chargeplugged in4T echnical Data4Technical Data4–1Scout II Series Model FeaturesPowerScout Model Scout II 240Scout II Series Handheld Thermal Camera with video resolution of 240 × 180 pixels with freeze frame capability.Scout II 320Scout II Series Handheld Thermal Camera with video resolution of 336 × 256 pixels with 2× digital electronic zoom.Included with all camera modelsLens Cover, USB Cable, Wrist Strap, Operator’s Manual, and Soft Carrying Pouch FeatureStart up< 5 seconds Thermal Sensitivity,Waveband< 50 mK @ f/1.0,7.5 µm to 13.5 µm Detector T ypeVOx Microbolometer Scout II 240—240 x 180 pixels Scout II 320—336 x 256 pixels Resolution / Display640x480 pixels LCD Scout II 240, < 9Hz Refresh rate;Scout II 320, < 9Hz Refresh rate Video OutputNTSC/PAL switchable using GUI available from FLIR website. (Scout II 320 models only—Composite video out through USB port via USB/Video Adapter Cable to customer supplied RCA cable.)Image ProcessingFLIR Proprietary Digital Detail Enhancement Focus, ZoomFixed focus (Scout II 320 models only—2x electronic zoom)Display PalettesWhite Hot, Black Hot, InstAlert ™; selectable T ask LightLED enabled during power off stateBattery T ypeInternal Li-Ion Battery Life Operating Greater than 5 Hours at 25°C4Technical DataEnvironmentalPhysicalField of View Range Detection1Scout II 240 and Scout II 320Camera OperationalTemp.-4°F to 122°F (-20°C to 50°C)Storage Temp.-40°F to 140°F(-40°C to 60°C)Ingress Protection Rating IP-67, submersible up to 1 meterDrop Test Rating 1 meter dropScout II 240, Scout II 320Weight, including lens12 oz. (340 g)Size (L × W × H) 6.70” × 2.31” × 2.44”(172 × 58.7 × 62 mm)Scout II 240, Scout II 320Field of View (FoV)Scout II 240: 24° × 18° NTSCScout II 320: 17° × 13° NTSCDetect Man (1.8 m × 0.5 m)Scout II 240383 yd. (350 m)Scout II 320600 yd. (550 m)1.Actual range may vary depending on camera set-up, environmental conditions, and userexperience.。
第一章红外乳腺诊断仪的仪器组成1.原理框图发射红外线摄取图像图像处理2.诊断原理红外线乳腺诊断仪主要是通过红外探头发射红外线穿透乳房,由于不同的组织对红外光的吸收程度不同,如:癌可优先吸收红外光,而良性病变吸收红外光较少,故恶性区比良性区吸收更多的红外线,通过高灵敏度的摄像机呈现在荧光屏上的图像也不相同,因此根据图像的异同来诊断疾病。
第二章红外乳腺诊断仪的使用第一节使用环境电脑彩色乳腺诊断仪属精密电子仪器,价格较贵,为了提高诊断率、延长仪器的使用寿命,对使用环境要求如下:1、光线:此检查是用光源探头对乳腺组织进行透视扫描,经过图像处理显示的屏幕上。
检查应在暗室中进行。
室内光线太强时,乳腺表面的光线将透进乳腺的部分光线抵消,从而不能有效地显示灰影,尤其可以掩盖浅灰影,而且太强的光线也可干扰视觉对屏幕的观察。
但是,室内光线太暗时,对操作不利,所以,可以让少量光线进入室内,以便操作及其它活动。
2、清洁:室内空气中尘埃过多,落入机内,日久会造成电气事故,损坏仪器。
所以,室内应适量减少流动人数,清洁地面勿干扫,最好用吸尘器。
因湿扫可增加室内湿度,对仪器也不利。
3、温度:电脑彩色乳腺诊断仪的使用环境温度在10-40℃,但是,由于受检者在检查时暴露较多,温度太低易造成受凉,而室温超过30℃时,又会使人感到闷热、易出汗,不利检查。
所以,诊断室的温度以30℃左右为宜。
最好能装置空调。
4、湿度:乳腺诊断室湿度不应超过80%(相对湿度),否则会降低仪器零部件、元件的绝缘电阻,对电压很高的部件甚至会造成危险;高湿还会引起仪器金属部分的锈蚀,加速仪器损坏。
5、供电:乳腺诊断仪的工作电压为220V±10%,电源电压不应波动过大,控制在使用电压的±5%范围为最好,不能超过±10%,否则会严重影响仪器的工作性能,甚至会烧坏仪器。
因此,必须配备功率适当的交流稳压器,并且在同一线路上应避免大功率电器,否则当大功率电器开关时,会影响仪器的图像。