PKS配置冗余服务器
- 格式:pdf
- 大小:437.24 KB
- 文档页数:12

PKS硬件配置说明书(1)PKS, 说明书, 硬件XXX DCS项目采用美国Honeywell公司的Experio TM KS分布式控制系统,实现对过程数据的高性能采集、控制和监视。
系统的结构采用冗余服务器、冗余控制网络以及冗余电源的模式,其中包括2台工程师站、4台操作员站、C200过程控制器和过程I/O接口。
工程师站主要用来实现对系统的配置与组态,同时作为系统的数据服务器实现对过程数据的保存以及存档。
操作员站是最重要的人机交互界面,主要用于对生产现场的监视和管理。
其中一台工程师站兼做操作员站使用。
C200控制器由机架、电源、控制器处理模件(CPM)、ControlNet接口,冗余模件和I/O连接模件所组成,完成对过程的控制、与过程I/O接口的通信,通过监控网络将数据传送到服务器等功能。
过程I/O接口主要包括接线端子、输入/输出(I/O)卡件和连接电缆等,主要实现对数据的采集、处理和工程单位的变换。
Experio TM KS系统的网络由上到下分为信息网络、监控网络和I/O网络三个层次。
信息网络用于操作员站与工程师站的通讯;监控网络实现C200控制器与服务器的互连;I/O网络实现C200控制器与PM I/O模件的通讯以及PMI/O模件与现场接线端子FTA的联系。
2 硬件配置说明2.1 工程师站本系统工程师站采用冗余服务器的配置,总体硬件配置情况如下:名称型号数量服务器DELL oweredgeSC1420 1GBRAM 73G CI HDD DVD-RW 2显示器DELL 19"Ultrashar am #8482;液晶显示器 2键盘 DELL /2 104-key 2鼠标 DELL U 2交换机 3COM 3C16974 1交换机华为S1008D 1网络适配卡 DCN-530TX 2PCIC卡 TC-PCIC01K 2服务器软件环境:操作系统 Window 2000 erver 英文版应用软件 Experio K R2012.2 操作员站本系统提供五台操作员站,其中一台工程师站兼做操作员站使用。

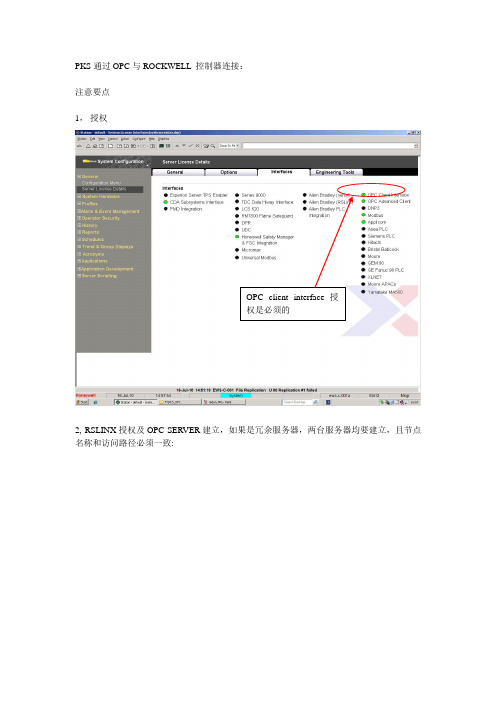
PKS通过OPC与ROCKWELL 控制器连接:注意要点1,授权OPC client interface 授权是必须的2, RSLINX授权及OPC SERVER建立,如果是冗余服务器,两台服务器均要建立,且节点名称和访问路径必须一致:Rslinx要PROFESS以上,最好是GA TEWAYRslinx建好OPC 节点3,Windows及DCOM配置,详细见附件“OPC_and_DCOM_5_things_you_need_to_know.pdf”4,PKS点击最右下角,以MNGR登陆,默认登陆密码”mngr”,这个是在安装PKS时设定与Windows系统账户和PKS操作员账户均不一样。
5,如果没有账号登入到STUDIO,可在STATION进入OPERATOR界面,建立账户:切换到分配画面后,权限改为“Full access”级别调到最高这个不选6,登陆到STUDIO选择以传统操作员权限登陆,这是指老版本的登陆方式7,在STUDIO里面Control Strategy建立channel(也就是以前的quickbulider):填入两台服务器名称,也可用IP,但如果服务器有双网卡,最好使用服务器名称这里必须填入“rslinx remote opcserver”,大小写无所谓8,建立controller这里要输入没什么特别设置9,建立POINT这里要注意寻址格式10,download到服务器数据库,与早版本的quickbuilder是一样的:11,Station可监视channel,controller状态:12, 以及point状态:13,也可做到历史记录中去:14,以及趋势组态:15趋势显示16,服务器冗余状态:OPC 测试的数据中断约10~15秒,应该与切换过程中其他控制器数据一样:。

今天教大家部署冗余服务器,什么是冗余?多余的意思,这里的意思可不是搞个多余的服务器啊说白点就是备份、辅助服务器。
现在的企业一般怎么说也有2个服务器或者多个服务器吧如果该企业里面期中一个服务器出了问题那就会影响到企业的运营,所以我们要搭建一个备份、辅助服务器来防止意外发生,一旦主服务器出了问题那么辅助服务器就替换角色。
网络拓扑:AD、wins、DHCP、DNS4个服务。
cfanclub1服务器IP地址:172.18.1.1cfanclub2服务器IP地址:172.18.1.2客户机地址IP:2个服务器提供教程目的:cfanclub1服务器出问题后,cfanclub2服务器替补继续为客户机提供服务。
设置主服务器的IP地址,wins地址。
记得设置好计算机名。
开始--控制面板--添加程序--添加或删除组件---网络服务--勾选wins服务、DHCP服务、DNS服务开始--管理工具--管理您的服务器--添加角色。
添加域控制器下一步选择新的域控制器选择新林中的域输入一个域名默认下一步路径选择,这个随便你。
我一般是默认。
选择配置DNS服务器下一步选第二项下一步输入还原密码下一步。
下一步等待完成,需要启动进入管理你的服务器,选择DNS服务器。
展开目录,反向查找区域--右键新建区域。
下一步。
选择主要区域和下面的域控存储区域。
选择第三个。
输入你的网络号选择只允许域控的动态更新。
OK完成。
接着在设置DHCP服务器展开服务器右键--授权接着右键新建作用域下一步。
随便你命名。
输入客户端获取的IP范围,我这里是1.10-1.20范围排除不想被获取的个别IP,这个按照自己情况设置。
可以直接下一步。
IP租期微软给的最大是8天,这个按照你实际情况设置,我一般是默认。
网内不同MAC的主机频繁从网络中退出或是加入哪么租期就要短。
反之主机在网内的存在比较恒定哪么租期长就好了选择是,我想现在配置。
配置网关地址,如果你的环境是允许上网的那么这里一定要配置正确,我这里不能上网所以就配置了服务器的IP地址。

对于正在运行的DCS系统装置来说,各个节点之间的时钟同步是非常重要的,假如各个节点的时间不一致,那么当装置出现故障的时候,我们无法准确的去判断故障发生的时间,给后续的事故事件分析带来了极大的不便。
因此,我们一定要做好DCS系统的时钟同步,本文以霍尼韦尔PKS系统为例,讲述一下时钟同步的方法,主要分为两种情况,第一就是没有外部时钟源,第二是有外部时钟源,如GPS。
首先说第一种情况,如果没有外部时钟源作参考,那么我们就以PKS系统的服务器作为时钟源,其他各个节点都去同步服务器的时间就可。
示例中两台冗余服务器,服务器A(IP:192.168.10.129)和服务器B(IP:192.168.10.131),我们把A服务器作为时钟源的主服务器,B服务器作为时钟源备用服务器,剩余的操作站(包括F站和C 站)作为时钟同步的客户端(Client),步骤如下:在服务器A上用管理员权限打开时钟源配置文件ntpconfg软件(路径为C:\Program Files(x86)\Honeywell\Experion PKS\Utilities\NTPSetup),如下图所示,将服务器A设置成时钟源的主服务器,点击Setup Athoriative/Root Server即可。
同样,在服务器B上相同的路径,以管理员的权限运行ntpconfg软件,打开下图所示的界面,将服务器B设置成四种同步的备用服务器,点击Setup Secondary Server,在弹出的对话框中,将服务器A的IP地址输入到UP-Stream Time Source后的输入框中,点击OK保存即可,这样备用服务器就设置完成了。
最后我们所要做的是在每台操作站上进行同步,具体步骤如下:在每台操作站相同的路径下,以管理员的权限打开ntpconfg,我们需要将每一台操作站都设置成时钟同步的客户端,点击Change/configure Client,在First NTPServer和Second NTP Server中分别输入服务器A和B的IP地址,点击OK保存,这样客户端局配置完成了。
Honeywell公司PKS系统介绍1 引言美国Honeywell公司曾成功推出TDC, TPS和PlantScape等多套DCS系统,PKS(Process Knowledge System)系统是Honeywell公司几年前推出的新一代控制系统,它继承了传统DCS 的优点,同时又融合新的技术突破,是一套比TPS及PlantScape系统更趋完善的控制系统。
本文将简单介绍PKS系统的结构构成及其强大的功能特点。
2 PKS系统的网络结构PKS系统可看作由3层控制网络构成,结构如图1所示。
第1层称为以太网,该层网络以服务器(Server),操作站(Station)为主要节点。
服务器与操作站之间采用Client/Server结构,每台Server提供模拟点、状态点和累积点多达2万多个集成点,可实时采集各种过程装置实时信息。
Station则提供了视窗化人机界面和强大的报警管理功能及丰富的应用开发功能,具有完善的系统管理维护和监控功能,并采用ACTIVE X编程语言,使用ODBC进行SQL数据交换。
因为操作站与现场控制站的控制器并没有直接相连,它们之间的数据交换是通过服务器进行的,因此操作站要实时访问服务器的数据库,以完成对整个生产过程的监控。
第2层控制网络称为监控网,该层网络的主要节点是服务器(Server)和控制器(CPM)。
其中CPM广泛采用C200系列混合控制器(Hybrid Controller),具有过程控制要求的连续调节、批处理、逻辑控制、顺序控制、连锁等综合控制功能。
监控网的相关硬件为PCIC卡,该卡件直接插在服务器主板上,协调外围设备之间的通讯,即服务器与控制站之间通过PCIC 卡完成数据交换。
第3层控制网络称为I/O控制网,该层的主要节点是控制器和输入输出卡件。
它们均采用模块化结构,配置灵活,各卡件均可以进行带电热插拔,不会对系统的运行造成任何影响。
I/O卡件是控制器的输入输出接口,可以进行模拟量(-10~+10V、0~+5V, 0~+10V,4~20mA、0~10mA)和开关量(24~220V AC、24V DC、10~30V DC、48V DC、125V DC)的输人输出。
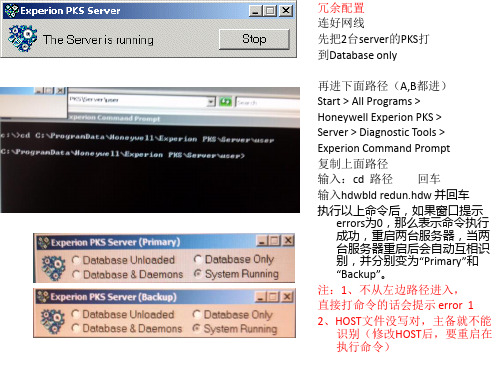
Note1:In this version, if you want to use the NIC on main board and a single identical NIC, please use the manual.Note2:Everyone must be obey the rules of anti viruses and manages our files and programs.PKS Installation1.Install the Win2k server:a.Please check your computer name (XXA,XXB).b.Be sure Video display:1024x768 pixels.c.Be sure your redundant server administrator password is identical.d.Install Win2K sp4 Patche. Installing the PCIC driversPrerequisitesExperion PKS R201 Applications Software CD.To install the PCIC drivers:Step Action1 Insert the Experion PKS R201 Applications Software CD into the CD-ROMdrive.2 In the Computer Management dialog box, right-click in the pane displaying thedevices, and then click Scan for Hardware Changes.3 Click Other Device and then click Reinstall Driver.4 Click Next to start installing the driver.5 Click Display a list of the known drivers for this device so that I canchoose a specific driver and then click Next.6 Click Other Device.7 Click Have Disk to display the Install from Disk dialog box.8 Click Browse and then browse to the following folder on the CD:\RSLinx\RSLinx\pnp_Drivers\Win2k\1784-PCIC(S)9 Click OK.10 Click A-B 1784-PCIC(S).11 Click Next.12 Click Yes in the update driver warning message dialog box.13 Click Next.14 If a confirm file replace message dialog box is displayed, click Yes to continuethe installation.15 Click Finish to complete the installation.f.Verifying the PCIC driverTo verify if the PCIC driver is installed:Step Action1 On the Windows Desktop, right-click on the My Computer icon and chooseManage.2 Click the Device Manager item.3 If the A-B Virtual Backplane item does not exist, Install the PCIC drivers onpage 430.4 In the Computer Management dialog box, expand the A-B Virtual Backplaneitem.5 Double-click the A-B 1784-PCIC(S) item to display the Properties dialog box.6 Click the Driver tab and then click Driver Details.7 Click the ABPCICSW.sys file in the Driver files list.8 Review the file version displayed below the Driver files list.9 The file version must be 3.6.18 WDM. If it is not, you need to update the PCICdriver: continue to 431.10 Click the VirtualBackplane.sys file in the Driver files list.11 Review the file version displayed below the Driver files list.12 The file version must be 1.9. If it is not, you need to update the PCIC driver:continue to 431.13 If both of driver files are the correct versions, click OK to close the Driver FileDetails dialog box, the click OK to close the Properties dialog box, and thenclose the Computer Management dialog box.2.IP settings (refer to the network design)3.Installation of PKS:with administrator logon, first insert the Base CD, then begin.! Be careful of remembering that our User name: mngr; password :mngr12 ! Remember to restart the computer after complete PKS installation!4.Patch installation:successfully installed.Start the PKS server to “System Running” statusAt ServerB only6. Run the DB Admin, in the right pane, click Enable Replication icon andthen click Yes when prompted "Are you sure you want to Enable databasereplication?"At both ServerA and ServerB7 Start the server into running.4.2 To complete the mandatory preparation at ServerA & ServerBTo remove Honeywell_HCI_Runtime and Honeywell Packaged Redistributable Files if exist. Step Action1. Stop the server and unload the database:Mode2. Insert the Experion PKS R201 Support Software CD into the CD-ROM.In Windows Explorer, browse to the Utilities folder on the CD and thendouble-click the hprf.reg file.3. Choose Start > Settings > Control Panel and double-click theAdd/Remove Programs icon.Click Honeywell_HCI_Runtime or HCI_Runtime and then clickRemove. Click Yes to confirm removalClick Honeywell Packaged Redistributable Files and then clickRemove. Click Yes to confirm removal.4. Shutdown and restart the computer.Installing Honeywell System Management DisplayInsert the Experion PKS Common Components CD into the CD-ROMdrive. It will auto run.Install the Honeywell Packaged Redistributable Files from the Platformmenu from the Common Components screen. Then rebootInsert the Experion PKS Common Components CD into the CD-ROMdrive. It will auto run and select Licensed Package Installer from theCommon Components CD.Review the information about installing software, license agreements, andthird-party compatibility on the next several screens. Click Next tocontinue.Enter license and authorization number as shown in the below of EPKSServer License Certificate. Click Next to continue.Select Honeywell System Management Display and click InstallPackage button.After a successful installation, click Exit and OK to end the Installationprocess.Manually reboot your computer.Install and Configure of FTE Node Components:(i) Configure the connection speed for NIC card (FTE node ports)1. Right-click My Network Places and select Properties.2. The status should now be as shown Network and Connections dialogRight-click the local area connection and rename it to “FTEA”Right-click the local area connection #2 Network and rename it to “FTEB”3. Right-click the FTEA and select Properties4. From the Properties page, select Configure and click the Advanced tab.5. In the Property list, select the Link Speed & Duplex and set to 100Mbps/Full Duplex.6. Click OK to apply the changes.7. Select Internet Protocol (TCP/IP) from the FTEA Properties page andclick Properties.8. From the Internet Protocol (TCP/IP) Properties page, enter your IPaddress (eg.10.38.1.31) and Subnet mask (eg.255.255.255.0) and clickAdvanced the button.9 From the Advanced TCP/IP Settings page, IP Setting tab, enter 1 forInterface metric.10. Click the DNS tab, select Register this connection's addresses in DNS ashown below.11. Click the WINS tab, select Enable NetBIOS over TCP/IP and then clickOK.12. Click OK to close the Internet Protocol (TCP/IP) Properties page.13. Click OK to close FTEA Properties page.14. Right-click the FTEB and select Properties15. From the Properties page, select Configure and click the Advanced tab.16. In the Property list, select the Link Speed & Duplex and set to 100Mbps/Full Duplex.17. Click OK to apply the changes.18. Select Internet Protocol (TCP/IP) from the FTEB Properties page andclick Properties.19. From the Internet Protocol (TCP/IP) Properties page, enter your IPaddress (eg.10.38.1.32) and Subnet mask (eg.255.255.255.0) and clickAdvanced the button.20. From the Advanced TCP/IP Settings page, IP Setting Tab, enter 5 forInterface metric.21. Click the DNS tab, de-select Register this connection's addresses in DNSa shown below.22. Click the WINS tab, select Disable NetBIOS over TCP/IP and then clickOK.23. Click OK to close the Internet Protocol (TCP/IP) Properties page.24. Click OK to close FTEB Properties page.25. Close the Network and Dial-up Connections windows. Reboot the computer. (ii) Arrange Adapters Binding order1. Right-click My Network Places and select Properties.2. At the Network and Dial-up connections, click at Advanced pull-down menu andselect Advanced Setting.3. At the Adapters and Bindings Tab, make sure that FTEA appears first inbinding order (upper row) than FTEB.Example:Note:If the network adapter port you connected to Switch A is NOT listed first,reorder the connections using the arrows.4. Click Ok to save if changes are made else click Cancel close the windows.5. Open the Command Prompt by Start>Run and type cmd and click OK6. At the command Prompt, type:ipconfig/all <enter>If you use two single NIC, you should choose small physical address asFTEA.Example:Ethernet adapter FTEA:Connection-specific DNS Suffix . :Description . . . . . . . . . . . : Intel <R> Pro/100S Dual Port Server Adapter Physical Address. . . . . . . . . : 44-45-53-54-42-00DHCP Enabled. . . . . . . . . .. : NoIP Address. . . . . . . . . . . . .: 10.38.1.31Subnet Mask . . . . . . . . . . : 255.255.255.0Can refer to the Install patch7 in redundant servers in 5.1 step.box that appears to continue the installation.vii) The Honeywell Fault Tolerant Ethernet Service should now appear in the Local Area Connection Properties dialog.viii) Click Close to return to Network Connections.10. Reboot the computer11. From the Network Connections dialog, right-click either one of FTENetwork Connections being used for FTE, and then click Properties.12. Select Honeywell Fault Tolerant Ethernet Service then click Properties.This opens the Honeywell Fault Tolerant Ethernet Service Propertiesdialog.13. From the FTE Configuration tab, select both of the adapters that are beingused for FTE.14. Enter a Device Index value that is greater than 0 and equal to or less than theMax FTE Nodes settingExample:Note:Device Index Must Be Unique throughout the whole FTE network. For the other Client machines, use the FTE status display to check for free Device1014.6Installing the System Management Patch R201[1].1.14.7NO4.8~4.14 Installing Experion PKS Patch 12~18Can refer to the Install patch7 in redundant servers in 4.1 step.4.15 Configure Server Redundancy & Synchronizea.Modify the host fileremember to update the PKS host file in such content, you only need to fill in the smaller IP in odd.eg,127.0.0.1 localhost200.0.0.1 servera servera0200.0.0.3 serverb serverb0b.Confiure Server redundantOn the serveraFirstly, click Start -> Programs -> Honeywell Experion PKS Server -> Start-Stop Experion PKS Server. Left click icon in top left of title bar and select Advanced -> Full Mode. Select Database Only and Yes.i)Open the Command Prompt by Start>Run and type cmd and click OK.ii) At the command Prompt, type:cd program files\honeywell\experion pks\server\user <enter>c:\program files\honeywell\experion pks\server\user>hdwbld redun.hdw<enter> restart the PKS server.On the serverbFirstly, click Start -> Programs -> Honeywell Experion PKS Server -> Start-Stop Experion PKS Server. Left click icon in top left of title bar and select Advanced -> Full Mode. Select Database Only and Yes.i)Open the Command Prompt by Start>Run and type cmd and click OK.ii) At the command Prompt, type:cd program files\honeywell\experion pks\server\user <enter>c:\program files\honeywell\experion pks\server\user>hdwbld redun.hdw<enter> restart the PKS server.C.Synchronize the redundant serversOn the serverai)Open the Command Prompt by Start>Run and type cmd and click OK.ii) At the command Prompt, type:settimesouce.vbs<enter>iii)Select Start > Settings > Control Panel > Administrative Tools > Services.iv)Select Windows Time service and set the startup type to Automatic.V )If the Windows Time service is running, stop it.vi)Restart the Windows Time service.On the serverbi)Open the Command Prompt by Start>Run and type cmd and click OK.ii) At the command Prompt, type:net time /setsntp:servera <enter>iii)Select Start > Settings > Control Panel > Administrative Tools > Services.iv)Select Windows Time service and set the startup type to Automatic.V )If the Windows Time service is running, stop it.vi)Restart the Windows Time service.At Last, log into Station and Synchronize the redundant Server!5、Installing PKS_sc_201.0-30.6.update.1a (Included Server, Quickbuild, HMI Web)6、configure RSLinx drivers for a ControlNet supervisory network: Step Action1 Click the RSLinx icon in the system tray to open the RSLinx application.2 Click the Configure Drivers button on the toolbar.3 In the Available Driver Types list, click 1784-PCIC(S) for ControlNetdevices, and click Add New.4 Verify that the name is AB_PCIC-1 and then click OK.5 Type the Network Address (dec), based on the following table:Server Type NetworkAddressRedundant Server A 24Redundant Server B 23Non-redundant Server 246 Click OK.7 Check the status of the driver. It must be Running.8 Click Close.9 Close the RSLinx window.10 Restart the computer.。
HONEYWELL PKS R201 软件安装过程系统要求server 要用win2000server 英文版client是专业版一、软件安装(一)工作站1、安装操作系统:1) 安装Windows 2000 Server 操作系统,要求sp5版。
2) 使用NTFS 格式进行分区,C 区空间不低于6G。
3) Internet information services (IIS) 不安装(除eServer)。
4) Script debugger 组件必须选中。
5) 在机器命名时,如冗余服务器,名字的末尾分别为a 和b,非冗余服务器,名字的末尾不得为a 和b。
6) 在时间设置中取消automatically adjust for daylight savings time。
7) 安装显卡、声卡、网卡等驱动程序。
8) 设置网卡速度为100M/Full,显示分辩率:1024x7689) 安装IE6.0 SP1。
10) 设置IE ,设为通过LAN 自动连接。
11) 设置本机IP 地址及默认网关(无论是否连网)。
12) 重新启动机器,安装PKS。
2、PKS系统软件安装:A、非冗余服务器:1) 放入PKS R201 base 盘,开始安装PKS 系统。
2) 按照提示,逐步换入support 盘,base盘,knowledge build 盘以及application 盘进行安装。
3) 安装完后,重新启动机器。
4) 打开PKS 的Station 界面,创建administrator 用户,赋予mngr 255级权限。
5) 主程序安装完毕,再安装PKS 补丁程序。
B、冗余服务器:1) 放入PKS R201 base 盘,开始安装PKS 系统。
2) 按照提示,逐步换入support 盘,base盘,knowledge build 盘以及application 盘进行安装。
3) 安装完后,重新启动机器。
4) 打开PKS 的Station 界面,创建administrator 用户,赋予mngr 255级权限。
Note1:In this version, if you want to use the NIC on main board and a single identical NIC, please use the manual.Note2:Everyone must be obey the rules of anti viruses and manages our files and programs.PKS Installation1.Install the Win2k server:a.Please check your computer name (XXA,XXB).b.Be sure Video display:1024x768 pixels.c.Be sure your redundant server administrator password is identical.d.Install Win2K sp4 Patche. Installing the PCIC driversPrerequisitesExperion PKS R201 Applications Software CD.To install the PCIC drivers:Step Action1 Insert the Experion PKS R201 Applications Software CD into the CD-ROMdrive.2 In the Computer Management dialog box, right-click in the pane displaying thedevices, and then click Scan for Hardware Changes.3 Click Other Device and then click Reinstall Driver.4 Click Next to start installing the driver.5 Click Display a list of the known drivers for this device so that I canchoose a specific driver and then click Next.6 Click Other Device.7 Click Have Disk to display the Install from Disk dialog box.8 Click Browse and then browse to the following folder on the CD:\RSLinx\RSLinx\pnp_Drivers\Win2k\1784-PCIC(S)9 Click OK.10 Click A-B 1784-PCIC(S).11 Click Next.12 Click Yes in the update driver warning message dialog box.13 Click Next.14 If a confirm file replace message dialog box is displayed, click Yes to continuethe installation.15 Click Finish to complete the installation.f.Verifying the PCIC driverTo verify if the PCIC driver is installed:Step Action1 On the Windows Desktop, right-click on the My Computer icon and chooseManage.2 Click the Device Manager item.3 If the A-B Virtual Backplane item does not exist, Install the PCIC drivers onpage 430.4 In the Computer Management dialog box, expand the A-B Virtual Backplaneitem.5 Double-click the A-B 1784-PCIC(S) item to display the Properties dialog box.6 Click the Driver tab and then click Driver Details.7 Click the ABPCICSW.sys file in the Driver files list.8 Review the file version displayed below the Driver files list.9 The file version must be 3.6.18 WDM. If it is not, you need to update the PCICdriver: continue to 431.10 Click the VirtualBackplane.sys file in the Driver files list.11 Review the file version displayed below the Driver files list.12 The file version must be 1.9. If it is not, you need to update the PCIC driver:continue to 431.13 If both of driver files are the correct versions, click OK to close the Driver FileDetails dialog box, the click OK to close the Properties dialog box, and thenclose the Computer Management dialog box.2.IP settings (refer to the network design)3.Installation of PKS:with administrator logon, first insert the Base CD, then begin.! Be careful of remembering that our User name: mngr; password :mngr12! Remember to restart the computer after complete PKS installation!4.Patch installation:4.1.Install Experion PKS patch 7.4.2.Install System Management and FTE components.4.3.Installing Experion PKS Patch 84.4.Installing Experion PKS Patch 94.5.Installing Fault Tolerance Ethernet (FTE) Patch R201.[1].1.24.6.Installing the System Management Patch R201[1][1].1.14.7.NO4.8.Installing Experion PKS Patch 124.9.Installing Experion PKS Patch 134.10.Installing Experion PKS Patch 144.11.Installing Experion PKS Patch 154.12.Installing Experion PKS Patch 164.13.Installing Experion PKS Patch 174.14.Installing Experion PKS Patch 184.15.Configure Server Redundancy & Synchronize4.1 Steps to install patch7 in redundant servers:Step ActionRepeat the following steps on both server A and server B:At ServerB only:1. Run the DB Admin application at Start> Programs> ExperionPKS>Engineer Tools2. In the right pane, click Disable Replication icon and then click Yes whenprompted "Are you sure you want to disable database replication?" Repeat the following steps on both server A and server B:3. Stop the server and unload the database4. In the patch installation, click the setup.exe.5. You can verify that the patch was installed by opening the following file:C:\Program Files\Honeywell\Experion PKS\Engineering Tools\ProductVersion.txtIf the line R201.0 Patch 07 installed (R201.0.08.7) is present, patch 07 wassuccessfully installed.Start the PKS server to “System Running” statusAt ServerB only6. Run the DB Admin, in the right pane, click Enable Replication icon andthen click Yes when prompted "Are you sure you want to Enable database replication?"At both ServerA and ServerB7 Start the server into running.4.2 To complete the mandatory preparation at ServerA & ServerBTo remove Honeywell_HCI_Runtime and Honeywell Packaged Redistributable Files if exist.Step Action1. Stop the server and unload the database:Mode2. Insert the Experion PKS R201 Support Software CD into the CD-ROM.In Windows Explorer, browse to the Utilities folder on the CD and thendouble-click the hprf.reg file.3. Choose S tart > Settings > Control Panel and double-click theAdd/Remove Programs icon.Click Honeywell_HCI_Runtime or HCI_Runtime and then clickRemove. Click Yes to confirm removalClick Honeywell Packaged Redistributable Files and then clickRemove. Click Yes to confirm removal.4. Shutdown and restart the computer.Installing Honeywell System Management DisplayInsert the Experion PKS Common Components CD into the CD-ROMdrive. It will auto run.Install the Honeywell Packaged Redistributable Files from the Platformmenu from the Common Components screen. Then rebootInsert the Experion PKS Common Components CD into the CD-ROMdrive. It will auto run and select Licensed Package Installer from theCommon Components CD.Review the information about installing software, license agreements, and third-party compatibility on the next several screens. Click N ext tocontinue.Enter license and authorization number as shown in the below of EPKSServer License Certificate. Click Next to continue.Select Honeywell System Management Display and click InstallPackage button.After a successful installation, click Exit and OK to end the Installationprocess.Manually reboot your computer.Install and Configure of FTE Node Components:(i) Configure the connection speed for NIC card (FTE node ports)1. Right-click My Network Places and select Properties.2. The status should now be as shown Network and Connections dialogRight-click the local area connection and rename it to “FTEA” Right-click the local area connection #2 Network and rename it to “FTEB”3. Right-click the FTEA and select Properties4. From the Properties page, select Configure andclick the Advanced tab.5. In the Property list, select the Link Speed & Duplex and set to 100Mbps/Full Duplex.6. Click OK to apply the changes.7. Select Internet Protocol (TCP/IP) from the FTEA Properties page andclick Properties.8. From the Internet Protocol (TCP/IP) Properties page, enter your IPaddress (eg.10.38.1.31) and Subnet mask (eg.255.255.255.0) and clickAdvanced the button.9 From the Advanced TCP/IP Settings page, IP Setting tab, enter 1 forInterface metric.10. Click the DNS tab, select R egister this connection's addresses in DNS ashown below.11. Click the WINS tab, select E nable NetBIOS over TCP/IP and then clickOK.12. Click OK to close the I nternet Protocol (TCP/IP) Properties page.13. Click OK to close FTEA Properties page.14. Right-click the FTEB and select Properties15. From the Properties page, select Configure andclick the Advanced tab.16. In the Property list, select the Link Speed & Duplex and set to 100Mbps/Full Duplex.17. Click OK to apply the changes.18. Select Internet Protocol (TCP/IP) from the FTEB Properties page andclick Properties.19. From the Internet Protocol (TCP/IP) Properties page, enter your IPaddress (eg.10.38.1.32) and Subnet mask (eg.255.255.255.0) and click Advanced the button.20. From the Advanced TCP/IP Settings page, IP Setting Tab, enter 5 forInterface metric.21. Click the DNS tab, de-select Register this connection's addresses in DNSa shown below.22. Click the WINS tab, select D isable NetBIOS over TCP/IP and then clickOK.23. Click OK to close the I nternet Protocol (TCP/IP) Properties page.24. Click OK to close FTEB Properties page.25. Close the Network and Dial-up Connections windows. Reboot the computer. (ii) Arrange Adapters Binding order1. Right-click My Network Places and select Properties.2. At the Network and Dial-up connections, click at Advanced pull-down menu andselect Advanced Setting.3. At the Adapters and Bindings Tab, make sure that FTEA appears first inbinding order (upper row) than FTEB.Example:Note:If the network adapter port you connected to Switch A is NOT listed first,reorder the connections using the arrows.4. Click Ok to save if changes are made else click Cancel close the windows.5. Open the Command Prompt by Start>Run and type cmd and click OK6. At the command Prompt, type:ipconfig/all <enter>If you use two single NIC, you should choose small physical address asFTEA.Example:Ethernet adapter FTEA:Connection-specific DNS Suffix . :Description . . . . . . . . . . . : Intel <R> Pro/100S Dual Port Server Adapter Physical Address. . . . . . . . . : 44-45-53-54-42-00DHCP Enabled. . . . . . . . . .. : NoIP Address. . . . . . . . . . . . .: 10.38.1.31Subnet Mask . . . . . . . . . . : 255.255.255.0Default Gateway . . . . . . . . :DNS Servers . . . . . . . . . . . :Ethernet adapter FTEB:Media State . . . . . . . . . . . : Cable DisconnectedDescription . . . . . . . . . . . : Int Intel <R>Pro/100S Dual Port ServerAdapter #2Physical Address. . . . . . . . : 44-E5-53-54-42-00DHCP Enabled. . . . . . . . . : NoIP Address. . . . . . . . . . . . : 10.38.1.32Subnet Mask . . . . . . . . . . : 255.255.255.0Default Gateway . . . . . . . :DNS Servers . . . . . . . . . . :Note: FTEA should display first then follows by FTEB Adapter.7. Reboot the computer.(v) Install FTE S/W:Stop services and processes( the following1-4 can be ignored if it is your first time to install FTE.1. Click Start, point to Settings, and then click Control Panel.2. Double-click Administrative Tools, and then double-click ComponentServices.3. In the console Tree, select Services and click the Name column to sort theservices and locate Windows Management Instrumentation Service4. Right-click and select Stop. Together, it’ll also stop few of systemManagement (sm – xxxx) services.Stop the remaining of System Management Services (sm-xxxx).Open the Windows Task Manager (right-click at Task Bar) and select theProcess tab.If theses Processes exist, stop it:cas.exehsopcserv.exehscsysmg.exe5 Stop Experion PKS Server byclick Start>Programs> Experion PKSServer and then S tart-Stop Experion PKS Server.6 Insert the Common Components CD into the CD-ROM drive, it will autolaunch or double-clicking Install from the Package folder.7 Select the appropriate package from the Install screen and click Next.8 Review the Honeywell Software Installation Welcome screen and clickNext.9. Review the Honeywell Software Installation End User LicenseAgreement screen and click N ext.10 Review the Honeywell Software Installation Third Party SoftwareCompatibility Policy screen and click N ext.11 Complete the H oneywell Software Installation User Information screenand click Next.12. Select Fault Tolerant Ethernet Driver (FTE) and click Install Package.13. From the Honeywell Software Installation Installable Packages screenand accept the selected defaults. Click OK.Do you want to run the FTE Driver Install Script14. When prompted “(ftecfg) now?” click NO.After successfully completed installation, if prompted to reboot, click No.15. Click Exit from the Installation window and do a manual reboot.4.3~4.4 Installing Experion PKS Patch 8、9Can refer to the I nstall patch7 in redundant servers in 5.1 step.4.5 Installing Fault Tolerance Ethernet (FTE) Patch FTE_201.1.2Installing the FTE Patch FTE_201.1.2Step Action1. Create a temporary folder c:\Program Files\Honeywell\FTE_Driver\Saved2. i)Move the old fteimdrv.sys file located in c:\ProgramFiles\Honeywell\FTE_Driver to c:\ProgramFiles\Honeywell\FTE_Driver\Savedii)Copy the fteimdrv.sys file from FTE_201.1.2 patch to c:\ProgramFiles\Honeywell\FTE_Driver3. Verify the new fteimdrv.sys file which have been updated.Right-click fteimdrv.sys,and select the “Properties”. Click the “Version” tab of the Properties dialog, which should indicate a file version of201.1.7.400.4. Install the FTE Service.i) From the Network Connections dialog, right-click either one of FTENetwork Connections being used for FTE, and then click P roperties.ii) Click Install from the Local Area Connection Properties page and selectService, and then click Add.iii) Click Have Disk to access the FTE intermediate driver files that loadedon the hard drive earlierNote: FTE was previously installed, it will appear in the Network Service list.DO NOT pick it from the list.iv) Browse to the location of the FTE intermediate driver files and clickOpen.Default is C:\Program Files\Honeywell\FTE_Driverv) Click OK and select H oneywell Fault Tolerant Ethernet Service thenclick OK.vi) If your digital signature protection level is set to Warn, the DigitalSignature Not Found message will appear. Click Y es for each messagebox that appears to continue the installation.vii) The Honeywell Fault Tolerant Ethernet Service should now appear in the Local Area Connection Properties dialog.viii) Click Close to return to Network Connections.10. Reboot the computer11. From the Network Connections dialog, right-click either one of FTENetwork Connections being used for FTE, and then click P roperties.12. Select Honeywell Fault Tolerant Ethernet Service then click Properties.This opens the Honeywell Fault Tolerant Ethernet Service Propertiesdialog.13. From the FTE Configuration tab, select both of the adapters that are beingused for FTE.14. Enter a D evice Index value that is greater than 0 and equal to or less than theMax FTE Nodes settingExample:101Note:Device Index Must Be Unique throughout the whole FTE network. For theother Client machines, use the FTE status display to check for free DeviceIndex.15. Click OK to save the setting and close the Network Adapter connectionProperties.16. Reboot the computer.4.6Installing the System Management Patch R201[1].1.1Step Action1. Pls refer to the file “system_mgmt_201[1].1.1.patch.pdf”4.7NO4.8~4.14 Installing Experion PKS Patch 12~18Can refer to the I nstall patch7 in redundant servers in 4.1 step.4.15 Configure Server Redundancy & Synchronizea.Modify the host fileremember to update the PKS host file in such content, you only need to fill in the smaller IP in odd.eg,127.0.0.1 localhost200.0.0.1 servera servera0200.0.0.3 serverb serverb0b.Confiure Server redundantOn the serveraFirstly, click Start -> Programs -> Honeywell Experion PKS Server -> Start-Stop Experion PKS Server. Left click icon in top left of title bar and select Advanced -> Full Mode. Select Database Only and Yes.i)Open the Command Prompt by Start>Run and type cmd and click OK.ii) At the command Prompt, type:cd program files\honeywell\experion pks\server\user <enter>c:\program files\honeywell\experion pks\server\user>hdwbld redun.hdw<enter> restart the PKS server.On the serverbFirstly, click Start -> Programs -> Honeywell Experion PKS Server -> Start-Stop Experion PKS Server. Left click icon in top left of title bar and select Advanced -> Full Mode. Select Database Only and Yes.i)Open the Command Prompt by Start>Run and type cmd and click OK.ii) At the command Prompt, type:cd program files\honeywell\experion pks\server\user <enter>c:\program files\honeywell\experion pks\server\user>hdwbld redun.hdw<enter> restart the PKS server.C.Synchronize the redundant serversOn the serverai)Open the Command Prompt by Start>Run and type cmd and click OK.ii) At the command Prompt, type:settimesouce.vbs<enter>iii)Select Start > Settings > Control Panel > Administrative Tools > Services. iv)Select Windows Time service and set the startup type to Automatic.V )If the Windows Time service is running, stop it.vi)Restart the Windows Time service.On the serverbi)Open the Command Prompt by Start>Run and type cmd and click OK.ii) At the command Prompt, type:net time /setsntp:servera <enter>iii)Select Start > Settings > Control Panel > Administrative Tools > Services. iv)Select Windows Time service and set the startup type to Automatic.V )If the Windows Time service is running, stop it.vi)Restart the Windows Time service.At Last, log into Station and Synchronize the redundant Server!5、Installing PKS_sc_201.0-30.6.update.1a (Included Server, Quickbuild, HMI Web)Step Action1. Pls refer to Cumulative Software Update 1a for R201[1][1].0 ServerSCN.pdf6、configure RSLinx drivers for a ControlNet supervisory network: Step Action1 Click the RSLinx icon in the system tray to open the RSLinx application.2 Click the Configure Drivers button on the toolbar.3 In the Available Driver Types list, click 1784-PCIC(S) for ControlNetdevices, and click Add New.4 Verify that the name is AB_PCIC-1 and then click OK.5 Type the Network Address (dec), based on the following table:Server Type NetworkAddressRedundant Server A 24Redundant Server B 23Non-redundant Server 246 Click OK.7 Check the status of the driver. It must be Running.8 Click Close.9 Close the RSLinx window.10 Restart the computer.。