制作win7开始按钮图片
How To Create A Windows 7 Start Orb
April 16th, 2010 - Customization, Downloads, Tips & Tricks, Windows 7
1digg
Requirements:
?Windows 7
?Windows 7 Start Button Changer (Download Link at Bottom)
?Any good image editor (We will use Photoshop for this tutorial)
?Three images for default, hover & pressed orb states
Steps:
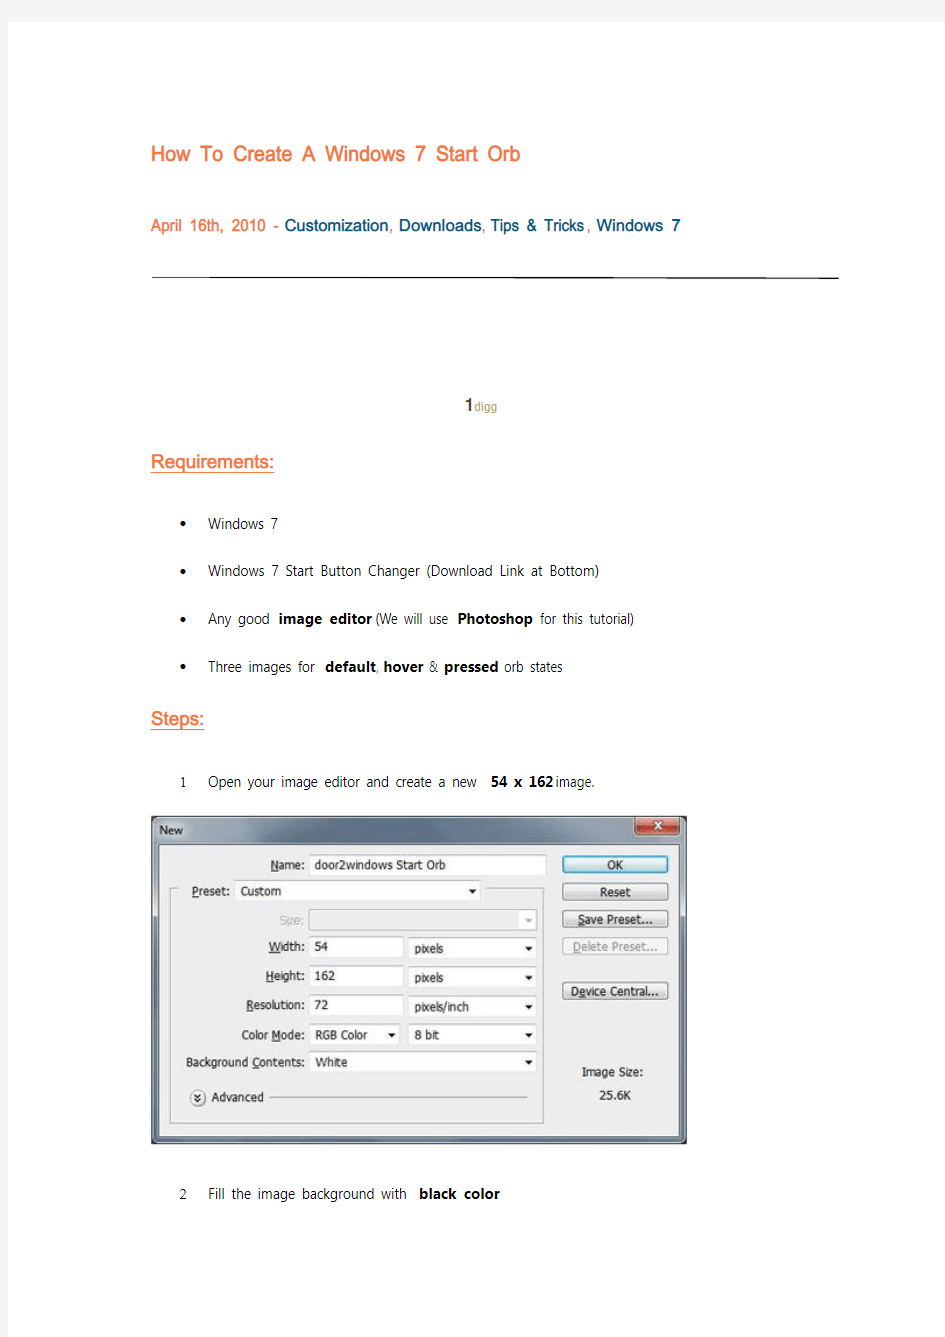
1Open your image editor and create a new 54 x 162 image.
2Fill the image background with black color.
3Create a new channel named “Alpha 1“
4Create guidelines at the 54th & 108th pixel with the help of rulers.
5Open the three images which you want to use for the default, hover & pressed orb states and resize them. It should not be greater then 54 x 54 pixels.
6Copy the image which you want to use for the default orb state and paste it before the first guideline.
7Copy the image which you want to use for the hover orb state and paste it in between the first & second guideline.
8Copy the image which you want to use for the pressed orb state and paste it after the second guideline.
9Merge all the three orb states images into one.
10Press CTRL & click on the layer’s thumbnail in which the three orb states are combined. 11Select the Alpha Channel and press Delete.
Press CTRL + S and save the image in BMP format.
13Use Windows 7 Start Button Changer to change the orb you have created.
14Check if it works properly. If it does not shows up properly then leave a comment here with a download link to your orb.
Downloads:
?door2windows Start Orb
?Start Orb PSD T emplate
?Windows 7 Start Button Changer
Unity3D游戏开发之添加背景图片 Unity3D游戏开发之添加背景图片 每个游戏在开始前都有登陆注册界面,但是登陆注册界面不只是几个Label,几个Button 组成的,还要有背景图片,可以怎么我们在只学习了GUI的前提下,怎么添加背景图片呢?我今天主要的任务就是做登陆注册界面,登陆注册界面要想好看点就要有背景图片,在unity中添加背景图片有两种方法,一种是通过代码来完成,还有一种是手动添加,我们都 来看看吧。 先来看看效果图: 通过代码完成: 1.//声明一张图片 2.public Texture2D img; 3. 4.//通过OnGUI方法执行下面操作 5.void OnGUI() 6.{ 7. string aa = ""; 8. 9. //构造一个空的GUIStyle 10. GUIStyle bb = new GUIStyle(); 11. 12. //设置bb正常显示时是背景图片
13. bb.normal.background = img; 14. https://www.doczj.com/doc/f014404865.html,bel(new Rect(0, 0, 1370, 780), aa, bb); 15.} 手动添加: 1、先创建一个新的摄像机,命名为Background Camera; 2、新建一个GUI Texture,命名为Background Image; 3、在Background Image的Inspector面板【狗刨学习网】中点击Layer下拉窗口, 选择“Add Layer”添加一个新的层名称为“Background Image”; 4、选中Background Image,做如下操作: 5、该GameObject的Layer值设置为之前你添加的Background Image; 6、选中Background Camera,进行如下操作:
Java程序添加漂亮背景图片的方法 整理后可执行代码如下: importjava.awt.*; importjavax.swing.*; public class TestBackgroundColor extends JFrame { public static void main(String[] args) { // TODO Auto-generated method stub TestBackgroundColortbc = new TestBackgroundColor(); tbc.setVisible(true); } privateJPanelimagePanel; privateImageIcon background; publicTestBackgroundColor() { background = new ImageIcon("渐变背景14.png");//背景图片 JLabel label = new JLabel(background);//把背景图片显示在一个标签里面 //把标签的大小位置设置为图片刚好填充整个面板 label.setBounds(0,0,background.getIconWidth(),background.getIconHeight()); //把内容窗格转化为JPanel,否则不能用方法setOpaque()来使内容窗格透明 imagePanel = (JPanel)this.getContentPane(); imagePanel.setOpaque(false); //内容窗格默认的布局管理器为BorderLayout imagePanel.setLayout(new FlowLayout()); imagePanel.add(new JButton("测试按钮")); this.getLayeredPane().setLayout(null); //把背景图片添加到分层窗格的最底层作为背景 this.getLayeredPane().add(label,new Integer(Integer.MIN_VALUE)); this.setDefaultCloseOperation(JFrame.EXIT_ON_CLOSE); this.setSize(background.getIconWidth(),background.getIconHeight()); this.setVisible(true);
(完整word版)修改BUTTON背景颜色 //定义色彩 const COLORREF CLOUDBLUE = RGB(128, 184, 223); const COLORREF WHITE = RGB(255, 255, 255); const COLORREF BLACK = RGB(1, 1, 1); const COLORREF DKGRAY = RGB(128, 128, 128); const COLORREF LTGRAY = RGB(192, 192, 192); const COLORREF YELLOW = RGB(255, 255, 0); const COLORREF DKYELLOW = RGB(128, 128, 0); const COLORREF RED = RGB(255, 0, 0); const COLORREF DKRED = RGB(128, 0, 0); const COLORREF BLUE = RGB(0, 0, 255); const COLORREF DKBLUE = RGB(0, 0, 128); const COLORREF CYAN = RGB(0, 255, 255); const COLORREF DKCYAN = RGB(0, 128, 128); const COLORREF GREEN = RGB(0, 255, 0); const COLORREF DKGREEN = RGB(0, 128, 0); const COLORREF MAGENTA = RGB(255, 0, 255); const COLORREF DKMAGENTA = RGB(128, 0, 128); //在.h文件定义彩色按钮 CColorButton m_btnUp; //在.cpp文件调用函数着色 VERIFY(m_btnUp.Attach(IDC_BUTTON1, this, RED, WHITE, DKRED)); //CColorButton 类原型 //colorbtn.h #ifndef __COLORBTN_H__ #define __COLORBTN_H__ class CColorButton : public CButton { DECLARE_DYNAMIC(CColorButton) public: CColorButton(); virtual ~CColorButton(); BOOL Attach(const UINT nID, CWnd* pParent, const COLORREF BGColor = RGB(192, 192, 192), // gray button const COLORREF FGColor = RGB(1, 1, 1), // black text const COLORREF DisabledColor = RGB(128, 128, 128), // dark gray disabled text const UINT nBevel = 2
给电脑的右键菜单添加背景图片 给电脑的右键菜单添加背景图片 有了电脑,要让电脑好看些,这就需要多多美化电脑了。现在说下,怎样给右键菜单添加背景图片,你可以给自己的右键背景图片修改成美女哦。那多爽眼啊。嘻嘻。 开始: 第一步,下载动态链接库文件 先下载并解压添加右键菜单背景图片动态链接库文件(下载地址 https://www.doczj.com/doc/f014404865.html,/soft/utilitie/systems/133/407633.shtml )。打开解压文件夹,里面的“ContextBG.dll”文件就是即将用到的动态链接库文件。为方便使用,将此文件复制到“C:\\Windows”文件夹中。 第二步,添加右键弹出菜单背景图片 依次单击“开始”→“运行”,打开“运行”对话框。在“运行”对话框中输入 “regsvr32 c:\\windows\\ContextBG.dll”(不包括引号),单击确定,弹出一个regsvr32加载成功的对话框。这时,再右击桌面上的图标,你就发现弹出菜单已经有虎哥的背景图片了(图1)。
小贴士:遗憾的是,右击我的电脑、盘符等系统图标弹出菜单不能出现背景图片。第三步,取消右键菜单背景图片 如果要取消右键菜单背景图片,同样在“运行”对话框中输入“regsvr32 /u c:\\windows\\ContextBG.dll”,单击确定,出现加载成功对话框,完成对图片的卸载。 如果看倦了虎哥的图片该怎样更换呢?你可以通过附带下载的ResHacker 工具软件来修改“ContextBG.dll”库文件进行图片的更换。 打开ResHacker工具软件,依次单击“文件→打开”,弹出打开文件对话框,指定并打开C盘Windows文件夹下的“ContextBG.dll”动态链接库文件。然后,单击“操作”菜单下的“替换位图”命令,弹出“替换位图”对话框(图2)。在对话框的右上角,可以清楚地看到虎哥的图片,单击“打开新位图文件”按钮,弹出“打开”文件对话框,指定打开事先准备好的一张位图图片(*.bmp格式图片),单击“替换”按钮完成图片替换。最后,单击“文件”菜单中“保存”命令,保存替换图片后的动态链接库文件。
给按钮添加背景图片 package background; import java.awt.Container; import java.awt.Graphics; import java.awt.Image; import javax.swing.ImageIcon; import javax.swing.JButton; import javax.swing.JFrame; import javax.swing.JPanel; public class JpanelBackgroundDemo extends JFrame{ MyPanel panel; JButton btn; Container c; public JpanelBackgroundDemo(){ setVisible(true); setSize(400,400); setLayout(null);// 不使用任何布局 c = getContentPane(); panel = new MyPanel(new ImageIcon("./src/images/chenhe.png").getImage()); panel.setBounds(0, 0, 300, 300); c.add(panel); btn = new JButton("测试按钮"); panel.add(btn); } public static void main(String[] args) { new JpanelBackgroundDemo(); } } // 重写容器类比如JPanel类的PaintComponent()方法 class MyPanel extends JPanel{ Image img;
qss美化___按钮 Qt开发界面程序时为按钮控件添加背景图片 Qt本身直接创建的按钮看起来有些单调,如,当然,程序员可以在程序代码里通过写相关的setStyle类的函数来自定义按钮样式,如设置颜色、形状等。但有时这些样式仍不能满足客户的特殊需求,这就需要为按钮添加背景图片。Qt自身支持的强大的qss美化文件为我们美化界面提供了极大方便,本文就最常用、简单的按钮美化给出简单教程。 1.首先,我们需要自己新建一个文本文件,写入以下内容: QPushButton#MyBtn{ border-image:url(:/my_ObjectName/Resources/ Normal/btn_Pic.bmp); } QPushButton# MyBtn:hover{ border-image:url(:/my_ObjectName /Resources/ Go/ btn_Pic.bmp); } QPushButton# MyBtn:pressed{ border-image:url(:/my_ObjectName /Resources/ Press/ btn_Pic.bmp); } QPushButton# MyBtn:!enabled{ border-image:url(:/my_ObjectName /Resources/ Null/ btn_Pic.bmp); } 将文件保存为my_qssFile.qss (注意:后缀是.qss),并将该文件放在你工程源代码的那个文件夹的目录下面。 说明:Normal文件夹下存放的是按钮正常状态下的背景图片,Go文件夹下存放的是鼠标经过该按钮时的按钮背景图片,Press文件夹下存放鼠标点击按下时的背景图片,Null文件夹下存放该按钮不可用时(setEnabled(false))的背景图片. 2.以记事本方式打开该目录下的.qrc文件(注意:该文件是建立工程时,系统自动生成的,不需要你改名字),在 前回车新建一行,在该行写如下代码: Resources /Normal/ btn_Pic.bmp Resources /Press/ btn_Pic.bmp Resources /Go/ btn_Pic.bmp Resources /Null/ btn_Pic.bmp 然后保存该文件。 3.在程序main.cpp文件里封装如下函数
MFC添加背景图片 问题 有的程序员希望在自己的应用程序中以有趣味的位图来代替对话框中令人讨厌的灰色背景,希望位图在对话框中看起来象墙纸而且并不影响对话框中的控制或静态文本的显示。 许多程序员找不到一个改变窗口背景的简单方法,是否有方法利用Windows API 函数来改变对话框的背景为某个位图呢? 方法 改变对话框的背景为某个位图并不困难,关键是需要清楚对话框和窗口是如何设置背景颜色的,以及程序员应该如何修改对话框和窗口改变显示的行为。 当Windows 准备改变对话框背景的颜色时,通常发送两个消息给对话框。第一个消息是WM_ERASEBKGND,此消息指示对话框绘制对话框的背景颜色,以“抹去”屏幕上对话框显示区域的任何显示。 第二个消息是WM_CTLCOLOR,发送此消息给对话框或窗口来表示Windows 需要知道对话框中控制的颜色。 在本节中,将重置对消息WM_ERASEBKGND 的处理,以便将位图绘制在窗口的背景上。另外,将重置对消息WM_CTLCOLOR 的处理,以避免对话框中的控制“剪补”位图。最后的结果是对话框的背景位图绘制在对话框背景上,控制在背景位图的“上面”。 步骤 按照下列步骤实现一个例子程序。运行此例子程序,选择菜单Dialog 和菜单项Bitmap Background,将弹出一个对话框,显示背景位图和几个控制。 实现例子程序的具体步骤如下: 1.在Visual C++中,利用AppWizard 创建新的项目文件,并命名此项目文件为 Ld145。 2.进入资源编辑器并创建新的对话框模板。在对话框中,添加几个静态文本域和编辑域,以及几个单选按钮和列表框。对话框的实际组成并不重要,只要能够覆盖部分位图就可以了。 3.选择ClassWizard,为刚创建的对话框模板创建对话框类,新类命名为 CBitma PB kgdDlg。 4.在资源编辑器中创建新的位图。 5.进入ClassWizard,从下拉列表中选择CBitmapBkgdDlg,从对象列表中选择对象CBitmapBkgdDlg,从消息列表中选择消息WM_INITDIALOG,点击按钮Add Function,在CBitmapBkgdDlg 的方法OnInitDialog 中添加下列代码: BOOL CBitmapBkgdDlg::OnInitDialog() { CBitmap * pBmpOld; RECT rectClient; VERIFY(m_brush=(HBRUSH)GetStockObject(HOLLOW_BRUSH)); VERIFY(m_Bitmap.LoadBitmap(IDB_BITMAP1)); m_Bitmap.GetObject(sizeof(BITMAP),&m_bmInfo);
QT 对话框添加背景图片的方法 QT 对话框添加背景图片的方法 1. QPalette的方法 #include #include int main(int argc, char *argv[]) { QApplication app(argc,argv); QFrame *frame = new QFrame; frame->resize(400,700); QPixmap pixmap("images/frame.png"); QPalette palette; palette.setBrush(frame->backgroundRole(),QBrush(pixmap)); frame->setPalette(palette); frame->setMask(pixmap.mask()); //可以将图片中透明部分显示为透明的 frame->setAutoFillBackground(true); frame->show(); return app.exec(); }注意图片路径怎么表示,我的图片放在该工程下的images文件夹中。 存在问题:图片可以显示出来,但是图片大小不能和frame大小一致,显示效果不好,具体怎样调整大小,以后再补充,效果如下(设置了透明的,好像很漂亮~透明部分将我的桌面显示出来了~_~): 2.setStyleSheet方法(非常好用的方法) #include #include int main(int argc, char *argv[]) { QApplication app(argc,argv); QFrame *frame = new QFrame; frame->setObjectName("myframe"); frame->resize(400,700); frame->setStyleSheet("QFrame#myframe{border-image:url(images/frame.png)}" ); frame->show(); return app.exec(); }效果如下:
Android使用xml改变button背景图片 Android使用xml改变button背景图片 这篇文章我们使用Android XML来改变各种按钮状态(获得焦点、获得焦点并按下、失去焦点、默认)时的背景图,首先我们自己定义一个imgbutton.xml代码: 在main.xml中定义一个button代码: 为jframe窗口设置背景图片 终于成功实现了如何为jframe窗口设置背景图片了。下面是示例,请初学swring的朋友们参考学习! import java.awt.*; import javax.swing.*; import java.awt.Container; public class framebg { public framebg() { } public static void main (String[] args) { JFrame frame=new JFrame("背景图设置"); frame.setDefaultCloseOperation(JFrame.EXIT_ON_CLOSE); ImageIcon img = new ImageIcon("bg\\1.gif");//这是背景图片 JLabel imgLabel = new JLabel(img);//将背景图放在标签里。 frame.getLayeredPane().add(imgLabel, new Integer(Integer.MIN_V ALUE));//注意这里是关键,将背景标签添加到jfram的LayeredPane面板里。 imgLabel.setBounds(0,0,img.getIconWidth(), img.getIconHeight());//设置背景标签的位置Container cp=frame.getContentPane(); cp.setLayout(new BorderLayout()); JButton but=new JButton("anniu");//创建按钮 cp.add(but,"North");//将按钮添加入窗口的内容面板 ((JPanel)cp).setOpaque(false); //注意这里,将内容面板设为透明。这样LayeredPane面板中的背景才能显示出来。
Qt中窗体和按钮添加背景图片的方法 Qt中添加背景图片的方法(转) 工作似乎走上正轨了,上周五的工作是做一个界面,用到QFrame和QPushButton,QFrame 做主面板,QPushButton为其子控件,需要在主面板上贴背景图片,还需要在QPushButton 上贴上相应的图标,弄了一天,再加上今天一小会,终于有一点点结果了。 通过从Google上搜索各种方法(现在才知道Google比Baidu强大很多啊),最后都试了一些,主要有下面几种方法: 1. QPalette的方法 #include #include int main(int argc, char *argv[]) { QApplication app(argc,argv); QFrame *frame = new QFrame; frame->resize(400,700); QPixmap pixmap("images/frame.png"); QPalette palette; palette.setBrush(frame->backgroundRole(),QBrush(pixmap)); frame->setPalette(palette); frame->setMask(pixmap.mask()); //可以将图片中透明部分显示为透明的 frame->setAutoFillBackground(true); frame->show(); return app.exec(); }注意图片路径怎么表示,我的图片放在该工程下的images文件夹中。 存在问题:图片可以显示出来,但是图片大小不能和frame大小一致,显示效果不好,具体怎样调整大小,以后再补充,效果如下(设置了透明的,好像很漂亮~透明部分将我的桌面显示出来了~_~):
如何更改MFC按钮的背景色 今天打算给自己写的工程上点色。但是在给按钮上色的时候出了点问题。在网上找的方法基本上都不管用。说得跟真的一样,各种OnCtrlColor()和OnEraseBkground(),各种技术帝的方法看起来都很厉害,但是都不管用。 真正有用的办法是自定义button,才能实现按钮颜色。但是这个办法不免有些复杂,我这么懒的人,既不想为这么个小功能去重写一个类,也不想使用第三方的按钮类,所以只能另辟蹊径了。 所幸在codeproject上又找到了一个大神写的教程。使用CMFCButton便可以实现这种功能。接下来简单介绍一下CMFCButton的用法。建立一个基于对话框的工程MFCButtonTest。在对话框编辑界面中,拖入一个button控件,改资源ID号为IDC_BUTTON_TEST。 接下来,在CMFCButtonTestDlg::OnInitDialog()中添加如下代码: CMFCButton * button = new CMFCButton; button->Create(_T("Test Button"), WS_VISIBLE, CRect(5, 5, 80, 50), this, IDC_BUTTON_TEST); 注意!!这个行为是错误的,会有内存泄漏,只为写个例子,真实工程中不允许这种写法。好了,运行一下吧,会看到屏幕上出现了两个按钮。 但是不用担心,TestButton就是Button1,Button1就是TestButton,他们共享同一个资源号。也可以说TestButton其实是Button1的“影分身”,在对话框编辑界面中是看不到的。那么解决方案就简单啦,在对话框编辑界面中把Button1的Visible属性设为False便可以了。Tips: 这样一来,可以创建多个CMFCButton,都使用同一个ID号,那么他们可以分散在世界各地,而且还能运行同一段代码,真够帅气! 再次运行。
MFC 添加背景图片并让控件背景透明和TREEVIEW添加背景图片 MFC 添加背景图片并让控件背景透明 收藏我要投稿/*添加背景图片*/ BOOL CTOOLDlg::OnEraseBkgnd(CDC* pDC) { // TODO: 在此添加消息处理程序代码和/或调用默认值 CDialog::OnEraseBkgnd(pDC); HBITMAP m_hBitmap; HDC m_hBkDC; m_hBitmap = ::LoadBitmap(::GetModuleHandle(NULL),MAKEINTRESOURCE(IDB_BITMAP2)); m_hBkDC = ::CreateCompatibleDC(pDC-> m_hDC); if(m_hBitmap && m_hBkDC) { ::SelectObject(m_hBkDC,m_hBitmap); ::StretchBlt(pDC-> m_hDC,0,0,700,610,m_hBkDC,0,0,700,610,SRCCOPY); ::DeleteObject(m_hBitmap); ::DeleteDC(m_hBkDC); } return TRUE; } /*设置控件背景透明*/ HBRUSH CTOOLDlg::OnCtlColor(CDC* pDC, CWnd* pWnd, UINT nCtlColor) { HBRUSH hbr = CDialogEx::OnCtlColor(pDC, pWnd, nCtlColor); if(nCtlColor == CTLCOLOR_STATIC ) { pDC->SetBkMode(TRANSPARENT);//设置背景透明 pDC->SetTextColor(RGB(255,255,0));//设置字体为黄色 return (HBRUSH)::GetStockObject(NULL_BRUSH); }
光影魔术手来制作抠图及添加背景图片 现在我们用光影魔术手来制作抠图及添加背景图片。制作前大家先准备好一张需要抠取的前景图片和一张背景图片。 需要注意的是抠取出来的前景图片大小、方向一定要适合背景图片,图片本身前景和背景差异比较大、且边缘较清晰的图抠取出来也就容易很多。 这是需要抠取的前景图片: 要添加的背景图片(这是为了配合前景图片而经过缩小的风景图片):
修改前景和背景图片的大小及方向在光影魔术手里可以修改。 大家可以看到前景的儿童如果在背景的右边的话对孩子来说即不安全而且也遮住了图片的主体画面;在右边孩子就安全多了,背景的主体部分也就显示出来了。这就需要我们把前景图片旋转方向:
下面我们一起学习抠图的方法: 一打开图片 点击右上角的“打开”按钮, 选择一副图片,打开,如果图片很大,简易先压缩后再打开。可以使用缩放功能: 二选择 选择里有线段、矩形和椭圆3种抠图选择工具。
线段工具:个人认为线段工具非常好用,您可以按住左键拖动想要的区域,按住右键拖动背景区域,是的,就这么简单。下面是抠图方法:
需要注意的是,划线时红色线条必须在所抠取的前景图内画出,不要画到背景上;画背景也一样不要把绿色线条画到前景里。 在画线时如果有错误的时候可以点击左上角的【撤 消】, 就可以把刚才画出的错误线条去掉,再重新画线,直到满意为止。 小技巧:因为每次鼠标抬起都要计算,很浪费时间,您可以按住Ctrl键进行选择,这样只有您抬起Ctrl
键的时候才会去运算。运算期间你可能要稍等几秒钟,如果您的图片很大的话。 怎么样?是不是简单的几笔就可以选出来了? 下面是我的抠图方法,大家看看: 有时候我们画好后,发现前景和背景之间的虚线有过渡现象,可以用红色或绿色线条沿着前景边缘逐渐靠近画出,两种线条互相接近,使虚线完全服帖在前景轮廓上。
如何给文件夹设置背景图片 如何给文件夹设置背景图片 大家都知道桌面有漂亮的壁纸,但是硬盘和文件夹却是白白的,感觉很枯燥。那么有什么方法让文件夹也有能像桌面一样有漂亮的背景呢?答案是肯定的,无须借助第三方软件,只要利用windows的desktop文件就搞定了。 一、在硬盘的分区下(比如说e盘)使用漂亮的背景,方法: 新建一个文本文档输入以下内容 [ExtShellFolderViews] {BE098140-A513-11D0-A3A4-00C04FD706EC}={BE098140-A513-11D0-A3A4-00C04FD706EC} [{BE098140-A513-11D0-A3A4-00C04FD706EC}] Attributes=1 IconArea_Image=E:\图片\xxxxx.jpg★这里写图片地址 IconArea_Text=0x00000000 [.ShellClassInfo] ConfirmFileOp=0 [Ctrl+A Select All] 红色部分分别是你要显示的图片所在的路径和字体颜色代码. 然后把它的扩展名.txt改为desktop.ini,放在c、d、e盘根下,然后你可以选择它的属性,把它隐藏起来更加清爽。这样就可以像桌面一样,有美丽的图片当背景了 注意:最好选择个颜色较浅的图片做背景,不然恐怕连文件夹的名字也看不清楚了 二、文件夹也像硬盘一样使用漂亮的背景。 首先要做的就是让你的文件夹下生成一个desktop.ini文件,(直接拷贝一个desktop.ini 进去是没有效果的,我的文档是可以的)下面就以e盘下MP3文件夹更换背景为例介绍下方法: (1)、右键点mp3文件夹,选择“属性”,“自定义”,最下面的“更改文件夹图标”,这时你可以为你的文件夹选择个好看的图标(如果觉的系统里的不好看的话可以到网上下载漂亮的ico文件)。选择好确定。此时你的文件夹图标已经更换,desktop.ini文件也已经生成,不过是隐藏的,要修改他先把他显示出来才行。别告诉我你不会查看隐藏的文件...(工具--文件夹选项--查看,把隐藏受系统保护的文件夹前的勾去掉、选中显示所有的文件和文件夹)(2)、然后到e:\mp3下找到哪个生成的desktop.ini文件,双击打开就会发现他已经有了一些代码: [.ShellClassInfo] IconFile=图标文件路径及文件 IconIndex=3 解释下: 其中“iconindex=n”表示使用的图标是指定文件中的第几个图标,“iconfile=图标文件路径及文件名”表示文件夹使用的图标文件的路径及文件名,如:“iconindex=1,iconfile=C:\windows\regedit.exe”。保存文件后按F5键刷新,目标文件夹就变成了注册表文件的图标。 在以有的代码下加上下列代码: [ExtShellFolderViews] {BE098140-A513-11D0-A3A4-00C04FD706EC}={BE098140-A513-11D0-A3A4-00C04FD706EC} [{BE098140-A513-11D0-A3A4-00C04FD706EC}] Attributes=1 IconArea_Image=E:\图片\xxxxx.jpg
给窗口添加背景图片 import java.awt.*; import javax.swing.*; import java.awt.event.*; public class TestImageWindow extends JFrame{ JLabel topLabel; JLabel userNameLabel,passwordLabel; JTextField userNameTextField; JPasswordField passwordField; JButton exitButton,loginButton; public TestImageWindow() { super("欢迎登录"); topLabel=new JLabel(); topLabel.setIcon(new ImageIcon("pictures/07.jpg")); add(topLabel); topLabel.setLayout(null); userNameLabel = new JLabel("用户名:"); userNameLabel.setForeground(Color.WHITE); passwordLabel = new JLabel("密码:"); userNameTextField = new JTextField(20); passwordField = new JPasswordField(20); exitButton = new JButton("退出"); loginButton = new JButton("登录"); ButtonListener bListener = new ButtonListener(); // 按钮注册事件监听器 exitButton.addActionListener(bListener); loginButton.addActionListener(bListener); userNameTextField.addActionListener(bListener); passwordField.addActionListener(bListener); MyKeyListener keylis=new MyKeyListener(); userNameTextField.addKeyListener(keylis); passwordField.addKeyListener(keylis); userNameLabel.setSize(45,20); userNameLabel.setLocation(40,280); topLabel.add(userNameLabel); userNameTextField.setSize(50,20); userNameTextField.setLocation(85,280);
对话框设置背景图片 对话框设置背景图片 CRect rect; GetClientRect(&rect); CDC *pDC=GetDC(); //这句值得记忆,如何获取当前DC CDC memdc; memdc.CreateCompatibleDC(pDC); CBitmap bitmap; bitmap.LoadBitmap(IDB_BITMAP3); memdc.SelectObject(bitmap); pDC->BitBlt(0,0,rect.Width(),rect.Height(),&memdc,0,0,SRCCOPY); 对于一般的空间及本功能对话框设置背景图片的中心思想大致是:获取本当前对话框坐标及句柄,然后创建图片对象,并加载控件,然后客户对话框选中图片对象并进行转换(最后一句)。 这些都是在OnPaint()下进行的。 Invalidate():立即重绘客户对话框(即立即刷新对话框),调用OnPaint()相关的消息映射。 路径显示图片 MFC界面加载图片大致有两个方法:通过BITMAP控件直接加载和通过路径动态加载图片。 通过BITMAP 加载图片很简单没有技术含量。在Resource页面下,添加Resource,然后导入图片(注意是BMP格式的,其他格式暂时没有研究),重命名等设置一下;接下来在对话框中添加picture control 控件,在type中选择bitmap,然后在image 中选择导入的加入的那个BITMAP就可以了。
通过路径加载图片相对复杂一点。picture control保持默认就可以。CPaintDC dc(this); HBITMAP bmpHandle; bmpHandle = (HBITMAP)LoadImage(NULL,_T(图片路径),IMAGE_BITMAP,0,0,LOADFROMFILE); //路径要使用双\ CBitmap bmpPicture; CDC mdcPicture; CBitmap *bmpFromHandle = bmpPicture.FromHandle(bmpHandle); CRect rctPicture; GetDlgItem(picture控件)->GetWindowRect(&rctPicture); //上面那一句很重要,GetDlgItem,获取相关控件 //关联相关控件,比如按钮控件m_btn.SubclassDlgItem mdcPicture.CreateCompatibleDC(&dc); CBitmap *bmpPrevious = mdcPicture.SelectObject(bmpFromHandle); ScreenToClient(&rctPicture); dc.BitBlt(rctPicture.left,rctPicture.top,rctPicture.Width();rctPicture.Heigth(),&mdcPicture,0,0,SRCCOPY); dc.SelectObject(bmpPrevious); 控件背景设置 加载ON_WM_CTLCOLOR消息映射,在相关的响应OmCltcolor响应函数中,添加以下代码可以修改相关控件的背景颜色等。 switch (nCtlColor) { case CTLCOLOR_EDIT: //这些是相关的控件名称 case CTLCOLOR_MSGBOX: case CTLCOLOR_DLG : case CTLCOLOR_STATIC : //在此加入你想要改变背景色的控件消息 pDC->SetBkMode(TRANSPARENT); HBRUSH B = CreateSolidBrush(RGB(120,182,74)); //COLOR是你想设置的颜色 return (HBRUSH) B; // default: //其他控件设置自己默认的颜色和背景刷. }
为文件夹添加背景图片,音乐 为文件夹添加背景音乐,和图片 [ExtShellFolderViews] {BE098140-A513-11D0-A3A4-00C04FD706EC}={BE098140-A513-11D0-A3A4-00C04FD706EC} [{BE098140-A513-11D0-A3A4-00C04FD706EC}] Attributes=1 IconArea_Image=D:\My Documents\杰少图片\俓典製筰\ [.ShellClassInfo] ConfirmFileOp=0 将文件保存为:desktop.ini,然后你可以选择它的属性,把它隐藏起来更加清爽,这样就可以像桌面一样,有美丽的图片当背景了,想让哪个盘添加这个效果就在哪个盘下建立。 白色,输入“IconArea_Text=0x00FFFFFF” 红色,“=”后的数字字母替换为“0x000000FF” 黄色,替换为“0x0000FFFF” 蓝色,替换为“0x00FF0000” 灰色,替换为“0x00808080” 黄色:IconArea_Text=0x0000FFFF 蓝色:IconArea_Text=0x00FF0000 绿色:IconArea_Text=0x0000FF00 红色:IconArea_Text=0x000000FF 浅绿色:IconArea_Text=0x0080FF00 浅蓝色:IconArea_Text=0x00FFFF00 暗蓝色:IconArea_Text=0x00FF8000 浅紫色:IconArea_Text=0x00FF80FF 紫色:IconArea_Text=0x00FF00FF 橙红色:IconArea_Text=0x000080FF 墨绿色:IconArea_Text=0x00408000 猪红色:IconArea_Text=0x00000080 灰色:IconArea_Text=0x00C0C0C0 白色:IconArea_Text=0x00FFFFFF 粉红色:IconArea_Text=0x008000FF 褐色:IconArea_Text=0x00004080 紫蓝色:IconArea_Text=0x00FF0080 黑色:IconArea_Text=0x00000000 深草绿色:IconArea_Text=0x00008080 为文件夹添加背景音乐