MPI在VS2008下的配置过程
- 格式:pdf
- 大小:507.25 KB
- 文档页数:11
MPICH2在Windows系统Visual Studio 2010的环境搭建本机运行环境:机器型号:联想G450处理器:Pentium(R)Dual-Core CPU T4200 @ 2.00GHz运行内存(RAM):2GB操作系统:Windows 7(32位)程序开发环境:Visual Studio 2008MPI版本:mpich2-1.3.2p1-win-ia32安装程序MPI的编译和运行对于简单的程序,可以使用专门的编译命令。
对于大的项目,最好使用标准的Makefile。
MPICH提供的编译命令有mpicc和mpif77,它们分别是C和Fortran的编译命令: mpicc -o first first.cmpif77 -o first firstf.f对于编译得到的目标程序,运行的命令为:mpirun –arch xxx –np yyy first其中xxx为machines.<arch>的<arch>,yyy为申请的进程数目。
MPICH的安装和配置文中使用的MPICH2安装文件是mpich2-1.4-win-ia32(/mpi/mpich),在Windows下安装MPICH2比较简单,但是要有Microsoft .NET Framework的支持。
安装基本上只要单击“Next”即可。
在安装过程中会提示输入进程管理器的密码,这个密码被用来访问所有的程序,这里使用的密码为admin。
如果是多台机器执行mpi,那么这多台机器上必须配置相同的mpi用户,就是新用户的用户名和密码必须相同。
安装完成后,安装目录下的include子目录包含了编程所需要的所有头文件,lib子目录包含了相应的程序库,而子目录bin则包含了MPI在Windows下面必须的运行程序。
运行时需要的动态链接库被安装在了Windows系统目录中。
在Windows平台下可以使用Microsoft Visual Studio来开发MPI程序。
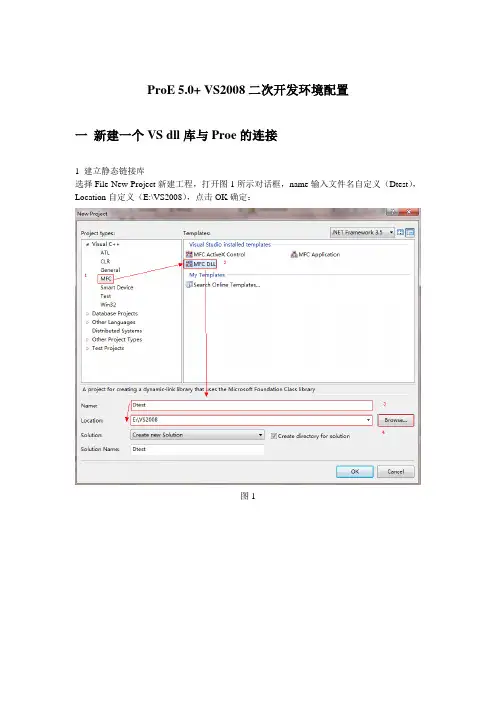
ProE 5.0+ VS2008二次开发环境配置一新建一个VS dll库与Proe的连接1 建立静态链接库选择File-New-Project新建工程,打开图1所示对话框,name输入文件名自定义(Dtest),Location自定义(E:\VS2008),点击OK确定:图1图2图3(在向导的第二步中选择使用静态链接MFC库方式)2进行工程属性配置新建dll工程后,在新建的工程文件菜单栏中选择Project菜单—--选择属性properties命令,然后进行如下操作:图4(属性配置,注意在Release下进行编译)Release配置1图5 (Release配置2)图6(选择Release后,进行基本配置,采用多字节字符集)图7 (添加处理器预定义PRO_USE_V AR_ARGS,_AFXDLL)图8 (设置运行时库为/MD)图9 (设置语言选项)图10 (添加库依赖wsock32.lib,mpr.lib,psapi.lib,protk_dllmd.lib)3进行工具选项配置(此项配置可以只进行一次,以后创建新的proe二次开发工程时此项操作可以不做修改)单击Tools菜单下—选择options命令进行添加include文件和lib文件搜索路径配置,图11(Include路径:..\ protoolkit\includes;.. \protoolkit\protk_appls\includes;.. \prodevelop\includes;.. \prodevelop\prodev_appls\includes;)图12(Lib路径:..\protoolkit\i486_nt\obj;..\prodevelop\i486_nt\obj;)4函数实现添加头文件:#include "ProMenubar.h"#include "ProMenu.h"#include "ProUtil.h"#include <ProToolkit.h>#define MSGFILE "message.txt"#pragma comment(lib, "netapi32")static uiCmdAccessState UserAccessTestMenu (uiCmdAccessMode);extern "C" int user_initialize()// 入口函数{AfxEnableControlContainer();ProError status;ProName menumsgfile;uiCmdCmdId cmd_id;//在Help菜单的右边添加“二次开发菜单”ProStringToWstring(menumsgfile,"usermsg1.txt");status=ProMenubarMenuAdd("Menu0","USERMenu0","Help",PRO_B_TRUE,menumsgfile );return(0);}static uiCmdAccessState UserAccessTestMenu(uiCmdAccessMode access_mode){return (ACCESS_A V AILABLE);}extern "C" void user_terminate() // 出口函数{AFX_MANAGE_STATE(AfxGetStaticModuleState());}5 进行应用注册设置,选择盘符创建文件(在此选择E:\VS2008\Dtest下创建Protk.dat 文件)图13(protk文件内容设置)(name Dteststartup dllallow_stop TRUEdelay_start FALSEexec_file E:\VS2008\Dtest\Release\Dtest.dlltext_dir E:\VS2008\Dtest\textrevision 1000end )6 进行菜单文字显示设置,选择当前目录下创建text文件夹,如图14,15所示:图147 打开proe---Tools菜单----Auxiliary application命令,按图进行操作,观察结果图16 操作过程二将已经建好的project拷贝到另一台电脑使用只需要修改其菜单Tools下的option属性,因为其本身的properties属性应经定义好。

在此操作实例中,您将了解如何在本地计算机和 Microsoft Windows HPC Server 2008 群集上设置和启动 MPI 群集调试程序会话。
此操作实例包括使用消息传递界面 (MPI) 和打开多进程 (OpenMP) 应用程序编程界面 (API) 创建应用程序所需的步骤和示例代码。
本指南内容:使用 MPI 群集调试程序的要求在 Visual Studio 2010 中创建 C++ MPI 示例项目配置和启动 MPI 群集调试程序附录:除应用程序二进制外,Visual Studio 部署的文件和 CRT (如果要求)使用 MPI 群集调试程序的要求您的开发计算机上必须安装了 Visual Studio 2010 Professional Edition 或更高版本(包括远程调试程序)。
您必须在群集上拥有管理权限。
Visual Studio 必须能够访问要运行调试会话的计算节点。
以下方案提供了所需的访问权限:您在群集头节点或专用登录节点上开发应用程序。
所使用群集的计算节点被连接到企业网络(拓扑 2、4 或 5),并且您的开发计算机连接到了相同的域或是与群集域有信任关系的域。
要从客户端计算机将应用程序提交到 HPC 群集,您必须安装了 Microsoft HPC Pack 2008。
要使用 Microsoft 消息传递界面构建 MPI 程序,需要在开发计算机上安装Windows HPC Server 2008 SDK。
在 Visual Studio 2010 中创建 C++ MPI 示例项目本部分的示例代码用于一个使用 Monte Carlo 模拟估算 Pi 值的并行应用程序。
示例代码在每个 MPI 进程上运行 50,000,000 次迭代计算。
在每次迭代计算中,示例代码都生成间隔为[0,1] 的随机数字以确定一组 x 和 y 坐标。
然后评估坐标组以确定点是否位于行 x2 + y2 = 1 下。
QT4.6.3+VS2008安装配置全过程-叶子的离开,是因为风的追求还是树的不挽...QT4.6.3 + VS2008安装配置全过程收藏一、下载两个安装EXE,qt-win-opensource-4.6.3-vs2008.exe 和qt-vs-addin-1.1.5.exe;也可以在这个找到这两个exe文件下载的地址/ati_crossfire/blog/item/a369c7fabd4f8f6 a024f5673.html//D:\Visual Studio Add-in 两个exe文件都在这个地方;二、系统中已经安装了VS2008及SP1补丁包;//不太确定是不是安装SP1补丁包,但安装vs2008的时候记得安装的比较全,没有缺少什么;三、然后安装两个EXE文件,最好先安装qt-win-opensource-4.6.3-vs2008.exe;//有什么先后顺序就不太清楚,反正我在下qt-win-opensource-4.6.3-vs2008.exe之前就已经将qt-vs-addin-1.1.5.exe安装了;什么后果就不晓得了;只是打开vs2008时菜单栏已经有了Qt ,只是打开下面的designer时出现错误的对话框,no default Qt Version found, please check your Qt visual Studio Add-insettings ? 也许是没有设置好环境变量之类的东西;四、配置QT:控制面板->系统->高级->环境变量,在“系统变量”这个组合框中,找到“Path”变量,在"Path"的最后面添加"d:\work\Qt463\bin\",(假设你的安装目录是“d:\work\Qt463\”以下的命令都是依照这个安装目录进行操作)//D:\Qt\4.6.3 这是我的安装路径;五、接下来,开始 -> 程序 -> Microsoft Visual Studio 2008 ->Visual Studio T ools ->Visual Studio 2008 命令提示六、在命令行中键入:d: 回车cd /D d:\work\Qt463 回车 //这里是D:\Qt\4.6.3configure (注意:如果机器中存在多个编译器,你想要指定一个编译器,需要把configure 替换成configure -platform win32-msvc)//这里出现两个候选项,一个是commecial 另一个是opensource; 这里我选择了opensource 也没有什么根据或理由选择这;这估计搞了一个小时左右;nmake 回车搞到这一步;2010-9-6七、编译成功之后,打开VS2008, 工具 -> 选项 -> 项目和解决方案 -> VC++目录中,A.在“包含文件”中加入以下目录:d:\work\Qt463\include D:\Qt\4.6.3\include d:\work\Qt463\include\Qtd:\work\Qt463\include\QtCored:\work\Qt463\include\QtGuid:\work\Qt463\include\QtHelpd:\work\Qt463\include\QtNetworkd:\work\Qt463\include\QtOpenGLd:\work\Qt463\include\QtScriptd:\work\Qt463\include\QtSqld:\work\Qt463\include\QtSvgd:\work\Qt463\include\QtT estd:\work\Qt463\include\QtUiToolsd:\work\Qt463\include\QtWebKitd:\work\Qt463\include\QtXmld:\work\Qt463\include\QtXmlPatternsd:\work\Qt463\srcB.在“库文件”中加入以下目录:D:\work\Qt463\lib八、好了,VS2008和QT的安装配置已经全部完成,你可以放心开发QT程序了。
vs2008中设置OpenMP:实验环境:平台为XP,VS2008如何建立Openmp编程环境OpenMP在Windows环境下比较容易实现,只要打开VS2008中的编译选项/openmp,设置一下环境变量OMP_NUM_THREADS就可以了。
一般是新建一个c++项目,以次选择Project-> (alt+f7)属性 -> 配置属性(configuration property) -> c/c++ -> 语言(Language),打开OpenMP支持;设置环境变量:我的电脑 -> 属性 -> 高级 -> 环境变量,新建一个OMP_NUM_THREADS变量,值设为2,即为程序执行的线程数。
至于其它环境变量,在使用的时候我们再设置就可以了,所以暂时不考虑。
这样,就可以进行OpenMP程序设计了。
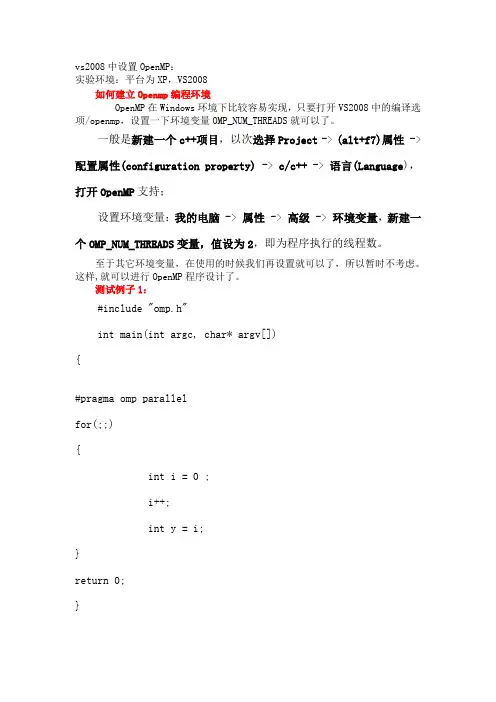
测试例子1:#include "omp.h"int main(int argc, char* argv[]){#pragma omp parallelfor(;;){int i = 0 ;i++;int y = i;}return 0;}测试例子2:#include <stdio.h>#include <omp.h>int main(){omp_set_num_threads(2);#pragma omp parallelprintf("Hello from Thread NO.%d\n", omp_get_thread_num()); return 0;}程序运行结果为:Hello from Thread NO.0Hello from Thread NO.1。
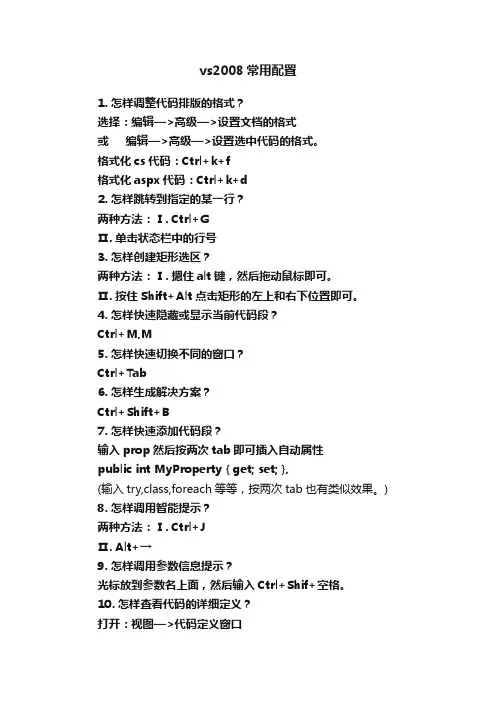
vs2008常用配置1. 怎样调整代码排版的格式?选择:编辑—>高级—>设置文档的格式或编辑—>高级—>设置选中代码的格式。
格式化cs代码:Ctrl+k+f格式化aspx代码:Ctrl+k+d2. 怎样跳转到指定的某一行?两种方法:Ⅰ. Ctrl+GⅡ. 单击状态栏中的行号3. 怎样创建矩形选区?两种方法:Ⅰ. 摁住alt键,然后拖动鼠标即可。
Ⅱ. 按住Shift+Alt点击矩形的左上和右下位置即可。
4. 怎样快速隐藏或显示当前代码段?Ctrl+M,M5. 怎样快速切换不同的窗口?Ctrl+Tab6. 怎样生成解决方案?Ctrl+Shift+B7. 怎样快速添加代码段?输入prop然后按两次tab即可插入自动属性public int MyProperty { get; set; },(输入try,class,foreach等等,按两次tab也有类似效果。
)8. 怎样调用智能提示?两种方法:Ⅰ. Ctrl+JⅡ. Alt+→9. 怎样调用参数信息提示?光标放到参数名上面,然后输入Ctrl+Shif+空格。
10. 怎样查看代码的详细定义?打开:视图—>代码定义窗口然后你再在页面中把鼠标点到某个方法上。
11. 怎样创建区域以方便代码的阅读?#region代码区域#endregion12. 怎样同时修改多个控件的属性?选中多个控件,然后右键属性,这个时候这些控件共有的属性就会出现,修改之后所有的控件都会变化。
13. 怎样快速添加命名空间?对于引用了dll,但代码中没有引用其命名空间的类,输入类名后在类名上按Ctrl+.即可自动添加该类的引用命名空间语句。
14. 怎样实现快速拷贝或剪切一行?光标只要在某行上,不用选中该行,直接按Ctrl+c 或Ctrl+x 就可以拷贝或剪切该行。
15. 怎样使用任务管理器?假如我们开发的项目很大,在项目中有些代码没有完成,我们可以做一下标记,便于将来查找。
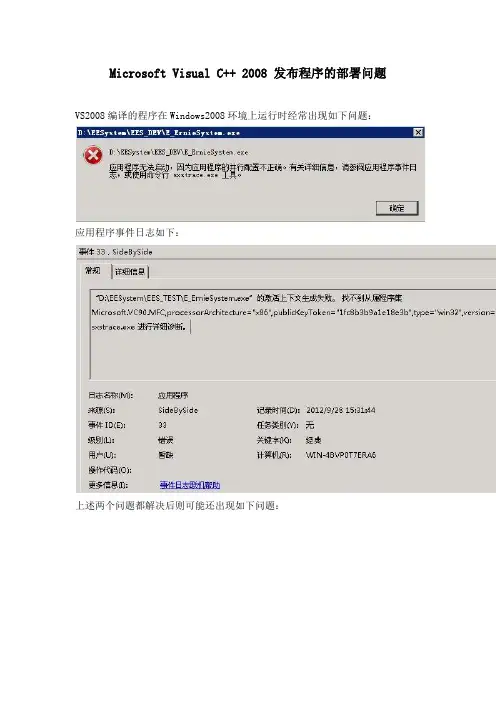
Microsoft Visual C++ 2008 发布程序的部署问题VS2008编译的程序在Windows2008环境上运行时经常出现如下问题:应用程序事件日志如下:上述两个问题都解决后则可能还出现如下问题:注意:此时是调用dll出现问题了,而不是运行主程序出错。
主要问题是“找不到从属程序集Microsoft.VC90.MFC”,解决办法如下:将整个“C:\Application\Microsoft Visual Studio 9.0\VC\ redist\x86\Microsoft.VC90.MFC”拷贝到exe文件所在目录下,如果exe程序所涉及调用的dll与该exe文件不在同一目录,那么须要在dll所在目录也拷贝一份。
详细描述如下:这个问题有好多Blog和Forum已经讨论过了,但都不详尽,在具体的操作过程中还是有许多疑问。
我摘录并整合了许多网络文章,希望能够做个最终了结。
一、VC2005和VC2008编译出来的程序如何发布/lf426/archive/2008/04/12/46885.aspxVC2005和VC2008编译出来的程序放到别人的电脑上为什么有可能无法运行呢?1:Microsoft Visual C++ 2008 Express Edition可以发布软件吗?能!很多人说,因为是Express版,不是Studio,所以只是用来练习语言的,不能发布软件——错!除了没有MFC和ATL,基本上跟 .net 版本是一样的。
发布出来的,是完整的可执行文件。
2:VC 2008 (2005) 发布出来的程序必须附带上他们特定的dll文件吗?不一定。
如果目标系统是个经常升级的系统,微软已经为其打上了所需要的dll文件补丁了,不需要在软件包里面附加特定的dll文件。
特别在Vista系统中,你更是不需要VC8和VC9的dll文件。
但是在一些老版本的系统中,这些文件就是必须的。
3:VC2008和VC2005特定的dll文件是哪些?VC8: msvcm80.dll, msvcp80.dll, msvcr80.dllVC9: msvcm90.dll, msvcp90.dll, msvcr90.dll4:如何部署文件?首先,请选择release版本;在生成可执行文件(exe文件)的时候,会得到相应的部署文件(manifest文件)。

创建项目并添加源文件通过以下方式创建一个项目:指向“文件”菜单上的“新建”,然后单击“项目”。
在“Visual C++”项目类型窗格中,单击“Win32”,然后单击“Win32 控制台应用程序”。
键入项目名称。
默认情况下,包含项目的解决方案与项目同名,但您可以键入其他名称。
您也可以为项目键入其他位置。
单击“确定”创建项目。
在“Win32 应用程序向导”中,单击“下一步”,选择“空项目”,然后单击“完成”。
如果未显示“解决方案资源管理器”,请在“视图”菜单上,单击“解决方案资源管理器”。
将一个新源文件添加到项目,如下所示。
在“解决方案资源管理器”中,右击“源文件”文件夹,指向“添加”,然后单击“新建项”。
在“代码”节点中单击“C++ 文件(.cpp)”,为文件键入名称,然后单击“添加”。
该 .cpp 文件即显示在“解决方案资源管理器”中的“源文件”文件夹中,并且文件将在Visual Studio 编辑器中打开。
在编辑器内的文件中,键入使用标准C++ 库的有效C++ 程序,或者复制示例程序之一并将其粘贴在文件中。
例如,您可以使用set::find (STL Samples)示例程序,该程序是帮助中附带的标准模板库示例之一。
如果使用该示例程序,请注意using namespace std; 指令。
此指令使程序能够使用cout和endl,而无需完全限定名(std::cout和std::endl)。
保存该文件。
在“生成”菜单上,单击“生成解决方案”。
“输出”窗口显示有关编译过程的信息,例如,生成日志的位置,以及指示生成状态的消息。
在“调试”菜单上,单击“开始执行(不调试)”。
如果使用了示例程序,将显示一个命令窗口,其中显示是否在集合中找到了特定的整数。
创建Visual C++ 源文件并在命令行上对其进行编译打开“Visual Studio 2010 命令提示”窗口,方法是单击“开始”,指向“所有程序”、“Microsoft Visual Studio 2010”、“Visual Studio 工具”,然后单击“Visual Studio 2010 命令提示”。
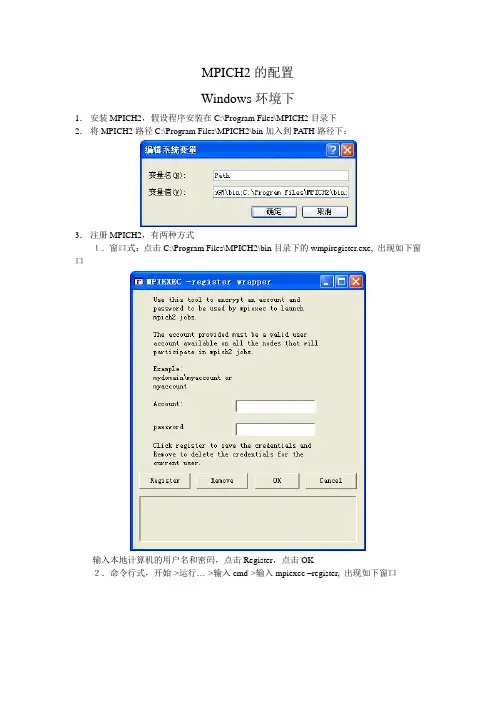
MPICH2的配置Windows环境下1.安装MPICH2,假设程序安装在C:\Program Files\MPICH2目录下2.将MPICH2路径C:\Program Files\MPICH2\bin加入到PA TH路径下:3.注册MPICH2,有两种方式1.窗口式:点击C:\Program Files\MPICH2\bin目录下的wmpiregister.exe, 出现如下窗口输入本地计算机的用户名和密码,点击Register,点击OK2.命令行式,开始->运行…->输入cmd->输入mpiexec –register, 出现如下窗口依次输入用户名和密码再确认一次,即可输入4.打开MPICH进程管理器服务程序:控制面板->管理工具->服务,找到如下服务确认其已经打开5.在VC项目中的程序配置1.打开VC6,在菜单工具->options…下的Directories下添加Include files:2.添加Library files:3.以C项目为例,新建一个C项目MPITest,新建一C文件HelloWorld.c, 文件内容如下:#include “mpi.h”#include <stdio.h>int main(int argc, char** argv){MPI_Init(&argc, &argv);printf(“Hello World!\n”);MPI_Finalize();return 0;}4.编译与连接:在工程菜单下的Setting…下选择Link选项卡,加入库文件mpi.lib,对于C++文件,加入cxx.lib和mpi.lib文件,对于fortran文件,VC6中加入fmpich2s.lib,VC2008中加入fmpich2.lib文件5.运行:运行时建议关闭防火墙1.命令行方式:在命令行模式下进入该目录,输入mpiexec –n 4 MPITest.exe, 即可得结果:2.窗口方式:在C:\Program Files\MPICH2\bin目录下打开wmpiexec.exe, 找到运行文件,设置进程数目,点击运行即可。

Windows 7 64bit +VS2008+ CUDA 4.0安装配置完全过程安装CUDA4.0时,碰到了很多意外,花费了较多时间,最终取得了成功,现对期间的经验教训总结如下,供大家分享,期待提高大家的工作质量和效率。
一 安装环境Windows 7 64bit 家庭版,VS2008(安装了X64编译器),CUDA 4.0 64bit版本;二 安装软件Windows 7 64bit 家庭版是购买笔记本时自带的系统,不再详说。
2.1 安装VS2008安装的professional版本,在安装时选择自定义安装,选择自己需要的组件,如下图1所示(这里借用了别人的一张图片),注意展开Visual C++子树,选中X64组件。
图1 自定义安装VS2008组件安装完毕后,对于如何取消90天试用限制问题,采用了别人的破解办法,具体的操作方法如下:打开 控制面板 Î 添加删除程序, 找到VS2008的安装项,运行VS2008的安装卸载程序,出现如下图2所示界面:图2 VS2008的安装卸载界面下载 破解程序CrackVS2008ForWindows7.zip,然后右键点击该破解程序,选择以管理员身份运行,出现如下的图3所示界面:图3 破解程序界面点击图3右上角 按钮“Bug 微软”,则久违的图4界面出现了:图4 破解后的界面输入相应的序列号,就可以了,以下是收集的序列号:1.Visual Studio 2008 Professional Edition:XMQ2Y-4T3V6-XJ48Y-D3K2V-6C4WT2.Visual Studio 2008 Team Test Load Agent:WPX3J-BXC3W-BPYWP-PJ8CM-F7M8T3.Visual Studio 2008 Team System:PYHYP-WXB3B-B2CCM-V9DX9-VDY8T4.Visual Studio 2008 Team Foundation Server:WPDW8-M962C-VJX9M-HQB4Q-JVTDM2.2 安装CUDA4.0在nvidia的下载网页上,下载了64bit的开发组件,包括driver、tookit、sdk 等主要组件,具体如下:devdriver_4.0_winvista-win7_64_275.33_notebook.execudatoolkit_4.0.17_win_64.msigpucomputingsdk_4.0.19_win_64.execudatools_4.0.17_win_64.msiCUDA4_0BuildCustomizationFix.zip注意驱动选择台式机或者笔记本版本。
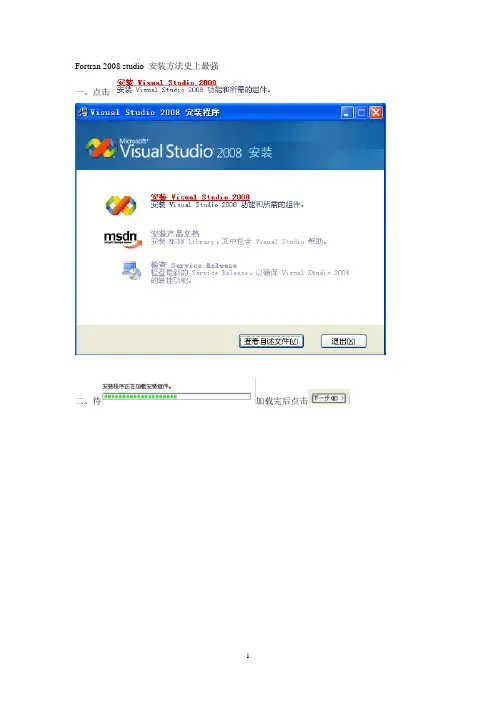
Fortran 2008 studio 安装方法史上最强一、点击二、待加载完后点击三、选中,点击四、选择安装路径和安装的功能五、点击六、点击,此过程而要很长时间,所以必须要耐心等待。
组件安装完后,点击完成,出现,点击。
至此安装Visual Studio 2008 就大功告成。
Visual Studio 2008 自述文件若要查看Visual Studio 2008 自述文件的最新版本,请单击此处。
目录∙ 1. 系统要求∙ 1.1. 支持的体系结构∙ 1.2. 支持的操作系统∙ 1.3. 硬件要求∙ 2. 已知问题∙ 2.1. 安装∙ 2.2. 卸载∙ 2.2.1. 在安装有Visual Studio 早期版本的计算机上∙ 2.2.2. 在未安装Visual Studio 早期版本的计算机上∙ 2.3. 产品问题∙ 2.3.1. 一般问题∙ 2.3.2. ∙ 2.3.3. 语言∙ 2.3.4. LINQ∙ 2.3.5. Visual Studio Tools for Office∙ 2.3.6. Web 开发∙ 2.3.7. Windows Communication Foundation (WCF) 工具∙ 2.3.8. Visual Studio Windows Presentation Foundation (WPF) 设计器∙ 2.3.9. Windows Workflow Foundation (WF) 工具∙ 2.3.10. Windows SDK 集成∙ 3. 相关链接∙1. 系统要求1.1. 支持的体系结构∙x86∙x64 (WOW)1.2. 支持的操作系统∙Microsoft Windows XP∙Microsoft Windows Server 2003∙Windows Vista1.3. 硬件要求∙最低要求:1.6 GHz CPU、384 MB RAM、1024x768 显示器、5400 RPM 硬盘∙建议配置:2.2 GHz 或速度更快的CPU、1024 MB 或更大容量的RAM、1280x1024 显示器、7200 RPM 或更高转速的硬盘∙在Windows Vista 上:2.4 GHz CPU、768 MB RAM2. 已知问题2.1. 安装2.1.1. Visual Studio SharePoint 工作流功能具有特定的安装要求。
VS2005/2008-配置文件(.config/Settings)一、.config设置NET的应用程序配置文件,使用的是XML格式。
相对INI文件来说,它的功能要强上不少,而且具有很强的可扩展性。
它的缺点是不能直接进行写操作,也就是说,不能直接在程序中修改配置文件的数据(当然不是指不能,不过不是本文讨论的范围)。
本文主要目的是探讨如何扩展配置文件,并在其加入各种自定义配置信息。
1. 使用<appSettings>简单的配置信息,可以直接放入<appSettings>标记中。
如:<?xml version="1.0" encoding="utf-8"?><appSettings><add key="LogFile" value="d:\log\debug.log"/></appSettings></configuration>相应访问代码如下:string fileName = System.Configuration.ConfigurationSettings.AppSettings.Ge t("LogFile");2. 自定义配置节(section)名称比如,我们要使用下面的配置结构,将配置信息归类分组:<?xml version="1.0" encoding="utf-8"?><configuration><!-- 需要在此处加入自定义配置声明 --><!-- 以下是自定义配置的内容 --><myConfig><myDictionary><add key="Area" value="Fuzhou"/><add key="Device" value="Printer"/><add key="Customer" value="Muf"/></myDictionary><myNameValue><add key="Area" value="Fuzhou"/><add key="Device" value="Printer"/><add key="Customer" value="Muf"/></myNameValue><myInfoArea="Fuzhou" Device="Printer" Customer="Muf"/></myConfig></configuration>但是光这样子说明是不行的。
对 VS2008技巧的各个方面进行详细而具体的说明, 它们分别是:使用CTRL+k+c注释代码、你可以关掉所有文档窗、在 App_Data目录中双击数据库文件打开数据库口、通过拖拽复制文件或目录到我们项目中等。
1. 使用 CTRL+k+c注释代码如果你想临时想禁用一段代码,你可以把这段代码注释掉,方法是:先选择这段代码, 然后 CTRL+k+c(按住 CTRL 键不放,然后,按一下 k 键,再按一下 c 键 ,使用CTRL+k+u可以取消注释2. 你可以关掉所有文档窗口,除了当前这个。
我们经常会在 Visual Studio 中打开多个文档窗口,这时可以使用 CTRL+TAB组合键方便的在不同的窗口之间切换。
然而如果我们打开了太多的窗口,使用CTRL+TAB就会变的很困难。
VS2008技巧这时有两个方法可以关掉打开的文档窗口。
一个是通过“ 窗口” 菜单的“ 关闭所有文档” 。
另一个更好的方法是,在当前文档窗口的标签上点击右键,然后选择“ 除此之外全部关闭”3. 在 App_Data目录中双击数据库文件打开数据库其实 VS2008技巧这个算不上是技巧了,很多朋友都有意或无意的这样用着。
4. 通过拖拽复制文件或目录到我们项目中有时候我们会在新的解决方案中使用到以前的项目, 原来我们的方法是, 在解决方案上点右击,然后选择“ 添加”->“ 现有项目” ,但是这种方法太慢了。
有没有更快捷的方法呢?答案是肯定的,直接将文件或目录拖拽到“ 解决方案资源管理器” , OK ,就么简单。
5. 使用 CTRL+空格进行自动完成这个方法对老外来说太体贴了,但是我们国内的朋友一般使用 CTRL+空格来进行输入法的开 /关。
这里就不细说了。
6. 使用 CTRL+n或 CTRL+SHIFT+a创建新项在执行一个操作的时候,一般来说, VS2008技巧使用鼠标是会比使用快捷键要慢一些的。
比如在项目中添加新项, 可以使用 CTRL+n或是 CTRL+SHIFT+a, 前一个用于 Web 站点,后一个用于 MVC Web Application 。
第一章安装所需开发环境一、开发所需软件环境1、Visual.Studio.2008开发环境下载地址:/downloads/details.aspx?displaylang=zh-cn&FamilyID=d95598d7-aa6 e-4f24-82e3-81570c5384cb#top2、ActiveSync同步软件下载地址:/soft/21106.htm3、SqlCe数据库(安装在智能设备中的)4、SqlServer2005/ SqlServer 2008下载地址:/downloads/details.aspx?FamilyId=d07219b2-1e23-49c8-8f0c-63f a18f26d3a&displaylang=zh-cn5、Iis安装包下载地址:/soft/7288.html二、创建项目1、打开Visual.Studio.2008,点击——>文件——>项目——>选择“智能设备”(如图)2、点击“确定”——>选择“设备应用程序”(如图)3、单击“确定”项目创建完毕。
(如图)4、可以在窗体上拖拽工具箱里的控件。
三、部署仿真器设备1、选择vs2008顶部菜单的“工具”菜单选项,选择“设备仿真器管理”(如图)2、右键选择仿真器设备(注意:选择的仿真器设备要与vs环境中的一致,如图:)3、选择完之后,点击“连接”,则会出现以下画面:4、在选择好的仿真器设备上,点击鼠标右键选择“插入底座”,仿真器设备部署完毕。
点击vs中的“调试按钮“可以看到仿真器设备的运行效果。
第二章安装智能设备中SqlCe数据库一、首先找到sql ce数据库所需文件:在C:\Program Files\Microsoft Visual Studio 8\SmartDevices\SDK\SQL Server\Mobile\v3.0\wce400\armv4二、通过同步软件ActiveSync将智能设备与PC同步,具体操作方法如下:1、打开ActiveSync ,点击“文件”——>“连接设置”,在“允许连接到以下其中一个端口”下选择“DMA”。
VS2008中OpenGL环境配置参照网上方法:将.h文件拷贝到C:\Program Files\Microsoft SDKs\Windows\v6.0A\Include\gl将.lib文件拷贝到C:\Program Files\Microsoft SDKs\Windows\v6.0A\Lib将.dll文件拷贝到C:\Windows\System32目录中以下方法也是网上的找的,没试过。
下面代码测试通过。
-------------------------------------------------1.安装下载OpenGL类库/source/274113(这个是 1.4版本的),也可以到OpenGL官网下载其他版本。
将.h文件拷贝到C:\Program Files\Microsoft Visual Studio 9.0\VC\include\GL目录中(没有GL 目录就自己创建一个,这里的具体路径视电脑上VS2008安装的位置而定)将.lib文件拷贝到C:\Program Files\Microsoft Visual Studio 9.0\VC\lib目录中将.dll文件拷贝到C:\Windows\System32目录中2.配置环境先创建一个Win32控制台项目,配置项目属性:(1)项目——项目属性——配置属性——C/C++——预处理器——预处理器定义,添加GLUT_BUILDING_LIB(2)项目——项目属性——配置属性——链接器——输入——附加依赖项,添加glut32.lib Opengl32.lib Glu32.lib glaux.lib3.测试创建C++控制台应用程序输入如下代码:#include <windows.h> //这个必不可少#include <gl/glut.h>void display(){glClear(GL_COLOR_BUFFER_BIT);glColor3f(1.0,1.0,1.0);glBegin(GL_POLYGON);glVertex3f(0.25,0.25,0.0);glVertex3f(0.75,0.25,0.0);glVertex3f(0.75,0.75,0.0);glVertex3f(0.25,0.75,0.0);glEnd();glFlush();}void init(){glClearColor(0.0,0.0,0.0,0.0); //以黑色清屏glMatrixMode(GL_PROJECTION); //glMatrixMode - 指定哪一个矩阵是当前矩阵//GL_PROJECTION,对投影矩阵应用随后的矩阵操作glLoadIdentity(); //该函数的功能是重置当前指定的矩阵为单位矩阵glOrtho(0.0,1.0,0.0,1.0,-1.0,1.0);}int main(int argc,char** argv){glutInit(&argc,argv);glutInitDisplayMode(GLUT_SINGLE|GLUT_RGB);glutInitWindowSize(250,250);glutInitWindowPosition(100,100);glutCreateWindow("Hello OpenGL");init();glutDisplayFunc(display);glutMainLoop();return 0;}运行,结果是一个矩形。
2014/8/26MFC和HALCON混合编程在visual studio 2008下配置HALCON10.01.新建一个MFC工程文件打开visual studio 2008->文件->新建->项目->Visual C++->MFC->MFC应用程序->输入程序名称->确定点击下一步点击基于对话框点击下一步勾选最小化框,最小化框点击下一步点击下一步点击完成。
2.配置属性●在【项目属性】->【配置属性】->【c/c++】->【常规】->【附加包含目录】中添加包含路径:$(HALCONROOT)\include;$(HALCONROOT)\include\cpp注意:这里用的HALCON为10.0。
●在【项目属性】->【配置属性】->【连接器】->【常规】->【附加库目录】中添加库路径:$(HALCONROOT)\lib\$(HALCONARCH)在【项目属性】->【配置属性】->【连接器】->【输入】->【附加依赖项】中添加库:halconcpp.lib点击确定。
生成如下项目:3.工具->选项->项目和解决方案->VC++目录下,附加库目录和包含文件目录添加库文件如下:$(HALCONROOT)\lib\x86sse2-win32包含文件设置如下:$(HALCONROOT)\include\cpp$(HALCONROOT)\include点击确定。
配置完成。
把HALCON程序导出到visual Studio 2008在HDevelop中编写的程序,导出为C++。
文件->导出选择导出文件所放的位置和类型,并选择导出。
本例中导出的halcon程序(c++)所在目录为:C:\Users\Administrator\Desktop\halcon\halcon\halconmfc.cpp在3Dlg.h(头文件中),把原hdevelop程序的变量声明部分放在Rebublic下,如图:// Local iconic variablesHobject File, Region, ConnectedRegions, RegionTrans;Hobject SelectedRegions;// Local control variablesHTuple Width, Height, WindowHandle;并在该头文件中添加’halconcpp.h’,并使用命名空间,即:#include “halconcpp.h”using namespace Halcon;如图:在3Dlg.cpp中包含头文件halcon.h,并使用命名空间,即:#include “halconcpp.h”或#include “halcon.h”using namespace Halcon;如图:点击生成->生成解决方案点击调试,出现下图点击读取图像,结果如下(与在HALCON中运行结果一致):点击图像处理:结果如下(与HALCON中结果一致):注意:1.在visual studio中导出HDevelop程序应该先导出程序,再在visual studio中新建MFC工程并配置。
MPI configuration with Visual C (Visual Studio 2008)Mumtazimah binti Mohamad & Md Yazid Mohd SamanDepartment Computer Science , Faculty of Science & TechnologyUniversiti Malaysia TerengganuEmail: mumtaz@.my1.0Introduction to Message Passing Interface and MPICH2Message Passing Interface(MPI) is a specification for a standard library for message passing that was defined by the MPI Forum, a broadly based group of parallel computer vendors, library, writers, and applications specialists(Gropp et al., 1996). MPI is combine interface, the protocol and semantic specifications for how its features must behave in any implementation (such as a message buffering and message delivery progress requirement). MPI includes point-to-point message passing and collective (global) operations, all scoped to a user-specified group of processes.MPICH is a freely available, complete implementation of the MPI specification, designed to be both portable and efficient. The “CH” in MPICH stands for “Chameleon”, symbol of adaptability to one’s environment and thus of portability. Chameleons are fast, and from the beginning a secondary goal was to give up as little efficiency as possible for the portability.MPICH2 is extension of MPI1 with high performance and widely portable implementation of message passing interface (MPI) standard. It is developed by Argonne National Laboratory. The goal of MPICH2 are (1) to provide an MPI implementation that supports different computation and communication platforms including commodity clusters (desktop systems, shared-memory systems, multicore architectures), high-speed networks(e.g. infiniBand) and propriety high-end computing(e.g. Cray) (2) to enable cutting-edge research in MPI through an easy-to-extend modular framework for other derived implementations (ANL, 2005).MPICH2 should be used instead of MPICH1 except for the case of clusters with heterogeneous data representations (e.g., different lengths for integers or different byte ordering). MPICH2 is distributed as source (with an open-source, freely available license). It has been tested on several platforms, including Linux (on IA32 and x86-64), Mac OS/X (PowerPC and Intel), Solaris (32- and 64-bit), and Windows. MPICH2 support Multiple Program Multiple Data(MPMD) and clusters on different platform and have C++ standard binding as previous MPICH1.1.1Other windows-based MPI implementations.There are other windows-based implementations such as:i.WMPI1.3 works on Microsoft Windows95 and Windows NT.ii.mp-mpich from RWTH: Scalable Computing, Aacheni.Contact: mp-mpich@lfbs.rwth-aachen.deiii.MPI-FM from University of Illinois, Concurrent Systems Architecture Groupi.Contact: fast-messages@iv.MPICH/NT from Mississippi State Universityi.Contact: shane@ and boris@v.MSMPI from Microsofti.Source : /en-us/library/cc720120%28WS.10%29.aspx vi.MPI/LAM - developed by Indiana, OSC, Notre Dame (freeware)vii.MPI/Pro - commercial productviii.Apple's X Gridix.OpenMPI - MPI-2 compliant, thread safeThe similarities in various implementations are:•Source code compatibility (except parallel I/O)•Programs should compile and run as it is•Most of them support for heterogeneous parallel architectures such as clusters, groups of workstations, SMP computers and grids.The various MPI implementations as above list maybe differs in commands for compiling and linking, MPI program launching, parallel I/O (start from MPI-2) and also debugging. Approaches of programming in most MPI windows-based implementation can be Single Program Multiple Data(SPMD) where the same program is on all processors and Multiple Program Multiple Data ( MPMD) where the different programs is located on different processors.2.0 Configuration of MPICH and Visual C++ in Visual Studio 2008In order to support MPI programming for multiprocessor and parallel computing, we have to have the MPI implementation standard. Note that this configuration is done unto Windows Vista Home Premium 32 bit operating system. The installation should also applied to Windows XP.We need:•Visual C++ from Visual Studio 2005 or visual Studio 2008 as a compiler.•MPICH2 for MPI library component for MPI windows-based implementations2.1Visual Studio 2008Both the express and professional editions can be used. The express edition can be downloaded from Internet at /od/learnc/ss/vc2008_2.htm . The incoming configuration also can be applied on Visual Studio 2003 and Visual Studio 2005 where it has been tested to be similar. The use of Visual Studio 2010 is yet to be tested.2.2 Configuring MPI with MPICH2The MPICH2 setup can be downloaded at /research/projects/mpich2/ . This version is 32bit edition.i.Double click on downloaded setup then it will automatically install on the machine. Figure1.1 shows the setup wizard for installation.Figure 1.1 : The installation windowsThere is a step that the process manager setup remind the user to remember the passphrase given. The default value of the passphrase is “behappy” as shown in figure 1.2. This passphrase will be used during SMPD service that capable to make processes from variety of platform.Figure 1.2 : Step 2 of the installation: Passphraseii.Edit the system pathAfter the mpich2 installation is done. Add the following to system path (in Vista: right click My Computer/Properties/Advanced System Settings/ Advanced/ Environment Variables) C:\Program Files\MPICH2\binEdit the path variable for either the system or user variables. This also works on XP but the advanced setting does not exist.Figure 1.3 : Editing the system pathiii.Add the following exceptions to your firewall:C:\Program Files\MPICH2\bin\mpiexec.exeC:\Program Files\MPICH2\bin\smpd.exeUsually, you will receive a message to unblock these programs. But in case you don't, you have to add them manually.iv.Register a user account with MPI. Go toC:\Program Files\MPICH2\bin\wmpiregisterand type in the user account and password that will be used to start MPI jobs. You shouldhave the same user account and password on all your cluster machinesv.Open port 8676. Go toC:\Program Files\MPICH2\bin\wmpiconfigand select "port" at the top of the listNote that if you install the 32 bit MPICH2 on a 64 bit windows, the MPICH installation directory will be under "Program Files (x86)".2.3Configuring Visual Studio 2005 or 2008Now, to setup the environment in Visual Studio we have to tell the compiler where to find the MPI header files and libraries, do the followinga.Start Visual Studio and go to menu “Tools>”Options”>”Projects and Solutions”>”VisualC++ Directories”.In the platform list, select win32. At Show directories for dropdown list, choose “Include files”. Add the following path to list by click new list icon. It can be done by directly type or by browsing the lib file location as follows: “C:\Program Files\MPICH2\include”b. Change directory to” Library Files” and add new path to the library files list as figure 1.5. add the following path: “C:\Program Files\MPICH2\lib”This setting is configured once after installation of MPICH2.Figure 1.4 : Configuring the include file of MPICH2 Figure 1.4 : Configuring the library file of MPICH22.4Configuring MPI project during codingTo develop a new project, click menu “File” and choose “New Project”. There will be a menu for setting a new project as in figure 1.6. Choose” Visual C++ “project type and click “Win32”. On the right, there will templates for win32 project, click on the “Win32 Console Application”. Name the project name and the location to be saved. Then click ‘OK’.Figure 1.6 : Creating a new project of win32 console application Figure 1.7 appear afterwards and choose empty project and click ‘Finish’ button.Figure 1.7: Setting the projectBefore start writing any codes, each MPI project should have the following setting manually.Click on project Name, and select menu “Project” and choose “Properties”. Click “Configuration Properties”, then choose C/C++ and click on “General”. On “Additional Include Directories”, add (or browse) the following entry:C:\Program Files\MPICH2\includeFigure 1.8 : Setting the include file projectAs figure 1.7, Select "Linker" tree menu and choose “Input”. In “Additional Library Directories” add the following entry:C:\Program Files\MPICH2\libFigure 1.9 : Setting the library file projectThe last one is by selecting “Linker”> “ Input”> on the left side. Choose “Additional Dependencies “ by add “mpi.lib” and click OK button as shown in Figure 1.10.2.5 MPI Debugging with Visual StudioOpen your project properties, and go to “Configuration Properties” and choose “Debugging”. Set the the following properties:1. MPIRun Command is the path and filename of your mpirun application (usuallympiexec.exe or mpirun.exe), if the default path is "c:\Program Files\MPICH2\bin\mpiexec.exe" (do not forget the “”). Make sure the mpiexec file in thelocated file.Figure 1.10 : Setting the input library of projectFigure 1.11 : Setting the mpiexec2. MPIRun Arguments are the arguments we want to pass to the mPIRun command, at veryleast we have to tell mpi the number processes to spawn, so we use –n 2 (or –np 2) for 2processes (change 2 as you wish).3. MPIShim Location is the path and filename of your mpishim.exe file. Mpishim.exe isdifferent for every release of visual studio and platform you have. For example its location for Visual Studio 2008 and 2005 for 32bit platforms should be “C:\Program Files\Microsoft Visual Studio 8\Common7\IDE\Remote Debugger\x86”3 Configuring MPI project during coding Figure 1.13 : Setting the MPI properties Figure 1.12 : Setting the MPI application commandDebuggingFigure 1.14 : Setting the MPI propertiesMPI program should define their library header which is “mpi.h” among all other libraries. To start debugging the MPI program, write some mpi code or, copy MPI “helloworld” program and paste into source file .cpp. Compile and run on command prompt where, the executable file is located Example:C:\..\theProject\debug\mpiexec –np 3 exefile.exe•mpiexec - mpirun command•np for number processor syntax• 3 is for numbers of processor include master•exefile is file executable file of compiled program.Figure 1.15 : Running on command promptMPI configuration with Visual C (Visual Studio 2008) (C) Mumtazimah Mohamad UniSZA 2010114.0 ConclusionBefore programming make sure the following work was finished.1. The windows cluster works well by configuration in2.5.2. The Visual Studio host computer (the one from which you are debugging) must has beensetted up as in 2.3. MPICH2 must be installed and configured on each node of the cluster4. The Visual Studio Remote Debugging Monitor (msvsmon.exe) must be installed on eachnode in the cluster.5. The MPIShim.exe file must be installed on each node in the cluster, and in the same locationon each node.5.0 References1. M. Y. Saman ;D. J. Evans, “Manual on System Setup for PC Cluster with WMPI andMicrosoft Visual C++”, 19942. /posts/mpi-debugging-with-visual-studio/3. A L. (2005). MPICH2: High-Performance and Widely Portable MPI. USA: Argonneational Laboratory.4. Gropp, W., Lusk, E., Doss, ., & Skjellum, A. (1996). A high-performance, portableimplementation of the MPI message passing interface standard. Parallel Computing, 22(6), 789-828.For more information, please contact:Mumtazimah binti Mohamad 1 & Md Yazid Mohd Saman 21Email: mumtaz@.my 2Department Computer Science , Faculty of Science & TechnologUniversiti Malaysia TerengganuDate: October 2010-09-20。