简单实现Android图片翻转动画效果
- 格式:doc
- 大小:125.68 KB
- 文档页数:6
Android 开源动画框架:NineOldAndroids1.介绍Android3.0推出了全新的AnimationAPI,使用起来很方便,但是不能在3.0以下版本使用,NineOldAndroids是一个可以在任意Android版本上使用的AnimationAPI,API和Android3.0中的类似。
2.常用类ObjectAnimatorValueAnimatorAnimatorSetViewPropertyAnimator类名与官方的API是对应的,只是包名为com.nineoldandroids.animation。
3.使用方法首先导入NineOldAndroids的jar包。
在Android3.0中,View中有一个animate方法,NineOldAndroids中提供了ViewPropertyAnimator.animate(View)与其对应,可以选择静态导入。
// 官方API(3.0以上)mView.animate().setDuration(5000).rotationY(720).x(100).y(100).start();// NineOldAndroidsViewPropertyAnimator.animate(mView).setDuration(5000).rotationY(720).x(100).y(100).start();// 可以使用静态导入import static com.nineoldandroids.view.ViewPropertyAnimator.animate;// 直接调用animate方法animate(mView).setDuration(5000).rotationY(720).x(100).y(100).start();使用链式编程设置各种属性参数,最终调用start()来启动动画,还可以调用setStartDelay()设置动画延迟启动。
Android Imageloader图片异步加载Imageloader是一个在android平台下简单的下载、显示、缓存空间的图片加载库.异步下载网络图片并可以在UI线程更新View,使用二级缓存控制即内存缓存、本地SD卡缓存.重要更新:1.5.8-SNAPSHOT添加加载图片的动画效果1.5.7ImageTagFactory使用工厂方法实现更加方便测试.本次升级请使用ImageTagFactory.getInstance代替new ImageFactory().添加图片加载过程中的回调接口,更多的方法请参考SettingsBuilder添加修改大量图片展示过程中滚动的一些问题当URL为null的时候添加错误图片Fix for loading images behind redirects (max 3)1.5.6clean up不需要在manifest中注册service,所有的操作在BasicFileManager的线程中完成.1.5.5修改bug添加直接加载图片的DirectLoader(不能在主线程使用)1.5.2缓存中添加预览图支持,可以从缓存中获取大图的预览图1.5.1使用多并发的加载参考Android SDK guidelines修改SDCARD中的缓存文件目录使用LruBitmapCacheImageloader library使用从Demo开始相对好点.具体步骤:1.in the application class添加下列代码初始化Imageloader,SettingsBuilder中提供设置缓存和网络连接的能力.@Overridepublic void onCreate() {super.onCreate();LoaderSettings settings = new SettingsBuilder().withDisconnectOnEveryCall(true).build(this);imageManager = new ImageManager(this, settings);}public static final ImageManagergetImageManager() { returnimageManager;}lru缓存设置选项默认的缓存使用软引用,但是由于系统的内存管理机制、空间限制可能经常被回收掉,限制缓存的性能,lru缓存解决了这个问题,如果你的应用中需要展示很多的小图片建议使用.settings = new SettingsBuilder().withCacheManager(new LruBitmapCache(this)).build(this); thumbnailImageLoader = new ImageManager(this, settings);LruBitmapCache默认使用%25的内存缓存也可以从构造函数中自行配置int PERCENTAGE_OF_CACHE = 50;settings = new SettingsBuilder().withCacheManager(new LruBitmapCache(this,PERCENTAGE_OF_CACHE)).build(this);thumbnailImageLoader = new ImageManager(this, settings);其他设置Imageloader使用UrlConnection获取图片,两个重要的请求的参数需要配置一下connectionTimeout&readTimeout SettingsBuilder builder = new SettingsBuilder();Settings settings = builder.withConnectionTimeout(20000).withReadTimeout(30000).build(this);连接超时的时间是初始化连接的时间读取超时是说已经建立连接获取数据的时间在Acitivty,fragment或Adapter中使用如果想在imageview中加载图片只需要调用的Application的静态方法获得Imageloader再调用其中的load方法下面的代码是Imageview是一个tag的时候的加载过程ImageTagFactoryimageTagFactory = new ImageTagFactory(this,R.drawable.bg_img_loading);imageTagFactory.setErrorImageId(R.drawable.bg_img_notfound); privateViewBindergetViewBinder() {return new ViewBinder() {@OverridepublicbooleansetViewValue(View view, Cursor cursor, intcolumnIndex) {// Build image tag with remote image URLImageTag tag =imageTagFactory.build(cursor.getString(columnIndex));((ImageView) view).setTag(tag);imageLoader.load(view);return true;}};}使用ImageTagFactory配置图片的显示的大小同时开始显示原图.Imageloader将依次从内存缓存,sdcard,网络获取清空SDCARD缓存如果需要清空SDCARD缓存调用imageManager.getFileManager().clean();Imageloader的初始化过程中可以使用settings builder配置缓存的过期时间(默认时间为7天)In the Androidmanifest.xml主要是声明两件事情:权限和注册清空缓存的service(从1.5.6以后清空sdcard缓存的service不是必须的了)<uses-permissionandroid:name="android.permission.WRITE_EXTERNAL_STORAGE" /><uses-permission android:name="android.permission.INTERNET" /> <uses-permissionandroid:name="android.permission.ACCESS_NETWORK_STATE" /><serviceandroid:name="com.novoda.imageloader.core.service.Cach eCleaner" android:exported="true"><intent-filter><actionandroid:name="com.novoda.imageloader.core.action.CLEAN_ CACHE" /></intent-filter></service>缓存预览图片(可选项)缓存预览图片的这个东西主要是考虑有比较多的图片的时候展示,先加载小兔再加载大图.预览图也可以缓存.在图片加载之前配置image tag或配置ImageTagFactory// Image tag after normal settingsimageTag.setPreviewHeight(100);imageTag.setPreviewHeight(100);imageTag.setPreviewUrl(previewUrl);imageView.setTag(imageTag);getImageManager().getLoader().load(imageView);// If small and large image have same URL, configure with the ImageTagFactoryimageTagFactory = new ImageTagFactory(this, R.drawable.loading); imageTagFactory.setErrorImageId(R.drawable.image_not_found); ePreviewImage(THUMB_IMAGE_SIZE,THUMB_IMAGE_SIZE, true);// On bindImageViewimageView = (ImageView) view;String url = cursor.getString(columnIndex);imageView.setTag(imageTagFactory.build(url));MyApplication.getImageManager().getLoader().load(imageView); DirectLoaderImageLoader提供直接通过url下载的图片的工具类,调用该方法请使用非UI线程Bitmap myImage = new DirectLoader().download(url);如果没有找到图片改方法会抛出ImageNotFoundException添加一个动画这是动画显示ImageTagFactoryimageTagFactory = new ImageTagFactory(this,R.drawable.bg_img_loading);imageTagFactory.setErrorImageId(R.drawable.bg_img_notfound);Animation fadeInAnimation = AnimationUtils.loadAnimation(this, R.anim.fade_in);imageTagFactory.setAnimation(fadeInAnimation);获取Imageloader library的途径:使用maven需要在你的pom文件中配置<dependency><groupId>com.novoda.imageloader</groupId><artifactId>imageloader-core</artifactId><version>1.5.6</version></dependency>获得一个.jar文件可以直接引入工程方便使用最新的版本/remotecontent?filepath=com/novoda/imageloader/imagel oader-core/1.5.6/imageloader-core-1.5.6.jar项目结构:core:maven上的java工程demo:Android的测试项目acceptance:添加了Robotium的内部测试工程使用maven构建工程mvn clean installIntelliJ当一个mavenpeoject导入进去项目地址:https:///novoda/ImageLoader。
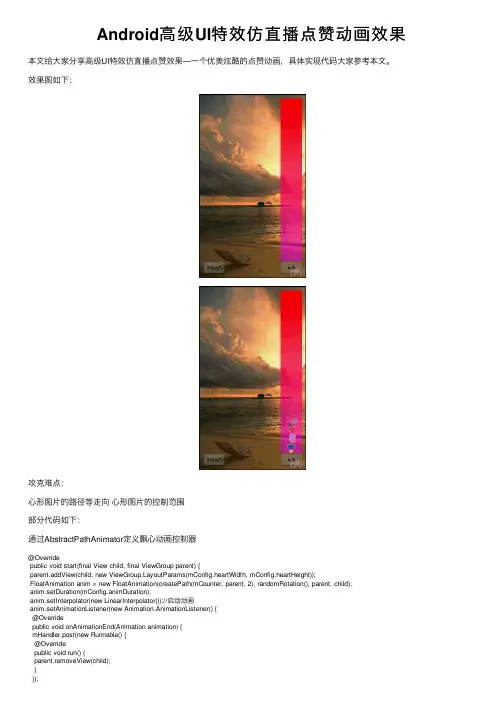
Android⾼级UI特效仿直播点赞动画效果本⽂给⼤家分享⾼级UI特效仿直播点赞效果—⼀个优美炫酷的点赞动画,具体实现代码⼤家参考本⽂。
效果图如下:攻克难点:⼼形图⽚的路径等⾛向⼼形图⽚的控制范围部分代码如下:通过AbstractPathAnimator定义飘⼼动画控制器@Overridepublic void start(final View child, final ViewGroup parent) {parent.addView(child, new youtParams(mConfig.heartWidth, mConfig.heartHeight));FloatAnimation anim = new FloatAnimation(createPath(mCounter, parent, 2), randomRotation(), parent, child);anim.setDuration(mConfig.animDuration);anim.setInterpolator(new LinearInterpolator());//启动动画anim.setAnimationListener(new Animation.AnimationListener() {@Overridepublic void onAnimationEnd(Animation animation) {mHandler.post(new Runnable() {@Overridepublic void run() {parent.removeView(child);}});mCounter.decrementAndGet();}@Overridepublic void onAnimationRepeat(Animation animation) {}@Overridepublic void onAnimationStart(Animation animation) {mCounter.incrementAndGet();}});anim.setInterpolator(new LinearInterpolator());child.startAnimation(anim);}/*** 根据图⽚设置bitmap* @param color* @return*/public Bitmap createHeart(int color) {if (sHeart == null) {sHeart = BitmapFactory.decodeResource(getResources(), mHeartResId);}if (sHeartBorder == null) {sHeartBorder = BitmapFactory.decodeResource(getResources(), mHeartBorderResId);}Bitmap heart = sHeart;Bitmap heartBorder = sHeartBorder;Bitmap bm = createBitmapSafely(heartBorder.getWidth(), heartBorder.getHeight());if (bm == null) {return null;}Canvas canvas = sCanvas;canvas.setBitmap(bm);Paint p = sPaint;canvas.drawBitmap(heartBorder, 0, 0, p);p.setColorFilter(new PorterDuffColorFilter(color, PorterDuff.Mode.SRC_ATOP));float dx = (heartBorder.getWidth() - heart.getWidth()) / 2f;float dy = (heartBorder.getHeight() - heart.getHeight()) / 2f;canvas.drawBitmap(heart, dx, dy, p);p.setColorFilter(null);canvas.setBitmap(null);return bm;}如何创建⼀个pathpublic Path createPath(AtomicInteger counter, View view, int factor) {Random r = mRandom;int x = r.nextInt(mConfig.xRand);int x2 = r.nextInt(mConfig.xRand);int y = view.getHeight() - mConfig.initY;int y2 = counter.intValue() * 15 + mConfig.animLength * factor + r.nextInt(mConfig.animLengthRand); factor = y2 / mConfig.bezierFactor;//随机xPointint xPointFactor = mRandom.nextInt(mConfig.xPointFactor);x = xPointFactor + x;x2 = xPointFactor + x2;int y3 = y - y2;y2 = y - y2 / 2;Path p = new Path();p.moveTo(mConfig.initX, y);p.cubicTo(mConfig.initX, y - factor, x, y2 + factor, x, y2);p.moveTo(x, y2);p.cubicTo(x, y2 - factor, x2, y3 + factor, x2, y3);return p;}Activity中代码:下⾯给⼤家分享⼀个源码:总结以上所述是⼩编给⼤家介绍的Android⾼级UI特效仿直播点赞动画效果,希望对⼤家有所帮助,如果⼤家有任何疑问请给我留⾔,⼩编会及时回复⼤家的。
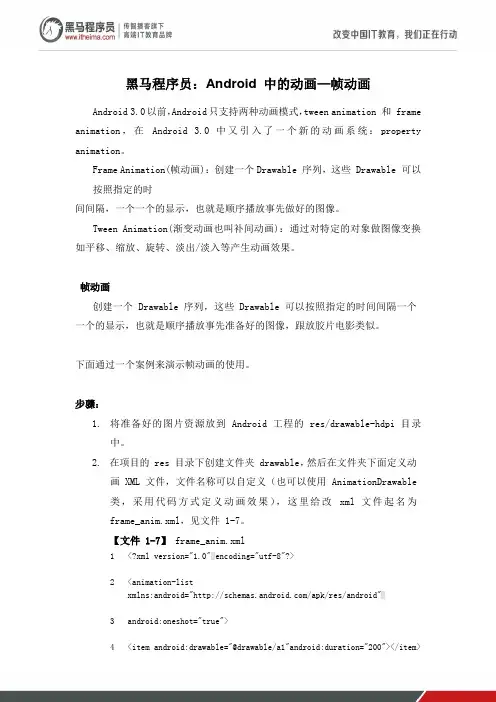
黑马程序员:Android 中的动画—帧动画Android 3.0以前,Android只支持两种动画模式,tween animation 和 frame animation,在Android 3.0 中又引入了一个新的动画系统:property animation。
Frame Animation(帧动画):创建一个Drawable 序列,这些 Drawable 可以按照指定的时间间隔,一个一个的显示,也就是顺序播放事先做好的图像。
Tween Animation(渐变动画也叫补间动画):通过对特定的对象做图像变换如平移、缩放、旋转、淡出/淡入等产生动画效果。
帧动画创建一个 Drawable 序列,这些 Drawable 可以按照指定的时间间隔一个一个的显示,也就是顺序播放事先准备好的图像,跟放胶片电影类似。
下面通过一个案例来演示帧动画的使用。
步骤:1.将准备好的图片资源放到 Android 工程的 res/drawable-hdpi 目录中。
2.在项目的 res 目录下创建文件夹 drawable,然后在文件夹下面定义动画 XML 文件,文件名称可以自定义(也可以使用 AnimationDrawable类,采用代码方式定义动画效果),这里给改xml 文件起名为frame_anim.xml,见文件 1-7。
【文件 1-7】frame_anim.xml1<?xml version="1.0"encoding="utf-8"?>2<animation-listxmlns:android="/apk/res/android"3android:oneshot="true">4<item android:drawable="@drawable/a1"android:duration="200"></item>5<item android:drawable="@drawable/a2"android:duration="200"></item> 6<!-----------------更多 item 不再展示--------------------->7</animation-list>3.打开创建好的 xml 文件,在里面添加根节点<animation-list>,可以在此根节点中设置属性” android:oneshot”来控制动画只播放一次,否则系统将默认持续播放。
AndroidMaterialComponents设计与动画效果演示Android Material Components 是一个为 Android 应用提供一致、美观和易用的设计语言和组件库。
通过使用 Android Material Components,开发者可以轻松实现具有流畅动画效果的应用界面,提升用户体验。
本文将介绍 Android Material Components 的设计原则以及演示一些常用的动画效果。
第一章:Android Material Components 设计原则Android Material Components 基于Material Design 的设计原则,旨在提供一个具有层次感、色彩鲜艳且易于使用的用户界面。
以下是 Android Material Components 的主要设计原则:1. 流线型设计:使用简洁的布局和组件,以提供直观和易于导航的用户界面。
避免过度装饰和不必要的复杂性。
2. 使用明亮的颜色:使用明亮、鲜艳且对比度良好的颜色,以吸引用户的注意力并增加界面的可读性。
3. 使用卡片和投影效果:通过使用卡片和投影效果,为界面元素增加深度感和层次感,使其更具扩展性。
4. 使用动画效果:通过使用动画效果,提供平滑的过渡和交互体验。
合理运用动画可以增强用户对界面操作的感知和满意度。
第二章:按钮效果演示按钮是用户与应用交互的重要组件之一。
Android Material Components 提供了一系列按钮样式和交互效果,以满足不同应用场景的需求。
1. 悬浮按钮:悬浮按钮可以吸引用户的注意力,通常用于主要操作或快速操作的入口。
点击悬浮按钮,可以触发特定的动作。
2. 扁平按钮:扁平按钮是一种简洁、低调的按钮样式。
它们通常用于次要操作或与其他按钮组合使用。
3. 封装按钮:封装按钮是一种特殊类型的按钮,用于在界面的不同部分之间导航。
它们通常具有图标和文本,并可以显示当前位置。

android手把手开发一个图片浏览器这次我给大家讲解一个Android图片浏览器的应用。
AndroidAndroid是基于Linux内核的软件平台和操作系统,早期由Google开发,后由开放手机联盟Open Handset Alliance)开发。
它采用了软件堆层(software stack,又名以软件叠层)的架构,主要分为三部分。
低层以Linux内核工作为基础,只提供基本功能;其他的应用软件则由各公司自行开发,以Java作为编写程序的一部分。
另外,为了推广此技术,Google和其它几十个手机公司建立了开放手机联盟。
Android在未公开之前常被传闻为Google电话或gPhone。
大多传闻认为Google开发的是自己的手机电话产品,而不是一套软件平台。
到了2010年1月,Google开始发表自家品牌手机电话的Nexus One。
目前最新版本为Android2.1。
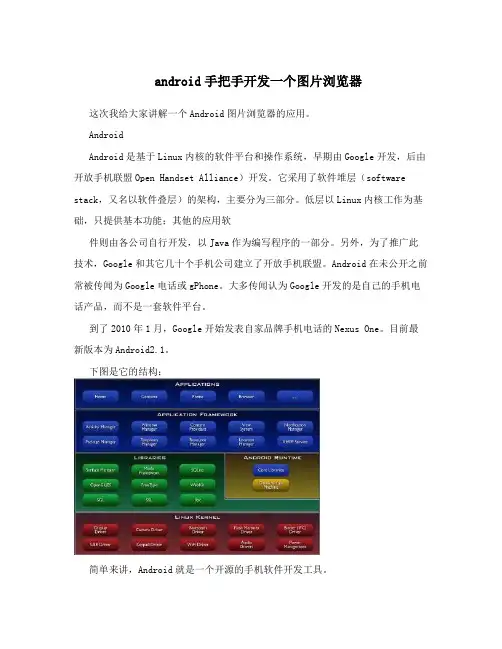
下图是它的结构:简单来讲,Android就是一个开源的手机软件开发工具。
我主要给大家讲应用方面,大家如果有兴趣,可以了解相关基本知识。
要开发一个Android应用,首先得搭建Android开发环境:下载并安装Android sdk(Software Development Kit, 即软件开发工具包)。
由于Android 开发是集成在Eclipse中,需下载并安装ADT (Eclipse集成Android sdk插件)。
搭建环境会用一个专门的章节为大家详细讲解,这里我就不再赘述。
Android开发环境搭好后,我们先启动Eclipse创建一个Android的应用程序,然后在左上角单击File,New,Android Project,如下图所示:如果在图中Java Project找不到Android Project:在左上角单击File,New,Other:在弹出框中Android文件件中选中Android Project,然后单击Next进入下一步:弹出一个列表框:下面对这个列表的一些重要属性进行讲解:1.应用程序名称以及内容栏:2.工具栏:采用的编译工具即Android模拟器:3.属性栏:即应用程序中的相关属性:Android 这就是我们刚才创建的一个Android应用程序如下图:在这里面,我们最关心的是界面(main.xml)与后台(Test1.java):单击main.xml:我们先看看中间视图:这是一个页面编辑器模式:在左下角点击main.xml切换到界面编码模式:这就是刚才页面视图的源码:下面让我们看看后台(Test1.java)源码:单击Test1.java:以下将此类程序称之为activity(活动),该activity运行时会自动调用onCreate方法:而上图中onCreate方法是启动res文件夹下的layout下的main.xml界面。
Android屏幕旋转之横屏竖屏切换的实现刚实现了App内⼿机横/竖放置时,屏幕横/竖屏的切换。
记录⼀下中间需要的关键信息和实现过程。
开门见⼭的说,实现屏幕⾃动/⼿动旋转的⽅式有两种:⼀种是在⼯程的代码中定义,这种⽅式在横竖屏切换时执⾏的操作是:销毁当前Activity–根据新的屏幕尺⼨重建Activity。
如果不进⾏数据存储的操作,在切换的过程中Activity中的数据会丢失。
另⼀种是在⼯程的AndroidManifest.xml中定义,这种定义的⽅式在某些情况下可以实现“不销毁需要横竖屏的Activity”,因为这种⽅式不会销毁Activity后重建Activity,因此Activity的数据不会丢失。
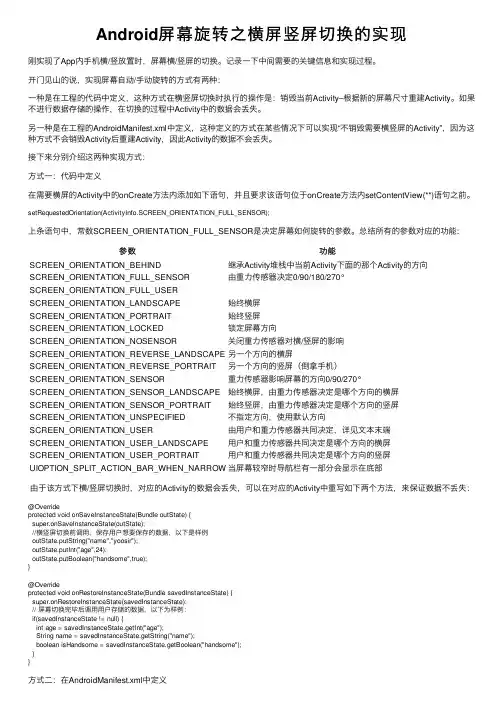
接下来分别介绍这两种实现⽅式:⽅式⼀:代码中定义在需要横屏的Activity中的onCreate⽅法内添加如下语句,并且要求该语句位于onCreate⽅法内setContentView(**)语句之前。
setRequestedOrientation(ActivityInfo.SCREEN_ORIENTATION_FULL_SENSOR);上条语句中,常数SCREEN_ORIENTATION_FULL_SENSOR是决定屏幕如何旋转的参数。
总结所有的参数对应的功能:参数功能SCREEN_ORIENTATION_BEHIND继承Activity堆栈中当前Activity下⾯的那个Activity的⽅向SCREEN_ORIENTATION_FULL_SENSOR由重⼒传感器决定0/90/180/270°SCREEN_ORIENTATION_FULL_USERSCREEN_ORIENTATION_LANDSCAPE始终横屏SCREEN_ORIENTATION_PORTRAIT始终竖屏SCREEN_ORIENTATION_LOCKED锁定屏幕⽅向SCREEN_ORIENTATION_NOSENSOR关闭重⼒传感器对横/竖屏的影响SCREEN_ORIENTATION_REVERSE_LANDSCAPE另⼀个⽅向的横屏SCREEN_ORIENTATION_REVERSE_PORTRAIT另⼀个⽅向的竖屏(倒拿⼿机)SCREEN_ORIENTATION_SENSOR重⼒传感器影响屏幕的⽅向0/90/270°SCREEN_ORIENTATION_SENSOR_LANDSCAPE始终横屏,由重⼒传感器决定是哪个⽅向的横屏SCREEN_ORIENTATION_SENSOR_PORTRAIT始终竖屏,由重⼒传感器决定是哪个⽅向的竖屏SCREEN_ORIENTATION_UNSPECIFIED不指定⽅向,使⽤默认⽅向SCREEN_ORIENTATION_USER由⽤户和重⼒传感器共同决定,详见⽂本末端SCREEN_ORIENTATION_USER_LANDSCAPE⽤户和重⼒传感器共同决定是哪个⽅向的横屏SCREEN_ORIENTATION_USER_PORTRAIT⽤户和重⼒传感器共同决定是哪个⽅向的竖屏UIOPTION_SPLIT_ACTION_BAR_WHEN_NARROW当屏幕较窄时导航栏有⼀部分会显⽰在底部由于该⽅式下横/竖屏切换时,对应的Activity的数据会丢失,可以在对应的Activity中重写如下两个⽅法,来保证数据不丢失:@Overrideprotected void onSaveInstanceState(Bundle outState) {super.onSaveInstanceState(outState);//横竖屏切换前调⽤,保存⽤户想要保存的数据,以下是样例outState.putString("name","yoosir");outState.putInt("age",24);outState.putBoolean("handsome",true);}@Overrideprotected void onRestoreInstanceState(Bundle savedInstanceState) {super.onRestoreInstanceState(savedInstanceState);// 屏幕切换完毕后调⽤⽤户存储的数据,以下为样例:if(savedInstanceState != null) {int age = savedInstanceState.getInt("age");String name = savedInstanceState.getString("name");boolean isHandsome = savedInstanceState.getBoolean("handsome");}}⽅式⼆:在AndroidManifest.xml中定义在AndroidManifest.xml中对应的Activity属性定义中配置android:configChanges和screenOrientation。
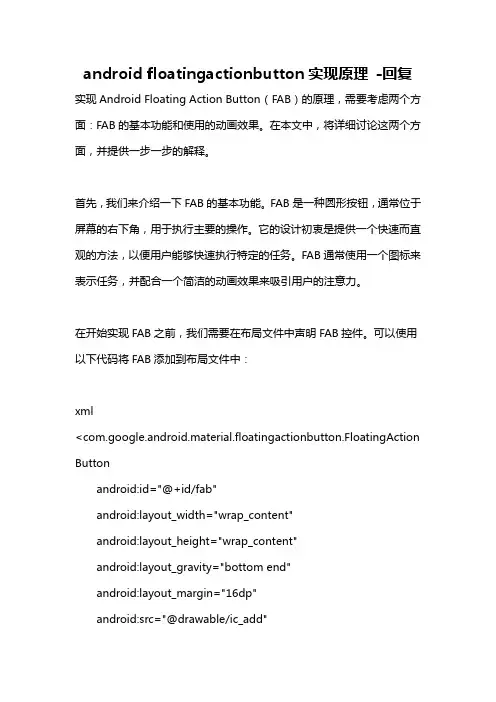
android floatingactionbutton实现原理-回复实现Android Floating Action Button(FAB)的原理,需要考虑两个方面:FAB的基本功能和使用的动画效果。
在本文中,将详细讨论这两个方面,并提供一步一步的解释。
首先,我们来介绍一下FAB的基本功能。
FAB是一种圆形按钮,通常位于屏幕的右下角,用于执行主要的操作。
它的设计初衷是提供一个快速而直观的方法,以便用户能够快速执行特定的任务。
FAB通常使用一个图标来表示任务,并配合一个简洁的动画效果来吸引用户的注意力。
在开始实现FAB之前,我们需要在布局文件中声明FAB控件。
可以使用以下代码将FAB添加到布局文件中:xml<com.google.android.material.floatingactionbutton.FloatingAction Buttonandroid:id="@+id/fab"android:layout_width="wrap_content"android:layout_height="wrap_content"android:layout_gravity="bottom end"android:layout_margin="16dp"android:src="@drawable/ic_add"app:backgroundTint="@color/colorAccent" />上述代码中,我们使用`com.google.android.material.floatingactionbutton.FloatingAction Button`类来定义FAB控件。
`android:src`属性用于指定FAB的图标,而`app:backgroundTint`属性用于指定FAB的背景颜色。
利用PPT幻灯片动画设置制作图像旋转效果在现代演示文稿制作中,利用PPT幻灯片动画设置可以让我们的演示更加生动、吸引人。
其中,一种非常常见且具有视觉冲击力的效果就是图像旋转效果。
本文将介绍如何利用PPT幻灯片动画设置来制作图像旋转效果,让您的演示更加生动有趣。
首先,打开Microsoft PowerPoint软件,新建一个PPT文档。
选择一张或多张需要旋转的图像,并将其插入到幻灯片中。
接下来,选中需要应用旋转效果的图像,并点击选项卡上的“动画”选项。
在打开的动画窗格中,点击“自定义动画”按钮。
在自定义动画窗格中,点击“添加效果”。
选择“旋转”效果,并设置旋转方向、速度等参数。
点击“确定”按钮,完成对当前图像的旋转效果设置。
在自定义动画窗格中,可以通过点击“上移”或“下移”按钮来调整动画效果的顺序。
按照上述步骤,对其他需要旋转效果的图像进行设置。
在设置完所有图像的旋转效果后,可以通过点击“幻灯片放映”按钮来查看效果。
此外,还可以在自定义动画窗格中对每个图像的动画效果进行进一步的细化调整,例如设置持续时间、延迟等。
总结一下,利用PPT幻灯片动画设置制作图像旋转效果非常简单。
只需要选择需要应用旋转效果的图像,通过自定义动画功能进行设置,即可使您的演示更加生动有趣。
当然,除了图像旋转效果,PPT还有许多其他动画效果可供选择。
希望本文对您在制作演示文稿中的图像旋转效果设置有所帮助。
通过以上的步骤,您可以轻松设置PPT幻灯片动画实现图像旋转效果。
希望本文对您在制作演示文稿中的图像旋转效果设置有所帮助,并能提高您的演示效果。
让我们在PPT制作中加入更多的动画效果,让观众们对我们的演示文稿留下深刻的印象。
利用PPT幻灯片动画设置制作图像旋转效果在PPT中,动画效果是使幻灯片更加生动和吸引人的重要元素之一。
其中,图像旋转效果可以为演示文稿增添一份创意和活力。
本文将介绍如何利用PPT幻灯片动画设置来制作图像旋转效果。
第一步:插入图片在制作图像旋转效果之前,首先需要在幻灯片中插入一张图片。
点击“插入”选项卡,在“图片”组下选择“图片”命令。
在弹出的对话框中选择要插入的图片,并点击“插入”按钮。
第二步:设置动画效果选中插入的图片后,点击“动画”选项卡,在“高级动画”组中选择“旋转”命令。
这将给图片添加一个默认的旋转动画效果。
第三步:自定义动画设置为了使图像旋转效果更加符合个人需求,需要自定义动画设置。
在“动画面板”中,找到刚刚添加的旋转动画效果,并点击旁边的小箭头按钮,展开详细设置选项。
第四步:设置旋转方式和角度在详细设置界面中,可以设置旋转的方式和角度。
点击“旋转方式”下拉菜单,选择“顺时针”或“逆时针”方向。
然后在“旋转度数”文本框中输入希望的旋转角度,可以通过拖动滑块调整角度。
第五步:设置动画时间和延迟在“动画面板”中,可以设置动画的时间和延迟。
点击“持续时间”文本框,并输入动画的持续时间,以毫秒为单位。
然后点击“延迟”文本框,并输入延迟时间,以毫秒为单位。
这将决定动画开始的时间点。
第六步:预览和调整动画效果在设置完旋转效果的参数后,可以点击“播放”按钮预览动画效果。
如果觉得效果不佳,可以根据需要进行微调。
例如,可以尝试调整旋转角度、动画时间等参数,直到达到满意的效果。
第七步:应用到其他幻灯片如果希望将图像旋转效果应用到其他幻灯片,可以使用“复制”和“粘贴”功能。
选中插入了旋转效果的图片,按下Ctrl+C复制,然后在其他幻灯片中按下Ctrl+V粘贴。
这样,旋转效果将被自动应用到新的幻灯片上。
第八步:保存和演示完成所有设置后,点击“文件”选项卡,在弹出的菜单中选择“保存”命令,将幻灯片保存为PPT格式。
一、什么是TranslateAnimation动画TranslateAnimation 是Android系统中提供的一种基本动画效果,用于实现视图在屏幕中的移动效果。
通过设置初始位置和目标位置的坐标,可以让视图在屏幕上产生平移动画效果,常用于实现视图的进出场动画、位移动画、手势拖动动画等。
二、TranslateAnimation动画的基本属性TranslateAnimation 动画主要涉及到以下几个基本属性:1. fromXDelta:起始位置的横坐标偏移量2. toXDelta:目标位置的横坐标偏移量3. fromYDelta:起始位置的纵坐标偏移量4. toYDelta:目标位置的纵坐标偏移量通过设置这些属性的值,可以控制视图在X轴和Y轴上的平移效果,从而实现不同方向和距离的移动动画。
三、TranslateAnimation动画的其他属性除了基本的偏移量属性外,TranslateAnimation 动画还涉及到一些其他属性,用于控制动画的持续时间、重复次数、插值器等,具体包括:1. duration:动画持续时间2. repeatCount:动画重复次数3. repeatMode:重复模式4. interpolator:插值器5. fillBefore:是否在动画开始前将视图移动到起始位置6. fillAfter:是否在动画结束后将视图保持在目标位置通过设置这些属性的值,可以调整动画的持续时间、重复次数和插值效果,以及控制动画结束后视图的位置保持状态。
四、TranslateAnimation动画的实现步骤1. 创建 TranslateAnimation 对象,设置起始位置和目标位置的偏移量。
2. 设置动画的持续时间、重复次数、插值器等属性。
3. 将动画应用到视图上,启动动画效果。
通过以上步骤,可以实现 TranslateAnimation 动画效果,并根据具体需求调整动画的各项属性,实现不同的平移效果和视图动画效果。
android 图片横向滚动效果原创【安卓进化五】分类:android android开发2011-07-22 23:18 342人阅读评论(0) 收藏举报近日有个同事要做一个效果:图片横向排列,而且可以横向滚动,而且能点击图片触发事件,用gallery也可以实现这个效果,现在我用ImageButton来实现,在xml文件中用HorizontalScrollView包起来这个布局文件就可以了。
现把代码分享给大家;先贴图让大家看一眼效果:整个队列在左边:整个队列在中间:整个队列在右边:一、main.xml布局view plaincopy to clipboardprint?1.<?xml version="1.0" encoding="utf-8"?>2.<LinearLayout xmlns:android="/apk/res/android"3. android:orientation="vertical"4. android:layout_width="fill_parent"5. android:layout_height="fill_parent"6. >7.<HorizontalScrollView android:id="@+id/HorizontalScrollView01"8. android:fadingEdgeLength="0.0dip" android:background="#5B5B5B"9. android:layout_width="fill_parent" android:scrollbars="none"10. android:layout_height="fill_parent">11. <LinearLayout android:layout_width="wrap_content"12. android:id="@+id/toolbar_items" android:paddingBottom="7.0dip"13. android:orientation="horizontal" android:layout_height="wrap_content"14. android:paddingTop="7.0dip">15. <ImageView android:layout_height="51.0dip"16. android:layout_width="wrap_content" android:src="@drawable/icon" />17. <LinearLayout android:layout_width="wrap_content"18. android:background="#ffffff" android:layout_height="51.0dip">19. <ImageButton android:background="@drawable/icon"20. android:layout_width="59.0dip" android:layout_height="51.0dip"21. android:scaleType="centerInside" android:id="@+id/back_main">22. </ImageButton>23.24. <LinearLayout android:paddingLeft="12.0dip"25. android:layout_height="51.0dip" android:layout_width="1sp"26. android:background="#000000">27. </LinearLayout>28.29. <ImageButton android:id="@+id/new_doc"30. android:layout_width="59.0dip" android:layout_height="51.0dip"31. android:scaleType="centerInside" android:background="@drawable/icon">32. </ImageButton>33.34. <LinearLayout android:layout_height="51.0dip"35. android:layout_width="1sp" android:background="#000000">36. </LinearLayout>37.38. <ImageButton android:id="@+id/filter_doc"39. android:layout_width="59.0dip" android:layout_height="51.0dip"40. android:scaleType="centerInside" android:background="@drawable/icon">41. </ImageButton>42.43.44. <LinearLayout android:layout_height="51.0dip"45. android:layout_width="1sp" android:background="#000000">46. </LinearLayout>47.48.49.50. <ImageButton android:id="@+id/multiselect_doc"51. android:layout_width="59.0dip" android:layout_height="51.0dip"52. android:scaleType="centerInside" android:background="@drawable/icon">53. </ImageButton>54.55.56. <LinearLayout android:layout_height="51.0dip"57. android:layout_width="1sp" android:background="#000000">58. </LinearLayout>59.60. <ImageButton android:id="@+id/delete_doc"61. android:layout_width="59.0dip" android:layout_height="51.0dip"62. android:scaleType="centerInside" android:background="@drawable/icon">63. </ImageButton>64.65. <LinearLayout android:layout_height="51.0dip"66. android:layout_width="1sp" android:background="#000000">67. </LinearLayout>68.69. <ImageButton android:id="@+id/property_doc" android:visibility="gone"70. android:layout_width="59.0dip" android:layout_height="51.0dip"71. android:scaleType="centerInside" android:background="@drawable/icon">72. </ImageButton>73.74. <LinearLayout android:layout_height="51.0dip"75. android:layout_width="1sp" android:background="#000000">76. </LinearLayout>77.78. <ImageButton android:id="@+id/sort_doc"79. android:layout_width="59.0dip" android:layout_height="51.0dip"80. android:scaleType="centerInside" android:background="@drawable/icon">81. </ImageButton>82.83.84. <LinearLayout android:layout_height="51.0dip"85. android:layout_width="1sp" android:background="#000000">86. </LinearLayout>87.88. <ImageButton android:id="@+id/send_doc"89. android:layout_width="59.0dip" android:layout_height="51.0dip"90. android:scaleType="centerInside" android:background="@drawable/icon">91. </ImageButton>92. </LinearLayout>93. <ImageView android:layout_width="wrap_content"94. android:layout_height="51.0dip" android:src="@drawable/icon" />95.96. </LinearLayout>97. </HorizontalScrollView>98.</LinearLayout>1.package .android;2.3.import android.app.Activity;4.import android.content.Intent;5.import android.os.Bundle;6.import android.view.View;7.import android.view.animation.Animation;8.import android.view.animation.AnimationUtils;9.import android.view.animation.OvershootInterpolator;10.import android.widget.ImageButton;11.import android.widget.LinearLayout;12.13.public class MainActivity extends Activity {14. /** Called when the activity is first created. */15.@Override16. public void onCreate(Bundle savedInstanceState) {17. super.onCreate(savedInstanceState);18.19. setContentView(yout.main);20. //打开项目整个队列图进入的效果动画21.22.23. LinearLayout toolbarLayout = (LinearLayout) findViewById(R.id.toolbar_items);24. Animation animation = AnimationUtils25. .loadAnimation(this, R.anim.toolbar);26. animation.setInterpolator(new OvershootInterpolator());27. // animation.setInterpolator(new BounceInterpolator());28. toolbarLayout.startAnimation(animation);29. initToolbarBtn();//初始化ImageButton30. }31.32.33.34.35. //响应按钮点击事件36.37.38. private void initToolbarBtn() {39. ImageButton backmain = (ImageButton) findViewById(R.id.back_main);40. backmain.setOnClickListener(new View.OnClickListener() {41.42. public void onClick(View v) {43. Intent i = getIntent();44. setResult(RESULT_CANCELED, i);45. finish();46. }47. });48.49. ImageButton newdoc = (ImageButton) findViewById(R.id.new_doc);50. newdoc.setOnClickListener(new View.OnClickListener(){51.52. public void onClick(View v) {53. //写上自己要实现的方法54. }55. });56. }57.}1.<translate2.android:duration="700"android:fromXDelta="100.0%p"android:toXDelta="0.0"3.xmlns:android="/apk/res/android"/>。
Android实现微信聊天语⾔点击喇叭动画效果微信聊天界⾯点击语⾳时,喇叭的动画效果,下⾯上代码,该类是控制背景变化的⼯具类,不涉及语⾳录制和播放。
图⽚资源:package xxx;import android.os.Handler;import android.widget.ImageView;import xxx.R;import java.util.Timer;import java.util.TimerTask;public class VoicePlayingBgUtil {private Handler handler;private ImageView imageView;private ImageView lastImageView;private Timer timer = new Timer();private TimerTask timerTask;private int i;private int modelType = 1;//类型private int[] leftVoiceBg = new int[] { R.drawable.gray1, R.drawable.gray2, R.drawable.gray3 };private int[] rightVoiceBg = new int[] { R.drawable.green1, R.drawable.green2, R.drawable.green3 };private int[] collectVoiceBg = new int[] { R.drawable.collect_voice_1, R.drawable.collect_voice_2, R.drawable.collect_voice_3 };public VoicePlayingBgUtil(Handler handler) {super();this.handler = handler;}public void voicePlay() {if (imageView == null) {return;}i = 0;timerTask = new TimerTask() {@Overridepublic void run() {if (imageView != null) {if (modelType == 1) {changeBg(leftVoiceBg[i % 3], false);}else if(modelType==2){changeBg(rightVoiceBg[i % 3], false);}else if(modelType==3){changeBg(collectVoiceBg[i % 3], false);}}else {return;}i++;}};timer.schedule(timerTask, 0, 500);}public void stopPlay() {lastImageView = imageView;if (lastImageView != null) {switch (modelType) {case 1:changeBg(R.drawable.gray3, true);break;case 2:changeBg(R.drawable.green3, true);break;case 3:changeBg(R.drawable.collect_voice_3, true);default:changeBg(R.drawable.gray3, true);break;}if (timerTask != null) {timerTask.cancel();}}}private void changeBg(final int id, final boolean isStop) {handler.post(new Runnable() {@Overridepublic void run() {if (isStop) {lastImageView.setImageResource(id);}else {imageView.setImageResource(id);}}});}public void setImageView(ImageView imageView) {this.imageView = imageView;}public void setModelType(int modelType) {this.modelType = modelType;}}调⽤⽅法playBgUtil = new VoicePlayingBgUtil(handler);playBgUtil.stopPlay();playBgUtil.voicePlay();以上就是本⽂的全部内容,希望对⼤家的学习有所帮助,也希望⼤家多多⽀持。
Java实现图⽚翻转以及任意⾓度旋转最近⼏天在做⼀个项⽬,因为涉及到了图⽚(绝⼤部分都不是整图,是把⼀张张的⼤图切成⼩图,也就是Title)的翻转以及90°旋转,弄得焦头烂额。
在⽹上搜索好⼏天,发现⽤到的⽅法都是⽐较公式化的,对于只是在绘图的时候需要显⽰翻转⽽不需要另外⽣成图⽚的情况,这些代码⽤起来⾮常的⿇烦。
最后仔细的研究了⼀下JDK⽂档,⽤Graphics2D很简单的就实现了以下功能:1、图⽚的翻转,包括⽔平翻转以及垂直翻转2、图⽚的任意⾓度旋转。
因为⼯程需要,代码⾥⾯都直接写成了+90,根据需要,可以对这个值进⾏改动,以符合需求。
3、可以使⽤组合操作,⽐如⽔平翻转+旋转,或者垂直+⽔平+旋转,任意。
以下是代码:package Demo628;import java.awt.*;import java.awt.event.*;import java.util.*;import javax.swing.*;public class ImageRote{public static void main(String[] args){JFrame frame = new TransformFrame();frame.setVisible(true);}}class TransformFrame extends JFrame implements ActionListener{//添加⼏个按钮⽅便操作。
JButton rote = new JButton("旋转") ;JButton flipX= new JButton("⽔平翻转");JButton flipY= new JButton("垂直翻转");JButton zoomIn = new JButton("放⼤") ;JButton zoomOut = new JButton("缩⼩") ;public TransformFrame(){setTitle("TransformTest");setSize(400, 400);addWindowListener(new WindowAdapter(){public void windowClosing(WindowEvent e){System.exit(0);}});Container contentPane = getContentPane();canvas = new TransPanel();contentPane.add(canvas, "Center");JPanel buttonPanel = new JPanel();buttonPanel.add(rote);rote.addActionListener(this);buttonPanel.add(flipX);flipX.addActionListener(this);buttonPanel.add(flipY);flipY.addActionListener(this);buttonPanel.add(zoomIn) ;zoomIn.addActionListener(this) ;buttonPanel.add(zoomOut) ;zoomOut.addActionListener(this) ;contentPane.add(buttonPanel, "North");}public void actionPerformed(ActionEvent event){Object source = event.getSource();//对于source == 这种⽅法,在特殊的情况下出现错误,所以,需要酌情使⽤event.getSource().equals()⽅法来替代==if (source == rote){canvas.setRotate();} elseif (source == flipX){canvas.flipX();} elseif (source == flipY){canvas.flipY();} elseif (source == zoomIn){canvas.zoomIn();} elseif (source == zoomOut){canvas.zoomOut();}}private TransPanel canvas;}class TransPanel extends JPanel{//⽔平翻转⽐例的标志。
简单实现Android图片翻转动画效果不说废话,先看效果。
这是原始图片的样子这是翻转后的效果图如果是你想要的效果,那么继续往下看,如果不是,那可以跳过了。
这是一个动画,而不是用matrix实现的直接翻转图片。
可能网上有很多例子了,但我这是我自己实验过的,单纯的翻转一张图片。
我这个是根据APIDemo简单修改写的需要一个Rotate3d 类,继承Animationpublic class Rotate3d extends Animation{private final float mFromDegrees;private final float mToDegrees;private final float mCenterX;private final float mCenterY;private final float mDepthZ;private final boolean mReverse;private Camera mCamera;public Rotate3d(float fromDegrees, float toDegrees,float centerX, float centerY, float depthZ, boolean reverse) {mFromDegrees = fromDegrees;mToDegrees = toDegrees;mCenterX = centerX;mCenterY = centerY;mDepthZ = depthZ;mReverse = reverse;}@Overridepublic void initialize(int width, int height, int parentWidth, int parentHeight) {super.initialize(width, height, parentWidth, parentHeight);mCamera = new Camera();}@Overrideprotected void applyTransformation(float interpolatedTime, Transformation t) {final float fromDegrees = mFromDegrees;float degrees = fromDegrees + ((mToDegrees - fromDegrees) * interpolatedTime);final float centerX = mCenterX;final float centerY = mCenterY;final Camera camera = mCamera;final Matrix matrix = t.getMatrix();camera.save();if (mReverse) {camera.translate(0.0f, 0.0f, mDepthZ * interpolatedTime);} else {camera.translate(0.0f, 0.0f, mDepthZ * (1.0f - interpolatedTime));}camera.rotateY(degrees);camera.getMatrix(matrix);camera.restore();matrix.preTranslate(-centerX, -centerY);matrix.postTranslate(centerX, centerY);}}这个类可以直接拷过去,不用做任何的修改。
其中的方法自己找相关资料研究。
在main.xml里加个ImageView,如<?xml version="1.0"encoding="utf-8"?><FrameLayoutxmlns:android="/apk/res/android"android:id="@+id/container"android:layout_width="fill_parent"android:layout_height="fill_parent"><ImageViewandroid:id="@+id/image"android:layout_width="wrap_content"android:layout_height="wrap_content"android:text="Rotate"android:textSize="50px"android:layout_x="150px"android:layout_y="30px"android:src="@drawable/ro">></ImageView></FrameLayout>这个不需要解释吧,都可以看懂的最后,还需要一个activity类如:public class TestRotate extends Activity implements OnClickListener{private mageView imageview;private ViewGroup mContainer;/***这个变量设置的是图片,如果是多张图片,那么可以用数组,如*private static final int IMAGE = new int[]{* R.drawable.ro,* R.drawable.icon*};*有多少图片就放多少,我这里做的只是一张图片的翻转**/private static final int IMAGE = R.drawable.ro;/** Called when the activity is first created. */@Overridepublic void onCreate(Bundle savedInstanceState) {super.onCreate(savedInstanceState);setContentView(yout.main);imageview = (ImageView) findViewById(R.id.image);mContainer = (ViewGroup) findViewById(R.id.container);/*** 设置最新显示的图片* 如果是数组,那么可以写成IMAGE[int]**/imageview.setImageResource(IMAGE);/**** 设置ImageView的OnClickListener**/imageview.setClickable(true);imageview.setFocusable(true);imageview.setOnClickListener(this);}private void applyRotation(int position, float start,float end) {// Find the center of the containerfinal float centerX = mContainer.getWidth() / 2.0f;final float centerY = mContainer.getHeight() / 2.0f;final Rotate3d rotation =new Rotate3d(start, end, centerX, centerY,310.0f, true);rotation.setDuration(500);rotation.setFillAfter(true);rotation.setInterpolator(new AccelerateInterpolator()); rotation.setAnimationListener(newDisplayNextView(position));mContainer.startAnimation(rotation);}@Overridepublic void onClick(View v) {// TODO Auto-generated method stub/**** 调用这个方法,就是翻转图片* 参数很简单,大家都应该看得懂* 简单说下,第一个是位置,第二是开始的角度,第三个是结束的角度* 这里需要说明的是,如果是要回到上一张* 把第一个参数设置成-1就行了**/applyRotation(0,0,90);}private final class DisplayNextView implementsAnimation.AnimationListener {private final int mPosition;private DisplayNextView(int position) {mPosition = position;}public void onAnimationStart(Animation animation) {}public void onAnimationEnd(Animation animation) {mContainer.post(new SwapViews(mPosition));}public void onAnimationRepeat(Animation animation) {}}/*** This class is responsible for swapping the views andstart the second* half of the animation.*/private final class SwapViews implements Runnable {private final int mPosition;public SwapViews(int position) {mPosition = position;}public void run() {final float centerX = mContainer.getWidth() / 2.0f;final float centerY = mContainer.getHeight() /2.0f;Rotate3d rotation;if (mPosition > -1) {imageview.setVisibility(View.VISIBLE);imageview.requestFocus();rotation = new Rotate3d(90, 180, centerX, centerY, 310.0f, false);} else {imageview.setVisibility(View.GONE);rotation = new Rotate3d(90, 0, centerX,centerY, 310.0f, false);}rotation.setDuration(500);rotation.setFillAfter(true);rotation.setInterpolator(newDecelerateInterpolator());mContainer.startAnimation(rotation);}}}代码里主要的地方我都注释了,大家自己看看,其他的都是不需要改,但也可根据自己实际需要来修改我这里比较适合一张图片的翻转,如果是多张图片,可以参考APIDemo里的例子,就是加个ArrayAdapter,还是简单的,也可以自己发挥修改,实现自己想要的。