神州数码交换机路由器配置命令
- 格式:doc
- 大小:797.50 KB
- 文档页数:13
交换机基本状态:hostname> ;用户模式hostname# ;特权模式hostname(config)# ;全局配置模式hostname(config-if)# ;接口状态交换机口令设置:switch>enable ;进入特权模式switch#config terminal ;进入全局配置模式switch(config)#hostname ;设置交换机的主机名switch(config)#enable secret xxx ;设置特权加密口令switch(config)#enable password xxa ;设置特权非密口令switch(config)#line console 0 ;进入控制台口switch(config-line)#line vty 0 4 ;进入虚拟终端switch(config-line)#login ;允许登录switch(config-line)#password xx ;设置登录口令xxswitch#exit ;返回命令交换机VLAN设置:switch#vlan database ;进入VLAN设置switch(vlan)#vlan 2 ;建VLAN 2switch(vlan)#no vlan 2 ;删vlan 2switch(config)#int f0/1 ;进入端口1switch(config-if)#switchport access vlan 2 ;当前端口加入vlan 2 switch(config-if)#switchport mode trunk ;设置为干线switch(config-if)#switchport trunk allowed vlan 1,2 ;设置允许的vlan switch(config-if)#switchport trunk encap dot1q ;设置vlan 中继switch(config)#vtp domain ;设置发vtp域名switch(config)#vtp password ;设置发vtp密码switch(config)#vtp mode server ;设置发vtp模式switch(config)#vtp mode client ;设置发vtp模式交换机设置IP地址:switch(config)#interface vlan 1 ;进入vlan 1switch(config-if)#ip address ;设置IP地址switch(config)#ip default-gateway ;设置默认网关switch#dir Flash: ;查看闪存交换机显示命令:switch#write ;保存配置信息switch#show vtp ;查看vtp配置信息switch#show run ;查看当前配置信息switch#show vlan ;查看vlan配置信息switch#show interface ;查看端口信息switch#show int f0/0 ;查看指定端口信息完了最最要的一步。
神州数码交换机配置基本命令交换机基本状态:hostname> ;用户模式hostname# ;特权模式hostname(config)# ;全局配置模式hostname(config-if)# ;接口状态交换机口令设置:switch>enable ;进入特权模式switch#config terminal ;进入全局配置模式switch(config)#hostname ;设置交换机的主机名switch(config)#enable secret xxx ;设置特权加密口令switch(config)#enable password xxa ;设置特权非密口令switch(config)#line console 0 ;进入控制台口switch(config-line)#line vty 0 4 ;进入虚拟终端switch(config-line)#login ;允许登录switch(config-line)#password xx ;设置登录口令xxswitch#exit ;返回命令交换机VLAN设置:switch#vlan database ;进入VLAN设置switch(vlan)#vlan 2 ;建VLAN 2switch(vlan)#no vlan 2 ;删vlan 2switch(config)#int f0/1 ;进入端口1switch(config-if)#switchport access vlan 2 ;当前端口加入vlan 2 switch(config-if)#switchport mode trunk ;设置为干线switch(config-if)#switchport trunk allowed vlan 1,2 ;设置允许的vlan switch(config-if)#switchport trunk encap dot1q ;设置vlan 中继switch(config)#vtp domain ;设置发vtp域名switch(config)#vtp password ;设置发vtp密码switch(config)#vtp mode server ;设置发vtp模式switch(config)#vtp mode client ;设置发vtp模式交换机设置IP地址:switch(config)#interface vlan 1 ;进入vlan 1switch(config-if)#ip address ;设置IP地址switch(config)#ip default-gateway ;设置默认网关switch#dir Flash: ;查看闪存交换机显示命令:switch#write ;保存配置信息switch#show vtp ;查看vtp配置信息switch#show run ;查看当前配置信息switch#show vlan ;查看vlan配置信息switch#show interface ;查看端口信息switch#show int f0/0 ;查看指定端口信息完了最最要的一步。
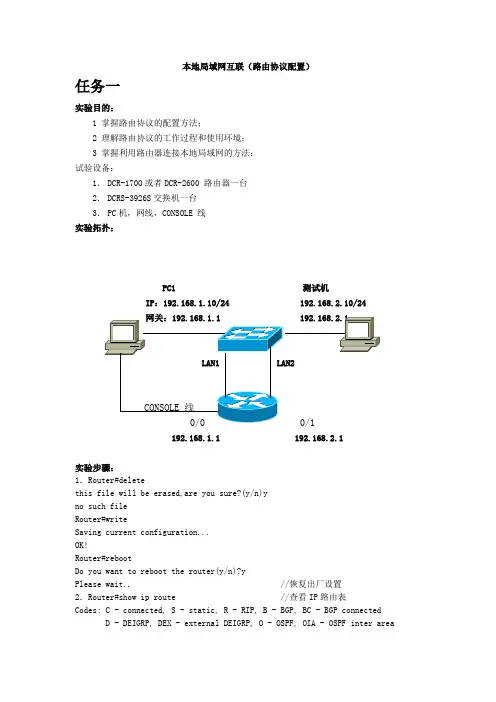
本地局域网互联(路由协议配置)任务一实验目的:1 掌握路由协议的配置方法;2 理解路由协议的工作过程和使用环境;3 掌握利用路由器连接本地局域网的方法;试验设备:1.DCR-1700或者DCR-2600 路由器一台2.DCRS-3926S交换机一台3.PC机,网线,CONSOLE 线实验拓扑:PC1 测试机IP:192.168.1.10/24 192.168.2.10/24192.168.1.1 192.168.2.1实验步骤:1.Router#deletethis file will be erased,are you sure?(y/n)yno such fileRouter#writeSaving current configuration...OK!Router#rebootDo you want to reboot the router(y/n)?yPlease wait.. //恢复出厂设置2.Router#show ip route //查看IP路由表Codes: C - connected, S - static, R - RIP, B - BGP, BC - BGP connectedD - DEIGRP, DEX - external DEIGRP, O - OSPF, OIA - OSPF inter areaON1 - OSPF NSSA external type 1, ON2 - OSPF NSSA external type 2 OE1 - OSPF external type 1, OE2 - OSPF external type 2DHCP - DHCP typeVRF ID: 0 //没有路由表项3.Router#configRouter_config#interface fRouter_config#interface fastEthernet 0/0Router_config_f0/0#ip address 192.168.2.1 255.255.255.0Router_config_f0/0#exitRouter_config#interface eRouter_config#interface ethernet 0/1Router_config_e0/1#ip address 192.168.1.1 255.255.255.0//设置路由器两个以太网接口IP地址4.VRF ID: 0C 192.168.1.0/24 is directly connected, Ethernet0/1C 192.168.2.0/24 is directly connected, FastEthernet0/0//直通路由5.测试PC1与测试计算机的连同性。
第一部分交换机配置一、基础配置1、模式进入Switch>Switch>enSwitch#configSwitch(Config)#interface ethernet 0/22、配置交换机主机名命令:hostname <主机名>3、配置交换机IP地址Switch(Config)#interface vlan 1Switch(Config-If-Vlan1)#ip address 10.1.128.251 255.255.255.0Switch(Config-If-Vlan1)#no shut4、为交换机设置Telnet授权用户和口令:telnet-user <用户名>password {0|7} <密码>例:Switch(Config)#telnet-user test password 0 test5、为交换机设置Web授权用户和口令:web-user <用户名>password {0|7} <密码>例:Switch(Config)#web-user admin password 0 digital6、设置系统日期和时钟:clock set <HH:MM:SS> <YYYY/MM/DD>7、设置退出特权用户配置模式超时时间exec timeout <minutes > //单位为分钟,取值范围为0~3008、保存配置:write9、显示系统当前的时钟:Switch#show clock10、指定登录用户的身份是管理级还是访问级Enable [level {visitor|admin} [<密码>]]11、指定登录配置模式的密码:Enable password level {visitor|admin}12、设置端口的速率和双工模式(接口配置模式下)命令:speed-duplex {auto | force10-half | force10-full | force100-half | force100-full | {{force1g-half | force1g-full} [nonegotiate [master | slave]] } }no speed-duplex二、单交换机VLAN划分1、VLAN基本配置(1)新建VLAN:vlan <vlan-id>(2)命名VLAN:name <vlan-name>(3)为VLAN 分配交换机端口Switch(Config-If-Vlan1)#switchport interface Ethernet 0/2(4)设置Trunk 端口允许通过VLAN:Switch(Config-ethernet0/0/5)#switchport trunk allowed vlan 1;3;5-202、划分VLAN:(1)进入相应端口:Switch(config)#interface Ethernet 0/2(2)修改模式:Switch(Config-ethernet0/0/5)switchport mode access(3)划分VLAN:Switch(Config-ethernet0/0/5)#switchport access vlan 4三、跨交换机VLAN划分(两台交换机作相同操作)1、新建VLAN2、划分VLAN3、修改链路模式(1)进入相应端口:Switch(config)#interface Ethernet 0/1(2)修改模式:Switch(config-if)#switchport mode trunk四、VLAN间主机的通信1、新建VLAN2、划分VLAN3、修改链路模式(1)进入相应端口:Switch(config)#interface Ethernet 0/1(2)修改模式:Switch(config-if)#switchport mode trunk注意:如果是三层交换机,在修改模式先封装802.1协议:Switch(config-if)#switchport trunk encapsulation dot1q4、建立VLAN子接口(1)、进入VLAN接口模式:Switch(config)#interface vlan 2(2)、设置VLAN子接口地址:Switch(config-if)#ip address 192.168.0.1 255.255.255.0(3)、打开端口:Switch(config-if)#no shutdown5、设置各主机IP地址、子网掩码、网关注意:(1)各主机IP地址应与其所在的VLAN在同一网段。
神州数码网络设备配置命令集合网路信息安全技能大赛网络搭建部分资料整理第一部分:交换机配置:1. 基本配置:开启SSH服务:debug ssh-server设置特权模式密码:enable password [8] <password> 注释:8为加密的密码设置退出特权模式超时时间::exec-timeout <minutes > [<seconds>]Switch(config)#exec-timeout 5 30(退出时间为5分30秒)更改主机名:hostname 主机名设置主机名与IP地址的映射关系:Switch(config)#ip host beijing 200.121.1.1(beijing为主机)开启web配置服务:Switch(config)#ip http serve显示帮户信息的语言类型:language {chinese|english}使用密码验证:login使用本地用户密码验证:Switch(config)#login local设置用户在console上进入一般用户配置模式时的口令:Switch(config)#password 8 test 热启动交换机:reload加密系统密码:service password-encryption恢复交换机出厂配置:set default保存当前配置:write配置交换机作为Telnet 服务器允许登录的Telnet 客户端的安全IP 地址:Switch(config)#telnet-server securityip 192.168.1.21设置Telnet 客户端的用户名及口令:Switch(config)#telnet-user Antony password 0 switch 打开交换机的SSH服务器功能:Switch(config)#ssh-server enable设置SSH客户端的用户名及口令:Switch(config)#ssh-user switch password 0 switch 通过DHCP 方式获取IP地址。
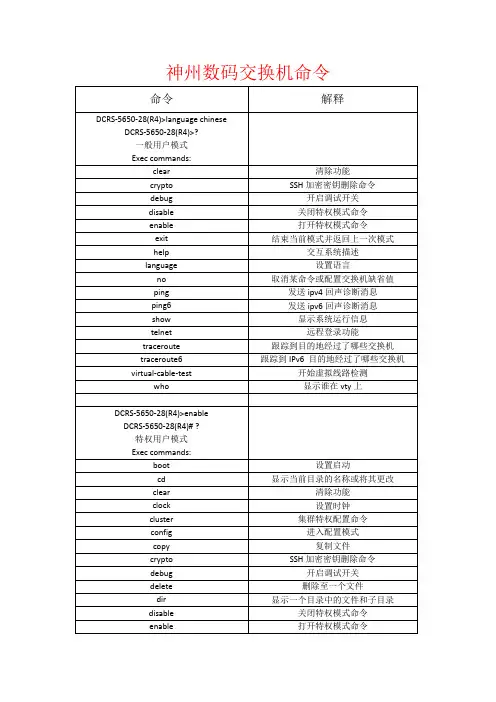
神州数码路由器DCR-2626和交换机CRS-5650-28命令1. 交换机恢复出厂设置及其基本配置.1) //进入特权模式2) del config.text2. Telnet方式管理交换机.1) //进入全局配置模式2) enable password 0 [密码]3) Line 0 44) Password 0 [密码]5) Login3. 交换机文件备份、升级、还原。
1) rgnos.bin系统文件2) config.text配置文件4. Enable密码丢失的解决办法1) 重启2) CTRL+C3) 选择 4 (file)4) 1 (移除)5) Config.text6) Load (重启)5. 交换机Vlan的划分1) Vlan 102) In vlan 103) Ip add [IP] [子网掩码]6. 交换机端口与Mac绑定和过滤1) //进入串口2) sw mode trunk3) sw port-security mac-address [MAC] IP-address [IP7. 生成树实验1) spanning-tree8. 交换机链路聚合1) Int aggregateport 12) sw mode trunk3) //进入串口4) port-group 19. 交换机端口镜像1) monitor session 1 source interface fastEthernet 0/2 both //被镜像的2) monitor session 1 destination interface fastEthernet 0/3 //镜像端口10. 多层交换机静态路由实验1) ip route [存在的IP段] [子网掩码] [下一跳IP]11. RIP动态路由1) router rip2) version 23) network [IP段]4) no auto-summary12. 端口安全1) //进入端口2) switchport port-security //开启端口安全3) switchport port-security maximum 5 //最大连接5.4) sw port-security violation shutdown //超出就shudown13. OSPF动态路由1) router ospf2) network [IP段] [反码] area 014. 标准ACL实验1) access-list 1 deny 192.168.1.0 0.0.0.255 //拒绝访问的IP段2) access-list 1 permit 192.168.1.0 0.0.0.255 //允许的IP段3) //进入端口4) ip access-group 1 in //把控制列表 1 配入端口,进入控制5) ip access-group 1 out //把控制列表 1 配入端口,输出控制15. 扩展ACL实验1) access-list 101 deny tcp A.B.C.D 255.255.255.0 A.B.C.D 255 .255.255.0 eq ftp(WWW)// 禁止前面个网段访问后面个网段的FTP或者WWW16. 交换机单向访问控制1) //使用标准ACL2) access-list 1 deny 192.168.1.0 0.0.0.2553) //进入端口4) ip access-group 1 in17. 交换机DHCP服务器配置1) service dhcp2) ip dhcp ping packets 13) ip dhcp excluded-address [ip1] [IP 2] //设置排斥的IP地址从1到2开始4) ip dhcp pool [名字]5) lease infinite //永久租用6) network [IP段] [子网掩码]7) default-router [网关IP]8) dns-server [NDS IP]18. 交换机DHCP中继功能1) service dhcp2) //进入VLAN3) ip helper-address [DHCP的网管]19. 交换机VRRP实验1) //进入VLAN2) vrrp 10 ip [IP] //设置vrrp虚拟网关3) vrrp 10 priority 150 //设置优先级为150(默认100)20. 交换机QOS实验 car1) //1.扩展控制列表,2策略,3方法 4配入端口2) access-list 101 permit ip host A.B.C.D any //定义要限速的IP3) class-map xiansu1 //创建class-map 名字为xiansu14) match access-group 101 //把控制列表套入策略xiansu15) policy-map pozz 创建policy-map名字为pozz6) class xiansu17) police 8000 512 exceed-action drop //限速值为8000 kbit ,512KB8) //进入端口9) service-policy input pozz路由器要求1. 路由器telneta) //进入全局配置模式b)c) enable password 0 [密码]d) Line vty 0 4e) Password 0 [密码]2. Login路由器weba) //先建立用户密码b) Ip http port 80 //开启web端口为803. 路由器广域网HDLC封装配置a) encapsulation hdlc4. 路由器广域网PPP封装配置a) encapsulation ppp5. 路由器广域网PPP封装PAP配置a) encapsulation pppb) ppp authentication papc) ppp pap sent-username [用户] password 0 [密码] //验证方d) username [用户名] password 0 [密码] //被验证方6. 路由器广域网PPP封装CHAP配置a) encapsulation pppb) ppp authentication CHAP7. ppp chap hostname [对方电脑]8. ppp chap password 0 12345687a) Ip nat Inside 设置为内网接口b) ip nat outside 设置为外网接口c) access-list 10 permit A.B.C.D 0.0.0.255//配置允许访问的ACLd) ip nat inside source list 10 interface serial 1/0 overl oad //允许访问外网的ACL9. NAT内网映射a) ip nat inside source static tcp 192.168.1.1 80 interfac e s4/0 //把IP的80端口射到s4/0端口10. 策略路由(PBR)配置Access-list 101 permit ip host A.B.C.D any //定义ACLRoute-map test permit 10 ..\\定义策略Match ip add0020101 .//匹配ACLSet int null 0//如果匹配就丢弃Set ip next-hop A.B.C.D //如果匹配就放到下一条Route-map test permit 20 //如果不匹配执行默认路由Int f 0/1 //进入端口Ip policy route-map test //关联策略11. 路由在发布a) 当出现多动态路由的时候,一个网段只声明一次,要和下一条的协议一样b) Reredistribute rip subnets 重分布RIP路由redistribute static subnets 重分布静态路由5650S-1(config)#router rip5650S-1(config-router)#version 25650S-1(config-router)#redistribute ospf5650S-1(config-router)#redistribute stati12. 配置QOSa) //1.扩展控制列表,2策略,3方法 4配入端口b) access-list 101 permit ip host A.B.C.D any //定义要限速的IPc) class-map xiansu1 //创建class-map 名字为xiansu1d) match access-group 101 //把控制列表套入策略xiansu1e) policy-map pozz 创建policy-map名字为pozzf) class xiansu1g) police 8000 512 exceed-action drop //限速值为8000 kbit ,512KBh) //进入端口i) service-policy input pozz13. VPN,pptpa) ip local pool text 192.168.2.2 192.168.2.20 //定义获取VPN的地址池,b) interface Virtual-Template 1 //进入虚接口1c) ppp authentication pap //配置认证方式d) ip unnumbered FastEthernet 1/0 //继承接口IPe) peer default ip address pool pptp //关联地址池f) //进入全局模式g) vpdn enable //开启VPNh) vpdn-group PPTP //定义组名称i) accept-dialin //允许拨入访问j) protocol pptp //允许拨入访问得协议k) virtual-template 1 //关联虚接口,拨入时候分配给用户得虚接口。
神州数码路由器的基本配置神州数码路由器的基本配置⒈硬件准备在进行神州数码路由器的基本配置之前,请确保您已经完成以下硬件准备:●神州数码路由器设备●电源适配器●网络电缆(Ethernet cable)●电脑或其他设备⒉连接路由器将神州数码路由器与电脑或其他设备连接起来,按照以下步骤进行操作:⑴将电源适配器插入神州数码路由器的电源口。
⑵使用网络电缆将一端插入神州数码路由器的LAN口(标有LAN或Ethernet的端口)。
⑶使用另一端将网络电缆插入电脑或其他设备的网卡接口。
⒊访问路由器管理界面通过以下步骤,访问神州数码路由器的管理界面:⑴打开您的浏览器(如Chrome、Firefox等)。
⑵在浏览器的地址栏中,输入默认的神州数码路由器IP地址(例如19⑴6⒏⑴)。
⑶按下Enter键,访问路由器管理界面。
⒋登录路由器登录神州数码路由器的管理界面,您需要进行以下操作:⑴在登录页面中输入默认的用户名和密码。
您可以在路由器的说明书或官方网站上找到这些信息。
⑵登录按钮,确认您的用户名和密码是否正确。
⑶如果登录成功,您将进入路由器的管理界面。
⒌基本设置在路由器的管理界面中,您可以进行路由器的基本配置。
以下是一些常见的基本设置:⑴更改路由器的名称(SSID):在Wireless设置中,您可以修改路由器的名称,使其更容易识别。
⑵设置无线密码:在Security设置中,您可以设置一个强密码以保护您的无线网络。
⑶ DHCP设置:在DHCP设置中,您可以启用或禁用DHCP服务,并设置IP地址范围。
⑷ WAN设置:在WAN设置中,您可以配置路由器连接到互联网的方式,例如ADSL、动态IP或静态IP等。
⒍保存配置完成基本设置后,确保保存或应用按钮来保存所做的更改。
附件:无法律名词及注释:●IP地址:网络中设备的唯一标识符,用来进行网络通信。
●LAN:Local Area Network,局域网的简称,是指一定范围内的局部网络。
第一部分交换机配置一、基础配置1、模式进入Switch>Switch>enSwitch#configSwitch(Config)#interface ethernet 0/22、配置交换机主机名命令:hostname <主机名>3、配置交换机IP地址Switch(Config)#interface vlan 1Switch(Config-If-Vlan1)#ip address 10.1.128.251 255.255.255.0Switch(Config-If-Vlan1)#no shut4、为交换机设置Telnet授权用户和口令:登录到Telnet的配置界面,需要输入正确的用户名和口令,否则交换机将拒绝该Telnet用户的访问。
该项措施是为了保护交换机免受非授权用户的非法操作。
若交换机没有设置授权Telnet用户,则任何用户都无法进入交换机的Telnet配置界面。
因此在允许Telnet方式配置管理交换机时,必须在Console的全局配置模式下使用命令username <username>privilege <privilege> [password (0 | 7) <password>]为交换机设置Telnet授权用户和口令并使用命令authentication line vty login local打开本地验证方式,其中privilege选项必须存在且为15。
例:Switch>enableSwitch#configSwitch(config)#username test privilege 15 password 0 testSwitch(config)#authentication line vty login localSwitch(Config)#telnet-user test password 0 testSwitch (Config)#telnet-server enable://启动远程服务功能5、配置允许Telnet管理交换机的地址限制(单独IP或IP地址段)(1)限制单个IP允许Telnet登录交换机switch(config)#authentication security ip 192.168.1.2(2)限制允许IP地址段Telnet登录交换机switch(config)#access-list 1 permit 192.168.1.0 0.0.0.255switch(config)#authentication ip access-class 1 in5、为交换机设置Web授权用户和口令:web-user <用户名>password {0|7} <密码>例:Switch(Config)#web-user admin password 0 digital6、设置系统日期和时钟:clock set <HH:MM:SS> <YYYY/MM/DD>7、设置退出特权用户配置模式超时时间exec timeout <minutes > //单位为分钟,取值范围为0~3008、保存配置:write9、显示系统当前的时钟:Switch#show clock10、指定登录用户的身份是管理级还是访问级Enable [level {visitor|admin} [<密码>]]11、指定登录配置模式的密码:Enable password level {visitor|admin}12、配置交换机的用户名密码:username admin privilege 15 password 0 admin00013、配置enable密码为ddd:enable password 0 ddd level 1514、配置登录时认证:authentication line vty login local15、设置端口的速率和双工模式(接口配置模式下)命令:speed-duplex {auto | force10-half | force10-full | force100-half | force100-full | {{force1g-half | force1g-full} [nonegotiate [master | slave]] } }no speed-duplex二、单交换机VLAN划分1、VLAN基本配置(1)新建VLAN:vlan <vlan-id>(2)命名VLAN:name <vlan-name>(3)为VLAN 分配交换机端口Switch(Config-If-Vlan1)#switchport interface Ethernet 0/2(4)设置Trunk 端口允许通过VLAN:Switch(Config-ethernet0/0/5)#switchport trunk allowed vlan 1;3;5-202、划分VLAN:(1)进入相应端口:Switch(config)#interface Ethernet 0/2(2)修改模式:Switch(Config-ethernet0/0/5)switchport mode access(3)划分VLAN:Switch(Config-ethernet0/0/5)#switchport access vlan 4三、跨交换机VLAN划分(两台交换机作相同操作)1、新建VLAN2、划分VLAN3、修改链路模式(1)进入相应端口:Switch(config)#interface Ethernet 0/1(2)修改模式:Switch(config-if)#switchport mode trunk四、VLAN间主机的通信1、新建VLAN2、划分VLAN3、修改链路模式(1)进入相应端口:Switch(config)#interface Ethernet 0/1(2)修改模式:Switch(config-if)#switchport mode trunk注意:如果是三层交换机,在修改模式先封装802.1协议:Switch(config-if)#switchport trunk encapsulation dot1q4、建立VLAN子接口(1)、进入VLAN接口模式:Switch(config)#interface vlan 2(2)、设置VLAN子接口地址:Switch(config-if)#ip address 192.168.0.1 255.255.255.0 (3)、打开端口:Switch(config-if)#no shutdown5、设置各主机IP地址、子网掩码、网关注意:(1)各主机IP地址应与其所在的VLAN在同一网段。
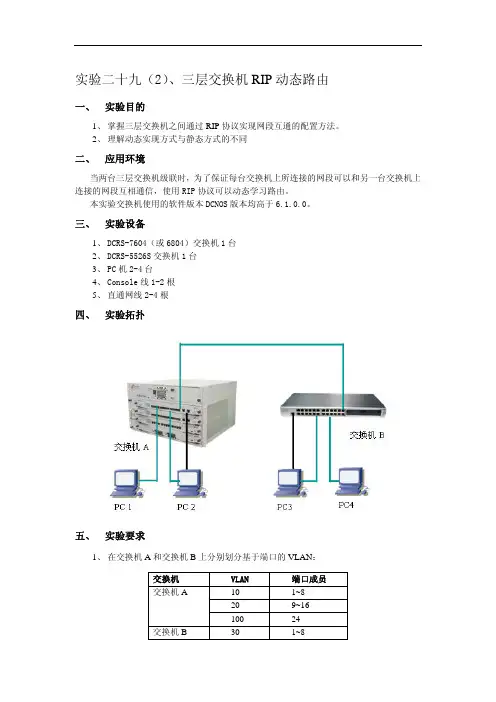
实验二十九(2)、三层交换机RIP动态路由一、 实验目的1、掌握三层交换机之间通过RIP协议实现网段互通的配置方法。
2、理解动态实现方式与静态方式的不同二、 应用环境当两台三层交换机级联时,为了保证每台交换机上所连接的网段可以和另一台交换机上连接的网段互相通信,使用RIP协议可以动态学习路由。
本实验交换机使用的软件版本DCNOS版本均高于6.1.0.0。
三、 实验设备1、DCRS-7604(或6804)交换机1台2、DCRS-5526S交换机1台3、PC机2-4台4、Console线1-2根5、直通网线2-4根四、 实验拓扑五、 实验要求1、在交换机A和交换机B上分别划分基于端口的VLAN:交换机 VLAN 端口成员10 1~8交换机A20 9~16100 24交换机B 30 1~840 9~16101 242、交换机A和B通过的24口级联。
3、配置交换机A和B各VLAN虚拟接口的IP地址分别如下表所示:VLAN10 VLAN20 VLAN30 VLAN40 VLAN100 VLAN101 192.168.10.1 192.168.20.1 192.168.30.1192.168.40.1192.168.100.1 192.168.100.24、PC1-PC4的网络设置为:设备 IP地址 gateway MaskPC1 192.168.10.101 192.168.10.1 255.255.255.0PC2 192.168.20.101 192.168.20.1 255.255.255.0PC3 192.168.30.101 192.168.30.1 255.255.255.0PC4 192.168.40.101 192.168.40.1 255.255.255.05、验证:z没有RIP路由协议之前:PC1与PC2,PC3与PC4可以互通。
PC1、PC2与PC3、PC4不通。
z配置RIP路由协议之后:四台PC之间都可以互通。

交换机路由器命令大全(结合配置实例)交换机路由器命令大全(结合配置实例)交换机和路由器是计算机网络中常用的网络设备,用于实现数据包的转发和路由选择。
在实际应用中,我们需要使用命令来配置交换机和路由器的各项参数。
本文将给出交换机和路由器常用命令的大全,并结合实际配置示例进行说明。
一、交换机命令1. 查看交换机基本信息查看交换机型号、固件版本、序列号等基本信息:show version2. 配置交换机端口设置交换机接口的速率、全双工模式等参数:interface interface_namespeed speed_valueduplex {full | half}3. 查看交换机端口状态查看交换机端口的连接状态、速率、工作模式等信息:show interfaces status4. 配置交换机VLAN创建VLAN和端口关联,实现VLAN的隔离和管理:vlan vlan_idname vlan_nameinterface interface_name5. 查看交换机MAC表显示交换机学习到的MAC地址和对应的端口:show mac-address-table6. 配置交换机链路聚合将多个物理端口绑定为一个逻辑端口,提高带宽和冗余性:interface port-channel channel_numberdescription description_textswitchport mode trunk/access7. 交换机Spanning Tree配置配置交换机的Spanning Tree协议参数,避免网络环路:spanning-tree vlan vlan_idpriority priority_value二、路由器命令1. 查看路由表显示路由器的路由表,包括直连路由、静态路由和动态路由表项:show ip route2. 配置静态路由手动配置路由器的静态路由表,指定目的网络和下一跳信息:ip route destination_network subnet_mask next_hop_ip3. 配置路由器接口配置路由器的接口参数,包括IP地址、子网掩码、描述等:interface interface_nameip address ip_address subnet_maskdescription description_text4. 配置路由器OSPF协议配置路由器之间的OSPF动态路由协议,实现网络的动态路由选择:router ospf process_idnetwork network_address wildcard_mask area area_number5. 配置路由器ACL配置路由器的访问控制列表,用于控制数据包的流量:access-list access_list_number permit/deny source destination6. 配置路由器NAT配置路由器的网络地址转换功能,实现内网与外网的互通:interface interface_nameip nat inside/outside三、配置实例1. 配置交换机端口接口GigabitEthernet0/1配置为100Mbps全双工模式:interface GigabitEthernet0/1speed 100duplex full2. 配置交换机VLAN创建VLAN10,将接口GigabitEthernet0/1划分到VLAN10:vlan 10name VLAN10interface GigabitEthernet0/13. 配置路由器接口将接口GigabitEthernet0/0配置为192.168.1.1/24的IP地址:interface GigabitEthernet0/0ip address 192.168.1.1 255.255.255.0description LAN interface4. 配置静态路由配置路由器的静态路由表,将目的网络192.168.2.0/24指向下一跳192.168.1.2:ip route 192.168.2.0 255.255.255.0 192.168.1.25. 配置路由器ACL设置访问控制列表,允许源IP地址为192.168.1.0/24的流量通过:access-list 1 permit 192.168.1.0 0.0.0.2556. 配置路由器NAT设置路由器的NAT,将内部接口GigabitEthernet0/1地址转换为公网地址:interface GigabitEthernet0/1ip nat inside以上是交换机和路由器常用命令的大全以及配置实例。
交换机和路由器是网络中的关键设备,它们有不同的功能和配置命令。
下面是一些基本的命令,用于配置和管理交换机和路由器:### 交换机基本命令:1. 进入特权模式:```enable```2. 进入全局配置模式:```configure terminal```3. 为接口配置VLAN:```interface FastEthernet0/1switchport mode accessswitchport access vlan 10```4. 显示交换机端口状态:```show interfaces status```5. 为交换机配置IP地址:```interface Vlan1ip address 192.168.1.1 255.255.255.0 ```6. 保存配置:```copy running-config startup-config ```### 路由器基本命令:1. 进入特权模式:```enable```2. 进入全局配置模式:```configure terminal```3. 为接口配置IP地址:```interface GigabitEthernet0/0ip address 192.168.1.1 255.255.255.0 ```4. 启用路由协议(如静态路由):```ip route 0.0.0.0 0.0.0.0 192.168.1.254 ```5. 查看路由表:```show ip route```6. 保存配置:```copy running-config startup-config```这些只是基本命令,实际的配置和管理可能会更加复杂,取决于网络需求和设备型号。
在实际应用中,您可能需要查阅特定设备的文档以获取更详细的命令和配置指南。
矿产资源开发利用方案编写内容要求及审查大纲
矿产资源开发利用方案编写内容要求及《矿产资源开发利用方案》审查大纲一、概述
㈠矿区位置、隶属关系和企业性质。
如为改扩建矿山, 应说明矿山现状、
特点及存在的主要问题。
㈡编制依据
(1简述项目前期工作进展情况及与有关方面对项目的意向性协议情况。
(2 列出开发利用方案编制所依据的主要基础性资料的名称。
如经储量管理部门认定的矿区地质勘探报告、选矿试验报告、加工利用试验报告、工程地质初评资料、矿区水文资料和供水资料等。
对改、扩建矿山应有生产实际资料, 如矿山总平面现状图、矿床开拓系统图、采场现状图和主要采选设备清单等。
二、矿产品需求现状和预测
㈠该矿产在国内需求情况和市场供应情况
1、矿产品现状及加工利用趋向。
2、国内近、远期的需求量及主要销向预测。
㈡产品价格分析
1、国内矿产品价格现状。
2、矿产品价格稳定性及变化趋势。
三、矿产资源概况
㈠矿区总体概况
1、矿区总体规划情况。
2、矿区矿产资源概况。
3、该设计与矿区总体开发的关系。
㈡该设计项目的资源概况
1、矿床地质及构造特征。
2、矿床开采技术条件及水文地质条件。
神州数码二层交换机的基本配置神州数码交换机DHCP服务配置:Sw1:Ip dhcp pool 1Network-adress 192.168.1.0 24 地址池的范围Default-router 192.168.1.254 网关地址为DHCP客户机配置默认网关Lease 1 租约为1天Service DHCP 开启DHCP服务Sw2:Ip dhcp pool 2Network-adress 192.168.2.0 24Default-router 192.168.2.254Lease 1Service DHCPip dhcp excluded-address 192.168.1.20 255.255.255.0 排除地址配置DHCP中继服务(二层不配中继)三层配Sw1:Service DHCPIp forword-protocol wdp bootpsIp help 10.1.1.1 远方管理地址交换机生成树协议:Spanning-tree 启用生成树协议Spanning-tree mode stp(mstp、rstp ) 设置交换机运行spnning-tree 模式:no 时恢复缺省模式交换机的MSTP功能与端口MAC绑定和设置为路由端口功能互斥,该端口不能启用DHCPInt e0/0/2No spanning-tree 关闭端口的MSTPShow spanning-tree (到网络总根代价cost为0的为生成树的总根)Int e0/0/1Spanning-tree mst 1 priority 4096Int e0/0/2Spanning-tree mst 1 priority 4096交换机的链路聚合:(又叫端口聚合)Sw1:Int vlan 1Ip add 192.168.1.1 255.255.255.0ExitPort-group 1 两台交换机创建prot-goupSw2:Int vlan 1Ip add 192.168.1.2 255.255.255.0ExitPort-group 2Sw1:Int e 0/0/1-2Port-group 1 mode on :(手工生成链路聚合组)或者port-group 1 mode active(动态生成链路组合)ExitInt port-channel 1Sw2:Int e 0/0/3-4Port-group 2 mode on :(手工生成链路聚合组)或者port-group 2 mode passive(动态生成链路组合)ExitInt port-channel 2命令解析:port-group mode 将物理端口加入port channelInterface port-channel 进入端口配置模式交换机端口和MAC地址绑定:在电脑上ipconfig/all显示MAC地址Int vlan 1Ip add 192.168.1.1 255.255.255.0Int e0/0/1Switchport port-securitySwitchport prot-security mac-adress 00-a0-d1-d1-07-ff 缺省端口最大安全mac地址数为1在一个以太网口上静态捆绑多个MACSwitchport port-security maximum 4Switchport prot-security mac-adress…….Switchport prot-security mac-adress……Switchport prot-security mac-adress……使能端口的MAC地址绑定功能,动态学习MAC并转换Int e0/0/1Switchport port-securitySwitchport port-security lockSwitchport port-security convertMAC与IP绑定:Am enableInt e0/0/1Am mac-ip-pool 00-a0-d1-d1-07-ff 192.168.1.1 (电脑地址) Am的默认动作使deny,当am使用时候,am会拒绝所有的ip 报文通过Int e0/0/2No am port给端口划分vlan :Int vlan 1 (vlan 1为交换机的管理地址)Ip add 192.168.1.0 255.255.255.0Ip default-gateway 192.168.1.254 (交换机的默认网关) Vlan 10 Int e0/0/1Swtichport mode accessSwitchport access vlan 10Int e0/0/24Switchport mode trunkSwitchport trunk allowed vlan all登陆交换机网页界面:ip http server 开启http协议username admin privilege 15 password 0 admin设置密码: enable password 123清空配置重启:set default yes writereload yesi。
1、公司内部人员不会配置IP地址,在SWA上配置DHCP服务,为PCC与PCB分配IP地址,PCC的地址段为192.168.10.0/24网段,PCB的地址段为192.168.11.0/24网段。
SWA:SWA(config)#service dhcp //启用dhcp服务SWA(config)#ip dhcp pool PC // 定义一个地址池SWA(dhcp-pc-config)#network-address 192.168.10.0 24 //地址段SWA(dhcp-pc-config)#lease 0 8 0 //租用时间8小时SWA(dhcp-pc-config)#default-router 192.168.10.254 //设置默认网关SWA(config)#int vlan 1SWA(config-if-vlan1)#ip address 192.168.10.1 255.255.255.0 //需和地址池同一网段SWA(config)#service dhcp //启用dhcp服务SWA(config)#ip dhcp pool PB // 定义一个地址池SWA(dhcp-pc-config)#network-address 192.168.20.0 24 //地址段SWA(dhcp-pc-config)#lease 0 3 0 //租用时间3小时SWA(dhcp-pc-config)#default-router 192.168.20.254 //设置默认网关2、由于内网用户不会设置IP地址,在内网接入层交换机SWB上设置DHCP服务,方便内网用户的使用。
其中PCC用户会设置IP地址,所以PCC使用静态IP 地址。
设置网段为:192.XX.20.0/24网段。
SWB:SWB(config)#service dhcp //启用dhcp服务SWB(config)#ip dhcp pool PB // 定义一个地址池SWB(dhcp-pc-config)#network-address 192.168.20.0 24 //地址段SWB(dhcp-pc-config)#lease 0 3 0 //租用时间3小时SWB(dhcp-pc-config)#default-router 192.168.20.254 //设置默认网关SWB(config)#int vlan 1SWB(config-if-vlan1)#ip address 192.168.20.254 255.255.255.0 3、为保证内网终端安全,要求内网所有用户的MAC地址与接入交换机SWB接口进行绑定,至少使用两种方法进行绑定。
第一部分交换机配置一、基础配置1、模式进入Switch>Switch>enSwitch#configSwitch(Config)#interface ethernet 0/22、配置交换机主机名命令:hostname <主机名>3、配置交换机IP地址Switch(Config)#interface vlan 1Switch(Config-If-Vlan1)#ip address 10.1.128.251 255.255.255.0Switch(Config-If-Vlan1)#no shut4、为交换机设置Telnet授权用户和口令:登录到Telnet的配置界面,需要输入正确的用户名和口令,否则交换机将拒绝该Telnet用户的访问。
该项措施是为了保护交换机免受非授权用户的非法操作。
若交换机没有设置授权Telnet用户,则任何用户都无法进入交换机的Telnet配置界面。
因此在允许Telnet方式配置管理交换机时,必须在Console的全局配置模式下使用命令username privilege [password (0 | 7) ]为交换机设置Telnet授权用户和口令并使用命令authentication line vty login local打开本地验证方式,其中privilege选项必须存在且为15。
例:Switch>enableSwitch#configSwitch(config)#username test privilege 15 password 0 testSwitch(config)#authentication line vty login localSwitch(Config)#telnet-user test password 0 testSwitch (Config)#telnet-server enable://启动远程服务功能5、配置允许Telnet管理交换机的地址限制(单独IP或IP地址段)(1)限制单个IP允许Telnet登录交换机switch(config)#authentication security ip 192.168.1.2(2)限制允许IP地址段Telnet登录交换机switch(config)#access-list 1 permit 192.168.1.0 0.0.0.255switch(config)#authentication ip access-class 1 in5、为交换机设置Web授权用户和口令:web-user <用户名>password {0|7} <密码>例:Switch(Config)#web-user admin password 0 digital6、设置系统日期和时钟:clock set7、设置退出特权用户配置模式超时时间exec timeout //单位为分钟,取值范围为0~3008、保存配置:write9、显示系统当前的时钟:Switch#show clock10、指定登录用户的身份是管理级还是访问级Enable [level {visitor|admin} [<密码>]]11、指定登录配置模式的密码:Enable password level {visitor|admin}12、配置交换机的用户名密码:username admin privilege 15 password 0 admin00013、配置enable密码为ddd:enable password 0 ddd level 1514、配置登录时认证:authentication line vty login local15、设置端口的速率和双工模式(接口配置模式下)命令:speed-duplex {auto | force10-half | force10-full | force100-half | force100-full |{{force1g-half | force1g-full} [nonegotiate [master | slave]] } }no speed-duplex二、单交换机VLAN划分1、VLAN基本配置(1)新建VLAN:vlan(2)命名VLAN:name(3)为VLAN 分配交换机端口Switch(Config-If-Vlan1)#switchport interface Ethernet 0/2(4)设置Trunk 端口允许通过VLAN:Switch(Config-ethernet0/0/5)#switchport trunk allowed vlan 1;3;5-202、划分VLAN:(1)进入相应端口:Switch(config)#interface Ethernet 0/2(2)修改模式:Switch(Config-ethernet0/0/5)switchport mode access (3)划分VLAN:Switch(Config-ethernet0/0/5)#switchport access vlan 4三、跨交换机VLAN划分(两台交换机作相同操作)1、新建VLAN2、划分VLAN3、修改链路模式(1)进入相应端口:Switch(config)#interface Ethernet 0/1(2)修改模式:Switch(config-if)#switchport mode trunk四、VLAN间主机的通信1、新建VLAN2、划分VLAN3、修改链路模式(1)进入相应端口:Switch(config)#interface Ethernet 0/1(2)修改模式:Switch(config-if)#switchport mode trunk注意:如果是三层交换机,在修改模式先封装802.1协议:Switch(config-if)#switchport trunk encapsulation dot1q4、建立VLAN子接口(1)、进入VLAN接口模式:Switch(config)#interface vlan 2(2)、设置VLAN子接口地址:Switch(config-if)#ip address 192.168.0.1 255.255.255.0 (3)、打开端口:Switch(config-if)#no shutdown5、设置各主机IP地址、子网掩码、网关注意:(1)各主机IP地址应与其所在的VLAN在同一网段。
神州数码交换机配置命令 Telnet远程Shell管理 • 设置交换机IP地址 – Switch(config)#interface vlan 1 – Switch(config-If-Vlan1)#ip address 10.1.1.1 255.255.255.0 – Switch(config-If-Vlan1)#no shutdown • 交换机设置Telnet授权用户和口令;若交换机没有设置授权Telnet用户,则任何用户都无法进入交换机的CLI配置界面。 – Switch(config)#telnet-user test password 0 test HTTP远程图形管理 • 设置交换机IP地址 – Switch(config)#interface vlan 1 – Switch(config-If-Vlan1)#ip address 10.1.1.1 255.255.255.0 – Switch(config-If-Vlan1)#no shutdown • 交换机启动HTTP Server功能 – Switch(config)#ip http server • 交换机设置Web授权用户和口令;若交换机没有设置授权Web用户,则任何用户都无法进入交换机的Web配置界面。 – Switch(config)#web-user test password 0 test SSH配置 • Switch(Config)#ssh-user test password 0 test • Switch(Config)#ssh-server enable
VLAN的基本配置 • 划分VLAN 100和VLAN 200,并加入端口; – Switch(Config)#vlan 100 – Switch(Config-Vlan100)#switchport interface e0/0/1-5 – Switch(Config)#vlan 200 – Switch(Config-Vlan200)#switchport interface e0/0/6-10 • 配置0/0/24端口为级联端口 – Switch(Config)#interface ethernet 0/0/24 – Switch(Config-ethernet0/0/24)#switchport mode trunk – switchport trunk allowed vlan 100;200 – /#Trunk端口缺省允许通过所有VLAN;用户可以通过上述命令设置哪些VLAN的流量可以通过Trunk口,没有包含的VLAN流量则被禁止。 • 察看配置:show vlan 利用三层交换机实现VLAN间路由 • 为VLAN接口设置IP地址; – Switch(Config)#interface vlan 100 – Switch(Config-If-Vlan100)#ip address 192.168.1.1 255.255.255.0 – Switch(Config)#interface vlan 200 – Switch(Config-If-Vlan200)#ip address 192.168.2.1 255.255.255.0 Switch-1的配置 • hostname Switch-1 • interface ethernet 0/0/1-2 – port-group 1 mode on • vlan 100 – switchport interface ethernet 0/0/16-20 • vlan 200 – switchport interface ethernet 0/0/6-10 • vlan 300 – switchport interface ethernet 0/0/11-15 • interface port-channel 1 – switchport mode trunk – switchport trunk allowed vlan 100;200;300 Switch-2的配置 • hostname Switch-2 • interface ethernet 0/0/1-2 – port-group 2 mode on • vlan 100 – switchport interface ethernet 0/0/16-20 • vlan 200 – switchport interface ethernet 0/0/6-10 • vlan 400 – switchport interface ethernet 0/0/11-15 • interface port-channel 2 – switchport mode trunk – switchport trunk allowed vlan 100;200;400 Switch的二层配置 • interface ethernet 0/0/1-2 – port-group 1 mode on • interface ethernet 0/0/3-4 – port-group 2 mode on • vlan 100 • vlan 200 • vlan 300 • vlan 400 • vlan 500 – switchport interface ethernet 0/0/11-15 • interface port-channel 1 – switchport mode trunk – switchport trunk allowed vlan 100;200;300 • interface port-channel 2 – switchport mode trunk – switchport trunk allowed vlan 100;200;400 Switch 三层配置 • interface vlan 100 – ip address 192.168.10.1 255.255.255.0 • interface vlan 200 – ip address 192.168.20.1 255.255.255.0 • interface vlan 300 – ip address 192.168.30.1 255.255.255.0 • interface vlan 400 – ip address 192.168.40.1 255.255.255.0 • interface vlan 500 – ip address 192.168.50.1 255.255.255.0
三层交换机中三层接口的创建 要将某一个端口设定为三层端口,需要将它加入到某一个VLAN中,然后为该VLAN设置IP地址 Vlan 100 Int f0/4 Switchport access vlan 100 Int vlan 100 Ip address 11.1.1.1 255.255.255.0 No shutdown
DHCP的配置 Switch(Config)#Service dhcp 启动/关闭 DHCP 服务
Switch(Config)#ip dhcp pool A Switch(dhcp-A-config)#network 10.16.1.0 24 Switch(dhcp-A-config)#lease 3 10 32 Switch(dhcp-A-config)#default-route 10.16.1.200 10.16.1.201 Switch(dhcp-A-config)#dns-server 10.16.1.202 Switch(dhcp-A-config)#exit Switch(Config)#ip dhcp excluded-address 10.16.1.200 10.16.1.201
二层交换机端口安全配置
设置静态一一映射: Mac-adderess-table static address 22-22-22-22-22-22-22 vlan 10 int f0/3 设置安全端口地址: Int f0/3 Switchport port-security Switchport port-security mac-address 22-22-22-22-22-22 神州数码路由器配置命令 端口基本配置 • interface serial 1/0 – encapsulation hdlc – ip address 192.168.10.1 255.255.255.252 – physical-layer speed 2048000 – !
PAP认证配置(双向认证) • DCR-1配置: • interface s0/1 – encapsulate ppp – ip add 192.168.10.1 255.255.0.0 – ppp authentication pap – ppp pap user routerA aaa – physical-layer speed 2048000 • username routerB password bbb • DCR-2配置: • username routerA password aaa • interface s0/1 – encapsulate ppp – ip add 192.168.10.2 255.255.0.0 – ppp authentication pap – ppp pap user routerB bbb CHAP协议配置 • DCR-1配置: • username digitalchina2 password legend • interface Serial1/0 – encapsulation ppp – ppp authentication chap – ppp chap hostname digitalchina1 – PPP chap password legend – ip address 192.168.10.1 255.255.255.252 – physical-layer speed 2048000 • DCR-2配置: • username digitalchina1 password legend • interface Serial1/0 encapsulation ppp – ppp authentication chap – ppp chap hostname digitalchina2 – PPP chap password legend – ip address 192.168.10.2 255.255.255.252 RIP协议配置 • DCR-1(config)#router rip – DCR-1(router-rip)#network 192.200.10.4 255.255.255.252 – DCR-1(router-rip)#version 2 – DCR-1(router-rip)#redistribute connect OSPF协议配置 • router ospf 1 – network 192.200.10.4 255.255.255.252 area 0 – redistribute connect NAT配置