登陆范例(Spring+Hibernate)
- 格式:pdf
- 大小:345.89 KB
- 文档页数:22
Hibernate+Spring多数据库解决方案我以前在项目中的探索和实践,写出来与大家分享。
大家有其他好的方式,也欢迎分享。
环境:JDK 1.4.x , Hibernate 3.1, Spring 2.0.6, JBOSS4.0, 开发模式: Service + DAO我们项目中需要同时使用多个数据库. 但 Hibernate 不能直接支持,为此我们对比了网上网友的方案,自己做了一点探索。
1. Demo需求我们的项目使用一个全省的公共库加十多个地市库的架构。
本文主要说明原理,将需求简化为两库模型。
主库:User管里,主要是系统管理,鉴权等数据;订单库:Order 管理,存放订单等业务性数据。
2. 原理:1) Hibernate 的每个配置文件对应一个数据库,因此多库需要做多个配置文件。
本文以两个为例:主库 hibernate_sys.cfg.xml,订单库 hibernate_order.cfg.xml每个库,Hibernate 对应一个 sessionFactory 实例,因此Hibernate 下的多库处理,就是在多个 sessionFactory 之间做好路由。
2) sessionFactory 有个 sessionFactory.getClassMetadata(voClass) 方法,返回值不为空时,表示该 VO 类在该库中(hbm.xml文件配置在了对应的hibernate.cfg.xml中),该方法是数据路由的核心和关键所在。
因此, User.hbm.xml 配置在 hibernate_sys.cfg.xml ,Order数据位于配置到 hibernate_order.cfg.xml3)多库处理时,需要使用 XA 事务管理。
本例中使用 Jboss4.0 来做JTA事务管理;用JOTM,其他应用服务器原理相同。
3. 实现1)为做多 sessionFactory 实例的管理,设计 SessionFactoryManager 类,功能就是做数据路由,控制路由的核心是 sessionFactoryMap 属性,它按dbFlag=sessionFactory 的方式存储了多个库的引用。
spring4.x + hibernate4.x 配置详解关于spring和hibernate的使用以及特征等等,在此不再啰嗦,相信大家也都知道,或者去搜索一下即可。
本篇博文的内容主要是我最近整理的关于spring4.x 和hibernate 4.x 相关配置和使用方式,当然spring3.x以及hibernate4.x也可以借鉴。
首先是配置文件web.xml 增加以下代码即可<!-- 加载spring相关的配置文件--><context-param><param-name>contextConfigLocation</param-name><param-value>classpath*:/applicationContext.xml</param-value> </context-param><!-- 启用spring监听--><listener><listener-class>org.springframework.web.context.ContextLoaderListener</l istener-class></listener>然后建立 applicationContext.xml 文件,src下。
文件内容如下,注释我尽量写的很详细<beans xmlns:xsi="/2001/XMLSchema-instance"xmlns="/schema/beans"xmlns:aop="http://ww /schema/aop"xmlns:context="/schema/context"xmlns:tx="ht tp:///schema/tx"xmlns:cache="/schema/cache"xmlns:p="http:// /schema/p"xsi:schemaLocation="/schema/beans /schema/beans/spring-beans-4.0.xsd/schema/aop/schema/aop/spring-aop-4.0.xsd/schema/context/schema/context/spring-context-4.0.xsd/schema/tx/schema/tx/spring-tx-4.0.xsd/schema/cache http://www.springframewor /schema/cache/spring-cache-4.0.xsd"><!-- 引入properties文件--><context:property-placeholder location="classpath*:/appConfig.properties"/> <!-- 定义数据库连接池数据源bean destroy-method="close"的作用是当数据库连接不使用的时候,就把该连接重新放到数据池中,方便下次使用调用--> <bean id="dataSource"class="boPooledDataSourc e"destroy-method="close"><!-- 设置JDBC驱动名称--><property name="driverClass"value="${jdbc.driver}"/><!-- 设置JDBC连接URL --><property name="jdbcUrl"value="${jdbc.url}"/><!-- 设置数据库用户名--><property name="user"value="${ername}"/><!-- 设置数据库密码--><property name="password"value="${jdbc.password}"/><!-- 设置连接池初始值--><property name="initialPoolSize"value="5"/></bean><!-- 配置sessionFactory --><bean id="sessionFactory"class="org.springframework.orm.hibernate4.LocalSessionFactoryBean"><!-- 数据源--><property name="dataSource"ref="dataSource"/><!-- hibernate的相关属性配置--><property name="hibernateProperties"><value><!-- 设置数据库方言-->hibernate.dialect=org.hibernate.dialect.MySQLDialect<!-- 设置自动创建|更新|验证数据库表结构-->hibernate.hbm2ddl.auto=update<!-- 是否在控制台显示sql -->hibernate.show_sql=true<!-- 是否格式化sql,优化显示-->hibernate.format_sql=true<!-- 是否开启二级缓存-->e_second_level_cache=false<!-- 是否开启查询缓存-->e_query_cache=false<!-- 数据库批量查询最大数-->hibernate.jdbc.fetch_size=50<!-- 数据库批量更新、添加、删除操作最大数-->hibernate.jdbc.batch_size=50<!-- 是否自动提交事务-->hibernate.connection.autocommit=true<!-- 指定hibernate在何时释放JDBC连接-->hibernate.connection.release_mode=auto<!-- 创建session方式hibernate4.x 的方式-->hibernate.current_session_context_class=org.springframework.or m.hibernate4.SpringSessionContext<!-- javax.persistence.validation.mode默认情况下是auto的,就是说如果不设置的话它是会自动去你的classpath下面找一个bean-validation**包所以把它设置为none即可-->javax.persistence.validation.mode=none</value></property><!-- 自动扫描实体对象tdxy.bean的包结构中存放实体类--><property name="packagesToScan"value="tdxy.bean"/> </bean><!-- 定义事务管理--><bean id="transactionManager"class="org.springframework.orm.hibernate4.HibernateTransactionManager "><property name="sessionFactory"ref="sessionFactory"/> </bean><!-- 定义Autowired 自动注入bean --><bean class="org.springframework.beans.factory.annotation.AutowiredAnnotati onBeanPostProcessor"/><!-- 扫描有注解的文件base-package 包路径--><context:component-scan base-package="tdxy"/><tx:advice id="txAdvice"transaction-manager="transactionManager"> <tx:attributes><!-- 事务执行方式REQUIRED:指定当前方法必需在事务环境中运行,如果当前有事务环境就加入当前正在执行的事务环境,如果当前没有事务,就新建一个事务。
SpringMVC框架搭建说明Spring4.1.4 + hibernate4.3.81、web.xml配置程序运行时从web.xml开始,加载顺序为:context-param -> listener -> filter ->structs (如果使用structs的话)-> servlet如下为web.xml的配置说明<?xml version="1.0" encoding="UTF-8"?><web-app xmlns:xsi="/2001/XMLSchema-instance"xmlns="/xml/ns/javaee"xmlns:web="/xml/ns/javaee/web-app_2_5.xsd"xsi:schemaLocation="/xml/ns/javaee/xml/ns/javaee/web-app_2_5.xsd" id="WebApp_ID" version="2.5"><!—-显示项目名称--><display-name>bmymis2</display-name><!-- 指定配置文件位置,contextConfigLocation是ContextLoaderListener中的一个参数,通过该参数在ContextLoaderListener中加载applicationContext-*.xml,并装配ApplicationContext --> <context-param><param-name>contextConfigLocation</param-name><param-value>classpath:applicationContext-*.xml</param-value></context-param><!-- 定义SPRING监听器,启动Web容器时,自动装配ApplicationContext的配置信息--><listener><listener-class>org.springframework.web.context.ContextLoaderListener </listener-class></listener><!—-字符编码过滤器,解决中文乱码问题--><filter><filter-name>encodingFilter</filter-name><filter-class>org.springframework.web.filter.CharacterEncodingFilter</filter-class><init-param><param-name>encoding</param-name><param-value>UTF-8</param-value></init-param><init-param><param-name>forceEncoding</param-name><param-value>true</param-value></init-param></filter><!—- springmvc配置--><servlet><servlet-name>springServlet</servlet-name><servlet-class>org.springframework.web.servlet.DispatcherServlet </servlet-class><init-param><param-name>contextConfigLocation</param-name><param-value>classpath*:/spring-mvc.xml</param-value></init-param><load-on-startup>1</load-on-startup> //容器启动时首先初始化该servlet </servlet><servlet-mapping><servlet-name>springServlet</servlet-name><url-pattern>/</url-pattern> //表示所有页面都由springmvc处理</servlet-mapping><!—-浏览器输入到项目名,默认打开如下配置页面--><welcome-file-list><welcome-file>/web/login.jsp</welcome-file></welcome-file-list><!—-错误跳转页面--><error-page><error-code>404</error-code><location>/404.html</location></error-page></web-app>2、applicationContext-common.xml配置:<?xml version="1.0" encoding="UTF-8"?><beans xmlns="/schema/beans"xmlns:context="/schema/context"xmlns:xsi="/2001/XMLSchema-instance"xmlns:tx="/schema/tx"xmlns:aop="/schema/aop"xsi:schemaLocation="/schema/beans/schema/beans/spring-beans-4.0.xsd/schema/context/schema/context/spring-context-4.0.xsd/schema/aop/schema/aop/spring-aop-4.0.xsd/schema/tx/schema/tx/spring-tx-4.0.xsd"><!-- 加载资源文件其中包含变量信息,必须在Spring配置文件的最前面加载,即第一个加载--><context:property-placeholder location="classpath:application.properties"/><!—-扫描包路径选项,使用annotation 自动注册bean,并保证@Required,@Autowired的属性被注入,有了该配置,那么<context:annotation-config/>这个配置就可以省略(以下配置包含了<context:annotation-config/>配置)--><context:component-scan base-package="xxx.xxx.xxx"/><!-- 数据源配置,使用应用内的DBCP数据库连接池 --><bean id="dataSource" class="mons.dbcp.BasicDataSource"destroy-method="close"><!-- 定义数据库连接池数据源bean destroy-method="close"的作用是当数据库连接不使用的时候,就把该连接重新放到数据池中,方便下次使用调用--><property name="driverClassName" value="${jdbc.driverClassName}"/><property name="url" value="${jdbc.url}"/><property name="username" value="${ername}"/><property name="password" value="${jdbc.password}"/></bean><!—Hibernate的注解配置 --><bean id="sessionFactory"class="org.springframework.orm.hibernate4.LocalSessionFactoryBean"><property name="dataSource" ref="dataSource"/><property name="hibernateProperties"><props><prop key="hibernate.hbm2ddl.auto">${hibernate.hbm2ddl.auto}</prop><prop key="hibernate.dialect">${hibernate.dialect}</prop><prop key="hibernate.show_sql">${hibernate.show_sql}</prop></props></property><property name="packagesToScan" value="xxx.xxx.xxx.model" /></bean><!-- 配置Hibernate事务管理器 --><bean id="transactionManager"class="org.springframework.orm.hibernate4.HibernateTransactionManager"> <property name="sessionFactory" ref="sessionFactory"/></bean><!-- 配置事务异常封装 --><bean id="persistenceExceptionTranslationPostProcessor"class="org.springframework.dao.annotation.PersistenceExceptionTranslationPost Processor"/><!-- 声明式容器事务管理 ,transaction-manager指定事务管理器为transactionManager --> <tx:advice id="txAdvice" transaction-manager="transactionManager"><tx:attributes><tx:method name="add*" propagation="REQUIRED"/><tx:method name="get*" propagation="REQUIRED"/><tx:method name="*" read-only="true"/></tx:attributes></tx:advice><aop:config expose-proxy="true"><!-- 只对业务逻辑层实施事务 --><aop:pointcut id="txPointcut"expression="execution(*xxx.xxx.xxx.service..*.*(..))"/><!-- Advisor定义,切入点和通知分别为txPointcut、txAdvice --><aop:advisor pointcut-ref="txPointcut" advice-ref="txAdvice"/> </aop:config></beans>3、application.properties配置jdbc.driverClassName=org.postgresql.Driverjdbc.url=jdbc:postgresql://ip:5432/数据库名ername=postgresjdbc.password=123hibernate.dialect=org.hibernate.dialect.PostgreSQLDialecthibernate.show_sql=truehibernate.format_sql=false4、spring-mvc.xml配置<?xml version="1.0"encoding="UTF-8"?><beans xmlns="/schema/beans"xmlns:context="/schema/context"xmlns:mvc="/schema/mvc"xmlns:p="/schema/p"xmlns:xsi="/2001/XMLSchema-instance"xmlns:tx="/schema/tx"xsi:schemaLocation="/schema/beans/schema/beans/spring-beans-3.0.xsd/schema/context/schema/context/spring-context-3.0.xsd/schema/mvc/schema/mvc/spring-mvc-3.0.xsd/schema/tx/schema/tx/spring-tx-4.0.xsd"><!-- 启用spring mvc 注解 --><mvc:annotation-driven><!-- 自动扫描且只扫描@Controller --><context:component-scan base-package="xxx.xxx.xxx "use-default-filters="false"></context:component-scan><!-- 定义JSP文件的位置 --><beanclass="org.springframework.web.servlet.view.InternalResourceView Resolver"><property name="prefix"value="/jsp/"/><property name="suffix"value=".jsp"/></bean><!-- 容器默认的DefaultServletHandler处理所有静态内容与无RequestMapping处理的URL--> <mvc:default-servlet-handler/><!-- 定义无需Controller的url<->view直接映射 --><mvc:view-controller path="/"view-name="login"/></beans>。

Struts2+Spring3+hibernate3整合(2011年7月末,最新)上次下载了一个教程,上面写着:“献给我亲爱的老婆!”(羡慕不已)。
想了想,我没老婆,难道没什么好写了!不难…献给我暗恋过的每一个女人!(嘿嘿…)如果在你遇到的女生中有一个幽默豁达的女生,不要犹豫,追上去,就娶她了!一,需要的框架包二,建立project,添加相应的.jar文件(重点)1,eclipse中建立dynamic web project,这里是ssh_integrate_0100。
2,src中创建需要的类,这里以一个域模型为user的例子说明。
(现在建立这些类,可以方便我们在搭建时候随时测试!)User.javaIUserDao.javaUserDaoImpl.javaIUserService.javaUserServiceImpl.java3,拷贝spring-framework-3.1.0\dist目录下的所有jar包,注意有一个不是jar的文件,当然拷过去也没事。
4,拷贝spring运行中需要的其他jar文件,主要是mons-logging,可以从spring-framework-3.0.2.RELEASE-dependencies中找到。
ii.Aspectjrt.jar和aspect-waver.jar,可以从spring-framework-2.5.6-with-dependencies/lib/aspectj下面找到(不知道为什么,spring-framework-3.0.2.RELEASE-dependencies中没有aspectjrt的jar包)iii.aopalliance.Jar,apache-dbcp.jar,apache-pool.jar,可以从spring-framework-3.0.2.RELEASE-dependencies中找到。
5,建立beans.xml,这里使用的是annotation和component-scan,这样配置可以大大简化配置,所以是best-practice,其他配置请参考spring文档。

Springboot+SpringSecurity实现前后端分离登录认证及权限控制的⽰例代码⽬录前⾔本⽂主要的功能⼀、准备⼯作1、统⼀错误码枚举2、统⼀json返回体3、返回体构造⼯具4、pom5、配置⽂件⼆、数据库表设计初始化表数据语句三、SpringSecurity核⼼配置:WebSecurityConfig四、⽤户登录认证逻辑:UserDetailsService1、创建⾃定义UserDetailsService2、准备service和dao层⽅法五、⽤户密码加密六、屏蔽SpringSecurity默认重定向登录页⾯以实现前后端分离功能1、实现登录成功/失败、登出处理逻辑2、在WebSecurityConfig中的configure(HttpSecurityhttp)⽅法中声明⼋、会话管理(登录过时、限制单⽤户或多⽤户登录等)1、限制登录⽤户数量2、处理账号被挤下线处理逻辑3、在WebSecurityConfig中声明九、实现基于JDBC的动态权限控制1、权限拦截器2、安全元数据源FilterInvocationSecurityMetadataSource3、访问决策管理器AccessDecisionManager4、在WebSecurityConfig中声明⼗、最终的WebSecurityConfig配置⼗⼀、结束语前⾔ 关于Spring Security的概念部分本⽂不进⾏赘述,本⽂主要针对于对Spring Security以及Springboot有⼀定了解的⼩伙伴,帮助⼤家使⽤Springboot + Spring Security 实现⼀个前后端分离登录认证的过程。
⽂章会⼀步⼀步循序渐进的带⼤家敲⼀遍代码。
最终的代码请看最后。
代码中我⽤到了插件lombok来⽣成实体的getter/setter,如果不想装插件请⾃⼰补全getter/setter本⽂主要的功能1、前后端分离⽤户登录认证2、基于RBAC(⾓⾊)的权限控制⼀、准备⼯作1、统⼀错误码枚举/*** @Author: Hutengfei* @Description: 返回码定义* 规定:* #1表⽰成功* #1001~1999 区间表⽰参数错误* #2001~2999 区间表⽰⽤户错误* #3001~3999 区间表⽰接⼝异常* @Date Create in 2019/7/22 19:28*/public enum ResultCode {/* 成功 */SUCCESS(200, "成功"),/* 默认失败 */COMMON_FAIL(999, "失败"),/* 参数错误:1000~1999 */PARAM_NOT_VALID(1001, "参数⽆效"),PARAM_IS_BLANK(1002, "参数为空"),PARAM_TYPE_ERROR(1003, "参数类型错误"),PARAM_NOT_COMPLETE(1004, "参数缺失"),/* ⽤户错误 */USER_NOT_LOGIN(2001, "⽤户未登录"),USER_ACCOUNT_EXPIRED(2002, "账号已过期"),USER_CREDENTIALS_ERROR(2003, "密码错误"),USER_CREDENTIALS_EXPIRED(2004, "密码过期"),USER_ACCOUNT_DISABLE(2005, "账号不可⽤"),USER_ACCOUNT_LOCKED(2006, "账号被锁定"),USER_ACCOUNT_NOT_EXIST(2007, "账号不存在"),USER_ACCOUNT_ALREADY_EXIST(2008, "账号已存在"),USER_ACCOUNT_USE_BY_OTHERS(2009, "账号下线"),/* 业务错误 */NO_PERMISSION(3001, "没有权限");private Integer code;private String message;ResultCode(Integer code, String message) {this.code = code;this.message = message;}public Integer getCode() {return code;}public void setCode(Integer code) {this.code = code;}public String getMessage() {return message;}public void setMessage(String message) {this.message = message;}/*** 根据code获取message** @param code* @return*/public static String getMessageByCode(Integer code) {for (ResultCode ele : values()) {if (ele.getCode().equals(code)) {return ele.getMessage();}}return null;}}2、统⼀json返回体/*** @Author: Hutengfei* @Description: 统⼀返回实体* @Date Create in 2019/7/22 19:20*/public class JsonResult<T> implements Serializable {private Boolean success;private Integer errorCode;private String errorMsg;private T data;public JsonResult() {}public JsonResult(boolean success) {this.success = success;this.errorCode = success ? ResultCode.SUCCESS.getCode() : MON_FAIL.getCode();this.errorMsg = success ? ResultCode.SUCCESS.getMessage() : MON_FAIL.getMessage();}public JsonResult(boolean success, ResultCode resultEnum) {this.success = success;this.errorCode = success ? ResultCode.SUCCESS.getCode() : (resultEnum == null ? MON_FAIL.getCode() : resultEnum.getCode());this.errorMsg = success ? ResultCode.SUCCESS.getMessage() : (resultEnum == null ? MON_FAIL.getMessage() : resultEnum.getMessage()); }public JsonResult(boolean success, T data) {this.success = success;this.errorCode = success ? ResultCode.SUCCESS.getCode() : MON_FAIL.getCode();this.errorMsg = success ? ResultCode.SUCCESS.getMessage() : MON_FAIL.getMessage();this.data = data;}public JsonResult(boolean success, ResultCode resultEnum, T data) {this.success = success;this.errorCode = success ? ResultCode.SUCCESS.getCode() : (resultEnum == null ? MON_FAIL.getCode() : resultEnum.getCode());this.errorMsg = success ? ResultCode.SUCCESS.getMessage() : (resultEnum == null ? MON_FAIL.getMessage() : resultEnum.getMessage()); this.data = data;}public Boolean getSuccess() {return success;}public void setSuccess(Boolean success) {this.success = success;}public Integer getErrorCode() {return errorCode;}public void setErrorCode(Integer errorCode) {this.errorCode = errorCode;}public String getErrorMsg() {return errorMsg;}public void setErrorMsg(String errorMsg) {this.errorMsg = errorMsg;}public T getData() {return data;}public void setData(T data) {this.data = data;}}3、返回体构造⼯具/*** @Author: Hutengfei* @Description:* @Date Create in 2019/7/22 19:52*/public class ResultTool {public static JsonResult success() {return new JsonResult(true);}public static <T> JsonResult<T> success(T data) {return new JsonResult(true, data);}public static JsonResult fail() {return new JsonResult(false);}public static JsonResult fail(ResultCode resultEnum) {return new JsonResult(false, resultEnum);}}4、pom<?xml version="1.0" encoding="UTF-8"?><project xmlns="/POM/4.0.0" xmlns:xsi="/2001/XMLSchema-instance"xsi:schemaLocation="/POM/4.0.0 https:///xsd/maven-4.0.0.xsd"><modelVersion>4.0.0</modelVersion><parent><groupId>org.springframework.boot</groupId><artifactId>spring-boot-starter-parent</artifactId><version>2.1.7.RELEASE</version><relativePath/> <!-- lookup parent from repository --></parent><groupId>com.spring</groupId><artifactId>security</artifactId><version>0.0.1-SNAPSHOT</version><name>security</name><description>测试spring-security⼯程</description><properties><java.version>1.8</java.version><spring.security.version>5.1.6.RELEASE</spring.security.version><fastjson.version>1.2.46</fastjson.version></properties><dependencies><dependency><groupId>org.springframework.boot</groupId><artifactId>spring-boot-starter-web</artifactId></dependency><dependency><groupId>org.springframework.boot</groupId><artifactId>spring-boot-starter-test</artifactId><scope>test</scope></dependency><!-- spring-security --><dependency><groupId>org.springframework.security</groupId><artifactId>spring-security-web</artifactId><version>${spring.security.version}</version></dependency><dependency><groupId>org.springframework.security</groupId><artifactId>spring-security-config</artifactId><version>${spring.security.version}</version></dependency><!-- Hikari连接池--><dependency><groupId>com.zaxxer</groupId><artifactId>HikariCP</artifactId></dependency><dependency><groupId>org.springframework.boot</groupId><artifactId>spring-boot-starter-jdbc</artifactId><exclusions><!-- 排除 tomcat-jdbc 以使⽤ HikariCP --><exclusion><groupId>org.apache.tomcat</groupId><artifactId>tomcat-jdbc</artifactId></exclusion></exclusions></dependency><dependency><groupId>mysql</groupId><artifactId>mysql-connector-java</artifactId><version>${mysql.version}</version></dependency><!-- Mybatis-plus--><dependency><groupId>com.baomidou</groupId><artifactId>mybatisplus-spring-boot-starter</artifactId><version>1.0.5</version></dependency><dependency><groupId>com.baomidou</groupId><artifactId>mybatis-plus</artifactId><version>2.1.9</version></dependency><dependency><groupId>org.projectlombok</groupId><artifactId>lombok</artifactId></dependency><!--JSON--><dependency><groupId>com.alibaba</groupId><artifactId>fastjson</artifactId><version>${fastjson.version}</version></dependency><dependency><groupId>mons</groupId><artifactId>commons-lang3</artifactId><version>3.8.1</version></dependency></dependencies><build><plugins><plugin><groupId>org.springframework.boot</groupId><artifactId>spring-boot-maven-plugin</artifactId></plugin></plugins></build></project>5、配置⽂件spring:application:name: isoftstone-securitydatasource:type: com.zaxxer.hikari.HikariDataSourcedriver-class-name: com.mysql.cj.jdbc.Driverurl: jdbc:mysql://localhost:3306/spring_security?useUnicode=true&characterEncoding=utf-8&useSSL=false&serverTimezone=CTT username: rootpassword: roothikari:minimum-idle: 5idle-timeout: 600000maximum-pool-size: 10auto-commit: truepool-name: MyHikariCPmax-lifetime: 1800000connection-timeout: 30000connection-test-query: SELECT 1server:port: 8666mybatis-plus:# 如果是放在src/main/java⽬录下 classpath:/com/yourpackage/*/mapper/*Mapper.xml# 如果是放在resource⽬录 classpath:/mapper/*Mapper.xmlmapper-locations: classpath:mapper/*.xml, classpath:mybatis/mapping/**/*.xml#实体扫描,多个package⽤逗号或者分号分隔typeAliasesPackage: com.spring.**global-config:#主键类型 0:"数据库ID⾃增", 1:"⽤户输⼊ID",2:"全局唯⼀ID (数字类型唯⼀ID)", 3:"全局唯⼀ID UUID";id-type: 0#字段策略 0:"忽略判断",1:"⾮ NULL 判断"),2:"⾮空判断"field-strategy: 1#驼峰下划线转换db-column-underline: true#刷新mapper 调试神器refresh-mapper: true#数据库⼤写下划线转换#capital-mode: true#序列接⼝实现类配置,不在推荐使⽤此⽅式进⾏配置,请使⽤⾃定义bean注⼊#key-generator: com.baomidou.mybatisplus.incrementer.H2KeyGenerator#逻辑删除配置(下⾯3个配置)logic-delete-value: 0logic-not-delete-value: 1#⾃定义sql注⼊器,不在推荐使⽤此⽅式进⾏配置,请使⽤⾃定义bean注⼊#sql-injector: com.baomidou.mybatisplus.mapper.LogicSqlInjector#⾃定义填充策略接⼝实现,不在推荐使⽤此⽅式进⾏配置,请使⽤⾃定义bean注⼊# meta-object-handler: com.baomidou.springboot.MyMetaObjectHandler#⾃定义SQL注⼊器#sql-injector: com.baomidou.springboot.xxx# SQL 解析缓存,开启后多租户 @SqlParser 注解⽣效sql-parser-cache: trueconfiguration:map-underscore-to-camel-case: truecache-enabled: false⼆、数据库表设计建表语句create table sys_user(id int auto_incrementprimary key,account varchar(32) not null comment '账号',user_name varchar(32) not null comment '⽤户名',password varchar(64) null comment '⽤户密码',last_login_time datetime null comment '上⼀次登录时间',enabled tinyint(1) default 1 null comment '账号是否可⽤。
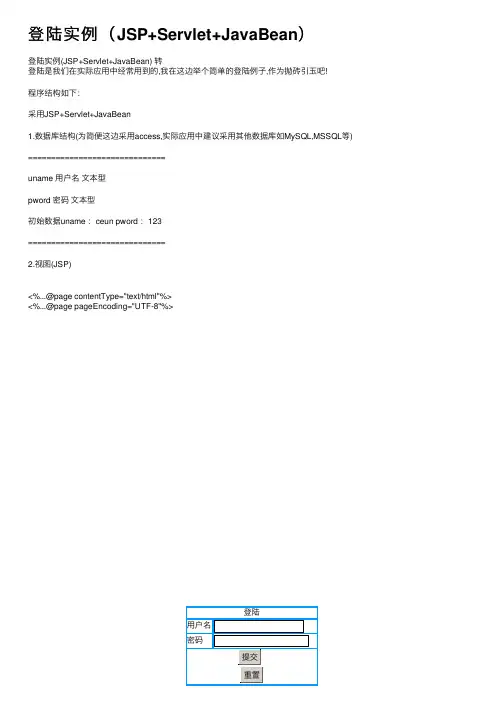
登陆实例(JSP+Servlet+JavaBean)登陆实例(JSP+Servlet+JavaBean) 转登陆是我们在实际应⽤中经常⽤到的,我在这边举个简单的登陆例⼦,作为抛砖引⽟吧!程序结构如下:采⽤JSP+Servlet+JavaBean1.数据库结构(为简便这边采⽤access,实际应⽤中建议采⽤其他数据库如MySQL,MSSQL等) ==============================uname ⽤户名⽂本型pword 密码⽂本型初始数据uname :ceun pword :123==============================2.视图(JSP)<%...@page contentType="text/html"%><%...@page pageEncoding="UTF-8"%>3.Servletpackage com.ceun;import java.io.*;import /doc/7751f3262f60ddccda38a003.html .*;import javax.servlet.*;import javax.servlet.http.*;import /doc/7751f3262f60ddccda38a003.html erBean;/** *//**** @author ceun* @version*/public class CheckServlet extends HttpServlet ...{/** *//** Processes requests for both HTTP GET and POST methods.* @param request servlet request* @param response servlet response*/protected void processRequest(HttpServletRequest request, HttpServletResponse response)throws ServletException, IOException ...{response.setContentType("text/html;charset=UTF-8");PrintWriter out = response.getWriter();String name=request.getParameter("uname");String pword=request.getParameter("pword");out.println("");try...{UserBean user=new UserBean();if(user.check(name,pword))out.println("登陆成功");elseout.println("登陆失败");}catch(Exception e)...{}out.println(" ");out.close();}///** *//** Handles the HTTP GET method.* @param request servlet request* @param responseservlet response*/protected void doGet(HttpServletRequest request, HttpServletResponse response) throws ServletException, IOException ...{processRequest(request, response);}/** *//** Handles the HTTP POST method.* @param request servlet request* @param response servlet response*/protected void doPost(HttpServletRequest request, HttpServletResponse response) throws ServletException, IOException ...{processRequest(request, response);}/** *//** Returns a short description of the servlet.*/public String getServletInfo() ...{return "Short description";}//}4.JavaBeanpackage com.ceun.bean;import java.sql.*;import com.ceun.util.DbUtil;/**//**** @author ceun*/public class UserBean ...{/**//** Creates a new instance of UserBean */public UserBean() ...{}public boolean check(String username,String password)throws Exception...{Connection con= DbUtil.connectToDb();Statement stmt=null;try...{String sql="SELECT * FROM loginInfo "+" WHERE uname='"+username+"' and pword='"+password+"'";stmt=con.createStatement();ResultSet rs=stmt.executeQuery(sql);if(rs.next()) return true;}catch(Exception ex)...{}finally...{try...{stmt.close();con.close();}catch(Exception e)...{e.printStackTrace();}}return false;}}5.实⽤类(⽤于连接数据库)package com.ceun.util;import java.io.*;import java.sql.*;/**//*** DbUtil is a utility class to create* a connection to our sample database.*/public class DbUtil ...{static String driverName="sun.jdbc.odbc.JdbcOdbcDriver";static String dbUrl="jdbc:odbc:";public DbUtil() ...{}public static java.sql.Connection connectToDb(String databaseName)throws Exception ...{Connection connection=null;String connName = dbUrl+databaseName;Class.forName(driverName).newInstance();connection = DriverManager.getConnection(connName);return connection;}public static java.sql.Connection connectToDb()throws Exception...{return (connectToDb("logInfo"));}}6.应⽤配置⽂件CheckServletcom.ceun.CheckServletCheckServlet/CheckServlet 30index.jsp。
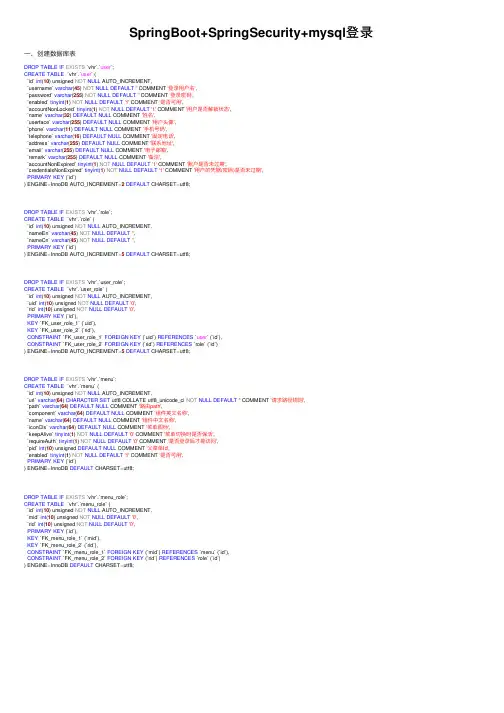
SpringBoot+SpringSecurity+mysql登录⼀、创建数据库表DROP TABLE IF EXISTS `vhr`.`user`;CREATE TABLE `vhr`.`user` (`id` int(10) unsigned NOT NULL AUTO_INCREMENT,`username` varchar(45) NOT NULL DEFAULT'' COMMENT '登录⽤户名',`password` varchar(255) NOT NULL DEFAULT'' COMMENT '登录密码',`enabled` tinyint(1) NOT NULL DEFAULT'1' COMMENT '是否可⽤',`accountNonLocked` tinyint(1) NOT NULL DEFAULT'1' COMMENT '⽤户是否解锁状态',`name` varchar(32) DEFAULT NULL COMMENT '姓名',`userface` varchar(255) DEFAULT NULL COMMENT '⽤户头像',`phone` varchar(11) DEFAULT NULL COMMENT '⼿机号码',`telephone` varchar(16) DEFAULT NULL COMMENT '固定电话',`address` varchar(255) DEFAULT NULL COMMENT '联系地址',`email` varchar(255) DEFAULT NULL COMMENT '电⼦邮箱',`remark` varchar(255) DEFAULT NULL COMMENT '备注',`accountNonExpired` tinyint(1) NOT NULL DEFAULT'1' COMMENT '账户是否未过期',`credentialsNonExpired` tinyint(1) NOT NULL DEFAULT'1' COMMENT '⽤户的凭据(密码)是否未过期',PRIMARY KEY (`id`)) ENGINE=InnoDB AUTO_INCREMENT=2DEFAULT CHARSET=utf8;DROP TABLE IF EXISTS `vhr`.`role`;CREATE TABLE `vhr`.`role` (`id` int(10) unsigned NOT NULL AUTO_INCREMENT,`nameEn` varchar(45) NOT NULL DEFAULT'',`nameCn` varchar(45) NOT NULL DEFAULT'',PRIMARY KEY (`id`)) ENGINE=InnoDB AUTO_INCREMENT=5DEFAULT CHARSET=utf8;DROP TABLE IF EXISTS `vhr`.`user_role`;CREATE TABLE `vhr`.`user_role` (`id` int(10) unsigned NOT NULL AUTO_INCREMENT,`uid` int(10) unsigned NOT NULL DEFAULT'0',`rid` int(10) unsigned NOT NULL DEFAULT'0',PRIMARY KEY (`id`),KEY `FK_user_role_1` (`uid`),KEY `FK_user_role_2` (`rid`),CONSTRAINT `FK_user_role_1` FOREIGN KEY (`uid`) REFERENCES `user` (`id`),CONSTRAINT `FK_user_role_2` FOREIGN KEY (`rid`) REFERENCES `role` (`id`)) ENGINE=InnoDB AUTO_INCREMENT=5DEFAULT CHARSET=utf8;DROP TABLE IF EXISTS `vhr`.`menu`;CREATE TABLE `vhr`.`menu` (`id` int(10) unsigned NOT NULL AUTO_INCREMENT,`url` varchar(64) CHARACTER SET utf8 COLLATE utf8_unicode_ci NOT NULL DEFAULT'' COMMENT '请求路径规则',`path` varchar(64) DEFAULT NULL COMMENT '路由path',`component` varchar(64) DEFAULT NULL COMMENT '组件英⽂名称',`name` varchar(64) DEFAULT NULL COMMENT '组件中⽂名称',`iconCls` varchar(64) DEFAULT NULL COMMENT '菜单图标',`keepAlive` tinyint(1) NOT NULL DEFAULT'0' COMMENT '菜单切换时是否保活',`requireAuth` tinyint(1) NOT NULL DEFAULT'0' COMMENT '是否登录后才能访问',`pid` int(10) unsigned DEFAULT NULL COMMENT '⽗菜单Id',`enabled` tinyint(1) NOT NULL DEFAULT'1' COMMENT '是否可⽤',PRIMARY KEY (`id`)) ENGINE=InnoDB DEFAULT CHARSET=utf8;DROP TABLE IF EXISTS `vhr`.`menu_role`;CREATE TABLE `vhr`.`menu_role` (`id` int(10) unsigned NOT NULL AUTO_INCREMENT,`mid` int(10) unsigned NOT NULL DEFAULT'0',`rid` int(10) unsigned NOT NULL DEFAULT'0',PRIMARY KEY (`id`),KEY `FK_menu_role_1` (`mid`),KEY `FK_menu_role_2` (`rid`),CONSTRAINT `FK_menu_role_1` FOREIGN KEY (`mid`) REFERENCES `menu` (`id`),CONSTRAINT `FK_menu_role_2` FOREIGN KEY (`rid`) REFERENCES `role` (`id`)) ENGINE=InnoDB DEFAULT CHARSET=utf8;⼆、写⼀个测试类,⼿动⽣成加密后的密码,⼿动添加admin⽤户到⽤户表package com.example.demo;import org.junit.Test;import org.springframework.security.crypto.bcrypt.BCryptPasswordEncoder;public class TestEncoder {@Testpublic void encoder() {String password = "admin";BCryptPasswordEncoder encoder = new BCryptPasswordEncoder(10);String enPassword = encoder.encode(password);System.out.println(enPassword);}}三、后端代码package com.example.pojo;import java.io.Serializable;public class Role implements Serializable {private Integer id;// `id` int(10) unsigned NOT NULL AUTO_INCREMENT,private String nameEn;// `nameEn` varchar(45) NOT NULL DEFAULT '',private String nameCn;// `nameCn` varchar(45) NOT NULL DEFAULT '',public Integer getId() {return id;}public void setId(Integer id) {this.id = id;}public String getNameEn() {return nameEn;}public void setNameEn(String nameEn) {En = nameEn;}public String getNameCn() {return nameCn;}public void setNameCn(String nameCn) {Cn = nameCn;}}package com.example.pojo;import org.springframework.security.core.GrantedAuthority;import org.springframework.security.core.authority.SimpleGrantedAuthority;import erDetails;import java.io.Serializable;import java.util.ArrayList;import java.util.Collection;import java.util.List;public class User implements UserDetails,Serializable {private Integer id; // `id` int(10) unsigned NOT NULL AUTO_INCREMENT,private String username; // `username` varchar(45) NOT NULL DEFAULT '' COMMENT '登录⽤户名',private String password;// `password` varchar(255) NOT NULL DEFAULT '' COMMENT '登录密码',private Boolean enabled; // `enabled` tinyint(1) NOT NULL DEFAULT '1' COMMENT '是否可⽤',private Boolean accountNonLocked;// `accountNonLocked` tinyint(1) NOT NULL DEFAULT '1' COMMENT '⽤户是否解锁状态',private String name;// `name` varchar(32) DEFAULT NULL COMMENT '姓名',private String userface;// `userface` varchar(255) DEFAULT NULL COMMENT '⽤户头像',private String phone;// `phone` varchar(11) DEFAULT NULL COMMENT '⼿机号码',private String telepone;// `telephone` varchar(16) DEFAULT NULL COMMENT '固定电话',private String address;// `address` varchar(255) DEFAULT NULL COMMENT '联系地址',private String email;// `email` varchar(255) DEFAULT NULL COMMENT '电⼦邮箱',private String remark;// `remark` varchar(255) DEFAULT NULL COMMENT '备注',private Boolean accountNonExpired; // `accountNonExpired` tinyint(1) NOT NULL DEFAULT '1' COMMENT '账户是否未过期',private Boolean credentialsNonExpired;// `credentialsNonExpired` tinyint(1) NOT NULL DEFAULT '1' COMMENT '⽤户的凭据(密码)是否未过期', private List<Role> roles;@Overridepublic Collection<? extends GrantedAuthority> getAuthorities() {List<SimpleGrantedAuthority> authorities = new ArrayList<>();for(Role role : roles){authorities.add(new SimpleGrantedAuthority(role.getNameEn()));}return authorities;}@Overridepublic boolean isAccountNonExpired() {return accountNonLocked;}@Overridepublic boolean isAccountNonLocked() {return accountNonExpired;}@Overridepublic boolean isCredentialsNonExpired() {return credentialsNonExpired;}@Overridepublic boolean isEnabled() {return enabled;}@Overridepublic String getPassword() {return password;}@Overridepublic String getUsername() {return username;}public Integer getId() {return id;}public void setId(Integer id) {this.id = id;}public void setUsername(String username) {ername = username;}public void setPassword(String password) {this.password = password;}public Boolean getEnabled() {return enabled;}public void setEnabled(Boolean enabled) {this.enabled = enabled;}public Boolean getAccountNonLocked() {return accountNonLocked;}public void setAccountNonLocked(Boolean accountNonLocked) { this.accountNonLocked = accountNonLocked;}public String getName() {return name;}public void setName(String name) { = name;}public String getUserface() {return userface;}public void setUserface(String userface) {erface = userface;}public String getPhone() {return phone;}public void setPhone(String phone) {this.phone = phone;}public String getTelepone() {return telepone;}public void setTelepone(String telepone) {this.telepone = telepone;}public String getAddress() {return address;}public void setAddress(String address) {this.address = address;}public String getEmail() {return email;}public void setEmail(String email) {this.email = email;}public String getRemark() {return remark;}public void setRemark(String remark) {this.remark = remark;}public Boolean getAccountNonExpired() {return accountNonExpired;}public void setAccountNonExpired(Boolean accountNonExpired) {this.accountNonExpired = accountNonExpired;}public Boolean getCredentialsNonExpired() {return credentialsNonExpired;}public void setCredentialsNonExpired(Boolean credentialsNonExpired) {this.credentialsNonExpired = credentialsNonExpired;}public List<Role> getRoles() {return roles;}public void setRoles(List<Role> roles) {this.roles = roles;}}package com.example.mapper;import com.example.pojo.Role;import er;import java.util.List;public interface UserMapper {User loadUserByUsername(String username);List<Role> getUserRolesByUid(Integer id);}UserMapper.xml<?xml version="1.0" encoding="UTF-8" ?><!DOCTYPE mapperPUBLIC "-////DTD Mapper 3.0//EN""/dtd/mybatis-3-mapper.dtd"><mapper namespace="erMapper"><select id="loadUserByUsername" parameterType="String" resultType="er"> select * from user where username=#{username}</select><select id="getUserRolesByUid" parameterType="int" resultType="com.example.pojo.Role">select * from role r,user_role ur where r.id=ur.rid and ur.uid=#{id}</select></mapper>package com.example.security;import erMapper;import er;import org.slf4j.Logger;import org.slf4j.LoggerFactory;import org.springframework.beans.factory.annotation.Autowired;import org.springframework.security.config.annotation.web.configuration.WebSecurityConfigurerAdapter; import org.springframework.security.core.GrantedAuthority;import org.springframework.security.core.authority.AuthorityUtils;import org.springframework.security.core.authority.SimpleGrantedAuthority;import erDetails;import erDetailsService;import ernameNotFoundException;import org.springframework.security.crypto.password.PasswordEncoder;import ponent;import org.springframework.stereotype.Service;import javax.annotation.Resource;import java.util.ArrayList;import java.util.Collection;//@Component@Servicepublic class DemoUserDetailsService implements UserDetailsService {private static final Logger logger = LoggerFactory.getLogger(WebSecurityConfigurerAdapter.class);@Resourceprivate PasswordEncoder passwordEncoder;// @Autowired@Resourceprivate UserMapper userMapper;// @Override// public UserDetails loadUserByUsername(String username) throws UsernameNotFoundException {////根据⽤户名查找⽤户信息(通过Mapper查询⽤户信息)// ("============loadUserByUsername========================="+username);////根据查找到的⽤户信息判断⽤户是否被冻结//// return new User(username,"123456", maSeparatedStringToAuthorityList("admin"));//authorities:权限// return new User(username,passwordEncoder.encode("123456"),// true,true,true,true,// maSeparatedStringToAuthorityList("admin"));//authorities:权限// }// 重写loadUserByUsername ⽅法获得 userdetails 类型⽤户@Overridepublic UserDetails loadUserByUsername(String username) {User user = userMapper.loadUserByUsername(username);if (user != null) {user.setRoles(userMapper.getUserRolesByUid(user.getId()));return user;} else {throw new UsernameNotFoundException("admin: " + username + " do not exist!");}}// public SecurityUser(User user) {// if (user != null) {// this.setUserUuid(user.getUserUuid());// this.setUsername(user.getUsername());// this.setPassword(user.getPassword());// this.setEmail(user.getEmail());// this.setTelephone(user.getTelephone());// this.setRole(user.getRole());// this.setImage(user.getImage());// this.setLastIp(user.getLastIp());// this.setLastTime(user.getLastTime());// }// }// @Override// public Collection<? extends GrantedAuthority> getAuthorities() {// Collection<GrantedAuthority> authorities = new ArrayList<>();// String username = this.getUsername();// if (username != null) {// SimpleGrantedAuthority authority = new SimpleGrantedAuthority(username);// authorities.add(authority);// }// return authorities;// }////账户是否未过期,过期⽆法验证// @Override// public boolean isAccountNonExpired() {// return true;// }//////指定⽤户是否解锁,锁定的⽤户⽆法进⾏⾝份验证// @Override// public boolean isAccountNonLocked() {// return true;// }//////指⽰是否已过期的⽤户的凭据(密码),过期的凭据防⽌认证// @Override// public boolean isCredentialsNonExpired() {// return true;// }//////是否可⽤ ,禁⽤的⽤户不能⾝份验证// @Override// public boolean isEnabled() {// return true;// }}package com.example.security;import com.fasterxml.jackson.databind.ObjectMapper;import org.slf4j.Logger;import org.slf4j.LoggerFactory;import org.springframework.security.access.AccessDeniedException;import org.springframework.security.core.context.SecurityContextHolder;import org.springframework.security.web.access.AccessDeniedHandler;import org.springframework.stereotype.Service;import javax.annotation.Resource;import javax.servlet.ServletException;import javax.servlet.http.HttpServletRequest;import javax.servlet.http.HttpServletResponse;import java.io.IOException;import java.util.HashMap;@Servicepublic class DemoAccessDeniedHandler implements AccessDeniedHandler {private static final Logger logger = LoggerFactory.getLogger(DemoAccessDeniedHandler.class);@Resourceprivate ObjectMapper objectMapper;@Overridepublic void handle(HttpServletRequest request, HttpServletResponse response, AccessDeniedException accessDeniedException) throws IOException, ServletException { String name = SecurityContextHolder.getContext().getAuthentication().getName();String requestUri = request.getRequestURI();StringBuffer requestUrl = request.getRequestURL();("⽤户[" + name + "]访问" + requestUri + "," + requestUrl + "失败,原因:权限不⾜!");HashMap<String, String> map = new HashMap<>(16);map.put("code", "40300");map.put("message", "权限不⾜");response.setContentType("application/json;charset=UTF-8");response.getWriter().write(objectMapper.writeValueAsString(map));}}package com.example.security;import org.slf4j.Logger;import org.slf4j.LoggerFactory;import org.springframework.beans.factory.annotation.Autowired;import org.springframework.context.annotation.Bean;import org.springframework.context.annotation.Configuration;import org.springframework.security.config.annotation.authentication.builders.AuthenticationManagerBuilder;import org.springframework.security.config.annotation.web.builders.HttpSecurity;import org.springframework.security.config.annotation.web.builders.WebSecurity;import org.springframework.security.config.annotation.web.configuration.EnableWebSecurity;import org.springframework.security.config.annotation.web.configuration.WebSecurityConfigurerAdapter;import org.springframework.security.core.Authentication;import org.springframework.security.core.authority.AuthorityUtils;import er;import erDetails;import erDetailsService;import ernameNotFoundException;import org.springframework.security.crypto.bcrypt.BCryptPasswordEncoder;import org.springframework.security.crypto.password.PasswordEncoder;import org.springframework.security.web.authentication.SavedRequestAwareAuthenticationSuccessHandler;import org.springframework.security.web.authentication.logout.LogoutSuccessHandler;import javax.annotation.Resource;import javax.servlet.ServletException;import javax.servlet.http.HttpServletRequest;import javax.servlet.http.HttpServletResponse;import java.io.IOException;@Configuration@EnableWebSecuritypublic class DemoSecurityConfig extends WebSecurityConfigurerAdapter {private static final Logger logger = LoggerFactory.getLogger(WebSecurityConfigurerAdapter.class);@AutowiredDemoUserDetailsService demoUserDetailsService;@Beanpublic PasswordEncoder passwordEncoder(){// return NoOpPasswordEncoder.getInstance();return new BCryptPasswordEncoder();}@Overrideprotected void configure(AuthenticationManagerBuilder auth) throws Exception {// erDetailsService(userService);erDetailsService(demoUserDetailsService);}@Overrideprotected void configure(HttpSecurity http) throws Exception {("==============configure==================================");// super.configure(http);http.csrf().disable();http.authorizeRequests() //对请求进⾏授权// .antMatchers("/login").permitAll().antMatchers("/admin/**").hasRole("admin").antMatchers("/db/**").hasRole("dba").antMatchers("/user/**").hasRole("user").anyRequest() //任何请求.authenticated()//都要进⾏⾝份认证.and().formLogin()//表单登录.loginPage("/login")//登录页⾯// .loginProcessingUrl("/login").permitAll();//和登录相关的接⼝都不需要认证即可访问// http.authorizeRequests().// antMatchers("/static/**").permitAll().anyRequest().authenticated().// and().formLogin().loginPage("/login").permitAll().successHandler(loginSuccessHandler()).// and().logout().permitAll().invalidateHttpSession(true).// deleteCookies("JSESSIONID").logoutSuccessHandler(logoutSuccessHandler()).// and().sessionManagement().maximumSessions(10).expiredUrl("/login");}//======================================================================/*** 配置忽略的静态⽂件,不加的话,登录之前页⾯的css,js不能正常使⽤,得登录之后才能正常.*/@Overridepublic void configure(WebSecurity web) throws Exception {// 忽略URLweb.ignoring().antMatchers("/**/*.js", "/lang/*.json", "/**/*.css", "/**/*.js", "/**/*.map", "/**/*.html","/**/*.png");}@Beanpublic LogoutSuccessHandler logoutSuccessHandler() { //登出处理return new LogoutSuccessHandler() {@Overridepublic void onLogoutSuccess(HttpServletRequest httpServletRequest, HttpServletResponse httpServletResponse, Authentication authentication) throws IOException, ServletException { }// @Override// public void onLogoutSuccess(HttpServletRequest httpServletRequest, HttpServletResponse httpServletResponse, Authentication authentication) throws IOException, ServletException { // try {// SecurityUser user = (SecurityUser) authentication.getPrincipal();//// ("USER : " + user.getUsername() + " LOGOUT SUCCESS ! ");// } catch (Exception e) {//// ("LOGOUT EXCEPTION , e : " + e.getMessage());// }// httpServletResponse.sendRedirect("/login");// }};}@Beanpublic SavedRequestAwareAuthenticationSuccessHandler loginSuccessHandler() { //登⼊处理return new SavedRequestAwareAuthenticationSuccessHandler() {@Overridepublic void onAuthenticationSuccess(HttpServletRequest request, HttpServletResponse response, Authentication authentication) throws IOException, ServletException {User userDetails = (User) authentication.getPrincipal();("USER : " + userDetails.getUsername() + " LOGIN SUCCESS ! ");super.onAuthenticationSuccess(request, response, authentication);}};}// @Bean// UserDetailsService demoUserDetailsService() {// return new DemoUserDetailsService();// }@Beanpublic UserDetailsService userDetailsService() { //⽤户登录实现// return new DemoUserDetailsService();return new UserDetailsService() {// @Override// public UserDetails loadUserByUsername(String s) throws UsernameNotFoundException {// return null;// }// @Autowired// private UserRepository userRepository;@Resourceprivate PasswordEncoder passwordEncoder;@Overridepublic UserDetails loadUserByUsername(String username) throws UsernameNotFoundException {("=-======loadUserByUsername======-=-========d================"+username);// User user = userRepository.findByUsername(s);// if (user == null) throw new UsernameNotFoundException("Username " + s + " not found");// return new SecurityUser(user);return new User(username,passwordEncoder.encode("123456"),true,true,true,true,maSeparatedStringToAuthorityList("admin"));}};}// @Autowired// public void configureGlobal(AuthenticationManagerBuilder auth) throws Exception {// erDetailsService(userDetailsService()).passwordEncoder(passwordEncoder());// auth.eraseCredentials(false);// }}package com.example.controller;import org.springframework.security.core.Authentication;import org.springframework.security.core.context.SecurityContext;import org.springframework.security.core.context.SecurityContextHolder;import erDetails;import org.springframework.stereotype.Controller;import org.springframework.web.bind.annotation.RequestMapping;import org.springframework.web.bind.annotation.RequestMethod;import org.springframework.web.context.request.RequestContextHolder;import org.springframework.web.context.request.ServletRequestAttributes;import javax.servlet.http.HttpServletRequest;@Controllerpublic class LoginController {@RequestMapping(value = "/login", method = RequestMethod.GET)public String login() {System.out.println("--------/login------------");return "/login";}@RequestMapping("/")public String root() {return "/index";}// public User getUser() { //为了session从获取⽤户信息,可以配置如下// User user = new User();// SecurityContext ctx = SecurityContextHolder.getContext();// Authentication auth = ctx.getAuthentication();// if (auth.getPrincipal() instanceof UserDetails) user = (User) auth.getPrincipal();// return user;// }public HttpServletRequest getRequest() {return ((ServletRequestAttributes) RequestContextHolder.getRequestAttributes()).getRequest(); }}package com.example.demo;import org.mybatis.spring.annotation.MapperScan;import org.springframework.boot.SpringApplication;import org.springframework.boot.autoconfigure.SpringBootApplication;//@SpringBootApplication(scanBasePackages = {"com.example.controller","com.example.service"}) @SpringBootApplication(scanBasePackages = {"com.example"})@MapperScan("com.example.mapper")public class DemoApplication {public static void main(String[] args) {SpringApplication.run(DemoApplication.class, args);}}四、配置⽂件和前端代码application.properties#是否开启缓存,开发时可设置为false,默认为truespring.thymeleaf.cache=false#检查模板是否存在,默认为truespring.thymeleaf.check-template=true#检查模板位置是否存在,默认为truespring.thymeleaf.check-template-location=true#模板⽂件编码,UTF-8spring.thymeleaf.encoding=UTF-8#模板⽂件位置spring.thymeleaf.prefix=classpath:/templates#Content-Type配置spring.thymeleaf.servlet.content-type=text/html#模板⽂件后缀spring.thymeleaf.suffix=.html#启⽤MVC Thymeleaf视图分辨率spring.thymeleaf.enabled=true#模板编码spring.thymeleaf.mode=LEGACYHTML5#链中模板解析器的顺序#spring.thymeleaf.template-resolver-order=o#应该中解决⽅案中排除的视图名称的逗号分隔列表#spring.thymeleaf.excluded-view-names=#root⽇志以 WARN 级别输出 (⽇志只输出 WARN 及以上级别的信息)#logging.level.root=WARN#springframework.web ⽇志只以 DEBUG 级别输出#.springframework.web=DEBUG#hibernate ⽇志以 ERROR 级别输出#.hibernate=ERROR=e:\\log\\info.loglogging.pattern.console=%d{yyyy/MM/dd-HH:mm:ss} [%thread] %-5level %logger- %msg%n logging.pattern.file=%d{yyyy/MM/dd-HH:mm:ss} [%thread] %-5level %logger- %msg%n#数据源配置=testspring.datasource.type=com.alibaba.druid.pool.DruidDataSource#加上?useUnicode=true&characterEncoding=UTF-8,否则可能插⼊数据库中⽂乱码spring.datasource.url=jdbc:mysql://127.0.0.1:3306/vhr?useUnicode=true&characterEncoding=UTF-8 ername=rootspring.datasource.password=rootspring.datasource.driver-class-name=com.mysql.jdbc.Driver#spring.datasource.sql-script-encoding=UTF-8#spring.datasource.druid.filter.encoding.enabled=truespring.datasource.druid.filters=statspring.datasource.druid.max-active=20spring.datasource.druid.initial-size=1spring.datasource.druid.max-wait=60000spring.datasource.druid.min-idle=1spring.datasource.druid.time-between-eviction-runs-millis=60000spring.datasource.druid.min-evictable-idle-time-millis=300000spring.datasource.druid.validation-query=select 'x'spring.datasource.druid.test-while-idle=truespring.datasource.druid.test-on-borrow=falsespring.datasource.druid.test-on-return=falsespring.datasource.druid.pool-prepared-statements=truespring.datasource.druid.max-open-prepared-statements=20#所有的mapper映射⽂件#mybatis.mapper-locations=classpath*:com/springboot/mapper/*.xml#resource下的mapper映射⽂件mybatis.mapper-locations=classpath*:mapper/**/*.xml#mybatis.mapper-locations=classpath:mapper/BookMapper.xml#mybatis.type-aliases-package=mybatis.config-location=classpath:mybatis/mybatis-config.xmlpagehelper.helper-dialect=mysqlpagehelper.reasonable=truepagehelper.support-methods-arguments=truepagehelper.params=count=countSqlspring.session.store-type=noneserver.port=8060#security.basic.enabled=false<!DOCTYPE html><html lang="en"><head><meta charset="UTF-8"><title>登录</title></head><body><h1>登录页⾯</h1><form action="/login" method="post">⽤户名 : <input type="text" name="username"/>密码 : <input type="password" name="password"/><input type="submit" value="登录"></form></body></html>。
详解使⽤SpringSecurity进⾏⾃动登录验证在之前的博客使⽤SpringMVC创建Web⼯程并使⽤SpringSecurity进⾏权限控制的详细配置⽅法中,我们描述了如何配置⼀个基于SpringMVC、SpringSecurity框架的⽹站系统。
在这篇博客中,我们将继续描述如何使⽤Spring Security进⾏登录验证。
总结⼀下Spring Security的登录验证关键步骤:1、在数据库中建好三张表,即users、authorities和persistent_logins三个。
注意字段的定义,不能少,可以多,名字必须按规定来。
2、在Spring Security的配置⽂件中,配置好登录跳转的页⾯,登录处理的页⾯和加密情况。
3、在前台的jsp页⾯中,登录的字段必须和后台users表中的⼀致,⼀般都是username和password。
4、注册页⾯必须⾃⼰写,注册的处理也要⾃⼰写。
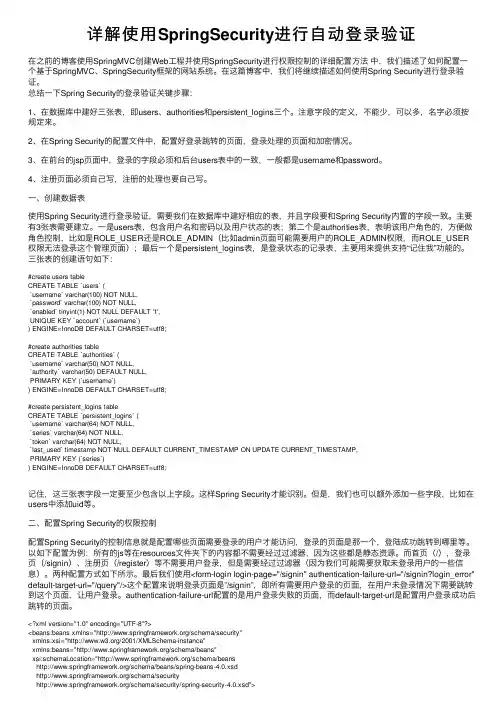
⼀、创建数据表使⽤Spring Security进⾏登录验证,需要我们在数据库中建好相应的表,并且字段要和Spring Security内置的字段⼀致。
主要有3张表需要建⽴。
⼀是users表,包含⽤户名和密码以及⽤户状态的表;第⼆个是authorities表,表明该⽤户⾓⾊的,⽅便做⾓⾊控制,⽐如是ROLE_USER还是ROLE_ADMIN(⽐如admin页⾯可能需要⽤户的ROLE_ADMIN权限,⽽ROLE_USER 权限⽆法登录这个管理页⾯);最后⼀个是persistent_logins表,是登录状态的记录表,主要⽤来提供⽀持“记住我”功能的。
三张表的创建语句如下:#create users tableCREATE TABLE `users` (`username` varchar(100) NOT NULL,`password` varchar(100) NOT NULL,`enabled` tinyint(1) NOT NULL DEFAULT '1',UNIQUE KEY `account` (`username`)) ENGINE=InnoDB DEFAULT CHARSET=utf8;#create authorities tableCREATE TABLE `authorities` (`username` varchar(50) NOT NULL,`authority` varchar(50) DEFAULT NULL,PRIMARY KEY (`username`)) ENGINE=InnoDB DEFAULT CHARSET=utf8;#create persistent_logins tableCREATE TABLE `persistent_logins` (`username` varchar(64) NOT NULL,`series` varchar(64) NOT NULL,`token` varchar(64) NOT NULL,`last_used` timestamp NOT NULL DEFAULT CURRENT_TIMESTAMP ON UPDATE CURRENT_TIMESTAMP,PRIMARY KEY (`series`)) ENGINE=InnoDB DEFAULT CHARSET=utf8;记住,这三张表字段⼀定要⾄少包含以上字段。
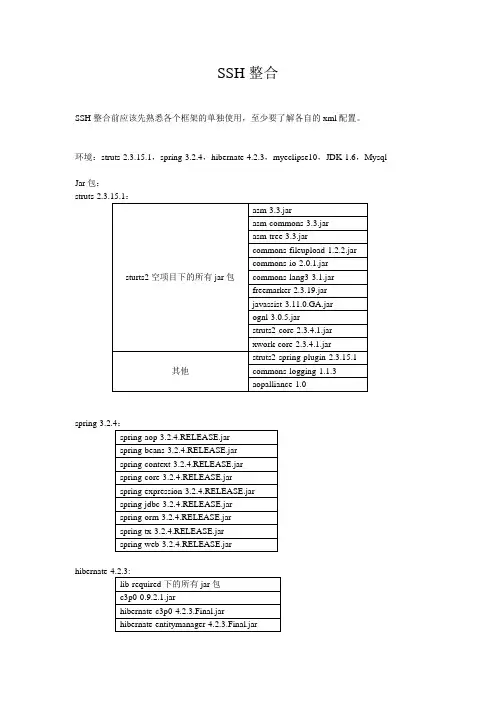
SSH整合SSH整合前应该先熟悉各个框架的单独使用,至少要了解各自的xml配置。
环境:struts-2.3.15.1,spring-3.2.4,hibernate-4.2.3,myeclipse10,JDK-1.6,Mysql Jar包:1.新建web项目2.以简单的登录验证为例3.建立login.jsp,login_success.jsp,login_error.jsp4.引入struts2(1)web.xml配置<filter><filter-name>struts2</filter-name><filter-class>org.apache.struts2.dispatcher.ng.filter.StrutsPrepa reAndExecuteFilter</filter-class></filter><filter-mapping><filter-name>struts2</filter-name><url-pattern>/*</url-pattern></filter-mapping>(2)src下的struts.xml配置<package name="default"namespace="/"extends="struts-default"><action name="login"class="com.accp.action.LoginAction" method="login"><result name="success"> /login_success.jsp </result><result name="error"> /login_error.jsp </result></action></package>(3)测试struts2是否能够通过5.引入spring(1)配置web.xml,添加listener<listener><listener-class>org.springframework.web.context.ContextLoaderListener </listener-class></listener><!-- 告知spring config location 的存储位置 --><context-param><param-name>contextConfigLocation</param-name><param-value>classpath:beans.xml</param-value></context-param>(2)配置src下的beans.xml将spring的ApplicationContext.xml拷贝至src下,删除里面的配置项,只保留下面内容<?xml version="1.0"encoding="UTF-8"?><beans xmlns="/schema/beans"xmlns:xsi="/2001/XMLSchema-instance"xsi:schemaLocation="/schema/beans/schema/beans/spring-beans.xsd"></beans>6.引入hibernate(1)配置beans.xml<?xml version="1.0"encoding="UTF-8"?><beans xmlns="/schema/beans"xmlns:xsi="/2001/XMLSchema-instance"xmlns:jee="/schema/jee"xmlns:tx="/schema/tx"xmlns:aop="/schema/aop"xmlns:p="/schema/p"xmlns:util="/schema/util"xmlns:tool="/schema/tool" xmlns:context="/schema/context"xsi:schemaLocation="/schema/beans/schema/beans/spring-beans.xsd /schema/tx/schema/tx/spring-tx.xsd/schema/aop/schema/aop/spring-aop.xsd/schema/jee/schema/jee/spring-jee.xsd/schema/context/schema/context/spring-context.xsd/schema/util/schema/util/spring-util.xsd/schema/tool/schema/tool/spring-tool.xsd"default-lazy-init="true"default-autowire="byName"><!--spring jdbc配置数据源 Mysql--><bean id="dataSource"class="org.springframework.jdbc.datasource.DriverManagerDataSource"> <property name="driverClassName"value="com.mysql.jdbc.Driver" /><property name="url"value="jdbc:mysql://localhost:3306/test" /><property name="username"value="user"/><property name="password"value="123456"/></bean><!-- hibernate.cfg.xml Spring config --><bean id="sessionFactory"class="org.springframework.orm.hibernate4.LocalSessionFactoryBean"><!-- connection --><property name="dataSource"><ref local="dataSource"/></property><!-- hibernate自身属性 --><property name="hibernateProperties"><props><prop key="hibernate.show_sql">true</prop><prop key="hibernate.format_sql">true</prop><propkey="hibernate.dialect">org.hibernate.dialect.MySQLDialect</prop> <propkey="hibernate.current_session_context_class">thread</prop></props></property><!-- 映射文件<property name="mappingResources"><list><value>com/forwor/ssh/entity/xml/User.hbm.xml</value></list></property>--></bean><!-- 注入 --><bean id="userDao"class="erDaoImpl"> <property name="sessionFactory"><ref local="sessionFactory"/></property></bean><!-- aop --><!-- transaction --><bean id="userManager"class="erManagerImpl"><property name="userDao"><ref local="userDao"/></property></bean><!-- advice --><bean id="transactionManager"class="org.springframework.orm.hibernate4.HibernateTransactionManager "><property name="sessionFactory"><ref local="sessionFactory"/></property></bean><!-- 事务处理 --><bean id="transactionInterceptor"class="org.springframework.transaction.interceptor.TransactionInterce ptor"><property name="transactionManager"><ref local="transactionManager"/></property><property name="transactionAttributes"><props><prop key="register">PROPAGATION_REQUIRED</prop><!--hibernate4必须配置为开启事务否则 getCurrentSession()获取不到--><prop key="get*">PROPAGATION_REQUIRED,readOnly</prop><prop key="find*">PROPAGATION_REQUIRED,readOnly</prop><prop key="select*">PROPAGATION_REQUIRED,readOnly</prop><prop key="query*">PROPAGATION_REQUIRED,readOnly</prop><prop key="sync*">PROPAGATION_REQUIRED</prop><prop key="finish*">PROPAGATION_REQUIRED</prop><prop key="add*">PROPAGATION_REQUIRED</prop><prop key="insert*">PROPAGATION_REQUIRED</prop><prop key="edit*">PROPAGATION_REQUIRED</prop><prop key="update*">PROPAGATION_REQUIRED</prop><prop key="save*">PROPAGATION_REQUIRED</prop><prop key="remove*">PROPAGATION_REQUIRED</prop><prop key="delete*">PROPAGATION_REQUIRED</prop><prop key="login*">PROPAGATION_REQUIRED</prop><propkey="*">PROPAGATION_REQUIRED,ng.Exception</prop></props></property></bean><!-- autoproxy 自动创建代理--><bean id="ProxyCreator"class="org.springframework.aop.framework.autoproxy.BeanNameAutoProxyC reator"><property name="beanNames"><list><value>*Manager</value></list></property><property name="interceptorNames"><list><value>transactionInterceptor</value></list></property></bean><bean id="loginAction"class="com.accp.action.LoginAction"scope="prototype"><property name="userManager"><ref local="userManager"/></property></bean></beans>7.类图以用户登录验证为基础的测试流程控制8.注意事项(1)login.jsp 输入内容的name为ername user.password时,LoginAction中应该为user生成相应的get/set方法。
Spring security 3 + CAS 单点登录 一.Server端配置 1.环境说明: Tomcat 6.0.20 JDK 1.6.x Spring 3.0.0.RELEASE Spring Security 3.0.0.RELEASE CAS cas-server-3.4.2 cas-client-3.1.10 2.Tomcat支持SSL 配置Keystores 要使用ssl connector,必须先创建一个keystore。他包含了服务器中被客户端用于验证服务器的数字证书。一旦客户端接受了这个证书,客户端就可以使用public key去加密他们要发送的数据。而服务器,拥有一个private key,作为唯一解密数据的密钥。 要创建keystore,可以使用JAVA_HOME/bin下的keytool 打开命令控制台输入: keytool -genkey -alias tomcat -keyalg RSA -keystore D:\tomcat.keystore -alias tomcat是别名。默认 -keyalg RSA是加密算法 MD5算法也是被支持的,但是建议使用RSA获得更好的兼容 -keystore D:\tomcat.keystore 是证书保存的路径 ,默认是在C:user/administrator路径下 命令执行后:提示输入密码:123456 然后,再输入性别,公司,地址等信息 最后为tomcat用户设置口令,可以和证书口令一样 最后就是生成一个tomcat.keystore证书 或者直接输入以下命令: keytool -genkey -v -alias tomcat -keyalg RSA -keystore D:/tomcat.keystore -dname "CN=192.168.1.1,OU=logiscn,O=logis,L=beijing,ST=beijing,C=CN" -validity 3650 -storepass logiscn -keypass logiscn -dname 直接输入规则:CN:名字与姓氏,如果Tomcat所在服务器的域名不是“localhost”,应改为对应的域名,如http://www.baidu.com 或者IP地址,否则浏览器会弹出警告窗口,提示用户证书与所在域不匹配;OU:组织单位名称;O:组织名称;L:区域;ST:省市区;C:国家地区 -validity 是有效期,现在是10年 -storepass 数字证书的口令 -keypass用于在导入浏览器时使用的密码,如果密码不正确,则不能正确导入到浏览器 修改Tomcat配置文件 protocol="org.apache.coyote.http11.Http11Protocol" port="8443" minSpareThreads="5" maxSpareThreads="75" enableLookups="true" disableUploadTimeout="true" acceptCount="100" maxThreads="200" scheme="https" secure="true" SSLEnabled="true" keystoreFile="D:\tomcat.keystore" keystorePass="logiscn" clientAuth="false" sslProtocol="TLS"/> clientAuth指定是否需要验证客户端证书,如果该设置为“false”,则为单向SSL验证,SSL配置可到此结束。如果clientAuth设置为“true”,表示强制双向SSL验证,必须验证客户端证书。如果clientAuth设置为“want”,则表示可以验证客户端证书,但如果客户端没有有效证书,也不强制验证。若是双向,配置链接http://blog.csdn.net/sxe18652071425/article/details/11556701。
Struts2+Spring + hibernate 中对action的单元测试环境搭建网上都说没有必要对action进行单元测试,但是有的项目中没有为了代码结构刻意去弄一个service层出来调用dao,而是在action中直接操作Dao层的函数,就我做的这个项目,搭建了一个对antion的单元测试。
仅作为备忘。
1.途中碰到的问题。
∙如何来测试action?网上给出的很多参考使用MockStrutsTestCase,而且还是对应struts1.x的。
在apache上查看struts2的文档时候发现,有提供一个包struts2-junit-plugin-2.1.8.jar,里面有测试struts2.x中action的类StrutsSpringTestCase,可以用来测试ssh中的action。
∙如何来解决JPA中的lazy机制?大家知道,ssh集成后,hibernate的lazy机制成为让人头疼的问题,网上普遍有两种解决方案,在web.xml中使用spring提供的OpenSessionInViewFilter来实现,还有一种是在application.xml中配置OpenSessionInViewFilter来实现。
前者通用,后者只能用在springmvc结构中。
这里不再详细描述,详见网友blog(/zxq1406spys/archive/2009/10/30/4748283.aspx)∙如何来做用户session管理?比如测试跟登陆用户身份信息相关的action。
在StrutsSpringTestCase中有request属性,所以我们可以mock出session来代替网页请求的真实session。
2.上述问题解决以后,我们的单元测试环境就可以开始搭建了。
环境描述:Struts2 + Spring2.5 + hibernate3 + junit4目的:对后台Action层的函数进行单元测试需要的Jar包:junit4.jar(eclipse自带的,在项目路径中导入即可。
第9章Spring与Struts2、Hibernate框架的整合基础一、搭建Struts框架注:导入的jar包与前面课程介绍的不同二、搭建Spring框架1.添加的类库包括AOP、Core、Persistent Core、JDBC、Web库2.修改applicationContext.xml的存储目录为WebRoot/WEB-INF三、搭建hibernate框架1.建立数据库连接2.搭建框架,注意选择的配置文件为applicationContext.xml而不是hibernate.cfg.xml。
1)设置SessionFactory的Bean id为sessionFactory。
2)设置DataSource的Bean Id为dataSource3)取消“Create SessionFactory class”选项4)导入包commons-pool-1.3到lib文件夹。
四、修改web.xml加入Spring监听器配置,至此所有框架搭建完毕。
<listener><listener-class>org.springframework.web.context.ContextLoaderListener</listener-class></listener>五、数据库建表六、在工程下创建domain、dao包,反向工程自动生成实体类、配置文件、dao类。
1)反向工程将生成的dao文件2)移动dao类到dao包,修改由于移动dao类后applicationContext.xml出现的错误,并将id名首字母改成小写。
3)为dao类提取出接口。
在工作区右键dao文件-》refactor-》extract interface七、编写service、service接口并配置1)创建service包2)创建service类,定义方法findScoreBySnumber()。
SessionFactory 注入Spring 可以与Hibernate结合使用,Hibernate的连结、事务管理等是由建立SessionFactory开始的,SessionFactory在应用程式中通常只需存在一个实例,因而SessionFactory底层的DataSource可以使用Spring的 IoC注入,之后您再注入SessionFactory至相依的物件之中。
例如可以改写一下第一个 Hibernate 程式,首先您可以删除hibernate.cfg.xml,因为这部份可以由Spring在Bean定义档中撰写DataSource设定及依赖注入来取代,您可以如下撰写Spring的Bean 定义档:•beans‐config.xml<?xml version="1.0" encoding="UTF-8"?><!DOCTYPE beans PUBLIC "-//SPRING/DTDBEAN/EN""/dtd/spring-beans.dtd"><beans><bean id="dataSource" class="org.springframework.jdbc.→ datasource.DriverManagerDataSource"><property name="driverClassName"><value>com.mysql.jdbc.Driver</value></property><property name="url"><value>jdbc:mysql://localhost:3306/demo</value></property><property name="username"><value>caterpillar</value></property><property name="password"><value>123456</value></property></bean><bean id="sessionFactory" class="org.springframework.orm.→ hibernate3.LocalSessionFactoryBean"destroy-method="destroy"><property name="dataSource"><ref bean="dataSource"/></property><property name="mappingResources"><list><value>onlyfun/caterpillar/User.hbm.xml</value></list></property><property name="hibernateProperties"><props><prop key="hibernate.dialect">org.hibernate.dialect.MySQLDialect</prop></props></property></bean><bean id="userDAO" class="erDAO"><property name="sessionFactory"><ref bean="sessionFactory"/></property></bean> </beans>可以看到使用 Spring 整合 Hibernate 的好处,可以直接将 DataSource 注入至 org.springframework.orm.hibernate3.LocalSessionFactoryBean 中,至于Hibernate 所需的相关设定,则可透过 LocalSessionFactoryBean 的相关属性来设定,像是设定资料库名称、使用者名称、密码等, LocalSessionFactoryBean 会建立SessionFactory 的实例,并在执行依赖注入时将这个实例设定给 UserDAO。
开发工具:MyEclipse 6.0 ,Tomcat 5.5 ,JDK 1.5 ,MySQL 5.0 ;开发准备:下载Struts 2.0和Hibernate 3.2,大家可Struts和Hibernate的官方网站下载这两个框架。
我们先来总览一下开发完成后的包—类图:首先NEW一个Web Project ,名为"LoginSystem" ,在 lib 目录下加入Struts 2.0的Jar包和Hibernate 3.2的Jar包,然后按下面的步骤来:1、在 src 目录下建 "hibernate.cfg.xml" 全部代码如下:1<?xml version='1.0' encoding='UTF-8'?>2<!DOCTYPE hibernate-configuration PUBLIC3"-//Hibernate/Hibernate Configuration DTD3.0//EN"4"/hibernate-configuration-3.0.dtd">56<!-- Generated by MyEclipse Hibernate Tools.-->7<hibernate-configuration>8<session-factory>9<property name="ername">root</prop erty>10<property name="connection.url">11jdbc:mysql://localhost:3306/LoginSystem12</property>13<property name="dialect">14org.hibernate.dialect.MySQLDialect16<property name="myeclipse.connection.profile"> 17LoginSystem18</property>19<property name="connection.password">root</prope rty>20<property name="connection.driver_class">21com.mysql.jdbc.Driver22</property>23<property name="show_sql">true</property>24<!-- POJO类映射配置-->25<mapping resource="com/rong/ORM/User.hbm.xml"/ >26</session-factory>27</hibernate-configuration>2、建立实体类 "User.java" 及其映射文件 "User.hbm.xml" 两者都放在 "com.rong.ORM" 包下。
其中"User.java"的代码如下:1package com.rong.ORM;23public class User {45private int id; //主键ID6private String name; //用户名7private String pwd; //密码89/*10* Getter方法与Setter方法11*/12public String getName() {13return name;14}15public void setName(String name) { = name;17}18public String getPwd() {19return pwd;20}21public void setPwd(String pwd) {22this.pwd = pwd;23}24public int getId() {26}27public void setId(int id) {28this.id = id;29}30}User.hbm.xml的代码如下:1<?xml version="1.0" encoding="utf-8"?>2<!DOCTYPE hibernate-mapping PUBLIC "-//Hibernate/Hibernate Mappin g DTD 3.0//EN"3"/hibernate-mapping-3.0.dtd">45<hibernate-mapping>6<class name="er"table="tb_user">7<id name="id">8<generator class="native"/>9</id>10<property name="name"type="ng.String" length="20"/>11<property name="pwd"type="ng.String"l ength="20"/>12</class>13</hibernate-mapping>3、建立"ExportDB.java"工具类,我们执行如下代码,就能轻松将User类导入数据库转变成数据库中的表。
不过,前提是我们已经在MySQL中建立了一个名为"LoginSystem"的数据库。
1package tool;23import org.hibernate.cfg.Configuration;4import org.hibernate.tool.hbm2ddl.SchemaExport;56public class ExportDB {78/*9* 运行此类,通过POJO类和配置文件,生成数据库的表10*/11public static void main(String[] args){12Configuration cfg = new Configuration().configure();13SchemaExport export = new SchemaExport(cfg); 14export.create(true, true);15}16}174、建立获取SessionFactory和管理Session的HibernateUtil.java 类:1package com.rong.hibernate;23import org.hibernate.HibernateException;4import org.hibernate.Session;5import org.hibernate.SessionFactory;6import org.hibernate.cfg.Configuration;78public class HibernateUtil {910//声明Hibernate配置文件所在的路径11private static String configFile = "/hibernate.cfg.x ml";12//建Configuration对象13private static Configuration configuration = new Co nfiguration();14//建Session工厂对象15private static SessionFactory sessionFactory = null; 1617/**18* 单例模式,只初始化一次,只产生一个SessionFactory对象(线程安全)19*/20static{21try{22//通过hibernate.cfg.xml配置数据库连接23configuration.configure(configFile);24//建立一个Session工厂25sessionFactory = configuration.buildSes sionFactory();26System.out.println("[标记]初始化SessionFactory");27}catch(Exception e){28System.out.println("[异常]创建SessionFactory时发生异常,异常原因如下:");29 e.printStackTrace();30}31}3233/**34* getSession()方法35* @return Session对象36* @throws HibernateException37*/38public Session getSession(){39Session session = null;40try{41session = sessionFactory.openSession();42}catch(Exception e){43System.out.println("[异常]开启Session时发生异常,异常原因如下:");44 e.printStackTrace();45}46return session;47}4849/**50* closeSession()方法51* @param session 要关闭的Session对象52*/53public void closeSession(Session session){54try{55if(null!= session)56session.close();57}catch(Exception e){58System.out.println("[异常]关闭Session时发生异常,异常原因如下:");59 e.printStackTrace();60}61}62636466}675、DAO层设计:在"com.rong.DAO" 包下建立两个类,一个是接口,一个是实现类,其中UserDao.java代码如下:1package com.rong.DAO;23import java.util.List;4import er;56public interface UserDao {78/**9* 增加用户10* @param user 要增加的用户11*/12public void add(User user);1314/**15* 登录验证16* @param name17* @param password18* @return-1:不存在用户名; -2:密码不正确; >0:登录成功(即返回该记录ID)19*/20public int isExist(String name,String password); 21}UserDaoImpl.java的代码如下1package com.rong.DAO;23import java.util.Iterator;4import java.util.List;5import org.hibernate.Query;6import org.hibernate.Session;7import org.hibernate.Transaction;8import er;9import com.rong.hibernate.HibernateUtil;1011public class UserDaoImpl implements UserDao {1213HibernateUtil util = new HibernateUtil();1415/**16* 增加用户17* @param user 要增加的用户18*/19public void add(User user){20Session session = util.getSession();21Transaction ts = null;22try{23ts = session.beginTransaction();24session.save(user);mit();26}catch(Exception e){27System.out.println("UserDaoImpl.add()方法发生异常:");28 e.printStackTrace();29}finally{30util.closeSession(session);31}32}3334/**35* 登录验证36* @param name37* @param password38* @return-1:不存在用户名; -2:密码不正确; >0:登录成功(即返回该记录ID)39*/40public int isExist(String name,String password){41//int state = 0 ; //初始化状态变量42Session session = util.getSession();43try{44Query query = session.createQuery("fro m User u where = ?");45query.setString(0, name);46List list = query.list();47if(null== list || 0 == list.size()){ 48return-1 ; //用户名不存在49}50Query query2 = session.createQuery("fr om User u where = ? and u.pwd = ?");51query2.setString(0, name);52query2.setString(1, password);53List list2 = query.list();54if(null== list2){55return-2 ; //密码不正确56}57Iterator it = list.iterator();58User user = (User)it.next();59return user.getId(); //验证成功,取ID值6061}catch(Exception e){62System.out.println("UserDaoImpl.isExist()方法发生异常:");63 e.printStackTrace();64return0; //异常时返回065}finally{66util.closeSession(session);67}68}69}706、在web.xml中配置Struts 2.0支持:1<?xml version="1.0" encoding="UTF-8"?>2<web-app version="2.5"xmlns="/xml/ns/javaee"3xmlns:xsi="/2001/XMLSchema-instance"4xsi:schemaLocation="/xml/ns/javaee5/xml/ns/javaee/web-app_2_5.xsd">67<!-- 用过滤器配置Struts2支持-->8<filter>9<filter-name>struts2</filter-name>10<filter-class>11org.apache.struts2.dispatcher.FilterDispa tcher12</filter-class>13</filter>14<filter-mapping>15<filter-name>struts2</filter-name>16<url-pattern>/*</url-pattern>17</filter-mapping>1819<welcome-file-list>20<welcome-file>login.jsp</welcome-file>21</welcome-file-list>22</web-app>7、登录页面login.jsp代码如下:1<%@ page language="java" import="java.util.*" pageEncoding="gbk"% >2<%@ taglib prefix="s" uri="/struts-tags" %>3<!DOCTYPE HTML PUBLIC "-//W3C//DTD HTML 4.01 Transitional//EN">4<html>5<head>67<title>Login Page</title>8</head>910<body>11<p><a href="register.jsp">用户注册</a>|用户登录</p>12<s:form action="loginAction"th eme="simple">13<table>14<tr>15<td style="text-align:ri ght">16账号17</td>18<td>19<s:textfield nam e="name"label="账号"/>2021</td>22</tr>23<tr>24<td style="text-align:ri ght">25密码26</td>27<td>28<s:password name ="pwd"label="密码"/>29</td>30</tr>31<tr>32<td style="text-align:ri ght">33验证码34</td>35<td>36<s:textfield nam e="inputCertCode"label="验证码"cssStyle="width:100px"/>37<img src="other/ makeCertPic.jsp">38</td>39</tr>40<tr>41<td style="text-align:ri ght">42<s:submit value= "登录"/>43</td>44<td style="text-align:le ft">45<s:reset value="取消"/>46</td>47</tr>48</table>49</s:form>50<s:fielderror cssStyle="color:red"/>51</body>52</html>53注册页register.jsp代码如下1<%@ page language="java" import="java.util.*" pageEncoding="gbk"% >2<%@ taglib prefix="s" uri="/struts-tags"%>3<!DOCTYPE HTML PUBLIC "-//W3C//DTD HTML 4.01 Transitional//EN">4<html>5<head>67<title>Register Page</title>8</head>910<body>11<p><a href="login.jsp">用户登录</a>|用户注册</p> 12<s:form action="registerAction"theme="simple"> 13<table>14<tr>15<td style="text-align:ri ght">16请输入账号17</td>18<td>19<s:textfield nam e=""label="账号"/>2021</td>22</tr>23<tr>24<td style="text-align:ri ght">25请输入密码26</td>27<td>28<s:password name ="user.pwd"label="密码"/>29</td>30</tr>31<tr>32<td style="text-align:ri ght">33请再次输入密码34</td>35<td>36<s:password name ="repwd"label="重复密码"/>37</td>38</tr>39<tr>40<td style="text-align:ri ght">41请输入验证码42</td>43<td>44<s:textfield nam e="inputCertCode"label="验证码"cssStyle="width:100px"/>45<img src="other/ makeCertPic.jsp">46</td>47</tr>48<tr>49<td style="text-align:ri ght">50<s:submit value= "注册"/>51</td>52<td style="text-align:le ft">53<s:reset value="取消"/>54</td>55</tr>56</table>57</s:form>58<s:fielderror cssStyle="color:red"/>59</body>60</html>618、在JSP页中所用到的验证码的生成页面makeCertPic.jsp(我们把它放在WebRoot的other目录下):1<%@page contentType="image/jpeg" pageEncoding="gbk"%>2<jsp:useBean id="image"scope="page"class="com.rong.other.makeCer tPic"/>3<%4String str = image.getCertPic(0,0,response.getOutputStr eam());5// 将验证码保存到Session中6session.setAttribute("certCode", str);7%>其中,它调用了名为makeCertPic的Bean ,这个类主要用来生成彩色的验证图片,其代码如下:1package com.rong.other;2import java.awt.Color;3import java.awt.Font;4import java.awt.Graphics;5import java.awt.image.BufferedImage;6import java.io.IOException;7import java.io.OutputStream;8import java.util.Random;9import javax.imageio.ImageIO;10/**11* 生成验证码图片12*/13public class makeCertPic {14//验证码图片中可以出现的字符集,可根据需要修改15private char mapTable[]={16'a','b','c','d','e','f',17'g','h','i','j','k','l',18'm','n','o','p','q','r',19's','t','u','v','w','x',20'y','z','0','1','2','3',21'4','5','6','7','8','9'};22/**23* 功能:生成彩色验证码图片24* 参数width为生成的图片的宽度,参数height为生成的图片的高度,参数os为页面的输出流25*/26public String getCertPic(int width, int height, Outpu tStream os) {27if(width<=0)width=60;28if(height<=0)height=20;29BufferedImage image = new BufferedImage(width , height,30BufferedImage.TYPE_INT_RGB);31// 获取图形上下文32Graphics g = image.getGraphics();33// 设定背景色34g.setColor(new Color(0xDCDCDC));35g.fillRect(0, 0, width, height);36//画边框37g.setColor(Color.black);38g.drawRect(0,0,width-1,height-1);39// 取随机产生的认证码40String strEnsure = "";41// 4代表4位验证码,如果要生成更多位的认证码,则加大数值42for(int i=0; i<4; ++i) {43strEnsure += mapTable[(int)(mapTable.le ngth*Math.random())];44}45// 将认证码显示到图象中,如果要生成更多位的认证码,增加drawString语句46g.setColor(Color.black);47g.setFont(new Font("Atlantic Inline",Font.PLAIN ,18));48String str = strEnsure.substring(0,1);49g.drawString(str,8,17);50str = strEnsure.substring(1,2);51g.drawString(str,20,15);52str = strEnsure.substring(2,3);53g.drawString(str,35,18);54str = strEnsure.substring(3,4);55g.drawString(str,45,15);56// 随机产生10个干扰点57Random rand = new Random();58for(int i=0;i<10;i++) {59int x = rand.nextInt(width);60int y = rand.nextInt(height);61g.drawOval(x,y,1,1);62}63// 释放图形上下文64g.dispose();65try{66// 输出图象到页面67ImageIO.write(image, "JPEG", os);68} catch(IOException e) {69return"";70}71return strEnsure;72}73}749、此时,我们很有必要来配置一下struts.xml其全部代码如下1<?xml version="1.0" encoding="UTF-8" ?>2<!DOCTYPE struts PUBLIC3"-//Apache Software Foundation//DTD Struts C onfiguration 2.0//EN"4"/dtds/struts-2.0.dtd">56<struts>78<package name="com.rong.action"extends="struts-defaul t">9<!-- 用户登录-->10<action name="loginAction"class="com.rong.acti on.LoginAction">11<result name="success"type="redirect"> /back/index.jsp</result>12<result name="input">/login.jsp</result> 13</action>14<!-- 用户注册-->15<action name="registerAction"class="com.rong.a ction.RegisterAction">16<result name="success"type="redirect"> /login.jsp</result>17<result name="input">/register.jsp</resu lt>18</action>19</package>20</struts>10、Action层设计:两个非常关键的类,其中LoginAction.java的代码如下:1package com.rong.action;23import java.util.Map;4import com.opensymphony.xwork2.ActionContext;5import com.opensymphony.xwork2.ActionSupport;6import erDao;7import erDaoImpl;8import er;910public class LoginAction extends ActionSupport {111213private UserDao userDao = new UserDaoImpl();//操纵数据库DAO类(Hibernate实现),通过Struts.xml注入值1415private int id;16private String name; //用户名(值由struts注入) 17private String pwd; //密码(值由struts注入)1819private String inputCertCode; //验证码2021public int getId() {22return id;23}24public void setId(int id) {25this.id = id;26}27public String getName() {28return name;29}30public void setName(String name) { = name;32}33public String getPwd() {34return pwd;35}36public void setPwd(String pwd) {37this.pwd = pwd;38}3940public String getInputCertCode() {41return inputCertCode;42}43public void setInputCertCode(String inputCertCode) { 44this.inputCertCode = inputCertCode;45}46@Override47public String execute() throws Exception {48int state = userDao.isExist(name,pwd);49System.out.println("state="+state);50if(state == -1){51this.addFieldError("name", "用户名不正确,请先注册!");52return INPUT;53}else if(state == -2){54this.addFieldError("pwd", "密码不正确,请重新输入密码!");55return INPUT;56}else if(state > 0){57System.out.println("[测试]登录成功!用户ID="+state);58this.setId(state);59return SUCCESS;60}else{61this.addFieldError("name", "登录失败,请与管理员联系!");62return INPUT;63}64}6566public void validate() {67//验证码验证68if(null== inputCertCode || "".equals(inputCert Code)){69this.addFieldError("inputCertCode", "验证码不能为空!");70}else{71Map session = ActionContext.getContext ().getSession();72String certCode = session.get("certCod e").toString();73if( ! certCode.equals(this.inputCertCode) ){74this.addFieldError("inputCertCode ", "验证码不正确!");75}76}7778}7980818283}84RegisterAction.java的代码如下:1package com.rong.action;23import java.util.Map;45import com.opensymphony.xwork2.ActionContext;6import com.opensymphony.xwork2.ActionSupport;7import erDao;8import erDaoImpl;9import er;1011public class RegisterAction extends ActionSupport {1213private UserDao userDao = new UserDaoImpl();1415private User user; //注册提交的用户对象1617private String repwd; //重复密码1819private String inputCertCode; //验证码2021public User getUser() {22return user;23}2425public void setUser(User user) {er = user;27}2829public String getRepwd() {30return repwd;31}3233public void setRepwd(String repwd) {34this.repwd = repwd;35}3637public String getInputCertCode() {38return inputCertCode;39}4041public void setInputCertCode(String inputCertCode) { 42this.inputCertCode = inputCertCode;43}4445@Override46public String execute() throws Exception {47User user = new User();48userDao.add(user); //保存注册的user对象49return SUCCESS;50}5152@Override53public void validate() {54//验证码验证55if(null== inputCertCode || "".equals(inputCert Code)){56this.addFieldError("inputCertCode", "验证码不能为空!");57}else{58Map session = ActionContext.getContext ().getSession();59String certCode = session.get("certCod e").toString();60if( ! certCode.equals(this.inputCertCode) ){61this.addFieldError("inputCertCode ", "验证码不正确!");62}63}6465}6667}6811、不要忘记配置校验框架,与上面两个Action同一个目录下。