Eucalyptus_Windows_EMI_Creation_from_VMDK
- 格式:pdf
- 大小:118.75 KB
- 文档页数:4
audacity windows编译Audacity是一款免费、开源的音频编辑软件,它支持多种音频格式,并且具有强大的音频编辑和混音功能。
Audacity软件在Windows 操作系统中非常受欢迎,因为它易于使用、功能强大且免费。
但是,如果想自己编译Audacity的Windows版本,就需要一些专业的知识和技巧。
首先,编译Audacity的Windows版本需要一台电脑,并确保安装了编译所需的软件和工具。
以下是在Windows上编译Audacity的基本步骤:1.安装编译工具:Audacity使用C和C++编写,因此您需要安装C++编译器,如Microsoft Visual Studio。
确保选择正确的版本,以便与您的操作系统兼容。
2.下载Audacity源代码:您可以从Audacity官方网站上下载最新的源代码。
解压缩下载的压缩文件,将源代码保存到您选择的目录中。
3.配置编译环境:打开命令提示符或Powershell,并导航到保存源代码的目录。
然后执行"./configure"命令,这将配置Audacity的编译环境并确保所有依赖项都已安装。
4.编译Audacity:完成环境配置后,执行"make"命令,这将开始编译Audacity的Windows版本。
编译过程可能需要一些时间,具体取决于您的计算机配置和网络速度。
5.构建Audacity可执行文件:编译成功后,您将在源代码目录中找到Audacity的可执行文件。
将其复制到任意位置(例如桌面),然后双击运行即可使用Audacity。
上述步骤简单介绍了编译Audacity的基本过程。
然而,要生成可执行的Windows应用程序,还有一些额外的步骤和配置需要进行。
以下是其中一些具体的内容:-部署库文件:Audacity在编译过程中使用了一些库文件,例如PortAudio、FFmpeg和libMAD。
您需要确保将这些库文件正确配置到项目中,并将其打包到最终的可执行文件中。
目录目录目录 (1)欢迎 (2)桉树特点 (2)谁应该阅读本指南? (2)在本指南是什么? (2)入门 (3)注册一个帐户 (3)获取用户凭据 (3)设置Euca2ools (4)使用ImagesUsing图片 (5)图片概述 (5)图片任务 (6)使用实例 (28)副本概观 (28)实例任务 (28)使用EBS (32)EBS概述 (32)EBS任务 (32)管理访问 (34)用户 (36)证书 (39)使用虚拟机的联网和安全性 (41)与实例关联的IP地址 (41)释放一个IP地址 (41)创建一个安全组 (41)删除安全组 (42)授权安全组规则 (42)吊销安全组规则 (43)欢迎桉树是一个基于Linux的软件架构,创建可扩展的私有云和混合云在您的IT基础设施。
它可以让你根据需要提供自己的资源的集合。
桉树两菌株不同用户的网络流量,并允许两个或多个集群的出现属于相同的本地区域网络(LAN)提供了一个虚拟的网络覆盖。
桉树还互操作亚马逊的EC2和S3的公共云服务,从而提供企业混合云能力。
桉树特点桉树可以提供一些方式来实现,管理和维护你自己收集的虚拟资源(机器,网络.和存储)。
以下是这些功能的概述。
密钥管理:当你登录到虚拟机使用SSH时,桉树会提供公共和私人密钥来验证您的身份。
您可以添加,描述和删除密钥对。
图片管理:在正在运行的实例之前,必须有人准备用于在云中的虚拟机映像,这可以是管理员或用户,您可以捆绑在一起,上传,注册,描述,下载,解包,并注销VM图像。
基于Linux的虚拟机管理:桉树可以让你在云中运行自己的虚拟机实例。
你可以运行,描述,终止,并重新启动各种各样的基于Linux的虚拟机实例,图像管理命令。
基于Windows的虚拟机管理:可以运行,说明,终止,重新启动,并捆绑的Windows虚拟机的实例。
IP地址管理:根据不同的网络模式,你可以访问有弹性的IP地址。
.弹性IP地址是公网IP地址,用户可以保留和动态虚拟机实例相关联您可以分配,关联,解除,描述,并释放IP地址。
![[Windows]关于映像劫持](https://uimg.taocdn.com/c1c3e9fa18e8b8f67c1cfad6195f312b3169eb06.webp)
[Windows]关于映像劫持什么是映像劫持也许你曾遇到过这种情况:⽆论你将软件安装在什么地⽅,在运⾏的时候总会出现“系统找不到指定的⽂件”的错误提⽰,导致软件⽆法运⾏。
如果你将软件的exe⽂件改个名称,就可以正常运⾏了。
这种现象就叫做映像劫持。
映像劫持是⼀种影响系统正常运转的⼿段,很多病毒、⽊马都会使⽤这种⼿段阻⽌安全软件的运⾏。
映像劫持的原理映像劫持是利⽤Windows的IFEO(Image File Execution Options)功能来实现的。
IFEO实际上是Windows的⼀项正常功能,主要⽤于调试程序,其初衷是在程序启动的时候开启调试器来调试程序,这样⼀来可以在调试器中观察程序在难以重现的环境中的⾏为。
例如,某个程序在随⽤户登录⾃动启动时会出错,但在登录后⼿动启动时却⼀切正常,这就可以通过IFEO设置⼀个调试器,⽆论程序何时启动,都会开启这个调试器对其进⾏调试,以便找出问题。
在注册表中,HKEY_LOCAL_MACHINE\SOFTWARE\Microsoft\Windows NT\CurrentVersion\Image File Execution Options就是保存IFEO设置的地⽅。
下⾯来演⽰⼀下IFEO正常的⽤法(假设你已经安装了Visual Studio):打开注册表编辑器,在HKEY_LOCAL_MACHINE\SOFTWARE\Microsoft\Windows NT\CurrentVersion\Image File Execution Options中添加⼀个新的项,取名为“calc.exe”。
打开刚刚创建的calc.exe项,在右侧的窗格中右击,新建⼀个字符串值,取名为“Debugger”,取值为“vsjitdebugger.exe”。
关闭注册表编辑器。
此时运⾏系统⾃带的计算器,会弹出⼀个应⽤程序错误窗⼝,选择“调试程序”,就会启动Visual Studio对计算器进⾏调试。
这两天逛论坛, 无意中发现了这个帖子. 作者极尽所能的介绍了 Windows 系统文件的相关信息. 极有参考价值. 虽说, 这个不同于 nLite 的预先精简定制, 但是相信对于 nLite 精简效果不够满意的大有人在. 那么按照这个指南就能够令你的系统最优化.当然, 精简系统是要付出代价的. 不要贪得无厌, 免得系统坏了修不好啊.Windows XP个别 System32 文件System32 文件夹下个别要移除的文件我们就要删除另外600 个 system32 文件...我们要一次把它们全都解决掉.以下是我所删除的 System32 文件列表, 另外还有相关的批处理文件.我不会把自己用的批处理文件给别人的.我已经厌倦别人认为我的批处理文件就是最适合他们的. 其实并不是这么回事.这里有个很简单的例子能够说明原因.我在我用的批处理文件中定义了要删除winfax.dll (Microsoft 传真 API 支持 DLL), 因为我没有传真机. 你直接用我的批处理文件的话, 就会把你的系统中的传真相关文件删掉. 这样, 你的传真机无法正常工作的话. 你就会骂我.到底需要移除哪些 System32 文件, 这应该由你自己来决定. 我已经尽力把相关信息提供给你了, 这些应该可以帮助你决定应当删除哪些文件.如果你想创建你自己的批处理文件的话,请仔细查看相关移除信息, 我会把相应部分的批处理脚本贴上去的, 然后你可以将其粘贴到你自己的批处理文件中.我在我的批处理文件中添加了一个防止出现意外的功能...这些文件会被移动并会被保存下来 (没有直接将其删除...) 备份至 C:/backup.在这个backup 文件夹中有个名为"smart placement"的子文件夹. 其出现的顺序与 XP 中的顺序相同. 首先你会看到 WINDOWS 文件夹. 在 WINDOWS 文件夹中你可以看到 system32 文件夹.我创建这个所谓的‖smart placement‖就是为了让你明白相关备份文件的来源. 如你所见, 这些批处理文件也可用于其它文件夹中的文件. 反正, Backup 文件夹中的结构与 XP 的相同.请确保在你使用任何注册表清理工具之前, 应当先把 Backup 文件夹中的文件临时删掉...注册表清理工具可能会把注册表中的路径指向 backup 文件夹中的相关路径.将用得到的部分脚本复制粘贴到记事本中. 然后将其另存.代码:________________________________________IF NOT EXIST "c:/backup/WINDOWS/system32" md c:/backup/WINDOWS/system32MOVE c:/WINDOWS/system32/6to4svc.dll c:/backup/WINDOWS/system32/MOVE c:/WINDOWS/system32/aaaamon.dll c:/backup/WINDOWS/system32/MOVE c:/WINDOWS/system32/acledit.dll c:/backup/WINDOWS/system32/MOVE c:/WINDOWS/system32/admparse.dll c:/backup/WINDOWS/system32/________________________________________C:/WINDOWS/system32:12520437.cpx ...代码页转换表.12520850.cpx ... 代码页转换表.6to4svc.dll ....在 IP4网络上提供IPv6 连接的服务aaaamon.dll ....Aaaa Monitor Dllacledit.dll ....访问控制列表编辑器ac3filter.cpl ..ac3filter 控制面板扩展属于我所安装用于看电影的 AC3Filter 编解码器.ahui.exe .......应用程序兼容用户界面ALSNDMGR.CPL ...Realtek AC97 音频控制面板我用 RTLCPL.EXE (Realtek 音频控制面板) 作为代替.amcompat.tlb ...ansi.sys .......apcups.dll .....APC 智能提供程序APPEND.EXE .....(Append). 允许应用程序在当前文件夹中打开指定目录中的数据文件. 此工具源于 MS-DOS 5.0.asctrls.ocx ....Active Setup 控件A T.EXE .........(AT). 用于设置在指定时间和日期执行任务. 需要运行计划任务服务.atkctrs.dll ....Windows NT AppleTalk 性能计数器 dllATMADM.EXE .....(A TM). ATM 呼叫管理器.auditusr.exe ... 设置每用户审核策略atmfd.dll ......Windows NT OpenType/Type 1 字体驱动atmlib.dll .....Windows NT OpenType/Type 1 API 库.atmpvcno.dll ...Atm Epvc Install DLLatrace.dll .....Async Trace DLLATTRIB.EXE .....(文件属性). 显示或更改文件属性 (只读, 存档, 隐藏, 或系统).AUTOCONV.EXE ...(自动转换). 用于将 FAT 分区格式转为 NTFS.autodisc.dll ...Windows AutoDiscovery API , 自动收取邮件AUTOFMT.EXE ...(自动格式化). 用于转换文件系统的工具.AUTOLFN.EXE ....长文件名转换工具. 用于 DOS模式下. 能够自动将长文件名转换为8.3 格式.-------------------------------------------------------batt.dll .......电池类安装程序如果你使用笔记本的话, 那么设备管理器会需要这个文件来访问你的电池属性.-------------------------------------------------------bidispl.dll ....Bidispl DLLbios1.rom ......bios4.rom ......bitsprx2.dll ...后台智能传输服务代理bitsprx3.dll ... 后台智能传输服务 2.0 代理blastcln.exe ...Blaster/Nachi 移除工具BOOTOK.EXE .....(启动确认). 在一次成功地登录系统之后, ―上次正确的配置‖会用它保存配置参数.BOOTVRFY.EXE ...(启动验证). ―上次正确的配置‖会用它验证一个引导选择.browsewm.dll ...BrowseWM Playerbthci.dll ......蓝牙类别安装程序bthprops.cpl ...蓝牙控制面板小程序 (无线公司)bthserv.dll ....蓝牙支持服务btpanui.dll ....蓝牙 PAN 用户界面-------------------------------------------------------capesnpn.dll ...Microsoft 证书模板管理扩展ccfgnt.dll .....Internet 配置库certmgr.dll ....证书管理工具certmgr.msc .... <-- 证书管理控制台.cdosys.dll .....Microsoft CDO for Windows Librarycdfview.dll ....频道定义文件文件查看器cewmdm.dll .....Windows CE WMDM 服务提供程序CHARMAP.EXE ....(字符映射表). 用于显示某个字体所能显示的所有字符. -------------------------------------------------------以下文件没有用批处理文件删除. 需要手动删除它们:cdplayer.exe.manifestlogonui.exe.manifestncpa.cpl.manifestnwc.cpl.manifestsapi.cpl.manifestWindowsLogon.manifest-------------------------------------------------------ChCfg.exe ......?? (我拿它没办法.) .......用于更换系统代码页的工具cmos.ram .......CHKNTFS.EXE ....(NTFS 驱动器检查工具). 用于检查 NTFS 分区的完整性.ckcnv.exe ......Cookie 转换工具cnvfat.dll .....FAT 文件系统转换工具 DLLcomcat.dll .....Microsoft C 运行时库文件comctl32.ocx ...Windows 通用控件 ActiveX 控件 DLLCOMP.EXE .......(比较). 用于比较两个文件之间的差别.compatUI.dll patUI Modulecompobj.dll ....OLE 2.1 16/32 互用性-------------------------------------------------------compstui.dll ...通用属性表用户界面DLL没有这个文件的话, 你可能无法访问打印机属性或是打印机参数.-------------------------------------------------------CONFIG.TMP .....confmsp.dll ....Microsoft IP 会议媒体服务提供程序CONIME.EXE .....(输入法控制台). 这个输入法控制台用于转换字符.console.dll ....控制面板控制台小程序control.exe ....Windows 控制面板 (这个不是实际上的控制面板.)CONVERT.EXE ....(转换). 用于将分区格式从 FAT 转为 NTFS 以及从 NTFSv4 转为 NTFSv5.corpol.dll .....Microsoft COM 运行时执行引擎country.sys ....cryptdlg.dll ...Microsoft 通用证书对话框cryptext.dll ...加密外壳扩展cryptnet.dll ...加密网络相关 APICSCRIPT.EXE ....(基于命令行的脚本宿主). 能让你通过命令行运行 VBScript 和 JScript 脚本.ctfmon.exe ....CTF 加载器 (在你安装手写识别, 语音识别, 输入法编辑器之后, 就会在任务栏上显示一个语言栏. 还有, 如果你添加了第二种语言或是键盘布局, 也会导致显示语言栏的.)ctl3d32.dll ....Ctl3D 3D Windows 控件ctl3dv2.dll ....Ctl3D 3D Windows NT(WOW) 控件Dcache.bin .....dbgeng.dll .....符号调试引擎DEBUG.EXE ......(调试程序). 命令行下的调试工具.DEFRAG.EXE .....(磁盘碎片整理). 用于整理磁盘碎片的命令行工具.desktop.ini ....DFRGFAT.EXE ....(FAT 碎片整理工具). 用于整理 FAT 分区上的磁盘碎片.dgnet.dll ......Dgnet Moduledgrpsetu.dll ...Digi RealPort? 驱动升级dgsetup.dll ....DGSETUP DLLdhcpmon.dll ....DHCP Monitor Dlldhcpsapi.dll ...DHCP Server API Stub DLLDIANTZ.EXE .....(Cab 打包程序). 用于将文件打包为 .cab 文件.digest.dll .....Digest SSPI 认证包DLLHOST.EXE ....(COM+ 服务器进程). COM+ 进程管理器.DLLHST3G.EXE ...(COM 代替品). 一个 COM+ 进程组件.dmconfig.dll ...逻辑磁盘管理器配置库DOSKEY.EXE .....(DOS 键盘). MS-DOS 5.0 键盘输入历史记录器,能提供宏.DOSX.EXE .......(DOS 扩展器). 一个 DOS 虚拟机 (VDM), 提供标准模式.DRW ATSON.EXE ...(Dr. Watson).16位的程序错误监测和记录工具.DRWTSN32.EXE ...(Dr. Watson 32). 32位的程序错误监测和记录工具.dsauth.dll .....用于服务的DS 认证 .......edit.hlp .......EDLIN.EXE ......(编辑行). 基于 DOS 的编辑器.emptyregdb.dat ..encdec.dll .....XDSCodec & Encypter/Decrypter 标识滤镜EqnClass.Dll ...Equinox 多端口串行协同安装程序esent97.dll ....Microsoft(R) Windows NT(TM) 服务器数据库存储引擎esentprf.dll ... 服务器数据库存储性能库esentprf.hxx ...esentprf.ini ...esentutl.exe ... 服务器数据库存储工具EUDCEDIT.EXE ...(私有字符编辑器). 一个造字程序, 可让你创建大约6400 个私有字符. EXE2BIN.EXE ....(Exe to Bin). 基于 DOS, 用于将 .exe 文件转为.bin 文件.EXPAND.EXE .....(Expand). 用于展开 Cab 压缩包中的某些文件.expsrv.dll .....Visual Basic 运行时文件extmgr.dll .....扩展管理器EXTRAC32.EXE ...(CAB 文件提取工具). 用于解压缩 Cab 压缩包exts.dll .......调试器扩展FASTOPEN.EXE ...(快速打开). 一个 DOS 工具, 用于改善系统性能, 加速访问经常用到的文件.fc.exe .........文件比较工具fe客户端.dll ...Windows NT 文件加密客户端接口find.exe .......查找字符串 (Grep) 的工具findstr.exe .... 查找字符串 (QGrep) 的工具FIXMAPI.EXE ....(MAPI 修复工具). 探测并解决 (MAPI) 文件出现的问题.fldrclnr.dll ...桌面清理向导fltlib.dll .....筛选库fltMc.exe ......筛选管理器控制程序fontsub.dll ....字体设置DLLFORCEDOS.EXE ...(强制 DOS). 强制在 Windows XP 下将包含 OS/2 和 DOS 代码的程序运行在 DOS 模式下. .....Disk Format Utility格式化命令fsmgmt.msc .....Microsoft 通用控制台文档 (共享文件夹)fsquirt.exe ....(属于蓝牙)fsusd.dll ......摄像头设备 DLLFSUTIL.EXE .....(FSUtil). 一个卷管理工具. 重分析点管理和稀疏文件控制FTP.EXE ........(FTP). 命令行模式下的 FTP 工具.ftsrch.dll .....Microsoft? 文本搜索g711codc.ax ....Intel G711 CODECgcdef.dll ......游戏控制器的默认表GDI.EXE ........(物理设备接口). 一个核心系统组件, 可以提供 Win16 图形设备接口API l 库, 以实现向后兼容.glmf32.dll .....OpenGL Metafiling DLLgpkcsp.dll .....Gemplus 加密服务提供程序gpkrsrc.dll ....Gemplus 加密服务提供程序资源文件 ...代码页工具 ...h323.tsp .......h323msp.dll ....Microsoft H.323 媒体服务提供程序hccoin.dll B 协同安装程序HELP.EXE .......(帮助). 显示 Windows XP 命令的基本常规帮助信息.hidphone.tsp ...hlink.dll ......Microsoft 超链接库hnetmon.dll ....家庭网络监视 DLLhnetwiz.dll ....网络安装向导homepage.inf ...hotplug.dll ....用于安全移除硬件, 比如, U 盘HSFCISP2.dll ...HSF 协同安装程序httpapi.dll ....HTTP 协议堆栈 APIiccvid.dll .....(Cinepak? Codec) 用于显示’’Cinepak’’格式的媒体文件. (非常古老的 A VI 编解码格式.)IE4UINIT.EXE ...(IE 安装工具). IE 5.0 每用户安装工具.iedkcs32.dll ...Microsoft Internet Explorer 定制 DLLieencode.dll ...Microsoft 字符编码iernonce.dll ...带用户界面的扩展 RunOnce 处理库iesetup.dll ....IOD 版本映射ieuinit.inf ....IEXPRESS.EXE ...(自解压和自安装创建程序). 用于创建自解压包或是自安装程序包.ifmon.dll ......IF Monitor DLLigmpagnt.dll ...Microsoft IGMP subagentils.dll ........用户位置服务组件模块imeshare.dll ...Microsoft Office IME 共享属性库inetmib1.dll ...Microsoft MIB-II subagentinitpki.dll ....Microsoft 受信赖的安装和设置input.dll ......(文本输入 DLL). 语言和区域设置需要这个文件来显示相关对话框inseng.dll .....(安装引擎). Active Setup 安装引擎, 允许打开或执行 cab 文件. 用于控制安装. instcat.sql ....用于安装编录intl.cpl .......区域和语言设置iologmsg.dll ...IO 日志 DLLipconf.tsp .....iprop.dll ......OLE 属性集ir32_32.dll ....ir41_32.ax .....Intel Indeo? Video 4.5ir41_qc.dll ....Intel Indeo? 视频快速压缩编码器 (文件版本: 4.30.62.2)ir41_qcx.dll ...Intel Indeo?视频快速压缩编码器 (文件版本: 4.30.62.2)ir50_32.dll ....Intel Indeo? video 5.10 (文件版本: 5.2562.15.55)ir50_qc.dll ....Intel Indeo? 5.10视频快速压缩编码器(文件版本: 5.0.63.48 )ir50_qcx.dll ...Intel Indeo? 5.10 视频快速压缩编码器 (文件版本: 5.0.63.48 )irclass.dll ....Infrared Class 协同安装程序isrdbg32.dll ...ISR 32 位调试引擎ivfsrc.ax ......Intel Indeo? 视频IVF 源滤镜 5.10itircl.dll .....Microsoft? InfoTech IR Local DLLitss.dll .......Microsoft? InfoTech 存储系统库文件iyuv_32.dll ....Intel Indeo(R) Video YUV Codec (文件版本: 5.1.2600.2180)jet500.dll .....JET 引擎 DLLjgaw400.dll ....JG 音频接口 DLL (AOL 文件)jgdw400.dll ....JG ART DLL (AOL 文件)jgmd400.dll ....JG MIDI Player DLL (AOL 文件)jgpl400.dll ....JG ART Player DLL (AOL 文件)jgsd400.dll ....JG ART DLL (AOL 文件)jgsh400.dll ....JG 幻灯片播放器 DLL (AOL 文件)jobexec.dll ....Active Setup 任务执行程序joy.cpl ........游戏控制器控制面板小程序jsproxy.dll ....JScript 代理自动配置kd1394.dll .....核心调试程序IEEE 1394 HW Extension DLL .......key01.sys ......keyboard.sys ...keymgr.dll .....存储的用户名和密码kmddsp.tsp .....KRNL386.EXE ....(Kernel 386). 包含了用于 Win16 增强模式下的核心Kernel 例程.l3codecp.acm ...MPEG Audio Layer-3 Codec for MSACM (系统默认的 MP3 解码器)LABEL.EXE ......(卷标). 用于显示, 编辑, 或更改驱动器的卷标.lanman.drv .....laprxy.dll .....Windows Media Logagent Proxylicmgr10.dll ...ActiveX 许可管理器LIGHTS.EXE .....(Lights). 在 Win 9x 下通过监视 COM 端口来提供对于调制解调器状态的设置.LNKSTUB.EXE ....(Win95-Winnt 迁移工具). 用于把 Windows 95 升级至 Windows. ....localui.dll ....本地监视用户界面 DLLLOCATOR.EXE ....(Locator). 向 Windows XP 的环境添加对于 Remote Procedure Calls (RPCs) 的支持.loghours.dll ...计划对话框lpk.dll ........会话注销工具lusrmgr.msc ....lusrmgr.msc = 本地用户和用户组. 无法在 Home 版 XP上使用这个管理工具. 用于管理电脑上的用户帐号.MAKECAB.EXE ....(Cab 文件创建工具). 用于创建 .cab 压缩包文件.mapi32.dll .....Extended MAPI 1.0 for Windows NTmcastmib.dll ...Microsoft 多播子代理mcd32.dll ......OpenGL MCD 客户端 DLLmcdsrv32.dll ...MCD 服务器mchgrcoi.dll ...中级更改器协同安装程序mciavi32.dll ... Windows MCI 视频驱动mciole16.dll ...MCIOLE16 - OLE Handler DLL for MCI Objectsmciole32.dll ...MCI OLE DLLmciwave.dll ....MCI 波形音频驱动mdhcp.dll ......Microsoft MDHCP 客户端 COM 接口mdwmdmsp.dll ...用于 MDM 驱动的WMDM 服务提供程序驱动MEM.EXE ........(Memory). 一个用于显示当前内存状态的命令行工具.mf3216.dll .....32 位至 16 位元文件的转换 DLLmfc40.dll ......MFCDLL 共享库–零售版mfc40u.dll .....MFCDLL 共享库–零售版mfcsubs.dll ....MSCTFIME.IME ...mgmtapi.dll ....Microsoft SNMP 管理器 API (使用 WinSNMP)mib.bin ........MIGPWD.EXE .....(迁移 dll). 用于 Windows 95 至 Windows NT 的迁移工具.miglibnt.dll ...NT 迁移支持 dllmlang.dat ......mll_hp.dll .....HP 媒体卷标库mll_mtf.dll ....MTF (Microsoft 磁带格式) 媒体卷标库mll_qic.dll ....QIC113媒体卷标库mmdrv.dll ......多媒体核心支持驱动mobsync.dll ....Microsoft 同步管理器MOBSYNC.EXE ....(脱机工作同步程序). 同步脱机网站. .......DOS 命令modex.dll ......ModeX 显示驱动 .......Dos 命令moricons.dll ...Windows NT 安装图标资源库MOUNTVOL.EXE ...(卷加载器). 创建, 列出以及修改你的存储卷加载点. mpg4ds32.ax ....(文件版本: 8.0.0.4487). Microsoft MPEG-4 视频解码器mplay32.exe ....Windows Media Player 5.1 (非常古老的媒体播放器.) MRINFO.EXE .....(多播信息). 用于查询多播路由器接口的命令行工具.msacm.dll ......Microsoft 音频压缩管理器msaatext.dll ... Active Accessibility 文本支持msadds32.ax ....(文件版本: 8.0.0.4487). Windows Media 音频解码器msafd.dll ......Microsoft Windows Sockets 2.0 服务提供程序msapsspc.dll ...32 位平台下的 DPA 客户端msaudite.dll ...安全审核事件 DLLmscat32.dll ....MSCAT32 Forwarder DLLMSCTFP.dll .....MSCTFP Server DLLmsdadiag.dll ...Microsoft Data Access –内建诊断msdart.dll .....Microsoft Data Access - OLE DB 例行运行时msdatsrc.tlb ...msdtcprf.ini ...msencode.dll ...Microsoft 字符编码器msieftp.dll ....Microsoft Internet Explorer FTP 文件夹外壳扩展msimsg.dll .....Windows? Installer 国际消息mslbui.dll .....msnsspc.dll ....MSN Internet Accessmsobjs.dll .....系统对象审核名称MsPMSNSv.dll ...Microsoft 媒体设备服务提供程序msr2c.dll ......Microsoft Forms DLLmsr2cenu.dll ...Microsoft Forms DLLmsratelc.dll ...Internet 分级和本地用户管理DLLmsrating.dll ...Internet 分级和本地用户管理DLLmsrclr40.dll ...Microsoft Jet公文包调解程序msrd2x40.dll ...Microsoft (R) Red ISAMmsrd3x40.dll ...Microsoft (R) Red ISAMmsrecr40.dll ...Microsoft Jet公文包调解程序资源库msrepl40.dll ...Microsoft 复制库msrle32.dll ....Microsoft RLE 压缩器msscds32.ax ....(文件版本: 8.0.0.4487). Microsoft 屏幕视频解压器msscript.ocx ...Microsoft (r) 脚本控件mssign32.dll ...Microsoft 受信赖签证 APIsmssip32.dll ....MSSIP32 Forwarder DLLmstime.dll .....Microsoft (R) 用于 HTML 的定时交互多媒体扩展msswch.dll .....(屏幕键盘). 用于 msswchx.exe.msswchx.exe ....msswchx (属于屏幕键盘.)msutb.dll ......MSUTB 服务器 DLL-------------------------------------------------------msvbvm50.dll ...Visual Basic 虚拟机 (文件版本: 5.2.82.44)这是个老版本的 VB 虚拟机. msvbvm60.dll (也是 VB 虚拟机)文件版本: 6.0.96.90----------------------------------------------msvcirt.dll ....Windows NT IOStreams DLLmsvcp50.dll ....Microsoft (R) C++ 运行时库文件msvcrt20.dll ...Microsoft? C运行时库文件msvcrt40.dll ...VC 4.x CRT DLL (向后兼容 msvcrt.dll)msvideo.dll ....Microsoft Video for Windows DLLmsxml.dll ......XML OM for Win32msxml2.dll .....XML OM for Win32msxml2r.dll ....XML2 资源文件msxmlr.dll .....XML 资源文件msyuv.dll ......Microsoft UYVY 视频解压器mtxoci.dll .....对于Oracle 的 Microsoft 数据库支持 DLLmydocs.dll .....我的文档文件夹用户界面ncxpnt.dll ork (不是 Network) 安装向导支持 DLLndptsp.tsp .....NET.EXE ........(Network). 用于管理, 配置和查看与网络相关的信息, 例如 net use, net print, net user, 等等.net.hlp ........NET1.EXE .......(Network). 与 NET.EXE 的功能相同.netapi.dll .....Microsoft 网络动态链接库neth.dll .......网络帮助消息 DLLnetplwiz.dll ...映射网络驱动器向导netsetup.cpl ...网络安装向导控制面板小程序NETSETUP.EXE ...(网络安装向导). 通过软盘帮你配置电脑网络.netui0.dll .....NT LM UI Common Code - GUI Classes (文件版本: 5.1.2600.2180)netui1.dll .....NT LM UI Common Code - GUI Classes (文件版本: 5.1.2600.2180)netui2.dll .....NT LM UI Common Code - GUI Classes (文件版本: 5.1.2600.0) <-- 版本要比 netui1.dll 老?netrap.dll .....网罗远程管理协议DLL所有的 "noise", "wbcache" 和 "wbdbase" 文件 (不同语言下的文件) 都可被删除.(它们大都是索引服务用到的文件, 可通过 nLite 删除)(下列文件列在了注册表中的这个位置:HKEY_LOCAL_MACHINE/SYSTEM/CurrentControlSet/Control/ContentIndex/Language)noise.chs <<简体中文noise.cht <<繁体中文noise.datnoise.deu <<...注意: ...DEU = 这是德国的noise.engnoise.enu <<英文noise.esn < noise.fra < noise.ita < noise.nld < noise.sve < noise.thawbcache.deuwbcache.enu <<英文wbcache.esn < wbcache.fra < wbcache.ita < wbcache.nld < wbcache.sve <wbdbase.deuwbdbase.enu <<英文wbdbase.esn < wbdbase.fra < wbdbase.ita < wbdbase.nld < wbdbase.sve <-------------------------------------------------------npptools.dll ...NPP 工具助手 DLLnscompat.tlb ...NSLOOKUP.EXE ...(域名服务器查寻). 用于显示 DNS 服务器的诊断和统计信息. ntlsapi.dll ....Microsoft? 许可服务器接口 DLLntdos404.sys ...ntdos411.sys ...ntdos412.sys ...ntdos804.sys ...ntimage.gif ....ntio404.sys ....ntio411.sys ....ntio412.sys ....ntio804.sys ....ntlanman.dll ...Microsoft? 局域网管理器ntlanui.dll ....ntlanui2.dll ...网络对象外壳用户界面NTSD.EXE .......(符号调试器). 系统出问题时, 这个疑难解答工具就会详细列出系统状态.ntsdexts.dll ... Windows 2000 下的符号调试工具nwprovau.dll ...用于 NetWare 提供程序和认证的客户端服务NTVDM.EXE ......(NT DOS 虚拟机). 提供用于 DOS 程序和Windows-on-Windows (WOW—支持 Win16) 的虚拟机.ntvdmd.dll .....NTVDMD.DLLoakley.dll .....Oakley 键盘管理器objsel.dll .....对象挑选对话框occache.dll ....对象控件查看器OSUNINST.EXE ....(卸载工具). 用于卸载Windows XP, 并将其还原到升级前使用的Windows 操作系统. 可在安全模式下运行于命令行模式.-------------------------------------------------------oembios.bin ....oembios.dat ....oembios.sig ....删掉 oembios.sig 的话, 可能会导致系统栏提示 "还剩下X 天用于激活 Windows". 这个可能会发生在 OEM 版 Windows 中. 如果出现了这种情况, 请将其放回.-------------------------------------------------------ole2.dll .......OLE 2.1 16/32相互操作库ole2disp.dll ...OLE 2.1 16/32相互操作库ole2nls.dll ....OLE 2.1 16/32相互操作库oleprn.dll .....Oleprn DLLp2p.dll ........点对点群p2pgasvc.dll ... 点对点群认证服务p2pgraph.dll ... 点对点图形p2pnetsh.dll ... 点对点NetSh 助手p2psvc.dll ..... 点对点服务PACKAGER.EXE ...(Object Packager). 用于在文档中创建嵌入数据的图标链接.panmap.dll .....PANOSE(tm) 字体映射器paqsp.dll ......PaqSP Modulepautoenr.dll ...自动注册 DLLpcl.sep ........PENTNT.EXE .....(NT Pentium 测试工具). 一个用于检测你的系统是否有Pentium 浮点运算错误的命令行工具. (我还把在―性能‖中的快捷方式删掉了).pifmgr.dll .....Windows NT PIF 管理器图标资源库pjlmon.dll .....PJL 语言监视器plustab.dll ....效果控制面板扩展pmspl.dll ......Microsoft 局域网管理器 2.1 网络动态polstore.dll …策略存储 dllpowercfg.exe ...电源设置命令行工具pnrpnsp.dll ....PNRP 命名空间提供程序proctexe.ocx ...Intel 程序纹理prodspec.ini ...PROGMAN.EXE ....(程序管理器). 可用于替换 Windows XP 资源管理器的外壳. 它的主界面基于 Windows 3.x, Windows for Workgroups, 和 Windows NT 3.51.pschdcnt.h .....pschdprf.dll ...Microsoft? Windows(TM) PSched 性能监视器pschdprf.ini ...pscript.sep ....psnppagn.dll ... NPPAgent对象的 DCOM 代理pubprn.vbs .....proquota.exe ...ProQuota 能让你设置一个用户配置文件的最大大小.PROXYCFG.EXE ...(代理配置工具). 一个用于查看和更改你当前代理设置的命令行工具.qmgrprxy.dll ...后台智能传输服务代理qosname.dll ....Microsoft Windows GetQosByName 服务提供程序query.dll ......目录索引工具 DLLrdpdd.dll ......RDP 显示驱动RECOVER.EXE ....(还原). 一个用于从有问题的驱动器中还原可读数据的命令行工具.REDIR.EXE ......(Redirector).Win16 网络重定向工具.remotesp.tsp...REG.EXE ........(注册表控制台). 一个用于查询和修改注册表的命令行工具.REGEDT32.EXE ...(注册表编辑器). 一个 32 位的注册表工具, 可用于设置注册表中相关项值的安全权限. 在 Windows XP 中, 原本带有更多功能的 regedt32.exe 已被合并regedit.exe 中了. Regedt32.exe 现在只不过相当于一个快捷方式. 如果你运行 regedt32.exe, 那么系统就会自动启动 regedit.exeregsvc.dll .....远程注册表服务REGWIZ.EXE .....(注册向导). 令注册 XP 的过程自动化.regwizc.dll .... 注册向导的相关模块rend.dll .......Microsoft 集合控件REPLACE.EXE ....(Replace). 用于替换文件的命令行工具.rnr20.dll ......Windows Socket2 命名空间 DLLroutetab.dll ...Microsoft 路由表 DLLrpcns4.dll .....Remote Procedure Call 命名服务客户端rsmps.dll ......RSM 代理存根rsaci.rat ...... <-- 属于 msrating.dll. 你可在以下位置查看分级选项: Internet 选项 -> 内容 -> 分级审查 -> 启用RTCSHARE.EXE ...(RTC 程序共享). 实时时钟组件.rtipxmib.dll ...Microsoft Router IPX MIB subagentRUNAS.EXE ......(运行方式). 这个工具可用一个新用户名和密码执行一个进程. 一般, 可用来在低权限用户登录的系统上以高权限的管理员身份来运行一个程序.safrdm.dll .....Microsoft 帮助中心桌面管理器safrslv.dll ....Microsoft 帮助中心会话处理程序SA VEDUMP.EXE ...(转储). 当系统出现 STOP 错误时, 可用于将内存中的内容转储为文件.sbe.dll ........DirectShow 流缓冲滤镜sbeio.dll ...... 流缓冲输入输出 DLLSC.EXE .........( Windows NT 服务管理). 一个服务管理工具.scrobj.dll .....Windows (r) 脚本组件运行时scrrun.dll .....Microsoft (r) 脚本运行时SDBINST.EXE ....(Installer). AppFix 和 AppHelp 安装程序.sendcmsg.dll ....发送控制台消息sdhcinst.dll ...Secure Digital Host 控制器类别控制器sdpblb.dll .....Microsoft Sdpblbsecupd.sig .....security.dll ...安全支持提供程序接口senscfg.dll ....SENS 安装设置工具serialui.dll ...串行端口属性页面setup.bmp ......SETUP.EXE ......(Setup). Windows 安装程序setupdll.dll ...Windows 2000 安装 DLLSETVER.EXE .....(设置版本). 用于定义报告给某个应用程序关于 DOS 的版本.sfc.exe ........(Windows 2000 系统文件检查工具). 用于验证 XP 的文件是否存在以及是否正确.sfc_os.dll ...(Windows 文件保护). 用于保护 Windows 的系统文件.sfmapi.dll .....Windows NT Macintosh 文件服务客户端SHARE.EXE ......(Share). 能让两个程序同时使用一个文件的 DOS 工具.shellstyle.dll ..Windows 外壳样式资源DllSHMGRATE.EXE ... Windows XP 用户数据转移工具.SHRPUBW.EXE ....(共享文件夹创建工具). 用于在 Windows XP 系统上创建共享文件夹.shscrap.dll ....外壳碎片对象句柄SHUTDOWN.EXE ...(远程关机工具). 允许关闭或重启本地或远程电脑.sigtab.dll .....文件完整性设置SIGVERIF.EXE ...(文件签名验证工具). 验证所选文件是否经过认证.simpdata.tlb ....sisbkup.dll ....单实例存储备份支持功能skdll.dll ......序列号SKEYS.EXE ......(序列号). 一个可提供支持序列号功能的系统服务.slayerxp.dll ...‖兼容性‖选项卡外壳扩展DLLsmbinst.exe ....系统管理 BIOS 驱动安装程序softpub.dll ....Softpub Forwarder DLLSORT.EXE .......(Sort). 用于整理键盘输入并将结果写入一个文件或是显示在屏幕上.spmsg.dll ......Service Pack 消息spnike.dll .....用于 Nike 设备的 MDM 设备接口spnpinst.exe ...点对点定制安装SPRESTRT.EXE ...重启时还原注册表sprio600.dll ... Rio 600 的 MDM 设备接口sprio800.dll ... Rio 800 的 MDM 设备接口spxcoins.dll ...Specialix MPS NT 升级协同安装程序srvsvc.dll .....服务器服务 DLLsti_ci.dll .....静止图像类别安装程序sti.dll ........ 静止图像设备客户端 DLLstimon.exe ..... 静止图像设备监视器storage.dll ....OLE 2.1 16/32 相互操作库strmfilt.dll ...流滤镜库SUBST.EXE ......(虚拟). 可将一个路径虚拟为一个分区.svcpack.dll ....Windows 2000 Service Pack 安装程序SYNCAPP.EXE ....(同步). 公文包用于同步所含文件的工具.synceng.dll ....Windows 公文包引擎syncui.dll .....Windows 公文包资源文件SYSEDIT.EXE .....(系统编辑器). 一个用于打开编辑 system.ini, win.ini, config.sys, 和 autoexec.bat 的编辑器.sysinv.dll .....Windows 系统清单SYSKEY.EXE .....(Windows XP 帐户数据库管理器). 用于设置Windows XP 帐户数据库的安全特性.sysmon.ocx .....系统监视控件sysprint.sep ...sysprtj.sep ....SYSTRAY.EXE ....(系统栏). 系统栏提供程序. 它能控制任务栏和系统栏. 但是, 没它的话, 也没有什么不正常的地方.t2embed.dll ....t2embedtaskman.exe ....任务管理器 (不是平时使用的那个. 平时那个是: "taskmgr.exe")tdc.ocx ........TDC ActiveX 控件TELNET.EXE .....(Telnet). 一个 Telnet 客户端, 可用于访问远程Telnet 服务器系统.tftp.exe .......简单文件传输协议应用程序toolhelp.dll ...Windows 调试工具助手库traffic.dll ....Microsoft 网络交通控制 1.0 DLL .......将文件夹列为树形结构tsbyuv.dll .....东芝视频解码器typelib.dll ....OLE 2.1 16/32 相互操作库ufat.dll .......FAT 工具 DLLumandlg.dll ....UManDlg DLLunimdm.tsp .....unimdmat.dll ...通用调制解调器服务提供程序 AT 微型驱动ureg.dll .......注册表工具 DLLusbmon.dll .....标准动态打印端口监视器DLLUSER.EXE .......(Windows 用户界面核心组件). 用于保持 Win16 的兼容性效的 Win32 应用程序.v7vga.rom .......vbajet32.dll ...Visual Basic 应用程序开发环境- Expression 服务加载器vcdex.dll ......32 位MSCDEX 虚拟设备驱动vdmredir.dll ...DOS 虚拟机网络接口库verifier.dll ...标准应用程序验证提供程序dllVERIFIER.EXE ...(驱动验证管理器). 可用它探测一个驱动的操作是否会导致系统冲突.vfpodbc.dll ....vfpodbcvga256.dll .....256 色 VGA/SVGA 显示驱动vga64k.dll .....32K/64K 色 VGA/SVGA 显示驱动View Channels.scf ..(查看频道).vjoy.dll .......32 位手柄虚拟设备驱动 (我没有手柄)w32topl.dll ....Windows NT Topology 维护工具wavemsp.dll ....Microsoft Wave MSPwdl.trm ........webvw.dll ......网页视图外壳扩展库WEXTRACT.EXE ...(Win32 Cab 自解压程序创建工具). 用于提取 Cab 压缩包中的文件. wiasf.ax .......WIA 流快照滤镜wifeman.dll ....Windows WIFE 接口核心组件 ........用于保持兼容性win87em.dll ....winbrand.dll ...Windows Branding 资源WINCHA T.EXE ....简单的聊天工具winfax.dll .....Microsoft 传真 API 支持 DLL (我没有传真机.)winhelp.hlp ....WINHLP32.EXE ...(Windows 帮助). 用于打开帮助文件.WINMSD.EXE .....(Windows XP 诊断工具或是系统信息工具). Windows XP 诊断工具.winnls.dll .....Windows IME 接口核心组件winntbbu.dll ...Windows 安装画面 DLLwinoldap.mod ...winshfhc.dll ...文件风险评估winsock.dll ....Windows Socket 16-Bit DLLwinstrm.dll ....Streams DLLwkssvc.dll .....Workstation 服务 DLLwmidx.dll ......Windows Media 索引 DLLwmiprop.dll ....WDM 动态属性页面协同安装程序wmv8ds32.ax ....(文件版本: 8.0.0.4000). Windows Media 视频解码器 V8wmvds32.ax .....Windows Media 视频解码器WOWDEB.EXE .....(WOW 调试程序). WOW 调试程序. Win16 调试助手wowexec.exe ....Windows Win16 程序启动工具wowfax.dll .....Windows 3.1 兼容传真驱动 DLLwowfaxui.dll ...Windows 3.1兼容传真驱动DLLWPABALN.EXE ....(Windows 产品激活). Windows 产品激活气球提示器.WRITE.EXE ......写字板, 支持纯文本和 RTF 文档.有 Word 就不用它了wscntfy.exe ....Windows 安全中心通知程序wscui.cpl ...... 安全中心控制面板小程序WSCRIPT.EXE ....(脚本宿主). 基于 Windows 的脚本宿主.wshatm.dll .....Windows 套接层助手 DLLwshbth.dll .....Windows套接层助手DLLwshcon.dll .....Microsoft (r) Windows 脚本控制器wshisn.dll .....NWLINK2套接层助手DLLwshnetbs.dll bios Windows套接层助手DLLwshom.ocx ......Windows 脚本宿主运行时库WshRm.dll ......用于 PGM 的 Windows套接层助手wsnmp32.dll ....Microsoft WinSNMP v2.0 Manager APIxactsrv.dll ....下级 API 服务器 DLLxcopy.exe ......加强版的复制命令xenroll.dll ....XEnrollxpob2res.dll ...Service Pack 2 OOB 消息............350 个没有删除的 System32 文件...以及原因............我为什么不删除这些文件是有很多重要原因的, 其中有许多文件要经常用到. 我会把为什么不想删除这些文件的原因列在下面.NVDVD 需要以下文件acelpdec.ax 音频解码器以下是 NVDVD 安装的文件:DolbyHph.dll .....杜比耳机引擎license.955200 ...... <-- 在我把这个看起来无害的文件删除之后,当我重启电脑时就会提示内存出错,还会在事件查看器中显示程序错误. 即使我将其放回system32 文件夹中, 错误仍然存在.msxml3a.dll ....XML 资源文件-------------------------------------------------Needed for Regeditaclui.dll .....Security Descriptor Editorclb.dll .....Column List Box-------------------------------------------------重启电脑需要以下文件AUTOCHK.EXE ..(自动检查磁盘). 如果存储卷被标记为杂乱的话 (有坏簇, 错误区块, 或是有其它损坏), 那么在 WinXP 启动期间就会自动运行这个程序.bootvid.dll .....VGA 启动驱动csseqchk.dll ....CSSeqChkdpcdll.dll ......Dpcdll Modulehal.dll ........(硬件抽象层). 隐藏 Windows 应用程序处理硬件问题的复杂性.kdcom.dll .......内核调试程序硬件扩展 DLLshgina.dll .....Windows 外壳用户登录 <-- 这个文件用于从你的桌面上重启电脑.进一步讲, 一旦你将其删除或是将其从 system32 文件夹中移走,那么即使你将其放回, 也照样无法从你的桌面重新启动.USERINIT.EXE ..(用户初始化). 在用户登录之后, 用于确定操作系统的环境.-------------------------------------------------安装 Yahoo Messenger 需要以下文件A VICAP32.dll .....A VI 捕获类当我安装 Yahoo Messenger 时,弹出以下错误对话框:"无法启动这个程序, 因为没有找到A VICAP32.dll. 请安装此文件以解决这个问题."然而, 即使出现了这个消息, 也能成功安装 Yahoo Messenger.-------------------------------------------------这些文件属于 Windows Media Player 10avifil32.dll .....Microsoft A VI 文件支持库 <-- Plus! MP3 Audio Converter LE 需要此文件blackbox.dll ..BlackBox DLLLOGAGENT.EXE ..(Windows Media Player 日志代理). 可记录 Windows Media Player 出现的错误.MsPMSP.dll ....Microsoft Media 设备服务提供程序MSSCP.dll .....Windows Media 安全内容提供程序msvfw32.dll ...Microsoft Video for Windows DLL。
This brief applies to all Microsoft Licensing programs.ContentsSummary .................................................................................................................................................................................................. 1 Details ....................................................................................................................................................................................................... 2 How to license Windows in a virtual environment ........................................................................................................... 2 Licensing users for Windows Enterprise E3/E5 subscription or Windows VDA E3/E5 subscription on a per user basis .................................................................................................................................................................................. 3 Comparing Windows Virtualization rights ........................................................................................................................... 4 Scenarios .. (6)SummaryThis licensing brief is an overview of the Microsoft Commercial Licensing use rights for the Windows 10 operating system when running virtual machines.The topics covered in this brief apply to the licenses listed below. We will refer to them as SoftwareAssurance for the Windows desktop operating system, Windows Enterprise E3/E5 subscription licenses, and Windows Virtual Desktop Access (VDA) subscription licenses.• Windows 10 Enterprise E3/E5 • Windows 10 Enterprise per device • Windows 10 Education E3/E5 • Windows VDA E3/E5 •Windows VDA per device(Microsoft 365 F3/E3 licenses include Windows 10 Enterprise E3 entitlements. Microsoft 365 E5 licenses include Windows 10 Enterprise E5 entitlements)For use rights provided with Windows preinstalled by the original equipment manufacturer (OEM) or purchased through other channels, review the license terms that accompany those products.Licensing briefApril 2020DetailsSoftware Assurance for the Windows desktop operating system, Windows 10 Enterprise E3/E5 subscription licenses, and Windows Virtual Desktop Access (VDA) subscription licenses provides the greatest flexibility for how you use Windows. They include access to unique products and license rights not available through other licensing programs. These offerings enable flexible work styles by providing access to Windows instances in a variety of ways across devices.You can separate license users or devices that do not have or are not eligible for Windows licenses (such as thin clients) with a Windows VDA subscription to gain access to these benefits.This brief provides an overview of the Windows virtualization rights available to Microsoft Commercial Licensing customers. The information here applies only to licensing the Windows desktop operating system for virtualization scenarios. It does not address other licenses that may be required for specific scenarios, such as Microsoft Office licenses and Client Access Licenses (CALs).For Windows desktop operating system software licenses acquired through the OEM channel, the Windows use rights are outlined in the Software License Terms that accompany the software. These license terms provide use rights to run Windows locally on the licensed device in a virtual operating system environment (OSE). However, they do not provide use rights for accessing Windows running remotely in a virtual OSE from the licensed device and are limited in other ways when compared to virtualization use rights provided with Software Assurance for the Windows desktop operating system, Windows 10 Enterprise E3/E5 subscription licenses, and Windows VDA subscription licenses acquired through Microsoft Commercial Licensing. For example, OEM licenses do not permit remote access to a Windows virtual machine running in a data center.How to license Windows in a virtual environmentThere are three ways to license and access a remote virtual machine running Windows desktop software: •Windows Virtualization rightsWindows Virtualization Rights allow for a licensed device or user to access virtual Windows desktops either remotely and/or locally, depending on how the device or user is licensed. You can licensedevices or users for Windows Virtualization rights in the following ways:o License devices with Software Assurance for the Windows desktop operating system or Windows VDA subscription on a per device basis via one of the following programs: Open License,Select/Select Plus, Microsoft Products and Services Agreement, Open Value, EnterpriseAgreement, or Enrollment for Education Solutions.o License users with Windows Enterprise E3/E5 subscription licenses or Windows VDA E3/E5 subscription on a per user basis via one of the following programs: Open License, Select/SelectPlus, Microsoft Products and Services Agreement, Open Value, Enterprise Agreement, orEnrollment for Education Solutions.Customers may choose to use a third party to host their Windows client virtual machines for remote access by their end users. This is often referred to as "Outsourcing Software Management" or using a third party to host Desktop as a Service (DaaS) and requires the third party to be an AuthorizedOutsourcer. The hosted environment must be on servers dedicated to the customer. An Authorized Outsourcer is restricted from being a Listed Provider and may not use a Listed Provider as a datacenter provider. A list of Listed Providers can be found at https://aka.ms/ListedProviders.Note: The license terms for Outsourcing Software Management were updated October 1, 2019,which the explanations in this brief reflect. The use of a Listed Provider was not restricted prior to the terms being updated. Refer to the Product Terms for more details.Note: Microsoft 365 licenses that include Windows 10 Enterprise E3/E5 are only eligible if the user is the primary user of a device with a Qualifying Operating System.•Windows 10 Multitenant Hosting rightsCustomers also have the option to host their Windows client virtual machines for remote access on Microsoft Azure or a third-party shared server under Windows 10 Multitenant Hosting rights. When using a third-party shared server, the third party hoster must be a Qualified Multitenant HostingPartner (QMTH). A list of Authorized QMTH Partners can be found at Qualified Multitenant Hosting Partner. The customer may only deploy Windows 10 desktops (Creators Update or later versionsoftware) using Azure AD-based activation. Windows 10 Multitenant Hosting rights are not provided with any device-based licenses and are only available with Windows Enterprise E3/E5 subscriptionlicenses and Windows VDA E3/E5 subscription licenses on a per user basis. (Licenses acquired through all programs are eligible)Note: Microsoft 365 licenses that include Windows 10 Enterprise E3/E5 are only eligible if the user is the primary user of a device with a Qualifying Operating System.•Windows Virtual Desktop (WVD) in AzureWVD is a desktop and app virtualization service running in Azure and provides licensed users access to Windows 7 and Windows 10 virtual machines. In addition to the eligible per user license, you only pay the base compute and storage costs in Azure. You can license users for WVD rights with WindowsEnterprise E3/E5 subscription licenses, Windows VDA E3/E5 subscription licenses, or Microsoft 365suite license on a per user basis. (Licenses acquired through all programs are eligible.)Note: Microsoft 365 licenses are eligible in all cases.Licensing users for Windows Enterprise E3/E5 subscription or Windows VDA E3/E5 subscription on a per user basisYou have the choice to license your users—instead of devices—for Windows 10 Enterprise E3/E5 subscription or Windows VDA E3/E5 subscription on a per user basis. If the primary user’s primary work device is already covered for Software Assurance for the Windows desktop operating system or Windows VDA subscription on a per device basis, you can acquire a Windows Enterprise E3/E5 per User Add-on or Windows VDA E3/E5 per User Add-on, which gives you all of the benefits of Windows per User or Windows VDA per User license at a price that recognizes your existing investment.Here’s an overview of the requirements for each per user option:For more information about Windows Software Assurance and Windows VDA subscription options, refer to the Commercial Licensing Reference Guide for Windows.Comparing Windows Virtualization rightsSome differences exist between the Windows Virtualization Rights granted depending on whether you are licensed for Windows Software Assurance or Windows VDA subscription and whether you are licensed on a per device or per user basis.The following table provides an overview of the Windows Virtualization Rights by license type.The following table below provides details of the Windows Virtualization Rights by license type.ScenariosThe following business scenarios can help you understand how you can license the Windows desktop operating system in your environments on servers dedicated to you. If the Dedicated Servers are under the management or control of a third party, they are subject to the Outsourcing Software Management terms. Notwithstanding anything to the contrary in the Outsourcing Software Management terms, Customer’s Windows VDA E3 and E5 Licensed Users may remotely access Windows software under these Remote Virtualization rights on any Listed Provider’s Servers dedicated to Customer’s use.Note: These examples are focused on scenarios for customers with Windows Software Assurance and/or Windows VDA subscription. They do not necessarily specify all licenses needed for the scenario. For example, Users or Devices also need to license for remotely accessing a VDI/Session desktop or application on Windows Server, if used, with the corresponding access licenses, i.e. Windows Server CALs and RDS CALs. Some scenarios may also require Microsoft Office Professional Plus licenses. For simplicity, those separate licensing requirements are not always included.Virtual Desktop Infrastructure Desktops The Windows desktop operating systemruns within virtual machines in the datacenter, on servers dedicated to thecustomer, on a hypervisor platform (suchas Hyper-V technology). These virtualdesktops are accessed from either PCs, thinclients, or other devices.Because they are accessing the Windowsdesktop operating system running withinvirtual machines, the devices or users wouldneed active Windows Software Assurance,Windows VDA subscription, or WindowsE3/E5 licenses acquired through an eligibleprogram (see above).Remote Desktop SessionHost/Terminal Services Session Virtualization “Desktops”A Windows Server operating system (suchas Windows Server 2019) is shared acrossmultiple users via Remote Desktop SessionHost running applications like MicrosoftOffice Professional Plus 2019. Either PCs,thin clients, or other devices access thesesessions.Because the devices access a WindowsServer operating system only, they do notneed any additional licensing for theWindows desktop operating system.However, the devices/users need to belicensed for the session technology (such asWindows Server CALs and Remote DesktopServices [RDS] CALs). The devices accessingthe sessions also need licenses for OfficeProfessional Plus.Mixed VDI and Session Desktops Some users access VDI desktops and someaccess session-based desktops orapplications. In some cases, a particulardevice may need to access bothsimultaneously (for example, a user logsinto a VDI desktop and then accesses aremote application or desktop through asession).Users or devices accessing Windows Clientand Windows Server sessions will need bothan eligible Windows 10 license and WindowsServer access licenses (Windows Server CALand RDS CAL).Roaming VDI Users A user’s primary device is a thin client atwork that has been licensed for VDI. Theuser also needs the flexibility to accesstheir VDI desktops from home or whiletraveling using their personal tablet device. The user needs a Windows VDA per User license— to allow access to up to four concurrent Windows virtual machines running in a data center from any device.Bring Your Own Companion Device (BYOCD) The company provides employees with aprimary work device covered by SoftwareAssurance for Windows, or Windows VDAsubscription and wants to allow employeesto bring their own companion devices(such as tablets) to work and access acorporate VDI form those devices.Because the primary work device is licensedfor Software Assurance for Windows orWindows VDA subscription, the companycan acquire a Windows Software Assuranceper User Add-on for the user, which allowsthat user to access a corporate VDI at workfrom any device.Bring Your Own Device (BYOD) The company decides to let users bringtheir own devices to work and sets up VDIdesktops for all users. Devices do not havea qualifying operating system (for example,they may be licensed for Windows 7 HomePremium). These users do not have accessto any other devices.The Windows VDA per User license wouldallow the user to access the VDI desktopsfrom any device.Contractor PCs Organization A contracts some work toorganization B and allows organization B’semplo yees to access organization A’s VDIdesktops through orga nization B’s PCs.Devices have a qualifying operating system(such as Windows 10 Pro). Organization A will need to license devices that organization B’s employees use to access organization A’s VDI d esktops with either Windows Enterprise per device with Software Assurance or Windows VDA per device subscription license; or license the users with Windows Enterprise E3/E5 subscription or Windows VDA E3/E5 subscription on a per user basis.Local Windows Virtual Machines An organization has a group of developerswho need to test an application acrossmultiple Windows images running in localvirtual machines on PCs running Windows10 Pro.The PC or the primary user of the PC needsactive Windows 10 Enterprise with SoftwareAssurance or Windows 10 Enterprise E3/E5subscription, which permits running up tofour virtual machines concurrently.© 2020 Microsoft Corporation. All rights reserved.This document is for informational purposes only. MICROSOFT MAKES NO WARRANTIES, EXPRESS OR IMPLIED, IN THIS DOCUMENT. This information is provided to help guide your authorized use of products you license; it is not your agreement. Your use of products licensed under your volume license agreement is governed by the terms and conditions of that agreement. In the case of any conflict between this information and your agreement, the terms and conditions of your agreement control. Prices for licenses acquired through Microsoft resellers are determined by the reseller.。

电脑中病毒映像劫持所谓的电脑病毒映像劫持IFEO就是Image File Execution Options,下面由店铺给你做出详细的电脑病毒映像劫持介绍!希望对你有帮助!电脑病毒映像劫持:(其实应该称为“Image Hijack”。
)它是位于注册表的HKEY_LOCAL_MACHINE\SOFTWARE\Microsoft\WindowsNT\CurrentVersion\Image File Execution OptionsIFEO的本意是为一些在默认系统环境中运行时可能引发错误的程序执行体提供特殊的环境设定。
由于这个项主要是用来调试程序用的,对一般用户意义不大。
默认是只有管理员和local system有权读写修改。
当一个可执行程序位于IFEO的控制中时,它的内存分配则根据该程序的参数来设定,而WindowsN T架构的系统能通过这个注册表项使用与可执行程序文件名匹配的项目作为程序载入时的控制依据,最终得以设定一个程序的堆管理机制和一些辅助机制等。
出于简化原因,IFEO使用忽略路径的方式来匹配它所要控制的程序文件名,所以程序无论放在哪个路径,只要名字没有变化,它就运行出问题。
先看看常规病毒等怎么修改注册表来达到随机启动吧。
病毒、蠕虫和,木马等仍然使用众所皆知并且过度使用的注册表键值,如下:HKEY_LOCAL_MACHINE\SOFTWARE\Microsoft\Windows\Cu rrentVersion\RunHKLM\SOFTWARE\Microsoft\WindowsNT\CurrentVersion\Windows\AppInit_DLLsHKEY_LOCAL_MACHINE\SOFTWARE\Microsoft\WindowsNT\CurrentVersion\Winlogon\NotifyHKEY_LOCAL_MACHINE\SOFTWARE\Microsoft\Windows\CurrentVersion\RunOnceHKEY_LOCAL_MACHINE\Software\Microsoft\Windows\Curr entVersion\RunServicesOnce等等。
如何解决XP中CPU占用率100%方法技巧导读:如何解决XP中CPU占用率100%的问题?事实上,遇到该问题并没有一个很好的解决方法,因为CPU占用100%,鼠标几乎移不动,即便用户花费了非常多的时间来判断,也有非常多的可能混淆视听,具体情况请看下文。
如何解决XP中CPU占用率100%1、dllhost进程造成CPU使用率占用100%特征:服务器正常CPU消耗应该在75%以下,而且CPU消耗应该是上下起伏的,出现这种问题的服务器,CPU会突然一直处100%的水平,而且不会下降。
查看任务管理器,可以发现是DLLHOST.EXE消耗了所有的CPU空闲时间,管理员在这种情况下,只好重新启动IIS服务,奇怪的是,重新启动IIS服务后一切正常,但可能过了一段时间后,问题又再次出现了。
直接原因:有一个或多个ACCESS数据库在多次读写过程中损坏,微软的MDAC系统在写入这个损坏的ACCESS文件时,ASP线程处于BLOCK状态,结果其它线程只能等待,IIS被死锁了,全部的CPU时间都消耗在DLLHOST中。
解决办法:安装“一流信息监控拦截系统”,使用其中的“首席文件检查官IIS健康检查官”软件,启用”查找死锁模块”,设置:--wblock=yes监控的目录,请指定您的主机的文件所在目录:--wblockdir=d:\test监控生成的日志的文件保存位置在安装目录的log目录中,文件名为:logblock.htm停止IIS,再启动“首席文件检查官IIS健康检查官”,再启动IIS,“首席文件检查官IIS健康检查官”会在logblock.htm中记录下最后写入的ACCESS文件的。
过了一段时间后,当问题出来时,例如CPU会再次一直处100%的水平,可以停止IIS,检查logblock.htm所记录的最后的十个文件,注意,最有问题的往往是计数器类的ACCESS文件,例如:”**COUNT.MDB”,”**COUNT.ASP”,可以先把最后十个文件或有所怀疑的文件删除到回收站中,再启动IIS,看看问题是否再次出现。
Windows XP系统windows目录下文件夹功能介绍├—WINDOWS│ ├—system32(存放Windows的系统文件和硬件驱动程序)│ │ ├—config(用户配置信息和密码信息)│ │ │ └—systemprofile(系统配置信息,用于恢复系统)│ │ ├—drivers(用来存放硬件驱动文件,不建议删除)│ │ ├—spool(用来存放系统打印文件。
包括打印的色彩、打印预存等)│ │ ├—wbem(存放WMI测试程序,用于查看和更改公共信息模型类、实例和方法等。
请勿删除)│ │ ├—IME(用来存放系统输入法文件,类似WINDOWS下的IME文件夹)│ │ ├—CatRoot(计算机启动测试信息目录,包括了计算机启动时检测的硬软件信息)│ │ ├—Com(用来存放组件服务文件)│ │ ├—ReinstallBackups(电脑中硬件的驱动程序备份)│ │ ├—DllCache(用来存放系统缓存文件。
当系统文件被替换时,文件保护机制会复制这个文件夹下的文件去覆盖非系统文件)│ │ ├—GroupPolicy(组策略文件夹)│ ││├—system(系统文件夹,用来存放系统虚拟设备文件)│ ├—$NtUninstall$(每给系统打一个补丁,系统就会自动创建这样的一个目录,可删除)│ ├—security(系统安全文件夹,用来存放系统重要的数据文件)│ ├—srchasst(搜索助手文件夹,用来存放系统搜索助手文件,与msagent 文件夹类似)│ ├—repair(系统修复文件夹,用来存放修复系统时所需的配置文件)│ ├—Downloaded Program Files(下载程序文件夹,用来存放扩展IE功能的ActiveX等插件)│ ├—inf(用来存放INF文件。
INF文件最常见的应用是为硬件设备提供驱动程序服务,不建议删除其中文件)│ ├—Help(Windows帮助文件)│ ├—Config(系统配置文件夹,用来存放系统的一些临时配置的文件)│ ├—msagent(微软助手文件夹,存放动态的卡通形象,协助你更好地使用系统。
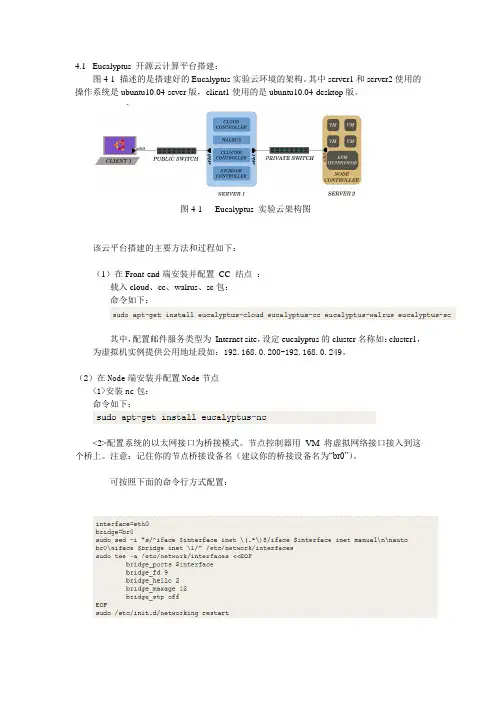
4.1 Eucalyptus 开源云计算平台搭建:图4-1 描述的是搭建好的Eucalyptus实验云环境的架构。
其中server1和server2使用的操作系统是ubuntu10.04-sever版,client1使用的是ubuntu10.04-desktop版。
图4-1 Eucalyptus 实验云架构图该云平台搭建的主要方法和过程如下:(1)在Front-end端安装并配置CC 结点:载入cloud、cc、walrus、sc包:命令如下:其中,配置邮件服务类型为Internet site,设定eucalyptus的cluster名称如:cluster1,为虚拟机实例提供公用地址段如:192.168.0.200-192.168.0.249。
(2)在Node端安装并配置Node节点<1>安装nc包:命令如下:<2>配置系统的以太网接口为桥接模式。
节点控制器用VM 将虚拟网络接口接入到这个桥上。
注意:记住你的节点桥接设备名(建议你的桥接设备名为“br0”)。
可按照下面的命令行方式配置:<3>配置/etc/eucalyptus/eucalyptus.conf,然后重启nc节点:<4>最后,需要安装云节点的eucalyptus 的用户公共的ssh 钥匙在节点控制器的eucalyptus用户的授权钥匙文件里:在nc 节点上,临时为eucalyptus用户设置密码:然后,通过以下命令,cc 节点将自己的公钥拷贝到nc 节点的eucalyptus 用户上,实现两节点eucalyptus之间认证及无密码连接:最后移除节点上的eucalyptus的密码即可:图4-2描述了eucalyptus安装的结构图:图4-2 Eucalyptus 安装结构图(3)对Walrus,Cluster和Storage注册由于cloud controller必须要知道storage(SC,WS3)和clusters controllers,,所以需要在CLC 和其他服务之间进行注册,实现通信的授权。
mediacreationtool 命令行参数
MediaCreationTool是一款微软开发的软件,用于从Microsoft服务器下载Windows ISO映像。
它支持命令行参数,允许用户通过命令行来启动和配置该工具。
以下是MediaCreationTool支持的一些命令行参数:
/acceptEula:接受软件使用条款。
/install:执行安装程序。
/?, /h, /help:显示帮助信息。
/u:指定用户名。
/p:指定密码。
/target:指定目标文件夹路径,用于保存下载的ISO 映像。
/lang:指定语言。
/sku:指定要下载的Windows版本(例如,Home、Professional等)。
/arch:指定系统架构(例如,x86、x64等)。
/version:指定要下载的Windows版本号(例如,10、
11等)。
/bitsclipper:禁用位剪裁器(bitsclipper)。
/nocopy Protection:禁用复制保护。
这些命令行参数可以帮助用户定制MediaCreationTool 的行为,以满足特定的需求。
请注意,命令行参数的具体使用方法和效果可能因MediaCreationTool的不同版本而有所差异。
在使用命令行参数时,建议查阅官方文档或参考相关资源以获取准确的信息和指导。
Microsoft可移植可执行文件和通用目标文件格式文件规范修订版8.1 - 2008年2月15日摘要本规范描述了Microsoft® Windows®操作系统家族下的可执行文件(映像)和目标文件的结构。
这些文件分别被称为可移植可执行(PE)文件和通用目标文件格式(COFF)文件。
注意:提供本文档是为了辅助开发用于Microsoft Windows操作系统上的工具和应用程序,但并不保证它在各个方面都是完整的规范。
Microsoft保留更改本文档而不通知的权利。
Microsoft可移植可执行文件和通用目标文件格式文件规范的此次修订版取代了本规范的6.0修订版。
本规范中的信息适用于以下操作系统:Windows Server® 2008Windows Vista®Windows Server 2003Windows XPWindows 2000本规范最后列出了参考信息和相关资源。
本规范的最新版在万维网的以下地址被维护:/whdc/system/platform/firmware/PECOFF.mspxSmartTech译电子信箱:zhzhtst@法律声明Microsoft可移植可执行文件和通用目标文件格式文件规范Microsoft Corporation修订版 8.1注意:提供本规范是为了辅助开发某些用于Microsoft Windows操作系统平台上的开发工具。
但是Microsoft并不保证它在各个方面都是完整的规范,也无法保证这里的所有信息在发布之后一直都是准确的。
Microsoft保留更改本规范而不通知的权利。
在合理的和非歧视性条款和条件下,Microsoft将针对任何Microsoft认为仅在面向Microsoft Windows的被称为编译器、链接器以及汇编程序的软件开发工具中实现和遵守本规范中所需部分这种有限用途下所需要的Microsoft权利要求书(如果存在)授予您免版税许可。
在windows命令行下编译运行Pascal程序在e盘新建文件夹mypascal,在文件夹内新建.txt,在.txt里写入下面的代码,保存之后,重命名为hello.pas,请记住一定要将文件扩展名.txt修改成.pas!!测试代码:begin writeln('Hello world!'); writeln('Hello world!'); writeln('Hello world! Go odbye world! '); readln; end.下面打开cmd界面,并且编译程序:键盘命令:win + r → 输入cmd → 回车,---打开了黑乎乎的cmd界面 e: cd mypascal dir fpc hello.pas dir此时你会看到e:\myc里面出现了两个新文件:hello.exe和hello.o你输入hello.exe就可以看到运行的结果。
也可以输入.\hello.exe,也可以双击hello.exe文件直接打开运行。
注释:1.在命令行界面,你输入fpc -v会看到fpc的版本号,这里的v表示version;2.你输入fpc并一直按住enter会看到全部的长长的命令目录;3.你也可以使用ppc386.exe作为你的编译器,此时你只需要将上述命令之中的fpc 改成ppc386即可;4.你可以使用dir命令列出当前目录下面的全部文件;顺便学习几个单词:cd -- change directory -- 改变目录dir -- directory -- 目录,枚举,列出当前目录. dir,是directory的缩写,是目录的意思。
dir也是DOS操作系统用来查看磁盘中文件的。
bin目录 -- binary文件的目录 -- 二进制文件所在的目录此外,下面有cd命令的其他用法:d: 进入D盘 e: 进入E盘 cd myc --可以进入到名字为myc的目录(必须C盘存在这个文件夹) cd.. 可以返回上一层目录 cd\ 返回到根目录 cd d:\myc 进入D盘的名字为myc的目录 cd /? 查看cd命令的具体用法。
Audacity源码编译简介Audacity是一款免费开源的音频编辑软件,拥有强大的音频处理和编辑功能。
它具有跨平台的特性,可以在Windows、Mac和Linux等操作系统上运行。
如果你想对Audacity进行自定义修改或添加新功能,就需要进行源码编译。
本文将详细介绍Audacity源码编译的过程,包括准备工作、依赖库的安装、配置编译环境、下载和构建Audacity源码等步骤。
希望通过本文能够帮助读者顺利完成Audacity源码编译。
准备工作在开始编译Audacity源码之前,需要进行一些准备工作。
安装开发工具首先,你需要安装一些开发工具和依赖库。
根据你所使用的操作系统不同,具体安装方法也会有所不同。
•Windows:在Windows上进行Audacity源码编译,你需要安装MinGW-w64()作为C/C++编译器,并且确保已经将其添加到系统环境变量中。
•Mac:在Mac上进行Audacity源码编译,你需要安装Xcode()并确保已经安装了Command Line Tools。
•Linux:在Linux上进行Audacity源码编译,你需要安装GCC和其他相关的开发工具。
具体安装方法可以参考你所使用的Linux发行版的文档。
下载源码Audacity的源码托管在GitHub上,你可以通过以下命令克隆源码到本地:git clone依赖库安装Audacity依赖一些第三方库,这些库需要先进行安装。
下面是一些常用的依赖库及其安装方法。
•wxWidgets:Audacity使用wxWidgets作为GUI库。
你可以从wxWidgets官方网站()下载最新版本的源码,并按照官方文档中的指导进行编译和安装。
•PortAudio:Audacity使用PortAudio进行音频输入输出处理。
你可以从PortAudio官方网站()下载最新版本的源码,并按照官方文档中的指导进行编译和安装。
•libsndfile:Audacity使用libsndfile进行音频文件读写操作。
Eucalyptus安装及实例映像制作--- 云计算及其应用的开源实现研究 摘要:本文对比分析了当前有代表性的云计算参与企业所采用的云计算实现方案和技术特点。
总结云计算是一种能够提供动态资源池、虚拟化和高可用性的计算平台,包含两个方面的含义:底层的基础设施平台和构建在这个平台之上的应用程序。
读者通过此文可以了解云计算的当前发展状况以及未来的研究趋势。
文章通过集成整合开源云计算平台(Eucalyptus)和开源内容管理系统(Liferay),剖析具有特定应用的云计算平台构建过程,并着重介绍了在基于虚拟技术的云计算平台中,如何使用虚拟技术(XEN)制作基于Linux系统的可定制服务的实例映像(AMI)文件,使用AMI工具运行制作的实例(虚拟服务器)和部署应用服务等技术要点,使读者能够明确掌握云计算搭建过程及云计算实例应用的快速部署及迁移。
关键词: 云计算;虚拟技术;映像;开源中图法分类号: TP393 文献标识码: AResearch on the Realization of Open Source Cloud Computing and its ApplicationsAbstract: This paper compares and analyses the technical characteristics and the solutions of the cloud computing adopted in some current representative enterprises. It summaries that cloud computing is a computing platform that support for virtualization, dynamic-resource-pool and high availability, including the low-layer infrastructure and the application based on it. From this paper, readers will comprehend the current status and future trends of cloud computing. Through the integration on both Eucalyptus system - an open-source cloud computing platform - and Liferay system - an open-source content management system-, the detailed build process of the application-specific cloud platform is described, especially, creating the linux-based service-customized machine image file (AMI) by the xen virtual tools in the virtualization-based cloud platform, and starting and running the virtual machines by AMI tools, to let readers capture the build process of cloud platform with rapidly deploying & migrating the application.Key words: cloud computing; virtual technology; machine image; open-source1、引言世界之所以精彩,是因为不断地有新的事物出现。
如何使⽤MediaCreationTool.bat脚本下载Win11系统? MediaCreationTool、bat是⼀个包装脚本,允许您下载最新到最旧版本的Windows11或Windows10以创建USB闪存驱动器、ISO⽂件,或者您可以使⽤它来⾃动启动安装过程。
MediaCreationTool.bat(win11升级限制绕开) 绿⾊版类型:系统其它⼤⼩:70KB语⾔:简体中⽂时间:2021-11-04查看详情 该⼯具甚⾄包括⼀个脚本,您可以执⾏该脚本将特定的注册表更改应⽤于当前安装,以绕过TPM2、0、安全启动、CPU 和任何其他可能阻⽌您升级计算机的要求。
在本指南中,您将了解使⽤MediaCreationTool、bat脚本下载Windows11安装⽂件的步骤。
使⽤MediaCreationTool、bat创建可启动的Windows11USB 通过设置变量、命令⾏参数或重命名脚本(如iso 21H2 Pro MediaCreationTool、bat 推荐的 Windows 设置选项)进⾏配置,升级时出现的问题最少已经设置了 很棒的键盘焦点对话框来选择 Windows 版本和增强的预设操作 ⾃动设置为直接与⾃动检测版本,语⾔,架构*升级 -可以解决⾃动设置加⼊失败no_update脚本的名称 创建ISO制作ISO⽂件直接⽤⾃动检测版本,语⾔,架构* -可以覆盖⾃动通过将版本名称/语⾔/架构添加到脚本名称来检测在使⽤⾃动检测的版本、语⾔、架构 *使⽤“oem”媒体⾃定义进⾏确认后, 创建 USB以制作 USB - 通过添加no_oem到脚本名称禁⽤ - 拾取$OEM$⽂件夹(如果它存在)具有任何后期设置调整,例如$OEM$\$$\Setup\Scripts\setupcomplete、cmd -sources\PID、txt在媒体启动时将⽂件写⼊预选版本或在 Windows 中进⾏设置(如果已配置) - 写⼊auto、cmd⽂件以根据需要从媒体重新运⾏⾃动设置(包括如果 11 则跳过 TPM) -winpeshl、ini在 boot、wim 中写⼊⽂件以跳过 TPM 检查媒体启动(如果是 11) 在 MCT 中选择_⽤于⼿动确认 MCT GUI 中的所有内容, ⽽⽆需‘oem’ 媒体定制,脚本通过 products、xml 配置并直接退出 在Windows 11 的动态更新 v1 (基于 wmi)或 v2 (基于 ifeo)独⽴切换脚本上跳过 TPM 检查 - 系统范围内,在 Windows 更新上取消阻⽌内部预览,或在线时⼿动运⾏ setup、exe - 使⽤创建的媒体时第⼀次在另⼀台电脑上,可以auto、cmd从媒体启动⼀次以启⽤ 要创建可启动的Windows11安装媒体,请连接⾄少8GB的USB闪存驱动器,使⽤以下步骤: 1、打开MediaCreationTool、batGitHub页⾯。
Windowsvs2019cef3源码编译最新版本环境准备安装windows最新版本git,硬盘建议空闲空间⼤于100G,内存16G。
安装vs2019,选择默认安装路径,组件选择最新的windows sdk和c++环境,因为google chromium的源码庞⼤,第三库极多,所以MFC和ATL也需要勾选安装。
打开控制⾯板,选中windows software development kit的修改选项勾上Debuging Tools for window进⾏更改。
⾄于其他版本请参考,可能你需要穿越伟⼤的封锁:),有个列表是每个分⽀对windows编译的要求。
源码准备这个是最难受的⼀部分,我尝试过⼏次,前⼏次都⽌步于此,这个时候你需要某种穿越代理,但是按照官⽅流程拉代码经常失败。
所以⾃⼰总结了下步骤:1.根据官⽅⽂档先创建以下结构⽬录:~/code/automate/chromium_git/depot_tools/2.设置代理在/code/⽬录下设置代理,xxxxx代表你⾃⼰的某种穿越代理端⼝git config --global http.proxy "http://127.0.0.1:xxxxx"git config --global https.proxy "http://127.0.0.1:xxxxx"3.从官⽅下载⽂件然后放到/code/automate/⽬录⾥。
这⾥是特指4430分⽀版本,实际上是需要根据你想编译的分⽀,将cef的具体某个分⽀⾥的/tools/automate/automate-git.py⽂件拷贝到上述⽬录⾥去。
4.从官⽅下载,然后提取到/code/depot_tools/⽬录⾥,但是我这边是在/code/⽬录下直接从git拉取的源码git clone https:///chromium/tools/depot_tools.git5.下载chromium源码在chromium_git ⽬录下克隆github 上的仓库,虽然官⽅不建议这么做,但是我建议这么搞,因为即使你有某种穿越代理,代码很难完整拉下来。
windows下系统dll文件大全注释它是Dynamic Link Library 的缩写形式,DLL 是一个包含可由多个程序同时使用的代码和数据的库,DLL不是可执行文件。
动态链接提供了一种方法,使进程可以调用不属于其可执行代码的函数。
函数的可执行代码位于一个DLL 中,该DLL 包含一个或多个已被编译、链接并与使用它们的进程分开存储的函数。
DLL 还有助于共享数据和资源。
多个应用程序可同时访问内存中单个DLL 副本的内容。
DLL 是一个包含可由多个程序同时使用的代码和数据的库。
例如,在Windows 操作系统中,Comdlg32 DLL 执行与对话框有关的常见函数。
因此,每个程序都可以使用该DLL 中包含的功能来实现“打开”对话框。
这有助于促进代码重用和内存的有效使用。
通过使用DLL,程序可以实现模块化,由相对独立的组件组成。
例如,一个计帐程序可以按模块来销售。
可以在运行时将各个模块加载到主程序中(如果安装了相应模块)。
因为模块是彼此独立的,所以程序的加载速度更快,而且模块只在相应的功能被请求时才加载。
此外,可以更为容易地将更新应用于各个模块,而不会影响该程序的其他部分。
例如,您可能具有一个工资计算程序,而税率每年都会更改。
当这些更改被隔离到DLL 中以后,您无需重新生成或安装整个程序就可以应用更新。
下表说明了Windows 操作系统中的一些作为DLL 实现的文件:• ActiveX 控件(.o cx) 文件ActiveX 控件的一个示例是日历控件,它使您可以从日历中选择日期。
• 控制面板(.cpl) 文件.cpl 文件的一个示例是位于控制面板中的项。
每个项都是一个专用DLL。
• 设备驱动程序(.drv) 文件设备驱动程序的一个示例是控制打印到打印机的打印机驱动程序。
DLL 的优点1、扩展了应用程序的特性;2、可以用许多种编程语言来编写;3、简化了软件项目的管理;4、有助于节省内存;5、有助于资源共享;6、有助于应用程序的本地化;7、有助于解决平台差异;8、可以用于一些特殊的目的。
矿产资源开发利用方案编写内容要求及审查大纲
矿产资源开发利用方案编写内容要求及《矿产资源开发利用方案》审查大纲一、概述
㈠矿区位置、隶属关系和企业性质。
如为改扩建矿山, 应说明矿山现状、
特点及存在的主要问题。
㈡编制依据
(1简述项目前期工作进展情况及与有关方面对项目的意向性协议情况。
(2 列出开发利用方案编制所依据的主要基础性资料的名称。
如经储量管理部门认定的矿区地质勘探报告、选矿试验报告、加工利用试验报告、工程地质初评资料、矿区水文资料和供水资料等。
对改、扩建矿山应有生产实际资料, 如矿山总平面现状图、矿床开拓系统图、采场现状图和主要采选设备清单等。
二、矿产品需求现状和预测
㈠该矿产在国内需求情况和市场供应情况
1、矿产品现状及加工利用趋向。
2、国内近、远期的需求量及主要销向预测。
㈡产品价格分析
1、国内矿产品价格现状。
2、矿产品价格稳定性及变化趋势。
三、矿产资源概况
㈠矿区总体概况
1、矿区总体规划情况。
2、矿区矿产资源概况。
3、该设计与矿区总体开发的关系。
㈡该设计项目的资源概况
1、矿床地质及构造特征。
2、矿床开采技术条件及水文地质条件。