2个PSD切图教程
- 格式:docx
- 大小:1.77 MB
- 文档页数:64
Photoshop图像切割教程:将一张图像切割为多个部分Photoshop是一款功能强大的图像处理软件,它提供了许多工具和功能,可以帮助我们对图像进行编辑和处理。
本教程将带你学习如何使用Photoshop将一张图像切割为多个部分。
下面是详细步骤:1. 打开图像:首先,在Photoshop中打开你要切割的图像。
可以通过点击菜单栏中的“文件”选项,然后选择“打开”来打开图像。
另外,你也可以直接拖拽图像文件到Photoshop窗口中。
2. 选择切割工具:在Photoshop的工具栏中,可以找到一个名为“切割工具”的选项。
点击该选项,然后在图像上拖拽一个矩形框来选择你要切割的区域。
你可以随意调整矩形框的大小和位置。
3. 创建切割线:当你完成选择一个区域后,点击工具栏上的“切割工具”选项旁边的三角形图标。
在下拉菜单中,选择“切割区域”。
然后,在你选定的区域上点击鼠标右键,选择“创建切割线”。
4. 切割区域:在弹出的对话框中,你可以更改切割区域的名称和其他属性,然后点击“确定”按钮。
这样,你就成功地将你选择的区域切割出来了。
5. 重复步骤2至4:重复上述步骤,继续选择和切割其他区域,直到你切割完整张图像。
6. 导出切割的图像部分:当你完成所有的切割后,点击菜单栏中的“文件”选项,选择“导出”>“图像另存为”。
在弹出的对话框中,为每个切割的图像部分选择一个目标文件夹和文件名,并设定适当的保存格式和选项,然后点击“保存”按钮。
7. 导出HTML用于网页展示(可选):如果你想将切割的图像部分用于网页展示,你可以选择将它们导出为HTML文件。
点击菜单栏中的“文件”选项,选择“导出”>“存储为Web所用格式”。
然后,按照提示进行设置,选择导出HTML所需的图像格式和设置,并点击“保存”按钮。
8. 完成:恭喜你完成了将一张图像切割为多个部分的教程!现在你可以根据自己的需要使用这些切割的图像部分。
以上就是使用Photoshop将一张图像切割为多个部分的详细步骤。
如何在Adobe Photoshop中制作图像的分割和拼接Adobe Photoshop是一款功能强大的图像处理软件,其中的图像分割和拼接功能让用户能够轻松地将多个图像元素合成为一个完整的图像。
在本文中,我将介绍一些在Adobe Photoshop中制作图像分割和拼接的技巧和步骤,帮助读者们更好地运用这些功能来创作出精美的图像作品。
首先,让我们来讨论如何进行图像的分割。
图像分割是指将一个图像分割成多个不同的区域,每个区域都有不同的特征。
在Adobe Photoshop中,有几种方法可以实现图像分割,其中最常用的方法是使用选择工具和图层遮罩。
首先,打开要进行分割的图像。
选择一个具备明显区分特征的区域,比如一个物体或者一个人的轮廓。
然后,使用选择工具(如套索工具、魔术棒工具等)选择该区域。
接下来,点击“选择”菜单,选择“反向”选项,这样你就成功选择了图像中的其他部分。
随后,在“图层”面板中点击“新建图层蒙版”按钮,这样你就在图层上创建了一个蒙版,它会根据你的选择来隐藏图像的其他部分。
如果你觉得所选的区域还不够精确,你可以使用“画笔工具”来编辑蒙版。
选择画笔工具,选择适当的画笔大小和硬度,然后使用黑色或白色来添加或移除蒙版。
以黑色颜色绘制的区域将被隐藏,以白色颜色绘制的区域将被显示。
通过反复调整细节,直到你得到一个理想的分割效果。
接下来,我们来讨论图像的拼接。
图像拼接是指将多个独立的图像元素合成为一个完整的图像。
在Adobe Photoshop中,有几种方法可以实现图像拼接,其中最常用的方法是使用图层和蒙版。
首先,打开要进行拼接的图像。
在图层面板中,将每个图像分别拖放到不同的图层中。
然后,使用移动工具将每个图层调整到合适的位置和大小。
如果需要,可以使用图层遮罩来隐藏或显示图层的部分内容,以实现更精确的拼接效果。
另一种常用的图像拼接方法是使用图像对齐工具。
首先,在“编辑”菜单中选择“自动对齐图层”,这将自动对齐图层中的不同元素。
利用Adobe Photoshop软件进行图片的分割和拼接的方法和技巧随着数字摄影技术的日益成熟和普及,人们的拍摄需求也越来越多样化。
有时,拍摄的画面无法完整展现出我们想要的效果,这时候我们就需要使用图像处理软件来进行图片的分割和拼接。
Adobe Photoshop作为世界上最为知名的图像处理软件之一,具备强大的分割和拼接功能,下面就为大家介绍一些方法和技巧。
首先,我们来讲一讲如何使用Adobe Photoshop进行图片的分割。
在分割之前,我们需要清楚自己想要将图片分割成几个部分,以及分割的形式是水平还是垂直。
打开Adobe Photoshop软件后,选择“文件”-“打开”来导入你要分割的图片。
接下来,在工具栏中选择“裁切工具”(快捷键C),然后在图片上按住鼠标并拖动,选择你想要分割的区域。
完成选择后,点击“图像”-“剪切”或按键盘上的Ctrl+X进行分割。
这样,你就成功地将图片分割成了几个独立的部分。
接下来,我们来讲一讲如何使用Adobe Photoshop进行图片的拼接。
在拼接之前,我们需要明确拼接的图片数量以及它们的排列顺序。
同样地,打开Adobe Photoshop软件后,选择“文件”-“打开”来导入你要拼接的图片。
在工具栏中选择“移动工具”(快捷键V),然后将图片拖动到主工作区域中。
在主工作区域中,你可以对图片进行调整和移动,以达到你想要的排列效果。
如果拼接的图片存在不同的图层,你可以通过点击图层面板中的眼睛图标来隐藏或显示部分图层。
完成调整后,点击“文件”-“存储为”或按键盘上的Ctrl+S来保存你的拼接结果。
除了基本的分割和拼接功能,Adobe Photoshop还提供了一些高级的技巧和工具,帮助我们更加灵活地进行图片的处理。
例如,你可以使用“裁剪工具”来剪裁图片的不需要部分,或使用“调整图像大小”功能来改变图片的尺寸。
此外,你还可以使用“图层样式”功能来为图片添加阴影、光晕等特效,使得拼接的图片更加生动和有层次感。
如何使用Adobe Photoshop软件进行图片剪裁使用Adobe Photoshop软件进行图片剪裁是一种非常常见的图像处理技术。
无论是在个人日常生活中还是在工作中,我们都可能需要对图片进行剪裁来达到所需的尺寸或者比例。
在本文中,我将向您介绍如何使用Adobe Photoshop软件进行图片剪裁。
首先,打开Adobe Photoshop软件。
在界面中选择“文件”菜单,然后选择“打开”,找到您需要剪裁的图片并点击“确定”按钮。
图片将被打开并显示在软件界面中。
接下来,我们需要确定图片的剪裁尺寸。
在工具栏中选择“裁剪工具”(Crop Tool)或者按下键盘快捷键“C”来激活裁剪工具。
一旦激活,您可以在图片上点击并拖动鼠标来创建一个剪裁区域。
在剪裁区域内,您可以调整大小以匹配您想要的剪裁尺寸。
要调整剪裁区域的大小,您可以悬停鼠标在剪裁区域的边缘上,然后按住鼠标左键并拖动。
同时,可以按住Shift键来保持剪裁区域的宽高比例。
在调整大小后,您还可以移动剪裁区域以选择其中的感兴趣的内容。
要移动剪裁区域,只需悬停鼠标在剪裁区域内,然后按住左键拖动即可。
完成调整后,您可以按下回车键或者点击工具栏上的确认剪裁按钮来确定剪裁。
剪裁后的图片将显示在软件界面中,您可以继续对其进行编辑或者保存。
如果您需要对多个图片进行批量剪裁,Adobe Photoshop也提供了这样的功能。
您可以选择“文件”菜单中的“脚本”选项,然后选择“图像处理器”。
在弹出的对话框中,选择您需要剪裁的图片所在的文件夹,并设置保存剪裁后的图片的位置。
点击“运行”按钮后,软件将会自动对文件夹中的所有图片进行剪裁操作。
使用Adobe Photoshop软件进行图片剪裁不仅仅是简单的调整尺寸和比例,还可以通过不同的剪裁方式实现不同的效果。
比如,您可以使用“固定尺寸”选项来确保剪裁后的图片具有相同的尺寸。
您还可以使用“原始尺寸”选项来保留原始图片的宽高比例。
如何使用Photoshop进行图片切割在设计和编辑图片的过程中,图片切割是一个非常常见且必要的操作。
当我们需要将一张大图切割成多个小图或者需要从一张图片中提取出某部分时,使用Photoshop进行图片切割是一个非常方便和高效的方法。
下面将介绍几种常用的切割方法和技巧。
1. 使用裁剪工具进行简单切割Photoshop提供了一个方便的裁剪工具,你可以使用它来对图片进行非常简单的切割。
首先打开要切割的图片,然后选择裁剪工具(快捷键C)。
在工具栏上,你可以看到一些设置选项,例如宽度、高度、分辨率等。
你可以根据需要调整这些选项。
在图片上点击并拖动裁剪工具,在要切割的位置完成选区后,松开鼠标。
接着,你可以按下回车键或者点击工具选项栏上的“确定”来裁剪图片。
裁剪后,你将得到一个新的文件,其中包含了你选定区域的图像。
2. 使用切片工具进行复杂切割如果你需要将一张大图切割成多个小图,或者需要将图片划分为不同的区域,以便于后续的处理或者网页设计等需求,可以使用切片工具。
选择切片工具(快捷键C),在工具选项栏上选择“固定大小”,然后输入你希望每个小图的宽度和高度。
例如,如果你希望每个小图的宽度为200像素,高度为200像素,那么就输入200x200。
接下来,在你希望切割的位置点击并拖动切片工具,然后松开鼠标。
这样,你就切割出了一个固定大小的切片。
你可以继续重复这个过程,在其他位置切割出更多的切片。
完成切割后,你可以导出你的切片。
选择“文件”-“存储为Web所用格式”,在弹出的对话框中选择“切片工具”。
3. 使用磁性套索工具进行精确切割有时候,我们可能需要从一张复杂的图片中精确地提取出某个特定的部分。
在这种情况下,磁性套索工具可以帮助我们进行更精确的切割。
选择磁性套索工具(快捷键L),在工具选项栏上选择合适的设置,例如套索宽度、边缘柔化等。
然后,点击并拖动套索工具,沿着你希望切割的轮廓绘制路径。
套索工具会根据图像的颜色和纹理自动贴合轮廓,帮助你进行精确的切割。
利用Photoshop进行像的裁剪和剪切利用Photoshop进行图片的裁剪和剪切在当今社交媒体和网络时代,图片在我们的生活中扮演着非常重要的角色。
而有时候,我们需要对图片进行一些处理,如裁剪或剪切,以满足特定的需求。
而Adobe Photoshop作为一款专业级的图像处理软件,提供了强大而灵活的工具,能够帮助我们轻松地进行图片的裁剪和剪切。
本文将介绍如何利用Photoshop进行图片的裁剪和剪切。
一、图片裁剪1、打开图片在开始之前,首先打开Photoshop软件,并导入需要处理的图片。
我们可以通过点击“文件”菜单下的“打开”选项来选择需要处理的图片,并将其导入到软件中。
2、选择裁剪工具在Photoshop工具栏中,我们可以找到裁剪工具。
它通常位于工具栏的第一个位置或者是隐藏在其他与裁剪相关的工具下面。
通过点击裁剪工具,我们可以激活该功能。
3、确定裁剪区域在图片上点击并拖动裁剪工具,以选择需要裁剪的区域。
我们可以根据需求自由地调整裁剪区域的大小和比例。
当我们确定好裁剪区域后,点击“确定”按钮进行裁剪。
4、保存裁剪结果裁剪完成后,我们可以点击“文件”菜单下的“另存为”选项,将裁剪后的图片保存到本地或者指定的位置。
在保存时,我们可以选择保存格式和图片质量等参数,以达到最佳的效果。
二、图片剪切1、打开图片同样地,在进行图片剪切之前,我们需要打开Photoshop软件,并将需要处理的图片导入到软件中。
2、选择剪切工具在Photoshop工具栏中,我们可以找到剪切工具。
它通常位于与裁剪相关的工具下面,如切割工具或者移动工具。
通过点击剪切工具,我们可以激活该功能。
3、确定剪切线在图片上点击并拖动剪切工具,以绘制需要进行剪切的线条。
我们可以根据需求自由地调整剪切线的粗细和位置。
当我们确定好剪切线后,点击“确定”按钮进行剪切。
4、保存剪切结果剪切完成后,同样地,我们可以点击“文件”菜单下的“另存为”选项,将剪切后的图片保存到本地或者指定的位置。

Photoshop切割工具:将图像切割成多个部分Photoshop是一款功能强大的图像处理软件,其中的切割工具可以将图像切割成多个部分。
在本文中,我将详细介绍如何使用Photoshop的切割工具,并分步解释具体的操作过程。
步骤一:准备工作1.打开Photoshop软件并载入要进行切割的图像。
点击菜单栏的“文件”选项,选择“打开”,然后导航到图像所在的文件夹并选择相应的图像文件。
2.在Photoshop的菜单栏上找到并点击“窗口”,然后选择“工具”以打开工具面板。
步骤二:选择切割工具1.在工具面板中找到切割工具。
切割工具位于工具面板中的第一行,是一个剪刀的图标。
2.点击并长按剪刀图标,将会出现一个下拉菜单。
在下拉菜单中选择“切割工具”。
现在你就可以开始使用切割工具了。
步骤三:使用切割工具1.在图像中选择一个起始点,这是你要开始切割的位置。
点击一次,然后移动鼠标到切割线的另一个位置,再次点击。
2.重复上一步骤,继续在图像上创建切割线,直到你完成了整个图像的切割。
每次点击鼠标,你都会创建一个新的切割线。
3.当你完成了所有的切割线之后,你可以通过拖动切割线的顶点来调整它们的位置和形状。
你也可以通过在图像上点击切割线然后按下删除键来删除不需要的切割线。
步骤四:保存切割图像1.完成切割后,点击菜单栏中的“文件”选项,选择“存储为Web & 设备所用格式”,或者使用快捷键Ctrl + Shift + Alt + S。
2.在弹出的“存储为Web”对话框中,你可以选择所需的图像格式(例如JPEG、PNG等)以及图像的保存质量或优化设置。
3.选择你想要保存切割图像的位置,并为图像命名。
点击“保存”按钮,Photoshop将会保存切割后的图像。
步骤五:检查切割图像1.在保存完切割图像后,你可以在保存的位置找到它们,并通过打开它们来查看切割结果。
2.检查切割是否正确完成,并确保每个切割区域的边界线清晰可见。
通过以上步骤,你可以轻松地使用Photoshop的切割工具将图像切割成多个部分。
Photoshop切图技巧详解Photoshop是一款功能强大的图像处理软件,广泛应用于平面设计、网页设计、数字艺术等领域。
切图是Photoshop中常用的一项技能,用于将图像转换为网页上使用的各种元素。
本文将详细介绍Photoshop中的切图技巧。
1. 准备工作首先,打开需要进行切图的图片文件。
确保图片质量良好,分辨率适中。
接下来,创建一个新的图层,以便在切图过程中保留原始图像的副本。
2. 选取工具Photoshop中有几种选取工具可供选择,包括矩形选框工具、套索工具、魔术棒工具等。
根据切图的需求,选择合适的选取工具。
例如,如果需要切割一个矩形形状的图像,可以使用矩形选框工具。
3. 切割图像使用选取工具,将要切割的图像选取出来。
可以使用“变换”工具对选取的图像进行调整,以获得更好的切割效果。
在选取好图像后,右键点击选取区域,选择“剪切”。
4. 新建图层切割好的图像将自动粘贴到新的图层中。
可以在图层面板中看到新建的图层。
此时,可以通过调整图层的顺序和透明度,对切割后的图像进行进一步的编辑和修饰。
5. 保存图像切割完毕后,点击“文件”菜单,选择“存储为Web所用格式”。
在打开的“存储为Web所用格式”窗口中,可以选择图像的格式(如JPEG、PNG等),调整图像质量和尺寸,最后点击“保存”按钮。
6. 重复操作如需切割多个图像,并保持一致的样式和尺寸,可以使用Photoshop的重复操作功能。
首先,将切割好的图像复制一份到剪贴板中。
然后,使用“新建”菜单中的“图像”选项,创建一个全新的画布。
在新建的画布中,右键点击并选择“放置”,将剪贴板中的图像粘贴过来。
接下来,可以选择使用“移动”工具和参考线将图像定位到正确的位置。
完成定位后,使用相同的步骤将该图像保存为Web所用格式。
7. 优化图像为了提高网页的加载速度,需要对图像进行优化。
可以使用Photoshop的“图像大小”选项调整图像的尺寸。
根据实际需要,可以缩小图像的尺寸以减少文件大小。
如何使用Adobe Photoshop进行图片剪裁和修剪使用Adobe Photoshop进行图片剪裁和修剪随着社交媒体的兴起以及智能手机的发展,摄影已经成为了人们生活中不可或缺的一部分。
然而,每张好看的照片背后都有一位杰出的摄影师和一款强大的后期处理软件。
而Adobe Photoshop就是这些摄影师们的首选之一。
在本文中,我们将介绍如何使用Adobe Photoshop进行图片剪裁和修剪,让你的照片更加出色。
1. 导入照片首先,打开Adobe Photoshop软件,并导入需要进行剪裁和修剪的照片。
你可以通过菜单栏中的“文件”选项来导入照片。
或者,你也可以使用快捷键Ctrl+O来打开照片。
2. 调整画布大小在进行剪裁之前,你可能想要调整图片的画布大小。
通过点击菜单栏中的“图像”选项,再选择“画布大小”,你可以进入到画布大小调整的界面。
在这里,你可以根据需要调整画布的尺寸和分辨率,以便更好地展示你的作品。
3. 选择裁剪工具接下来,你需要选择合适的裁剪工具。
在工具栏中,你会看到几个不同的选项,如剪切、切割、切割框等。
根据图片的特点和你想要达到的效果来选择合适的工具。
4. 进行剪裁此时,你可以点击鼠标左键并拖动,来创建一个剪裁框。
根据需要,你可以调整剪裁框的大小和比例。
当剪裁框达到你所期望的效果后,你可以点击回车键来进行剪裁。
5. 修剪图像在剪裁之后,你可能还需要对图像进行进一步的修剪,以便使其更加完美。
通过点击菜单栏中的“图像”选项,再选择“图像大小”,你可以进入到图像大小调整的界面。
在这里,你可以对图像的尺寸进行调整,并选择是否保持宽高比。
同时,你也可以通过旋转、倾斜等操作来进行图像的微调。
6. 调整曝光和对比度除了剪裁和修剪之外,你还可以通过调整曝光和对比度来提升图像的质量。
在Adobe Photoshop中,你可以通过点击菜单栏中的“图像”选项,再选择“调整”来进行曝光和对比度的调整。
在这里,你可以增加或减少曝光度,改变图像的明暗程度;同时,你也可以调整对比度,增加图像的层次感和鲜明度。
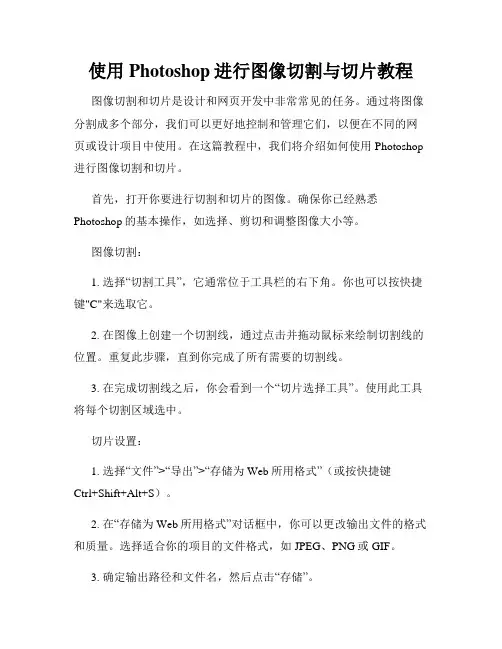
使用Photoshop进行图像切割与切片教程图像切割和切片是设计和网页开发中非常常见的任务。
通过将图像分割成多个部分,我们可以更好地控制和管理它们,以便在不同的网页或设计项目中使用。
在这篇教程中,我们将介绍如何使用Photoshop 进行图像切割和切片。
首先,打开你要进行切割和切片的图像。
确保你已经熟悉Photoshop的基本操作,如选择、剪切和调整图像大小等。
图像切割:1. 选择“切割工具”,它通常位于工具栏的右下角。
你也可以按快捷键"C"来选取它。
2. 在图像上创建一个切割线,通过点击并拖动鼠标来绘制切割线的位置。
重复此步骤,直到你完成了所有需要的切割线。
3. 在完成切割线之后,你会看到一个“切片选择工具”。
使用此工具将每个切割区域选中。
切片设置:1. 选择“文件”>“导出”>“存储为Web所用格式”(或按快捷键Ctrl+Shift+Alt+S)。
2. 在“存储为Web所用格式”对话框中,你可以更改输出文件的格式和质量。
选择适合你的项目的文件格式,如JPEG、PNG或GIF。
3. 确定输出路径和文件名,然后点击“存储”。
图像切片和导出:1. 在“存储为Web所用格式”对话框中,点击“切片工具”。
这将打开一个新的“切片”选项卡,显示所有的切片区域和相关设置。
2. 选择一个切片,通过双击切片或点击“选择切片工具”来编辑选定切片的设置。
3. 在“优化”选项卡中,你可以进一步调整图像的输出设置。
通过改变色彩模式、减少颜色数量或优化压缩,来减小文件大小并提高加载速度。
4. 在“切片选项”对话框中,你可以更改切片的类型、链接和鼠标悬停时显示的文本等。
你还可以选择是否通过图像边界自动切割切片。
5. 确认所有设置后,点击“确定”返回“存储为Web所用格式”对话框。
6. 最后,点击“保存”按钮,将切片输出为一个或多个图像文件。
通过这个简易的教程,你现在已经了解了在Photoshop中进行图像切割和切片的基本步骤。

如何在Photoshop中剪裁图像简介:Photoshop是一款功能强大的图像处理软件,它不仅可以用来编辑和修饰图像,还可以用来剪裁图像。
本文将为您介绍如何在Photoshop中剪裁图像的步骤和方法。
步骤一:打开图像1. 启动Photoshop软件并打开您想要剪裁的图像。
在菜单栏中选择“文件”>“打开”,然后在文件浏览器中选择图像文件并点击“打开”。
步骤二:选择剪裁工具2. 在工具栏中找到“剪裁工具”。
它通常显示为一个方框或一个切角的方框图标。
单击该工具以使其处于激活状态。
步骤三:确定剪裁区域3. 在图像上拖动剪裁工具来确定剪裁区域的位置和尺寸。
您可以通过调整选择框的大小和位置来精确控制剪裁区域。
步骤四:调整剪裁参数4. 在顶部工具栏中,您可以看到有关剪裁尺寸和位置的选项。
您可以手动输入数值或选择常见的剪裁比例(例如16:9)来调整剪裁参数。
步骤五:执行剪裁5. 点击顶部工具栏中的“剪裁”按钮来执行剪裁操作。
此时,您将只看到剪裁区域内的图像,剪裁区域外的图像将被删除。
步骤六:保存剪裁后的图像6. 若要保存剪裁后的图像,请在菜单栏中选择“文件”>“另存为”。
选择保存图像的位置和格式,并点击“保存”。
注意事项:- 在进行剪裁操作前,最好先备份原始图像,以防止意外删除错误的部分。
- 在剪裁区域内部分保留更多像素,以便在后续的编辑过程中有更多的处理空间。
- 遵循比例原则来调整剪裁区域的大小,以保持图像比例的一致性。
总结:使用Photoshop进行图像剪裁是一个简单而有效的方法。
通过遵循上述步骤和注意事项,您可以轻松地剪裁图像,并在剪裁后的图像上进行进一步的编辑和修饰。
Photoshop的许多强大功能将使您能够创建出令人印象深刻的图像作品。
加油吧!。
Photoshop中的图像切片教程图像切片是一种在Photoshop中使用的技术,它可以将一个大图像分割成多个较小的部分。
这种技术常用于网页设计和图片优化,可以提高网页加载速度并减小带宽使用。
要使用图像切片功能,首先打开Photoshop软件并导入要进行切片处理的图像。
在菜单栏中选择"图像",然后选择"切片"选项。
接下来,会出现一个以图像为背景的新窗口,里面有一个切片工具。
切片工具是Photoshop提供的主要工具,用来创建和编辑切片。
在切片工具栏中,有一系列不同的切片工具可以选择使用。
其中最常用的是矩形切片工具和自由切片工具。
要使用矩形切片工具,只需在工具栏中点击并按住,然后选择矩形切片工具。
然后,在图像中点击并拖动鼠标以创建一个矩形,这个矩形将成为一个切片。
可以根据需要调整矩形的大小和位置。
创建切片后,可以通过选中切片并使用选项卡栏中的各种选项来编辑切片的属性,例如添加链接、修改大小和位置等。
自由切片工具与矩形切片工具类似,不同之处在于它创建的切片形状更加自由。
要使用自由切片工具,只需在工具栏中点击并按住,然后选择自由切片工具。
然后,在图像中点击并拖动鼠标以创建一个不规则形状的切片。
同样,可以使用选项卡栏中的选项来修改切片的属性。
除了创建切片,还可以对现有切片进行编辑和调整。
选中切片后,可以使用编辑工具对切片的大小和位置进行调整,还可以使用选项卡栏中的其他选项来修改切片的属性。
在切片完成后,可以导出为Web所支持的格式。
在菜单栏中选择"文件",然后选择"存储为Web和设备所用格式"。
在弹出的窗口中,可以选择导出的文件格式和保存的位置。
点击"保存"按钮后,切片图像将被导出并生成HTML代码,可以直接插入到网页中使用。
切片功能不仅可以用于将图像分割成多个部分,还可以用于图片的优化。
通过对每个切片进行优化,可以减小文件的大小并提高网页加载速度。
五分钟学会Photoshop中的切图技巧切图是Photoshop中最基本、最常用的技巧之一,对于设计师来说是必备的技能之一。
下面将介绍一些简单而实用的切图技巧,帮助你更高效地完成切图工作。
1. 使用矩形选框工具切割图层要将一个图层切割成特定形状,可以使用矩形选框工具。
选择该工具后,点击并拖动光标来创建选区,然后按下Ctrl+J (Windows) / Command+J (Mac) 将选区另存为一个新图层。
这样你就可以在新图层中对选区进行编辑了。
2. 使用快捷键快速调整选区为了更精确地选择所需区域,可以使用快捷键来调整选区。
按住Shift+拖动选区边缘可以等比例地调整选区的大小。
按住Alt (Windows) / Option (Mac) +Shift+拖动选区边缘可以从选区中心扩大或缩小。
3. 使用磁吸功能对齐选区为了将选区对齐到特定元素或边缘,可以打开视图菜单中的“磁吸”选项。
这将使选区像磁铁一样吸附到其他元素或边缘上,帮助你更准确地调整选区的位置。
4. 使用蒙版隐藏或显示选区如果你只需要显示选区内的部分内容,可以创建一个蒙版来隐藏选区外的部分。
在图层面板中选择要创建蒙版的图层,然后点击底部的“添加蒙版”按钮。
通过使用画笔工具在蒙版上绘制黑色来隐藏选区外的部分,绘制白色来显示选区内的部分。
5. 利用智能对象非破坏性地编辑在切割图层之前,将其转换为智能对象可以保留图层的可编辑性。
这意味着你可以随时更改图层的大小、颜色、效果等,而不会对原始图像进行破坏。
右键点击图层,选择“转换为智能对象”进行转换。
6. 使用钢笔工具创建精确的选区钢笔工具是Photoshop中创建精确路径和选择的常用工具。
选择钢笔工具,在图像上点击来创建路径点,然后点击并拖动来创建曲线。
当你完成整个路径后,点击右键选择“创建选区”来将路径转换为选区。
7. 利用图层样式增强切图效果通过使用图层样式,可以为切图添加各种效果,如阴影、倒影、描边等。
Photoshop图形切割工具的使用技巧与技巧图形切割是数字图像处理中常用的一种技术,能够将图像中的元素进行分割和抠取,使得图像更加清晰、细腻。
而在这个数字时代,Photoshop成为设计师们最常用的工具之一,其图形切割工具也备受瞩目。
本文将介绍Photoshop图形切割工具的使用技巧与技巧,帮助设计师更好地运用这一工具。
首先,了解图形切割工具的基本使用方法是非常重要的。
在打开Photoshop软件后,选择一个图像进行编辑,然后在工具栏中找到“切片工具”。
点击该工具后,可以看到屏幕上的图像被分成了若干个切片框,这些切片框将图像分割为不同的部分。
可以通过拖动和调整切片框的大小和位置来精确地选择需要切割的区域。
切片完成后,可以通过“文件”菜单中的“存储为Web和设备所用格式”将切割好的图像导出,便于在网页等应用中使用。
其次,正确使用图形切割工具还需要掌握几个技巧。
首先是对于复杂图像的切割,可以使用“简单切割”功能来进行更精确的操作。
在切片工具的选项栏中,点击“裁切”按钮,就可以将切片框的形状调整为更符合图像的形状。
此外,Photoshop还提供了“详情”选项,可以通过调整“画质”、“优化”和“色彩表”等参数来优化切割后的图像质量。
这些技巧在处理大型图片时尤为重要。
除了基本的切割功能外,Photoshop的图形切割工具还提供了一些高级的功能。
其中之一是“导出切片”,可以将切割好的图像导出到常见的图像格式,例如JPEG、PNG或GIF。
另一个有用的功能是“图像映射”,可以将鼠标的不同位置映射到不同的链接或网页。
这样,在设计网页时,可以通过切割图像并映射链接,使得用户在浏览网页时能够快速定位到所需的内容。
此外,Photoshop还提供了一系列的图形切割辅助工具,使得切割更加精准和高效。
例如,可以使用“参考线”来对齐切割框,或者使用“尺子”工具来测量切割框的大小。
此外,还可以通过“导入”功能将其他已切割好的图像导入到当前的Photoshop项目中,以便进行进一步的编辑和处理。
手把手教你使用Adobe Photoshop软件剪裁图像在现代社交媒体和数字化时代,图像处理软件的需求变得越来越重要。
Adobe Photoshop是一款非常受欢迎且功能强大的图像处理软件,使得用户能够轻松编辑和处理图片。
其中,剪裁图像是一项基本的编辑技巧,下面我将详细介绍如何使用Adobe Photoshop软件进行图像剪裁。
首先,你需要打开Adobe Photoshop软件。
在界面的右上角,可以看到“文件”选项。
点击“文件”选项,然后选择“打开”,从计算机中选择你需要剪裁的图像文件。
接下来,你将在软件的工作区中看到所选图像的预览。
要开始剪裁图像,你需要在软件的工具栏中选择“裁剪工具”。
这个工具看起来像一把剪刀。
点击这个工具后,你将看到工具栏中显示了与裁剪相关的选项。
在选中裁剪工具后,你可以在图像上拖动鼠标来选择剪裁区域。
你会注意到边缘有一个虚线矩形框,它标志着你所选择的剪裁区域。
如果你不满意剪裁区域的位置,可以再次点击并拖动鼠标来重新选择区域。
一旦你满意所选的剪裁区域,你可以点击回车键来进行实际的剪裁。
在剪裁完成后,你会发现原图像被裁剪成一个新的图像,只包含你所选择的部分。
接下来,你可能想调整裁剪好的图像的大小。
为此,你可以选择“图像”选项卡,然后点击“图像大小”选项。
在弹出的窗口中,你可以调整图像的宽度和高度,以达到你想要的大小。
重要的是要保持宽高比,以避免图像变形。
此外,Adobe Photoshop还提供了许多其他的图像处理功能,你可以继续探索这些功能以进一步优化和完善你的图像。
例如,你可以调整亮度和对比度,增加或减少饱和度,应用滤镜等等。
这些功能可以通过选择工具栏上的不同选项来进行操作。
需要提醒的是,使用Adobe Photoshop进行图像剪裁和编辑是需要一定技巧和实践的。
初学者可能需要花费一些时间来熟悉软件的界面和功能。
因此,我建议你在使用之前先查看一些Adobe Photoshop的教程,以便更好地理解和掌握软件的使用方法。
利用Photoshop制作切割和拼接照片Photoshop作为一款图像处理软件,具有强大的功能和丰富的工具,可以作为一位摄影师或设计师的得力助手。
在Photoshop中,我们可以利用其切割和拼接照片的功能,实现多张照片的合并和拼接,以创造出更有趣、更独特的图像效果。
本文将为大家介绍利用Photoshop制作切割和拼接照片的方法和技巧。
1. 切割照片:首先,打开需要切割的照片,在Photoshop的工具栏中选择"切割工具",或按下快捷键"C"。
2. 设定切割区域:在照片上点击鼠标左键,然后拖动鼠标,形成一个矩形或方形的切割框,用于切割出需要的部分。
可以根据需要多次使用该工具,切割出不同部分的照片。
3. 完成切割:当你切割完所有需要的部分后,点击菜单栏中的"图像",选择"裁剪",或按下快捷键"Ctrl+Alt+X",即可完成对照片的切割。
4. 拼接照片:打开需要拼接的照片,在菜单栏中选择"文件",点击"打开",将需要拼接的照片导入到Photoshop中。
5. 剪切和复制图层:在图层面板中,我们会看到导入的照片显示在一个叠加的图层上。
使用"选择工具"(快捷键为"V"),选择要剪切的部分,然后按下"Ctrl+X"将该部分剪切。
6. 粘贴剪切图层:打开要拼接的照片所在的工作区,在图层面板中点击右键,选择"粘贴",或按下快捷键"Ctrl+V",即可将剪切的部分粘贴到该照片上。
7. 调整大小和位置:在拼接图层上,使用"自由变换"工具(快捷键为"Ctrl+T"),可以调整剪切的部分的大小和位置,以便与背景图像融合。
8. 融合拼接图层:在图层面板中,将拼接图层的不透明度适当设置,使其与背景图像更加自然地融合在一起。
如何使用Photoshop进行图像切割和合成第一章:图像切割的基本概念图像切割是指将一张大图分割成几个小片段的过程。
这个过程可以帮助我们更好地处理图像,提取感兴趣的部分,或者组合多个图像。
1.1 图像切割的应用领域图像切割在很多领域都有应用,比如网站设计、广告制作、数字艺术和科学研究等。
通过切割图像,可以实现更精确的图像编辑效果。
1.2 Photoshop中的图像切割工具Photoshop提供了多种图像切割工具,如矩形选框工具、椭圆选框工具、套索工具和魔棒工具等。
根据不同的需求,我们可以选择合适的工具进行切割。
第二章:图像切割的基本操作在这一章节,我们将介绍使用Photoshop进行图像切割的基本操作,包括如何使用矩形选框工具、椭圆选框工具和套索工具进行切割。
2.1 使用矩形选框工具进行切割首先,打开需要切割的图像,在工具栏中选择矩形选框工具。
然后,用鼠标点击并拖动来创建一个矩形选框,选择你想要的部分。
最后,按下Ctrl+X剪切选中的部分,即可完成切割。
2.2 使用椭圆选框工具进行切割椭圆选框工具与矩形选框工具类似,操作方式也相同。
选择椭圆选框工具后,点击并拖动鼠标来创建一个椭圆选框,选择你想要的部分。
最后,按下Ctrl+X剪切选中的部分,即可完成切割。
2.3 使用套索工具进行切割套索工具可以用于更加复杂的图像切割。
在工具栏中选择套索工具,点击并拖动鼠标来勾勒出你想要的部分。
然后,按下Ctrl+X剪切选中的部分,即可完成切割。
第三章:图像合成的基本概念图像合成是指将多个图像合并到一个图像上的过程。
这个过程可以用于创建艺术作品、设计海报、修复老照片或者制作特效等。
3.1 图像合成的应用领域图像合成的应用非常广泛,比如电影特效制作、广告设计、平面设计等。
通过合成不同的图像元素,可以创造出令人惊艳的效果。
3.2 Photoshop中的图像合成工具Photoshop提供了多种图像合成工具,如图层蒙版、渐变工具、修补工具和文字工具等。
Tutorial1The Design Lab: PSD ConversionHello, welcome to another layout coding tutorial. In this tutorial il show how to code my design lab layout tutorial. Make sure you have your PSD ready made in photoshop.Create a new folder on your desktop called “design lab”, inside this folder create another folder called “images”. Open notepad then just goto “file > save as” save the blank document as “styles.css” save it in the “design lab” directory. Open up dreamweaver start a new HTML document then goto ” file > save as” save the HTML file as “index.html”.Open up both files (styles.css & index.html) in adobe dreamweaver, put your HTML file in code view by clicking the code tab. Change the text within the title tag to what ever you want your site name to be. Also link your style sheet by adding the snippet of code underneath the title tag. That snippet of code is vital as without it your website will look pretty dull.<!DOCTYPE html PUBLIC "-//W3C//DTD XHTML 1.0 Transitional//EN" "/TR/xhtml1/DTD/xhtml1-transitional.dtd"><html xmlns="/1999/xhtml"><head><meta http-equiv="Content-Type" content="text/html; charset=utf-8" /> <title>The Design Lab | HV-Designs Tutorial</title><link href="styles.css" rel="stylesheet" type="text/css" /></head><body></body></html>The way i code my PSD’s are from top to bottom, so we’l start with the main things first like our container, title and naviagtion. The first thing we’ll need is our containe r to hold the website, then within the container there will be another container for our clouds background. Then there will be our title and naviagtion. We can draft these out in our HTML file which looks like this.<div id="container"><!--BEGIN CONTAINER--><div id="clouds"><!--BEGIN CLOUDS--><div id="title"><!--BEGIN TITLE--></div><!--END TITLE--><div id="navigation"><!--BEGIN NAVIGATION--><ul class="nav_menu"><li><a href="#">Home</a></li><li><a href="#">Services</a></li><li><a href="#">Portfolio</a></li><li><a href="#">Free Quote</a></li><li><a href="#">Support</a></li><li><a href="#">Contact</a></li></ul></div><!--END NAVIGATION--></div><!--END CONTAINER--></div><!--END CLOUDS-->To keep on top of our code and to see where one div begins and where another one ends we can use coded comments, which you’ll only see when viewing the source code. When creating a div i always start with a comment to say that it starts here, then end it with a comment to reflect the end of the div. from the structure above you can clearly see where one item begins and where one ends. Now before we code out CSS we need to make a couple of images from our PSD. The first one being our clouds background, so in photoshop with your PSD file HIDE every layer apart from your clouds layers (there should be two) a blurred one and a normal one. With all the layers hidden apart from the two clouds images goto “layer > merge visable”your two clouds layers should merge into one. Now you need to make a selection around your clouds image making sure you have it all. Once the selection has been made copy and paste it to a new document with a TRANSPARENT background. Goto “file > save as” then save it as clouds.png in your images folder. Heres my clouds image on my canvas.your going to need to do this for each item that we copy from our PSD so remember the steps listed above, failure to follow the steps will result in choppy images, non transparent images etc,.. Do the same to the website title and the navigation bar.Save each file as “navigation.png” and “title.png”.You also need a little chunk of the background as we have used a gradient background. We can repeat the background horizontally across our website.Save the background as “background.png”. You should now have 4 images in your images folder background, website title, navigation and the clouds.Now we have our first set of images we can now add our CSS styles to our stylesheet. The first set of styles we will write will be our body styles which will be repeated through out our whole site.*{padding:0;margin:0;}body {font-family: Arial, Helvetica, sans-serif;font-size: 12px;color: #797979;margin: 0px;padding: 0px;background-color: #156894;background-image: url(images/background.png);background-repeat: repeat-x;}So we dont want any margins or padding around our website so we set our margin and padding to 0. We want a common font family “Arial, Helvetica, sans-serif;”, with a size of 12 pixels in the color #797979. Our background color will reflect the color at the very bottom of our “background.png”file. Mine is #156894 yours might be slightly different depending on how long your selection was. Just open it up in photoshop and use the eye dropper to select the color of the last couple of pixels. We then want our background image with the gradient on it to repeat along the x axis (horizontally). The next bit of code we need to add is for our container and clouds.#container {width: 850px;margin: auto;}#clouds {width: 850px;float: left;background-image: url(images/clouds.png);background-repeat: no-repeat;}The first div we style is our container which we want to be 850pixels wide the same as our PSD file. We want our magins set to auto, this will center our whole site in our a browsers. We then style our 2nd div which is our clouds div, which will also act as our container but with a background image. We want the width to be the same as our container and we want to float it left within our container, we then set our background image to the clouds image in our images folder. We dont want it to repeat so we set no-repeat. You can view your HTML file in your browser to see how it looks, yo u wont see alot, but you’ll definetley be able to see if your background color matches. The next part we want to style is our title and navigation which looks like this.#title {background-image: url(images/title.png);background-repeat: no-repeat;height: 39px;width: 243px;float: left;margin-top: 45px;margin-left: 20px;}#navigation {background-image: url(images/navigation.png);background-repeat: no-repeat;height: 45px;width: 434px;float: right;margin-top: 40px;}.nav_menu li{list-style:none;display:inline;padding-left: 13px;padding-right: 13px;float: left;padding-top: 14px;}.nav_menu a {font-size: 11px;text-decoration: none;font-family: Arial, Helvetica, sans-serif;color: #848484;font-weight: bold;}.nav_menu a:hover {color: #156894;}Okay so the title div first, we set a background image which will be our title image from our images folder, we dont want it to repeat. Then the width and height which is the actual dimensions of our title.png image.We then want to float it left with a top and left margin to bring the title in abit so its not stuck up in the corner of our container. Next is our navigation similar to our title styles we set a background, width and height, dont forget the width and height have to be the same as your .PNG image in your images folder. Then we just want to add a top margin to bring it down a touch, importantly we want to float it to the right.Now for our lists, and link styles for our navigation bar. We dont want any list style, setting the list style to none will get rid of the bullet points, we also want our navigation text to display inline next to each other so we use display:inline. We want our text in the middle of our navigation so ive set some padding around the items. Yours might have to be adjusted depending on how big your navigation.png image is. We then style our links and hovers for our navigation text, i wont go into to much detail on the last two styles as there self explanitory. Hit F12 on your HTML file to display it in our browser. This is how mine looks.If you examine the PSD file you will see we also have some catchy text above our big content box, we can add this the same way we did our title.The HTML code for the catchy text is as follows.<div id="content"><!--BEGIN CONTENT--><div id="catchy_text"><!--BEGIN CATCHY TEXT--></div><!--END CATCHY TEXT--></div><!--END CONTENT-->We want our catchy text to be inside the same div our big content box will be in, so we add the above content underneath the END of our navigation div. We start with an id of content which will be like our container for our big content box, then simply add our id of catchy text. Then end with our content closing div. The styles for our content and catchy text div are as follows.#catchy_text {height: 55px;width: 362px;background-image: url(images/catchy_title.png);background-repeat: no-repeat;margin-top: 150px;margin-left: 65px;}#content {float: left;width: 511px;}Firstly the styles for the catchy text, the width an height relate to the image dimensions of our catchy text, dont forget you will need to create the .png image from the PSD file. The background image refers to the actual image in the images folder, we dont want it to repeat. We have then added quite a big top margin to push the whole thing down quite abit. Ive also added a left margin to center the text abit, you will see its sort of centered when we add the content box.The content div will be like a container for our content box, we just need to float it left and add a width of 511 pixels which is how wide i want it to be. If you view your HTML file in your browser you should have something like this.Coming on nicely :) dont you think…… Right this next part you need to create top, middle and bottom images from your big content box.Quick Tip: instead of creating your bottom bit of the content box, just rotate your canvas 180 degrees on content box top image then just save it as content_box_bottom. That way your top content box will be identical to the bottom ;) therefor your styles will also be the same. So you’ve got your 3 individual images saved in your images folder. Lets draft it out into our HTML file.<div id="content"><!--BEGIN CONTENT--><div id="catchy_text"><!--BEGIN CATCHY TEXT--></div><!--END CATCHY TEXT--><div class="content_top"><!--BEGIN CONTENT TOP--></div><!--END CONTENT TOP--><div class="content_middle"><!--BEGIN CONTENT MIDDLE--></div><!--END CONTENT MIDDLE--><div class="content_bottom"><!--BEGIN CONTENT BOTTOM--></div><!--END CONTENT BOTTOM--></div><!--END CONTENT-->You’ve already done the content div and catchy text, just add the rest. Content box top and bottom will stay the same but inbetween the content box middle div and ending div thats where your content will be. Also please note content top, middle and bottom are all classes NOT div id’s. Now for the styles..content_top {background-image: url(images/content_top.png);background-repeat: no-repeat;height: 16px;width: 511px;}.content_middle {background-image: url(images/content_middle.png);background-repeat: repeat-y;width: 471px;padding-right: 20px;padding-left: 20px;line-height: 20px;padding-top: 15px;padding-bottom: 15px;}.content_bottom {height: 16px;width: 511px;background-image: url(images/content_bottom.png);background-repeat: no-repeat;margin-bottom: 50px;}The first class is the top half of the content box, it has the background image of content_top which is the top part of the big content box, we dont want it to repeat. Height and width refer to the images dimensions. The bottom class is exactly the same apart from it has a bottom margin, the margin is there to ensure there’s spacing between the box and the footer which will be underneath. Also because these styles are classes, they can be duplicated in the HTML file so you can continue to create another content box underneath if need be. The content middle class is abit different, it has a background image but repeats on the y axis (vertically) also note there is no height only the width, the width is 471 pixels, but is exactly the same as 511pixels if you add the left and right padding.You have to count the padding in with your width. If we set a height then the box wouldnt expand with the content. Also note there is some padding in all directions, this is to make the content nice and spacious, you can adjust the padding to suite if you wish.Add some text and headers to your content middle part and check to see how it looks in your browser. Dont forget to style some head tags ;) They might look like this.h1 {color: #3b3b3b;font-size: 24px;margin-bottom: 10px;}h2 {color: #FFFFFF;font-weight: bold;font-size: 18px;margin-left: 5px;line-height: 30px;}Now for the sidebar, The way the sidebar is constructed is exactly the same as our content box we just created. Only the top half of our sidebar box will contain a big tag saying free quote. Split your sidebar box into 3 sections from your PSD file like we did with the content box. Once your done we’ll write it out in our HTML file.<div id="sidebar"><!--BEGIN SIDEBAR--><div class="sidebar_top"><!--BEGIN SIDEBAR TOP--></div><!--END SIDEBAR TOP--><div class="sidebar_middle"><!--BEGIN SIDEBAR MIDDLE--></div>><!--END SIDEBAR MIDDLE--><div class="sidebar_bottom"><!--BEGIN SIDEBAR BOTTOM--></div><!--END SIDEBAR BOTTOM--></div><!--END SIDEBAR-->We start off with a div called sidebar which will be like our sidebar container, then we have 3 classes similar to the big content box sidebar top, middle and bottom. Inbetween sidebar middle and the ending div thats where your content would go. The CSS for the sidebar is as follows.#sidebar {float: right;width: 264px;margin-top: 75px;}.sidebar_top {height: 58px;width: 264px;background-image: url(images/sidebar_top.png);background-repeat: no-repeat;}.sidebar_middle {background-image: url(images/sidebar_middle.png);background-repeat: repeat-y;width: 264px;padding-top: 20px;padding-bottom: 20px;}.sidebar_bottom {background-image: url(images/sidebar_bottom.png);background-repeat: no-repeat;height: 8px;width: 264px;margin-bottom: 20px;}So we start with our first style which is for our div of sidebar, because we want it to be on the right side of our page we float it right, we also need a margin at the top BUT not as big as the big content box as the sidebar sits slightly higher. Finally the width of the sidebar is 264pixels which should also be the size of our split images for our content box.The last 3 class top, middle and bottom are the same as we did for the big content box but only on a small scale meaning the images arn’t aswide as the big content box., Just make sure the widths and heights of the top and bottom relate to the images in your images folder. Although the widths should most definetley be identical.</div><!--END CLOUDS--> </div><!--END CONTAINER--> <div id="footer"> </div> </body> </html>For the footer we just create a new div called container, your content would then go between the footer and footer end div tag. The styles for our simple footer are.#footer {background-color: #115579;clear: both;padding: 20px;}We want a slighly darker background color so i used an optional background color, Importantly we added clear:both, this means we dont want anything either side of our footer. We then add some simple padding to fill out our text abit. Thats it all done simple as that. Hope you enjoyed this tutorial dont forget to subscribe to our RSS or/and twitter.Till next time, thanks for reading.Tutorial2As you may or may not know, I’ve (very slowly) writing a book on WordPress theming. What we’re building is actually the HTML that I’m using in the book to build the main example themes. The final set of themes is called Creatif. You can see the 4 mockups shown in screenshots below (click to get the larger versions).You can get the full layered PSD files *and* a tutorial on designing them up from our PSDTUTS Plus membership – but it will cost you $9 a month to access. If you don’t wish to join though, don’t worry because you can follow today’s tutorial completely just using the JPG screenshots below.Part 1 - Building the Framework and First PageUnlike previous Site Builds this tutorial is covering a decent sized template. So we’re going to take this in stages. First we’ll do the framework, then the first page, then alternate pages, then finally an alternate colour scheme.Step 1 - Getting ReadySo first of all we boot up our code editor of choice. I actually use Dreamweaver most of the time (and Textmate sometimes). I find it has some pretty decent code tools and a few features that I’m really used to (in particular a powerful Find+Replace and a quick <img> hook up). If you do use Dreamweaver, I recommend setting up a "Site".In any case the first things to do are create a directory structure and get ready to build. I usually have an /images/ directory and a /scripts/ directory, and then plonk all my CSS and HTML in the root.Step 2 - Quick Early LayoutThe first thing we’ll do is a quick overall layout in HTML with some barebones CSS just to make sure we’ve got a solid foundation. We can also check it in the major browsers (IE7, IE6, Firefox, Safari) just to make sure we’re on a solid footing. There is noth ing worse than coming back all the way to the beginning to fix browser compatibility issues. It’s much better to do it as you go.So we’re building the first mockup, we can see a few things:1.The design is centred. That immediately tells us we have to wrap it in a container andthen centre that container.2.Essentially the design is a series of horizontal blocks. Sometimes the blocks have twocolumns, sometimes one. So we can do it as a series of <div>’s. This is good because wecan then mix and match element s into different pages as you’ll see later.3.We have a footer which is a different colour. This means the background needs to be thatcolour, in case the users browser stretches. So the footer will need to sit in a differentcontainer to the main stuff.S o here’s a HTML layout:view plaincopy to clipboardprint?1.2.<!DOCTYPE html PUBLIC "-//W3C//DTD XHTML 1.0 Strict//EN" "http://www.w/TR/xhtml1/DTD/xhtml1-strict.dtd">3.<html xmlns="/1999/xhtml">4.<head>5. <meta http-equiv="Content-Type" content="text/html; charset=UTF-8" />6. <title>Creatif</title>7. <link href="style.css" rel="stylesheet" type="text/css" />8.9.</head>10.11.<body>12. <div id="main">13.14. <div class="container">15.16. <div id="header">17.18. Logo / Menu19.20. </div>21.22. <div id="block_feature">23.24. Featured Content25.26. </div>27.28. <div id="block_content">29.30. Content31.32. </div>33.34. </div>35.36. </div>37.38. <div id="footer">39.40. <div class="container">41.42. Footer Stuff Goes in Here43.44. </div>45.46. </div>47.</body>48.</html>As you can see there are two segments: the #main area and the #footer area. Inside each we have a <div class="container">element which will be fixed width and centred. Then inside the main container we just have a sequence of <div>’s. Now let’s add a litt le CSS as follows:view plaincopy to clipboardprint?1.2.body {3. margin:0px; padding:0px;4. background-color:#131211;5.}6.7.#main {8. background-color:#c4c0be;9.}10.#footer {11. color:white;12.}13..container {14. width:950px;15. margin:0 auto;16. border:1px solid red;17.}So we’re setting the body’s background colour to the dark brown of the footer. Then the #main area has the lighter background. Finally you can see the .container elements have a width of 950px and are centred using margin: auto. I’ve also added a red borde r just so you can see where the elements are on the page.You can see the layout here, or view the screenshot below.Step 3 - Add Some Background ImagesSo our layout is looking ship shape. With the main elements positioned, it’s just a matter of going through and styling it all up, couldn’t be easierThe first thing we need are some images. You can make these yourself if you have the layered PSD’s, or just grab the download ZIP and you’ll find some I made earlier!Here’s a screenshot of me saving the first image – a large background JPG. I’m using this large background image to get that radial gradient highlight, then I’ll use a thin 1px slice to fill out the left and right sides so it extends off.Similarly we’ll create a background image for the footer to tile along as a border between it and the main area (you can find that image in theZI P file, it’s called background_footer.jpg). Now we’ll update the CSS file to remove that red border and add our new background images, as follows:view plaincopy to clipboardprint?1.@charset "UTF-8";2./* Background-Styles */3.4.body {5. margin:0px; padding:0px;6. background-color:#131211;7.}8.#main {9. background:#c4c0be url(images/background_light_slice.jpg) repeat-x;10.}11.#main .container {12. background-image:url(images/background_light.jpg);13. background-repeat:no-repeat;14. min-height:400px;15.}16.#footer {17. background-image:url(images/background_footer.jpg);18. background-repeat:repeat-x;19. color:white;20. padding:40px;21.}22..container {23. width:950px;24. margin:0 auto;25. position:relative;26.}Two things to note:1.There are multiple ways to set a background. In #main I’ve used a single selector whichsets three properties – colour, image, image repeat. But you can also set each propertyindividually as I’ve done in #main .container and #footer.2.Notice that because I want to apply the "background_light.jpg" image to the <divclass=’container’> which inside #main, but not to the one that is inside #footer, I’vewritten #main .container. In other words, apply it only to elements with theclass=’container’ that are inside elements with id=’main’.Step 4 - Testing in BrowsersSo far so good. Don’t forget to test in different browsers. Here you can see in IE7 it’s looking fine and dandy!Step 5 - Making a Transparent LogoNext I’ve created the logo element. Because later on we’ll be running an alternate colour scheme I’m going to use a transparent background PNG file. You can make these by switching off the background in Photoshop and then going to File > Save for Web and Devices and selecting PNG-24. You should be aware that PNG-24 produces pretty high file sizes. It’s OK for a small image like this, but for larger ones it can be big.(If anyone knows how to make compressed PNG files, leave a comment, because I’m pretty sure there is a way to do it, I just don’t kno w how!)Anyhow you can grab the transparent logo PNG here.Now we’ll add our logo and also a menu with this HTML:view plaincopy to clipboardprint?1.<!DOCTYPE html PUBLIC "-//W3C//DTD XHTML 1.0 Strict//EN" "/TR/xhtml1/DTD/xhtml1-strict.dtd">2.<html xmlns="http://www.w/1999/xhtml">3.<head>4. <meta http-equiv="Content-Type" content="text/html; charset=UTF-8" />5. <title>Creatif</title>6. <link href="step_2.css" rel="stylesheet" type="text/css" />7. <link rel="shortcut icon" href="images/favicon.ico" />8.</head>9.10.<body>11. <div id="main">12. <div class="container">13.14. <div id="header">15.16. <ul id="menu">17. <li><a href="">Portfolio</a></li>18. <li><a href="">Services</a></li>19. <li><a href="">About</a></li>20. <li><a href="">Testimonials</a></li>21. <li><a href="">Request a Quote</a></li>22. </ul>23.24. <div id="logo">25. <h1>Creatif</h1>26. <small>A Family of Rockstar WordPress Themes</small>27. </div>28.29. </div>30.31. <div id="block_feature">32.33. Featured Content34.35. </div>36.37. <div id="block_content">38.39. Content40.41. </div>42.43. </div>44. </div>45.46. <div id="footer">47. <div class="container">48.49. Footer Stuff Goes in Here50.51. </div>52. </div>53.</body>54.</html>and this extra CSS:view plaincopy to clipboardprint?1.2.#header {3. padding-top:20px;4.}5.#logo h1, #logo small {6. margin:0px;7. display:block;8. text-indent:-9999px;9.}10.#logo {11. background-image:url(images/logo.png);12. background-repeat:no-repeat;13. width:194px;14. height:83px;15.}16.ul#menu {17. margin:0px; padding:0px;18. position:absolute;19. rightright:0px;20.}21.ul#menu li {22. display:inline;23.}Some things to note:1.Rather than just placing the logo image in the HTML, we’ve created a <div id="logo"> andinside that placed a <h1> with the title. Then using CSS we’ve made the text vanish andswapped it for the logo image. This has some SEO benefits.2.I used to just set the text to display:hidden, but a kind commenter on a previous tutorialpointed out that this is a bad practice and it’s better to use text-indent. So as you can seeI *do* read my comments3.I’ve placed a very quick, unstyled menu using an unordered list. By setting the displayproperty to inline for the <li> elements, the list changes to a horizontal set of elements …yay!4.Finally because our <div class="container"> element has position:relative, we can nowuse absolute positioning inside and set right:0px for the menu and it will be aligned tothe right. This is great for a WordPress theme because as the person creates new pagesthe menu will extend, and this way it will stay right aligned.Step 6 - Fixing Transparency in IE6Now the one problem with transparent PNGs is that our friend Internet Explorer 6 doesn’t support them! Fortunately that’s relatively easily fixed thanks to this article I found –The Easiest Way to Fix PNG for IE6. We just download a script and add this line in our CSS:。