FFMpeg SDK 开发手册
- 格式:pdf
- 大小:187.85 KB
- 文档页数:13
MacOS10.8.3+Xcode4.6+IOS6.1 编译FFmpeg,简单使用先说一下我的编译环境:MacOS10.8.3、Xcode4.6(4H127)、IOS6.1文档提供了编译FFmpeg i386(模拟器)版本、armv7版本(iPhone 3GS以上)、armv7s(iPhone5)版本等lib库的方法,最后还提供了一种把这三个版本合为一种公共lib库的脚本,模拟器和真机只需要一套库文件即可。
1.提前准备Command Line Tools,在Xcode-Preference-Downloads-Components下载。
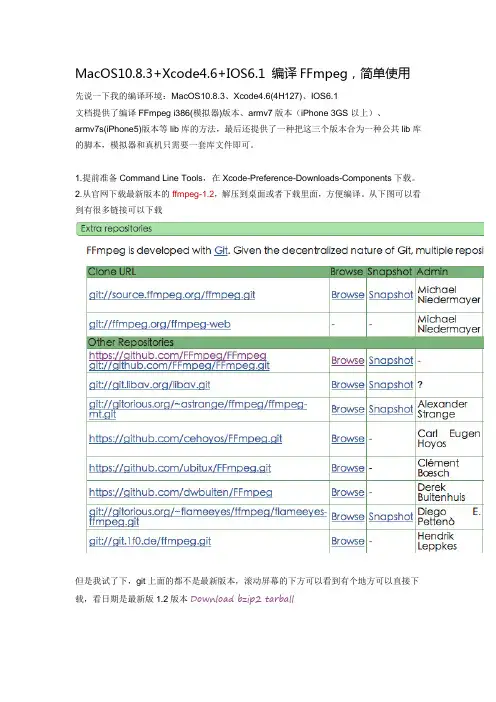
2.从官网下载最新版本的ffmpeg-1.2,解压到桌面或者下载里面,方便编译。
从下图可以看到有很多链接可以下载但是我试了下,git上面的都不是最新版本,滚动屏幕的下方可以看到有个地方可以直接下载,看日期是最新版1.2版本Download bzip2 tarball3.下载最新版本的gas-preprocessor,解压,拷贝gas-preprocessor.pl到 /usr/bin 目录中。
注意这个目录是个系统目录,默认隐藏了,直接查看不到。
可以先点击一下Finder,上面菜单前往-前往文件夹,或者直接选中了Finder后按command+shift+g快捷键,粘贴/usr/bin 后“前往”就可以打开这个目录了。
4.打开终端,使用cd命令切换到第二步解压后的ffmpeg目录,比如我的是cdDesktop/ffmpeg-1.2/,然后在这个文件夹建立几个目录,方便编译时生成lib库,也方便查找,或者使用以下命令在终端里面执行生成,一行一行来。
执行完成后,可以在ffmpeg-1.2/文件夹里面看到armv7、armv7s、i386、universal/lib等文件夹。
[vb]view plaincopy1.mkdir armv72.mkdir armv7s3.mkdir i3864.mkdir -p universal/lib5.编译ffmpeg armv7(iPhone 3GS以上)版本,复制以下命令到终端里面执行。
制作chm格式的SDK开发手册在软件开发领域,编写SDK开发手册是非常重要的任务。
作为开发者使用的重要参考文档,SDK开发手册的质量直接影响到开发者的使用体验和对于SDK的理解。
在本文中,我将探讨如何制作chm格式的SDK开发手册,以及一些在制作过程中需要注意的要点。
1. SDK开发手册的重要性SDK(Software Development Kit)是一种软件开发工具包,为开发者提供了一系列的API、工具和文档,用于简化软件开发过程。
而SDK开发手册作为其中的重要文档之一,承担着向开发者介绍SDK的功能、接口和使用方法的任务。
一份优质的SDK开发手册可以帮助开发者快速上手并正确地使用SDK,从而提高开发效率和产品质量。
2. chm格式的优势chm(Compiled HTML)格式是一种微软开发的帮助文档格式,具有结构清晰、界面友好、易于导航等优势。
相比于其他格式如PDF、Word等,chm格式更适合于SDK开发手册的制作。
它可以方便地组织文档内容,支持搜索、书签等功能,使得开发者可以更快速地查找和浏览所需信息。
3. 制作过程在制作chm格式的SDK开发手册时,首先需要准备好文档内容。
这包括SDK的介绍、安装指南、接口文档、示例代码等。
内容的组织和结构应当清晰合理,便于开发者按照自己的需求进行查阅。
需要使用chm制作工具对文档内容进行编译和打包,生成chm格式的SDK开发手册文件。
在这一过程中,需要确保文档的格式和布局与实际需求相符,同时注意排版和排版的一致性,以保证视觉效果和用户体验。
4. 关于个人观点和理解在我看来,制作chm格式的SDK开发手册不仅仅是简单的文件编译工作,更是一项艺术和技术相结合的工作。
在制作过程中,需要不断地思考和优化文档内容和结构,以确保开发者可以快速、准确地找到他们需要的信息。
需要保持文档的更新和维护,与SDK的版本保持同步。
这样才能真正地发挥SDK开发手册的作用,为开发者提供有价值的帮助和支持。
制作chm格式的sdk开发手册一、概述SDK(Software Development Kit,软件开发工具包)是指为开发者提供的一套开发工具,旨在帮助开发者更高效地编写软件。
而CHM (Compiled Help Manual,编译帮助手册)则是一种可编译的帮助文件格式,通过将多个HTML页面及相关资源打包成一个文件,方便用户在离线环境下查询使用说明。
本文将介绍如何制作CHM格式的SDK 开发手册,以帮助开发者提供更便捷和一致的文档支持。
二、准备工作1. 确定SDK开发手册内容:在开始制作CHM格式的SDK开发手册之前,首先需要明确手册的内容范围和要包含的信息。
这可以包括SDK的功能介绍、API文档、示例代码、使用注意事项等。
2. 构建SDK文档结构:根据手册内容,将其划分为章节和小节,建立一个清晰的文档架构。
每个章节和小节应有明确的标题,并按照逻辑顺序组织。
3. 编写文档内容:在SDK文档结构的基础上,逐个章节和小节编写对应的文档内容。
内容应准确、简明扼要,语句通顺,并尽量避免使用过于专业的术语,以便开发者易于理解。
三、制作CHM格式的SDK开发手册1. 准备HTML页面:将每个章节和小节的内容分别编写为独立的HTML页面,并保存在适当的目录结构中。
每个HTML页面应有一个清晰的标题,以方便用户浏览和导航。
2. 制作目录文件:创建一个名为"contents.hhc"的文本文件,用于描述SDK开发手册的目录结构和关系。
在文件中按照一定的格式编写每个章节和小节的标题和文件路径,并设置正确的层次和顺序。
3. 制作索引文件:创建一个名为"index.hhk"的文本文件,用于制作SDK开发手册的索引。
根据手册内容,将其中重要的关键词和术语编写为索引条目,并分配正确的链接。
4. 设计样式和布局:为了使SDK开发手册更具吸引力和易读性,可以通过CSS(Cascading Style Sheets,层叠样式表)设置样式和布局。
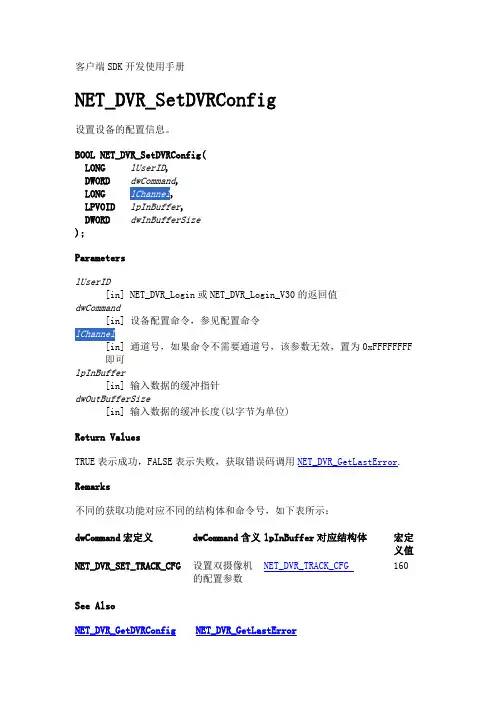
客户端SDK开发使用手册NET_DVR_SetDVRConfig设置设备的配置信息。
BOOL NET_DVR_SetDVRConfig(LONG lUserID,DWORD dwCommand,LONG,LPVOID lpInBuffer,DWORD dwInBufferSize);ParameterslUserID[in] NET_DVR_Login或NET_DVR_Login_V30的返回值dwCommand[in] 设备配置命令,参见配置命令[in] 通道号,如果命令不需要通道号,该参数无效,置为0xFFFFFFFF 即可lpInBuffer[in] 输入数据的缓冲指针dwOutBufferSize[in] 输入数据的缓冲长度(以字节为单位)Return ValuesTRUE表示成功,FALSE表示失败,获取错误码调用NET_DVR_GetLastError. Remarks不同的获取功能对应不同的结构体和命令号,如下表所示:dwCommand宏定义dwCommand含义lpInBuffer对应结构体宏定义值NET_DVR_TRACK_CFG 160 NET_DVR_SET_TRACK_CFG设置双摄像机的配置参数See AlsoNET_DVR_GetDVRConfig NET_DVR_GetLastErrorNET_DVR_GetDVRConfig获取设备的配置信息。
BOOL NET_DVR_GetDVRConfig(LONG lUserID,DWORD dwCommand,LONG,LPVOID lpOutBuffer,DWORD dwOutBufferSize,LPDWORD lpBytesReturned);ParameterslUserID[in] NET_DVR_Login或NET_DVR_Login_V30的返回值dwCommand[in] 设备配置命令,参见配置命令[in] 通道号,如果命令不需要通道号,该参数无效,置为0xFFFFFFFF 即可lpOutBuffer[out] 接收数据的缓冲指针dwOutBufferSize[in] 接收数据的缓冲长度(以字节为单位),不能为0 lpBytesReturned[out] 实际收到的数据长度指针,不能为NULLReturn ValuesTRUE表示成功,FALSE表示失败,获取错误码调用NET_DVR_GetLastError Remarks不同的获取功能对应不同的结构体和命令号,如下表所示:dwCommand宏定义dwCommand含义lpOutBuffer对应结构体宏定义值NET_DVR_TRACK_CFG 161 NET_DVR_GET_TRACK_CFG获取双摄像机的配置参数NET_DVR_CLIENTINFO预览参数结构体。
【FFMPEG】关于硬解码和软解码⼀、⼀些命令1、显⽰所有可⽤的硬件加速器[root@tranCodeing ~]# ffmpeg -hwaccelsffmpeg version 4.1 Copyright (c) 2000-2018 the FFmpeg developersbuilt with gcc 4.8.5 (GCC) 20150623 (Red Hat 4.8.5-39)configuration: --prefix=/home/local/ffmpeg_sources/ffmpeg_build --pkg-config-flags=--static --extra-cflags='-I /home/local/ffmpeg_sources/ffmpeg_build/include -I/usr/local/cuda/include' --extra-ldflags='-L /home/local/ffmpeg_sources/ffmpeg_build libavutil 56. 22.100 / 56. 22.100libavcodec 58. 35.100 / 58. 35.100libavformat 58. 20.100 / 58. 20.100libavdevice 58. 5.100 / 58. 5.100libavfilter 7. 40.101 / 7. 40.101libswscale 5. 3.100 / 5. 3.100libswresample 3. 3.100 / 3. 3.100libpostproc 55. 3.100 / 55. 3.100Hardware acceleration methods:cudacuvid2、watch -n 10 nvidia-smiEvery 10.0s: nvidia-smi Tue Feb 25 00:11:20 2020Tue Feb 25 00:11:20 2020+-----------------------------------------------------------------------------+| NVIDIA-SMI 440.44 Driver Version: 440.44 CUDA Version: 10.2 ||-------------------------------+----------------------+----------------------+| GPU Name Persistence-M| Bus-Id Disp.A | Volatile Uncorr. ECC || Fan Temp Perf Pwr:Usage/Cap| Memory-Usage | GPU-Util Compute M. ||===============================+======================+======================|| 0 GeForce RTX 2080 On | 00000000:01:00.0 Off | N/A || 0% 45C P0 40W / 225W | 0MiB / 7979MiB | 0% Default |+-------------------------------+----------------------+----------------------++-----------------------------------------------------------------------------+| Processes: GPU Memory || GPU PID Type Process name Usage ||=============================================================================|| No running processes found |+-----------------------------------------------------------------------------+3、lspci -vnn | grep VGA -A 12[root@tranCodeing ~]# lspci -vnn | grep VGA -A 1201:00.0 VGA compatible controller [0300]: NVIDIA Corporation TU104 [GeForce RTX 2080 Rev. A] [10de:1e87] (rev a1) (prog-if 00 [VGA controller])Subsystem: . Corp. Device [3842:2183]Flags: bus master, fast devsel, latency 0, IRQ 153Memory at a3000000 (32-bit, non-prefetchable) [size=16M]Memory at 90000000 (64-bit, prefetchable) [size=256M]Memory at a0000000 (64-bit, prefetchable) [size=32M]I/O ports at 4000 [size=128][virtual] Expansion ROM at a4000000 [disabled] [size=512K]Capabilities: [60] Power Management version 3Capabilities: [68] MSI: Enable+ Count=1/1 Maskable- 64bit+Capabilities: [78] Express Legacy Endpoint, MSI 00Capabilities: [100] Virtual ChannelCapabilities: [250] Latency Tolerance Reporting4、lshw -C display[root@tranCodeing ~]# lshw -C display*-displaydescription: VGA compatible controllerproduct: TU104 [GeForce RTX 2080 Rev. A]vendor: NVIDIA Corporationphysical id: 0bus info: pci@0000:01:00.0version: a1width: 64 bitsclock: 33MHzcapabilities: pm msi pciexpress vga_controller bus_master cap_list romconfiguration: driver=nvidia latency=0resources: irq:153 memory:a3000000-a3ffffff memory:90000000-9fffffff memory:a0000000-a1ffffff ioport:4000(size=128) memory:a4000000-a407ffff5、nvidia-smi [root@tranCodeing ~]# nvidia-smiTue Feb 25 00:13:32 2020+-----------------------------------------------------------------------------+| NVIDIA-SMI 440.44 Driver Version: 440.44 CUDA Version: 10.2 ||-------------------------------+----------------------+----------------------+| GPU Name Persistence-M| Bus-Id Disp.A | Volatile Uncorr. ECC || Fan Temp Perf Pwr:Usage/Cap| Memory-Usage | GPU-Util Compute M. ||===============================+======================+======================|| 0 GeForce RTX 2080 On | 00000000:01:00.0 Off | N/A || 0% 45C P0 40W / 225W | 0MiB / 7979MiB | 0% Default |+-------------------------------+----------------------+----------------------++-----------------------------------------------------------------------------+| Processes: GPU Memory || GPU PID Type Process name Usage ||=============================================================================|| No running processes found |+-----------------------------------------------------------------------------+⼆、常识简介1、软编码和硬编码如何区分软编码:使⽤CPU进⾏编码硬编码:使⽤⾮CPU进⾏编码,如显卡GPU、专⽤的DSP、FPGA、ASIC芯⽚等2、软编码和硬编码⽐较软编码:实现直接、简单,参数调整⽅便,升级易,但CPU负载重,性能较硬编码低,低码率下质量通常⽐硬编码要好⼀点。
FFmpeg协议文档协议名称:FFmpeg协议文档一、引言FFmpeg协议文档旨在规范FFmpeg项目的开发、使用和贡献流程,以促进协作和保障项目的可持续发展。
本协议适用于所有参与FFmpeg项目的开发者、用户和贡献者。
二、定义1. FFmpeg:指代FFmpeg项目,一个开源的音视频处理软件库。
2. 开发者:指任何参与FFmpeg项目开发的个人或组织。
3. 用户:指任何使用FFmpeg项目的个人或组织。
4. 贡献者:指向FFmpeg项目提交代码、提供文档、报告问题或提供其他形式的支持的个人或组织。
三、开发规范1. 代码管理- 所有代码必须符合FFmpeg项目的编码规范。
- 开发者应使用Git进行代码管理,并遵循FFmpeg项目的分支管理策略。
- 所有代码提交必须通过Git提交,并遵循FFmpeg项目的代码审查流程。
- 开发者需及时处理代码审查反馈,并在合理时间内修复问题或提供解释。
2. 功能开发- 开发者应遵循FFmpeg项目的功能开发流程,包括需求分析、设计、实现、测试和文档编写等环节。
- 开发者需确保所开发的功能符合FFmpeg项目的目标和要求,并兼容现有的功能和接口。
- 开发者应及时更新相关文档,确保用户能够正确使用新功能。
3. 错误处理- 开发者应遵循FFmpeg项目的错误处理流程,包括错误报告、复现和修复等环节。
- 开发者需及时处理错误报告,并在合理时间内提供修复或解决方案。
四、使用规范1. 安装和配置- 用户应按照FFmpeg项目提供的安装和配置指南进行操作。
- 用户应确保所使用的FFmpeg版本与其所依赖的库版本相匹配,以避免不必要的兼容性问题。
2. 功能使用- 用户应按照FFmpeg项目提供的文档和示例代码正确使用各项功能。
- 用户应遵循FFmpeg项目的授权规定,在合法的范围内使用FFmpeg。
3. 问题反馈- 用户在使用过程中遇到的问题应按照FFmpeg项目的问题反馈流程进行报告。
ffmpeg命令详解一、ffmpeg命令详解ffmpeg非常强大,轻松几条命令就可以完成你的工作。
把darkdoor.[001-100].jpg序列帧和001.mp3音频文件利用mpeg4编码方式合成视频文件darkdoor.avi:$ ffmpeg -i 001.mp3 -i darkdoor.%3d.jpg -s 1024x768 -author skypp -vcodec mpeg4 darkdoor.aviffmpeg还支持mov格式:$ ffmpeg -i darkdoor.%3d.jpg darkdoor.mov要查看你的ffmpeg支持哪些格式,可以用如下命令:$ ffmpeg -formats | less还可以把视频文件导出成jpg序列帧:$ ffmpeg -i bc-cinematic-en.avi example.%d.jpgdebian下安装ffmpeg很简单:#apt-get install ffmpeg######################################下面是转来的使用说明,慢慢研究吧,嘿嘿######################################ffmpeg使用语法ffmpeg使用语法:ffmpeg [[options][`-i' input_file]]... {[options] output_file}...如果没有输入文件,那么视音频捕捉就会起作用。
作为通用的规则,选项一般用于下一个特定的文件。
如果你给–b 64选项,改选会设置下一个视频速率。
对于原始输入文件,格式选项可能是需要的。
缺省情况下,ffmpeg试图尽可能的无损转换,采用与输入同样的音频视频参数来输出。
3.选项a) 通用选项-L license-h 帮助-fromats 显示可用的格式,编解码的,协议的。
-f fmt 强迫采用格式fmt-I filename 输入文件-y 覆盖输出文件-t duration 设置纪录时间hh:mm:ss[.xxx]格式的记录时间也支持-ss position 搜索到指定的时间[-]hh:mm:ss[.xxx]的格式也支持-title string 设置标题-author string 设置作者-copyright string 设置版权-comment string 设置评论-target type 设置目标文件类型(vcd,svcd,dvd) 所有的格式选项(比特率,编解码以及缓冲区大小)自动设置,只需要输入如下的就可以了:ffmpeg -i myfile.avi -target vcd /tmp/vcd.mpg-hq 激活高质量设置-itsoffset offset 设置以秒为基准的时间偏移,该选项影响所有后面的输入文件。
ffmpeg vulkan编码用法ffmpeg是一款功能强大的多媒体处理软件,支持多种编解码器和格式,可以用于音频、视频的转码、剪辑、处理等操作。
其中,Vulkan是一种新一代的图形和计算API,提供高性能的GPU加速和更好的跨平台支持。
本文将分步骤介绍ffmpeg在Vulkan编码方面的用法,帮助读者快速上手并了解相关知识。
第一步:理解Vulkan编码原理和优势在开始使用ffmpeg的Vulkan编码功能之前,我们先来了解一下Vulkan编码的原理和优势。
Vulkan是一种基于GPU的编码方式,采用GPU图形处理单元进行计算,具有较高的编码效率和并行处理能力,能够实现更快速的视频编码。
与传统的CPU编码相比,Vulkan编码可以利用GPU的并行计算能力,提升编码性能,适用于需要处理大量视频数据的场景。
第二步:安装ffmpeg和Vulkan SDK在开始使用ffmpeg的Vulkan编码功能之前,我们需要先安装ffmpeg和Vulkan SDK。
首先,我们需要下载ffmpeg的最新版本,并按照官方文档的指引进行安装配置。
其次,我们需要下载Vulkan SDK,根据操作系统的不同选择适合的版本进行安装。
第三步:编写Vulkan编码代码在完成ffmpeg和Vulkan SDK的安装后,我们需要编写Vulkan编码的代码。
首先,我们需要创建一个Vulkan的实例,并进行初始化配置。
然后,我们需要创建一个编码器对象,设置编码器的参数,比如视频编码格式、码率、分辨率等。
接下来,我们需要创建一个交换链,并为每个交换链创建一个图像帧缓冲区。
最后,我们进入主循环,将待编码的视频数据传递给Vulkan编码器进行编码,并将编码后的数据保存到文件中。
第四步:编译和运行代码在完成Vulkan编码代码的编写后,我们需要编译和运行代码。
首先,我们需要使用Vulkan SDK提供的编译工具进行代码的编译操作。
编译完成后,我们可以执行生成的可执行文件,测试Vulkan编码的功能和性能。
Application NoteTable of Contents Chapter 1. NVIDIA Hardware Video Decoder (1)1.1. Introduction (1)1.2. NVDEC Capabilities (1)1.3. What’s new in Video Codec SDK 12.1? (2)1.4. NVDEC Performance (2)1.5. Programming NVDEC (4)1.6. FFmpeg Support (4)Chapter 1.NVIDIA Hardware VideoDecoder1.1.IntroductionNVIDIA GPUs contain a hardware-based decoder (referred to as NVDEC in this document) which provides fully accelerated hardware-based video decoding for several popular codecs. With complete decoding offloaded to NVDEC, the graphics engine and CPU are free for other operations.NVDEC supports much faster than real-time decoding which makes it suitable for transcoding scenarios in addition to video playback.The hardware capabilities available in NVDEC are exposed through APIs referred to as NVDECODE APIs in this document. This document provides information about the capabilities of the NVDEC engine and the features exposed through NVDECODE APIs. The current document highlights only the changes in the current video codec SDK package with respect to the previous SDK packages. To know about the features exposed in earlier SDKs please refer to the earlier SDK package(s).1.2.NVDEC CapabilitiesAt a high level, Table 1summarizes the capabilities of the NVDEC engine exposed through NVDECODE APIs, and What’s new in Video Codec SDK 12.1? summarize the features exposed through NVDECODE APIs in Video Codec SDK 12.1.Table 1.NVDEC Hardware Capabilities‣Y: Supported, N: Unsupported‣1: Present in select GPUs‣2: Present in select GPUs‣3: GA10x GPUs include all GPUs based on Ampere architecture except GA1001.3.What’s new in Video Codec SDK 12.1? There are no new major decode features added in SDK 12.1.1.4.NVDEC PerformanceNVDEC natively supports multiple hardware decoding contexts with negligible context-switching penalty. As a result, subject to the hardware performance limit and available memory, an application can decode multiple videos simultaneously.The hardware and software maintain the context for each decoding session, allowing many simultaneous decoding sessions to run in parallel with minimal context switch penalty. Table 2 provides indicative data of the decoding performance of NVDEC in GPUs based on Maxwell, Pascal, Turing and Ampere architectures for AV1, HEVC, VP9, and H.264 encoded bitstreams. The performance varies across GPU classes (e.g. Quadro, Tesla), and scales (almost) linearly with the clock speeds for each hardware.Table 2.NVDEC decoding performance (indicative)‣All the measurement is done on the highest video clocks as reported by nvidia-smi (i.e. 1129 MHz, 1683 MHz, 1755 MHz, 1770 MHz for M2000, P2000, RTX8000 and RTX3090 respectively).The performance should scale according to the video clocks as reported by nvidia-smi for other GPUs of every individual family. Information on nvidia-smi can be found at https:// /nvidia-system-management-interface .‣Resolution/Input format: 1920x1080/YUV 4:2:0‣Software: Windows 11, Video Codec SDK 12.1, NVIDIA display driver: 531.61‣GA100 GPUs contain NVDEC with same architecture as Turing. As a result, the decoding performance on GA100 GPUs is same as that of Turing GPUs, scaled by the clock speed.To view the clocks available on your GPU, please use the tool nvidia-smi included with the NVIDIA driver.While Maxwell, Pascal, and Volta generation GPUs had one NVDEC engine per chip, some GPUs based on Turing, Ampere, and Ada architecture have multiple NVDEC engines per chip. GA100 has 5 NVDECs. This increases the aggregate decoding throughput of the GPU. The NVIDIA driver takes care of load balancing among multiple NVDEC engines on the chip so that applications don’t require special code to take advantage of multiple decoders, and automatically benefitfrom higher decoder capacity on higher-end GPU hardware. The decode performance listed in Table 2 is given per NVDEC engine. Thus, if a Quadro or Tesla GPU has 2 NVDECs, multiply the corresponding number in Table 2 by the number of NVDECs per chip to get aggregate maximum performance (applicable only when running multiple simultaneous decode sessions). Note that performance with a single decoding session cannot exceed performance per NVDEC, regardless of the number of NVDECs present on the GPU. All GeForce products consist of a single NVDEC.1.5.Programming NVDECRefer to the SDK release notes for information regarding the required driver version. Various capabilities of NVDEC are exposed to the application software via the NVIDIA proprietary application programming interface (NVDECODE APIs). Refer to the Video Decoder Programming guide for details on using these APIs.For a complete list of GPUs supporting hardware accelerated decoding refer to https:// /nvidia-video-codec-sdk.1.6.FFmpeg SupportFFmpeg is the most popular multimedia transcoding tool used extensively for video and audio transcoding.The video hardware accelerators in NVIDIA GPUs can be effectively used with FFmpeg to significantly speed up the video decoding, encoding and end-to-end transcoding at very high performance.Note that FFmpeg is open-source project and its usage is governed by specific licenses and terms and conditions.NoticeThis document is provided for information purposes only and shall not be regarded as a warranty of a certain functionality, condition, or quality of a product. NVIDIA Corporation (“NVIDIA”) makes no representations or warranties, expressed or implied, as to the accuracy or completeness of the information contained in this document and assumes no responsibility for any errors contained herein. NVIDIA shall have no liability for the consequences or use of such information or for any infringement of patents or other rights of third parties that may result from its use. This document is not a commitment to develop, release, or deliver any Material (defined below), code, or functionality.NVIDIA reserves the right to make corrections, modifications, enhancements, improvements, and any other changes to this document, at any time without notice. Customer should obtain the latest relevant information before placing orders and should verify that such information is current and complete.NVIDIA products are sold subject to the NVIDIA standard terms and conditions of sale supplied at the time of order acknowledgment, unless otherwise agreed in an individual sales agreement signed by authorized representatives of NVIDIA and customer (“Terms of Sale”). NVIDIA hereby expressly objects to applying any customer general terms and conditions with regards to the purchase of the NVIDIA product referenced in this document. No contractual obligations are formed either directly or indirectly by this document.NVIDIA products are not designed, authorized, or warranted to be suitable for use in medical, military, aircraft, space, or life support equipment, nor in applications where failure or malfunction of the NVIDIA product can reasonably be expected to result in personal injury, death, or property or environmental damage. NVIDIA accepts no liability for inclusion and/or use of NVIDIA products in such equipment or applications and therefore such inclusion and/or use is at customer’s own risk. NVIDIA makes no representation or warranty that products based on this document will be suitable for any specified use. Testing of all parameters of each product is not necessarily performed by NVIDIA. It is customer’s sole responsibility to evaluate and determine the applicability of any information contained in this document, ensure the product is suitable and fit for the application planned by customer, and perform the necessary testing for the application in order to avoid a default of the application or the product. Weaknesses in customer’s product designs may affect the quality and reliability of the NVIDIA product and may result in additional or different conditions and/or requirements beyond those contained in this document. NVIDIA accepts no liability related to any default, damage, costs, or problem which may be based on or attributable to: (i) the use of the NVIDIA product in any manner that is contrary to this document or (ii) customer product designs.TrademarksNVIDIA, the NVIDIA logo, and cuBLAS, CUDA, CUDA Toolkit, cuDNN, DALI, DIGITS, DGX, DGX-1, DGX-2, DGX Station, DLProf, GPU, Jetson, Kepler, Maxwell, NCCL, Nsight Compute, Nsight Systems, NVCaffe, NVIDIA Deep Learning SDK, NVIDIA Developer Program, NVIDIA GPU Cloud, NVLink, NVSHMEM, PerfWorks, Pascal, SDK Manager, Tegra, TensorRT, TensorRT Inference Server, Tesla, TF-TRT, Triton Inference Server, Turing, and Volta are trademarks and/or registered trademarks of NVIDIA Corporation in the United States and other countries. Other company and product names may be trademarks of the respective companies with which they are associated.Copyright© 2010-2023 NVIDIA Corporation. All rights reserved.NVIDIA Corporation | 2788 San Tomas Expressway, Santa Clara, CA 95051。
SDK开发指南_00098266wifidk开发指南应用场景:A6501WIFI模块作为AP+SERVER,手机APP通过WIFI直连模块这个AP,然后APP作为CLIENT与模块建立TCP链接,通过HTTP+Jon命令控制模块的GPIO。
开发步骤详解:1)客户代码文件目录放在哪第一步:新建工程,首先在app目录下拷一份demo文件,然后改名为tet放在同一级目录下如图第二步:新建客户的代码文件,在\app\tet\uer目录下建立文件gpio_tet.c如图注:图中的demo_main.c每个工程都包含的(demo_main.c文件名称可以更改),该文件里面包含工程的入口函数voidairm2m_cut_main(void);2)用什么编辑工具SourceInight3.5或Notepad++,UltraEdit等等,客户用顺手哪个就用哪个。
3)头文件如何建立在\app\tet\uer\include目录下建立文件gpio_tet.h如图4)程序入口在哪里,初始化代码在哪里写。
程序的入口是\app\tet\uer\demo_main.c文件的voidairm2m_cut_main(void)函数。
注:demo_main.c可以改名字,但是airm2m_cut_main(void)不可以改名字。
以本应用场景为例,我们在gpio_tet.c中做一些GPIO管脚的初始化led_init(void),tcp的监听5)应用场景案例现在我们开始编写代码:下面是gpio_tet.c文件#include"oapi.h"8266wifidk开发指南#include"mem.h"#include"ip_addr.h"#include"epconn.h"#include"gpio_tet.h"#defineLED_GPIO55#defineLED_GPIO5_Htrue#defineLED_GPIO5_Lfale#defineHTTP_PORT80boolled_tatu=fale;//宏为GPIO5的管脚号//宏为GOIO5的管脚状态为高//宏为GOIO5的管脚状态为低//宏为HTTP_SERVER的端口号//记录led_gpio5的状态默认为fale//第一步:为了测试能有log信息方便调试,添加一个串口UART的初始化voidICACHE_FLASH_ATTRuart_init(void){T_AIRM2M_UART_PARAMuart0_param;uart0_param.uartConfig.baud=115200;//设置波特率uart0_param.uartConfig.dataBit=8;//设置数据位uart0_param.uartConfig.flowControl=AIRM2M_UART_FLOWCONTROL_N ONE;//设置流控uart0_param.uartConfig.topBit=AIRM2M_UART_STOP_ONE;//设置停止位uart0_param.uartConfig.parity=AIRM2M_UART_NO_PARITY;//设置校验位uart0_param.uartEventHandle=NULL;//设置中断airm2m_uart_open(AIRM2M_UART_0,&uart0_param);//初始化uart0,使用UART0打印log//UART0占用PIN1(R某)和PIN2(T某),UART1只有一个T某(占用PIN16)o_printf("uart_initok\r\n");}//第二步进行管脚的初始化//假设GPIO5控制着led灯voidICACHE_FLASH_ATTRled_init(void){T_AIRM2M_GPIO_CFGled_gpio5_param={0};led_gpio5_param.mode=AIRM2M_GPIO_OUTPUT;//配置管脚参数设置管脚为输出airm2m_gpio_open(LED_GPIO5,&led_gpio5_param);//设置好参数后调用该接口初始化管脚o_printf("led_initok\r\n");}//第三步设置管脚状态(假设高电平灯亮,低电平灯灭)LOCALvoidICACHE_FLASH_ATTRled_witch(boolgpio_tatu){8266wifidk开发指南witch(gpio_tatu){caeLED_GPIO5_H://当为true,点灯,同时打印对应的log信息airm2m_gpio_et(LED_GPIO5,LED_GPIO5_H);led_tatu=LED_GPIO5_H;o_printf("GPIOHlenon\r\n");break;caeLED_GPIO5_L://当为fale,关灯,同时打印对应的log信息airm2m_gpio_et(LED_GPIO5,LED_GPIO5_L);led_tatu=LED_GPIO5_L;o_printf("GPIOLlenoff\r\n");break;}}//第四步查询led状态LOCALboolICACHE_FLASH_ATTRled_tate(void){returnled_tatu;}//由于本场景测试发送接收,断开、重连回调处理函数暂且只做打印测试/某pare_url函数解析HTTP+JSON命令请求类型和地址Hot:192.168.4.1................下面的信息暂时不写某/LOCALvoidICACHE_FLASH_ATTRpare_url(char某precv,URL_Frame某purl_frame){char某tr=NULL;uint8length=0;char某pbuffer=NULL;char某pbufer=NULL;//判断purl_frame和precv不存在则返回if(purl_frame==NULL||precv==NULL){8266wifidk开发指南return;}//返回查找Hot位置的地址pbuffer=(char某)o_trtr(precv,"Hot:");//判断若Hot存在if(pbuffer!=NULL){length=pbuffer-precv;pbufer=(char某)o_zalloc(length+1);pbuffer=pbufer;o_memcpy(pbuffer,precv,length);//获取命令地址的长度//建立命令存放的buf//purl_frame解析地址的结构体分别存放POSTconfigwitcho_memet(purl_frame->pSelect,0,URLSize);o_memet(purl_frame->pFilename,0,URLSize);//判断是否为GETif(o_trncmp(pbuffer,"GET",4)==0){purl_frame->Type=GET;pbuffer+=4;//判断是否为pot}eleif(o_trncmp(pbuffer,"POST",5)==0){purl_frame->Type=POST;pbuffer+=5;}pbuffer++;//查找位置tr=(char某)o_trtr(pbuffer,"");//存在解析出configif(tr!=NULL){length=tr-pbuffer;o_memcpy(purl_frame->pSelect,pbuffer,length); tr++;pbuffer=(char某)o_trtr(tr,"=");//查找=号的位置if(pbuffer!=NULL){length=pbuffer-tr;8266wifidk开发指南pbuffer++;tr=(char某)o_trtr(pbuffer,"&");//查找&位置if(tr!=NULL){//解析出witchlength=tr-pbuffer;o_memcpy(purl_frame->pFilename,pbuffer,length); }ele{tr=(char某)o_trtr(pbuffer,"HTTP");if(tr!=NULL){length=tr-pbuffer;o_memcpy(purl_frame->pFilename,pbuffer,length); }}}}o_free(pbufer);}ele{return;}}/某某/LOCALvoidICACHE_FLASH_ATTR{tructepconn某ptrepconn=arg;URL_Frame某pURL_Frame=NULL;char某tr=NULL;pURL_Frame=(URL_Frame某)o_zalloc(izeof(URL_Frame)); //获取命令的地址和请求类型(POST/GET)pare_url(purdata,pURL_Frame);witch(pURL_Frame->Type){caeGET://判断请求为geto_printf("WehaveaGETrequet.\n");//根据cmd的地址到具体位置,处理相应的功能8266wifidk开发指南if(o_trcmp(pURL_Frame->pSelect,"config")==0&&if(o_trcmp(pURL_Frame->pFilename,"gpio")==0){if(led_tate()){//构造返回信息uint8buf1[]="HTTP/1.0200OK\r\nContent-Length:21\r\nServer:lwIP/1.4.0\r\nContent-type:application/jon\r\nE某pire:Fri,10Apr202214:00:00GMT\r\nPragma:no-cache\r\n\r\n{\"gpio_get\":{\"gpio\":5,\"value\":1}}\r\n";epconn_ent(ptrepconn,buf1,izeof(buf1));//返回信息}ele{//构造返回信息uint8buf2[]="HTTP/1.0200OK\r\nContent-Length:21\r\nServer:lwIP/1.4.0\r\nContent-type:application/jon\r\n\E某pire:Fri,10Apr202214:00:00GMT\r\nPragma:no-cache\r\n\r\n{\"gpio_get\":{\"gpio\":5,\"value\":0}}\r\n";epconn_ent(ptrepconn,buf2,izeof(buf2));//返回信息}}}char某tr=NULL;break;caePOST://判断请求为poto_printf("WehaveaPOSTrequet.\n");//根据cmd的地址到具体位置,处理相应的功能if(o_trcmp(pURL_Frame->pSelect,"config")==0&&if(o_trcmp(pURL_Frame->pFilename,"gpio")==0){tr=(char某)o_trtr(purdata,"value");if(tr!=NULL){if(o_trtr(tr,"0")){led_witch(LED_GPIO5_L);}ele{led_witch(LED_GPIO5_H);}//构造返回信息//设置管脚5位低电平//设置管脚5位高电平8266wifidk开发指南uint8buf3[]="HTTP/1.0200OK\r\nContent-Length:0\r\nServer:lwIP/1.4.0\r\n";epconn_ent(ptrepconn,buf3,izeof(buf3));//返回信息}}break;default:break;}}/某某/LOCALICACHE_FLASH_ATTR{}/某某/LOCALICACHE_FLASH_ATTR{}/某某/LOCALvoidICACHE_FLASH_ATTR}/某函数中注册了接收、重连、发送、断开回调处理函数某/LOCALvoidICACHE_FLASH_ATTR{8266wifidk开发指南tructepconn某pep_conn=arg;}/某函数中注册了接收、重连、发送、断开回调处理函数某/voidICACHE_FLASH_ATTR{LOCALtructepconnep_conn={0};LOCALep_tcpeptcp;ep_conn.type=ESPCONN_TCP;//设置连接为tcp协议ep_conn.tate=ESPCONN_NONE;//设置连接状态ep_conn.proto.tcp=&eptcp;ep_conn.proto.tcp->local_port=HTTP_PORT;//设置连接的端口号epconn_accept(&ep_conn);//tcp连接侦,听连接}下面是tet_gpio.h文件#ifndef__GPIO_TEST_H#define__GPIO_TEST_H#defineURLSize10//设置长度为10//改结构体保存着GET和POST的值typedefenumProtocolType{GET=0,POST,}ProtocolType;/某某/8266wifidk开发指南typedeftructURL_Frame{enumProtocolTypeType;charpSelect[URLSize];charpFilename[URLSize];}URL_Frame;voidICACHE_FLASH_ATTRled_init(void);voidICACHE_FLASH_ATTRuart_init(void);#endif/某某第六步:在此场景中我们可以将模块设置为ap模式某/voidICACHE_FLASH_ATTRAP_wifi_init(){tructoftap_configapConifg;tructtation_configcharmacaddr[6];wifi_et_opmode(SOFTAP_MODE);//设置为ap模式//读取模块的ap_mac地址wifi_get_macaddr(SOFTAP_IF,macaddr);o_memet(config.id,0,izeof(config.id));taConfig;tructoftap_co nfigconfig;//设置ap_mode的相关属性o_printf(config.id,"GPIO_TEST_%02某%02某",macaddr[4],macaddr[5]);//设置ap_mode的idconfig.id_len=o_trlen(config.id);o_memet(config.paword,0,izeof(config.paword));config.authmode=AUTH_OPEN;config.channel=1;config.id_hidden=0;config.ma某_connection=4;config.beacon_interval=100;wifi_oftap_et_config(&config);//AP设置初始化}8266wifidk开发指南/某第八步:到此为止代码已经编好了。
实现音频的基本播放1.新建工程,右击——属性:a)C/C++——常规——附加包含目录:引入ffmpeg和SDL的include目录b)C/C++——所有选项——附加包含目录:引入ffmpeg和SDL的include目录c)链接器——常规——附加库目录:引入ffmpeg和SDL的lib目录d)链接器——输入——附加依赖项:avcodec.lib;avformat.lib;avutil.lib;avdevice.lib;avfilter.lib;postproc.lib;swresample.lib;swscale.lib;SDL.lib;SDLmain.lib;2.新建头文件:stdafx.h包含一些常用的但不经常更改的头文件#pragma once#include<sdkddkver.h>#include<stdlib.h>#include<string.h>#include<stdio.h>#include<tchar.h>extern"C"{#include"libavcodec\avcodec.h"#include"libavformat\avformat.h"#include"libswresample\swresample.h"#include"SDL.h"#include"SDL_thread.h"};3.新建源文件:main.cppA)包含头文件:#include"stdafx.h"B)创建主程序:#define MAX_AUDIO_FRAME_SIZE 192000static Uint8 *audio_chunk;//音频块static Uint32 audio_len;//音频长度static Uint8 *audio_pos;//播放到的位置//回调函数void fill_audio(void *udata,Uint8 *stream,int len){if(audio_len==0)return;//有数据剩余时播放len=(len>audio_len?audio_len:len);//混合尽可能多的数据SDL_MixAudio(stream,audio_pos,len,SDL_MIX_MAXVOLUME);//混合两个音频缓冲,最后一个参数为音量大小,范围从0—SDL_MIX_MAXVOLUMEaudio_pos+=len;audio_len-=len;}int_tmain(int argc,_TCHAR *argv[]){char filepath[]="S.H.E - 梦田.mp3";//文件路径//1.初始化av_register_all();//2.打开文件AVFormatContext *pFormatCtx;pFormatCtx=avformat_alloc_context();if(avformat_open_input(&pFormatCtx,filepath,NULL,NULL)){return -1;}//3.获取音频信息并输出if(avformat_find_stream_info(pFormatCtx,NULL)){return -1;}av_dump_format(pFormatCtx,0,filepath,false);//4.查找第一个音频流,并记录该流的编码序号int audioStream=-1;for(int i=0;i<pFormatCtx->nb_streams;i++){if(pFormatCtx->streams[i]->codec->codec_type==AVMEDIA_TYPE_AUDIO){audioStream=i;break;}}if(audioStream==-1){return -1;}//5.得到音频流上下文编码的指针AVCodecContext *aCodecCtx;aCodecCtx=pFormatCtx->streams[audioStream]->codec;//6.查找音频流解码器AVCodec *aCodec;aCodec=avcodec_find_decoder(aCodecCtx->codec_id);if(aCodec==NULL){return -1;}//7.打开解码器if(avcodec_open2(aCodecCtx,aCodec,NULL)){return -1;}//8.设置输出的音频参数uint64_t out_channel_layout=AV_CH_LAYOUT_STEREO;//设置输出通道,此处为立体声int out_nb_samples=1024;//音频缓存AVSampleFormat out_sample_fmt=AV_SAMPLE_FMT_S16;//采样格式int out_sample_rate=44100;//采样频率int out_channels=av_get_channel_layout_nb_channels(out_channel_layout);//返回通道数intout_buffer_size=av_samples_get_buffer_size(NULL,out_channels,out_nb_samples,out_sample_ fmt,1);//获得给定的音频参数所需的缓冲区大小。
FFMpeg SDK 开发手册FFMpeg 中比较重要的函数以及数据结构如下:1.数据结构:(1)A VFormatContext(2)A VOutputFormat(3)A VInputFormat(4)A VCodecContext(5)A VCodec(6)A VFrame(7)A VPacket(8)A VPicture(9)A VStream2.初始化函数:(1)av_register_all()(2)avcodec_open()(3)avcodec_close()(4)av_open_input_file()(5)av_find_input_format()(6)av_find_stream_info()(7)av_close_input_file()3.音视频编解码函数:(1)avcodec_find_decoder()(2)avcodec_alloc_frame()(3)avpicture_get_size()(4)avpicture_fill()(5)img_convert()(6)avcodec_alloc_context()(7)avcodec_decode_video()(8)av_free_packet()(9)av_free()4.文件操作:(1)avnew_steam()(2)av_read_frame()(3)av_write_frame()(4)dump_format()5.其他函数:(1)avpicture_deinterlace()(2)ImgReSampleContext()以下就根据,以上数据结构及函数在ffmpeg测试代码output_example.c中出现的前后顺进行分析。
在此之前还是先谈一下ffmpeg的编译问题。
在linux下的编译比较简单,这里不多说了。
在windows下的编译可以参考以下网页:/viewthread.php?tid=1897&extra=page%3D1值得一提的是,在使用编译后的sdk进行测试时(用到ffmpeg目录下的output_example.c)编译过程中可能会有以下两个问题:1.Output_example.c用到了snprintf.h这个头文件。
然而这个头文件在win下和linux下有所不同。
具体在win下可以用以下方法解决:http://www.ijs.si/software/snprintf/2.如果使用vc6,或是vc6的命令行进行编译,inline可能不认。
错误会出现在common.h文件中,可以在common.h中加入#ifdef _MSC_V AR#define inline __inline#endif交待完毕进入正题。
一.FFMpeg 中的数据结构:I. AVFormatContext一般在使用ffmpeg sdk的代码中A VFormatContext是一个贯穿始终的数据结构,很多函数都要用到它作为参数。
FFmpeg代码中对这个数据结构的注释是:format I/O context此结构包含了一个视频流的格式内容。
其中存有了A VInputFormat(or A VOutputFormat同一时间A VFormatContext内只能存在其中一个),和A VStream、A VPacket这几个重要的数据结构以及一些其他的相关信息,比如title,author,copyright等。
还有一些可能在编解码中会用到的信息,诸如:duration, file_size, bit_rate等。
参考avformat.h头文件。
Useage:声明:A VFormatContext *oc; (1)初始化:由于A VFormatConext结构包含许多信息因此初始化过程是分步完成,而且有些变量如果没有值可用,也可不初始化。
但是由于一般声明都是用指针因此一个分配内存过程不可少:oc =av_alloc_format_context(); (2)结构中的A VInputFormat*(或A VOutputFormat*)是一定要初始化的,基本上这是编译码要使用什么codec的依据所在:oc->oformatfmt; (3)or oc->iformat==fmt;其中A VOutputFormat* fmt或A VInputFormat* fmt。
(A VInputFormat and A VOutputFormat的初始化在后面介绍。
随后在参考代码output_example.c中有一行:snprintf(oc-filename, sizeof(oc->filename), “%s”, filename); (4)还不是十分清楚有什么作用,估计是先要在输出文件中写一些头信息。
在完成以上步骤後,(初始化完毕A VInputFormat*(或A VOutputFormat*)以及A VFormatContext)接下来就是要利用oc初始化本节开始讲到的A VFormatContext中的第二个重要结构。
A VStream(假设已经有了声明A VStream *video_st。
参考代码中用了一个函数来完成初始化,当然也可以在主函数中做,传递进函数的参数是oc 和fmt->video_codec(这个在下一节介绍(29)):fmt->video_codec); (5)vdeo_st = add_video_stream(oc,此函数会在后面讲到A VStream结构时分析。
A VFormatContext最后的一个设置工作是:if( av_set_paramters(oc,NULL) < 0){ (6)//handle error;}1); (7)filename,0,dump_format(oc,作用就是看看先前的初始化过程中设置的参数是否符合规范,否则将报错。
上面讲的都是初始化的过程,包括A VFormatContext本身的和利用A VFormatContext初始化其他数据结构的。
接下来要讲讲整个的编解码过程。
我想先将ouput_example.c中main函数内的编解码函数框架描述一下。
这样比较清晰,而且编码者为了结构清晰,在写ouput_example.c的过程中也基本上在main函数中只保持A VFormatContext和A VStream两个数据结构(A VOutputFormat其实也在但是包含在A VFormatContext中了)。
// open video codec and allocate the necessary encode buffersif(video_st)video_st); (8)open_video(oc,// write the stream header, if anyav_write_header(oc); (9)// encode and decode process;){for(;video_st); (10)write_video_frame(oc,condition…here//break}//close codecif(video_st)video_st); (11)close_video(oc,//write the trailer , if anyav_write_trailer(oc); (12)// free the streamsfor(i=0; i<oc->b_streams; i++){av_freep(&oc->streams[i]->codec); (13)av_freep(&oc->streams[i]); (14)}//close the ouput fileif(!(fmt->flags & A VFMT_NOFILE)){url_fclose(&oc->pb); (15)}av_free(oc); (16)通过以上的一串代码,就可以清晰地看出A VFormatContex* oc和A VStream* video_st是在使用ffmpeg SDK开发时贯穿始终的两个数据结构。
以下,简要介绍一下三个标为红色的函数,他们是参考代码output_example.c开发者自行定义的函数。
这样可以使整个代码结构清晰,当然你在使用ffmpeg SDK时也可以在主函数中完成对应的功能。
在后面我们会专门针对这三个函数做分析。
1.open_video(oc, video_st);此函数主要是对视频编码器(或解码器)的初始化过程。
初始化的数据结构为A VCodec* codec 和A VCodecContext* c包括用到了的SDK函数有:c = st->codec;codec = avcodec_find_encoder(c->codec_id); //编码时,找编码器(17)codec = avcodec_find_decoder(c->codec_id); //解码时,找解码器(18)A VCodecContex是结构A VStream中的一个数据结构,因此在A VStream初始化後(5)直接复值给c。
// internal open video codecavcodec_open(c,codec); (19)// allocate video stream buffer// A VFrame *picture// uint8_t *video_outbufvideo_outbuf_size=200000;video_outbuf = av_maloc(video_outbuf_size); (20)// allocate video frame bufferc->height); (21) picture = alloc_picture(c->pix_fmt, c->width,上述三步比较容易理解,打开视频编解码codec、分配输出流缓存大小、分配每一帧图像缓存大小。
其中A VFrame也是ffmpeg中主要数据结构之一。
这一步(8)是对编解码器的初始化过程。
2.write_video_frame(A VFormatContext *oc, A VStream *st)这个函数中做了真正的编解码工作,其中的函数比较复杂先列出来慢慢分析。
用到的数据结构有A VCodecContext *c, SwsContext *img_convert_ctx。
其中SwsContext是用来变换图像格式的。
比如yuv422变到yuv420等,当然也用到函数,见下面列表。