Python小游戏程序锦集
- 格式:doc
- 大小:198.50 KB
- 文档页数:48
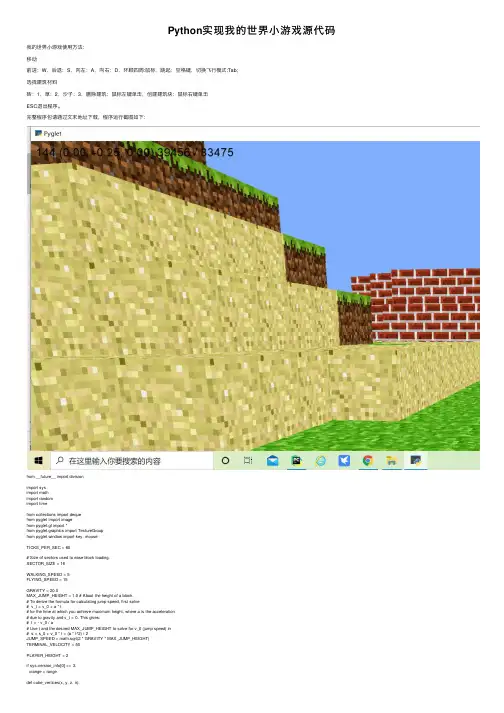
Python实现我的世界⼩游戏源代码我的世界⼩游戏使⽤⽅法:移动前进:W,后退:S,向左:A,向右:D,环顾四周:⿏标,跳起:空格键,切换飞⾏模式:Tab;选择建筑材料砖:1,草:2,沙⼦:3,删除建筑:⿏标左键单击,创建建筑块:⿏标右键单击ESC退出程序。
完整程序包请通过⽂末地址下载,程序运⾏截图如下:from __future__ import divisionimport sysimport mathimport randomimport timefrom collections import dequefrom pyglet import imagefrom pyglet.gl import *from pyglet.graphics import TextureGroupfrom pyglet.window import key, mouseTICKS_PER_SEC = 60# Size of sectors used to ease block loading.SECTOR_SIZE = 16WALKING_SPEED = 5FLYING_SPEED = 15GRAVITY = 20.0MAX_JUMP_HEIGHT = 1.0 # About the height of a block.# To derive the formula for calculating jump speed, first solve# v_t = v_0 + a * t# for the time at which you achieve maximum height, where a is the acceleration# due to gravity and v_t = 0. This gives:# t = - v_0 / a# Use t and the desired MAX_JUMP_HEIGHT to solve for v_0 (jump speed) in# s = s_0 + v_0 * t + (a * t^2) / 2JUMP_SPEED = math.sqrt(2 * GRAVITY * MAX_JUMP_HEIGHT)TERMINAL_VELOCITY = 50PLAYER_HEIGHT = 2if sys.version_info[0] >= 3:xrange = range""" Return the vertices of the cube at position x, y, z with size 2*n."""return [x-n,y+n,z-n, x-n,y+n,z+n, x+n,y+n,z+n, x+n,y+n,z-n, # topx-n,y-n,z-n, x+n,y-n,z-n, x+n,y-n,z+n, x-n,y-n,z+n, # bottomx-n,y-n,z-n, x-n,y-n,z+n, x-n,y+n,z+n, x-n,y+n,z-n, # leftx+n,y-n,z+n, x+n,y-n,z-n, x+n,y+n,z-n, x+n,y+n,z+n, # rightx-n,y-n,z+n, x+n,y-n,z+n, x+n,y+n,z+n, x-n,y+n,z+n, # frontx+n,y-n,z-n, x-n,y-n,z-n, x-n,y+n,z-n, x+n,y+n,z-n, # back]def tex_coord(x, y, n=4):""" Return the bounding vertices of the texture square."""m = 1.0 / ndx = x * mdy = y * mreturn dx, dy, dx + m, dy, dx + m, dy + m, dx, dy + mdef tex_coords(top, bottom, side):""" Return a list of the texture squares for the top, bottom and side."""top = tex_coord(*top)bottom = tex_coord(*bottom)side = tex_coord(*side)result = []result.extend(top)result.extend(bottom)result.extend(side * 4)return resultTEXTURE_PATH = 'texture.png'GRASS = tex_coords((1, 0), (0, 1), (0, 0))SAND = tex_coords((1, 1), (1, 1), (1, 1))BRICK = tex_coords((2, 0), (2, 0), (2, 0))STONE = tex_coords((2, 1), (2, 1), (2, 1))FACES = [( 0, 1, 0),( 0,-1, 0),(-1, 0, 0),( 1, 0, 0),( 0, 0, 1),( 0, 0,-1),]def normalize(position):""" Accepts `position` of arbitrary precision and returns the blockcontaining that position.Parameters----------position : tuple of len 3Returns-------block_position : tuple of ints of len 3"""x, y, z = positionx, y, z = (int(round(x)), int(round(y)), int(round(z)))return (x, y, z)def sectorize(position):""" Returns a tuple representing the sector for the given `position`.Parameters----------position : tuple of len 3Returns-------sector : tuple of len 3"""x, y, z = normalize(position)x, y, z = x // SECTOR_SIZE, y // SECTOR_SIZE, z // SECTOR_SIZE return (x, 0, z)class Model(object):def __init__(self):# A Batch is a collection of vertex lists for batched rendering.self.batch = pyglet.graphics.Batch()# A TextureGroup manages an OpenGL texture.self.group = TextureGroup(image.load(TEXTURE_PATH).get_texture()) # A mapping from position to the texture of the block at that position. # This defines all the blocks that are currently in the world.self.world = {}# Same mapping as `world` but only contains blocks that are shown. self.shown = {}# Mapping from position to a pyglet `VertextList` for all shown blocks. self._shown = {}# Mapping from sector to a list of positions inside that sector.self.sectors = {}# Simple function queue implementation. The queue is populated with # _show_block() and _hide_block() callsself.queue = deque()self._initialize()def _initialize(self):""" Initialize the world by placing all the blocks.for x in xrange(-n, n + 1, s):for z in xrange(-n, n + 1, s):# create a layer stone an grass everywhere.self.add_block((x, y - 2, z), GRASS, immediate=False)self.add_block((x, y - 3, z), STONE, immediate=False)if x in (-n, n) or z in (-n, n):# create outer walls.for dy in xrange(-2, 3):self.add_block((x, y + dy, z), STONE, immediate=False)# generate the hills randomlyo = n - 10for _ in xrange(120):a = random.randint(-o, o) # x position of the hillb = random.randint(-o, o) # z position of the hillc = -1 # base of the hillh = random.randint(1, 6) # height of the hills = random.randint(4, 8) # 2 * s is the side length of the hilld = 1 # how quickly to taper off the hillst = random.choice([GRASS, SAND, BRICK])for y in xrange(c, c + h):for x in xrange(a - s, a + s + 1):for z in xrange(b - s, b + s + 1):if (x - a) ** 2 + (z - b) ** 2 > (s + 1) ** 2:continueif (x - 0) ** 2 + (z - 0) ** 2 < 5 ** 2:continueself.add_block((x, y, z), t, immediate=False)s -= d # decrement side lenth so hills taper offdef hit_test(self, position, vector, max_distance=8):""" Line of sight search from current position. If a block isintersected it is returned, along with the block previously in the lineof sight. If no block is found, return None, None.Parameters----------position : tuple of len 3The (x, y, z) position to check visibility from.vector : tuple of len 3The line of sight vector.max_distance : intHow many blocks away to search for a hit."""m = 8x, y, z = positiondx, dy, dz = vectorprevious = Nonefor _ in xrange(max_distance * m):key = normalize((x, y, z))if key != previous and key in self.world:return key, previousprevious = keyx, y, z = x + dx / m, y + dy / m, z + dz / mreturn None, Nonedef exposed(self, position):""" Returns False is given `position` is surrounded on all 6 sides byblocks, True otherwise."""x, y, z = positionfor dx, dy, dz in FACES:if (x + dx, y + dy, z + dz) not in self.world:return Truereturn Falsedef add_block(self, position, texture, immediate=True):""" Add a block with the given `texture` and `position` to the world.Parameters----------position : tuple of len 3The (x, y, z) position of the block to add.texture : list of len 3The coordinates of the texture squares. Use `tex_coords()` togenerate.immediate : boolWhether or not to draw the block immediately."""if position in self.world:self.remove_block(position, immediate)self.world[position] = textureself.sectors.setdefault(sectorize(position), []).append(position)if immediate:if self.exposed(position):self.show_block(position)self.check_neighbors(position)def remove_block(self, position, immediate=True):""" Remove the block at the given `position`.Parameters----------position : tuple of len 3The (x, y, z) position of the block to remove.immediate : boolWhether or not to immediately remove block from canvas."""del self.world[position]self.sectors[sectorize(position)].remove(position)if immediate:if position in self.shown:self.hide_block(position)self.check_neighbors(position)def check_neighbors(self, position):""" Check all blocks surrounding `position` and ensure their visualstate is current. This means hiding blocks that are not exposed and ensuring that all exposed blocks are shown. Usually used after a block is added or removed."""x, y, z = positionfor dx, dy, dz in FACES:key = (x + dx, y + dy, z + dz)self.show_block(key)else:if key in self.shown:self.hide_block(key)def show_block(self, position, immediate=True):""" Show the block at the given `position`. This method assumes the block has already been added with add_block()Parameters----------position : tuple of len 3The (x, y, z) position of the block to show.immediate : boolWhether or not to show the block immediately."""texture = self.world[position]self.shown[position] = textureif immediate:self._show_block(position, texture)else:self._enqueue(self._show_block, position, texture)def _show_block(self, position, texture):""" Private implementation of the `show_block()` method.Parameters----------position : tuple of len 3The (x, y, z) position of the block to show.texture : list of len 3The coordinates of the texture squares. Use `tex_coords()` togenerate."""x, y, z = positionvertex_data = cube_vertices(x, y, z, 0.5)texture_data = list(texture)# create vertex list# FIXME Maybe `add_indexed()` should be used insteadself._shown[position] = self.batch.add(24, GL_QUADS, self.group, ('v3f/static', vertex_data),('t2f/static', texture_data))def hide_block(self, position, immediate=True):""" Hide the block at the given `position`. Hiding does not remove the block from the world.Parameters----------position : tuple of len 3The (x, y, z) position of the block to hide.immediate : boolWhether or not to immediately remove the block from the canvas. """self.shown.pop(position)if immediate:self._hide_block(position)else:self._enqueue(self._hide_block, position)def _hide_block(self, position):""" Private implementation of the 'hide_block()` method."""self._shown.pop(position).delete()def show_sector(self, sector):""" Ensure all blocks in the given sector that should be shown aredrawn to the canvas."""for position in self.sectors.get(sector, []):if position not in self.shown and self.exposed(position):self.show_block(position, False)def hide_sector(self, sector):""" Ensure all blocks in the given sector that should be hidden are removed from the canvas."""for position in self.sectors.get(sector, []):if position in self.shown:self.hide_block(position, False)def change_sectors(self, before, after):""" Move from sector `before` to sector `after`. A sector is acontiguous x, y sub-region of world. Sectors are used to speed up world rendering."""before_set = set()after_set = set()pad = 4for dx in xrange(-pad, pad + 1):for dy in [0]: # xrange(-pad, pad + 1):for dz in xrange(-pad, pad + 1):if dx ** 2 + dy ** 2 + dz ** 2 > (pad + 1) ** 2:continueif before:x, y, z = beforebefore_set.add((x + dx, y + dy, z + dz))if after:x, y, z = afterafter_set.add((x + dx, y + dy, z + dz))show = after_set - before_sethide = before_set - after_setfor sector in show:self.show_sector(sector)for sector in hide:self.hide_sector(sector)def _enqueue(self, func, *args):""" Add `func` to the internal queue."""self.queue.append((func, args))""" Pop the top function from the internal queue and call it."""func, args = self.queue.popleft()func(*args)def process_queue(self):""" Process the entire queue while taking periodic breaks. This allowsthe game loop to run smoothly. The queue contains calls to_show_block() and _hide_block() so this method should be called ifadd_block() or remove_block() was called with immediate=False"""start = time.perf_counter()while self.queue and time.time()- start < 1.0 / TICKS_PER_SEC:self._dequeue()def process_entire_queue(self):""" Process the entire queue with no breaks."""while self.queue:self._dequeue()class Window(pyglet.window.Window):def __init__(self, *args, **kwargs):super(Window, self).__init__(*args, **kwargs)# Whether or not the window exclusively captures the mouse.self.exclusive = False# When flying gravity has no effect and speed is increased.self.flying = False# Strafing is moving lateral to the direction you are facing,# e.g. moving to the left or right while continuing to face forward.## First element is -1 when moving forward, 1 when moving back, and 0 # otherwise. The second element is -1 when moving left, 1 when moving # right, and 0 otherwise.self.strafe = [0, 0]# Current (x, y, z) position in the world, specified with floats. Note# that, perhaps unlike in math class, the y-axis is the vertical axis.self.position = (0, 0, 0)# First element is rotation of the player in the x-z plane (ground# plane) measured from the z-axis down. The second is the rotation# angle from the ground plane up. Rotation is in degrees.## The vertical plane rotation ranges from -90 (looking straight down) to # 90 (looking straight up). The horizontal rotation range is unbounded.self.rotation = (0, 0)# Which sector the player is currently in.self.sector = None# The crosshairs at the center of the screen.self.reticle = None# Velocity in the y (upward) direction.self.dy = 0# A list of blocks the player can place. Hit num keys to cycle.self.inventory = [BRICK, GRASS, SAND]# The current block the user can place. Hit num keys to cycle.self.block = self.inventory[0]# Convenience list of num keys.self.num_keys = [key._1, key._2, key._3, key._4, key._5,key._6, key._7, key._8, key._9, key._0]# Instance of the model that handles the world.self.model = Model()# The label that is displayed in the top left of the canvas.bel = bel('', font_name='Arial', font_size=18,x=10, y=self.height - 10, anchor_x='left', anchor_y='top',color=(0, 0, 0, 255))# This call schedules the `update()` method to be called# TICKS_PER_SEC. This is the main game event loop.pyglet.clock.schedule_interval(self.update, 1.0 / TICKS_PER_SEC)def set_exclusive_mouse(self, exclusive):""" If `exclusive` is True, the game will capture the mouse, if Falsethe game will ignore the mouse."""super(Window, self).set_exclusive_mouse(exclusive)self.exclusive = exclusivedef get_sight_vector(self):""" Returns the current line of sight vector indicating the directionthe player is looking."""x, y = self.rotation# y ranges from -90 to 90, or -pi/2 to pi/2, so m ranges from 0 to 1 and # is 1 when looking ahead parallel to the ground and 0 when looking# straight up or down.m = math.cos(math.radians(y))# dy ranges from -1 to 1 and is -1 when looking straight down and 1 when # looking straight up.dy = math.sin(math.radians(y))dx = math.cos(math.radians(x - 90)) * mdz = math.sin(math.radians(x - 90)) * mreturn (dx, dy, dz)def get_motion_vector(self):""" Returns the current motion vector indicating the velocity of theplayer.Returns-------vector : tuple of len 3Tuple containing the velocity in x, y, and z respectively.if any(self.strafe):x, y = self.rotationstrafe = math.degrees(math.atan2(*self.strafe))y_angle = math.radians(y)x_angle = math.radians(x + strafe)if self.flying:m = math.cos(y_angle)dy = math.sin(y_angle)if self.strafe[1]:# Moving left or right.dy = 0.0m = 1if self.strafe[0] > 0:# Moving backwards.dy *= -1# When you are flying up or down, you have less left and right# motion.dx = math.cos(x_angle) * mdz = math.sin(x_angle) * melse:dy = 0.0dx = math.cos(x_angle)dz = math.sin(x_angle)else:dy = 0.0dx = 0.0dz = 0.0return (dx, dy, dz)def update(self, dt):""" This method is scheduled to be called repeatedly by the pygletclock.Parameters----------dt : floatThe change in time since the last call."""self.model.process_queue()sector = sectorize(self.position)if sector != self.sector:self.model.change_sectors(self.sector, sector)if self.sector is None:self.model.process_entire_queue()self.sector = sectorm = 8dt = min(dt, 0.2)for _ in xrange(m):self._update(dt / m)def _update(self, dt):""" Private implementation of the `update()` method. This is where most of the motion logic lives, along with gravity and collision detection.Parameters----------dt : floatThe change in time since the last call."""# walkingspeed = FLYING_SPEED if self.flying else WALKING_SPEEDd = dt * speed # distance covered this tick.dx, dy, dz = self.get_motion_vector()# New position in space, before accounting for gravity.dx, dy, dz = dx * d, dy * d, dz * d# gravityif not self.flying:# Update your vertical speed: if you are falling, speed up until you# hit terminal velocity; if you are jumping, slow down until you# start falling.self.dy -= dt * GRAVITYself.dy = max(self.dy, -TERMINAL_VELOCITY)dy += self.dy * dt# collisionsx, y, z = self.positionx, y, z = self.collide((x + dx, y + dy, z + dz), PLAYER_HEIGHT)self.position = (x, y, z)def collide(self, position, height):""" Checks to see if the player at the given `position` and `height`is colliding with any blocks in the world.Parameters----------position : tuple of len 3The (x, y, z) position to check for collisions at.height : int or floatThe height of the player.Returns-------position : tuple of len 3The new position of the player taking into account collisions."""# How much overlap with a dimension of a surrounding block you need to # have to count as a collision. If 0, touching terrain at all counts as# a collision. If .49, you sink into the ground, as if walking through# tall grass. If >= .5, you'll fall through the ground.pad = 0.25p = list(position)np = normalize(position)for face in FACES: # check all surrounding blocksfor i in xrange(3): # check each dimension independentlyif not face[i]:continue# How much overlap you have with this dimension.d = (p[i] - np[i]) * face[i]if d < pad:continuefor dy in xrange(height): # check each heightop = list(np)op[1] -= dyop[i] += face[i]if tuple(op) not in self.model.world:continuep[i] -= (d - pad) * face[i]if face == (0, -1, 0) or face == (0, 1, 0):# You are colliding with the ground or ceiling, so stopbreakreturn tuple(p)def on_mouse_press(self, x, y, button, modifiers):""" Called when a mouse button is pressed. See pyglet docs for button amd modifier mappings.Parameters----------x, y : intThe coordinates of the mouse click. Always center of the screen if the mouse is captured.button : intNumber representing mouse button that was clicked. 1 = left button, 4 = right button.modifiers : intNumber representing any modifying keys that were pressed when the mouse button was clicked."""if self.exclusive:vector = self.get_sight_vector()block, previous = self.model.hit_test(self.position, vector)if (button == mouse.RIGHT) or \((button == mouse.LEFT) and (modifiers & key.MOD_CTRL)):# ON OSX, control + left click = right click.if previous:self.model.add_block(previous, self.block)elif button == pyglet.window.mouse.LEFT and block:texture = self.model.world[block]if texture != STONE:self.model.remove_block(block)else:self.set_exclusive_mouse(True)def on_mouse_motion(self, x, y, dx, dy):""" Called when the player moves the mouse.Parameters----------x, y : intThe coordinates of the mouse click. Always center of the screen if the mouse is captured.dx, dy : floatThe movement of the mouse."""if self.exclusive:m = 0.15x, y = self.rotationx, y = x + dx * m, y + dy * my = max(-90, min(90, y))self.rotation = (x, y)def on_key_press(self, symbol, modifiers):""" Called when the player presses a key. See pyglet docs for keymappings.Parameters----------symbol : intNumber representing the key that was pressed.modifiers : intNumber representing any modifying keys that were pressed."""if symbol == key.W:self.strafe[0] -= 1elif symbol == key.S:self.strafe[0] += 1elif symbol == key.A:self.strafe[1] -= 1elif symbol == key.D:self.strafe[1] += 1elif symbol == key.SPACE:if self.dy == 0:self.dy = JUMP_SPEEDelif symbol == key.ESCAPE:self.set_exclusive_mouse(False)elif symbol == key.TAB:self.flying = not self.flyingelif symbol in self.num_keys:index = (symbol - self.num_keys[0]) % len(self.inventory)self.block = self.inventory[index]def on_key_release(self, symbol, modifiers):""" Called when the player releases a key. See pyglet docs for keymappings.Parameters----------symbol : intNumber representing the key that was pressed.modifiers : intNumber representing any modifying keys that were pressed."""if symbol == key.W:self.strafe[0] += 1elif symbol == key.S:self.strafe[0] -= 1elif symbol == key.A:self.strafe[1] += 1elif symbol == key.D:self.strafe[1] -= 1def on_resize(self, width, height):""" Called when the window is resized to a new `width` and `height`."""# labelbel.y = height - 10# reticleif self.reticle:self.reticle.delete()x, y = self.width // 2, self.height // 2n = 10self.reticle = pyglet.graphics.vertex_list(4,('v2i', (x - n, y, x + n, y, x, y - n, x, y + n)))"""width, height = self.get_size()glDisable(GL_DEPTH_TEST)viewport = self.get_viewport_size()glViewport(0, 0, max(1, viewport[0]), max(1, viewport[1]))glMatrixMode(GL_PROJECTION)glLoadIdentity()glOrtho(0, max(1, width), 0, max(1, height), -1, 1)glMatrixMode(GL_MODELVIEW)glLoadIdentity()def set_3d(self):""" Configure OpenGL to draw in 3d."""width, height = self.get_size()glEnable(GL_DEPTH_TEST)viewport = self.get_viewport_size()glViewport(0, 0, max(1, viewport[0]), max(1, viewport[1]))glMatrixMode(GL_PROJECTION)glLoadIdentity()gluPerspective(65.0, width / float(height), 0.1, 60.0)glMatrixMode(GL_MODELVIEW)glLoadIdentity()x, y = self.rotationglRotatef(x, 0, 1, 0)glRotatef(-y, math.cos(math.radians(x)), 0, math.sin(math.radians(x)))x, y, z = self.positionglTranslatef(-x, -y, -z)def on_draw(self):""" Called by pyglet to draw the canvas."""self.clear()self.set_3d()glColor3d(1, 1, 1)self.model.batch.draw()self.draw_focused_block()self.set_2d()self.draw_label()self.draw_reticle()def draw_focused_block(self):""" Draw black edges around the block that is currently under thecrosshairs."""vector = self.get_sight_vector()block = self.model.hit_test(self.position, vector)[0]if block:x, y, z = blockvertex_data = cube_vertices(x, y, z, 0.51)glColor3d(0, 0, 0)glPolygonMode(GL_FRONT_AND_BACK, GL_LINE)pyglet.graphics.draw(24, GL_QUADS, ('v3f/static', vertex_data))glPolygonMode(GL_FRONT_AND_BACK, GL_FILL)def draw_label(self):""" Draw the label in the top left of the screen."""x, y, z = self.positionbel.text = '%02d (%.2f, %.2f, %.2f) %d / %d' % (pyglet.clock.get_fps(), x, y, z,len(self.model._shown), len(self.model.world))bel.draw()def draw_reticle(self):""" Draw the crosshairs in the center of the screen."""glColor3d(0, 0, 0)self.reticle.draw(GL_LINES)def setup_fog():""" Configure the OpenGL fog properties."""# Enable fog. Fog "blends a fog color with each rasterized pixel fragment's# post-texturing color."glEnable(GL_FOG)# Set the fog color.glFogfv(GL_FOG_COLOR, (GLfloat * 4)(0.5, 0.69, 1.0, 1))# Say we have no preference between rendering speed and quality.glHint(GL_FOG_HINT, GL_DONT_CARE)# Specify the equation used to compute the blending factor.glFogi(GL_FOG_MODE, GL_LINEAR)# How close and far away fog starts and ends. The closer the start and end,# the denser the fog in the fog range.glFogf(GL_FOG_START, 20.0)glFogf(GL_FOG_END, 60.0)def setup():""" Basic OpenGL configuration."""# Set the color of "clear", i.e. the sky, in rgba.glClearColor(0.5, 0.69, 1.0, 1)# Enable culling (not rendering) of back-facing facets -- facets that aren't# visible to you.glEnable(GL_CULL_FACE)# Set the texture minification/magnification function to GL_NEAREST (nearest# in Manhattan distance) to the specified texture coordinates. GL_NEAREST# "is generally faster than GL_LINEAR, but it can produce textured 图⽚# with sharper edges because the transition between texture elements is not# as smooth."glTexParameteri(GL_TEXTURE_2D, GL_TEXTURE_MIN_FILTER, GL_NEAREST) glTexParameteri(GL_TEXTURE_2D, GL_TEXTURE_MAG_FILTER, GL_NEAREST) setup_fog()def main():window = Window(width=1800, height=1600, caption='Pyglet', resizable=True)# Hide the mouse cursor and prevent the mouse from leaving the window.window.set_exclusive_mouse(True)setup()pyglet.app.run()if __name__ == '__main__':main()我的世界⼩游戏python源代码包下载地址:提取码: rya9到此这篇关于Python实现我的世界⼩游戏源代码的⽂章就介绍到这了,更多相关Python⼩游戏源代码内容请搜索以前的⽂章或继续浏览下⾯的相关⽂章希望⼤家以后多多⽀持!。
基于python实现井字棋⼩游戏本⽂为⼤家分享了python实现井字棋⼩游戏,供⼤家参考,具体内容如下周五晚上上了python的选修课,本来以为⽼师是从python的基础语法开始的,没想到是从turtle画图开始,正好补上了我以前⼀些不懂的地⽅,有⼈讲⼀下还是⽐啃书好⼀点。
之前从图书馆借了⼀本python游戏编程,看了前⾯⼏章后就没怎么看了,晚上突然想看看,然后跟着教程写个游戏的。
最后就有了这个井字棋的诞⽣,其实代码并不是很长,主要是思路,需要考虑的周全⼀点。
代码写完后就和电脑下了好久的井字棋,⼀局都没赢,真的是很⽆奈了,⽐不过⽐不过。
开发环境:windows10 + pycharm(因为下棋时候需要输⼊,sublime不知道怎么弄输⼊,所以就⽤了pycharm)需要⽤到的包也只有⼀个:random游戏的话⾸先要弄清楚的是游戏的流程,⾸先做什么然后做什么。
因为井字棋相对来说不算是⼀个复杂的游戏,所以流程就不多讲了,我⾸先做的是画棋盘、电脑和玩家的棋⼦、谁先落⼦等,下⾯通过代码来解释:# 画棋盘的函数,传⼊⼀个放置棋⼦的列表def drawBoard(board) :print(" " + board[7] + " | " + board[8] + " | " + board[9])print("------------")print(" " + board[4] + " | " + board[5] + " | " + board[6])print("------------")print(" " + board[1] + " | " + board[2] + " | " + board[3])# 玩家选择所想⽤的棋⼦种类def inputPlayerLetter() :letter = ''while not (letter == 'X' or letter == 'O') :print("Do you want to be X or O")# ⾃动将⼩写转化为⼤写letter = input().upper()# 如果玩家选择的X,则⾃动将O赋给电脑,反之⼀样if letter == 'X' :return ['X','O']else :return ['O','X']# 这⾥随机⽣成0或者1来表⽰谁先落⼦def whoGoesFirst() :if random.randint(0,1) == 0 :return 'computer'else :return 'player'# 如果玩家选择y或者Y则游戏重新开始def playAgain():print("Do you want to play again?(yes or no)")return input().lower().startswith('y')# 将棋⼦放置到棋盘上⾯# board参数是储存棋⼦的列表# letter参数是棋⼦的类型# move是选择将棋⼦放在哪def makeMove(board, letter, move) :board[move] = letter# 根据井字棋规则判断是否获胜def isWinner(bo, le) :return ((bo[7] == le and bo[8] == le and bo[9] == le) or(bo[4] == le and bo[5] == le and bo[6] == le) or(bo[1] == le and bo[2] == le and bo[3] == le) or(bo[7] == le and bo[4] == le and bo[1] == le) or(bo[8] == le and bo[5] == le and bo[2] == le) or(bo[9] == le and bo[6] == le and bo[3] == le) or(bo[7] == le and bo[5] == le and bo[3] == le) or(bo[9] == le and bo[5] == le and bo[1] == le))# 将已经在棋盘上的棋⼦备份,随时更新def getBoardCopy(board) :dupeBoard = []for i in board :dupeBoard.append(i)return dupeBoard# 判断棋盘是否还有可落⼦的地⽅def isSpaceFree(board, move) :return board[move] == ' '# 获取玩家落⼦的位置def getPlayerMove(board) :move = ' '# 判断落⼦的位置是否正确以及棋盘是否还能落⼦while move not in '1 2 3 4 5 6 7 8 9'.split() or not isSpaceFree(board, int(move)) :print("What is your next move?(1-9)")move = input()return int(move)# 找到可以落⼦的地⽅,主要是计算机使⽤的def chooseRandomMoveFromList(board, moveList) :possibleMoves = []for i in moveList :if isSpaceFree(board, i) :possibleMoves.append(i)if len(possibleMoves) != 0 :return random.choice(possibleMoves)else :return None上述代码实现了部分简单的功能,然后是实现计算机的落⼦部分,毕竟是计算机,得看着不那么傻,所以下⾯相当于是⼀个⼩⼩的AI,电脑能在备份的副本上判断,根据判断的结果来指定落⼦的位置:# 电脑落⼦def getComputerMove(board, computerLetter) :# 给出棋盘上电脑和玩家棋⼦的类型if computerLetter == 'X' :playerLetter = 'O'else :playerLetter = 'X'for i in range(1,10) :# 在备份的棋盘中判断是否有可以落⼦的地⽅copy = getBoardCopy(board)if isSpaceFree(copy, i) :# 如果有可以落⼦的地⽅,则先在备份的棋盘上落⼦makeMove(copy, computerLetter, i)# 落⼦后判断电脑是否能赢,并且返回能赢的落⼦的位置if isWinner(copy, computerLetter) :return ifor i in range(1,10) :copy = getBoardCopy(board)if isSpaceFree(copy, i) :# 在备份的棋盘上模拟玩家落⼦makeMove(copy, playerLetter, i)# 如果下⼀次玩家落⼦就可以赢,返回玩家落⼦的位置,⽤于堵住玩家if isWinner(copy, playerLetter) :return i# 随机在四个⾓处落⼦move = chooseRandomMoveFromList(board,[1,3,7,9])if move != None :return move# 如果⾓处已被占满,则落⼦在中间位置5处if isSpaceFree(board, 5) :return 5# 如果⾓和中间都被占满,则随机选择边上落⼦return chooseRandomMoveFromList(board,[2,4,6,8]) # 判断棋盘是否已满def isBoardFull(board) :for i in range(1,10) :if isSpaceFree(board, i) :return Falsereturn Trueprint("Welcome to Tictactoe ")while True :# 初始化棋盘为空theBoard = [' '] * 10# 玩家和电脑棋⼦类型的选择playerLetter, computerLetter = inputPlayerLetter()# 先后顺序的决定turn = whoGoesFirst()print('The ' + turn + ' will go first')# 游戏开始的标志位,当游戏结束时变成FalsegameIsPlaying = Truewhile gameIsPlaying :# 玩家先⾏if turn == 'player' :drawBoard(theBoard)# 获取玩家下棋的位置move = getPlayerMove(theBoard)# 将玩家的棋⼦传⼊列表相应的位置makeMove(theBoard, playerLetter, move)# 如果玩家获胜,标志位变为Falseif isWinner(theBoard, playerLetter) :drawBoard(theBoard)print("You win !")gameIsPlaying = False# 否则则判断棋盘是否已满else :if isBoardFull(theBoard) :drawBoard(theBoard)print("Tie")break# 若棋盘未满,且玩家已落⼦,则下⼀次落到计算机落⼦ else :turn = 'computer'# 电脑先⾏else :# 电脑随机选择位置落⼦move = getComputerMove(theBoard, computerLetter) makeMove(theBoard, computerLetter, move)# 如果电脑落⼦获胜,则游戏结束if isWinner(theBoard, computerLetter) :drawBoard(theBoard)print("You lose !")gameIsPlaying = Falseelse :if isBoardFull(theBoard) :drawBoard(theBoard)print("Tie")breakelse :turn = 'player'# 玩家没有再次开始游戏,则跳出循环if not playAgain():break上述所有代码实现了井字棋的⼈机对战,整合起来就可以玩了,反正我是没有下赢过的。
python实现连连看游戏编程⼀直是在课余时间,放假时间⾃学,到现在为⽌也有半年了。
这是我⾃⼰⽤python实现的连连看,也是第⼀个完成的游戏,虽然极其简陋。
思路呢,⼀开始是想要从⼀个点出发开始寻路,遇到数字就换⼀条路,直到找到第⼆个点,但是这样就得做到不断寻路且不能和重复之前⾛过的路径,这就有点让我犯难了,想了很久也没想出解决办法,后来去⽹上参考了⼤神们的想法:输⼊的两个坐标(x1,y1)(x2,y2),分别寻找两个点周围的空⽩点,空⽩点的坐标保存在数组a1,a2中,如果a1,a2有重合的点,那么就说明可以⽤⼀条直线连接。
如果没有重合的点,那就以其中⼀个数组a1中的点为坐标,继续寻找该坐标周围的空⽩点,保存为另⼀个数组a3,之后⽐较a2和a3,如果有重合的,就说明可以⽤两条直线连接,否则两个点不能连接。
然后再把两个坐标相邻的情况考虑进去就差不多了。
import randomimport math#建⼀个随机列表,作为地图的元素list1 = []for i in range(0,50):r = random.randint(0,9)list1.append(r)list1.append(r)random.shuffle(list1) #打乱#建地图map1 = []map2 = []list2 = []for i in range(0,10):map1 += [0]for i in range(0,100,10):k = int(i/10)map2 = list1[i:i+10]map1[k] = map2for i in range(0,10):list2.append("")map1.insert(0,list2)map1.append(list2)for i in range(0,12):map1[i].insert(0,"")map1[i].append("")#map1为10*10的地图,序号从1~10,最外⾯⼀圈是""r =l =u =d =1go1 = 1go2 = 1go3 = 1list1 = []list2 = []mylist1 = []mylist2 = []#寻找点(x1,y1)附近的空⽩点,并将坐标存⼊列表list1def judgepoint(x1,y1):global list1,list2,map1,r,l,u,dlist1 = []list2 = []r = l = u = d = 1for i in range(1,12):if (x1+i)<=11:if (map1[x1+i][y1] == "")&(d == 1):list2 = [x1+i,y1]list1.append(list2)else:d = 0else:d = 0for i in range(1,12):if (x1-i)>=0:if (map1[x1-i][y1] == "")&(u == 1):list2 = [x1-i,y1]list1.append(list2)else:u = 0else:u = 0for i in range(1,12):if (y1+i)<=11:if (map1[x1][y1+i] == "")&(r == 1):list2 = [x1,y1+i]list1.append(list2)else:r = 0else:r = 0for i in range(1,12):if (y1-i)>=0:if (map1[x1][y1-i] == "")&(l == 1):list2 = [x1,y1-i]list1.append(list2)else:l = 0else:l = 0for i in range(12):print(map1[i])while(count < 50):x1 = input("请输⼊坐标x1:")y1 = input("请输⼊坐标y1:")x2 = input("请输⼊坐标x2:")y2 = input("请输⼊坐标y2:")x1 = int(x1)y1 = int(y1)x2 = int(x2)y2 = int(y2)go1 = 1#表⽰⽤⼀条直线即可完成连接go2 = 1#表⽰⽤两条go3 = 1#⽤三条if map1[x1][y1] == map1[x2][y2]: #先判断输⼊的两个坐标对应的值是否相等 if (x1 <= 11)&(x1 >=0)&(y1 >= 0)&(y1 <= 11):if go1 == 1: #⼀条直线的情况if (int(math.fabs(x1-x2)) == 1)&(y1 == y2):map1[x1][y1]=map1[x2][y2]=""go2 = go3 = 0if (int(math.fabs(y1-y2)) == 1)&(x1 == x2):map1[x1][y1]=map1[x2][y2]=""count += 1go2 = go3 = 0if go2 == 1: #两条直线的情况judgepoint(x1,y1)list3 = list1judgepoint(x2,y2)for i in range(len(list1)):for k in range(len(list3)):if (i <= (len(list1)-1))&(k <= (len(list3)-1)):if list1[i]==list3[k]:map1[x1][y1]=map1[x2][y2]=""count += 1go3 = 0breakif go3 == 1: #三条直线的情况judgepoint(x1,y1)list3 = list1judgepoint(x2,y2)list4 = list1mylist1 = []#以点(x1,y1)周围空⽩点为坐标进⾏第⼆次寻找空⽩点for i in range(len(list3)):judgepoint(list3[i][0],list3[i][1])mylist1 += list1#遍历列表,与点(x2,y2)形成的列表进⾏⽐较,寻找交叉点for i in range(len(mylist1)):for k in range(len(list4)):if (i <= (len(mylist1)-1))&(k <= (len(list4)-1)):if mylist1[i]==list4[k]:map1[x1][y1]=map1[x2][y2]=""count += 1mylist1 = []breakfor i in range(12):print(map1[i])else:print("越界了")else:print("不对哦")if (count==50):print("YOU WIN")以上就是本⽂的全部内容,希望对⼤家的学习有所帮助,也希望⼤家多多⽀持。
Python语言是一种广泛应用于科学计算、数据分析和人工智能领域的高级编程语言,它具有简洁、易读、易学的特点,因此备受程序员们的喜爱。
为了帮助大家更好地掌握Python语言的应用和提升编程技能,本文将介绍70个Python练手项目,并附上源码,希望能对大家有所帮助。
1. 简易计算器:设计一个简单的计算器,实现加减乘除等基本运算功能。
2. 井字棋游戏:编写一个井字棋游戏,实现人机对战的功能。
3. 简易天气应用:通过API获取天气信息,实现一个简单的天气查询应用。
4. 网页爬虫:编写一个简单的网页爬虫,爬取指定全球信息站的信息。
5. 文本词频统计:统计一篇文章中单词出现的频次,并生成词频统计图表。
6. 查找文件:编写一个程序,在指定目录中查找指定类型的文件。
7. 图片处理工具:实现图片的缩放、旋转、滤镜等功能。
8. 数据可视化:利用matplotlib库,对数据进行可视化展示。
9. 简易录音机:实现录音、播放、保存等基本录音功能。
10. 简单的贪吃蛇游戏:设计一个简单的贪吃蛇游戏,控制蛇吃食物并避开障碍。
11. 图片转字符画:将一张图片转换为字符画,并输出到控制台或保存为文本文件。
12. RSS阅读器:编写一个RSS订阅工具,用于查看最新的订阅更新。
13. 网络速度测试:测试当前网络的上传下载速度,并生成测试报告。
14. 电子书阅读器:实现一个简单的电子书阅读器,支持文本阅读、目录浏览等功能。
15. 文件加密解密:实现文件的加密和解密功能,保护文件安全。
16. 电流信箱客户端:编写一个简单的邮件客户端,实现邮件的发送和接收功能。
17. 简单的音乐播放器:实现音乐播放、列表管理、歌词显示等功能。
18. 网络聊天室:设计一个简单的网络聊天室,处理用户之间的文字交流。
19. 简易的投票系统:实现一个简单的上线投票系统,支持用户投票和结果展示。
20. 图片批量处理工具:实现对指定目录中的图片进行批量处理,如缩放、旋转、加水印等操作。
使用Turtle绘制一个正方形。
创建一个绘制五角星的函数。
使用循环绘制一个彩虹。
编写一个程序,绘制一个迷宫并寻找路径。
创建一个绘制螺旋线的函数。
使用Turtle绘制一个太阳花。
编写一个交互式程序,允许用户控制Turtle的移动。
使用Turtle绘制一个风车。
创建一个模拟时钟的程序,让指针走动。
编写一个绘制随机图案的函数。
创造一个绘制立体感的图案。
绘制一个具有渐变颜色的圆形。
编写一个生成分形树的函数。
制作一个能绘制螺线的交互界面。
绘制一个抽象艺术作品。
创建一个Turtle画板,允许用户绘制自由图形。
制作一个Turtle追逐游戏,让Turtle追赶鼠标光标。
创造一个绘制多边形的函数,支持不同边数和大小。
编写一个Turtle画板,可以记录用户绘制的路径,然后重新绘制。
绘制一个渐变色的心形。
创建一个能绘制动画的Turtle程序。
绘制一个螺旋状的曲线。
制作一个Turtle版本的植物大战僵尸小游戏。
绘制一个有规律的图案,如棋盘或蜂窝。
编写一个程序,在窗口内随机生成一些Turtle,让它们漫游。
绘制一个类似万花筒效果的图案。
制作一个Turtle版本的井字棋游戏。
绘制一个抽象的城市风景。
创建一个Turtle绘制花纹的艺术工具。
绘制一个立体的魔方。
制作一个Turtle版本的弹球小游戏。
编写一个可以绘制旋转图案的函数。
绘制一个变化颜色的正弦曲线。
创建一个Turtle模拟火焰的效果。
绘制一个Turtle版本的扫雷游戏。
编写一个程序,让Turtle在屏幕上显示文字信息。
制作一个能在画布上绘制轨迹的Turtle程序。
绘制一个蝴蝶状的图案。
创建一个Turtle模拟水波纹的效果。
绘制一个多层次的星星图案。
编写一个程序,绘制一个Turtle赛车游戏。
制作一个能画出分形图案的Turtle工具。
绘制一个抽象的宇宙星空。
创建一个Turtle模拟钟摆的摆动。
编写一个Turtle版本的弹幕屏保。
绘制一个环绕的螺旋图案。
制作一个Turtle模拟雨滴的效果。
python飞翔的小鸟源代码Python飞翔的小鸟源代码介绍:Python飞翔的小鸟源代码是一款基于Python语言开发的游戏,游戏玩法简单,玩家通过点击屏幕使小鸟飞行,避免撞到障碍物。
该游戏实现了基本的游戏逻辑和界面设计,适合初学者学习和练手。
一、环境搭建1.安装Python3在官网下载Python3版本并安装。
2.安装Pygame库使用pip命令安装Pygame库:```pip install pygame二、源代码解析1.导入模块```pythonimport pygameimport randomimport sys```导入pygame、random和sys模块。
2.初始化pygame```pythonpygame.init()```初始化pygame,必须在程序开始时调用。
3.设置窗口大小和标题```pythonsize = width, height = 288, 512screen = pygame.display.set_mode(size)pygame.display.set_caption("Flappy Bird")```设置窗口大小为288×512,并设置标题为“Flappy Bird”。
4.加载图片资源```pythonbackground_image =pygame.image.load("images/background.png").convert()floor_image = pygame.image.load("images/floor.png").convert() bird_images =[pygame.image.load("images/bird1.png").convert_alpha(), pygame.image.load("images/bird2.png").convert_alpha(),pygame.image.load("images/bird3.png").convert_alpha()]pipe_image =pygame.image.load("images/pipe.png").convert_alpha()加载游戏中需要用到的图片资源。
计算机程序爱心代码python复制
计算机程序中的爱心代码是一种非常流行的小游戏,很多人都喜欢用它来表达自己的感情。
如果你也想学习如何编写一个爱心代码,那么可以使用Python语言来实现。
首先,打开Python的编辑器,创建一个新的Python文件。
然后,输入以下代码:
import turtle
t = turtle.Turtle()
t.speed(0)
t.color('red', 'pink')
t.begin_fill()
while True:
t.forward(200)
t.left(170)
if abs(t.pos()) < 1:
break
t.end_fill()
turtle.done()
这段代码使用了Python的turtle库来实现绘制爱心图案的功能。
首先,我们创建了一个turtle对象,并设置它的速度为0,这样它
就可以以最快的速度运行程序。
然后,我们设置笔的颜色和填充颜色为红色和粉色。
接着,我们
开始绘制一个圆弧,然后让海龟向左转动170度,再继续绘制圆弧。
这个过程会一直重复,直到海龟返回到起点。
最后,我们填充图案,并使用turtle.done()函数来保持窗口打开状态,直到我们手动关闭它。
这段代码非常简单,但是它可以让你学习到如何使用Python来创建一个有趣的小游戏。
你可以自己修改程序,尝试添加其他图案或者修改颜色等参数。
【python】10分钟教你⽤Python做个打飞机⼩游戏超详细教程整体框架开始之前-精灵类Sprite⼦弹类class Bullet玩家飞机类class Player敌机类class Enemy游戏主体循环以及帧率设置让⼦弹飞刷出敌机 打怪把飞机敌机⼦弹都画出来处理键盘事件分数显⽰ 和 GameOver最终代码这次还是⽤python的pygame库来做的游戏。
关于这个库的内容,读者可以上⽹了解⼀下。
本⽂只讲解⽤到的知识。
代码参考⾃⽹上,⾃⼰也做了⼀点代码简化。
尽量把最核⼼的⽅⾯⽤最简单的⽅式呈现给⼤家,让⼤家尽快掌握这个游戏的框架。
⾄于那些华丽的功能,⼤家在弄懂了核⼼知识以后,再去添加也是⾮常easy的。
这个游戏设计⽤到了⾯向对象的编程思想。
游戏主体划分为三个主要的类:⼦弹类class Bullet玩家类class Player敌机类class Enemy在屏幕上可见的也就是这三个东西了。
⾃⼰的飞机、敌⼈的飞机、⼦弹。
因此整个游戏的核⼼就是:把这三个东西的图像呈现在屏幕上。
判断和处理⼦弹撞击敌机和敌机撞击玩家这两种情况。
下⾯我们会展开为⼤家⼀⼀讲解。
在下⾯的代码中,你们会⼤量见到这个pygame.sprite模块。
这⾥就给⼤家介绍⼀下。
“sprite”,中⽂翻译“精灵”,在游戏动画⼀般是指⼀个独⽴运动的画⾯元素,在pygame中,就可以是⼀个带有图像(Surface)和⼤⼩位置(Rect)的对象。
简单来说是⼀个会动图⽚。
它的两个成员变量self.image=要显⽰图⽚的Surfaceself.rect = 显⽰Surface的区域对于self.rect,常⽤的设置rect的⽅法:self.rect = self.image.get_rect()。
然后设定self.rect.topleft=(0,0)来设定左上⾓的位置,从⽽设定这个精灵在屏幕上的显⽰位置。
精灵特别适合⽤在OO语⾔中,⽐如Python。
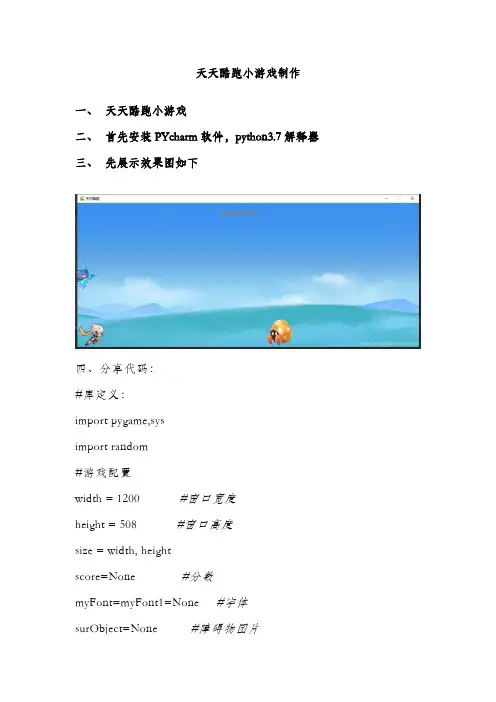
天天酷跑小游戏制作一、天天酷跑小游戏二、首先安装PYcharm软件,python3.7解释器三、先展示效果图如下四、分享代码:#库定义:import pygame,sysimport random#游戏配置width = 1200 #窗口宽度height = 508 #窗口高度size = width, heightscore=None #分数myFont=myFont1=None #字体surObject=None #障碍物图片surGameOver=None #游戏结束图片bg=None #背景对象role=None #人物对象object=None #障碍物对象objectList=[] #障碍物对象数组clock=None #时钟gameState=None #游戏状态(0,1)表示(游戏中,游戏结束)#写人物class Role: #人物def __init__(self,surface=None,y=None):self.surface=surfaceself.y=yself.w=(surface.get_width())/12self.h=surface.get_height()/2self.currentFrame=-1self.state=0 #0代表跑步状态,1代表跳跃状态,2代表连续跳跃self.g=1 #重力加速度self.vy=0 #y轴速度self.vy_start=-20 #起跳开始速度def getRect(self):return (0,self.y+12,self.w,self.h)#写障碍物class Object: #障碍物def __init__(self,surface,x=0,y=0):self.surface=surfaceself.x=xself.y=yself.w=surface.get_width()self.h=surface.get_height()self.currentFrame=random.randint(0,6)self.w = 100self.h = 100def getRect(self):return (self.x,self.y,self.w,self.h)def collision(self,rect1,rect2):#碰撞检测if (rect2[0]>=rect1[2]-20) or (rect1[0]+40>=rect2[2])or (rect1[1]+rect1[3]<rect2[1]+20) or (r ect2[1]+rect2[3]<rect1[1]+20):return Falsereturn True#写背景class Bg: #背景def __init__(self,surface):self.surface=surfaceself.dx=-10self.w=surface.get_width()self.rect=surface.get_rect()def initGame():global bg,role,clock,gameState,surObject,surGameOver,score,myFo nt,myFont1,objectList#分数初始化score=0#初始化objectList=[]#加载字体myFont=pygame.font.Font("./freesansbold.ttf",32)myFont1=pygame.font.Font("./freesansbold.ttf",64)# 创建时钟对象 (可以控制游戏循环频率)clock = pygame.time.Clock()#初始化游戏状态gameState=0#游戏背景surBg=pygame.image.load("image/bg.bmp").convert_alpha()bg=Bg(surBg)#结束画面surGameOver=pygame.image.load("image/gameover.bmp").convert _alpha()#人物图片surRole=pygame.image.load("image/role.png").convert_alpha() role=Role(surRole,508-85)#障碍物图片surObject=pygame.image.load("image/object.png").convert_alpha()def addObject():global surObject,object,objectList,objectrate=4#是否生成障碍物if not random.randint(0,300)<rate:returny=random.choice([height-100,height-200,height-300,height-400]) object=Object(surObject,width+40,y)objectList.append(object)def updateLogic():global gameState,score#键盘事件处理for event in pygame.event.get():if event.type == pygame.QUIT:sys.exit()elif event.type==pygame.KEYDOWN: #空格键跳跃if gameState==0:if event.key==pygame.K_SPACE: if role.state==0:role.state=1role.vy=role.vy_startelif role.state==1:role.state=2role.vy=role.vy_startelif gameState==1:if event.key==pygame.K_SPACE:#重新开始游戏initGame()if gameState==0:#背景的移动bg.dx+=10if bg.dx==1200:bg.dx=0#人物的移动if role.state==0:role.currentFrame+=1if role.currentFrame==12: role.currentFrame=0 else:role.y+=role.vyrole.vy+=role.gif role.y>=508-85:role.y=508-85role.state=0#障碍物的移动addObject()for object in objectList:object.x-=10 #障碍物移动# 障碍物超出屏幕,移除障碍物if object.x+object.w<=0:objectList.remove(object)score+=10 #避开障碍物,加10分print("移除了一个目标")#碰撞检测if object.collision(role.getRect(),object.getRect()): if(object.currentFrame==6):objectList.remove(object)score+=100 #吃金币加100分print(score)print("吃了一个金币")else:gameState=1 #游戏失败print("发生了碰撞!")。
python扫雷简易代码扫雷是一款经典的策略游戏,玩家需要在一个方格矩阵中找出所有没有地雷的格子。
在Python 中可以使用`pygame`库来实现扫雷游戏,`pygame`库是一个第三方库使用前请确保其已经安装,如下是一个代码示例:```pythonimport pygameimport sysimport random# 定义雷的数量和方格大小MINE_NUMBER = 10GRID_SIZE = 10# 定义颜色COLOR_BLACK = (0, 0, 0)COLOR_WHITE = (255, 255, 255)COLOR_RED = (255, 0, 0)COLOR_GREEN = (0, 255, 0)COLOR_GRAY = (192, 192, 192)# 初始化 pygamepygame.init()# 获取对显示系统的访问,并创建一个窗口 screenscreen = pygame.display.set_mode((GRID_SIZE * 20, GRID_SIZE * 20))# 设置画布的标题pygame.display.set_caption("扫雷游戏")# 定义游戏区域的坐标范围area_x = (0, GRID_SIZE * 20)area_y = (0, GRID_SIZE * 20)# 定义一个二维数组来表示游戏区域的状态grid = [[False for _ in range(GRID_SIZE)] for _ in range(GRID_SIZE)]# 生成地雷的位置mines = []for i in range(GRID_SIZE):for j in range(GRID_SIZE):if random.randint(0, MINE_NUMBER) == 0:mines.append((i, j))# 在游戏区域中标记地雷的位置for mine in mines:grid[mine[0]][mine[1]] = True# 用 0 表示空白,1 表示地雷,2 表示已标记的地雷,3 表示周围有地雷的格子,4 表示已翻开的空白格子for i in range(GRID_SIZE):for j in range(GRID_SIZE):if grid[i][j]:grid[i][j] = 1else:grid[i][j] = 0# 游戏循环running = Truewhile running:for event in pygame.event.get():if event.type == pygame.QUIT:running = Falseelif event.type == pygame.MOUSEBUTTONDOWN:x, y = pygame.mouse.get_pos()x = int((x - area_x[0]) / 20)y = int((y - area_y[0]) / 20)if x < 0 or x >= GRID_SIZE or y < 0 or y >= GRID_SIZE:continueif grid[x][y] == 1:running = Falseelif grid[x][y] == 0:grid[x][y] = 4elif grid[x][y] == 2:grid[x][y] = 3# 绘制游戏区域screen.fill(COLOR_WHITE)for i in range(GRID_SIZE):for j in range(GRID_SIZE):if grid[i][j] == 1:pygame.draw.rect(screen, COLOR_RED, (i * 20 + area_x[0], j * 20 + area_y[0], 20, 20))elif grid[i][j] == 2:pygame.draw.rect(screen, COLOR_GRAY, (i * 20 + area_x[0], j * 20 + area_y[0], 20, 20))elif grid[i][j] == 3:pygame.draw.rect(screen, COLOR_GREEN, (i * 20 + area_x[0], j * 20 + area_y[0], 20, 20))elif grid[i][j] == 4:pygame.draw.rect(screen, COLOR_WHITE, (i * 20 + area_x[0], j * 20 + area_y[0], 20, 20))# 刷新显示pygame.display.flip()# 退出程序pygame.quit()sys.exit()```上述代码中定义了一个`扫雷`游戏,首先初始化`pygame`,并创建了一个游戏窗口,设置了游戏区域的大小和坐标范围。
教你⽤Python实现⼀个轮盘抽奖⼩游戏⽬录⼀、Python GUI 编程简介⼆、流⾏GUI框架总结三、代码演⽰四、界⾯⼀、Python GUI 编程简介Tkinter 模块(Tk 接⼝)是 Python 的标准 Tk GUI ⼯具包的接⼝ .Tk 和 Tkinter 可以在⼤多数的 Unix 平台下使⽤,同样可以应⽤在 Windows 和 Macintosh 系统⾥。
Tk8.0 的后续版本可以实现本地窗⼝风格,并良好地运⾏在绝⼤多数平台中。
wxPython 是⼀款开源软件,是 Python 语⾔的⼀套优秀的 GUI 图形库,允许 Python 程序员很⽅便的创建完整的、功能健全的 GUI ⽤户界⾯。
pyqt5是⼀套Python绑定Digia QT5应⽤的框架。
它可⽤于Python 2和3。
pyqt5作为Python的⼀个模块,它有620多个类和6000个函数和⽅法。
这是⼀个跨平台的⼯具包,它可以运⾏在所有主要的操作系统,包括UNIX,Windows,Mac OS。
pyqt5是双重许可,开发者可以在LGPL协议和商业许可之间进⾏选择,也就是开源免费版本或者收费版本,商业版的 Qt 通常包含有⼀些开源版本所没有的库。
QT给我们带来最⽅便的好处,就是它有⼀个QT Desiginer,这个设计器可以⽅便我们进⾏页⾯的布局,可以说在Tkinter⾥⾯需要⼀坨坨的代码完成的页⾯布局,在QT⾥⾯只要拖⼀拖控件就搞定了。
⼆、流⾏GUI框架总结QT的优点是有⼀个关于页⾯布局设计的设计器QT Desiginer,拖动控件就可以进⾏页⾯的布局设计、美化等,界⾯美观,多个平台可使⽤,⽂档和教程丰富,但是有商业化使⽤版权问题,需要授权,体积较⼤。
⽽Tkinter要设计这种页⾯,需要⾃⼰写代码定义按钮,使⽤代码完成的页⾯布局,因为Tkinter 没有提供⼀个图形界⾯设计器,但是Tikinter的优点是容易学习、性能好。
QT可能是最强⼤的,但也许它也是最复杂的。
详解如何利⽤Python制作24点⼩游戏⽬录先睹为快游戏规则(改编⾃维基百科)逐步实现Step1:制作24点⽣成器Step2:定义游戏精灵类Step3:实现游戏主循环先睹为快游戏规则(改编⾃维基百科)从1~10这⼗个数字中随机抽取4个数字(可重复),对这四个数运⽤加、减、乘、除和括号进⾏运算得出24。
每个数字都必须使⽤⼀次,但不能重复使⽤。
逐步实现Step1:制作24点⽣成器既然是24点⼩游戏,当然要先定义⼀个24点游戏⽣成器啦。
主要思路就是随机⽣成4个有解的数字,且范围在1~10之间,代码实现如下:def generate(self):self.__reset()while True:self.numbers_ori = [random.randint(1, 10) for i in range(4)]self.numbers_now = copy.deepcopy(self.numbers_ori)self.answers = self.__verify()if self.answers:break在验证4个数字是否有解并求出所有解部分,我直接暴⼒枚举然后去重了,感兴趣的同学可以⾃⼰再优化⼀下求解算法(有数字重复的时候)。
我的代码如下图所⽰,其实就是递归枚举所有排序然后⼀⼀验证是否有解:'''验证⽣成的数字是否有答案'''def __verify(self):answers = []for item in self.__iter(self.numbers_ori, len(self.numbers_ori)):item_dict = []list(map(lambda i: item_dict.append({str(i): i}), item))solution1 = self.__func(self.__func(self.__func(item_dict[0], item_dict[1]), item_dict[2]), item_dict[3])solution2 = self.__func(self.__func(item_dict[0], item_dict[1]), self.__func(item_dict[2], item_dict[3]))solution = dict()solution.update(solution1)solution.update(solution2)for key, value in solution.items():if float(value) == self.target:answers.append(key)# 避免有数字重复时表达式重复(T_T懒得优化了)answers = list(set(answers))return answers'''递归枚举'''def __iter(self, items, n):for idx, item in enumerate(items):if n == 1:yield [item]else:for each in self.__iter(items[:idx]+items[idx+1:], n-1):yield [item] + each'''计算函数'''def __func(self, a, b):res = dict()for key1, value1 in a.items():for key2, value2 in b.items():res.update({'('+key1+'+'+key2+')': value1+value2})res.update({'('+key1+'-'+key2+')': value1-value2})res.update({'('+key2+'-'+key1+')': value2-value1})res.update({'('+key1+'×'+key2+')': value1*value2})value2 > 0 and res.update({'('+key1+'÷'+key2+')': value1/value2})value1 > 0 and res.update({'('+key2+'÷'+key1+')': value2/value1})return resStep2:定义游戏精灵类因为玩家需要通过⿏标点击来操作卡⽚,这时候就涉及到⼀些碰撞检测。
python实现五⼦棋游戏(pygame版)本⽂实例为⼤家分享了python五⼦棋游戏的具体代码,供⼤家参考,具体内容如下⽬录简介实现过程结语简介使⽤python实现pygame版的五⼦棋游戏;环境:Windows系统+python3.8.0游戏规则:1.分两位棋⼿对战,默认⿊棋先下;当在棋盘点击左键,即在该位置绘制⿊棋;2.⾃动切换到⽩棋,当在棋盘点击左键,即在该位置绘制⽩棋;3.轮流切换棋⼿下棋,当那⽅先形成5⼦连线者获胜(横、竖、斜、反斜四个⽅向都可以)。
游戏运⾏效果如下:实现过程1.新建⽂件settings.py,⽤来定义⼀些必须的基本属性和初始值;class Settings():def __init__(self):"""初始化的游戏配置"""# 屏幕宽⾼self.width = 700self.height = 554# ⽂字颜⾊和⼤⼩self.fontsize = 14self.fonttype = 'simsunnsimsun'# 棋盘格数self.number = 15# 棋盘左边距、上边距和间隔self.bd_left = 30self.bd_top = 30self.bd_space = 36# 判断游戏是否结束(默认开始)self.game_active = True# 判断哪⽅下棋(默认⿊⼦先写)self.chess_player = 1self.prompt_info = '当前棋⼿:⿊棋'# 开始校验输赢(两边合计9,因为已经有⼀边5步)self.win_number = 0# 设置背景图、⿊棋图⽚、⽩棋图⽚路径self.checkerboard_bg = 'images/checkerboard_bg.png'self.black_chess = 'images/black_chess.png'self.white_chess = 'images/white_chess.png'# 存储落⼦数据self.move_chess = []2.新建⽂件checkerboard.py,主要⽤来绘制背景图和棋格线;import sysimport pygameclass Checkerboard():def __init__(self, ck_settings, screen, position):self.ck_settings = ck_settingsself.screen = screenself.position = position# 颜⾊和坐标⼤⼩self.text_color = (0, 0, 0)self.font = pygame.font.SysFont(ck_settings.fonttype, ck_settings.fontsize)# 存储棋⼦坐标self.checkerboard = []# 加载背景图、⿊棋和⽩棋(当有图⽚不存在时,打印错误并退出游戏)try:self.bg_image = pygame.image.load(ck_settings.checkerboard_bg)self.black_image = pygame.image.load(ck_settings.black_chess).convert_alpha() # convert_alpha背景透明self.white_image = pygame.image.load(ck_settings.white_chess).convert_alpha()self.chess_rect = self.black_image.get_rect()except Exception as e:print('error:', e)sys.exit()def draw_board(self):# 存储棋⼦坐标for i in range(self.ck_settings.number):self.checkerboard.append([])for j in range(self.ck_settings.number):self.checkerboard[i].append(self.position(self.ck_settings.bd_left + i * self.ck_settings.bd_space, self.ck_settings.bd_top + j * self.ck_settings.bd_space)) # 绘制棋盘坐标for i in range(0, self.ck_settings.number):# ord返回字符的ASCII数值,chr再返回字符x_text = self.font.render(chr(ord('A') + i), True, self.text_color) # A-Oy_text = self.font.render(str(i + 1), True, self.text_color) # 1-15# 绘制xy轴坐标(在棋盘背景图绘制)self.bg_image.blit(x_text, (self.checkerboard[i][0].x - x_text.get_width() / 2, self.checkerboard[i][0].y - 20))self.bg_image.blit(y_text, (self.checkerboard[0][i].x - 20, self.checkerboard[0][i].y - y_text.get_height() / 2))# 绘制横竖线(在棋盘背景图绘制)pygame.draw.line(self.bg_image, self.text_color, self.checkerboard[0][i], self.checkerboard[self.ck_settings.number-1][i])pygame.draw.line(self.bg_image, self.text_color, self.checkerboard[i][0], self.checkerboard[i][self.ck_settings.number-1])# 绘制棋盘背景图self.screen.blit(self.bg_image, (0, 0))3.新建⽂件infopanel.py,主要⽤来绘制棋盘右边提⽰信息(暂时只有显⽰下棋⽅和获胜信息);import pygame.fontclass Infopanel():def __init__(self, ck_settings, screen):"""初始化属性"""self.settings = ck_settingsself.screen = screenself.screen_rect = screen.get_rect()# 设置⽂字颜⾊和字体⼤⼩_color = (217, 8, 10)self.font = pygame.font.SysFont(ck_settings.fonttype, 16)def draw_info(self, info):"""将⽂字渲染为图像,并定位到右边⽔平居中"""_image = self.font.render(info, True, _color)_image_rect = _image.get_rect()_image_rect.right = self.screen_rect.right - (self.screen_rect.width - 536 - _image_rect.width) / 2_image_rect.top = 50# 绘制到屏幕self.screen.blit(_image, _image_rect)4.新建⽂件“game_functions.py”,存放跟游戏有关的所有业务逻辑函数;import sysimport pygame# 棋def update_board(ck_settings, cb, index_coordinates, position):"""更新棋盘信息"""# 判断棋⼿(⿊棋或⽩棋)if ck_settings.chess_player == 1:ck_settings.prompt_info = '当前棋⼿:⽩棋'img = cb.black_imagechess_type = 'black'else:ck_settings.prompt_info = '当前棋⼿:⿊棋'img = cb.white_imagechess_type = 'white'"""落棋"""dropState = check_at(ck_settings, index_coordinates)if dropState:i, j = index_coordinateschess_x = cb.checkerboard[j][i].x - cb.chess_rect.width / 2chess_y = cb.checkerboard[j][i].y - cb.chess_rect.height / 2# 累计步数(两边合计)ck_settings.win_number += 1# 落⼦并转换棋⼿ck_settings.move_chess.append({'type': chess_type, 'coord': position(i, j)}) cb.bg_image.blit(img, (chess_x, chess_y))ck_settings.chess_player *= -1# 合计9步开始校验输赢if ck_settings.win_number >= 9:check_stats(ck_settings, (i, j))else:ck_settings.prompt_info = '已经有其他棋⼦'# 检查(i,j)位置是否已占⽤def check_at(ck_settings, index_coordinates):for item in ck_settings.move_chess:if index_coordinates == item['coord']:return Falsereturn Truedef check_stats(ck_settings, pos):"""校验四个⽅向,是否有了输赢"""pos_i, pos_j = posdirects = [(1, 0), (0, 1), (1, 1), (1, -1)] # 横、竖、斜、反斜四个⽅向检查for direct in directs:line_checkerboard = []d_x, d_y = directlast = ck_settings.move_chess[-1]line_ball = [] # 存放在⼀条线上的棋⼦for ball in ck_settings.move_chess:# 跟最后落⼦判断if ball['type'] == last['type']:x = ball['coord'].x - last['coord'].xy = ball['coord'].y - last['coord'].yif d_x == 0:if x == 0:line_ball.append(ball['coord'])if d_y == 0:if y == 0:line_ball.append(ball['coord'])if x * d_y == y * d_x:line_ball.append(ball['coord'])if len(line_ball) >= 5: # 只有5⼦及以上才继续判断sorted_line = sorted(line_ball)for i, item in enumerate(sorted_line):index = i + 4if index < len(sorted_line):if d_x == 0:y1 = item.yy2 = sorted_line[index].y# 此点和第5个点⽐较y值,如相差为4则连成5⼦if abs(y1 - y2) == 4:ck_settings.prompt_info = '⿊棋获胜' if last['type'] == 'black' else '⽩棋获胜' else:x1 = item.xx2 = sorted_line[index].x# 此点和第5个点⽐较x值,如相差为4则连成5⼦if abs(x1 - x2) == 4:ck_settings.prompt_info = '⿊棋获胜' if last['type'] == 'black' else '⽩棋获胜' else:break# 事件def check_events(ck_settings, cb, position):"""监听事件"""for event in pygame.event.get():if event.type == pygame.QUIT:sys.exit()elif event.type == pygame.MOUSEBUTTONDOWN:# 点击左键if event.button == 1:pos = pygame.mouse.get_pos() # 获取点击实际坐标# 判断是否溢出x_first = cb.checkerboard[0][0].xx_last = cb.checkerboard[ck_settings.number - 1][ck_settings.number - 1].xy_first = cb.checkerboard[0][0].yy_last = cb.checkerboard[ck_settings.number - 1][ck_settings.number - 1].yif pos[0] < x_first or pos[0] > x_last or pos[1] < y_first or pos[1] > y_last:ck_settings.prompt_info = '落⼦位置不正确!'else:index_coordinates = to_index(ck_settings, pos)update_board(ck_settings, cb, index_coordinates, position)def to_index(ck_settings, pos):"""实际坐标转换为棋盘下标"""i = round((pos[1] - ck_settings.bd_top) / ck_settings.bd_space)j = round((pos[0] - ck_settings.bd_left) / ck_settings.bd_space)return (i, j)5.新建⽂件gobang.py,主函数⽤来初始化程序,并同步更新程序的信息;import pygamefrom settings import Settingsfrom checkerboard import Checkerboardfrom collections import namedtupleimport game_functions as gffrom infopanel import Infopaneldef run_game():"""运⾏游戏"""# 初始化游戏屏幕pygame.init()# 创建时钟对象 (可以控制游戏循环频率)clock = pygame.time.Clock()# 配置实例化ck_settings = Settings()screen = pygame.display.set_mode((ck_settings.width, ck_settings.height))pygame.display.set_caption('五⼦棋游戏')# namedtuple创建类似于元组的数据类型,除了可以⽤索引访问,能够迭代,还能⽤属性名访问数据position = namedtuple('Position', ['x', 'y'])# 创建实例cb = Checkerboard(ck_settings, screen, position)# 实例化⾯板信息infopanel = Infopanel(ck_settings, screen)while ck_settings.game_active:# 绘制棋盘cb.draw_board()# 绘制⾯板信息infopanel.draw_info(ck_settings.prompt_info)# 检查玩家事件并更新棋盘gf.check_events(ck_settings, cb, position)# 让最近绘制的屏幕可见pygame.display.flip()# 通过时钟对象指定循环频率clock.tick(60) # 每秒循环60次run_game()6.在⽂件gobang.py⽬录路径下,执⾏命令“python gobang.py”弹出窗⼝,即可对其操作游玩。
Python拼图游戏代码编写一个完整的拼图游戏同样需要使用图形界面库来实现游戏画面和交互。
以下是一个简化的拼图游戏示例代码的框架,其中使用了`pygame`库实现游戏界面:```pythonimport pygameimport random# 游戏窗口大小WINDOW_WIDTH = 600WINDOW_HEIGHT = 600# 拼图格子数量GRID_SIZE = 3# 颜色定义WHITE = (255, 255, 255)BLACK = (0, 0, 0)# 图片路径IMAGE_PATH = "images/"# 初始化Pygamepygame.init()# 创建游戏窗口window = pygame.display.set_mode([WINDOW_WIDTH, WINDOW_HEIGHT]) pygame.display.set_caption("拼图游戏")# 设置游戏时钟clock = pygame.time.Clock()# 加载图片def load_image(file_name, size):image = pygame.image.load(IMAGE_PATH + file_name)image = pygame.transform.scale(image, size)return image# 游戏元素类class Tile:def __init__(self, image, row, column, target_row, target_column):self.image = imageself.rect = image.get_rect()self.row = rowself.column = columnself.target_row = target_rowself.target_column = target_columndef draw(self):x = self.column * (WINDOW_WIDTH // GRID_SIZE)y = self.row * (WINDOW_HEIGHT // GRID_SIZE)self.rect.topleft = (x, y)window.blit(self.image, self.rect)# 创建拼图游戏image_size = (WINDOW_WIDTH // GRID_SIZE, WINDOW_HEIGHT // GRID_SIZE)tiles = []for row in range(GRID_SIZE):for column in range(GRID_SIZE):if row == GRID_SIZE - 1 and column == GRID_SIZE - 1:continuetile_image = load_image(f"image{row * GRID_SIZE + column + 1}.png", image_size)target_row = rowtarget_column = columntile = Tile(tile_image, row, column, target_row, target_column)tiles.append(tile)# 打乱拼图顺序random.shuffle(tiles)# 标记被拖动的拼图方块dragging_tile = None# 游戏主循环running = Truewhile running:# 处理事件for event in pygame.event.get():if event.type == pygame.QUIT:running = Falseelif event.type == pygame.MOUSEBUTTONDOWN:if event.button == 1:mouse_pos = pygame.mouse.get_pos()for tile in tiles:if tile.rect.collidepoint(mouse_pos):dragging_tile = tilebreakelif event.type == pygame.MOUSEBUTTONUP:if event.button == 1:if dragging_tile is not None:mouse_pos = pygame.mouse.get_pos()for tile in tiles:if tile != dragging_tile and tile.rect.collidepoint(mouse_pos):dragging_tile.row, tile.row = tile.row, dragging_tile.rowdragging_tile.column, tile.column = tile.column, dragging_tile.columndragging_tile = None# 绘制游戏画面window.fill(WHITE)for tile in tiles:tile.draw()pygame.display.update()# 控制游戏帧率clock.tick(60)# 退出游戏pygame.quit()这个示例代码实现了一个简化的拼图游戏框架。
做小游戏教程小游戏教程:如何制作一款简单的打地鼠游戏一、介绍小游戏是一种简单而有趣的娱乐方式,制作一个小游戏并不需要太多的编程经验。
在本教程中,我将向你展示如何使用Python编程语言制作一款简单的打地鼠游戏。
二、准备工作在开始编写游戏之前,你需要确保已经安装了Python的最新版本。
你可以在Python官方网站上下载并安装它。
此外,你还需要一个文本编辑器来编写代码,推荐使用Visual Studio Code或PyCharm。
三、游戏原理这款打地鼠游戏基于经典的打地鼠游戏,玩家需要在规定的时间内尽可能多地击中从洞口出现的地鼠。
游戏中的地鼠将会随机出现在不同的洞口,并以不同的速度出现和消失。
玩家通过鼠标点击来击中地鼠,每次命中将得到一定的分数。
四、编写代码接下来,我们将编写代码来实现这款游戏。
首先,我们需要导入所需的模块:```pythonimport pygameimport randomimport sys```然后,我们可以设置游戏窗口的尺寸和背景颜色:```pythonWIDTH = 800HEIGHT = 600BG_COLOR = (255, 255, 255)```接下来,我们需要在窗口中显示地鼠,并为其设置一些属性,如坐标、速度等:```pythonclass Mole(pygame.sprite.Sprite):def __init__(self, image, position, speed):super().__init__()self.image = pygame.image.load(image)self.rect = self.image.get_rect()self.rect.topleft = positionself.speed = speedself.is_hit = False```在游戏初始化部分,我们可以设置窗口,并创建一个地鼠实例:```pythonpygame.init()screen = pygame.display.set_mode((WIDTH, HEIGHT))pygame.display.set_caption("Whac-A-Mole")mole = Mole("mole.png", (400, 300), 5)```接下来,我们可以设置游戏的主循环,以便处理用户的输入和更新游戏状态:```pythonwhile True:for event in pygame.event.get():if event.type == pygame.QUIT:pygame.quit()sys.exit()elif event.type == pygame.MOUSEBUTTONDOWN:if mole.rect.collidepoint(pygame.mouse.get_pos()):mole.is_hit = Trueif mole.is_hit:mole.is_hit = False# 根据击中地鼠后的操作进行处理pygame.display.update()```五、游戏完善在上述的代码框架中,我们可以添加一些逻辑来完善游戏的功能和体验。
忆童年!⽤Python实现愤怒的⼩鸟游戏开发⼯具Python版本:3.6.4相关模块:pygame模块;以及⼀些python⾃带的模块。
环境搭建安装Python并添加到环境变量,pip安装需要的相关模块即可。
原理介绍这⾥简单介绍⼀下游戏的实现原理呗。
⾸先是游戏的开始界⾯,⼤概是长这样的,⽐较简约:主要包括两个部分,即游戏的标题和游戏的开始以及退出按钮,这两部分的代码实现如下:'''按钮类'''class Button(pygame.sprite.Sprite):def __init__(self, screen, x, y, width, height, action=None, color_not_active=(189, 195, 199), color_active=(189, 195, 199)):pygame.sprite.Sprite.__init__(self)self.x = xself.y = yself.width = widthself.height = heightself.action = actionself.screen = screenself.color_active = color_activeself.color_not_active = color_not_active'''添加⽂字'''def addtext(self, text, size=20, font='Times New Roman', color=(0, 0, 0)):self.font = pygame.font.Font(font, size)self.text = self.font.render(text, True, color)self.text_pos = self.text.get_rect()self.text_pos.center = (self.x + self.width / 2, self.y + self.height / 2)'''是否被⿏标选中'''def selected(self):pos = pygame.mouse.get_pos()if (self.x < pos[0] < self.x + self.width) and (self.y < pos[1] < self.y + self.height):return Truereturn False'''画到屏幕上'''def draw(self):if self.selected():pygame.draw.rect(self.screen, self.color_active, (self.x, self.y, self.width, self.height))else:pygame.draw.rect(self.screen, self.color_not_active, (self.x, self.y, self.width, self.height))if hasattr(self, 'text'):self.screen.blit(self.text, self.text_pos)'''⽂字标签类'''class Label(pygame.sprite.Sprite):def __init__(self, screen, x, y, width, height):pygame.sprite.Sprite.__init__(self)self.x = xself.y = yself.width = widthself.height = heightself.screen = screen'''添加⽂字'''def addtext(self, text, size=20, font='Times New Roman', color=(0, 0, 0)):self.font = pygame.font.Font(font, size)self.text = self.font.render(text, True, color)self.text_pos = self.text.get_rect()self.text_pos.center = (self.x + self.width / 2, self.y + self.height / 2)'''画到屏幕上'''def draw(self):if hasattr(self, 'text'):self.screen.blit(self.text, self.text_pos)实现起来其实都⽐较简单,按钮类就是多了⼀个被⿏标选中之后(也就是⿏标的位置落在按钮的区域范围内时)改变颜⾊以直观地告诉玩家该按钮已经被选中了的功能。
可拖动地图的放大镜 """ Demonstration of a draggable magnifier on a map """ import simplegui
# 1521x1818 pixel map of native American language # Source - Gutenberg project MAP_WIDTH = 1521 MAP_HEIGHT = 1818 map_image = simplegui.load_image("http://commondatastorage.googleapis.com/codeskulptor-assets/gutenberg.jpg")
# Constants MAP_SCALE = 3 CANVAS_WIDTH = MAP_WIDTH / MAP_SCALE CANVAS_HEIGHT = MAP_HEIGHT / MAP_SCALE MAGNIFIER_SIZE = 120
# Event handlers def click(pos): """ Reset center of magnifier pane to current click position """ magnifier_center[0] = pos[0] magnifier_center[1] = pos[1]
def drag(pos): """ Reset center of magnifier pane to current click position """ magnifier_center[0] = pos[0] magnifier_center[1] = pos[1]
def draw(canvas): """ Draw handler - draws map, magnifier pane, and box around magnifier """ # Draw map canvas.draw_image(map_image, (MAP_WIDTH / 2, MAP_HEIGHT / 2), (MAP_WIDTH, MAP_HEIGHT), (CANVAS_WIDTH / 2, CANVAS_HEIGHT / 2), (CANVAS_WIDTH, CANVAS_HEIGHT))
# Draw magnifier source_center = (MAP_SCALE * magnifier_center[0], MAP_SCALE * magnifier_center[1]) canvas.draw_image(map_image, source_center, [MAGNIFIER_SIZE, MAGNIFIER_SIZE], magnifier_center, [MAGNIFIER_SIZE, MAGNIFIER_SIZE])
# Draw outline around magnifier mag_left = magnifier_center[0] - MAGNIFIER_SIZE / 2 mag_right = magnifier_center[0] + MAGNIFIER_SIZE / 2 mag_top = magnifier_center[1] - MAGNIFIER_SIZE / 2 mag_bottom = magnifier_center[1] + MAGNIFIER_SIZE / 2 mag_topleft = (mag_left, mag_top) mag_topright = (mag_right, mag_top) mag_botleft = (mag_left, mag_bottom) mag_botright = (mag_right, mag_bottom) box = [mag_topleft, mag_botleft, mag_botright, mag_topright, mag_topleft] canvas.draw_polyline(box, 4, "Blue") # event handler for timer def tick(): """ Move center of magnifier pane slowly down/right """ magnifier_center[0] += 1 magnifier_center[1] += 1
# Create frame for map frame = simplegui.create_frame("Map magnifier", CANVAS_WIDTH, CANVAS_HEIGHT) frame.set_draw_handler(draw) frame.set_mouseclick_handler(click) frame.set_mousedrag_handler(drag)
# Create timer that slowly slides the magnifier pane timer = simplegui.create_timer(60.0,tick)
# Start timer and frame animation magnifier_center = [CANVAS_WIDTH / 2, CANVAS_HEIGHT / 2] timer.start() frame.start() 骰子骰子游戏 """ Dice game "Craps" - uses only control elements plus prints to console """ import simplegui import random
def gen_roll(): """ Helper function that rolls two dice and prints/returns the results """ die1 = random.randrange(0, 6) + 1 die2 = random.randrange(0, 6) + 1 print "You rolled", str(die1), "and", str(die2) return die1 + die2
def process_roll(): """ Handler for roll, encodes basic logic for Craps""" global point, point_set, bankroll
# print out message for new game" if not point_set: print print "New game. Your bet is", str(bet)
# logic for first roll roll = gen_roll() if not point_set: if roll == 7 or roll == 11: bankroll += bet print "You won. Your bankroll is", str(bankroll) elif roll == 2 or roll ==3 or roll == 12: bankroll -= bet print "You lost. Your bankroll is", str(bankroll) else: point = roll point_set = True print "Your point is", str(point) # logic for subsequent rolls elif roll == 7: bankroll -= bet point_set = False print "You crapped out! Your bankroll is", str(bankroll) elif roll == point: bankroll += bet point_set = False print "You made your point! Your bankroll is", str(bankroll)
def set_bet(inp): """ Input handler for changing bet size via input, forfeits current bet """ global bet, bankroll, point_set print if point_set: point_set = False bankroll -= bet print "Forfeiting current bet. Your bankroll is", str(bankroll) bet = int(inp) print "New bet size is", str(bet) # create frame and UI elements frame = simplegui.create_frame("Craps", 200, 200) frame.add_button("Roll", process_roll, 200) frame.add_input("Set bet", set_bet, 200)
# initialize global variables used in game point_set = False bet = 10 bankroll = 1000 print "Your initial bankroll is", bankroll print "Your initial bet size is", bet print "Click roll to start the game"
frame.start()
雪碧动画片 """