PPT outline
- 格式:doc
- 大小:1.25 MB
- 文档页数:8
我们做presentation时不用怕了。
总结的真强大,转帖啦!来源:周逸轩的日志转帖一成功英语演讲的秘诀:开场白、结束语应对问题-I will be pleased to answer any questions you may have at the end of the present ation.-Please can you save your questions till the end.-If you have any questions, I will be pleased to answer them at the end of the pre sentation.-there will be time at the end of the presentation to answer your questions-so plea se feel free to ask me anything then.-Don't hesitate to interrupt if you have a question.-Please feel free to interrupt me at any time.-Please stop me if you have any questions.-If you need clarification on any point, you're welcome to ask questions at any time. -Can I come back to that point later?-I will be coming to that point in a minute.-That's a tricky question.-We will go into details later. But just to give you an idea of...-I am afraid there's no easy answer to that one...-Yes, that's a very good point.-Perhaps we could leave that point until the questions at the end of the presentatio n-I think I said that I would answer questions at the end of the presentation---perha ps you wouldn't mind waiting until then.-I think we have time for just one more question欢迎听众(正式)- Welcome to our company- I am pleased to be able to welcome you to our company...- I'd like to thank you for coming.- May I take this opportunity of thanking you for coming欢迎听众(非正式)- I'm glad you could all get here...- I'm glad to see so many people here.- It's GREat to be back here.- Hello again everybody. Thank you for being on time/making the effort to come to day.- Welcome to X Part II.受邀请在会议上致词- I am delighted/pleased/glad to have the opportunity to present/of making this pre sentation...- I am grateful for the opportunity to present...- I'd like to thank you for inviting/asking me/giving me the chance to...- Good morning/afternoon/evening ladies and gentleman- It's my pleasant duty today to...- I've been asked to...告知演讲的话题- the subject of my presentation is...- I shall be speaking today about...- My presentation concerns...- Today's topic is...- Today we are here to give a presentation on...- Today we are here to talk about...Before we start, I'd like you meet my team me mbers...- A brief look at today's agenda...(告诉听众所讲内容的先后顺序)- Before we start our presentation, let's take a brief look at the agenda...- I shall be offering a brief analysis of...- the main area that I intend to cover in this presentation is...- Take a moment and think of...- Thank you for giving me the opportunity to tell you about...告诉听众发言的长度- During the next ten minutes, I shall...- I shall be speaking for about ten minutes...- My presentation will last for about ten minutes...- I won't take up more than ten minutes of your time...- I don't intend to speak for longer than ten minutes...- I know that time is short, so I intend to keep this brief- I have a lot to cram in to the next ten minutes, so I'd better make a start...引起听众的兴趣- I'm going to be speaking about something that is vitally important to all of us. - My presentation will help solve a problem that has puzzled people for years...- At the end of this presentation you will understand why this company has been s o successful for so long...- I am going to be talking about a product that could double your profit margins... - the next ten minutes will change your attitude to sales and marketing...- Over the next ten minutes you are going to hear about something that will chang e the way your companies operate...- By the end of this presentation you will know all there is to know about...告诉听众内容要点- there are five main aspects to this topic (...the first, ... the second, ...a third, ...another, ... the final)- I am going to examine these topics in the following order (...first, ...next, ...after that, ...finally)- I've divided my talk into five parts...- I will deal with these topics in chronological order...- I'm going to start with a general overview and then focus on this particular probl em (...in general, ...more particularly).- I want to start with this particular topic, and then draw some more general concl usions from it (...specifically, ... in a wider context).- there are (a number of) factors that may affect...- We have to take into account in any discussion of this subject, the following cons iderations.- We all ought to be aware of the following points.结束语-In conclusion, I'd like to...-I'd like to finish by...-Finally...-By way of conclusion...-I hope I have made myself understood-I hope you have found this useful-I hope this has given you some idea/clear idea/an outline of...-Let me end by saying...-That, then was all I had to say on...-That concludes our presentation...-I hope I've managed to give you a clearer picture of...-If there are any questions, I'd be delighted to...-Thank you for your attention...-Let's break for a coffee at this point-I am afraid that the clock is against us, so we had better stop here-You have been a very attentive audience---thank you转自/abc/html/kouyujicui/20070821/4.html转帖二做presentation,我们要注意对话题的准备以及态度和身体语言等等,除此之外,我们还应该掌握一些常用句型。


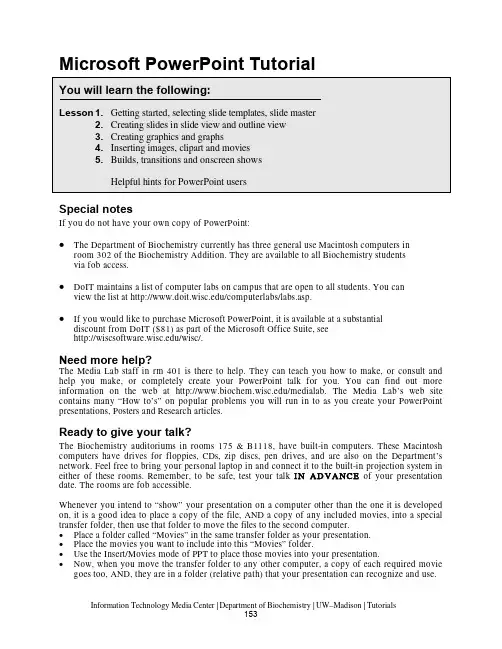
Microsoft PowerPoint TutorialSpecial notesIf you do not have your own copy of PowerPoint:•The Department of Biochemistry currently has three general use Macintosh computers in room 302 of the Biochemistry Addition. They are available to all Biochemistry studentsvia fob access.•DoIT maintains a list of computer labs on campus that are open to all students. You can view the list at /computerlabs/labs.asp.•If you would like to purchase Microsoft PowerPoint, it is available at a substantial discount from DoIT ($81) as part of the Microsoft Office Suite, see/wisc/.Need more help?The Media Lab staff in rm 401 is there to help. They can teach you how to make, or consult and help you make, or completely create your PowerPoint talk for you. You can find out more information on the web at /medialab. The Media Lab’s web site contains many “How to’s” on popular problems you will run in to as you create your PowerPoint presentations, Posters and Research articles.Ready to give your talk?The Biochemistry auditoriums in rooms 175 & B1118, hav e built-in computers. These Macintosh computers hav e driv es for floppies, CDs, zip discs, pen driv es, and are also on the Department’s network. Feel free to bring your personal laptop in and connect it to the built-in projection system in either of these rooms. Remember, to be safe, test your talk I I N AD VA NCE of your presentation date. The rooms are fob accessible.Whenever you intend to “show” your presentation on a computer other than the one it is developed on, it is a good idea to place a copy of the file, AND a copy of any included movies, into a special transfer folder, then use that folder to move the files to the second computer.•Place a folder called “Movies” in the same transfer folder as your presentation.•Place the movies you want to include into this “Movies” folder.•Use the Insert/Movies mode of PPT to place those movies into your presentation.•Now, when you move the transfer folder to any other computer, a copy of each required movie goes too, AND, they are in a folder (relative path) that your presentation can recognize and use.For security reasons, the computers in rooms 175 and B1118 do not appear on the Macintosh Chooser Appletalk menu. Instead, there is a separate serv er called “Maitre d” in the Biochemistry AppleTalk zone. Log on as “guest” v ia the chooser (no username or password required), or as “” via ftp (username: transfer, password: bioshow). Place a copy of your transfer folder (label with your name, please!) into the “pub” subdirectory of this serv er. You can retriev e it onto the auditorium Mac before your presentation. O O R… go directly to one of the auditoriums and link to your computer from there and then transfer your files.1) Open PowerPoint .Double click on the H H ardD rive folder iconDouble click on the A A pplications folder then the M M icrosoft O ffice X folderDouble click on the M M icrosoft PowerPoint program2) Starting a newpresentation . When you firstopen PPT, the program willshow you the project gallery,choose PowerPoint and a blankpresentation will open.3) Selecting a slidelayout . The next window topop up will ask you about thegeneral layout of the slides thatyou wish to use in thispresentation. Although there aremany options here (title slides,slides with or without additionaltext, slides with graphs, slides with clipart, etc) don’t let this bother you! Any particular slide can be changed later, and you can insert images, graphs, or movies at any stage on any kind of slide. You can see all 24 possible layouts by scrolling within this dialogue box.Select a generic slide layout with title and text called “B B ulleted List ”, as shown above.Click on the indicated slide template, then click O O K . The chosen slide (blank) will now fill your screen.Note:depending upon how PPT is configuredwhen first installed, and the settings in the PPT customize folder (Tools/customize), the v arioustoolbars and menus may look different fromplatform to platform.Don’t panic! All PPT functions are av ailablesomewhere in the menus and toolbars, you mayjust have to hunt a bit to find them.4)Use the Master Slide!!! You may set the background color, text size, font and style for each slide in your presentation by using the various menus at the top of the screen but it is much easier to pick a common format by specifying your preferences on the Master slide. This format will automatically be followed for all slides in your presentation, unless you turn it off for particular slides or chose to change any elements for a particular slide.Master”Choose the “F F ormat” menu, and then explore thevarious options in the “M M aster layout”, “S S lide colorscheme”, “B B ackground” and “Apply design” menu.Install any of these “looks” as your Master Slide, orchose your own fonts, colors, backgrounds and stylesfrom among the many selections (e.g., Format menu,Fonts).The presentation you are going to create is one that you and your colleague, Christopher Columbus, will use to convince Queen Isabella to finance your new venture, called New World Expeditions. There are three views one can use to create PPT slides: Normal, Outline and Slide. In Slide View you see one slide at a time as you type the text and draw the graphics. In Outline view you see the outline of all the text on your slide. In Normal View, you see the outline, the slide and a place for speaker notes.1) Return to the first blank slide in your presentation (NOT the Master slide), by c c licking on the Slide icon in the views button in the lower left corner of your screen (or select S S lides from the View menu)2) Type the title of the first slide into the title boxClick in the title box, then type: W W e must act soonClick inside the Body text box, then type the following short list, pressing return as indicated:F avorable weather <rtn>Increase in competition <rtn>Available c rew(don’t press <rtn>!)Click anywhere outside of the body or title boxes to deselect them.3)Save your work by choosing “S S ave” from the File menu, and selecting an appropriate file name (e.g. P P ractice_1.ppt).4) Now we will make 2 more slides from the Normal View. This method is a really slick way to enter lots of nicely formatted text. You can easily use it to create a lot of slides for a lecture.Choose N N ormal from the V V iew menu, or click the N N ormal icon in the lower left corner of the screen.Now click the NN ew Slide button, or select N N ew Slide from the I I nsert menu. This will create another “slide icon” in your outline and place the cursor next to it.Type the title of slide 2: E E xpedition plan then press <<rtn>Click the “Demote” arrow (see image), to indent, or demote one level in the outline.Type the two bullet items:P repare a fleet of three ships <rtn>H and-select a staf f of able office rs and sailors (press Option + <<rtn>)Type in the following title for slide 3: BB enefits to Spain <rtn>Now press the Tab key to indent one lev el and type the following the same way you typed thebulleted items above.S ignificant rise in trade <rtn>M ore revenue for the crown (don’t press <rtn>!)Your outline should look something like this.5) Go back to Slide view to see the new slides you have made. If you click on the thick double-arrow icons at lower right of screen, you can shuffle back and forth among your slides.6) Reordering slides in SlideSorter view.Click on the S S lideSorter icon (lower left), or select SlideSorter from the View menu.Click on the picture of slide 3, hold down the mouse button and d d rag this slide to position 2 of your presentation. Note how the slide content remains exactly the same but the slide order is now different.Note: the SlideSorter v iew is an excellent way to cut and paste slides from one presentation into another, or to reorder and/or delete slides from within a presentation. Just remember that each presentation will take its master format from its own master slide, and if you transfer in slides from another PPT file, they will assume the new master’s format in font, size, color and background. Therefore, it may be a good idea to pick a layout and master slide “look” that you like, and stick with it for many of your (and your lab-group’s) presentations. That way, you can mix and match slides from various presentations without messing up their carefully chosen color schemes!PPT contains text and drawing tools so you can create your own graphics to illustrate your presentation. In these Lessons, we will draw some simple pictures, then create a graph for inclusion on a slide. In subsequent Lessons (D) we will expand these processes by importing pre-existing graphics that you might already have prepared in another graphics program, or perhaps downloaded from the web.1) Return to Slide view , then i i nsert a new slide after slide 3.Click the N N ew Slide button at the top of the screen (or Insert menu New Slide)Select a slide format “Title Only”, but with no other body or insert boxes (see next figure).2) Use the PPT drawing tools and drawing toolbars at the left or bottom of the screen to create some images that Christopher C. can use to help convince the Queen that his ships are seaworthy and can cross the ocean. These drawing tools are standard for most graphics programs. Explore a bit, and ask for help if you have NEVER done anything like this before. A sample slide is shown below.Save your file again, so this elegant piece of work is properly enshrined on the hard drive.Special note: it is a GOOD piece of advice to sav e your file frequently, especially when working on irreplaceable artwork. Some systems can crash, and many a potential Picasso has ended up in electronic vapor-land, when the file wasn’t properly saved!3) Now insert another slide (#5), in which we will create a graph to show the Queen how her costs vs profits may stack up during the next 4 quarters of the fiscal year.Note: PPT contains sev eral automatic graphing, clipart, and organizational chart functions that make it easy to create these types of aids in your presentation. The chart function essentially contains a small spreadsheet and the projected chart is drawn from the data in this sheet. If you wish, you may link the data to an external spreadsheet (preferably Microsoft Excel), or copy existing data into the PPT sheet. Either way, when you update the data in the spreadsheet, the displayed chart is automatically updated too. The chart menu bar which appears when you initiate a chart (Insert a new slide, with a chart function, or choose “Chart” from the Insert menu) allows you to choose the type of chart, color it, label the axis, title the graph, etc.Change the default data in the chart spreadsheet to indicate how much profit in gold and silver the Queen might expect, vs her costs for this voyage. To do this, just select each spreadsheet cell in turn, and change its label or v alue. Note how the graph changes too, when you enter new v alues. (Example values, below left)When you are finished playing with the data and the chart, c c hoose Quit (Command or Control Q), to return to SlideView.Now you can add a title into the title box:P rofit vs CostsAlso a a dd some text to the body box to explain your data:1st through 3rd Qtr costs may increase slightly until New Worldmines are operational <rtn>Therea fter, the looted gold and silver should vastly exceedexpedition costs.Note how the program automatically creates bullets to start each new body text object. If you wish to turn off the bullets, select the appropriate text with your mouse, then select the Bullet option in the Format Palette or Format menu. This is also how you can change the shape of the bullets, or their size and color.1) Inserting PPT clipartIf you have not already done so, S S ave your file again.In Slide view, s s croll back to the “My Ships” graphic slide you created earlier.In the Insert menu, select P P icture then C C lipart. The Microsoft Clipart Gallery will open.You may wish to explore the v arious categories and clipart figures so you know what is available here.Select the category “w w eather” then highlight “t t he storm” to add to your presentation. (Thismay help convince the Queen that your voyage will be exceedingly dangerous!).Your selected clipart will appear on the slide, and sometimes be too big or too small.To Resize click once on it to highlight it, then use the mouse to grab and mov e one of the corner boxes in or out. If you hold down the Shift key while doing this, the picture’s height and width proportions will remain unchanged..Alternatively, double-click the image and the F F ormat Picture window will appear so you can scale your object by a defined percentage. Type 1120 in the dialogue box (120% of current size) then “O O K”. Your clipart will grow in proportion. D D r ag the storm with your mouse to a menacing position above your boats.Click once on the storm to select it. Then c c lick and drag it with the mouse w w hile you holddown the option key, the storm will duplicate when you let go of the mouse. When usingthe o o ption drag you must begin dragging the object before you hold down the option keyAND you must let go of the mouse button first and then the option key.Add a bunch of rain clouds, draw some lightning, create a thunderstorm on your slide!Note: as with most computer programs, pictures, clipart or movies inserted into PPT can be resized by clicking on their corner boxes and dragging to an appropriate shape. Howev er, this method can distort the figure’s proportions, display the pixels of the image or in the case of movies or .pict files, can also impair their ability to be displayed in OnScreenShows. We recommend that you only use the Object/Scale method of resizing for clipart, N N O T for images or mov ies. You may also use this feature to enlarge things by choosing a % that is >100 (e.g. 150%).2) Inserting MoviesNote: Ann Palmenberg has provided some sample QuickTime movies for use in your tutorial PPT presentation. Go to /acp and click on Public Data, Class Resources to download a quicktime movie file.Note: If you highlight an inserted mov ie you can select Loop from the Mov ie tools in the formatting palette. This way your movie will play over and over during your onscreen show.Note: PPT will use the QuickTime mov ie player that is installed on your Macintosh or PC. It does NOT have its own internal movie player. Moreover, unlike images that can be inserted into your PPT presentation, when you tell PPT to insert a movie, the program only really inserts a pointer to the location of that mov ie on your harddriv e. That is, PPT remembers where you told it to find that movie and goes back to that location whenever you want to play the movie. This is an IMPORTANT concept, because if you transfer your PPT presentation to another computer, you must also transfer the inserted movie files too, or the program can’t find them or play them.3) Inserting pictures into PPT is similar to the insertion of clipart.Create a new slides at the end of your presentation that contains only a title box. (Just like Lesson 3.1 above).Open this new slide in Slide view, then select “P P icture/ From File” from the “I I nsert” menu. In the dialogue box choose an image from your hard drive or download one from the web.Select a file then click O O K. The picture will appear in your slide, where it can be dragged to a favorable location.Note: You can insert many popular graphics formats into your PPT presentation: Joint Photographic Experts Group (JPEG), Macintosh Picture (PICT), Macintosh paint (PNTG), Portable Network Graphics (PNG), Windows Bitmap (BMP), Portable Document Format (PDF), Encapsulated postscript (EPS), Graphics Interchange Format (GIF), and Tagged Image File Format (TIFF).Note: Images should be inserted into PPT at the correct size. You should not have to scale them up or down in size. Scaling images up in size may show their pixels and scaling them down in size means the files are too large in size (bytes of information). There is a separate tutorial at /medialab under “How to” that goes ov er “getting images into PPT correctly”.Note: In the “Picture Palette” under “Tools” is a v ery useful element for working with pictures,called “Crop” (). Should you only require a small portion of a figure, the rest can be removed by judiciously cropping the edges of the inserted picture with this tool. You can also duplicate the picture and crop different portions from each image.1) Slide to slide transitions.Use Slide View to go back to the first slide of your presentation. Then click on the “O O nScreen” icon (the one that looks like a mov ie screen) in the lower left corner of your screen. The slide should FILL your Macintosh screen.Click <<rtn>, or click the mouse button, OR press the down-arrow key, to advance to the next slide. Note: There are 3 different ways to adv ance your slides sequentially during an “OnScreen” show: (1) by pressing the <rtn> key, (2) by pressing the “down-arrow” key, and (3) by clicking on your mouse. As you advance through your presentation, you can reverse the direction with the up-arrow key. Remember, some of these slides contain a lot of material, and each time you advance by any of the 3 modes, the computer must think a bit. Be patient.When you reach your movie slide, click twice on the movie to make it play. When you reach the end of your presentation, PPT will kick you out of OnScreenView and place you back into SlideView. You can end the OnScreen show at any time, by pressing the Escape (esc) key. Fun, isn’t it!If you wish, r r ear range the order of your slides using the SortViewer .While you are in the SortView mode, you can easily add animated transitions for the slides, so they appear to morph into one another during your On Screen show. To do this, c c lick on any slide, or group of slides to highlight it (them), then select a “S S lide t ransition” from the S S lideShow menu. Select “B B oxIn” “Checkerboard” or whatever else seems interesting.Save your file, then run it through the OnScreenShow again, to see what effects the v arious transitions have.If you like, you may select a different transition between every slide... but if you actually do this for a REAL presentation, your audience will probably find it distracting to the information flow.2) Building “body object” text.The entry of text into the “body-object” boxes that we practiced in Lesson 3, has two practical purposes. First, body-object text can be very easily entered in OutlineView, so it is directly formatted on new slides with almost no hassle. The second purpose for body text, is so text itself can be “built” or appear to be phased in, line by line, or point by point, during an OnScreenShow.Return to S S lideView, and select any of the 1st three slides we made (the slide should include a title and also several lines of body-text). Click on the body text to highlight it.In the S S lideShow menu, select A A nimation then W W ipe Right or any other effect, then return to SlideView.Now rerun your O O nScreenShow and watch what happens when you hit this slide. Each click of the mouse should have an effect.Note: When the text of a slide is “built” the first click of the mouse will launch the slide. The title and any graphics will appear according to the “transition” mode that is selected. The next click of the mouse will launch the first key point of the body text, and each subsequent click will launch the subsequent points, so they appear on the screen one at a time, even though in reality they are all part of the same slide.3) Building graphics, movies and other objects.PowerPoint will also allow you to “animate” v irtually any text, pictures, graphics, charts or mov ies on your slides and play them with desired effects during your presentations. If you hav e sev eral objects you want to link as a unit, be sure to “group” them before doing the following Lesson.Go to any of your slides that contains a few items of text, and perhaps some graphics, like your boat slide.Open the S S lideShow Custom animation menu.Choose an item on this slide (Group 3) that you wish to animate and then choose an E E ntry E f fect: for that item.If you choose to animate more than one object make sure you s s elect the order for each animation in the O O rder and Timing Tab. Decide whether you want that ev ent to happen at a specified timed interval, or at the next sequential mouse click.Remember also that you can t t est the ef fects you have created, by clicking on the P P lay button.Helpful hints for PowerPoint users1.Another way to “build” graphics is make successive slides, each with another part of the figure.Actually, it is easier to make the last slide (or the most complex slide) first, copy it successively in the Slide Sorter, then “erase” stuff from the initial slides so that it seems as if you are gradually adding more figures or text.2.Slide titles should nev er be less than 32 pt, for visibility. Text should nev er be less than 20 pt,and preferably larger.3.Remember the “Rule of 5 & 5”. In general, no more than fiv e lines of text on a slide and nomore than five words in each line of text on the slide! Think about it… if you use five lines of text and five words in each line that is 25 words for an audience to read and comprehend when they should be paying attention to you!4.Although PPT will allow the use of millions of colors, in truth there are few colors that makeeffective slides. Dark backgrounds (blue or black) are OK if the projection room is dark. In this case, yellow, white or light blue text will show up better. Other darker colors like green, orange, red may detract from your talk. Be careful if you use red text on a dark background. It may look fine on your computer but will project with poor contrast on the screen. Light backgrounds (white, grey) with dark text (black, dark blue, dark green), will always project nicely. Hint: the PPT default color schemes in F F ormat/ Color Schemes are effective, attractive and easy to use.5.If your mov ies don’t play right. Delete them then reinsert them. Sometimes, the PPT pathpointers get screwed up.6.OnScreenShows require an LCD projector that can hook up to your computer. Properlyinstalled, whatev er you then see on your computer screen will be projected for the audience.Sev eral campus halls, including Biochem 175 and B1118 are equipped for this. If you are planning to do a presentation elsewhere though, make sure you check out the equipment ahead of time in the Media Lab (rm 401 Biochem 98 Addition)/medialab.。


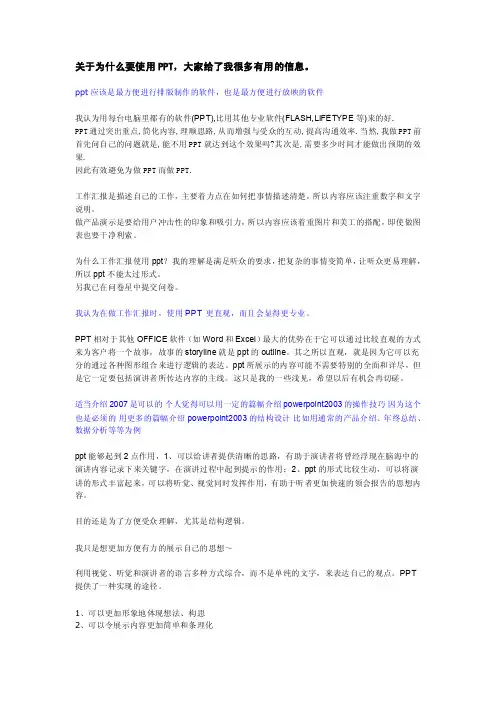
关于为什么要使用PPT,大家给了我很多有用的信息。
ppt应该是最方便进行排版制作的软件,也是最方便进行放映的软件我认为用每台电脑里都有的软件(PPT),比用其他专业软件(FLASH,LIFETYPE等)来的好.PPT通过突出重点,简化内容,理顺思路,从而增强与受众的互动,提高沟通效率.当然,我做PPT前首先问自己的问题就是,能不用PPT就达到这个效果吗?其次是,需要多少时间才能做出预期的效果.因此有效避免为做PPT而做PPT.工作汇报是描述自己的工作,主要着力点在如何把事情描述清楚,所以内容应该注重数字和文字说明。
做产品演示是要给用户冲击性的印象和吸引力,所以内容应该着重图片和美工的搭配,即使做图表也要干净利索。
为什么工作汇报使用ppt?我的理解是满足听众的要求,把复杂的事情变简单,让听众更易理解,所以ppt不能太过形式。
另我已在问卷星中提交问卷。
我认为在做工作汇报时,使用PPT 更直观,而且会显得更专业。
PPT相对于其他OFFICE软件(如Word和Excel)最大的优势在于它可以通过比较直观的方式来为客户将一个故事,故事的storyline就是ppt的outline。
其之所以直观,就是因为它可以充分的通过各种图形组合来进行逻辑的表达。
ppt所展示的内容可能不需要特别的全面和详尽,但是它一定要包括演讲者所传达内容的主线。
这只是我的一些浅见,希望以后有机会再切磋。
适当介绍2007是可以的个人觉得可以用一定的篇幅介绍powerpoint2003的操作技巧因为这个也是必须的用更多的篇幅介绍powerpoint2003的结构设计比如用通常的产品介绍、年终总结、数据分析等等为例ppt能够起到2点作用,1、可以给讲者提供清晰的思路,有助于演讲者将曾经浮现在脑海中的演讲内容记录下来关键字,在演讲过程中起到提示的作用;2、ppt的形式比较生动,可以将演讲的形式丰富起来,可以将听觉、视觉同时发挥作用,有助于听者更加快速的领会报告的思想内容。


国花national flower :郁金香tulip
国鸟 national bird :白篦鹭White spoonbills 时差
time difference :7 hr.
Language :荷兰语Dutch (荷兰语和英语一样,是一种日耳曼语,因而属于印欧语系。
它介于德语和英语之间,比任何一种语言都更接近英语。
因为荷兰人长期以来是一个航海民族,所以荷兰语在世界很多语言中留有痕迹。
许多荷兰语航海词汇,为其它语言所采用。
在现代印尼语中,还可以清楚地看到荷兰语的习惯说法和句型。
英语中源于荷兰语的词有:deck (甲板),yacht (游艇),easel (画架),freight (船运的货物),furlough (休假),brandy (白兰地),cookie (家常小甜饼),cruller (油煎饼),waffle (蛋奶烘饼),maelstrom (大旋涡),Santa Claus (圣诞老人)
宗教religion :天主教Catholicism [k ə'θɔlisiz əm ]
基督新教Christianity NEW CHURCH [.kristi'æniti ]
The Nieuwe Kerk ("New Church") was built towards the end of the 14th century. The tower is about 109 metres high. You can climb 376 steps to enjoy lovely views of the town.
New Church Tower: you can climb to the top
Stained glass window of Willem III and Maria ("William and Mary") who also ruled England
William the First, Prince
Mausoleum of the Prince of Orange of Orange
Originally there were 15 windmills within the old defensive walls of Delft, but only one survives today. This is called Molen De Roos ("The Rose
Windmill"). It is located a short walk from the Oude Kerk ("Old Church"). It was used for grinding grain for bakers and barley, oats and corn for farmers. It needed extensive restoration work between 1988 and 1990, but is now back in full working order. When it is open to visitors a blue flag flies from the top of the windmill. There is no entrance charge, but voluntary donations help the Vereniging De Hollandsche Molen ("The Dutch
Windmill Association") to maintain the building.
A blue flag flies: visitors
are welcome
You need to climb some steep steps to reach
the top
The mill wheel spins fast when the
wind is blowing
You can watch the sails turning
through the windows
Food :Dutch Cheese
This cheese looks like giant orange with rough, pitted skin. It is creamery, hard cheese made from cow's milk and it is actually a matured Edam colored with carrot juice. After five months the cheese is firm, slightly oily, with a fruity aroma and nutty flavor. When aged the color darkens to deep orange, the texture becomes hard, granular and brittle. It is fruity with a hint of orange zest. This cheese ripens in six to twelve months.
荷兰木鞋Dutch sabot ['sæbəu]
还有其它木鞋照片
Arts
伦勃朗·哈尔曼松·凡·莱因(Rembrandt Harmenszoon van Rijn 1606年7月15日 - 1669年10月4日)
文森特·梵高Vincent van Gogh
People Profile:
Van Gogh committed suicide only 37 years old, as an artist until his death shortly before he shocked the people and imaginative paintings won critical praise. Van Gogh died a few years, some artists began to imitate his painting, in order to strong performance of the feelings can not be accurately reflected reality, this is called a creative attitude and performance, and proved to be in a modern painting Of ever-lasting trend.
代表作:《吃土豆的人们》《夜咖啡》《向日葵》《星夜》《自画像》等
Masterpieces[ˈmæstəpi:s ,ˈmɑ:stəpi:s]: "People eat potato," "Night Coffee" and "Sunflowers" and "Xingye" "self-portrait."
鹿特丹(Rotterdam)
伊拉斯谟大桥Erasmusbrug
Capita:阿姆斯特丹(Amsterdam)
In Amsterdam, the Bicycle Still Rules在阿姆斯特丹,自行车仍主宰
Among Western nations, cycling is most popular in the Netherlands. Nearly 30 percent of Dutch commuters always travel by bicycle, and an additional 40 percent sometimes bike to work, according to FietsBeraad. 在西方国家,骑自行车在荷兰是最流行的。
将近百分之30的荷兰乘客总是骑自行车旅行,另外百分之四十,有时骑自行车去上班,根据FietsBeraad。