CactiEZ V10.1 中文版
- 格式:docx
- 大小:266.11 KB
- 文档页数:12
I/O 远程控制服务器EZI-10 使用者说明书Version 1.2Sollae Systems Co., Ltd.http://www.sollae.co.kr目录........................................................................................................................................................ - 1 -1产品概要........................................................................................................................................ - 3 -1.1概要......................................................................................................................................................................... - 3 -1.2构成品..................................................................................................................................................................... - 3 - 1.3产品应用构成图................................................................................................................................................ - 3 -1.4产品规格................................................................................................................................................................ - 5 -1.4.1硬件规格.......................................................................................................................................................... - 5 -1.4.2软件规格.......................................................................................................................................................... - 5 -1.4.3系统状态指示灯............................................................................................................................................. - 6 -1.4.4ISP 开关........................................................................................................................................................ - 6 -1.5接口......................................................................................................................................................................... - 7 -1.5.1输入端口.......................................................................................................................................................... - 7 -1.5.2输出端口.......................................................................................................................................................... - 7 -1.5.3以太网连接接口............................................................................................................................................ - 8 -1.5.4电源.................................................................................................................................................................. - 9 -2开始............................................................................................................................................. - 10 -2.1设定方法............................................................................................................................................................. - 10 -2.1.1通信环境检查.............................................................................................................................................. - 10 -2.1.2连接到网络.................................................................................................................................................. - 10 -2.1.3参数变更设定............................................................................................................................................. - 10 -2.2测试...................................................................................................................................................................... - 10 -2.2.1变更PC IP 地址.......................................................................................................................................... - 10 -2.2.2EZI-10 安装............................................................................................................................................... - 10 -2.2.3EZI-10 设定............................................................................................................................................... - 10 -2.2.1HTTP 测试................................................................................................................................................. - 11 -2.2.2Modbus/TCP 测试................................................................................................................................. - 12 -3设定............................................................................................................................................. - 14 -3.1IP 地址及参数值............................................................................................................................................. - 14 -3.2通过ezConfigIO的设定................................................................................................................................. - 14 -3.2.1ezConfigIO ................................................................................................................................................ - 14 -3.2.2ezConfigIO 按钮..................................................................................................................................... - 15 -3.2.3ezConfigIO ................................................................................................................................................ - 15 -3.3自动接收IP地址 (DHCP)............................................................................................................................... - 16 -3.4通过PPPoE设定IP地址................................................................................................................................... - 17 -4系统管理..................................................................................................................................... - 18 -4.1动作模式............................................................................................................................................................. - 18 -4.1.1一般模式........................................................................................................................................................ - 18 -4.1.2ISP 模式....................................................................................................................................................... - 18 -4.1.3网络诊断模式............................................................................................................................................. - 18 -4.1.4各动作模式比较....................................................................................................................................... - 18 -4.2固件升级............................................................................................................................................................. - 18 - 4.3查看当前状状态............................................................................................................................................... - 21 -4.3.1查看当前状态............................................................................................................................................. - 21 -5其他功能..................................................................................................................................... - 22 -5.1保安...................................................................................................................................................................... - 22 -5.1.1密码设定....................................................................................................................................................... - 22 -5.1.2设定允许连接的IP地址设定...................................................................................................................... - 22 -5.2初始化参数值.................................................................................................................................................... - 23 -5.2.1利用ISP按钮的参数值初始化.................................................................................................................... - 23 -6技术支援/质保期间/注意事项................................................................................................. - 24 -6.1技术支援............................................................................................................................................................. - 24 -6.2保证...................................................................................................................................................................... - 24 -6.2.1退货............................................................................................................................................................... - 24 -6.2.2无偿A/S ..................................................................................................................................................... - 24 -6.2.3有偿A/S ..................................................................................................................................................... - 24 -6.3注意事项............................................................................................................................................................. - 24 -7Revision History...................................................................................................................... - 25 -11.1概要随着互联网的不断发展,通过因特网通信的技能要求日趋增加成为趋势。
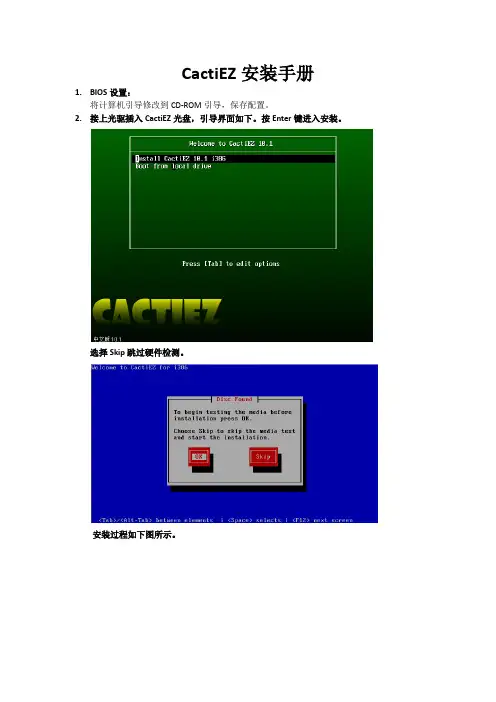
CactiEZ安装手册1.BIOS设置:将计算机引导修改到CD-ROM引导,保存配置。
2.接上光驱插入CactiEZ光盘,引导界面如下。
按Enter键进入安装。
选择Skip跳过硬件检测。
安装过程如下图所示。
安装完毕后按Enter键重启系统。
登陆界面如下图3.登录用户名:root密码:CactiEZ4.网络配置system-config-network→’Device configuration’#设备配置→’eth0’#对第一块网卡配置Service network restart #重启网络服务并且能ping通网关!5.web访问:http://IP_ADDRESSWebuser=adminWebpasswd=admin6.Yum源更新1.> /.help/选择系统对应的源!2.>首先备份/etc/yum.repos.d/CentOS-Base.repomv /etc/yum.repos.d/CentOS-Base.repo /etc/yum.repos.d/CentOS-Base.repo.backup 3.>下载对应版本repo文件, 放入/etc/yum.repos.d/(操作前请做好相应备份)CentOS4CentOS5CentOS64.>运行yum clean all清理缓存5.>运行yum makecache生成缓存6.>1、安装完系统后,运行一次#yum update(yum产生了缓存),然后再安装zlib1.2.5,之后如果不执行#yum clean all,则一直可以使用yum,不会报段错误7.>2、如果在执行yum前已经安装了zlib1.2.5,则需要做如下处理#cd /usr/lib#ln -sf libz.so.1.2.3 libz.so#ln -sf libz.so.1.2.3 libz.so.1但此后zlib就使用了旧版本,在成功执行了yum后,还需要将软连接更改#cd /usr/lib#ln -sf libz.so.1.2.5 libz.so#ln -sf libz.so.1.2.5 libz.so.17.Web管理员密码重置CactiEZ中文版安装完后忘记密码了,需要到mysql重置WEB的登录密码,CactiEZ安装完后mysql的密码默认是空的。

ACDSee 10.0 简体中文版教程[导语]现在拥有数码相机的朋友越来越多,在外出旅游后,你是不是拍了许多数码相片呢?许多朋友都是把照片保存到电脑中,以后通过电脑慢慢的欣赏,那么如何把这些照片导入到你的电脑中,同时方便的对其进行管理、浏览及生成数码相册呢?AcdSee10.0是一款集图片管理、浏览、简单编辑于一身的强大图像管理软件,对于一般的个人用户来说,该软件完全能够胜任你管理、浏览数码照片,同时还可以对一些拍的不理想的数码照片进行简单的编辑,下面我们就教大家使用该软件来管理数码照片。
一.选择图片课件制作、文稿演示都离不开选择图片,而看图是ACDSee的看家本领。
小技巧:我们可以通过点击“视图→过滤方式→高级过滤”指定想要显示的项目。
二.图像格式转换ACDSee可轻松实现JPG、BMP、GIF等图像格式的任意转化。
最常用的是将BMP转化为JPG,这样可大大减小课件的体积。
小技巧:该操作支持批量转换文件格式:按住“Ctrl”点选多个文件,然后点击“工具→转换文件格式”,选择转换的相应命令。
三.数码照片的导入照片拍摄完成后需导入到电脑中才能浏览,AcdSee提供了完善的导入照片服务。
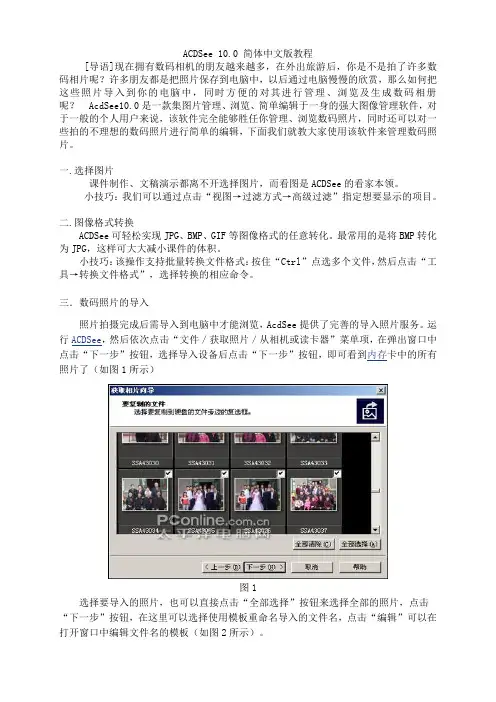
运行ACDSee,然后依次点击“文件/获取照片/从相机或读卡器”菜单项,在弹出窗口中点击“下一步”按钮,选择导入设备后点击“下一步”按钮,即可看到内存卡中的所有照片了(如图1所示)图1选择要导入的照片,也可以直接点击“全部选择”按钮来选择全部的照片,点击“下一步”按钮,在这里可以选择使用模板重命名导入的文件名,点击“编辑”可以在打开窗口中编辑文件名的模板(如图2所示)。
图2这样导入的文件就按模板的方式来进行重命名,为你以后管理数码照片提供了方便。
四.获取图像截取屏幕图像:ACDSee显然不像HyperSnap那么专业,但截取桌面、窗口或选中的区域还是力所能及的事。
点击“工具→屏幕截图”,按需要选择,并点击[开始]按钮,然后按要求操作即可。
Cacti操作指南1.1 要监控一台Windows主机,需要在被监控的主机上安装“简单网络管理协议”(SNMP),并做基本配置1.2 安装方法:1.2.1 进入“控制面板”1.2.2 双击“添加或删除程序”1.2.3 点击“添加/删除Windows组件”1.2.4 钩选“管理和监视工具”,点击“下一步”1.2.5 此时会要求您插入光盘:1.2.6 您可以插入光盘,也可以将光盘解压到磁盘某个目录中1.2.7 愚蠢的Windows可能会多次要求您插入光盘,您只需要选择相同位置即可。
点击“完成”1.3 运行“services.msc”1.4 双击“SNMP Service”1.5 确保类似以下设置,您也可以修改“团体名称”,但在CactiEZ中文版-Web 界面中添加主机时要对应。
点击“确定”完成设置1.6 登录CactiEZ-Web界面,依次点击:“控制台”,“主机”,“添加”。
类似以下设置:1.7 如果一切正常,您将会看到类似以下信息:Windows主机 (192.168.0.1)SNMP信息操作系统:Hardware: x86 Family 6 Model 37 Stepping 2 AT/AT COMPATIBLE -Software: Windows 2000 Version 5.1 (Build 2600 Multiprocessor Free) 运行时间: 56379 (0 天, 0 小时, 9 分钟)主机名: Windows-host2.1 要监控Cisco路由交换,需要在被监控的设备上启用SNMP。
可使用以命令启用:Router#configure terminalEnter configuration commands, one per line. End with CNTL/Z.Router(config)#snmp-server community ORARO roRouter(config)#end2.2 登录CactiEZ-Web界面,依次点击:“控制台”,“主机”,“添加”。
cactiez手册CactiEZ是一种开源网络监控工具,可以帮助管理员轻松地监视和管理网络设备。
它基于CentOS操作系统,并集成了Cacti、RRDTool和其他一些常用插件;它提供了一个用户友好的Web界面,使用户可以轻松设置和配置监控项目。
本手册将为您介绍如何安装、配置和使用CactiEZ。
第一部分:安装和配置第一步是下载CactiEZ ISO文件。
您可以在CactiEZ官方网站上找到最新的ISO文件,并根据您的硬件平台下载相应的版本。
一旦您下载了ISO文件,您可以将其刻录到光盘上,或者使用虚拟机软件来挂载ISO文件。
接下来,您需要启动计算机,并从CactiEZ光盘或虚拟机中引导。
选择"Install"选项来开始安装过程。
在安装过程中,您需要选择安装语言、键盘布局和存储设备。
选择默认选项通常是安全的,但您也可以根据需要进行自定义设置。
在安装类型中,选择"CactiEZ Install"。
然后,按照屏幕上的说明完成操作系统的安装。
这个过程可能需要一些时间,所以请耐心等待直到安装完成。
安装完成后,您可以重新启动计算机,并开始配置CactiEZ。
首次启动CactiEZ时,系统将自动分配一个IP地址,并显示在屏幕上。
您可以使用分配的IP地址在本地计算机上打开Web浏览器,并输入该地址来访问CactiEZ的Web界面。
进入CactiEZ的Web界面后,您将被要求设置管理员用户名和密码。
请确保设置一个强密码,以确保系统的安全性。
接下来,您需要配置CactiEZ以连接到您的网络设备。
在Web界面的导航栏中,选择"Configuration",然后选择"Network"。
在这里,您可以添加、编辑和删除网络设备。
选择"Add Device"选项,然后输入设备的IP地址、SNMP团体字符串和其他相关信息。
单击"Save"按钮保存配置。
CactiEZ中文版V10CactiEZ中文版官方论坛:CactiEZ中文版官方微薄:/cactiezCactiEZ中文版官方论坛:CactiEZ中文版官方微薄:/cactiez目录声明: (3)1.CactiEZ中文版安装 (4)2.第一次登录CactiEZ中文版 (6)3.配置网络 (7)4.登录CactiEZ中文版-Web界面 (13)5.监控Linux主机 (15)6.监控Windows主机 (23)7.监控Cisco路由交换 (29)8.监控基于Linux主机的Apache (34)9.监控基于Linux主机的Squid (37)10.添加邮件报警功能 (38)11.添加阈值监控 (57)12.配置Syslog报警 (71)13.配置气象图(Weathermap) (74)14.忘记root密码 (81)15无密码登录CactiEZ中文版 (87)16.不出图或有图无数据问题汇总 (89)17.MySQL数据库备份和恢复 (90)CactiEZ中文版官方论坛:CactiEZ中文版官方微薄:/cactiez声明:1.CactiEZ中文版软件是基于开源软件Cacti和RRDTool以及Red HatEnterprise Linux 6,经过重新整合后释放的软件。
2.该软件内所有涉及到的Cacti,RRDTool,Red Hat Enterprise Linux等著作权归相应著作者所有。
3.该软件的发行并不以商业赢利为目的,而是为广大爱好者方便安装及使用。
4.该软件内包含了《微软雅黑》字体,该字体版权归“微软”所有,如果您没有使用该字体的权利,请自行删除。
5.该软件中产生的任何问题,如数据丢失等,欢迎随时反馈,但本人不承担任何责任。
6.作者本人保留该软件的所有权利。
7.CactiEZ中文版从第一个版本开始,一直由作者本人制作,发行,修改,更新等。
任何修改“CactiEZ中文版”的名称,然后冒充作者重新发布的人。
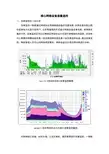
核心网络设备流量监控一、流量监控的一些认识流量监控一般是通过网络协议得到网络设备的流量信息,并将流量负载以图形或表格方式显示给用户,以非常直观的形式显示网络设备流量负载。
在网络发展的今天,流量监控还可以以网络应用层协议方式进行更精细化的监控,如信息中心部署的网康设备既是一台流量控制设备也是一台流量监控设备。
通过流量监控,网络管理人员可以对网络带宽需求,网络设备运行情况等信息进行分析。
CactiEZ对网络带宽进行流量监控截图panabit按应用层协议方式进行流量监控截图。
对网络核心设备,如防火墙,三层交换机,服务器等进行流量监控,一般都要将这些设备的SNMP(简单网络管理协议)功能打开,同时在网络内部署流量监控服务器,安装监控软件进行监控。
下面将从SNMP协议认识、网络设备的SNMP 功能开启以及流量监控服务器安装配置两方面进行说明。
二、SNMP简介及网络设备的SNMP功能开启SNMP(Simple Network Management Protocol,简单网络管理协议)的前身是简单网关监控协议(SGMP),用来对通信线路进行管理。
随后,人们对SGMP进行了很大的修改,特别是加入了符合Internet定义的SMI(管理信息结构)和MIB(管理信息库)体系结构,改进后的协议就是著名的SNMP。
SNMP的目标是管理互联网Internet上众多厂家生产的软硬件平台,因此SNMP受Internet标准网络管理框架的影响也很大。
现在SNMP已经出到第三个版本的协议,其功能较以前已经大大地加强和改进了。
SNMP第一版SNMPv1使用基于团体名进行报文认证。
SNMP第二版在功能上对第一版进行增加和强化。
SNMP第三版主要增加SNMP在安全性和远端配置方面的强化。
虽然SNMP3.0出现已经有一段时间了,但目前还没有广泛应用。
如果设备是2、3年前的产品,很可能根本不支持SNMP3.0;甚至有些较新的设备也只有SNMP2.0或SNMP1.0。
cncKad V10.0版新增功能1一般接口新增功能 (3)1.1 新软件安装选项接口 (3)1.2 DNC 之安装合并于cncKad (3)1.3 加工单位转换 (4)1.4 客制化选单界面 (4)1.5 零件缩图预览 (5)1.6 手动排版里编辑CAM (6)1.7 仿真接口显示程序执行预览 (8)1.8 材料库存目录 (9)1.9 支持零件卸料之堆栈 (11)1.10 从 AutoCAD 加载时使用实体线之颜色及型式 (12)1.11 模具资料对话框更新 (12)1.12 变更攻牙模具资料内之型式特性 (12)1.13 分离钢板线之计算 (13)1.14 在零件放置对话框中支持多零件之选择 (13)1.15 变更ToolBlockOrder .mdl 指令 (13)2冲压新增功能 (14)2.1 使用两支模具做圆孔咬碎冲制 (14)2.2 咬碎冲制平整型状 (15)2.3 自动冲压变更 (15)2.4 可于自动冲压中复制特殊冲压之描述 (15)2.5 支持 PH (零件接点管理).......................................... .. 163激光新增功能 (18)3.1 激光共切及架桥标示为粉红色 (18)3.2 等离子切割机可使用架桥功能 (18)3.3 于自动切割加工进程中指定微接点 (19)3.4 于增加(手动)切割中加入斜角角度 (20)3.5 改善"编辑轮廓进入"功能 (20)3.6 改善内孔之进入(引割)点 (20)3.7 改善零件外型之进入(引割)点 (21)3.8 改善圆弧之任意位置进入(引割) (21)3.9 新的引割选项 (21)3.10 修改自动切割中之共同切边 (21)1New in V104自动排版新增功能 (22)4.1 自动排版里零件着色 (22)4.2 为所选的子排版建立DXF 檔 (23)4.3 激光共切之间距加载自动排版 (23)4.4 支持子排版之标签贴纸报告单 (24)4.5 变更ORD 檔 (25)4.6 自动排版支持CSV 格式之订单需求档案(Order Files)加载 (25)5折弯新增功能 (28)5.1 折弯线特征參数对话框 (28)5.2 使用折弯技术表& 折弯补正模式 (29)5.3 变更折线页面显示 (31)5.4 折弯系数页面 (32)5.5 激光以及折弯技术材料 (35)5.6 标记(划线)折弯线 (35)2cncKad1一般接口新增功能1.1 新软件安装选项接口V10 呈现新的安装选项。
Teamcenter10.1安装手册Teamcenter10.1安装手册Teamcenter 10.1InstallationWindows Publication Number__2 Jon Clients GuideTeamcenter10.1安装手册Proprietary and restricted rights noticeThis software and related documentation are proprietary to Siemens Product Lifecycle Management Software Inc.2022年Siemens Product Lifecycle Management Software Inc. All Rights Reserved. Siemens and the Siemens logo are registered trademarks of Siemens AG. Teamcenter is a trademark or registered trademark of Siemens Product Lifecycle Management Software Inc. or its subsidiaries in the United States and in other countries. All other trademarks, registered trademarks, or service marks belong to their respective holders.Teamcenter10.1安装手册ContentsProprietary and restricted rightsnotice ............................................................. 2 Getting started with Teamcenter client installation ....................................... 1-1 Introduction to Teamcenter client installationSystem requirements ................................................................. 1-1 Preparing to installTeamcenter ............................................................................................................. Configuring Teamcenterinstallation ............................................................................................... 11-1-6 Starting Teamcenter installation .................................................................................. 1-7 Teamcenter Environment Managerinterface ......................................................................................... 1-7 Basic concepts about Teamcenterinstallation ................................................................... ........................................................ .......... 11-7-8 Installing the richclient ............................................................................. 2-1 Before you startInstall a four-tier richclient ....................................................................................................................... Install a two-tier rich clientAlternate rich clientconfigurations . ................................................................................................... .............. ................................................................................... 22-12-1 -6 Configure rich clientfeatures ............................................................................................ .................................... .............................................. 2-102-11 Creating a customdistribution ......................................................................... 3-1 Overview of custom distributionsCreate a silentdistribution ........................................................................................ 3Create a compactdistribution ................................................................................................... ...................... ........................................................................ 3-13-2 -5 Installing Microsoft Office interfaces .............................................................. 4-1 Installing Microsoft Office interfacesInstalling Teamcenter Client for MicrosoftOffice .................................................................................. 4-1 Installing Teamcenter Extensions for Microsoft Office ............................................................ Install Teamcenter Plug-in for Microsoft ProjectPatching Client forOffice ........................................................... ................................................ 4-124-2 Patching Extensions for Office.................................................................................................... 4-16 ........................................................................................... 4-16 4-18 Installing TCCS ....................................................................................................... 5-1 What is TCCS?Preparing to installTCCS ......................................................................................................................... 5-1 Enable TCCS usingTEM ..................................................................................................... 5-2 Install TCCS using the stand-alone installation wizard....................................................................................................... ................................................. 55-3-6Troubleshooting . . . . . . . . . . . . . . . . . . . . . . . . . . . . . . . . . . . . . . . . . . . A-1 Enabling multiple client sessions . . . . . . . . . . . . . . . . . . . . . . . . . . . . . . B-1 Overview of multiple client sessions . . . . . . . . . . . . . . . . . . . . . . . . . . . . . . . Installing support services for multiple client sessions . . . . . . . . . . . . . . . . . . B-1 Uninstalling multiple client supportservices . . . . . . . . . . . . . . . . . . . . . . . . . B-2B-1Teamcenter10.1安装手册ContentsUninstalling Teamcenter . . . . . . . . . . . . . . . . . . . . . . . . . . . . . . . . . . . . . C-1 Uninstall the rich client . . . . . . . . . . . . . . . . . . . . . . . . . . . . . . . . . . . . . . . C-1 Uninstall Microsoft Office interfaces . . . . . . . . . . . . . . . . . . . . . . . . . . . . . . . C-2 Uninstall TCCS . . . . . . . . . . . . . . . . . . . . . . . . . . . . . . . . . . . . . . . . . . . . . C-4 Uninstall Engineering Process Management rich client . . . . . . . . . . . . . . . . . C-4 Glossary . . . . . . . . . . . . . . . . . . . . . . . . . . . . . . . . . . . . . . . . . . . . . . . . . . D-1 Index . . . . . . . . . . . . . . . . . . . . . . . . . . . . . . . . . . . . . . . . . . . . . . . . . Index-1FiguresTeamcenter EnvironmentManager ........................................................................ 1-7 Two-tier architecture .................................................................................................. 1-9 Four-tier architecture .............................................................................................. 1-11 Sample silent installation configuration file .........................................................3-5Platform support for Teamcenter servers andclients .......................................... 1-2 Required hard disk space for Teamcenter configurations .................................. 1-4Teamcenter10.1安装手册Chapter1Getting started with client installationTeamcenter Introduction to Teamcenter clientinstallation ................................................................. 1-1 System requirementsWhere to find systemrequirements ............................................................................................................. 1-1 PlatformsSystemhardware ........................................................................................................................... .. ........................................................................... 11-1 Web browserJava Runtime Environment ...................................................................................................................... . ............................................................................................................ 1-11-3 -4 Softwareintegrations ...................................................................................................... .................. ........................................................................ 11-4-5 Preparing to install Teamcenter .............................................................................................. 1-6 Configuring Teamcenterinstallation .................................................................................. 1-7 Starting Teamcenter installation ........................................................................................ 1-7 Teamcenter Environment Managerinterface ................................................................... 1-7 Basic concepts about Teamcenter installationTeamcenterclients .................................................................. 1-8Richclient ................................................................................................................... .................. ......................................................................................... 1-8Teamcenter network architecturesThinclient .................................................................................................................. 11-8-8 Two-tierarchitecture ............................................................................................... ......................... ...................................................... 11-8File Management System (FMS)Four-tierarchitecture ............................................................................................... 1-8-9 Selecting and configuringfeatures ............................................................................... Basic tasks in Teamcenter installation............................................................................ 1-121-12 Installing Teamcenter clientsInstalling clientfeatures ...................................................................................... .......................................... .................................... .................................................................... 1-13 1-13 1-13Teamcenter10.1安装手册Teamcenter10.1安装手册Introduction to Teamcenter client installationThis guide describes how to install Teamcenter 10.1 on Microsoft Windows clients. This includes installation of Teamcenter two-tier rich clients using Teamcenter Environment Manager and four-tier rich clients using the Over-the-Web Installer. This guide assumes you have a thorough working knowledge of your operating system and general knowledge of Teamcenter use.System requirementsWhere to find system requirementsFor information about versions of operating systems, third-party software, Teamcenter software, and system hardware certified for your platform, see the Siemens PLM Software Certification Database: / certification/teamcenter.shtmlNoteSome software requirements differ for non-English locales. When viewing the certification database, make sure you note any exceptions for your locale.PlatformsDetermine from the following table which Teamcenter 10.1 servers and clients are supported on your operating system. Bullet characters ( )denote supported servers and clients.Teamcenter10.1安装手册Chapter 1Getting started with Teamcenter client installationPlatform support for Teamcenter servers and clientsOperating System Microsoft Windows (desktop platforms)2 Microsoft Windows (server platforms)3 Sun SolarisHewlett-Packard HP-UX4 IBM AIX SUSE Linux Red Hat Linux5Apple Macintosh Mac OSCorporate Web server tierBusinessModelerRich Thin IDETCCS1 client client clientNotes about platform supportGeneral notesFor information about versions of operating systems certified for Teamcenter10.1, see the Siemens PLM Software Certification Database. For information about installing Teamcenter on Windows servers, see the Installation on Windows Servers Guide. For information about installing Teamcenter on Linux clients, see theInstallation on Linux Clients Guide. For information about installing Teamcenter on Macintosh clients, see theInstallation on Macintosh Clients Guide. If your Teamcenter database server is IBM DB2, all Teamcenter servers andtwo-tier rich clients in your network must run operating systems supported for Teamcenter with IBM DB2. IBM DB2 databases are supported only with Teamcenter servers running on Microsoft Windows, IBM AIX, or SUSE Linux platforms. Microsoft WindowsMake sure the C:\Temp directory exists, and grant full access permissionsto this directory for all users.1. Teamcenter client communication system (TCCS) is installed with the rich client. This column refers to the stand-alone TCCS application.2. Microsoft Windows desktop platforms include Windows XP and Windows 7.3. Microsoft Windows server platforms include Windows Server 2022年.4. Itanium platforms only. PA-RISC hardware is not supported.5. Only 64-bit Red Hat Linux is supported.Teamcenter10.1安装手册Getting started with Teamcenter client installationOn Windows Server and Windows 7, disable Windows User Account Control(UAC) before you install Teamcenter. This option is available in theControl Panel→User Accounts dialog box.Windows UAC can interfere with Teamcenter installation programs. Siemens PLM Software recommends turning off UAC for administrative users only.For more information, see Microsoft Windows documentation.Disable the Windows TCP scaling feature. Open a command prompt andenter the following command:netsh interface tcp set global autotuninglevel=disabledSiemens PLM Software recommends setting this parameter before installing Teamcenter because most client network infrastructures use one or more switches or routers. By default, Windows enables TCP window scaling, but some routers do not support this feature. This can cause installation failures that are difficult to diagnose and correct.For more information, see Microsoft Windows documentation.Teamcenter applications are provided in 32-bit and 64-bit versions. Use theappropriate Teamcenter software distribution image for your platform. If you use a nonnative language operating system version of Windows, youmust install and enable the Multilingual User Interface (MUI) pack to ensure the language font is displayed properly.1. Download and install the MUI pack for Windows from Microsoft.2. Open the Regional and Language Options dialog box in the WindowsControl Panel. 3. In the Languages tab, set the required language for the menus anddialogs. 4. In the Advanced tab and the Regional Options tab, set the requiredlanguage.System hardwareMake sure your Teamcenter host has the required amount of disk space available. Required hard disk space for Teamcenter configurations shows the required disk space for the following common Teamcenter configurations: Corporate serverThe corporate server contains the features included in the Corporate Server solution in Teamcenter Environment Manager (TEM). Additional features may require additional disk space.For more information, see the appropriate server installation guide (for Windows or UNIX/Linux). Two-tier rich clientTeamcenter10.1安装手册Chapter 1 Getting started with Teamcenter client installationThe two-tier rich client contains the features included in the Rich Client 2-tier solution in Teamcenter Environment Manager (TEM).Additional features may require additional disk space.For more information, see Install a two-tier rich client.Web tierThe Web tier includes the Web Application Manager, a distribution server, and a distribution server instance that contains the Over-the-Web installer and Rich Client 4-tier solutions. Additional solutions may require additional disk space. For more information, see the appropriate server installation guide (for Windows or UNIX/Linux).Required hard disk space for Teamcenter configurationsPlatformHewlett-Packard HP-UX6 IBM AIX SUSE Linux Red Hat Linux Sun Solaris Microsoft WindowsCorporate server 3.0 GB 2.0 GB 2.0 GB 2.0 GB 2.5 GB 1.5 GBTwo-tier rich client Not supported Not supported 300 MB 300 MB Not supported 450 MBWeb tier 3 GB 3 GB 3 GB 3 GB 3 GB 4.5 GBWeb browserThe Teamcenter thin client and Over-the-Web Installer7 require a Web browser. Teamcenter 10.1 supports the following Web browsers: Windows systems: Microsoft Internet Explorer and Mozilla Firefox Linux systems: Mozilla Firefox Macintosh systems: Apple Safari For information about versions supported, see the Siemens PLMSoftware Certification Database.Java Runtime EnvironmentTeamcenter Environment Manager (TEM) requires a supported Java Runtime Environment (JRE). You must download and install the required JRE before you install Teamcenter.For information about required versions of the JRE for Teamcenter, see the Siemens PLM Software certification database:6. Itanium platforms only. PA-RISC hardware is not supported.7. The Over-the-Web Installer installs the four-tier Teamcenter rich client and Teamcenter Microsoft Office interfaces.Teamcenter10.1安装手册Getting started with Teamcenter client installation/ certification/teamcenter.shtmlTEM verifies the required version of Java is available on the host. If the required version is not present, TEM does not launch.Before you launch TEM to install Teamcenter, specify the location of the JRE by one of the following methods:Set the appropriate environment variable on your host:o32-bit JavaSet the JRE_HOME environment variable to the location of the 32-bit Java JRE. o64-bit JavaSet the JRE64_HOME environment variable to the location of the 64-bit Java JRE.NoteYou must use the appropriate Teamcenter software distribution image (32-bit or 64-bit) for the JRE you use.Use the -jre argument to specify the JRE location when you launch TEM from acommand prompt:tem ―jre JRE-pathFor example:tem Cjre c:\apps\jre1.7TEM stores the JRE location during Teamcenter installation. After installation is complete, TEM no longer requires the JRE_HOME orJRE64_HOME environment variable or the -jre argument.Software integrationsIf you use Teamcenter 10.1 integrations to other Siemens PLM Software products or third-party software, install those products before you install Teamcenter 10.1. Some Siemens PLM Software products require separate licenses from your Siemens PLM Software representative. Siemens PLM Software products are licensed using the Siemens PLM Software Common Licensing Server.For more information about the Common Licensing Server, see the appropriate server installation guide (for Windows or UNIX/Linux).If you use any of the following integrations with the rich client, make sure you install these applications in locations specified by the Teamcenter administrator. Teamcenter Integration for NX or NX Integration Obtain the NX software distribution image and install a supported version of NX on your workstation. You must install the optional Teamcenter Integration for NX executables.For installation information, see the installation guide distributed with NX. Lifecycle VisualizationTeamcenter10.1安装手册Chapter 1 Getting started with Teamcenter client installationObtain the Lifecycle Visualization software distribution image and install a supported version of Lifecycle Visualization on your workstation.For installation information, see the installation guide distributed with Lifecycle Visualization.SCM Integration C ClearCaseObtain the IBM Rational ClearCase client distribution image and install a supported version on your workstation.NoteTeamcenter Microsoft Office interfaces require additional software. For more information, see Installing Microsoft Office interfaces.Preparing to install TeamcenterTo enable Teamcenter Environment Manager (TEM), make sure you complete the following:Locate the Teamcenter software and documentation distribution images andmake sure they are accessible to your host. Specify the path to the required Java Runtime Environment (JRE) by settingthe appropriate environment variable on your host:o32-bit JavaSet the JRE_HOME environment variable to the location of the 32-bit Java JRE.o 64-bit JavaSet the JRE64_HOME environment variable to the location of the 64-bit Java JRE.NoteYou must use the appropriate Teamcenter software distribution image (32-bit or 64-bit) for the JRE you use.Alternatively, you can specify the JRE path from the command line using the -jre argument when you launch TEM:tem ―jre JRE-pathFor example:tem Cjre c:\apps\jre1.7For information about required versions of the JRE for Teamcenter, see the Siemens PLM Software certification database:/ certification/teamcenter.shtmlTeamcenter10.1安装手册Getting started with Teamcenter client installationConfiguring Teamcenter installationIf your Teamcenter administrator configured the rich client to include Teamcenter lifecycle visualization, ensure you have administrator privileges on your workstation.Starting Teamcenter installationTo begin installing Teamcenter installation, launch the appropriate Teamcenter installation tool:Teamcenter Environment ManagerTo install a Teamcenter rich client, launch Teamcenter Environment Manager using the tem.bat command from the Teamcenter software distribution image. Over-the-Web InstallerTo install a Teamcenter four-tier rich client, open the URL to theOver-the-Web Installer provided by your Teamcenter administrator.Teamcenter Environment Manager interfaceTeamcenter Environment Manager is a tool that installs Teamcenter two-tier and four-tier rich clients.Teamcenter Environment ManagerTeamcenter10.1安装手册Chapter 1 Getting started with Teamcenter client installationTeamcenter Environment Manager also performs maintenance operations, such as upgrading servers, applying maintenance packs, and installing patches. You launch Teamcenter Environment Manager using the tem.bat command.Basic concepts about Teamcenter installationTeamcenter clientsTeamcenter provides clients suited to various uses and network configurations. These clients include the rich client, the thin client, and specialized clients such as Teamcenter Client for Microsoft Office and Teamcenter Extensions for Microsoft Office. Rich clientThe rich client is a platform-independent client implementation (Java application) for users who interact with Teamcenter frequently. It is extendable and able to run both Teamcenter and customer-written applications. Customers can also extend the standard user interface.The rich client application is deployed on each user workstation using Teamcenter Environment Manager or the Over-the-Web Installer, depending on which Teamcenter network architecture you use. The rich client is supported in both architectural models described in Two-tier architecture and Four-tier architecture. Thin clientThe thin client provides access to Teamcenter through a standard commercial Web browser, such as Microsoft Internet Explorer or Mozilla Firefox. The user interface provides a streamlined browser-based view of product information stored in a Teamcenter database.The thin client is supported only in the four-tier architectural model described in Four-tier architecture.Teamcenter network architecturesTeamcenter provides two architecture models for deployment: two-tier and four-tier. Two-tier architectureThe two-tier architectural model comprises the following tiers: Client tierThe client tier comprises the Teamcenter rich clients.In a deployment of the two-tier architecture, the Teamcenter server runs on the client workstation.Teamcenter10.1安装手册Getting started with Teamcenter client installationNoteThe two-tier rich client is installed only through TEM. Over-the-Web installation is supported only for the four-tier rich client.Some Teamcenter client features, such as Teamcenter Integration for NX, Lifecycle Visualization, and Teamcenter Client for Microsoft Office, require the Web tier, a component of the four-tier architecture. To enablethese features for a two-tier rich client, you can connect the two-tier rich client to a deployment of the Web tier. For information about functionality you can add to a rich client and which add-ons require the Web tier, see the appropriate server installation guide (for Windows or UNIX/Linux).Resource tierThe resource tier comprises a database server, database, volumes, and file servers.Two-tier architectureIn the two-tier model, you deploy the Teamcenter rich client, which includes the local server, and the optional applications that integrate with the rich client on the client workstation. Typically, the database server, volumes, and file servers are installed on one or more separate hosts.Teamcenter File Management System (FMS) manages the rich client access to volumes:The FMS server cache (FSC) process run on the server hosting the volume.The FMS client cache (FCC) process runs on the rich client host.For more information about FMS and two-tier rich client architecture, see the appropriate Teamcenter server installation guide (for Windows or UNIX/Linux). Four-tier architectureThe four-tier architecture model comprises the following tiers:Teamcenter10.1安装手册Chapter 1 Getting started with Teamcenter client installationClient tierThe client tier comprises the Teamcenter rich client, thin client, and other clients such as Teamcenter Client for Microsoft Office.NoteThe rich client can be deployed with additional functionality, such as Lifecycle Visualization, Teamcenter Client for Microsoft Office, and Teamcenter Integration for NX or NX Integration 4.0.1. (Teamcenter Integration for NX/NX Integration 3 is not supported.)J2EE Web tierThe J2EE Web tier is a Java application that runs in a Java 2 Enterprise Edition (J2EE) application server, such as Oracle WebLogic, and is responsible forcommunication between the client tier and enterprise tier. For information about supported application servers, see the Siemens PLM Software Certification Database:/ certification/teamcenter.shtmlEnterprise tierThe enterprise tier comprises a configurable pool of Teamcenter C++ server processes and a server manager. The enterprise tier retrieves data from and stores data in the database.A server manager manages a pool of Teamcenter server processes.You must install a server manager whenever you deploy the Web tier.NoteTeamcenter provides server managers based on the J2EE and the Microsoft .NET platforms. Install the appropriate server manager for the Web tier you use.Resource tierThe resource tier comprises a database server, database, volumes, and file servers.Teamcenter10.1安装手册Getting started with Teamcenter client installationFour-tier architectureYou can design deployments that host the Web tier, resource tier, and enterprisetiers on the same computer or on separate computers: Smaller sites can run the pool of servers and the server manager on the samehost as the Web tier.Larger sites can distribute the pool of server processes across multiple hostsand optionally include an HTTP server to serve static files or multiple HTTPservers to support load balancing.For a multihost configuration, the server pool consists of multiple subpools, oneor more for each host. Each subpool is managed by one server manager process. The Web tier balances the load across the serverpools.Teamcenter10.1安装手册Chapter 1 Getting started with Teamcenter client installationThe Teamcenter J2EE based server manager and Web tier application both employ the JBoss cache, a tree-structured cache, to provide replication and transaction context. You must configure the JBoss cache (called TreeCache in Teamcenter) in both the J2EE based server manager and the Web tier application.8To ensure communication between the Web tier and the server manager, you must coordinate the values you specify for each component. For some values, you must provide the identical value when configuring the Web tier application.For more information about four-tier rich client architecture, see the appropriate Teamcenter server installation manual (for Windows orUNIX/Linux). A minimum of one server manager for each Web tier deployment.A separate TreeCache cluster for each environment.To configure a separate TreeCache cluster, Siemens PLM Software recommends configuring a different port (multicast) or set of ports (TCP) for each cluster.File Management System (FMS)File Management System (FMS) is a file storage, caching, distribution,。
centos7⼀键安装cacti_1.2.16版本#!/bin/bash#hanzb⾃学⼀键搭建cacti#本安装⽅案适合centos7版本,采⽤LAMP。
#把脚本放置到系统⾥⾯,需要chmod +x 脚本名赋予权限,然后bash 脚本即可或者./脚本cdsetenforce 0sed -i 's/SELINUX=enforcing/SELINUX=disabled/g' /etc/sysconfig/selinuxyum install wget -yyum install ntpdate -ysystemctl start ntpdatesystemctl enable ntpdatentpdate echo "59 23 * * * ntpdate " > /var/spool/cron/rootyum install /enterprise/remi-release-7.rpm -yyum install yum-utils -yyum-config-manager --enable remi-php72yum install -y httpdsystemctl start httpdsystemctl enable httpdsystemctl stop firewalldsystemctl disable firewalldtouch /etc/httpd/conf.d/cacti.confcat <<EOF> /etc/httpd/conf.d/cacti.conf<VirtualHost *:443>DocumentRoot "/var/www/html/cacti"Alias /cacti /var/www/html/cacti<Directory /var/www/html/cacti/><IfModule mod_authz_core.c>Allow from allRequire all granted</IfModule></Directory></VirtualHost>EOFyum install -y php php-common php-bcmath php-cli \php-mysqlnd php-gd php-gmp php-intl \php-json php-ldap php-mbstring \php-pdo php-pear php-snmp php-process \php-xml php-zipsed -i 's/;date.timezone =/date.timezone = Asia\/shanghai/g' /etc/php.inised -i 's/memory_limit = 128M/memory_limit = 800M/g' /etc/php.inised -i 's/max_execution_time = 30/max_execution_time = 60/g' /etc/php.iniyum install -y rrdtoolyum install -y net-snmp net-snmp-utilsmv autocacti/cacti-latest.tar.gz /tmp/cd /tmp#此处因为我⾃⼰已经提前下载好包,所以注释掉了wget,没有下载的可以去掉#。
CactiEZ V10.1 中文版 Cacti中文解决方案+使用教程一、CactiEZ介绍CactiEZ中文版是最简单有效的Cacti中文解决方案,整合Spine,RRDTool 和美化字体。
集成Thold,Monitor,Syslog,Weathermap,Realtime,Errorimage,Mobile,Aggregate以及Apache,Squid,F5,Nginx,MySQL 等模板。
支持多种硬盘控制器和阵列卡,基于CentOS6,启动速度更快,支持EXT4文件系统,原生rsyslog更稳定。
全中文页面,中文图形,支持邮件报警,支持声音报警,安装方便使用简单。
--------------------------------------------------------------------------------------------------说明:CactiEZ中文版V10.1是基于CentOS 6.0系统,整合Cacti等相关软件,重新编译而成的一个操作系统!优点:省去了复杂烦琐的Cacti配置过程,安装之后即可使用,全部中文化,界面更友好缺点:CactiEZ是一个完整的操作系统,需要专门一台电脑才能安装使用具体案例:1、CactiEZ服务器监控主机IP:192.168.220.254子网掩码:255.255.255.0网关:192.168.220.1DNS:8.8.8.88.8.4.42、Windows客户机系统:Windows Server 2003IP:192.168.220.130,与CactiEZ监控主机在同一个局域网内3、Linux客户机系统:CentOS 6.2IP:192.168.220.169,与CactiEZ监控主机在同一个局域网内目的:使用CactiEZ监控主机对Windows客户机和Linux客户机进行监控二、安装CactiEZ监控主机CactiEZ下载地址(下载方法:复制下载地址到迅雷等下载工具里面进行下载):32位下载:迅雷下载(将下面地址复制到迅雷中):8000/CactiEZ-10.1-i386.iso?key=dd 5b704f43cf70024bdf787a63dc04d9&file_url=/gdrive/resource/FC/B7/FC 7E27B0B23A01A48F274110DCC4140F3F7320B7&file_type=0&authkey=5 44A3F701F8895CC3635134BF55EB773D66C4955D756CE30E998FCC4C71 27B7C&exp_time=1367960567&from_uid=280987&task_id=5835371868 065652226&get_uid=1007077871&f=&reduce_cdn=1&fid=qiNQY1Vfn/cqwouUauYF/CFZC7EAoI0VAAAAAPx+J7CyOgGkjy dBE NzEFA8/cyC3&mid=666&threshold=150&tid=48973CB84832FCD2313FC 5A7B80C1F70&srcid=7&verno=1" file_size="361603072"cid="AA235063555F9FF72AC28B946AE605FC21590BB1"gcid="FC7E27B0B23A01A48F274110DCC4140F3F7320B7"gcid_resid="tSH9tFE9k7RLH7QRHGwRQGlZH7z4HFOPtOQGQGO4HOb3t 7z3H7RLQxiTQFO0gFfTQ7O0HGk0gFH.BT种子下载/CactiEZ-10.1-i386.torrent64位下载:迅雷下载(将下面地址复制到迅雷中):8000/CactiEZ-10.1-x86_64.iso?key =53fa47f5091b0e3d99c1aaded218600f&file_url=/gdrive/resource/6F/CA /6F103ECECBDC4F31596DE91AF2BEAF33EF6D83CA&file_type=0&authke y=9A3A0641445805A4257F3263BEC82F4B37B97F9DC1C52CD39132C406 336E9D33&exp_time=1367960567&from_uid=280987&task_id=5835371 868065652226&get_uid=1007077871&f=&reduce_c dn=1&fid=icHGUsUtxEGBTcLjslYwvOaTghMAKFcYAAAAAG8QPs7L3E8xW W3pGvK+rzPvbYPK&mid=666&threshold=150&tid=E1CE3A8A5AA1C5D 11EE52F960233F29A&srcid=7&verno=1" file_size="408365056"cid="89C1C652C52DC441814DC2E3B25630BCE6938213"gcid="6F103ECECBDC4F31596DE91AF2BEAF33EF6D83CA"gcid_resid="QSb_HGQwk4AGkStGQOb3HF-0QStwgFwRt72Lt-wZH3Qwt7 oOgGQGkAiTQFO0gFfTQ7O0HGk0gFO.BT种子下载/CactiEZ-10.1-x86_64.torrent链接:/s/1mgIBEo4密码:sa5o三、安装步骤(64位CactiEZ系统)特别说明:安装CactiEZ的主机磁盘空间必须要在10G以上(当然这在某程度上来说是废话),否则不能安装如果是虚拟机安装,请设置磁盘空间大于10G把下载好的CactiEZ系统镜像刻录为光盘,使用光盘成功引导系统之后,会出现下面的界面选择第一项,安装CactiEZ,回车,出现如下界面检查安装介质,这里通常都选择Skip直接跳过,回车,系统会自动安装继续等待.......OK 系统已经安装完成,点击Reboot重启系统!四、设置CactiEZ监控主机默认安装好之后,系统登录用户root,密码CactiEZ(区分大小写)以下操作在登录系统之后进行1、修改root登录密码passwd root →回车之后,提示输入2次新密码出现:passwd:all authentication tokens updated successfully.说明密码修改成功2、修改IP地址、子网掩码、网关、DNS等信息vi /etc/sysconfig/network-scripts/ifcfg-eth0DEVICE="eth0"BOOTPROTO="static"DNS1="8.8.8.8"DNS2="8.8.4.4"GATEWAY="192.168.220.1"HOSTNAME="CactiEZ.local"HWADDR="00:0C:29:AF:98:C1"IPADDR="192.168.220.254"MTU="1500"NETMASK="255.255.255.0"NM_CONTROLLED="yes"ONBOOT="yes":x →保存并退出service network restart →重启网络服务3、登录CactiEZ监控平台浏览器里面输入CactiEZ的IP地址打开用户名:admin,默认初始密码:admin为了安全考虑,第一次登录之后必须修改默认密码,修改好之后点保存,登录到CactiEZ Web监控平台现在CactiEZ监控服务器端安装完成。
CactiEZ V10.1安装配置手册1.下载光盘镜像,刻录好光盘,选择从光盘启动,界面如下图:3.用TAB键切换到“SKIP”,按回车选择跳过测试,直接安装。
4.点击回车,重启电脑,完成安装。
配置CactiEZ:1.使用用户名:root,密码:CactiEZ进入系统。
2.配置网络环境。
输入system-config-network命令配置网络,提示:您只需要输入“syst”然后按下字母“Q”左边的“Tab”键即可自动补充完整命令。
3.选择“Device configuration”(设备配置),回车进入。
的网络设备。
置成功。
注:使用“Shift + Tab”键跳到上一个输入框。
6.将光标跳到“SAVE”处,点击回车,保存设置。
7.将光标跳到“SAVE & QUIT”处,点击回车,保存并退出。
8.输入命令service network restart来重启网络服务,使网络配置生效。
9.输入命令ifconfig eth0来查看请求到的IP地址。
10.打开浏览器,输入CactiEZ服务器的ip地址,进入管理页面。
11.在此输入CactiEZ-Web界面的用户名和密码,注意该用户名和密码与系统的用户名和密码不同。
默认管理员用户名:admin,默认密码:admin,然后点击“登录”按钮。
12.第一次登录时会强制修改密码,输入密码即可,点击保存,下一次登录时要使用新密码。
13.至此,基本配置完毕。
CactiEZ中文版搭建完毕,使用页面可进行管理。
点击最上方“控制台”按钮进入如下画面:添加要监控的设备如下图:注意:以下红色方框是必填项目点击右下角“保存”按钮保存,然后单击“主机”就可以看见刚才添加的主机了。
选中刚才添加的主机最后的复选框,在右下角选择添加到树(测试),点击确定。
点击最上方“图形"按钮就能看见主机被加入指定的目录中了。
如下图:接下来为主机添加流量图,点击最上方的控制台按钮,如下图:找到刚才添加的主机,单击,然后选择”为这个主机添加图形“在打开的界面选中所有复选框,如下图:然后在右下角选择一个值,点击保存,如图所示:这样我们再点击最上方的”图形“按钮,切换到如下界面:再点击主机名就可以查看设备所有的端口流量了。
Cacti安装和配置目录一,Cacti简介 (2)二,安装CactiEZ (2)2.1下载CactiEZ的ISO镜像 (2)2.2 安装CactiEZ (2)2.3 修改CactiEz的IP地址 (3)2.4 登陆CactiEZ系统 (4)三配置CactiEZ (4)3.1 设置邮件/域名解析 (4)3.2 设置宕机通知和报警邮件正文内容 (4)3.3 创建阈值模板 (5)3.4 添加设备 (6)3.5 为监控主机创建图形 (7)3.6自动创建阈值 (8)3.7 查看阈值 (8)3.8 编辑自动创建的阈值 (9)3.9 创建图形树 (9)3.9.1创建一级目录 (9)3.9.2创建二级目录 (10)3.9.3 将设备加入到图形树中 (10)四后续问题 (10)4.1 Cacti端口名称显示不全的问题 (10)4.2交换机端口流量达到100M以上图像有问题? (11)4.3重建rrd cache (11)4.4 检查cacti错误的数据库和表 (11)4.5 报警邮件无法通知 (11)4.6 windows的CPU、内存等数据监控不到 (12)4.7 Cacti模板导入提示hash版本不存在的解决方法 (12)4.8添加设备,错误: 密码不匹配,请重新输入 (13)4.9 CactiEZ的Syslog显示的主机如何删除 (13)4.10 CacitEZ10.1 修改取值间隔为1分钟 (13)4.11优化数据库schema,建立合理的索引 (14)前言在互联网快速发展的今天,人们对网络功能应用又有了更高的需要,现在的互联网追求的是智能化、自动化等等,拿监控网络流量来说,基本的带宽监控已经无法满足我们的需要,比如MRTG,对于一些监控应用MRTG是很难实现的,比如流量阈值报警,用户权限分配等,特别是数据中心,经常会遭遇DDOS攻击,有了自动流量阈值报警通知,能准确定位故障原因,提高数据中心的响应速度。
一、安装前先对各版本有个初步的认识,下图是安装开始的界面32位安装界面截图64位安装界面截图从以上图可以看出,运维网发布的cacti+nagios集成一键安装的V11版本,在一个ISO中集成了中英文两个版本,而两个版本中又分为多个版本,各维友可以通键盘的上下箭头来选择安装,下里先解说一下各版本情况:Cacti+Nagios+Centreon_EN:是指Cacti英文版本+ Nagios英文版本+ Centreon中英文自由切换版本Cacti+Nagios+Centreon_CN:是指Cacti中文版本+ Nagios中文版本+ Centreon中英文自由切换版本Cacti+Nagios+Check_MK_EN:是指Cacti英文版本+ Nagios英文版本+ Check_MK 英文版本Cacti+Nagios+Check_MK_CN:是指Cacti中文版本+ Nagios中文版本+ Check_MK 英文版本Cacti+Nagios+Nconf_EN:是指Cacti英文版本+ Nagios英文版本+ Nconf英文版本Cacti+Nagios+Nconf_CN:是指Cacti中文版本+ Nagios中文版本+ Nconf英文版本注意:以上所说的所有英文版本都是采用国外官方英文原版源码编译安装的,且全部是目前为止最新的稳定版本,中文版本并不是国外官方所发布而是国人翻译的,所以并不是最新版本;因此,建议大家还是选择英文版本安装使用,也方便与官方同步升级……Cacti简介:/forum.php?mod=viewthread&tid=5499Nagios简介:/forum.php?mod=viewthread&tid=5498 Centreon简介:/forum.php?mod=viewthread&tid=4315 Check_MK简介:/forum.php?mod=viewthread&tid=826 Nconf简介:/forum.php?mod=viewthread&tid=696以上作个简单的了解,更多详细的说明可以参考上更多的文档二、安装说明各维友安装时按以上说明选择相关的进行安装,安装很简单,直接回车即可全自动安装,成功安装后会提示reboot重启界面,再回车reboot即完成安装进入系统,此时即可通过默认的IP(32位:192.168.0.8 64位:192.168.0.88)用IE来访问,进行设备的各监控,当然,你最好是通过Cnyunwei-Cacti+Nagios 安装后按自己的要求修改相关信息文章来修改相关的帐号等信息;各维友下载iso文件后,可通过MD5来验证一下,是否下载正确完整,避免不完整或下载错误导致安装失败,参考帖子MD5验证工具的下载与使用;各维友注意了,Cnyunwei-Cacti+Nagios安装是一个全自动的过程,选择相关安装选项后直接回车即可,中间无需人工干预,并且安装过程中会把你的整个磁盘全部重新格式化分区,如果磁盘里还有需要的数据一定要先保存好,否则你就哭去吧……可没有后悔药了;各维友可以通过物理机、虚拟机来安装,建议内存512M以上、磁盘20G以上(具体按个人实际情况来),直接用下载iso文件刻录成光盘来安装或通过U盘的方式来安装,或直接iso文件挂载来安装(不可对iso解压修改任何文件后再安装否则无法安装)安装引导后会看到以下安装界面,通过上下箭头来选择,选择后直接回车即可全自动安装:最后会看到以下reboot重启界面提示,此时需要注意一点,如果你的机器是设成光驱启动的,你直接回车后不管它的话它又会自动重新安装,因此,此时的你需要取出光盘,如果是虚拟机挂载iso安装的话,也需要把光驱改掉;回车重启后即可完成全部的安装,进入系统安装之后默认的登录使用说明,建议尽快按个人要求修改相关帐号等信息,可以参考Cnyunwei-Cacti+Nagios 安装后按自己的要求修改相关信息文章来修改:32位系统的默认IP是:192.168.0.864位系统的默认IP是:192.168.0.88登录操作系统密码:(建议尽快修改)pass: 登录cacti的默认密码:(建议尽快修改)32位:http://192.168.0.864位:http://192.168.0.88user: adminpass: 登录nagios的默认密码:(建议尽快修改)32位:http://192.168.0.8/nagios64位:http://192.168.0.88/nagiosuser: nagiosadminpass: 登录Centreon的默认密码:(建议尽快修改)32位:http://192.168.0.8/centreon64位:http://192.168.0.88/centreonuser: adminpass: 登录Check_MK的默认密码:(建议尽快修改)32位:http://192.168.0.8/check_mk64位:http://192.168.0.88/check_mkuser: nagiosadminpass: 登录Nconf地址及默认密码:(建议尽快修改)32位:http://192.168.0.8/nconf64位:http://192.168.0.88/nconfuser:adminpass:Webmin地址及默认密码:(V11之前的版本帐号信息如下,建议尽快修改,从V11版本开始默认不集成webmin,你可以自行下载安装,坛子上提供详细的安装说明及下载地址关于webmin 下载及安装配置)32位:http://192.168.0.8:1000064位:http://192.168.0.88:10000user:rootpass:登录phpMyAdmin的默认密码:(建议尽快修改)32位:http://192.168.0.8/phpmyadmin64位:http://192.168.0.88/phpmyadminpass: Cnyunwei-Cacti+Nagios最新版本下载地址:/forum.php?mod=viewthread&tid=802Cnyunwei-Cacti+Nagios安装后按自己的相关要求修改相关信息:/forum.php?mod=viewthread&tid=806Cnyunwei-Cacti+Nagios操作手(图文详解):/forum.php?mod=viewthread&tid=2029关注站点、关注微博和大家一同进步,随时关注动态……新浪:/cnyunwei腾讯:/cnyunwei一、CentOS系统部分1、修改服务器的IP地址:安装完后默认的IP地址是192.168.0.8,网关是192.168.0.253,DNS是8.8.8.8,自己按需修改,修改方法如下:(1)修改配置文件/etc/sysconfig/network-scripts/ifcfg-eth0vi /etc/sysconfig/network-scripts/ifcfg-eth0DNS1="8.8.8.8"GATEWAY="192.168.0.253"IPADDR="192.168.0.8"修改后,重启服务使修改生效:/etc/init.d/network restart(2)通过system-config-network命令修改[root@Cnyunwei ~]# system-config-network输入此命令后按提示一步一步修改即可(3)通过Web方式登录http://IP:10000进行修改(从V11版本开始默认不集成webmin,你可以自行下载安装,坛子上提供详细的安装说明及下载地址关于webmin 下载及安装配置)2、登录CentOS操作系统密码:(建议尽快修改)初始密码:user: root pass: 修改方法:以root帐号登录系统后直接输入passwd即可修改3、Webmin地址及默认密码:(建议尽快修改)修改方法:登录系统执行以下密码即可修改/usr/libexec/webmin/changepass.pl /etc/webmin root ********4、登录phpMyAdmin的默认密码:(建议尽快修改)初始密码:user: root pass: 这里是通过数据库的帐号来登录验证的,所以修改数据库帐号密码就可以二、cacti部分1、登录Cacti的默认密码:(建议尽快修改)初始密码:user: admin pass: 修改方法:登录后选择【console】——【User Management】——【admin】2、修改邮件报警,当设置相关阀值,当超过你所设定的阀值后就会邮件报警提醒修改成自己的相关邮件信息,不然报警信息就发送到我的邮箱来了,邮箱伤不起啊>_<修改配置后点击【Send a Test Emai】,发送邮件测试,成功会看到以下界面:在设置超过阀值报警:你在设置时填写邮件地址即可,以下是磁盘空间报警例子,内存、流量等等都是相同的设置方法【Console】-->【Settings】-->【Thresholds】4、修改NPC里nagios的链接地址【Console】-->【Settings】-->【NPC】,修改Nagios URL地址修改成你改后的IP地址(http://新的IP/nagios),否则在NPC插件里点击Nagios时会找不到链接(注意:Cacti+Nagios+Centreon组合是不支持NPC插件的)三、Nagios部分1、登录Nagios的默认密码:(建议尽快修改)初始密码:user: nagiosadmin pass: 修改方法:登录系统执行以下命令即可修改/usr/bin/htpasswd -c /usr/local/nagios/etc/ers nagiosadmin2、修改飞信短信及邮件相关报警信息,以Nconf为例进行说明(2)修改信息接收短信的手机号及接收邮件的Email地址3、修改发报警短信的飞信机器人登录帐号(注意:必须是以手机号注册的飞信号才可以发短信,可以给好友发短信也可自己给自己发,但是一般不用你自己手机注册的飞信号来发,除非你不在电脑上使用飞信;可以用一个平时不用飞信的手机号来注册,然后把你加为好友,这样就可以给你发短信报警了,以Email方式注册的不能发短信)修改notify-host-by-fetion及notify-service-by-fetion,修改里面的sid号及pwd密码--sid=534**** --pwd=***,如果不方便修改可以把全部内容复制到记事本上修改后再粘贴回去,注意全部内容都在一行的;4、报警设置四、Centreon部分登录Centreon的默认密码:(建议尽快修改) 32位:http://192.168.0.8/centreon64位:http://192.168.0.88/centreon user: adminpass: 五、Check_MK部分登录Check_MK的默认密码:(建议尽快修改) 32位:http://192.168.0.8/check_mk64位:http://192.168.0.88/check_mk user: nagiosadminpass: 六、Nconf部分更多的帐号信息修改及修改后需要修改哪些配置文件关注站点、关注微博和大家一同进步,随时关注动态……修改cacti登陆密码:用户界面修改centos密码:passpw修改hostname:vi /etc/sysconfig/network修改网络配置:vi /etc/sysconfig/network-scripts/ifcfg-eth0 修改后,重启服务使修改生效:/etc/init.d/network restart设置方法:# vi /etc/ntp.conf添加两行:restrict 210.72.145.44server 210.72.145.44 prefer保存。
Cacti的使用一、Cacti中目录结构二、熟悉Cacti界面,并添加监测设备1、添加监测设备2、选择收集数据的模板3、添加一颗图形树4、监测效果三、利用Cacti导入模板的功能监测一台Windows 2008主机1、在Windows 2008上启用SNMP服务2、在监控主机Cacti上安装第三方软件snmp informant 官网:3、下载Windows 2008主机模板或从官网文档库下载模板:/templates(2)、上传到Cacti监控主机,解压[root@localhost ~]# unzip Cacti_SNMP_INFORMANT_STD_W32_Metrics.zip(3)、导入模板解压后10个文件:1) cacti_data_query_w32_-_cpu_statistics.xmlcacti_data_query_w32_-_network_statistics.xml cacti_data_query_w32_-_disk_statistics.xmlcacti_data_query_w32_-_object_statistics.xmlcacti_data_query_w32_-_memory_statistics.xml 以上文件在cactit管理界面,Import Templates导入。
2) snmp_informant_disk.xmlsnmp_informant_objects.xmlsnmp_informant_memory.xmlsnmp_informant_cpu.xmlsnmp_informant_network.xml以上文件copy 到服务器cacti 安装目录的resource/snmp_queries 。
4、添加Windows 主机,查看主机,查看主机模板主机模板5、查看图模板四、Cacti插件的使用1、为Cacti安装插件(plugin)作用:扩展cacti的功能2、Monitor的安装方法:上传后解压到下面的文件夹[root@dba ~]# mv monitor /var/www/html/cacti/plugins3、Cacti插件-Thold使用You are missing a dependency for thold, please install the 'Settings' plugin.【需要先安装settings插件】下载地址:/plugin:settings#settings五、Cactiez说明:CactiEZ中文版V10.1是基于CentOS 6.0系统,整合Cacti等相关软件,重新编译而成的一个操作系统!优点:省去了复杂烦琐的Cacti配置过程,安装之后即可使用,全部中文化,界面更友好缺点:CactiEZ是一个完整的操作系统,需要专门一台电脑才能安装使用默认安装好之后,系统登录用户root,密码更改通过网页登录(用户名:admin,默认初始密码:admin):。
CactiEZ安装和配置CactiEZ安装和配置⼀,安装CactiEZ (1)1.1下载CactiEZ的ISO镜像 (1)1.2 安装CactiEZ (1)1.3 修改CactiEz的IP地址 (2)1.4 登陆CactiEZ (3)⼆配置CactiEZ (4)2.1 设置邮件/域名解析 (4)2.2 设置报警和阀值 (4)2.3.创建设备版本监控 (5)2.4 为监控主机创建图形 (6)2.5 Cacti的阈值预警设置 (7)2.6 创建图形树 (9)三后续问题 (11)3.1 Cacti端⼝名称显⽰不全的问题 (11)3.2交换机端⼝流量达到100M以上图像有问题? (11)3.3重建rrd cache (11)3.4 检查cacti错误的数据库和表 (11)前⾔Cacti 是⽹络流量监控⾥的开源⼤餐,对于⼀般⽹络管理员来说,监控⽹络流量的作⽤是为了有⼀个参照,对于问题分析有⼀个数据可依,那CACTI就是⼀个最佳的选择。
但是CACTI安装繁琐成为了⼀个不⼩的问题,此处推荐⼀般的管理员安装CactiEZ,安装配置⼀步搞定。
CactiEZ中⽂版V9,基于RHEL5.2,⽀持更多的硬盘和阵列卡,系统更稳定,⽀持中⽂页⾯和中⽂图形,美化字体。
⼀,安装CactiEZ1.1下载CactiEZ的ISO镜像CacitEZ下载地址http://122.225.31.253/CactiEZ_V9.iso,先下载ISO镜像,然后将CactiEZ_V9.iso刻录到光盘中.1.2 安装CactiEZ将光盘插⼊到电脑上,启动计算机,选择从光驱驱动。
按回车键Enter开始安装⼏分钟后就安装完成了,按回车重启,记得把光盘拿出来,改成硬盘引导。
1.3 修改CactiEz的IP地址启动好后,到登陆界⾯输⼊⽤户名root和密码CactiEZ1.4 登陆CactiEZ打开浏览器输⼊IP,然后输⼊⽤户名和密码,⽤户名: admin密码: admin (注第⼀次登录Cacti需要修改密码)⼆配置CactiEZ2.1 设置邮件/域名解析由于公司需要监控⼤攻击流量,⾃动发报警邮件,所以要预先设置好邮件报警。
CactiEZ V10.1 中文版Cacti中文解决方案+使用教程(1)
CactiEZ中文版是最简单有效的Cacti中文解决方案,整合Spine,RRDTool 和美化字体。
集成Thold,Monitor,Syslog,Weathermap,Realtime,Errorimage,Mobile,Aggregate以及Apache,Squid,F5,Nginx,MySQL 等模板。
支持多种硬盘控制器和阵列卡,基于CentOS6,启动速度更快,支持EXT4文件系统,原生rsyslog更稳定。
全中文页面,中文图形,支持邮件报警,支持声音报警,安装方便使用简单。
--------------------------------------------------------------------------------------------------
说明:CactiEZ中文版V10.1是基于CentOS 6.0系统,整合Cacti等相关软件,重新编译而成的一个操作系统!
优点:省去了复杂烦琐的Cacti配置过程,安装之后即可使用,全部中文化,界面更友好
缺点:CactiEZ是一个完整的操作系统,需要专门一台电脑才能安装使用
具体案例:
1、CactiEZ服务器监控主机
IP:192.168.220.254
子网掩码:255.255.255.0
网关:192.168.220.1
DNS:8.8.8.8
8.8.4.4
2、Windows客户机
系统:Windows Server 2003
IP:192.168.220.130,与CactiEZ监控主机在同一个局域网内
3、Linux客户机
系统:CentOS 6.2
IP:192.168.220.169,与CactiEZ监控主机在同一个局域网内
目的:使用CactiEZ监控主机对Windows客户机和Linux客户机进行监控一、安装CactiEZ监控主机
CactiEZ下载地址(下载方法:复制下载地址到迅雷等下载工具里面进行下载):32位下载:迅雷下载(将下面地址复制到迅雷中)
:8000/CactiEZ-10.1-i386.iso?key=dd 5b704f43cf70024bdf787a63dc04d9&file_url=/gdrive/resource/FC/B7/FC 7E27B0B23A01A48F274110DCC4140F3F7320B7&file_type=0&authkey=5 44A3F701F8895CC3635134BF55EB773D66C4955D756CE30E998FCC4C71 27B7C&exp_time=1367960567&from_uid=280987&task_id=5835371868 065652226&get_uid=1007077871&f=&reduce_cdn= 1&fid=qiNQY1Vfn/cqwouUauYF/CFZC7EAoI0VAAAAAPx+J7CyOgGkjydBE NzEFA8/cyC3&mid=666&threshold=150&tid=48973CB84832FCD2313FC 5A7B80C1F70&srcid=7&verno=1" file_size="361603072"
cid="AA235063555F9FF72AC28B946AE605FC21590BB1"
gcid="FC7E27B0B23A01A48F274110DCC4140F3F7320B7"
gcid_resid="tSH9tFE9k7RLH7QRHGwRQGlZH7z4HFOPtOQGQGO4HOb3t 7z3H7RLQxiTQFO0gFfTQ7O0HGk0gFH.
BT种子下载/CactiEZ-10.1-i386.torrent
64位下载:迅雷下载(将下面地址复制到迅雷中)
:8000/CactiEZ-10.1-x86_64.iso?key =53fa47f5091b0e3d99c1aaded218600f&file_url=/gdrive/resource/6F/CA /6F103ECECBDC4F31596DE91AF2BEAF33EF6D83CA&file_type=0&authke y=9A3A0641445805A4257F3263BEC82F4B37B97F9DC1C52CD39132C406 336E9D33&exp_time=1367960567&from_uid=280987&task_id=5835371 868065652226&get_uid=1007077871&f=&reduce_c dn=1&fid=icHGUsUtxEGBTcLjslYwvOaTghMAKFcYAAAAAG8QPs7L3E8xW W3pGvK+rzPvbYPK&mid=666&threshold=150&tid=E1CE3A8A5AA1C5D 11EE52F960233F29A&srcid=7&verno=1" file_size="408365056"
cid="89C1C652C52DC441814DC2E3B25630BCE6938213"
gcid="6F103ECECBDC4F31596DE91AF2BEAF33EF6D83CA"
gcid_resid="QSb_HGQwk4AGkStGQOb3HF-0QStwgFwRt72Lt-wZH3Qwt7 oOgGQGkAiTQFO0gFfTQ7O0HGk0gFO.
BT种子下载/CactiEZ-10.1-x86_64.torrent
链接:/s/1mgIBEo4密码:sa5o
下面以安装64为CactiEZ系统为例,32位系统安装方法相同
特别说明:安装CactiEZ的主机磁盘空间必须要在10G以上(当然这在某程度上来说是废话),否则不能安装
如果是虚拟机安装,请设置磁盘空间大于10G
把下载好的CactiEZ系统镜像刻录为光盘,使用光盘成功引导系统之后,会出现下面的界面
选择第一项,安装CactiEZ,回车,出现如下界面
检查安装介质,这里通常都选择Skip直接跳过,回车,系统会自动安装
继续等待.......
OK 系统已经安装完成,点击Reboot重启系统!
二、设置CactiEZ监控主机
默认安装好之后,系统登录用户root,密码CactiEZ(区分大小写)
以下操作在登录系统之后进行
1、修改root登录密码
passwd root →回车之后,提示输入2次新密码
出现:passwd:all authentication tokens updated successfully.说明密码修改成功
2、修改IP地址、子网掩码、网关、DNS等信息
vi /etc/sysconfig/network-scripts/ifcfg-eth0
DEVICE="eth0"
BOOTPROTO="static"
DNS1="8.8.8.8"
DNS2="8.8.4.4"
GATEWAY="192.168.220.1"
HOSTNAME="CactiEZ.local"
HWADDR="00:0C:29:AF:98:C1"
IPADDR="192.168.220.254"
MTU="1500"
NETMASK="255.255.255.0"
NM_CONTROLLED="yes"
ONBOOT="yes"
:x →保存并退出
service network restart →重启网络服务3、登录CactiEZ监控平台
浏览器里面输入
CactiEZ的IP地址打开
用户名:admin,默认初始密码:admin
为了安全考虑,第一次登录之后必须修改默认密码,修改好之后点保存,登录到CactiEZ Web监控平台
现在CactiEZ监控服务器端安装完成。