USB 2_0与UVC 1_1 在Webcam F_W传输设定
- 格式:docx
- 大小:7.32 MB
- 文档页数:50
I.產品資訊I-1. 包裝內容物EW-7711UAn V2USB 傳輸線 安裝指南CD I-2. LED 指示燈號說明I-3. 系統需求- 適用含以下作業系統的個人電腦或筆記型電腦:Windows2000/Vista/7/8/8.1, Mac OS 10.4.x 或以上版本, Linux 。
同時,電腦必須內建USB 插槽(TYPE A)供無線網路卡來使用。
- 硬碟空間: 100MB- CD 光碟槽LED 指示燈II.硬體安裝請先啟動您的電腦,接著將本產品插入您電腦的USB 接埠。
1. 請將工具光碟片直接插入您的Windows 電腦的光碟機內。
您也可自Edimax 官網下載本安裝精靈2. 在Windows 作業系統,本安裝精靈下會自動啟動執行。
如果本包裝隨附CD 不會自動執行,或者如您下載了安裝精靈,Windows 用戶請您前往" Autorun "資料夾, Mac 用戶請前往"Mac"資料夾。
3. Windows 作業系統用戶,請參照下列章節中的說明操作:(MAC 及Linux 用戶,請您參照CD 光碟內附使用手冊中詳細說明)請注意:● 電腦USB 接埠有方向性,需依其方向正確插入網卡!● 部分桌上型電腦的USB 接埠方向會讓插入後的網卡天線朝下,在這種情況下,建議您搭配使用包裝內附的USB 延長底座。
● 插/拔網卡時,也請如上圖示意,抓住本體後再適當插/拔,如不當施力會很容易造成人為損害,影響保固權益。
III. Windows用戶III-1.安裝驅動程式若本包裝隨附CD未自動執行,請點開“Autorun.exe”檔,手動執行自動安裝精靈1.2.接著,請點選“Install Driver”安裝驅動程式。
3.請稍待安裝精靈啟動。
4.接著,請點選”下一步”。
5.請點選”安裝”。
6.驅動程式安裝中,請稍待!7.安裝完成後,請點選”Finish”<完成>。

EW-7811Un V2N150高效能隱形USB無線網路卡I.產品資訊 (1)I-1. 包裝內容 (1)I-2. LED指示燈 (1)I-3. 系統需求 (1)I-4. 安裝注意事項 (2)II.安裝 (2)III.Windows用戶 (3)III-1. 安裝驅動程式 (3)III-2. 移除驅動程式 (5)IV.Mac OS用戶 (6)IV-1. 安裝驅動程式 (6)IV-2. 移除驅動程式 (6)V.停用其它網路卡 (11)V-1. Windows 7用戶 (11)V-2. Windows 8.1/10 用戶 (11)V-3. Mac用戶 (12)VI.使用本網路卡 (12)VI-1. Windows用戶 (13)VI-2. Mac: 連線至Wi-Fi網路 (14)I.產品資訊I-1. 包裝內容EW-7811Un V2 安裝指南I-2. LED指示燈I-3. 系統需求-Windows 7/8/8.1/10, macOS 10.13-USB 2.0接埠-硬碟: 100MBI-4. 安裝注意事項為確保您及本產品操作使用上的安全,請務必詳讀及遵照以下說明指示。
1.本產品設計僅適合室內使用,請勿將本產品替代室外無線網卡。
2.請勿將本產品擺置在(或靠近)高熱或高濕的地方,如廚房或浴室。
3.本產品小巧,請勿讓幼童接觸,以避免受傷或誤食。
4.此產品在使用中,會產生熱度,請勿將本產品放置於紙張、布類或其它容易燃燒的材質上。
5.本產品並無需要您自行組裝的部分,若您在開箱後發現問題,請與您購買的店家或經銷商聯繫。
6.由於本無線產品仍屬電器產品,一旦遇水弄濕,請務必馬上停止使用,並就近聯絡有經驗的電器技師,尋求協助。
II.安裝1.請至Edimax官網EW-7811Un V2產品頁面,請依您的作業系統下載安裝驅動程式,並將下載的驅動程式進行解壓縮和儲存。
2.請啟動您的電腦,並將本產品插入您電腦的USB接埠,再將筆電移至收訊較好的地方。
UVCUSBVIDEOCLASS协议规范篇一:嵌入式Linux下Camera编程--V4L2最近有个需求,要在ARM Linux上实现USB Camera 拍照功能。
0. 背景知识:首先要确认的是,Kernel是否支持USB Camera。
因为Linux 下,USB协议除了电气协议和标准,还有很多Class。
这些Class就是为了支持和定义某一类设备接口和交互数据格式。
只要符合这类标准,则不同厂商的USB设备,不需要特定的driver就能在Linux下使用。
例如:USB Input class,则使所有输入设备都可以直接使用。
还有类似Audio Class,Pring Class,Mass Storage Class, video class等。
其中Video Class 就是我们常说的UVC(USB Video Class). 只要USB Camera符合UVC标准。
理论上在2.6 Kernel Linux 就可以正常使用。
网络上有人谈到怎样判断是否UVC Camera设备:#lsusbBus 001 Device 010: ID 046d:0825 Logitech, Inc.#lsusb -d 046d:0825 -v | grep "14 Video"如果出现:bInterfaceClass 14 VideobInterfaceClass 14 VideobInterfaceClass 14 VideobInterfaceClass 14 VideobInterfaceClass 14 VideobInterfaceClass 14 VideobInterfaceClass 14 VideobInterfaceClass 14 VideobInterfaceClass 14 VideobInterfaceClass 14 VideobInterfaceClass 14 VideobInterfaceClass 14 VideobInterfaceClass 14 Video则说明是支持UVC.1. Kernel配置:Device Drivers ---> <*> Multimedia support ---><M>Video For LinuxDevice Drivers ---> <*> Multimedia support ---> [*]Video captureadapters ---> [*]V4L USBdevices ---> <M>USB Video Class (UVC)--- V4L USB devices : 这里还有很多特定厂商的driver.可供选择。

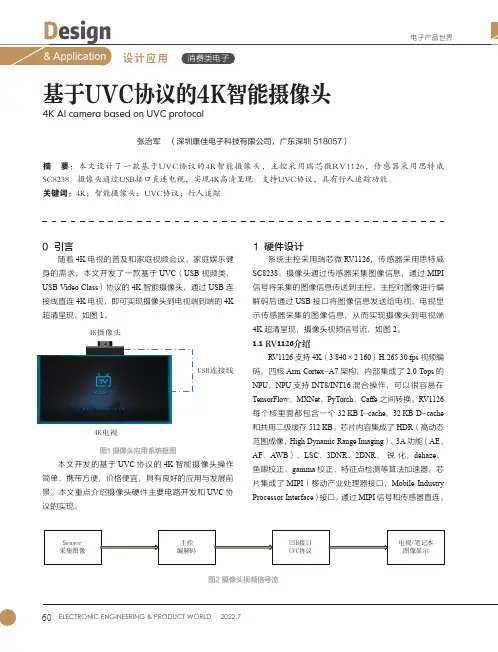
60ELECTRONIC ENGINEERING & PRODUCT WORLD2022.7电子产品世界基于UVC协议的4K智能摄像头4K AI camera based on UVC protocol张治军 (深圳康佳电子科技有限公司,广东深圳 518057)摘 要:本文设计了一款基于UVC协议的4K智能摄像头,主控采用瑞芯微RV1126,传感器采用思特威SC8238。
摄像头通过USB接口直连电视,实现4K高清呈现。
支持UVC协议,具有行人追踪功能。
关键词:4K;智能摄像头;UVC协议;行人追踪0 引言随着4K 电视的普及和家庭视频会议、家庭娱乐健身的需求,本文开发了一款基于UVC (USB 视频类,USB Video Class )协议的4K 智能摄像头,通过USB 连接线直连4K 电视,即可实现摄像头到电视端到端的4K 超清呈现,如图1。
4K 电视4K摄像头USB 连接线图1 摄像头应用系统框图本文开发的基于UVC 协议的4K 智能摄像头操作简单,携带方便,价格便宜,具有良好的应用与发展前景。
本文重点介绍摄像头硬件主要电路开发和UVC 协议的实现。
1 硬件设计系统主控采用瑞芯微RV1126,传感器采用思特威SC8238。
摄像头通过传感器采集图像信息,通过MIPI 信号将采集的图像信息传送到主控,主控对图像进行编解码后通过USB 接口将图像信息发送给电视,电视显示传感器采集的图像信息,从而实现摄像头到电视端4K 超清呈现,摄像头视频信号流,如图2。
1.1 RV 1126介绍RV1126支持4K (3 840×2 160)H .265 30 fps 视频编码,四核Arm Cortex -A7架构,内部集成了2.0 Tops 的 NPU ,NPU 支持INT8/INT16混合操作,可以很容易在TensorFlow 、MXNet 、PyTorch 、Caffe 之间转换。
RV1126 每个核里面都包含一个32 KB I -cache 、32 KB D -cache 和共用二级缓存512 KB 。
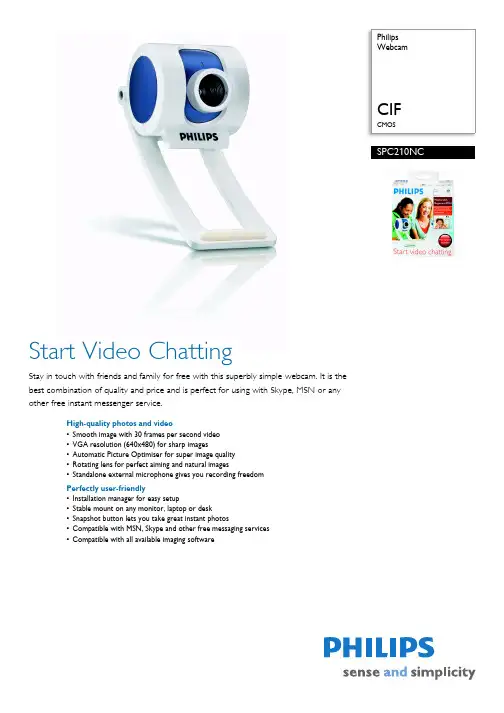
PhilipsWebcamCIFCMOSSPC210NCStart Video ChattingStay in touch with friends and family for free with this superbly simple webcam. It is thebest combination of quality and price and is perfect for using with Skype, MSN or anyother free instant messenger service.High-quality photos and video•Smooth image with 30 frames per second video•VGA resolution (640x480) for sharp images•Automatic Picture Optimiser for super image quality•Rotating lens for perfect aiming and natural images•Standalone external microphone gives you recording freedomPerfectly user-friendly•Installation manager for easy setup•Stable mount on any monitor, laptop or desk•Snapshot button lets you take great instant photos•Compatible with MSN, Skype and other free messaging services•Compatible with all available imaging softwareSpecificationsWebcamCIF CMOSHighlights30 frames per second videoSit back and enjoy superior viewing with 30 frames per second video. This gives you smoother video images and a better all-round video chatting experience.VGA resolutionVGA (640 x 480) means around 300,000 pixels are used to create the total image. This VGA resolution ensures sharp images for use in documents, webpages and e-mails.Automatic Picture OptimiserThe Automatic Picture Optimiser helps you get the most out of your webcam by automatically adjusting the camera and image settings to match the light available.Rotating lensRotating lens for perfect aiming and natural images. You can get the right camera angle quickly and easily without having to put things underneath it to change the tilt.Standalone external microphoneWith a separate external microphone, you have the freedom to place it where it best picks up your voice to add high-quality audio to your video chats.Installation managerInstall your webcam in seconds with the handy Installation Manager. Just follow the easy, step-by-step instructions and you'll have the webcam set up to match your computer perfectly.Stable mountThe multifunctional stand makes it easy for you to mount the webcam on any monitor, laptop, notebook or flat surface.Snapshot buttonWith just one press of this button, your webcam takes a picture automatically. It's a fun way to share your pictures by adding them to e-mails, webpages or documents.Compatible with MSN and SkypeThe webcam and its software have been designed with all messaging systems in mind. Add video to Skype, MSN Messenger, Yahoo!, AOL Messenger and other free messaging services. It also works with Windows Messenger and NetMeeting for multi-person video conferencing and is designed to be future-proof.Compatible with all softwareThe webcam works with all available free and professional imaging software. Take a snapshot or still picture from your video and open it with any image program.Video & snapshot capturing•Sensor:CMOS•Sensor resolution: QVGA •Video resolution: QVGA •Snapshot resolution: QVGA •Interpolated snapshot res.: VGA •Max. frame rate: 30 fps •Lens: f: 6 mm, F2.8, D42°•White balance: 2600 – 7600 k •Min. illuminance: < 10 lux •Colour depth: 24 bitMechanics•Laptop clamp •CRT stand •Desktop stand•Built-in digital microphone: No •QuickLaunch button: No •Snapshot button •LCD clampAccessories•Included Accessories: Quick install guide, User Manual, External microphoneSoftware•Add video to: MSN Messenger, Yahoo! Messenger, AOL Messenger, SkypeSystem Requirements•Operating System: Microsoft Windows 98, Microsoft Windows ME, Microsoft Windows 2000, Microsoft Windows XP•Processor: Pentium II 500 MHz or faster•RAM memory: 128 MB RAM •Sound card•USB: Free USB port •Internet connection•Hard disk space: 200 MB•CD-ROM or DVD-ROM DriveConnectivity•Cable length: 1.5 m •PC Link: USB 1.1Dimensions•Product dimensions (W x H x D): 74 x 142 x 74 mm•Product weight (g): 106Packaging Data•12NC: 908210008562•EAN/UPC/GTIN: 87 10895 97590 2•Gross weight: 0.322 kg •Height: 170 mm •Length: 150 mm •Width: 90 mm •Quantity:1•Tare weight: 0.216 kgOuter Box•EAN/UPC/GTIN: 87 10895 97972 6•Gross weight: 2.392 kg •Tare weight: 1.756 kg •Height: 188 mm •Length: 316 mm •Quantity:6•Width: 285 mmIssue date 2009-05-31Version: 2.0.512 NC: 9082 100 08562EAN: 87 10895 97590 2© 2009 Koninklijke Philips Electronics N.V.All Rights reserved.Specifications are subject to change without notice. Trademarks are the property of Koninklijke Philips Electronics N.V. or their respective 。
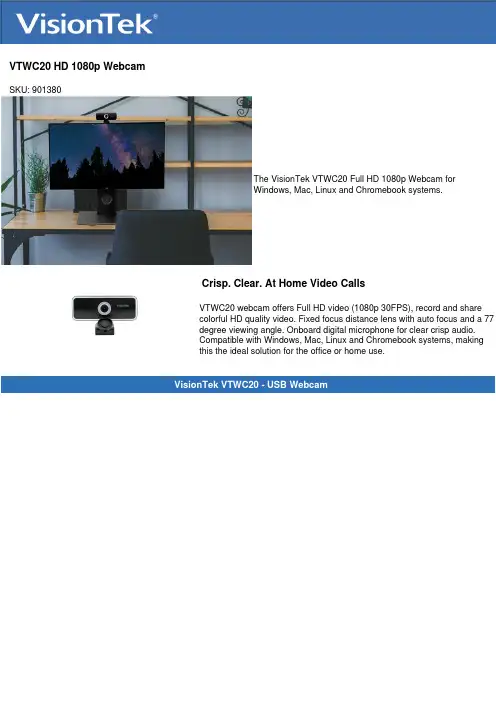
VTWC20 HD 1080p WebcamSKU: 901380The VisionTek VTWC20 Full HD 1080p Webcam forWindows, Mac, Linux and Chromebook systems.Crisp. Clear. At Home Video CallsVTWC20 webcam offers Full HD video (1080p 30FPS), record and sharecolorful HD quality video. Fixed focus distance lens with auto focus and a 77degree viewing angle. Onboard digital microphone for clear crisp audio.Compatible with Windows, Mac, Linux and Chromebook systems, makingthis the ideal solution for the office or home use.VisionTek VTWC20 - USB WebcamKey Features1080p (1920x1080) High Definition cameralets you present yourself clearly andprofessionally in your home or office.Fixed FocusCompatible with most video conferencingsoftware including MS Teams, Zoom, Skype,Cisco Webex, Google Meet, FacebookMessenger and more.No Drivers Required - UVC Compliantmeans no setup time and ready to go assoon as you plug it in.Privacy cover keeps your lens protected andassures you peace of mind against spywareand other hacking tools.Dual built-in digital microphone ensurecrystal clear audio so you can speak at anormal volume and still be heard.The camera allows for a 360 degreehorizontal rotation and 30 degrees of tilt tofind the best position for your setup.The tripod mount allows for additional setupoptions to find your best angle. Technical SpecificationsPart #901380InterfaceUSB 2.0Resolution Supported1920 x 1080Frame RateUp to 30 FPSPixels2 millionViewing Angle:77ºFocusFixedMicrophoneDigitalCable Length1.7mWorking Temperature-10 to 40º CPower Consumption<1.25 WSystem RequirementsOperating SystemWindows 10Windows 8Windows 7macOS 10.9 or aboveLinuxChromeOSConnection PortUSB 2.0 PortWarrantyWarranty:1 Year Limited*You may register your product here: /support/warranty-registrationFor additional warranty information, please see our Warranty Page: /support/warranty-informationWhat's In The BoxVTWC20 WebcamQuick Start GuideSupportDriversNo drivers required UVC Plug N PlayOBS Studio Setup1) After having installed OBS Studio navigate to the lower left section to find a column titled “Sources”. Underneath the column there will be a “+” button, click on it to open another window.2) In this window you will need to select “Video Capture Device”. Once selected, a new window will appear, make sure you have “Create New” selected and then you can name it whatever you would like. For simplicity sake, we suggest naming it “VisionTek VTWC20”. Click OK once this has been completed.3) A new window will appear with a preview of the source you are adding. You will need to select the device in which you would like for the source. Please select "VisionTek VTWC20” and click “OK” to complete the source creation. The video and audio feed from the capture card should not be recognized in OBS Studio.Streamlabs OBS Setup1) After having installed Streamlabs OBS navigate to the lower middle section to find a column titled “Sources”. Near the top of the column there will be a “+” button, click on it to open another window.2) In this window you will need to select “Video Capture Device”. Once selected, click “add source” and a new window will appear, make sure you click “Add a new source instead” selected and then you can name it whatever you would like. For simplicity sake, we suggest naming it “VisionTek VTWC20”. Click “Add Source”once this has been completed.3) A new window will appear with a preview of the source you are adding. You will need to select the device in which you would like for the source. Please select “VisionTek VTWC20”. Scroll to the bottom of this window and check the box titled “Use custom audio device” (if this is not checked, there will be no video feed). Click “Done” to complete the source creation. The video and audio feed from the capture card should now be recognized in OBS Studio.Microsoft Teams Setup1) Open the Microsoft Teams App.2) Click on the user icon in the upper right corner and select settings from the menu.3) Select Devices on the left settings menu, under the camera dropdown select VisionTek VTWC20. The source should appear in the preview window.4) Click the X in the upper right corner of the Settings Window to save the settings.Zoom Setup1) Open the Zoom App and log in.2) Click the settings icon in the upper right corner to open the settings window.3) Select Video from the left side menu.4) Under the Camera drop down select VisionTek VTWC20.5) Click the X in the upper right corner of the Settings Window to save the settings.FAQHow do I test to see if my camera is functioning?Check to see if the webcam is recognized in Windows Device Manager or Mac OS System report. In Windows 7, 8.1, and 10 the camera application can be launched to not only make sure the webcam is functional but also to tune the focus of the webcam if your model is manual focus (VTWC30). The camera application can be launched by either searching for the application or launching it from the All Programs menu.Why is my camera out of focus?The VTWC40 is an auto focus camera. Move your hand in front of the camera and pull it back towards you body for the sensor to find a focal point.The VTWC30 is a manual focus camera. To adjust the focus, rotate the knob that houses the camera lens until you achieve the desired focus.The VTWC20 is a fixed focus camera and will always have a consistent focal distance which means you may need to adjust the distance between you and the webcam for best results. Be sure to open the camera application on your system to help determine when the focus is set in the proper location.Is there a way to adjust the brightness of the video when under bright lights?The webcams come standard with advanced built-in parameter adjustment chips. When the video is too bright, face the camera at the ceiling or white wall so that the camera can automatically reduce brightness. Readjust the camera back to its original position and the video will revert to normal brightness.Why am I getting horizontal lines in images?The horizontal lines are caused by light refraction. If you adjust the angle of the camera, the screen will come back to normal. Some overhead LED lighting systems may also cause the horizontal lines, there is no way to fix this besides turning off the lights.Why does the image flash when the computer is used online?When the image flashes, adjust the angle of the camera and the focus should reset.How do I improve the image quality while my system is in use?Light plays a very important role in image quality. Adjust your webcam angle to adjust lighting conditions. Natural daylight or bright white bulbs are the best options for optimal image quality.Why is the image reversed after installation? Is there a way to change it?For Windows XP SP1 or Windows XP SP2, the image is reversed if the USB port being used is USB1.1. We recommend installing the Service Pack that includes “AMCAP”. Go into Properties > Reverse and remove the checkmark.I use Windows Me, is there a driver I can download to use the webcam?Unfortunately, Windows Me and Windows 98 are not supported.Why is the image on my system not as clear as expected?Using the latest Microsoft Service Pack and the USB 2.0 or 3.0 port will improve the image quality. Most newer systems will not experience this issue.Why is my webcam acting slow or there is a delay in the image?Try restarting your computer as this may solve the issue. Ensure that the webcam is recognized properly in Windows Device Manager or MacOS System Report. If the issue happens only while using your video chat application, check your internet connection bandwidth and/or adjust the quality settings in your video chat application. Make sure that the webcam is connected directly to a High-Speed USB 2.0 or 3.0, preferably the one at the rear if you are using a desktop computer.Connect the webcam directly to the computer. Try to bypass your Dock, USB hub, USB extension cable, USB port of monitor or keyboard. If you still experience problems, try connecting the webcam to another computer.Why does the microphone produce a noise and muffled sound in Windows?To resolve this, go to the Windows sound settings and configure the bit depth and sample rate of your webcam's microphone to?2 channel, 16 bit, 44100Hz (CD Quality).How do I enable my built-in microphone?First, ensure that your device is connected to your PC or Mac. In Windows, navigate to your sound settings. Under the input selection, choose the VisionTek Webcam Microphone as the device you would like to use. To enable the webcam Microphone in video conferencing software (Microsoft Teams, Zoom, Skype, Etc.) you will need to open the video conference software and navigate to the settings section. From there, locate the audio settings and then select the Webcam Microphone as the default input device. In Mac OS, go into utilities and find Audio MIDI Setup. From there choose the Webcam Device and select use this device for sound input. Why does the webcam not work when used online?If the webcam stops functioning correctly when going online, a simple system restart should resolve the issue. If you are still experiencing issues, please contact our support department for assistance.What do I do if there is no image being displayed when the camera is connected properly?In the event you are connecting to a system that already has another webcam or media capture device connected, you will need to select the VisionTek Webcam as the source instead of a different option. This selection can be made in most video conference services. In some cases, Windows will have a “camera switch” icon that can be pressed which will change video capture sources.How do I know if my webcam is being detected in macOS?Click the Apple logo in the upper left corner and select “About This Mac”. When the window appears, click on “System Report”. Select “Audio” on the left and the VisionTek Webcam will appear in the list of devices. Next, click on “Camera” and the VisionTek webcam will appear as a camera device.How do I test the webcam's microphone input on macOS?Go to System Preferences, and then Sound. Under the input tab be sure that you have the VisionTek Webcam selected. Try speaking into the microphone and observe the input volume bar indicate that audio is being detected. Please be sure that the mute box is unchecked.How do I test the webcam's video functionality in macOS?Launch Facetime and select the video menu from the top. From there, please select the VisionTek Webcam under the camera devices.How do I test the webcam microphone in Windows OS?Open sound settings and make sure the input device is set to the VisionTek Webcam Microphone. From there, speak into the webcam microphone and watch for the volume bar to move indicating that audio is being detected.How do I test the webcam video functionality in Windows OS?In Windows the Camera Application can be launched to not only make sure the webcam is functional but also to tune the focus of the webcam if your model is manual focus (VTWC30). The camera application can be launched by either searching for the application or launching it from the All Programs menu.For California Residents Only:WARNING: Cancer and Reproductive harm. For more information, go to * Please, Note that Proposition 65 may be best defined as a “Right To Know” law in California and Prop 65 warning labels are not an indication that a product is violating safety standards or regulations. The Prop 65 warning label does not mean our products inevitably cause cancer or reproductive harm. We do not consider our products harmful when used as intended. However, it is a necessary precaution to provide the warning because of this California law.。
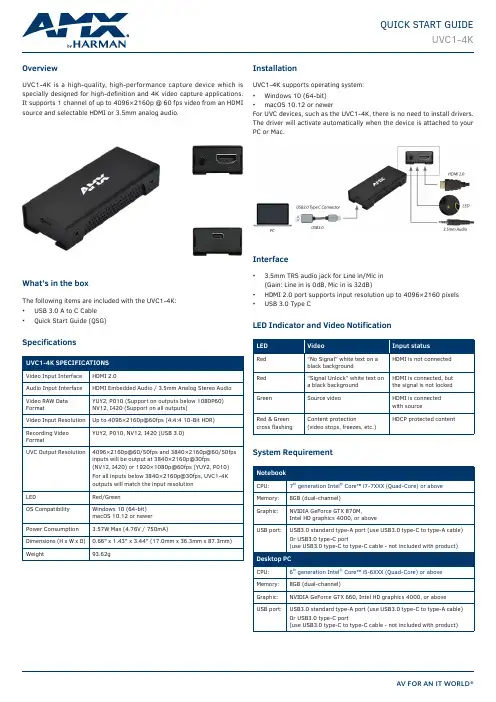
AV FOR AN IT WORLD ®QUICK START GUIDEUVC1-4KOverviewUVC1-4K is a high-quality, high-performance capture device which is specially designed for high-definition and 4K video capture applications. It supports 1 channel of up to 4096×2160p @ 60 fps video from an HDMIsource and selectable HDMI or 3.5mm analog audio.What’s in the boxThe following items are included with the UVC1-4K:• USB 3.0 A to C Cable •Quick Start Guide (QSG)SpecificationsInstallationUVC1-4K supports operating system:• Windows 10 (64-bit)• macOS 10.12 or newerFor UVC devices, such as the UVC1-4K, there is no need to install drivers. The driver will activate automatically when the device is attached to yourPC or Mac.Interface• 3.5mm TRS audio jack for Line in/Mic in (Gain: Line in is 0dB, Mic in is 32dB)• HDMI 2.0 port supports input resolution up to 4096×2160 pixels •USB 3.0 Type CLED Indicator and Video NotificationSystem Requirement© 2021 Harman. All rights reserved. SmartScale, NetLinx, Enova, AMX, AV FOR AN IT WORLD, and HARMAN, and their respective logos areregistered trademarks of HARMAN. Oracle, Java and any other company or brand name referenced may be trademarks/registered trademarks of their respective companies.AMX does not assume responsibility for errors or omissions. AMX also reserves the right to alter specifications without prior notice at any time. The AMX Warranty and Return Policy and related documents can be viewed/downloaded at .3000 RESEARCH DRIVE, RICHARDSON, TX 75082 | 800.222.0193 | 469.624.8000 | +1.469.624.7400 | fax 469.624.7153Last Revised: 2021-05-253. Firmware Update:Update UVC1-4K device firmware with the following steps:(1)Press “Send firmware update” button.(2)Browse to the firmware image and click open to select file.(3) If the firmware image file is incorrect or damaged, the update procedure willstop and show the following warning message.(4) Click “YES” to install new firmware.**Please do not disconnect power or USB during firmware updateprocedure.(5) Wait for the firmware update to complete(until 100% with “Update Successfully” message pop up).AMX UVC Configuration Tool User GuideI. Connect UVC1-4K to PC with USB cable.II. If updating firmware, download firmware image file from .III. Download and install “UVC Configuration Tool” application from .IV. Run UVC Configuration Tool to configure the connected UVC1-4K.V.Please close UVC Configuration Tool before using video capture software.1. Video Settings:(1) Preferred EDID: Select the preferred video resolution EDID setting for UVC1-4K capture device (for example 1920x1080 @ 60Hz).This setting indicates the preferred resolution to the video source.2. Audio Settings: Select audio input source(1) HDMI: From HDMI embedded audio (2) Line in: From external analog audio (3) Mic in: From microphone(4) HDMI + Line in: Mix audio from HDMI and external analog audio (5) HDMI + Mic in: Mix audio from HDMI and microphone(6)NONE: UVC1-4K does not output audio。

IMMERSIVE MEETINGS, SIMPLIFIED & SEAMLESSHikvision Audio & Video Collaboration Solution31Audio and video conferencing for working remotely has become popular. With millions now working remotely all or part of their hours, the demand for audio & video conferencing has skyrocketed.* Data source: QUEST MOBILETrends in audio & video conferencingIn today’s workplaces, most personnel are expected to telecommute 2.4 days per week .Only work outside the office26Use a hybrid schedule, between remote work & in-office hours50Only work in the office242Individual Collaboration02Small and medium-sized conferencingTeamCollaboration01Medium and large-sized conferencingTelecommuting Remote learning Live streaming3Audio and video devices: All-in-One A/V Pillar, or Sound CubeSpeakerphone and Camera Bar are recommended. Enjoy 1080p or better video quality, 3- to 5-meter pick-up distance, and sound amplification.Display devices: Interactive Flat Panel & Monitor.Video Conference Host: 65” Interactive Flat Panel display and laptop.Video Software: Zoom, Webex, Tencent Meeting, WeChat, DingTalk, and more.Small & medium-sized conferencing3-8 people, 15 m 28-20 people, 25 m 2Video Conference Host: 65” Interactive Flat Panel display and laptop.Video Software: Zoom, Webex, Tencent Meeting, WeChat, DingTalk, and more.Audio and video devices: All-in-One A/V Pillar, or Sound Cube Speakerphoneand Camera Bar are recommended. Enjoy 1080p or better video quality, 3- to 5-meter pick-up distance, and sound amplification.Display devices: Interactive Flat Panel & Monitor.Medium & large-sized conferencingIndividual CollaborationTeam CollaborationSmall & Medium-sized Conferencing01Individual Collaboration• Compact, all in one design with integrated camera, 4 microphones,and speaker to quickly start a meeting in huddle space• 1080p HD video imaging• 120° Wide-angle viewing without distortion• Easily adjust viewing angle and volume by remote control• Easy to set up with simple cable connections• Portable design to help you get into meetings anytime, anywhereThis solution includes a light-weight, portable, and all-in-one Audio/Video Pillar unit. It’s great for officeconference rooms or starting a remote meeting anywhere you need. With audio and video functionalities inone device, it’s easy to use and great for high-quality communication.All-in-One Pillar X12DS-UVC-X12DS-D5B65RB/CInteractive Flat PanelD5B 65”Portable audio and video conferencing solution545Combining our Camera Bar and Sound Cube Speakerphone, Hikvision provides an enjoyable communication experience for teams in small- to medium-sized conference rooms. Your meeting will be much more productive and interactive with ultra-HD imaging and crisp, clear audio, ensuring more interaction with virtually face-to face collaboration.Ultra-HD audio and video conferencing solution02Conference Webcam UC8Sound CubeSpeakerphone S1• Premium 4K video imaging • Auto focus targets objects quickly • Easy setup with simple cable connections• Designed with microphones and speakers set at key angles • Accurate voice reception with AI noise reduction and clear audioInteractive Flat Panel D5B 65”Individual CollaborationTeam CollaborationDS-D5B65RB/CDS-UAC-S1DS-UC8Individual CollaborationMedium & Large-sized Conferencing01Need to upgrade your conferencing equipment simply and affordably? Hikvision can help! Our world-class, All-in-OneA/V Camera Bar gives you 4K UHD imaging with a wide-angle view, and clear voice pick up and playback even forlarge groups. The smart auto-framing and speaker tracking always puts you in the best position. It’s remarkably simpleto use, manage, and integrate with its sleek design.Smart, ultra-HD audio & video conferencing solutionAll-in-One Camera BarX28• All in one design with integratedcamera, 8 microphones, and speakerto quickly start a meeting• 4K ultra-high definition, 118° wide-angle viewing without distortion• Clear voice collection with intelligent noisereduction, loud & clear voice transmission• Smart auto-framing and speaker trackingInteractive Flat PanelD5B 75”DS-D5B75RB/CiDS-UVC-X28687Conference WebcamU102Sound CubeSpeakerphone S1• Premium video imaging • 5x optical zoom for clear visual details• Rapid focus on a speaker via pre-programmed settings • 120 dB true WDR to deliver crisp video even against strong backlighting• Designed with microphones and speakers set at key angles • Accurate voice reception with AI noise reduction and clear audioInteractive Flat PanelD5B 65”Individual CollaborationTeam CollaborationOne plus one is greater than two! Stay at ease and look your best in your meeting when our PTZ Camera zooms in for quick framing with clear visual details. Enjoy natural video reproduction even against strong backlighting. The Sound Cube Speakerphone ensures that everyone in the meeting will be heard clearly while filling larger rooms with rich, realistic sound. How can a business operate without it?High-definition audio and video conferencing solution for businesses02DS-D5B65RB/CDS-UAC-S1DS-U1029Filters unwanted ambient noise in the roomIntelligent noise reductionAir conditioninghummingFan humming EnvironmentalnoiseAll participants always remain in the center of the image, evenwhen someone leaves or joins.Smart auto framingAutomatic focus and tracking the speakerkeeps the key person in the center.Smart speaker tracking 120° super wide-angle without distortionGreater coverage with one view3 in 1 design++One device to start remote meeting easilyCamera Microphone SpeakerNo need to install plug-insPlug and play12All-in-One PillarDS-UVC-X12All-in-One BariDS-UVC-X28Bluetoothremote control10DS-U102Quickly capture the details. The remote control can help configure and trigger preset points, quickly With True WDR Without True WDR56°330°5x3.1-15.5 mm motorized lens5x Optical zoomSee clearly, near & far. Zoom in to show the meeting material details and all participants clearly.Auto focusF12345Up to 5 preset points3.1 mm to 15.5 mm vari-focal lens, 5x optical Product ShowcaseDS-U1022MPIndividual Collaboration4K 118°8-mic array DS-UC8DS-UVC-X12iDS-UVC-X28*Two-year warranty for products above.12Individual CollaborationToday, remote meetings, distance learning, and working-from-home have become normal for people around the world. That’s why Hikvision designed its own Webcam Series with world-class audio and video quality, creating top-notch products for the most optimal experience. Our webcams contain a wide variety of products to guarantee the perfect fit for any user in virtually any environment. Packed with cutting-edge imaging definition and noise reduction, Hikvision USB webcams are plug & play ready. You’ll love the studio-quality imaging, crisp clear sound, and ease of use.Cameras: Hikvision Webcams are recommended.Enjoy 1080p or better video imaging, built-in mic with noise reduction, and 3-meter pick-up distance via our webcams.Computer: Desktop or laptop.Video Software: Conferencing software (Zoom,Webex, Tencent Meeting, WeChat, DingTalk, etc.) or live streaming software— Facebook, YouTube, Tiktok, etc.Suitable for 1-3 peopleRecommended productsValue Series WebcamsU02(P)/U04(P)/UA12/UA14Business Series WebcamsUC2/UC4/UC8Live Series WebcamsUL2/UL4/UL8Hikvision’s all-new webcams feature incredible functionality including AI-powered auto-framing and smart portrait enhancement. Users will look natural and great, and enjoy the improved audio and video experience for live streaming, remote learning, conferencing, and more.All-new WebcamsNatural, authentic tones and shadingThe webcam automatically adjusts image color to ensuremore natural looking.Automatic exposure (AE)Exposure gets automatically adjusted based on facebrightness to achieve optimal imaging all around, in anyenvironment.Always in the right positionNo matter what’s going on behind the lens – whether youare sitting or moving around – you can rest assured thatour all-new webcam is keeping you front and center. Italso intelligently focuses on and centers more than oneperson, putting you both in the right position at all times.AE OFF AE ON Product ShowcaseDS-U02DS-U04DS-U02P DS-U04PAI AI142IMMERSIVE MEETINGS,SIMPLIFIED AND SEAMLESSHikvision Audio & Video Collaboration Solution@HikvisionEurop e@HikvisionEurop eH IKVISION EuropeHikvision EuropeDirk Storklaan 32132 PX Hoofddorp The Netherlands T +31 23 5542770*********************。

WUE Getting StartedOcean Optics is offering the Wireless USB Extender (WUE), for our USB-interface spectrometers. WUE allows you to capture data wirelessly or over the Ethernet and is transparent to your computer. WUE can work with several spectrometers at one time by using a USB hub with the WUE. You can also use several WUEs simultaneously in your system.The WUE is IEEE802.11b/g compliant (Wi-Fi). The provided software is compatible with computers using Windows 2000/XP/Vista or Mac OS X and most wireless networks. It also supports wired Ethernet connection to your computer (instead of wireless).WUE provides all functionality as though your spectrometer is connected directly through USB to your computer, allowing you to operate your spectrometer from any location in the world. Possible applications for WUE include polling a spectrometer sitting in your lab from a remote location and changing spectrometer configuration parameters such as integration time and signal averaging while on the other side of campus.Package ContentsYour WUE package contains everything you need for setting up and using your wireless device server.Additional Equipment Available❑Ocean Optics USB spectrometer❑Spectrometer operating software such as SpectraSuiteWUE InstallationInstalling the WUE consists of the following main steps:∙Configuring your computer to work with the WUE.∙Configuring the WUE∙Connecting the WUE to your spectrometer’s USB port100-40000-033-01-201202 1WUE Getting Started Instructions 2 100-40000-033-01-201202 Instructions for configuring your computer and the WUE are contained in the Setup Guide in your device package. Additional information on this device can be found here: /support/downloads/documentation/usb_device_connec tivity/SX2000WG/SX2000WG.htmFor More Information on Other Ocean Optics ProductsYou can access complete documentation for other Ocean Optics products on the Software and Technical Resources CD or by visiting our website at . Select Technical | Operating Instructions . Choose the appropriate document from the drop-down lists or use the Search by Model Number field.Please feel free to call Ocean Optics Technical Support at (727) 733-2447 for help or more information.。
QUAD-CAPTURE USB 2.0 Audio Interface▼▼▼▼▼▼▼▼Low-Noise Power SupplyAluminum Build, DI FunctionalityVS StreamingQUAD-CAPTURE Specifications■ Number of Audio Record/Playback Channels < Sampling Frequency = 96 kHz, 48 kHz, 44.1 kHz > Recording: 4 channels, Playback: 4 channels < Sampling Frequency = 192 kHz > Recording: 2 channels, Playback: 2 channels ■ Signal Processing PC interface: 24-bit, AD/DA Conversion: 24-bit, Internal: 40-bit ■ Sampling Frequency AD/DA Conversion: 192 kHz, 96 kHz, 48 kHz, 44.1 kHz, DIGITAL (IN/OUT): 96 kHz, 48 kHz, 44.1 kHz ■ Nominal Input Level Input jacks 1–2 (XLR type): -60 to -6 dBu, Input jacks 1–2 (1/4-inch TRS phone type): -50 to +4 dBu ■ Nominal Output Level OUTPUT 1–2: +0 dBu (balanced) ■ Headroom 14 dB ■ Input Impedance Input jacks 1–2 (XLR type): 4.8 k Ω (balanced), Input jacks 1–2 (1/4-inch TRS phone type): 15 k Ω (balanced) ■ Output Impedance OUTPUT 1–2: 2 k Ω (balanced), PHONES: 47 Ω ■ Frequency Response 192.0 kHz: 20 Hz to 90 kHz (+0/-8 dB), 20 Hz to 60 kHz (+0/-2 dB), 96.0 kHz: 20 Hz to 40 kHz (+0/-2 dB), 48.0 kHz: 20 Hz to 22 kHz (+0/-2 dB), 44.1 kHz: 20 Hz to 20 kHz (+0/-2 dB) ■ Residual Noise Level INPUT> MAIN OUT : -95 dBu typ. (GAIN: min., 600 Ω terminated, IHF-A) * Internal Direct Monitor Mixer setting, ■ Dynamic Range < AD block > INPUT 1–2: 104 dB typ. (GAIN: min.) < DA block >OUTPUT 1–2: 109 dB typ. ■ Connectors Input jacks 1–2 (XLR type / 1/4-inch TRS phone type) XLR type (balanced / phantom power: DC 48V, 6mA Max) * Current value per channel. 1/4-inch TRS phone type (balanced), Coaxial Input connector, Coaxial Output connector, Headphone jack (Stereo 1/4-inch phone type), Output jacks 1–2 (1/4-inch TRS phone type (balanced)), MIDI connectors (In, Out), USB connector ■ Interface Hi-Speed USB, Digital input/output: Coaxial type (Conforms to IEC60958 consumer format.), MIDI input/output ■ Power Supply USB Bus Power ■ Current Draw 480 mA ■ Dimensions 184.6 (W) x 133.9 (D) x 44.3 (H) mm / 7-5/16 (W) x 5-5/16 (D) x 1-3/4 (H) inches ■ Weight 0.57 kg / 1 lbs 4 oz ■ Included Accessories Owner’s Manual, Cakewalk SONAR LE DVD-ROM (for Windows), Driver CD-ROM, USB cable* 0 dBu = 0.775 Vrms* The specifications are subject to change without notice.SONAR X1 LE BundleVS PreampsOne-Click AUTO-SENS■ Front Panel ■ Rear Panel。
uvc 实现方式UVC(USB Video Class)的实现方式分为设备端和主机端。
设备端的实现源码头部的版本信息描述为“USB Video Class Gadget driver”,而主机端的实现则是“USB Video Class driver”。
这两端都与v4l2框架挂接。
UVC设备驱动初始化入口为uvcg_video_init,而主机端驱动初始化入口则未知。
在主机端,注册了用于发送的/dev/video设备节点,并且有IOCTL接口和与UVC设备相关的buffer操作。
具体来说,qbuf 操作用于向USB接口发送编码帧,dqbuf操作用于获取空帧,而buffer_done则在USB传输完成后被调用,生成空帧。
UVC驱动的设备端和主机端是通过VIDIOC_QUERYCAP调用探测video设备的capability来区分的。
对于设备端,V4L2_CAP_STREAMING 和V4L2_CAP_VIDEO_CAPTURE等功能表示它能够接收UVC数据流。
在数据传输方面,UVC使用ISO传输模式,其中包含一个配置和两个接口:Video Control和Video Stream。
Video Control接口主要处理UVC CT/PU/XU等控制操作,而Video Stream接口则处理UVC视频流控制。
每个Video Control可以关联一个或多个流接口,每个流接口下又关联多个接口配置。
在ISO传输中,流接口下还有多个备用接口,用于控制视频流的传输。
此外,摄像头的Sensor模块使用光学仪器采集实景,UVC设备对采集到的数据进行处理,并实现UVC相关的规范。
而PC机则负责识别固件信息,加载驱动,与固件通讯,实现摄像头数据的传输及显示。
以上信息仅供参考,如需更专业的解释,建议咨询计算机领域的专业人士。
HuddleCamHD WebcamUSB 2.0 Webcam INSTALLATION & OPERATION MANUALPrecautions…………………………………………………………………………………………. Safety Tips…………………………………………………………………………………………….•Please read this manual carefully before using the webcam.•Avoid damage from stress, violent vibration or liquid intrusion duringtransportation, storage or installation.•Take care of the webcam during installation to prevent damage to the webcam case, ports, or lens.•Do not apply excessive voltage. (Use only the specified voltage.) Otherwise, you may experience electrical shock.•Keep the webcam away from strong electromagnetic sources.•Do not aim the webcam at bright light sources (e.g. bright lights, the sun, etc.) for extended periods of time.•Do not clean the webcam with any active chemicals or corrosive detergents.•Do not disassemble the webcam or any of the webcam's components. If problems arise, please contact your authorized dealer.•After long term operation, moving components can wear down. Contact your authorized dealer for repair.In The Box…………………………………………………………………………….Supplied Equipment•Webcam (1)•Quick Start Guide (1)•Privacy Cover (1)Physical Description……………………………………………………………………… 1. Front View…………………………………………………………………………………1. Lens104° field of view lens2. Power LEDBlue LED lights when unit is powered and on.3. Microphone arrayInternal microphone array with up to a 15-foot range4. T op MountUsed for resting the webcam on a monitor1 2342. Rear View…………………………………………………………………………………………………….5.Built in USB 2.0 cableFor connection to PC USB 2.0 port.6.Bottom MountUsed for securing the webcam in position on monitor7.1/4-20 MountUsed for mounting to any standard 1/4-20 mounting screw 56Connection Instructions………………………………………………………………………1.Connect USB2.0 cable from webcam to an available USB port on the PC.2.Select and configure webcam in your software of choice.NOTE: Failure to follow this sequence may result in no connection to PC.Care Of The Unit………………………………………………………………………………….Remove dust or dirt on the surface of the lens with a blower (commercially available). Installation Instructions………………………………………………………………………Monitor Installation……………………………………………………………………………………. When mounting the HuddleCam on a monitor, ensure that the mount screw is fastened tightly to the webcam. Use the top mount to rest the webcam on the monitor. Position the bottom mount on the back of the monitor to secure the webcam in position.Tripod Installation………………………………………………………………………………………. When using the HuddleCam with a tripod, screw the tripod to the bottom of the webcam mount. The tripod screw must fit below specifications:Note: Tripod must stand on a level surface.Troubleshooting………….…………………………………………………………………………•No imageo Check whether the USB cable is connected properly to the PC.o Check whether the LED glows when USB is connected to the PC.•Abnormal display of imageo Check OSD of webcam through the OSD Menu app.o Check settings of software you’re viewing the video feed in.•Image is shaky or vibratingo Check whether the webcam is mounted solidly or sitting on a steady horizontal and level surface.o Check the building and any supporting furniture for vibration.o Any external vibration that is affecting the webcam will be more apparent when in tele zoom (zoomed in) settings.Important Notes Regarding USB Connectivity:USB 3.0 ports are backwards compatible with USB 2.0 devices. USB 2.0 ports are not completely forward compatible with USB 3.0 devices (some USB 3.0 devices will connect to USB 2.0 with limited functionality).External USB hubs should be avoided (i.e. give the webcam its own USB port on the device) as they are not well suited to transmitting HD video reliably.USB extension systems must be fully compatible with the version of USB that you are using and must utilize an external power supply, when required. Always connect the HuddleCam directly to the PC in order to associate the UVC drivers before attempting to use any extension system.USB power saving settings in the device’s operating system should be turned off completely for reliable USB webcam connectivity.HuddleCam CamerasAll HuddleCamHD cameras utilize the UVC (USB Video Class) drivers that are built into Windows, Mac OS and Linux to stream HD video to your device via your device’s USB port (USB 2.0 or USB 3.0 depending upon HuddleCam model). When your device successfully recognizes the camera, your device will register the HuddleCam as an “imaging device”. You can see this in your Windows Device Manager program (type “device manager” into the Windows search tool) as shown in the screenshot, below:In this example, you can see the HuddleCam model in use connected as a fully functional USB 2.0 device (HuddleCamHD).If your device has not connected to or has not recognized the HuddleCam as an imaging device (in which case, you may see a new “unknown device”, “Westbridge” or “CYTFX3” labeled device show up in Device Manager’s “Universal Serial Bus Controllers” section rather than in the “Imaging Devices” section), the HuddleCam will not be available to programs that utilize a webcam. In this case, try restarting the device and reconnecting the webcam via USB (USB 2.0 or USB 3.0 depending upon HuddleCam model).Similarly, you can see a connected device in System Information on a MAC. See screenshot below:In this example, you can see the HuddleCam model in use connected as a fully functional USB 2.0 device (HuddleCamHD).Specs……………………………………………………………………………………………………… Model Number: HC-WEBCAM-104-v2Camera & Lens•Video CMOS Sensor1/2.7” CMOS 2.07M Mega Pixel•Frame Rate1080p-30/25, 720p-30/25,960x540p-30/25, 640x360p-30/25•Field of View104°•Lens Focus: f=2.26mm•Min Lux0.5 Lux @ (F2.0, AGC ON)•Warranty 5 years parts and laborRear Board Connectors•Video Interface USB 2.0•Power Interface USB 2.0 5VPhysical•Material Aluminum, Plastic•Dimensions 4.6”W x 1.4”D x 1.2”H(118mm x 36mm x 30mm)•Weight0.35 lbs (0.16 kg)•Box Dimensions 5.5”W x 3”D x 3.125”H (139.7mm x 76.2mm x 79.4mm)•Boxed Weight0.75 lbs (0.34 kg)•Color Black•Operating Temperature14°F to +104°F (-10°C to +40°C)•Storage Temperature-40°F to 140°F (-40°C +60°C)•Working Environment Indoor only Warranty………………………………………………………………………………………………HuddleCamHD includes a limited parts & labor warranty for all HuddleCamHDmanufactured cameras. Warranty lengths are shown below. The warranty isvalid only if HuddleCamHD receives proper notice of such defects duringthe warranty period. HuddleCamHD, at its option, will repair or replaceproducts that prove to be defective. HuddleCamHD manufactures itshardware products from parts and components that are new or equivalentto new in accordance with industry standard practices.Page 10 of 10Ver 1.0 9/20。
一.題目:Webcam ISP 工作原理簡介二.摘要:ISP 是Webcam中的重要搭配零組件,ISP主要負責對感測器中出來的圖像資料進行後處理。
直接從感測器中得到的圖像是很糟糕的,不論色彩還是細節都與實際圖像有很大差距,只能看到圖像的中物體的大致輪廓。
經過ISP的處理,包括內插、去噪、去壞點、邊緣加強、膚色矯正、白平衡等操作後,可以使圖像變的更加細膩,更加貼近真實世界中的圖像。
ISP的主要功能包括線性糾正、雜訊去除、壞點去除、內插、白平衡、自動曝光控制等。
三.內容Webcam/NBCam ISP 方塊圖工作原理:CMOS Sensor 使用傳統的Parallel 或MIPI CSI-2 的介面與ISP 做影像的傳輸, 合併CMOS Sensor 介面支援10 bit高品質的Jpeg, RAW, YUV 格式的影像, 影像的解析度根據ISP 型號的不同可支援1.3M(1280x1024) 到3.0M(2048x1536)的CMOS Sensor, 當數位影像輸入利用CDSP處理色彩運算,壞點去除,空間Noise消去,自動對焦,自動曝光,自動白平衡,HDR 等功能,利用MCU 8032 CPU 來處理這些功能的程式運作, 程式Code燒錄在外掛的serial flash,經處理的影像信號RAW/YUY2/M420/MJPEG利用USB 2.0 HS/FS 的介面輸出到PC/NB, 在高速的USB 2.0 介面可傳輸FHD(1920x1080) 30fps 的影像。
相關名詞說明1.何謂CCD sensor 與CMOS sensor?CCD(Charge Coupled Device, 感光耦合元件)為數位相機記錄光線變化的半導體,CCD主要材質為矽晶半導體,透過光電效應,由感光元件表面來感應光源,從而轉換成儲存電荷的能力,CCD元件上安排有通道線路,將這些電荷傳輸至放大解碼元件,就能還原所有CCD感光元件產生的信號,並購成一幅完整的畫面。
学习报告第一:摄像头(CAMERA)摄像头分为数字摄像头和模拟摄像头两大类。
模拟摄像头是将前端设备采集的视频图像的模拟信号在特定的视频采集卡下进行压缩,然后存储到计算机的硬盘中;数字摄像头不需要进行采集卡的压缩,而直接将图像通过传输设备直接存储到计算机的硬盘中。
摄像头按结构划分为:光学部分、电子部分、镜头三大类光学部分:在选择摄像头时,镜头是很重要的,按感光器件类别来分,现在市场上摄像头使用的镜头大多为CCD和CMOS两种,其中CCD是应用在摄像、图像扫描方面的高端技术组件,CMOS则大多应用在一些低端视频产品中。
CCD(Charge Coupled Device),即“电荷耦合器件”,以百万像素为单位,现市面上的数码相机规格中有几百万像素,指的就是CCD的分辨率,CCD是一种感光半导体芯片,用于捕捉图形,广泛运用于扫描仪、复印件以及无胶片相机等设备,与胶卷的原理大致相似,光线穿过镜头,将图形信息投射到CCD上,与胶卷不同的是CCD既没有记录图形数据记录的能力,也没有永久保存下来的能力,甚至不具备“曝光”能力;所有图形数据都会不停地传送到“模-数”转换器、信号处理器、以及存储设备(如内存卡或内存芯片),CCD有各式各样的尺寸和形状,目前CCD元件的尺寸多为1/3英寸或者1/4英寸,在相同的分辨率下,宜选择元件尺寸较大的为好。
CMOS(Complementary Metal Oxide Semiconductor),即“互补金属氧化物半导体”,它是计算机系统内的一种重要芯片,保存了系统引导所需的大量资料,CMOS传感器便于大规模生产,并且速度快、成本低,是数码相机关键器件的发展方向之一。
CCD和CMOS在制造上主要区别于CCD是集成在半导体单晶材料上,而CMOS是集成在金属氧化物的半导体材料上,工作原理没有本质的区别,CCD只有少数几个厂商,如索尼、松下等;而CCD制造工艺比较复杂,采用CCD的摄像头价格都会比较贵,经过技术改造,目前CCD和CMOS的实际效果差距已经减少了很多,而且CMOS的制作成本和功耗都低于CCD,所以很多摄像头生厂商都采用CMOS的感光元件;成像方面:在相同像素下CCD的成像通透性、明锐度都很好,色彩还原、曝光可以保证基本准确,而CMOS的产品往往通透性一般,对实物的色彩还原能力偏弱,曝光也不太好,由于自身物理特性的原因,CMOS的成像质量和CCD 还是有一定距离的,但由于低廉的价格以及高度的整合性,因此在同领域还是得到广泛应用名词解释:通透性(permeability):膜允许离子或分子穿过的性质。
水星二代(MERCURY2)USB3.0数字相机应用说明书版本:V1.0.59发布日期:2023-02-22本手册中所提及的其它软硬件产品的商标与名称,都属于相应公司所有。
本手册的版权属于中国大恒(集团)有限公司北京图像视觉技术分公司所有。
未得到本公司的正式许可,任何组织或个人均不得以任何手段和形式对本手册内容进行复制或传播。
本手册的内容若有任何修改,恕不另行通知。
© 2023中国大恒(集团)有限公司北京图像视觉技术分公司版权所有网站:公司总机:************客户服务热线:400-999-7595销售信箱:************************支持信箱:**************************前言首先感谢您选用大恒图像产品,水星二代(MERCURY2)USB3.0接口数字相机是我公司最新推出的大靶面高分辨率工业数字相机,它具有高分辨率、高清晰度、低噪声等特点。
水星二代USB3.0相机包括标准版(MER2-U3(-L)系列)、Pro版(ME2P-U3系列)和Lite版(ME2L-U3(-L)系列),相机采用了USB3.0标准接口,安装、使用方便。
适用于工业检测、医疗、科研、教育、安防等领域。
本手册详细介绍了水星二代USB3.0接口数字相机的应用。
目录1. 概述 (1)1.1. 系列概述 (1)1.2. 型号名称说明 (1)1.3. 遵循的标准 (1)1.4. 相关文档及软件下载 (2)2. 注意事项及认证声明 (3)2.1. EMI、ESD注意事项 (3)2.2. 使用环境注意事项 (3)2.3. 相机机械安装注意事项 (3)2.4. 认证声明 (3)3. 安装指南 (5)3.1. 主机端准备 (5)用户软件组成 (5)用户软件接口 (5)3.2. 相机供电 (6)3.3. 相机驱动安装 (6)系统要求 (6)驱动安装 (7)3.4. 打开相机采集 (7)4. 性能参数 (8)4.1. 重要参数解释 (8)关于光谱响应图 (8)4.2. MER2-041-436U3M/C(-L) (8)参数列表 (8)光谱响应图 (10)4.3. MER2-041-528U3M/C(-L) (11)光谱响应图 (13)4.4. MER2-135-150U3M/C(-L) (14)参数列表 (14)光谱响应图 (16)4.5. MER2-135-208U3M/C(-L) (17)参数列表 (17)光谱响应图 (19)4.6. MER2-160-227U3M/C(-L) (20)参数列表 (20)光谱响应图 (22)4.7. MER2-230-168U3M/C(-L) (23)参数列表 (23)光谱响应图 (25)4.8. MER2-231-41U3M/C(-L) (26)参数列表 (26)光谱响应图 (28)4.9. MER2-301-125U3M/C(-L) (29)参数列表 (29)光谱响应图 (31)4.10. MER2-302-56U3M/C(-L) (32)参数列表 (32)光谱响应图 (34)4.11. MER2-502-79U3M/C(-L) (35)参数列表 (35)光谱响应图 (37)4.12. MER2-502-79U3M POL (38)参数列表 (38)光谱响应图 (39)4.13. MER2-503-36U3M/C(-L) (39)参数列表 (39)光谱响应图 (41)4.14. MER2-503-36U3M POL (42)光谱响应图 (43)4.15. MER2-630-60U3M/C(-L/-W90) (44)参数列表 (44)光谱响应图 (46)4.16. MER2-1220-32U3M/C(-L/-W90) (47)参数列表 (47)光谱响应图 (49)4.17. MER2-2000-19U3M/C(-L/-W90) (50)参数列表 (50)光谱响应图 (52)4.18. ME2P-560-36U3M/C (53)参数列表 (53)光谱响应图 (55)4.19. ME2P-900-43U3M/C (55)参数列表 (55)光谱响应图 (57)4.20. ME2P-1230-23U3M/C (58)参数列表 (58)光谱响应图 (60)4.21. ME2P-1231-32U3M/C (61)参数列表 (61)光谱响应图 (63)4.22. ME2P-1840-21U3M/C (64)参数列表 (64)光谱响应图 (66)4.23. ME2P-2621-15U3M/C \ ME2P-2622-15U3M/C (66)参数列表 (66)光谱响应图 (69)4.24. ME2P-2621-15U3M NIR \ ME2P-2622-15U3M NIR (70)参数列表 (70)光谱响应图 (71)4.25. ME2L-161-61U3M/C(-L) (72)光谱响应图 (74)4.26. ME2L-203-76U3M/C(-L) (75)参数列表 (75)4.27. ME2L-204-76U3C(-L)-F02 (77)参数列表 (77)4.28. ME2L-505-36U3M/C(-L) (78)参数列表 (78)光谱响应图 (80)4.29. ME2L-830-22U3M/C(-L) (81)参数列表 (81)光谱响应图 (83)5. 机械尺寸 (84)5.1. 相机尺寸 (84)5.2. 光学接口 (87)5.3. 固定块尺寸 (87)6. 滤光片及镜头 (89)6.1. 滤光片规格参数及响应图 (89)6.2. 镜头选型参考 (90)HN-2M系列 (90)HN-5M 系列 (91)HN-6M 系列 (91)HN-20M 系列 (92)HN-P-6M 系列 (92)HN-P-10M 系列 (93)HN-P-25M 系列 (93)7. 电气接口 (94)7.1. LED灯状态 (94)7.2. USB接口 (94)7.3. IO接口 (94)MER2/ME2P系列 (94)7.3.1.1. Line0(光耦隔离输入)电路 (95)7.3.1.2. Line1(光耦隔离输出)电路 (97)7.3.1.3. GPIO2/3(双向)电路 (98)ME2L系列 (101)7.3.2.1. Line0(光耦隔离输入)电路 (102)7.3.2.2. Line2(双向)电路 (104)8. 功能定义 (108)8.1. I/O控制 (108)MER2/ME2P系列 (108)8.1.1.1. 配置输入引脚 (108)8.1.1.2. 配置输出引脚 (109)8.1.1.3. 读取引脚状态 (113)ME2L系列 (113)8.1.2.1. 配置输入引脚 (113)8.1.2.2. 配置输出引脚 (115)8.1.2.3. 读取引脚状态 (116)8.2. 图像采集控制 (116)开始采集/停止采集 (116)8.2.1.1. 开始采集 (116)8.2.1.2. 停止采集 (117)采集模式 (118)触发类型选择 (119)触发模式切换 (120)连续采集及其配置 (122)软触发采集及其配置 (122)外触发采集及其配置 (122)设置曝光 (125)8.2.8.2. 设置曝光值 (127)交叠曝光和非交叠曝光 (130)8.3. 基本属性设置 (132)增益 (132)Sensor位深 (133)像素格式 (134)ROI (137)自动曝光和自动增益 (138)自动白平衡 (139)自动白平衡(ME2L-U3(-L)) (140)环境光源预设 (142)8.3.8.1. 环境光源预设(ME2L-U3(-L)) (142)8.3.8.2. 环境光源预设(MER2 \ ME2P) (144)测试图 (145)参数组 (146)用户自定义名称 (148)时间戳 (149)Binning (149)像素抽样 (151)镜像翻转 (154)数字移位 (157)采集状态 (159)黑电平 (159)取消参数范围限制 (160)用户数据区 (166)定时器 (167)计数器 (169)交叠曝光时间最大值 (170)多帧灰度控制 (171)8.3.25.1. 标准曝光时间模式 (172)8.3.25.2. 极小曝光时间模式 (172)8.4. 图像处理 (173)颜色转换 (173)Gamma (175)查找表 (176)锐化 (177)平场校正 (179)8.4.5.1. 平场校正系数的求取和预览 (180)8.4.5.2. 系数的读取和保存 (181)8.4.5.3. 文件的读取与保存 (181)降噪 (182)饱和度 (183)8.5. 图像传输 (184)帧率计算 (184)USB接口带宽 (185)设备链路带宽限制 (185)相机采集时间计算 (187)8.6. 事件 (193)曝光结束事件 (194)图像帧数据丢弃事件 (194)帧存不为空事件 (194)帧开始触发信号溢出事件 (194)帧高速连拍开始触发信号溢出事件 (194)帧开始触发信号等待事件 (195)帧高速连拍开始触发信号等待事件 (195)9. 软件工具 (196)9.1. 查找表生成插件 (196)界面 (196)使用说明 (197)9.1.2.1. 使用场景 (197)9.1.2.2. 基准Lut选择 (197)9.1.2.3. 调整Lut (199)9.1.2.4. 保存查找表 (200)9.1.2.5. 读取Lut (200)注意事项 (201)9.1.3.1. 从设备中读取 (201)9.1.3.2. Lut写入设备 (201)9.1.3.3. 目录结构 (201)9.2. 平场校正插件 (201)界面 (201)使用说明 (202)9.2.2.1. 平场校正执行步骤 (202)9.2.2.2. 采集亮场图像 (202)9.2.2.3. 执行平场校正 (203)9.2.2.4. 校正数据从设备读取/写入设备 (203)9.2.2.5. 校正数据从文件加载/保存到文件 (204)注意事项 (204)9.2.3.1. 平场校正实现方式 (204)9.2.3.2. 预览 (205)9.3. 帧率计算工具 (205)9.4. 静态坏点校正插件 (206)界面 (207)使用说明 (208)9.4.2.1. 执行静态坏点校正步骤 (208)9.4.2.2. 捕获图像 (209)9.4.2.3. 静态坏点校正 (209)9.4.2.4. 坏点数据文件使用 (209)10. 常见问题处理 (210)11. 版本说明 (212)12. 联系方式 (216)12.1. 销售联系方式 (216)12.2. 技术支持联系方式 (216)12.3. 总部及各办事处联系方式 (216)1. 概述1.1. 系列概述水星二代(MERCURY2)USB3.0数字相机是由大恒图像自主研发的成熟产品,性能出色、价格实惠、安装、使用方便。
題目: USB 2.0 與UVC 1.1 在Webcam F/W傳輸設定尚立Webcam 高級工程師Aladdin前言:Webcam使用USB Video Class 1.1 以及使用USB 2.0 的通訊協定將Webcam 的影像資料傳輸到PC 或NB, 如果有支援聲音則使用USB Audio Class 1.0 的協定內容:Webcam可以從程式設定了解USB 協定(1) 設定Standard Device主要設定USB 2.0 High Speed 的Standard Device Descriptor, 定義在USB2.0 Spec. Table 9.8設定USB 版本, 產品的VID, PID, Serial Number ....等0x00, 0x12, // length of device decriptor// Device Descriptor0x12, // bLength: 0x12 byte0x01, // bDescriptorType: DEVICE0x00, 0x02, // bcdUSB: version 2.000xEF, // bDeviceClass: independent interfaces0x02, // bDeviceSubClass: 20x01, // bDeviceProtocol: class specific protocols NOT used on device basis0x40, // bMaxPacketSize0: maximum packet size for endpoint zero0xF2, 0x04, // idVendor: vendor ID0xC3, 0xB2, // idProduct: product ID0x27, 0x11, // bcdDevice: device release number in BCD0x01, // iManufacturer: index of string0x02, // iProduct: index of string0x00, // iSerialNumber: index of string0x01, // bNumConfigurations: 1 configuration解釋Offset 0 -> bLength: 為這個Descriptor 的長度為18 Bytes,, 占1 Byte, 設定為0x12 Offset 1 ->bDescriptorType, 這個Descriptor type, 占1 Byte, 為0x01Offset 2->bcdUSB, USB通訊的版本, 占2個Bytes, 由於是支援USB2.0 , 所以要設定0x00, 0x02(傳輸先傳低位元組再傳高位元組)Offset 4 ->bDeviceClass, USB_IF 對這Device Class的編碼, 0xEFOffset 5 ->bDeviceSubClass, USB_IF對這Device sub Class 編碼, 0x02Offset 6 ->bDeviceProtocol, USB_IF 對這Device Protocol 編碼, 0x01Offset 7 ->bMaxPacketSize, 傳輸最大數據包的Size, 只可以定義8, 16, 32, 64, 這裡定義為64 Bytes,為0x40Offset 8 -> idVendor, 為產品的VID根據USB-IF 定義, 占2bytes,0xF2,0x40Offset10->idProduct, 定義產品的PID, 占2bytes, 0xC3, 0xB2Offset12-> bcdDevice, 可定義產品的版本, 占2bytes, 0x27,0x11Offset14-> iManufacturer, 製造廠商, 利用index 選擇Strings, 0x01Offset15 -> iProduct, 產品名稱,利用index 選擇Strings,0x02Offset16-> iSerialNumber, 序號, 利用index 選擇Strings,0x00Offset 17-> bNumConfigurations, 結構的編號, 使用Configuration 1, 0x01這個Device descriptor 傳輸到NB 或PC, 在Windows 的系統的硬體識別碼顯示VID, PID,與Rev(2) 其他速率傳輸設定Device_Qualifier Descriptor,設定非High Speed USB Device Descriptor , 如Webcam 也有支援Full Speed 傳輸, 定義在USB Spec. Table 9.9F/W 設定為0x00, 0x0A, // length of device qualifier descriptor// Device Qualifier Descriptor0x0A, // bLength: 0x0A byte0x06, // bDescriptorType: DEVICE QUALIFIER0x00, 0x02, // bcdUSB: version 2.000xEF, // bDeviceClass: independent interfaces0x02, // bDeviceSubClass: 20x01, // bDeviceProtocol: class specific protocols NOT used on device basis0x40, // bMaxPacketSize0: maximum packet size for endpoint zero0x01, // bNumConfigurations: 1 configuration0x00, // bReserved: 0x00解釋Offset0, 為bLength, 這Device Qualifier 為10bytes, 0x0AOffset1, 為bDescriptorType, 設定為0x06Offset2, 為bcdUSB, USB通訊的版本, 占2個Bytes, 由於是USB2.0 , 所以要設定0x00, 0x02Offset 4, 為bDeviceClass, USB-IF 對這Device 的class 編碼, 0xEFOffset5, 為bDeviceSubClass, USB-IF 對這Device 的subclass 編碼, 0x0x02 Offset6 , 為bDeviceProtocol, USB-IF 對這Device 的protocol編碼, 0x0x01 Offset 7 ->bMaxPacketSize, 傳輸最大數據包的Size, 只可以定義8, 16, 32, 64, 這裡定義為64,為0x40Offset8-> bNumConfigurations, 結構的編號, 使用Configuration 1, 0x01Offset9-> bReserved, 保留,需設定0x00(3)顯示語言編碼顯示Webcam字串的語言編碼, 定義在USB 2.0 Spec. Table 9.15F/W設定0x00, 0x04, // length of language id string descriptor// Language ID String Descriptor0x04, // bLength0x03, // bDescriptorType: STRING0x09, 0x04, // bString: English (US)解釋Offset0 為bLength, 因指定義一種語言所以為0x04Offset1 為bbDescriptorType, String 的Descriptor 為0x03Offset2 為wLANGID[0], 占2bytes,英文編碼為0x09,0x04 參考USB Language 編碼(4)產品名稱編碼Webcam 的產品名稱, 定義在USB 2.0 Spec. Table 9.16F/W 設定0x00,0x32, //length of product string descriptor0x32, //Product String Descriptor0x03, //bLength0x53,0x00,0x50,0x00,0x43,0x00,0x41,0x00,0x32,0x00,0x32,0x00,0x38,0x00,0x31,0x00,0x20,0x00,0x57,0x00, //'W'0x65,0x00, //'e'0x62,0x00, //'b'0x20,0x00, //' '0x43,0x00, //'C'0x61,0x00, //'a'0x6D,0x00, //'m'0x65,0x00, //'e'0x72,0x00, //'r'0x61,0x00, //'a'0x20,0x00,0x20,0x00,0x20,0x00,0x20,0x00,解釋Offset0 為bLength, 更具字串+2 來定義LengthOffset1 為bDescriptorType, 設定字串的Descriptor 為0x03Offset2~OffsetN 設定字串編碼, 使用Unicode 碼, 每個字為2Bytes這個Strings descriptor 傳輸到NB 或PC, 在顯示名稱會秀出如USB Camera2. 傳輸設定: 主要設定USB 2.0 的Configuration 及UVC 1.1 的定義處理如feature, resolution...等等可分為Full Speed USB 定義及High Speed USB 定義, 兩者的Descriptor 類似只是參數設定不同,(1) USB ConfigurationF/W 編碼// Configuration Descriptor0x09, // bLength: 0x09 byte0x02, // bDescriptorType: CONFIGURATION 0x81, 0x05, // wTotalLength: 0x062d byte0x04, // bNumInterfaces: 2 interfaces0x01, // bConfigurationValue: configuration 1 0x00, // iConfiguration: index of string0x80, // bmAttributes: bus powered0xFA, // MaxPower: 500 mA這定義USB2.0 傳送UVC 及UAC 的型態, 規範在USB 2.0 Spec. Table 9.10解釋Offset0 為bLength, Configuration Descriptor 的長度為9 bytes, 0x09Offset1 為bDescriptorType, Configuration Descriptor type, 0x02Offset2 為wTotalLength, 占2bytes 為傳送USB 2.0 的UVC 或UAC 定義資料的全部長度, 包括Configuration Descriptor, 0x81,0x05(0x581 bytes)Offset4 為bNumInterfaces, Interface number, SPCA2281 有Audio 所以設定0x04, 如沒有Audio 設定0x02Offset5 為bConfigurationValue, 為設定結構值, 定義0x01Offset6 為iConfiguration, 為設定這結構的描述字串指標, 0x00Offset7 為bmAttributes, 為設定bus 的power 狀況, D7 為reserved 必須設定為1, D6 為是否要Self Power, D5為遠端遙控開機功能, D4~D0為reserved 設為0, 所以為0x80Offset8 為bMaxPower, 設定USB bus最大電流, 每單為為2mA, 所以0xfa=250即為500mA(2)Video Interface Association DescriptorUSB 在Video 介面接口關連描述(IAD)定義在UVC1.1 Spec. Table 3-1F/W 設定// Video Interface Association Descriptor0x08, // bLength: 0x08 byte0x0B, // bDescriptorType: INTERFACE ASSOCATION Descriptor0x00, // bInterfaceNumber: interface 00x02, // bInterfaceCount: 20x0E, // bFunctionClass: 0x0E0x03, // bFunctionSubClass: 0x030x00, // bInterfaceProtocol: class specific protocol NOT used on this interface0x02, // iFunction: 2解釋Offset0 為bLength, IAD長度為8bytes, 0x08Offset1 bDescriptorType , Interface Association descriptor type, Value=11,0x0BDescriptor Types 編號Offset2 為bFirstInterface 為第一個Video control number, 設定0x00Offset3 為bInterfaceCount 為鄰近的interface 總數,設定0x02(Webcam, NB or PC) Offset4 為bFunctionClass, Video Interface Class code 的CC_VIDEO ,0x0EOffset5 為bFunctionSubClass, 設定SC_VIDEO_INTERFACE_COLLECTION, 0x03Offset6 為bFunctionProtocol ,必須設為PC_PROTOCOL_UNDEFINED,0x00Offset7 為iFunction , 這界面字串的指標,0x02(3) Standard VC Interface Descriptor設定基本Video Control 介面的Descriptor, 定義UVC1.1 Spec Table 3-2F/W 設定// VideoControl Interface Descriptor0x09, // bLength: 0x09 byte0x04, // bDescriptorType: INTERFACE0x00, // bInterfaceNumber: interface 00x00, // bAlternateSetting: alternate setting 0 0x01, // bNumEndpoints: 1 endpoint0x0E, // bInterfaceClass: 0x0E0x01, // bInterfaceSubClass: 0x010x00, // bInterfaceProtocol: class specific protocol NOT used on this interface0x02, // iInterface: index of string解釋Offset0 為bLength , 這VC interface Descriptor 固定長度為9Bytes, 0x09 Offset1 為bDescriptorType, 介面Descriptor type, 0x04Offset2 為bInterfaceNumber, 介面數, 設定為0Offset3 為bAlternateSetting , 間隔數的設定, 設為0間隔, 0x00Offset4 為bNumEndpoints , 端點的設定,需設為1, 0x01Offset5 為bInterfaceClass , 設定為CC_VIDEO, 0x0EOffset6 為bInterfaceSubClass , 設定SC_VIDEOCONTROL,0x01Offset7 為bInterfaceProtocol , 沒使用必須設PC_PROTOCOL_UNDEFINED ,0x00 Offset8 為iInterface, 介面descriptor 描述字串指標, 設定0x02(4) Class-specific VC Interface Header Descriptor主要是設定Class-specific 的total length 及Device clock Frequency, 參考UVC Spec Table 3-3F/W 設定// Class-specific VideoControl Interface Header Descriptor0x0D, // bLength: 0x0D byte0x24, // bDescriptorType: 0x240x01, // bDescriptorSubType: VC_HEADER subtype0x00, 0x01, // bcdVDC: Revision of class specification that this device is based upon0x50, 0x00, // wTotalLength: Total size ofclass-specific descriptors0x00, 0x6C, 0xDC, 0x02, // dwClockFrequency: 48MHz0x01, // bInCollection: Number of streaming interfaces0x01, // baInterfaceNr(1): Interface number ofthe first VideoStreaming interface解釋Offset0 為bLength, 基本Length為12, 另外增加1Byte 的interface number, 為13, 0x0DOffset1 為bDescriptorType , 設定CS_INTERFACE, 為0x24Offset2 為bDescriptorSubType , 要設VC_Header, 0x01Offset3為bcdUVC, 定義Video Device Class Specification release number, 占2bytes, 0x00, 0x01Offset5為wTotalLength, 定義class-specific VideoControl interface descriptor的全部長度,占2bytes, 為0x50, 0x00Offset7 為dwClockFrequency , 裝置的clock Frequency, 為48MHz->48000000->02DC6C00, 占4bytes, 0x00,0x6C,0xDC,0x02Offset11 為bInCollection ,為VideoStreaming number, 設定0x01Offset12 為baInterfaceNr(1), 為第一個VideoStreaming 有多少interface, 為0x01(5) Input (Camera)Terminal Descriptor設定VideoControl Camera Input Terminal Descriptor, 參考UVC Spec Table 3-6F/W 設定// VideoControl Camera Terminal Descriptor 0x12, // bLength: 0x12 byte0x24, // bDescriptorType: 0x240x02, // bDescriptorSubType:VC_INPUT_TERMINAL subtype0x01, // bTerminalID: ID of this input terminal 0x01, 0x02, // wTerminalType: ITT_CAMERA type.0x00, // bAssocTerminal: No assocation0x00, // iTerminal: Unused0x00, 0x00, // wObjectiveFocalLengthMin: No optional zoom supported0x00, 0x00, // wObjectiveFocalLengthMax: No optional zoom supported0x00, 0x00, // wOcularFocalLength: No optional zoom supported0x03, // bControlSize: The size of the bmControls is 2 bytes0x0A, 0x00, 0x00, // bmControls: Camera Terminal controls are supported解釋:Offset0 為bLength , 設定0x12Offset1 為bDescriptorType, 設定CS_INTERFACE , 0x24Offset2 為bDescriptorSubtype, 設定VC_INPUT_TERMINAL, 0x02Offset3 為bTerminalID , 為Input terminal ID, 0x01Offset4 為wTerminalType, 占2bytes, Input Terminal type為Camera,0x01, 0x02Offset6 為bAssocTerminal , no such association exists 設0, 0x00Offset7 為iTerminal, input Terminal String 指標, 0x00, 因SPCA2281 沒Support Offset8 為wObjectiveFocalLengthMin , The value of Lmincontrol Focal 設0x00, 0x00,設0x00, 0x00Offset10 為wObjectiveFocalLengthMax, The value of LmaxOffset12 為wOcularFocalLength , The value of L,設0x00, 0x00ocularOptical Zoom公式為Offset14 為bControlSize, 為Camera Control bmControls Size, 0x03Offset15 為bmControls , Camera Unit control, 設定為0x0A,0x00,0x00 占3bytes 表示0000,0000,0000,0000,0000,1010-> support D3 Exposure Time (Absolute), D1 Auto-Exposure Mode(6) Processing Unit Descriptor主要設定Support video stream 及analog Video standard 參考UVC Spec. Table 3-8F/W 設定// VideoControl Processing Unit Descriptor0x0B, // bLength: 0x0B byte0x24, // bDescriptorType: 0x240x05, // bDescriptorSubtype:VC_PROCESSING_UNIT0x02, // bUnitID: ID of this unit0x01, // bSourceID: This input pin of this unit isconnected to the output pin of unit with ID 0x010x00, 0x40, // wMaxMultiplier: Maximum digital magnification (4X).0x02, // bControlSize: Size in bytes of the bmControls field0x7F, 0x15, // bmControls: Processing Unit controls supported.0x00, // iProcessing: Unused解釋Offset0 為bLength , 0x0BOffset1 為bDescriptorType , 設定CS_INTERFACE, 0x24Offset2 為bDescriptorSubtype , 設定VC_PROCESSING_UNIT,0x05Offset3 為bUnitID, Uini ID, 0x02Offset4 為bSourceID , Source ID, 輸入為camera 為0x01Offset5 為wMaxMultiplier, Max Digital Multiplier 為4x, 0x00, 0x40Offset7 為bControlSize, bmControls size, 0x02Offset8 為bmControls, 設定0x7F, 0x17, 占2bytes, 為0001,0111,0111,1111 表示Support White Balance Temperature( Auto), Power Line Frequency,Gain,Backlight Compensation ,White Balance Temperature, Gamma,Sharpness,Hue,Contrast, BrightnessOffset10 為iProcessing , Index of a string descriptor,設0x00(7) Extension Unit Descriptor延伸資料的Descriptor, 可以將製造商資料(SunplusIT) 或是客戶(Dell) 放入16bytes 的Extension unit中, 參考UVC Spec. Table 3-9F/W 設定0x1D, // bLength: 0x1D byte0x24, // bDescriptorType: 0x240x06, // bDescriptorSubtype:VC_EXTENSION_UNIT0x03, // bUnitID: ID of this unit0x99, 0x1D, 0x5A, 0x7D, // guidFormat: Globally Unique Identifier for Sunplus Extension Unit. */0x32, 0x5B,0x8B, 0x42,0x8C, 0xAD,0x67, 0x1B,0x8A, 0x65, 0xF3, 0x7A,0x00, // bNumControls0x01, // bNrInPins0x02, // bSourceID0x04, // bControlSize0xFF, 0xFF, 0x19,0x00, // bmControls0x00, // Unused(8)Output Terminal Descriptor參考UVC SPEC. Table3-5F/W 設定// VideoControl Output Terminal Descriptor0x09, // bLength: 0x09 byte0x24, // bDescriptorType: 0x240x03, // bDescriptorSubtype:VC_OUTPUT_TERMINAL.0x04, // bTerminalID: ID of this terminal.0x01, 0x01, // wTerminalType: TT_STREAMING type. This terminal is a USB streaming terminal.0x00, // bAssocTerminal: No association.0x04, // bSourceID: The input pin of this unit is connected to the output pin of unit 3.0x00, // iTerminal: Unused解釋Offset0, 為bLength , 為9bytes, 0x09Offset1 為bDescriptorType , 設定CS_INTERFACE , 0x24Offset2 為bDescriptorSubtype, 設定VC_OUTPUT_TERMINAL, 0x03Offset3 為bTerminalID , 為Terminal ID, 0x04Offset4 為wTerminalType, Terminal type TT_STREAMING, 0x01,0x01Offset6 為bAssocTerminal, 由於沒有Association, 設為0x00 Offset7 為bSourceID , Source ID , 0x01Offset8 為iTerminal , Index of a string descriptor, 0x00(9) Video Control Interrupt Endpoint Descriptor設定中斷端點的Descriptor參考UVC SPEC. Table 3-10F/W 設定0x07, // bLength: 0x07 byte0x05, // bDescriptorType: ENDPOINT0x87, // bEndpointAddress: IN endpoint 7.0x03, // bmAttributes: Interrupt transfer type. 0x10, 0x00, // wMaxPacketSize: 16-byte status packet.0x08, // bInterval: polling interval is 2^(8-1) * 125 us = 16 ms解釋Offset0 為bLength, Descriptor 長度, 0x07Offset1 為bDescriptorType ,Offset2 為bEndpointAddress , Endpoint Address, D7=1 為In endpoint, number endpoint = 7, 0x87Offset3 為bmAttributes , Must be set to 11 (Interrupt), 為0x03Offset4 為wMaxPacketSize , Max Packet Size 為16bytes, 占2bytes, 0x10,0x00 Offset6 為bInterval , interrupt endpoint polling 時間->16ms, 公式:2^(n-1) * 125 us=16ms, n=8(10) Class-specific Video Control Interrupt Endpoint Descriptor參考UVC SPEC. Table 3-11F/W設定0x05, // bLength: 0x05 byte0x25, // bDescriptorType: CS_ENDPOINT descriptor.0x03, // bDescriptorSubType: EP_INTERRUPT. 0x10, 0x00, // wMaxTransferSize: 16-byte status packet.解釋Offset0, 為bLength, 0x05Offset1 為bDescriptorType, 設定CS_ENDPOINT, 0x25Offset2 為bDescriptorSubType ,設定EP_INTERRUPT, 0x03Offset3 為wMaxTransferSize, Maximum interrupt structure size 為16 bytes, 0x10, 0x00Video Control descriptor 已設定完畢, 接下來要設定Video Streaming descriptor (11) Video Streaming Interface Descriptor參考UVC SPEC. Table 3-12F/W 設定// VideoStreaming Interface Descriptor0x09, // bLength: 0x09 byte0x04, // bDescriptorType: INTERFACE0x01, // bInterfaceNumber: interface 10x00, // bAlternateSetting: alternate setting 0 0x00, // bNumEndpoints: 0 endpoint0x0E, // bInterfaceClass: 0x0E0x02, // bInterfaceSubClass: 0x02.0x00, // bInterfaceProtocol:PC_PROTOCOL_UNDEFINED.0x00, // iInterface: Unused解釋Offset0 為bLength , Descriptor Length 為0x09Offset1 為bDescriptorType, 設定Interface, 0x04Offset2 為bInterfaceNumber , Interface number, 0x01Offset3 為bAlternateSetting, Alternate Setting, 0x00Offset4 為bNumEndpoints, excluding endpoint 0, 0x00Offset5 為bInterfaceClass, 設為CC_Video, 0x0EOffset6 為bInterfaceSubClass, 設為SC_VIDEOSTREAMING ,0x02Offset7 為bInterfaceProtocol ,設定為PC_PROTOCOL_UNDEFINED, 0x00 Offset8 為iInterface, Index of a string descriptor,0x00(12) Video Streaming Input Header Descriptor參考UVC SPEC. Table 3-13F/W 設定// VideoStreaming Input Header Descriptor 0x0F, // bLength: 0x0F byte0x24, // bDescriptorType: 0x24.0x01, // bDescriptorSubtype:VS_INPUT_HEADER.0x02, // bNumFormats:VC_NUMBER_OF_FORMAT.0x12, 0x04, // wTotalLength: Total size ofclass-specific VideoStreaming interface descriptors.0x81, // bEndpointAddress: Address of the isochronous endpoint used for video data.0x00, // bmInfo: Dynamic format change doesn't supported.0x04, // bTerminalLink: This VideoStreaming interface supplies terminal ID 5 (Output Terminal).0x02, // bStillCaptureMethod: Device supports still image capture method 2.0x01, // bTriggerSupport: Hardware trigger supported for still image capture.0x00, // bTriggerUsage: Hardware trigger should initiate a still image capture.0x01, // bControlSize: Size of the bmaControls field.0x00, // BmaControls(1): no videoStreaming specific controls is supported.0x04, // BmaControls(2): Compression quality videoStreaming specific controls is supported.解釋Offset0 為bLength, Descriptor length, 0x0fOffset1 為bDescriptorType, 設定CS_INTERFACE, 0x24Offset2 為bDescriptorSubtype, 設定VS_INPUT_HEADER, 0x01Offset3 為bNumFormats , VS Fromat number(YUY2,MJPEG), 0x02Offset4 為wTotalLength, Class-specific VS+ VS header Length=1042 bytes, 0x12, 0x04Offset6 為bEndpointAddress, Endpoint Address 使用Isochronous endpoint, D7 為input=1,0x81Offset7 為bmInfo, 設定Dyname format, no support, 0x00Offset8 為bTerminalLink, The terminal ID of the Output Terminal,0x04Offset9 為bStillCaptureMethod, Still image Capture 為Method 2, 0x02Offset10 為bTriggerSupport, 為Support HW 觸發, 0x01Offset11 為bTriggerUsage, HW 觸發still image 形式為Initiate still image capture,0x00Offset12 為bControlSize, 為Size of each bmaControls(x) ,0x01Offset13 為bmaControls(1), 為YUY2 image still image control, no support control, 0x00Offset14 為bmaControl(2), 為MJPEG image still image control, 設定0x04-> 0000,0100-> wCompQuality enable接下來是設定Resolution 的Video Format, 及Video Frame Rate, 由於有支援YUY2 與MJPEG 兩種格式, 在default value 為YUY2 或是MJPEG 取決於設定放在前面或後面, YUY2 與MJPEG 在大致上設定相同, 只在bDescriptorSubtype 設為0x04 為YUY2 Video format, 0x06 為MJPEG Video format, 0x05 為YUY2 Frame Rate, 0x07 為MJPEG Frame Rate(13) Video Streaming YUY2 Video Format Descriptor設定Uncompressed Video Format Descriptor, 這個Descriptor 不在UVC 1.1 Spec, 需參考USB_Video_Payload_Uncompressed_1.1.pdf 的Table 3.1F/W 設定// VideoStreaming YUY2 Video Format Descriptor 0x1B, // bLength: 0x1B byte0x24, // bDescriptorType: 0x240x04, // bDescriptorSubtype: 0x040x01, // bFormatIndex: Second format descriptor. 0x07, // bNumFrameDescriptors0x59, 0x55, 0x59, 0x32, // guidFormat: Globally Unique Identifier for YUV2.0x00, 0x00,0x10, 0x00,0x80, 0x00,0x00, 0xAA,0x00, 0x38, 0x9B, 0x71,0x10, // bBitsPerPixel: Decoded frame has 16 bits per pixel0x01, // bDefaultFrameIndex: Default frame index is 1.0x00, // bAspectRatioX: Non-interlaced stream - not required.0x00, // bAspectRatioY: Non-interlaced stream - not required.0x00, // bmInterlaceFlags: Non-interlaced stream. 0x00, // bCopyProtect: No restrictions imposedon the duplication of this video stream.解釋Offset0 為bLength, 設定Descriptor 長度27 Bytes, 0x1BOffset1 為bDescriptorType, 設定為CS_INTERFACE, 0x24Offset2 為bDescriptorSubtype , 設定為VS_FORMAT_UNCOMPRESSED ,0x04Offset3 為bFormatIndex, Index of this format descriptor , 因YUY2 為default 所以為first format, 0x01Offset4 為bNumFrameDescriptors, 有多少個Frame , 0x07Offset5 為guidFormat , 占16 Bytes, 為Globally Unique IdentifierOffset21 為bBitsPerPixel , 設定每一個Pixel 用幾個bits 來表現, 0x10 表示1 個pixel 使用16個bitsOffset22 為bDefaultFrameIndex, 定義default frame, 0x01 表示以第一個frame 做為defaultOffset23 為bAspectRatioX, 設定Aspect Ratio X 值, 因是non-interlace , 0x00 Offset24 為bAspectRatioY, 設定Aspect Ratio Y 值, 因是non-interlace , 0x00 Offset25 為bmInterlaceFlags , Interlace Flages, 因non-interlaced 所以設0x00 Offset26 為bCopyProtect, 設定No restrictions, 0x00(14) Video Streaming YUY2 Video Frame Descriptor設定YUY2 的Video frame Descriptor, 舉YUY2 800x600 為例, 參考參考USB_Video_Payload_Uncompressed_1.1.pdf 的Table 3.2F/W 設定// VideoStreaming YUY2 Video Frame Descriptor 800x6000x32, // bLength: 0x32 byte0x24, // bDescriptorType: 0x240x05, // bDescriptorSubtype: 0x050x01, // bFrameIndex: 1st frame descriptor0x00, // bmCapabilities: Unused0x20, 0x03, // wWidth: Width of frame is 800 pixels 0x58, 0x02, // wHeight: Height of frame is 600 pixels 0x00, 0xF0, 0x49, 0x02, // dwMinBitRate: Min bit rate in bits/s0x00, 0xB0, 0x71, 0x0B, // dwMaxBitRate: Max bit rate in bits/s0x00, 0xA6, 0x0E, 0x00, // dwMaxVideoFrameBufSize: Max video or still frame size in bytes0x80, 0x1A, 0x06, 0x00, // dwDefaultFrameInterval: 25 fps0x06, // bFrameIntervalType: 6 discrete frame interval0x80, 0x1A, 0x06, 0x00, // Frame interval 25 fps0x20, 0xA1, 0x07, 0x00, // Frame interval 20 fps0x2A, 0x2C, 0x0A, 0x00, // Frame interval 15 fps0x40, 0x42, 0x0F, 0x00, // Frame interval 10 fps0x55, 0x58, 0x14, 0x00, // Frame interval 7.5 fps0x80, 0x84, 0x1E, 0x00, // Frame interval 5 fps解釋Offset0 為bLength , Frame Descriptor Length, 0x32Offset1 為bDescriptorType, 設定CS_INTERFACE, 0x24Offset2 為bDescriptorSubtype, 設定VS_FRAME_UNCOMPRESSED, 0x05Offset3 為bFrameIndex , 設定這個Frame是編號第幾的Frame, 0x01Offset4 為bmCapabilities, 設定Still image supported 及Fixed frame-rate, 0x00 Offset5 為wWidth, 設定Frame 的Width為800->0x320, 0x20,0x03Offset7 為wHeight, 設定Frame 的Height為600->0x258, 0x58,0x02Offset9 為dwMinBitRate , Min bit rate bit/s, 公式: 800(W)x600(H)x16(bits)x5(fps) =38400000 bit/s = 0x0249F000, 0x00,0xF0,0x49,0x02Offset13 為dwMaxBitRate, Max bit rate bit/s, 公式:800(W)x600(H)x16(bits)x25(fps)=192000000->0xB71B000, 0x00,0xB0,0x71,0x0B OffsetOffset17 為dwMaxVideoFrameBufferSize, 設Max Buffer frame size, 公式800(W)x600(H)x2(Bytes)=960000->0xEA600, 0x00,0xA6,0x0E,0x00Offset21 為dwDefaultFrameInterval , 設定Default frame rate 為25fps,0x80,0x1A,0x06,0x00Offset25 為bFrameIntervalType , 支援多少Frame rate, 0x05Offset26 為dwFrameInterval(0), The video frame interval is specified in 100 ns units, 公式: 10,000,000/x , Frame rate =25fps->10,000,000/25 =400000->0x61A80 , 0x80, 0x1A,0x06, 0x00Offset30 為dwFrameInterval(1), Frame rate = 20fps, 0x20,0xA1,0x07,0x00Offset34 為dwFrameInterval(2), Frame rate = 15fps, 0x2A, 0x2C,0x0A,0x00Offset38 為dwFrameInterval(3), Frame rate= 10fps, 0x40,0x42,0x0F,0x00Offset42 為dwFrameInterval(4), Frame rate= 7.5fps, 0x55,0x58,0x14,0x00Offset46 為dwFrameInterval(5), Frame rate= 5fps, 0x80,0x84,0x1E,0x00(15) Video Streaming YUY2 Still Image Frame Descriptor設定支援的Still image frame Descriptor 參考UVC SPEC Table 3-17F/W 設定0x23, // bLength: 0x23 byte0x24, // bDescriptorType: 0x24.0x03, // bDescriptorSubtype:VS_STILL_IMAGE_FRAME0x00, // bEndpointAddress: Unused.0x07, // bNumImageSizePatterns0x20, 0x03, // wWidth(1): Width of image is 800 pixels.0x58, 0x02, // wHeight(1): Height of image is 600 pixels.0xA0, 0x00, // wWidth(2): Width of image is 160 pixels.0x78, 0x00, // wHeight(2): Height of image is 120 pixels.0xB0, 0x00, // wWidth(3): Width of image is 176 pixels.0x90, 0x00, // wHeight(3): Height of image is 144 pixels.0x40, 0x01, // wWidth(4): Width of image is 320 pixels.0xF0, 0x00, // wHeight(4): Height of image is 240pixels.0x60, 0x01, // wWidth(5): Width of image is 352 pixels.0x20, 0x01, // wHeight(5): Height of image is 288 pixels.0x80, 0x02, // wWidth(6): Width of image is 640 pixels.0xE0, 0x01, // wHeight(6): Height of image is 480 pixels.0x00, 0x05, // wWidth(7): Width of image is 1280 pixels.0xD0, 0x02, // wHeight(7): Height of image is 720 pixels.0x01, // bNumCompressionPattern: One compression pattern.0x01, // bCompression(1): Compression ratio is 1.解釋Offset0 為bLength, Still image frame descriptor length, 0x23Offset1 為bDescriptorType , 設為CS_INTERFACE, 0x24Offset2 為bDescriptorSubtype, 設為VS_STILL_IMAGE_FRAME ,0x03Offset3 為bEndpointAddress, 因傳輸方式為Iso, 所以是為0x00Offset4 為bNumImageSizePatterns, 設定支援多少Still Image Frame, 0x07 Offset5 為wWidth(1), first Still image frame 的Width=800->0x320, 設定0x20 ,0x03Offset7 為wHeight(1), first Still image frame 的Height=600->0x258, 設定0x58,0x02以下still image frame 由此類推(16) Video Streaming YUY2 Color Matching Descriptor設定Color Matching Descriptor 參考UVC SPEC. Table 3-18F/W 設定// VideoStreaming YUY2 Color Matching Descriptor0x06, // bLength: 0x06 byte0x24, // bDescriptorType: 0x240x0D, // bDescriptorSubtype:VS_COLORFORMAT0x01, // bColorPrimaries: BT.709, sRGB.0x01, // bTransferCharacteristics: BT.7090x04, // bMatrixCoefficients: SMPTE 170M (BT.601)解釋Offset0 為bLength , Color Matching Descriptor length, 0x06Offset1 為bDescriptorType , 設定CS_INTERFACE type, 0x24Offset2 為bDescriptorSubtype , 設定VS_COLORFORMAT, 0x0DOffset3 為bColorPrimaries , 設定BT.709, sRGB (default), 0x01Offset4 為bTransferCharacteristics, 設定1: BT.709 (default), 0x01Offset5 為bMatrixCoefficients, 設定4: SMPTE 170M (BT.601, default) ,0x04(17) Video Streaming MJPG Video Format Descriptor設定MJPEG的Video format Descriptor, 因與YUY2 的Video Format Descriptor 設定類似所以不做說明, 參考USB_Video_Payload_MJPEG_1.1 的Table 3-1(18) VideoStreaming MJPG Video Frame Descriptor設定MJPEG 的Video Frame Descriptor 參考參考USB_Video_Payload_MJPEG_1.1 的Table 3-1(19) Video Streaming MJPG Still Image Frame Descriptor設定MJPEG Still Image Frame Descriptor, 與YUY2 Still Image frame descriptor 設定類似,所以不做說明(20) Video Streaming MJPG Color Matching Descriptor設定MJPEG 的Color Matching Descriptor, 與YUY2 的Color Matching Descriptor 設定類似, 所以不做說明接下來要設定Isochronous 方式的Interface descriptor 及Endpoint Descriptor, 共要設定11 組(21) VideoStreaming Interface Descriptor 1第一組的Interface Descriptor, 參考UVC SPEC. Table 3-12F/W 設定// VideoStreaming Interface Descriptor 1 0x09, // bLength: 0x09 byte0x04, // bDescriptorType: INTERFACE0x01, // bInterfaceNumber: interface 10x01, // bAlternateSetting: alternate setting 1 0x01, // bNumEndpoints: 1 endpoint0x0E, // bInterfaceClass: 0x0E.0x02, // bInterfaceSubClass: 0x02.0x00, // bInterfaceProtocol:PC_PROTOCOL_UNDEFINED.0x00, // iInterface: Unused.解釋Offset0 為bLength, Interface descriptor size, 0x09Offset1 為bDescriptorType, 設INTERFACE , 0x04Offset2 為bInterfaceNumber , 只有1個interface, 設0x01Offset3 為bAlternateSetting , 設Alternate number, 0x01Offset4 為bNumEndpoints , 設Endpoint number, 0x01Offset5 為bInterfaceClass , 設CC_VIDEO, 0x0EOffset6 為bInterfaceSubClass , 設SC_VIDEOSTREAMING, 0x02 Offset7 為bInterfaceProtocol , 設PC_PROTOCOL_UNDEFINED, 0x00 Offset8 為iInterface , Index of a string descriptor, 0x00(22) Video Streaming Endpoint Descriptor 1設first Endpoint Descriptor 參考UVC SPEC. TableF/W 設定// VideoStreaming Endpoint Descriptor 10x07, // bLength: 0x07 byte0x05, // bDescriptorType: ENDPOINT descriptor. 0x81, // bEndpointAddress: IN endpoint 1.0x05, // bmAttributes: Isochronous transfer type.0xC0, 0x00, // wMaxPacketSize: 192 bytes.0x01, // bInterval: Poll at least every 1ms or 125 us.解釋Offset0 bLength , Endpoint Descriptor Length, 0x07Offset1 bDescriptorType, 設定Endpoint , 0x05Offset2 為bEndpointAddress, Endpoint Address, 屬於input Endpoint 所以D7 要設為1, 而endpoint 1, 0x81Offset3 為bmAttributes , 設定Attribute 為AsynchronousIsochronous 方式傳輸, 0x05Offset4 為wMaxPacketSize, 這ISO 的11 個Endpoint Size 分別是192 Bytes, 384 Bytes, 512 Bytes, 640 bytes, 800 bytes, 944 bytes, 2688 bytes, 2848 bytes, 3040 bytes, 5056 bytes, 5116 bytes.Offset6 為bInterval , polling endpoint for data transfers, 0x01USB Video Class 的傳輸已經設定完成, 如果有支援Usb Audio, 接下來要設定USB Audio Class 傳輸的Descriptor參考: Universal Serial Bus Specification 2.0 及USB Device Class Definition for Video Device 1.1。