H3C-3100和cisco-2960接入层配置方法
- 格式:doc
- 大小:26.00 KB
- 文档页数:2
H3C S3100低端交换机配置步伐之阿布丰王创作1、给设备命名<H3C>system[H3C]sysname (楼宇名称简写)2、配IP地址及vlan描述[H3C]interface Vlan-interface1 (VLAN 1作为下级单元的管理VLAN)[H3C-Vlan-interface1] ip address (各楼宇设备IP)IP地址掩码[H3C-Vlan-interface1]description GL_VLAN3、缺省网关[H3C]ip route-static 0.0.0.0 0.0.0.0 本地网关地址4、超级用户密码[H3C]super password level 3 cipher H3C5、配置telnet密码[H3C]user-interface vty 0 4[H3C-ui-vty0-4]authentication-mode password[H3C-ui-vty0-4]set authentication password cipher huawei [H3C-ui-vty0-4]user privilege level 16、WEB访问用户名和密码[H3C]local-user admin[H3C-luser-admin]password cipher huawei[H3C-luser-admin]service-type telnet [H3C-luser-admin]level 37、网管配置[H3C]snmp-agent community read public[H3C]snmp-agent community write H3C[H3C]snmp-agent sys-info version all[H3C]snmp-agent trap enable8、链路捆绑及端口描述[H3C]link-aggregation group1modemanual[H3C]interface GigabitEthernet3/0/1[H3C-GigabitEthernet3/0/1]port link-type trunk[H3C-GigabitEthernet3/0/1]port trunk permit vlan1000[H3C-GigabitEthernet3/0/1]port link-aggregation group1[H3C-GigabitEthernet3/0/1]description TO_对端设备名_对端设备型号_对端接口#[H3C]interface GigabitEthernet3/0/2[H3C-GigabitEthernet3/0/2]port link-type trunk[H3C-GigabitEthernet3/0/2]port trunk permit vlan1000[H3C-GigabitEthernet3/0/2]port link-aggregation group19、Trunk链路配置[H3C]interface GigabitEthernet1/1/3[H3C-GigabitEthernet1/1/3]port link-type trunk[H3C-GigabitEthernet1/1/3]port trunk permit vlan all10、S3100交换机堆叠[H3C]stacking ip-pool IP地址前缀堆叠交换机个数IP地址掩码[H3C]stacking enable11、O SPF简易配置过程[H3C]ospf[H3C -ospf-1]area 区域编码[H3C -ospf-1-area-0.0.0.1]network IP地址 IP地址反掩码12、O SPF和RIP路由的双向引入[H3C]ospf[H3C -ospf-1]import-route rip[H3C]rip[H3C -ospf-1]import-route ospf。

H3C配置三层交换机4个步骤详细解析H3C配置三层交换机4个步骤详细解析H3C认证:H3C认证培训体系充分考虑客户不同层次的需求,致力于为全球客户提供全面、专业、权威的网络技术认证培训。
下面是店铺整理的关于H3C配置三层交换机4个步骤详细解析,欢迎大家参考!language-modechinese//切换到中文模式system-view//进入系统视图[H3C]displaycurrent-configuration//显示当前配置三层交换机//以下开始配置三层交换机配置三层交换机第一步:划分VLAN,并描述vlan1description local-s3600//本交换机使用#vlan2description link-to-shanxicentre//陕西省中心#vlan3description link-to-shangjiecentre//商界分中心内部使用#vlan4description link-to-shangdongsuo//商东所#vlan5description link-to-shangnansuo//商南所配置三层交换机第二步:给VLAN划网关#interfaceVlan-interface2description linktoshanxicentreipaddress 10.61.242.110 255.255.255.252//省中心指定广域网关、子网掩码#interfaceVlan-interface3description linktoshangjiecentreipaddress 10.161.134.65255.255.255.192//商界分中心局域网关、子网掩码#interfaceVlan-interface4description linktoshangdongsuoipaddress 10.61.242.113255.255.255.252//商东所广域网关、子网掩码#interfaceVlan-interface5description linktoshangnansuoipaddress 10.61.242.117255.255.255.252//商南所广域网关、子网掩码配置三层交换机第三步:给VLAN指定端口#interfaceEthernet1/0/2//将交换机的端口2指定给省中心使用description linktoshanxicentreport access vlan2#interfaceEthernet1/0/15-24//将交换机的端口15-24指定给分中心内部使用description linktoshangjiecentreport access vlan3#interfaceEthernet1/0/3//将交换机的'端口3指定给商东所使用description linktoshangdongsuoport access vlan4#interfaceEthernet1/0/4//将交换机的端口4指定给商南所使用description linktoshangnansuoportaccessvlan5配置三层交换机第四步:配置路由协议//配静态路由(只用对远端设备配一条路由即可,本地自通)iproute 0.0.0.0 0.0.0.0 10.61.242.109//指定所有网段到商东所的路由//配置三层交换机商东所的反向路由iproute 10.161.134.0 255.255.255.0 10.61.242.114iproute 10.161.135.0 255.255.255.0 10.61.242.114//配置三层交换机商南所的反向路由iproute 10.161.135.0 255.255.255.0 10.61.242.118iproute 10.161.136.0 255.255.255.0 10.61.242.118//省中心配置三层交换机:iproute 10.61.242.0 255.255.255.0 10.61.242.110//商东所242.114和商南所242.118共属的242.0指向分中心网关iproute 10.161.134.0 255.255.255.0 10.61.242.110//分中心内部网段指向分中心网关//iproute 10.161.134.0 255.255.255.0 10.61.242.110//iproute 10.161.135.0 255.255.255.0 10.61.242.110//iproute 10.161.136.0 255.255.255.0 10.61.242.110【H3C配置三层交换机4个步骤详细解析】。

首先用console线配置好交换机打开web 页面大体过程改交换机管理IP为与客户端同一网段,并加一条同网关的路由。
配置一个access口允许交换机所在vlan通过。
建立Web访问用户并设密码打开Http 服务具体操作请参照网络摘抄的一个例子:通过Console口在超级终端中执行以下命令,配置以太网交换机管理VLAN的IP地址。
system-view[H3C] interface Vlan-interface 1(进入管理VLAN)[H3C-Vlan-interface1] undo ip address(取消管理VLAN原有的IP地址)[H3C-Vlan-interface1] ip address 10.153.17.82 255.255.255.0(配置以太网交换机管理VLAN的IP 地址为10.153.17.82)第二步:用户通过Console口,在以太网交换机上配置欲登录的WEB网管用户名和认证口令。
l 通过Console口,添加以太网交换机的Web用户,用户级别设为3(管理级用户)[H3C] local-user admin(设置用户名为admin)[H3C-luser-admin] service-type telnet level 3(设置级别3)[H3C-luser-admin] password simple admin(设置密码admin)l 配置交换机到网关的静态路由[H3C] ip route-static 0.0.0.0 0.0.0.0192.168.0.50 (网关的IP地址为192.168.0.50)执行 undo ip http shutdown确保http服务运行。
至此配置完成将本机网卡与交换机某access类型的口连接,输入http://管理IP 即可。

H3C路由器和交换机的基本配置交换机:1.基本配置:(1)视图:<H3C> 用户视图[H3C] 系统视图[H3C-ui-vty0-4] 用户界面视图[H3C-ethernet1/0/1] 以太网视图(2)<H3C>reset saved-configuration 初始化<H3C>reboot 重启<H3C>system-view 进入系统视图[H3C]sysname H3C 设置主机名[H3C]super password (level 1/2/3) simple/cipher password 配置特权口令[H3C]save (safely) 保存设置配置管理IP[H3C]interface vlan 1[H3C-Vlan-interface1]ip address 192.168.1.2 255.255.255.0]undo ip add配置端口[H3C]interface e1/0/2[H3C-ethernet1/0/2]duplex auto/full/half]flow-control 开启以太网端口Ethernet0/0的流量控制。
]undo flow-control 关闭以太网端口流量控制]speed 10/100/auto]display interface ethernet0/0配置网关[H3C]ip route-static 0.0.0.0 0.0.0.0 192.168.1.1配置Aux口令[H3C]user-interface aux 0 7[H3C-ui-aux0-7]authentication-mode password]set authentication password simple/cipher wnt]user privilege level 0/1/2/3配置Console口令[H3C]user-interface 0[H3C-ui0]authentication-mode password]set authentication password simple/cipher wnt]user privilege level 0/1/2/3配置vty口令[H3C]user-interface vty 0 4[H3C-ui-vty0-4]authentication-mode password]set authentication password simple/cipher wnt]user privilege level 0/1/2/3查看的命令[H3C]display history-command[H3C]display version[H3C]display current-configuration[H3C]display saved-configuration[H3C]display interface[H3C]display ip interface[H3C]display interface ethernet(0/0)[H3C]display ip host 显示域名解析表2.telnet(1)基于vty[H3C]ip host hostname ip-address 静态域名解析]display ip host[H3C]interface vlan 1[H3C-Vlan-interface1]ip address 192.168.1.2 255.255.255.0]quit[H3C]user-interface vty 0 4[H3C-ui-vty0-4]authentication-mode password (none/password/scheme) ]set authentication password simple/cipher wnt]user privilege level 0/1/2/3]quit<H3C>(按Ctrl+]键,断开telnet)>(按Ctrl+K键,断开telnet)[H3C]display users all]display users 显示连接本地的telnet会话]display tcp status 显示当前建立的所有TCP链接情况(2)基于用户Switch[H3C]interface vlan 1[H3C-Vlan-interface1]ip address 192.168.1.2 255.255.255.0]quit[H3C]local-user bob[H3C-luser-bob]password simple/cipher wnt]service-type telnet level 0/1/2/3]quit[H3C]super password simple/cipher wnt[H3C]user-interface vty 0 4[H3C-ui-vty0-4]authentication-mode scheme]quit[H3C]domain system[H3C-isp-system]authentication default local<H3C>telnet IP3.vlan(1)可用命令[H3C](undo) vlan 3[H3C-Vlan3]name wnt]description gongsi](undo)port ethernet1/0/2 to ethernet1/0/5 把e1/0/2、3、4、5加入vlan 3]port ethernet1/0/6 ethernet1/0/10 把e1/0/6和e1/0/10加入vlan 3]port ethernet1/0/12]save (safely)]undo name/description]return/quit[H3C]display brief interface ethernet 查看端口属于哪个Vlan[H3C]display brief interface vlan-interface 查看有几个Vlan[H3C]display ip interface brief 查看Vlan信息[H3C]display ip interface vlan-interface 3 查看已配置IP的Vlan信息 [H3C]display ip interface 查看配置IP的Vlan[H3C]display vlan all[H3C]display interface vlan-interface[H3C]interface vlan 0001[H3C-Vlan-interface1]ip address 192.168.1.2 255.255.255.0]undo ip add]return/quit[H3C]interface e1/0/5[H3C-ethernet1/0/5]port access vlan 2(2)单个交换机+Vlan间路由[H3C]vlan 2[H3C-vlan2]name caiwu]port e1/0/3 to e1/0/6]quit[H3C]vlan 3[H3C-vlan3]name kaifa]port e1/0/8 to e1/0/10]quit[H3C]interface vlan 2[H3C-vlan-interface2]ip add 192.168.1.1 255.255.255.0]quit[H3C]interface vlan 3[H3C-vlan-interface3]ip add 192.168.2.1 255.255.255.0]quit(3)Vlan间路由SwitchA[H3C]vlan 2[H3C-vlan2]name caiwu]port e1/0/2 to e1/0/3]quit[H3C]vlan 3[H3C-vlan3]name kaifa]port e1/0/4 to e1/0/5]quit[H3C]interface e1/0/1[H3C-ethernete1/0/1]port link-type trunk]port trunk permit vlan all[H3C]display vlan allRouterA[H3C]interface e0/0[H3C-ethernet0/0]undo ip address[H3C]interface e0/0.2[H3C-ethernet0/0.2]vlan-type dot1q vid 2]ip address 192.168.1.1 255.255.255.0 ]interface e0/0.3e0/0.3]vlan-type dot1q vid 3]ip address 192.168.2.1 255.255.255.0 HostA :192.168.1.2 GW:192.168.1.1HostB :192.168.2.2 GW:192.168.2.1HostA:ping 192.168.2.2路由器:1.基本配置:(1)视图:<H3C> 用户视图[H3C] 系统视图[H3C-ui-vty0-4] 用户界面视图[H3C-ethernet1/0/1] 以太网视图[H3C-serial1/0/0.1] 子接口视图[H3C-ospf] ospf协议视图[H3C-rip] rip协议视图[H3C-serial1/0/0] [H3C-serial1/0/0:1] 同/异步串口视图[H3C-async1/0/0] 异步视图(2)修改系统时间<H3C>clock datatime 11:20:30 2009/11/16[H3C]display clock<H3C>reset saved-configuration 初始化<H3C>reboot 重启<H3C>system-view[H3C]sysname H3C 设置主机名[H3C]super password (level 1/2/3) simple/copher password 配置特权口令[H3C]save (safely) 保存设置配置端口[H3C]interface e0/0[H3C-ethernet0/0]ip address 192.168.1.1 255.255.255.0]duplex auto/full/half]flow-control 开启以太网端口Ethernet0/0的流量控制。

华三接入层交换机需注意配置方法技巧交换机的主要功能包括物理编址、网络拓扑结构、错误校验、帧序列以及流控。
交换机还具备了一些新的功能,如对VLAN(虚拟局域网)的支持、对链路汇聚的支持,甚至有的还具有防火墙的功能。
本文将详细介绍华三接入层交换机需配置的几项细节,需要的朋友可以参考下方法步骤1、查看交换机上应用的配置文件[h3c]dis startupCurrent startup saved-configuration file: flash:/config.cfgNext main startup saved-configuration file: flash:/config.cfg Next backup startup saved-configuration file: NULL2、配置主备配置文件startup saved-configuration config.cfg ?backup Backup config filemain Main config file3、Telnet 用户认证方式登录user-interface vty 0 4authentication-mode schemeuser privilege level 3Telnet 密码方式登录user-interface aux 0user-interface vty 0 4user privilege level 3set authentication password simple abc新建用户local-user adminpassword simple abcpasswordservice-type telnetlevel 34、配置MSTPstp enablestp region-configurationregion-name abcrevision-level 1instance 1 vlan 200active region-configuration*********************************************************5、配置接入层交换机只接电脑,不能接交换机,避免已经配置好的生成树受新添加的交换机影响造成网络的不稳定。

H3C三层交换机和路由器的配置流程H3C三层交换机和路由器的配置流程举例讲解H3C配置三层交换机4个步骤详细用法,配置三层交换机通用的四个步骤就是:划分VLAN,并描述;给VLAN划网关;给VLAN指定端口;配置路由协议;学会这几个步骤之后就能解决所有的配置三层交换机的问题。
language-modechinese//切换到中文模式system-view//进入系统视图[H3C]displaycurrent-configuration//显示当前配置三层交换机//以下开始配置三层交换机配置三层交换机第一步:划分VLAN,并描述vlan1descriptionlocal-s3600//本交换机使用#vlan2descriptionlink-to-shanxicentre//陕西省中心#vlan3descriptionlink-to-shangjiecentre//商界分中心内部使用#vlan4descriptionlink-to-shangdongsuo//商东所#vlan5descriptionlink-to-shangnansuo//商南所配置三层交换机第二步:给VLAN划网关#interfaceVlan-interface2descriptionlinktoshanxicentreipaddress10.61.242.110255.255.255.252//省中心指定广域网关、子网掩码#interfaceVlan-interface3descriptionlinktoshangjiecentreipaddress10.161.134.65255.255.255.192//商界分中心局域网关、子网掩码#interfaceVlan-interface4descriptionlinktoshangdongsuoipaddress10.61.242.113255.255.255.252//商东所广域网关、子网掩码#interfaceVlan-interface5descriptionlinktoshangnansuoipaddress10.61.242.117255.255.255.252//商南所广域网关、子网掩码配置三层交换机第三步:给VLAN指定端口#interfaceEthernet1/0/2//将交换机的端口2指定给省中心使用descriptionlinktoshanxicentreportaccessvlan2#interfaceEthernet1/0/15-24//将交换机的端口15-24指定给分中心内部使用descriptionlinktoshangjiecentreportaccessvlan3#interfaceEthernet1/0/3//将交换机的端口3指定给商东所使用descriptionlinktoshangdongsuoportaccessvlan4#interfaceEthernet1/0/4//将交换机的端口4指定给商南所使用descriptionlinktoshangnansuoportaccessvlan5配置三层交换机第四步:配置路由协议//配静态路由(只用对远端设备配一条路由即可,本地自通)iproute0.0.0.00.0.0.010.61.242.109//指定所有网段到商东所的路由//配置三层交换机商东所的反向路由iproute10.161.134.0255.255.255.010.61.242.114iproute10.161.135.0255.255.255.010.61.242.114//配置三层交换机商南所的反向路由iproute10.161.135.0255.255.255.010.61.242.118iproute10.161.136.0255.255.255.010.61.242.118//省中心配置三层交换机:iproute10.61.242.0255.255.255.010.61.242.110//商东所242.114和商南所242.118共属的242.0指向分中心网关iproute10.161.134.0255.255.255.010.61.242.110//分中心内部网段指向分中心网关//iproute10.161.134.0255.255.255.010.61.242.110//iproute10.161.135.0255.255.255.010.61.242.110//iproute10.161.136.0255.255.255.010.61.242.110//以下开始配置路由器syslocal-user admin创建账号adminpassword simple chuntent创建密码chuntentauthorization-attribute level 3 账号权限service-type telnet打开telnet服务service-type web打开页面登陆服务telnet server enable 启用服务ip http enable 启用服务quitsysuser-interface vty 0 4authentication-mode schemequitinterface g0/0 进入外网接口配置外网ip和子网掩码ip address X.X.X.X 255.255.255.X这里地址按照您的公网ip地址和掩码填写nat outboundquitinterface vlan 1 进入内网接口配置内网ip和子网掩码ip address X.X.X.X 255.255.255.Xquitip route-static 0.0.0.0 0.0.0.0 X.X.X.X这里填写外网网关地址。
For personal use only in study and research;1.恢复到出厂设置->2.连接Trunk端口,设置Vlan1(管理Vlan)的IP地址,确保交换机互联互通->3.开启所有交换机的Telnet服务->4.从下至上依次配置Vlan,在三层交换机上配置Vlan接口地址(本Vlan的网关)->5.在三层交换机上配置服务器Vlan->6.在三层交换机上配置到汇聚层交换机的端口。
---------------------------------------------------------------------------------------一、初始化Reset save //删除保存配置Reboot //重启二、交换机之间实现互联互通登录3100,输入如下命令:System-viewInterface vlan-interface 1 //进入默认的VLAN端口,vlan 1Ip address 192.168.1.4 24 //设置本机在VLAN 1 中的IP 地址Quitsave登录5100,输入如下命令:System-viewInterface vlan-interface 1Ip address 192.168.1.2 24Quitsave登录5600,输入如下命令:System-viewInterface vlan-interface 1Ip address 192.168.1.1 24Quitsave在3100上输入:Ping 192.168.1.1Ping 192.168.1.2同理在5100上也输入:Ping 192.168.1.1Ping 192.168.1.4同理在5600上也输入:Ping 192.168.1.2Ping 192.168.1.4至此,交换机之间的管理vlan 就可以互相通信。
三、开启TELNET登录3100,输入如下命令:System-viewUser-interface vty 0 4 //进入用户端口Authenticate-mode scheme //设置认证模式Protocol inbound all //允许telnet 和RSH 访问User privilege level 3 //设置访问级别QuitLocal-user iamcat //创建本地用户Password simple xxxxxx //设置密码Service-type telnet //访问服务类型:telnetLevel 3 //设置授权访问级别QuitSave在5100或5600上,即可用telnet 192.168.1.4配置3100交换机。
CISCO2960交换机的基本配置1、2960交换机所需要进行的配置项目交换机的主机名、进入enable模式的密码、远程登陆的用户名和密码及设置、管理vlan 的IP地址、交换机的默认网关、交换机的端口、SNMP服务、交换机时间设置等。
这些和之前的2950交换机都是一样的,2960交换机和2950相比增加了限速等功能,由于今后客户新上架除了签署了流量合同的其他都要在交换机的端口上做限速。
2、2960交换机配置时的注意事项首先也是十分重要的一点就是,在交换机的配置没有完成前,特别是VTP模式的配置(一般情况下VTP的初始模式因配置为transparent模式)没有完成前禁止将交换机接入网络,以免使网络中的VLAN信息发生改变,因当使用console线对其进行配置。
在刚开始配置2950的时候由于还没有设置密码,处于安全方面的考虑不要将其接入网络,因使用console口对其进行配置。
交换机刚加电启动时所有的端口会进行自检,开始时每个端口上的指示灯会呈琥珀色经过一段时间后熄灭。
系统的指示等默认情况下会亮在SYST和 STAT两个灯上。
3、2960交换机的配置流程交换机启动后使用console线对其进行设置。
Console线使用的是串行接口,串行口与电脑的串行口相连(如电脑没有串行口可以使用转接器连接),RJ-45的接头和交换机的console口相连。
线连好后在windows上点击开始→程序→附件→通讯→超级终端,在跳出新建连接对话框后在名称一栏中填入想要新建的连接名称,然后确定。
接着所连接的COM 口,在COM1属性里波特率选择“9600”,数据位选择“8”,奇偶效验选择“无”,停止位选择“1”,流量控制选择“无”;或直接点击“还原默认值”,确定进入2950配置界面。
2950如第一次启动会出现对话配置模式选项,选择yes进入对话配置模式,选择no进入CLI命令行界面。
以下配置都在CLI模式下进行。
在CLI模式下交换机显示:switch>在此输入命令switch> 用户模式switch>enable 进入特权模式switch# configure terminal 进入配置模式switch(config)# 配置模式设置主机名switch(config)#hostname 主机名一般情况下主机名的设置规则是switch后面跟交换机编号,如switch20、switch21等设置enable密码switch(config)#enable secret 密码设置密码时使用secret命令,因为它比password命令有更好的安全性,密码用Password Agent软件随机生成12位包含数字和大小写字母的密码设置远程登陆的switch(config)# username 用户名privilege 权限secret 密码用户名、权限和密码在设置权限参数时一般填0,用户名统一为netmaster,密码用Password Agent软件随机生成12位包含数字和大小写字母的密码对所设置的密码switch(config)# service password-encryption进行加密设置管理vlan和switch(config)# interface vlan1 进入管理vlan的配置默认网关switch(config-if)# ip address IP地址子网掩码设置管理vlan的IP,远程登陆使用此IPswitch(config-if)#no shutdown 启用管理vlanswitch(config-if)#exit 退出管理vlan的配置switch(config)# ip default-gateway IP地址设置默认网关设置交换机端口switch(config)# interface FastEthernet 0/1 进入交换机的1号端口switch(config-if)# description uplink port 对端口进行描述,默认时交换机1号口为上连口switch(config-if)# switchport mode trunk 将上连口设为trunk模式switch(config-if)# speed 100 设置端口速率switch(config-if)# duplex full 端口设为全双工模式switch(config-if) interface range fastEthernet 0/2 -24进入端口2至端口24的配置switch(config-if-range)#shutdown 关闭这些端口,到使用时再打开设置SNMP服务switch(config)#snmp-server community 字符串RO命令允许读访问到任何提交community string为字符串的软件,字符串设置要符合长度8位以上、需包含大小写字母和数字关闭http服务switch(config)#no ip http server 由于开启http服务在全全上存在隐患,因关闭设置vty switch(config)#line vty 0 4 设置telnet为0至4共5条线路switch24(config-line)# login local 使系统在远程登录时使用本地设置的用户名和密码进行验证设置timestamps switch(config)# service timestamps debug datetimeswitch(config)# service timestamps log datetime 默认时debug/log为uptime,改为datetime debug和log 显示时间设置VTP模式switch#vlan database 进入VTP的设置switch (vlan)#vtp transparent 将VTP模式设置为transparent模式设置交换机时间switch#clock set hh:mm:ss保存交换机的设置switch#copy running-config startup-config查看交换机设置switch#show running-config 查看交换机的配置端口流量的限制交换机端口流量的限制是用policy-map来实现的。
进入管理模式<H3C>system-view显示正在运行的配置信息[H3C] dis cur保存配置信息[H3C]quit<H3C>save配置telnet 管理的用户和口令[H3C]local-user admin[H3C-]password simple password123[H3C-]service-type telnet[H3C-]level 3[H3C-]quit[H3C]user-interface vty 0 4[H3C-]authentication-mode scheme一、H3C 3600交换机1、划分VLAN,并对VLAN进行IP路由创建vlan 1[H3C]vlan 1[H3C]int vlan 1[H3C-Vlan-interface1]ip add 192.168.1.253 255.255.255.0 [H3C-Vlan-interface1]quit[H3C]int e1/0/1[H3C-Ethernet1/0/1]port access vlan 1[H3C-Ethernet1/0/1]quit[H3C]int e1/0/2[H3C-Ethernet1/0/2]port access vlan 1[H3C-Ethernet1/0/2]quit创建vlan 2[H3C]vlan 2[H3C]int vlan 2[H3C-Vlan-interface1]ip add 192.168.2.253 255.255.255.0 [H3C-Vlan-interface1]quit[H3C]int e1/0/3[H3C-Ethernet1/0/3]port access vlan 2[H3C-Ethernet1/0/3]quit[H3C]int e1/0/4[H3C-Ethernet1/0/4]port access vlan 2[H3C-Ethernet1/0/4]quit[H3C]int g1/0/1[H3C-G1/0/1]port access vlan 2[H3C-G1/0/1]quit3100及3600交换机TRUNK口应用:两台交换机级联SwitchA与SwitchB用trunk互连,相同VLAN的PC 之间可以互访,不同VLAN的PC之间禁止互访l 配置方法:# 进入GigabitEthernet 1/1 以太网端口视图。
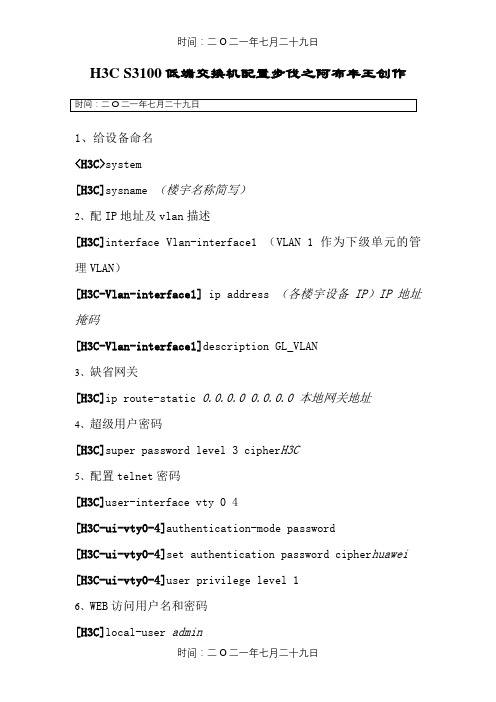
H3C S3100低端交换机配置步伐之南宫帮珍创作1、给设备命名<H3C>system[H3C]sysname (楼宇名称简写)2、配IP地址及vlan描述[H3C]interface Vlan-interface1 (VLAN 1作为下级单元的管理VLAN)[H3C-Vlan-interface1] ip address (各楼宇设备IP)IP地址掩码[H3C-Vlan-interface1]description GL_VLAN3、缺省网关[H3C]ip route-static 0.0.0.0 0.0.0.0 本地网关地址4、超级用户密码[H3C]super password level 3 cipher H3C5、配置telnet密码[H3C]user-interface vty 0 4[H3C-ui-vty0-4]authentication-mode password[H3C-ui-vty0-4]set authentication password cipher huawei [H3C-ui-vty0-4]user privilege level 16、WEB访问用户名和密码[H3C]local-user admin[H3C-luser-admin]password cipher huawei[H3C-luser-admin]service-type telnet [H3C-luser-admin]level 37、网管配置[H3C]snmp-agent community read public[H3C]snmp-agent community write H3C[H3C]snmp-agent sys-info version all[H3C]snmp-agent trap enable8、链路捆绑及端口描述[H3C]link-aggregation group1modemanual[H3C]interface GigabitEthernet3/0/1[H3C-GigabitEthernet3/0/1]port link-type trunk[H3C-GigabitEthernet3/0/1]port trunk permit vlan1000[H3C-GigabitEthernet3/0/1]port link-aggregation group1[H3C-GigabitEthernet3/0/1]description TO_对端设备名_对端设备型号_对端接口#[H3C]interface GigabitEthernet3/0/2[H3C-GigabitEthernet3/0/2]port link-type trunk[H3C-GigabitEthernet3/0/2]port trunk permit vlan1000[H3C-GigabitEthernet3/0/2]port link-aggregation group19、Trunk链路配置[H3C]interface GigabitEthernet1/1/3[H3C-GigabitEthernet1/1/3]port link-type trunk[H3C-GigabitEthernet1/1/3]port trunk permit vlan all10、S3100交换机堆叠[H3C]stacking ip-pool IP地址前缀堆叠交换机个数IP地址掩码[H3C]stacking enable11、O SPF简易配置过程[H3C]ospf[H3C -ospf-1]area 区域编码[H3C -ospf-1-area-0.0.0.1]network IP地址 IP地址反掩码12、O SPF和RIP路由的双向引入[H3C]ospf[H3C -ospf-1]import-route rip[H3C]rip[H3C -ospf-1]import-route ospf。
接入层交换机配置
H3c 3100交换机配置:
1.进入全局配置模式,并修改交换机名:
<H3C>system-view
[H3C]sysname XXX
[XXX]
2.配置交换机管理IP:
[H3C]interface Vlan-interface 1
[H3C-Vlan-interface1]ip address X.X.X.X 255.255.255.0
[H3C-Vlan-interface1]undo shutdown
3.返回上一级:
[H3C-Vlan-interface1]quit
[H3C]
4.设置默认路由:
[H3C]ip route-static 0.0.0.0 0.0.0.0 Y.Y.Y.Y
5.设置telnet登陆,并设置使用manager用户名登陆:
[H3C]user-interface vty 0 4
[H3C-ui-vty0-4]authentication-mode scheme
[H3C-ui-vty0-4]user privilege level 3
[H3C-ui-vty0-4]set authentication password simple wles,bgXXX(登录密码)
[H3C-ui-vty0-4]quit
[H3C]local-user manager
[H3C-luser-manager]password simple wles,bg005(登录密码)
[H3C-luser-manager]service-type ssh telnet terminal
[H3C-luser-manager]level 3
6.创建VLAN,并把端口划在此VLAN下:
[H3C]vlan XXX
[H3C-vlanXXX]port Ethernet 1/0/1
7.进入最后几个光口,设置成trunk接口,并通过所有VLAN:
[H3C]interface GigabitEthernet 1/1/1
[H3C-GigabitEthernet1/1/1]port link-type trunk
[H3C-GigabitEthernet1/1/1]port trunk permit vlan all
8.使用北塔监控:
[H3C]snmp-agent
[H3C]snmp-agent sys-info version all
[H3C]snmp-agent community read public
[H3C]snmp-agent community write private
[H3C]snmp-agent target-host trap address udp-domain 10.10.111.88 params securityname private
[H3C]snmp-agent target-host trap address udp-domain 10.10.111.88 params securityname public
9.保存配置:
[H3C]save
The configuration will be written to the device.
Are you sure?[Y/N]y两次回车。
完成。
Cisco 2960交换机配置:
1.进入全局配置模式,修改交换机名,并设置enable密码:Switch>en
Switch#configure terminal
Switch(config)#hostname XX
XX(config)#enable password XXX
2.配置交换机管理IP:
Switch(config)#interface vlan 1
Switch(config-if)#ip address X.X.X.X 255.255.255.0
Switch(config-if)#no shutdown
3.返回上一级:
Switch(config-if)#exit
Switch(config)#
4.设置默认网关:
Switch(config)#ip default-gateway Y.Y.Y.Y
5.设置telnet登陆,并设置使用manager用户名登陆:
Switch(config)#line vty 0 4
Switch(config-line)#password wles,bgXXX(登录密码)
Switch(config-line)#login local
Switch(config)#username manager password wles,bgXXX(登录密码) 6.创建VLAN,并把端口划在此VLAN下:
Switch(config)#vlan XXX
Switch(config-vlan)#exit
Switch(config)#interface gigabitEthernet 1/0/1
Switch(config-if)#switchport mode access
Switch(config-if)#switchport access vlan XXX
7.进入最后几个光口,设置成trunk接口,并通过所有VLAN:Switch(config)#interface gigabitEthernet 1/0/25
Switch(config-if)#switchport mode trunk
Switch(config-if)#switchport trunk allowed vlan all
8.使用北塔监控:
Switch(config)#snmp-server community public ro
Switch(config)#snmp-server community private rw
Switch(config)#snmp-server host 10.10.111.88 public
9.保存配置:
Switch#write。