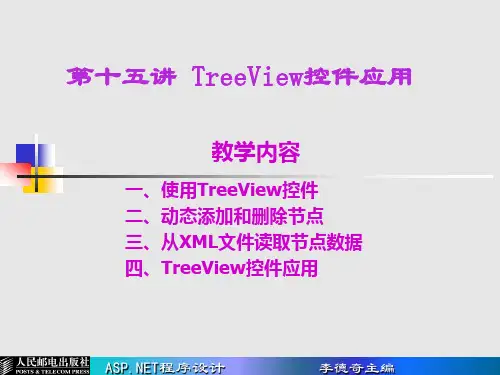
silverlight TreeView
- 格式:doc
- 大小:235.50 KB
- 文档页数:38

Silverlight 探秘系列课程51g SilverLight 控件深入介绍()(一)
苏鹏
MVP 特
MSDN 特约讲师
下载Webcast好帮手
iR iReaper
文件大小<=2.5Mb
可按照多种分类方式进行批量下载
WMV、MP3、MP4、Zune四种格式Webcast
访问iReaper主页:
/iReaper
h d l i
收听本次课程需具备的条件
Level 200
SilverLight3的Control Toolkit
概述
基本控件类
TreeView控件
<controls:TreeViewItem Header=You
Header="You"
AutoCompleteBox
Accordion
NumericUpDown
TimeUpDown
ListTimePickerPopup
RangeTimePickerPopup
DomainUpDown
DEMO 演示控件
好消息
总结
MSDN
获取更多资源
•中文网站
MSDN
•MSDN中文网络广播
•MSDN中文网络广播课程预告邮件
/•MSDN免费中文速递邮件(MSDN Flash)
•MSDN开发中心
•MSDN图书中心
如需提出问题,请在此区域输入文字,并单击“问题和解答”右上方的“提问”按钮即可。
http://forums microsoft com/china
/china。


TreeView软件
Treeview是Windows系统下最早的系统树显示软,可以满足大多数情况下对系统树显示方式的需求;TreeView能够输人nexus和Newick格式的文件,可以将系统树输出保存为几种不同的文本和图像格式:
1.在“file—save as”中叶以保存为1种不同的本格式;在“file-save as graphic”中可以保存为2种图形格式(此时保存的图形类似屏幕截图软件,需要将系统树在屏幕上调整好,)
2.比较好的图形输出方式在:" Tree-Print trees”菜单命令下,在Print trees窗口中,我击“layout”中设置每页放置的图形数;点击“order”设置三种不同的分支排列方式,点击“leaf font”中设置分类单元名称的字体、字型(物种学名斜体)和大小;点击“internal font”设置内部节点名称的字、字型、大小。
设置完成后,点击“picture”可以保存为wmf或emf格式的图形;点击“print”在打印机上打印;点击“copy”复制后粘贴到其他文件中。

TreeView控件使用教程11. TreeView 控件TreeView 控件显示Node 对象的分层列表,每个Node 对象均由一个标签和一个可选的位图组成。
TreeView 一般用于显示文档标题、索引入口、磁盘上的文件和目录、或能被有效地分层显示的其它种类信息。
语法Treeview说明创建了TreeView 控件之后,可以通过设置属性与调用方法对各Node 对象进行操作,这些操作包括添加、删除、对齐和其它操作。
可以编程展开与折回Node 对象来显示或隐藏所有子节点。
Collapse、Expand 和NodeClick 三个事件也提供编程功能。
Node 对象使用Root、Parent、Child、FirstSibling、Next、Previous 和LastSibling 属性。
在代码中可通过检索对Node 对象的引用,从而在树上定位。
也可以使用键盘定位。
UP ARROW 键和DOWN ARROW 键向下循环穿过所有展开的Node 对象。
从左到右、从上到下地选择Node 对象。
若在树的底部,选择便跳回树的顶部,必要时滚动窗口。
RIGHT ARROW 键和LEFT ARROW 键也穿过所有展开的Node 对象,但是如果选择了未展开的Node之后再按RIGHT ARROW 键,该Node 便展开;第二次按该键,选择将移向下一个Node。
相反,若扩展的Node 有焦点,这时再按LEFT ARROW 键,该Node 便折回。
如果按下ANSI 字符集中的键,焦点将跳转至以那个字母开头的最近的Node。
后续的按该键的动作将使选择向下循环,穿过以那个字母开头的所有展开节点。
控件的外观有八种可用的替换样式,它们是文本、位图、直线和+/- 号的组合,Node 对象可以任一种组合出现。
TreeView 控件使用由ImageList 属性指定的ImageList 控件,来存储显示于Node 对象的位图和图标。
任何时刻,TreeView 控件只能使用一个ImageList。

treeview用法Treeview一种用于展示数据层次的可视化控件,它通常被用来展示文件夹的内容、文件树状结构、网站的导航结构等。
它可以使用鼠标点击来展开和收起,它的数据通常以树的形式呈现,它可以使用来递归展示数据,以及实现展开和收起的效果。
Treeview使用步骤是:1. 入 Treeview件首先,我们需要在项目中引入 Treeview件,一般来讲,我们可以使用 JavaScript、jQuery、bootstrap相关库来引入 Treeview。
2. 建数据源在使用 Treeview件之前,我们需要准备一份用于展示的文件树状结构的数据。
常见的数据源有 JavaScript数组、JSON式的数据格式等。
3. 始化 Treeview件接着,我们将 Treeview件初始化,通常我们需要指定数据源,以及一些属性,比如支持展开收起等。
4. 建 Treeview 事件当我们在使用 Treeview件的时候,可以创建一些事件,比如点击事件等,这样我们就可以在点击 Treeview件的任意节点时做出相应的反应。
总的来说,Treeview 为我们提供了一种实现文件树状结构展示的可视化控件。
它可以为我们呈现出简洁清晰的数据层次结构,它可以帮助我们更方便地使用它来构建文件层次结构。
Treeview 也可以用于其他更多的场景,比如用于网站的导航设计。
简单的设计可以让用户快速地找到所需的内容,而复杂的设计则可以实现对访问量的控制,帮助用户快速地找到有用的内容。
另外,通过 Treeview件,我们可以让用户看到更直观、更清晰的网站结构,从而使用户可以更加顺利地浏览网站。
另外,Treeview件还可以用于实现较大数据量的展示。
针对于较大的数据量,我们可以利用 Treeview层级展示,实现较大数据量的展示,同时又保留了数据的层次结构,使用户可以更加顺利地浏览数据。
Treeview一种使用极为广泛的可视化控件,它可以用于文件树状结构的展示、网站的导航设计、较大数据量的展示等,它的使用与实现相比较简单,使用它来可视化展示数据是一种更加有效的方式。
微软⼀站式⽰例代码库2010-05-31新增代码⽰例简介微软⼀站式开发技术框架2010年5⽉31⽇更新。
下载地址:在这次release中,我们除了新加了不少⽰例代码,还应园⼦⾥朋友们的建议,对每个编程语⾔增加了该语⾔的⽰例包。
⽐如对于Silverlight ⽰例包:All-In-One Silverlight Samples.sln,我们增加了C# 包:All-In-One Silverlight Samples (C#).sln, 包:All-In-One Silverlight Samples ().sln。
Azure 新⽰例CSAzureTableStoragePaging, VBAzureTableStoragePaging我们经常需要在使⽤Table Storage的时候同时使⽤分页功能。
然⽽,因为当前Table Storage的功能限制,我们只能使⽤继续令牌来实现简单的前⼀页/后⼀页分页。
这个例⼦⽰范了如何在⼀个MVC程序中实现Table Storage的该分页功能。
新⽰例CSASPNETMVCPager这个例⼦介绍了如何通过⾃定义htmlhelper扩展⽅法来实现分页。
在这个例⼦中我们⾸先定义了⼀个Pager的泛型类,该类⽤来初始化分页的⼀些基本属性,如总页数,每页显⽰多少记录等。
接着我们在CustomizePager类中定义了⼀个htmlhelper扩展⽅法,该⽅法⽤于输出页码。
Silverlight 4 新⽰例CSSL4COMInterop, VBSL4COMInteropCSSL4COMInterop和VBSL4COMInterop ⽰例展⽰了Silverlight4的⼀个新特性: COM交互。
⽰例程序通过使⽤AutomationFactory类,将数据导出到notepad或 MS Word并打印。
Windows 7 新⽰例CppWin7MultiTouch本⽰例演⽰如何使⽤Windows 7的多点触摸功能创建⼀个简单但是现代化的图⽚浏览器。
![Silverlight入门系列]使用MVVM模式(9) 想在ViewModel中控制Storyboard动画?](https://uimg.taocdn.com/40199f7702768e9951e7381c.webp)
实现 Treeview 的展开状态持久化和自动恢复,配合 MVVM 实现不容易。
所以,MVVM 的 核心概念理解不难,在具体使用上则问题多多。
今天要讲的话题就是一个 MVVM 使用上的 具体问题: Silverlight 中的 Storyboard 动画是否可以在 ViewModel 中来控制? 为什么想在 ViewModel 中控制 Storyboard?假设我的业务逻辑在 ViewModel 中, 业务操作好了保存 Save 成功了就需要启动一个动画: Stobyboard.begin()。
而这个动画在视图中,怎么去控制它?这个需求很普遍吧。
确实很 普遍,但实现就不那么简单了,不像下面这样的 Storyboard 启动那么简单:1:<Imagex:Name="myImage" 2:Source="/man.png"> 3:<Image.Triggers> 4:<EventTriggerRoutedEvent="Image.Loaded"> 5:<BeginStoryboard> 6:<Storyboardx:Name="myStoryboard"> 7:<DoubleAnimationDuration="0:0:2" 8:Storyboard.TargetName="myImage" 9:Storyboard.TargetProperty="Opacity" 10:From="0"To="1"/> 11:</Storyboard> 12:</BeginStoryboard> 13:</EventTrigger> 14:</Image.Triggers> 15:</Image>解决方法一: 解决方法一:ViewModel 中用事件 Event 通知 View 启动 Storyboard 动画ViewModel 是对界面逻辑、业务逻辑、和模型数据的封装和抽象,ViewModel 不依赖于 具体的 View 视图,所以 ViewModel 根本不知道具体的某个 Storyboard,怎么去启动这 个动画呢? 解决问题思路有好多:第一种方法就是很自然的想到在 ViewModel 中用事件 Event 通知 View 启动动画。
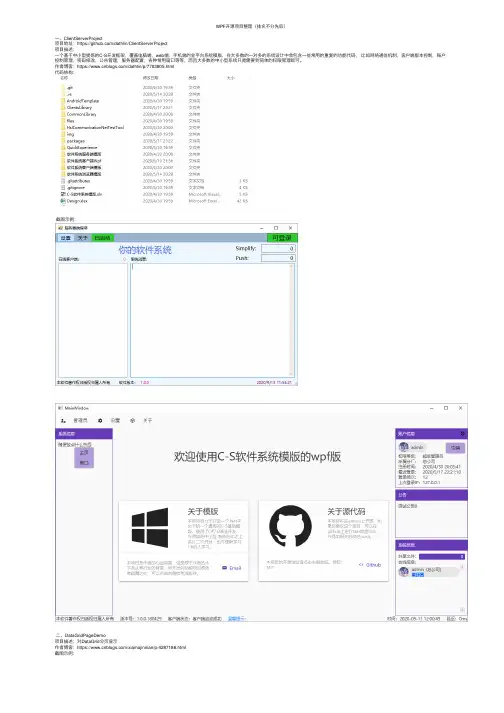
WPF开源项⽬整理(排名不分先后)⼀、ClientServerProject项⽬地址:https:///dathlin/ClientServerProject项⽬描述:⼀个基于中⼩型提炼的C-S开发框架,覆盖电脑端,web端,⼿机端的全平台系统模版,在⼤多数的⼀对多的系统设计中会包含⼀些常⽤的重复的功能代码,⽐如⽹络通信机制,客户端版本控制,账户控制管理,密码修改,公告管理,服务器配置,各种常⽤窗⼝等等,⽽且⼤多数的中⼩型系统只是需要到简单的权限管理即可。
作者博客:https:///dathlin/p/7703805.html代码结构:截图⽰例:⼆、DataGridPageDemo项⽬描述:对DataGrid分页显⽰作者博客:https:///xiamojinnian/p/4287186.html截图⽰例:三、DMSkin-CloudMusic项⽬描述:仿⽹易云⾳乐客户端界⾯项⽬地址:https:///944095635/DMSkin-CloudMusic 截图⽰例:四、DMSkin项⽬描述:快速开发WPF客户端的框架项⽬地址:https:///944095635/DMSkin项⽬截图:作者对项⽬进⾏了较⼤的升级,以前的版本⽰例界⾯是这样的五、DropDownMenu项⽬描述:菜单导航功能实现,常规的管理系统应该常⽤,左侧显⽰菜单条⽬,点击菜单,右侧切换不同的业务⽤户控件。
参考博客:https:///HenryMoore/article/details/103732086截图⽰例:六、exSplitter项⽬描述:展开/折叠效果实现作者博客:https:///kooleven/archive/2013/04/21/3034395.html截图⽰例:七、Extended WPF Toolkit项⽬描述:Extended WPF Toolkit™ by is the number one collection of WPF controls, components and utilities for creating next generation Windows applications 项⽬地址:https:///xceedsoftware/wpftoolkit截图⽰例:⼋、Fluent.Ribbon项⽬描述:Fluent.Ribbon is a library that implements an Office-like user interface for the Windows Presentation Foundation (WPF). It provides controls such as RibbonTabControl, Backstage, Gallery, QuickAccessToolbar, ScreenTip and so on.项⽬地址:https:///fluentribbon/Fluent.Ribbon截图⽰例:九、GemBox.Document项⽬描述:GemBox.Document is a .NET component which enables developers to read, write, convert and print document files (DOCX, DOC, PDF, HTML, XPS, RTF and TXT) from .NET applications in a simple and efficient way.项⽬地址:https:///GemBox-d-o-o/GemBox.Document.Examples截图⽰例:⼗、greatmaps项⽬描述: is great and Powerful, Free, cross platform, open source .NET control. Enable use routing, geocoding, directions and maps from Coogle, Yahoo!, Bing, OpenStreetMap, ArcGIS, Pergo,SigPac, Yendux, Mapy.cz, Maps.lt, iKarte.lv, NearMap, OviMap, CloudMade, WikiMapia, MapQuest in Windows Forms & Presentation, supports caching and runs on windows mobile!项⽬地址:https:///radioman/greatmaps⼗⼀、HandyControl项⽬描述:内容⼗分丰富的WPF控件库项⽬地址:https:///HandyOrg/HandyControl 截图⽰例:⼗⼆、MahApps.Metro项⽬描述:metro风格的控件库,可谓⼤名⿍⿍了项⽬地址:截图⽰例:⼗三、MaterialDesignInXamlToolkit项⽬描述:Comprehensive and easy to use Material Design theme and control library for the Windows desktop.项⽬地址:https:///MaterialDesignInXAML/MaterialDesignInXamlToolkit截图⽰例:⼗四、FirstFloor.ModernUI项⽬描述:A set of controls and styles converting your WPF application into a great looking Modern UI app. This open source project is a spin-off of , the visual runtime inspector for Silverlight, Windows Phone, Windows Store and WPF. Read the项⽬地址:https:///firstfloorsoftware/mui截图⽰例:⼗五、 MultiSelectTreeView项⽬描述:A WPF TreeView control with support for multiple selection.项⽬地址:https:///yaozzj/MultiSelectTreeView/blob/master/README.md截图⽰例:⼗六、 HZHControls控件库项⽬描述:这是winform项⽬,但具有不⼩的参考价值项⽬地址:https:///kwwwvagaa/net_winform_custom_control?_from=gitee_search 截图⽰例:⼗七、OxyPlot项⽬描述:OxyPlot is a cross-platform plotting library for .NET 项⽬地址:https:///oxyplot/oxyplot截图⽰例:⼗⼋、Panuon.UI.Silver项⽬描述:Panuon.UI optimized version. A beautiful wpf ui library using templates & attached properties. Panuon.UI的优化版本。
VB中如何修改treeview的背景色改变 TreeView 的背景Private Declare Function SendMessage Lib "User32" Alias "SendMessageA" (ByVal hWnd As Long, ByVal wMsg As Long, ByVal wParamAs Long, lParam As Long) As LongPrivate Declare Function GetWindowLong Lib "User32" Alias "GetWindowLongA" (ByVal hWnd As Long, ByVal nIndex As Long) As LongPrivate Declare Function SetWindowLong Lib "User32" Alias "SetWindowLongA" (ByVal hWnd As Long, ByVal nIndex As Long, ByValdwNewLong As Long) As LongPrivate Const GWL_STYLE = -16&Private Const TVM_SETBKCOLOR = 4381&Private Const TVM_GETBKCOLOR = 4383&Private Const TVS_HASLINES = 2&Dim frmlastForm As FormPrivate Sub Form_Load()Dim nodX As NodeSet nodX = TreeView1.Nodes.Add(, , "R", "Root")Set nodX = TreeView1.Nodes.Add("R", tvwChild, "C1", "Child 1")Set nodX = TreeView1.Nodes.Add("R", tvwChild, "C2", "Child 2")Set nodX = TreeView1.Nodes.Add("R", tvwChild, "C3", "Child 3")Set nodX = TreeView1.Nodes.Add("R", tvwChild, "C4", "Child4")nodX.EnsureVisibleTreeView1.style = tvwTreelinesText ' Style 4.TreeView1.BorderStyle = vbFixedSingleEnd SubPrivate Sub Command1_Click()Dim lngStyle As LongCall SendMessage(TreeView1.hWnd, TVM_SETBKCOLOR, 0, ByVal RGB(255, 0, 0))'改变背景到红色lngStyle = GetWindowLong(TreeView1.hWnd, GWL_STYLE)Call SetWindowLong(TreeView1.hWnd, GWL_STYLE, lngStyle - TVS_HASLINES)Call SetWindowLong(TreeView1.hWnd, GWL_STYLE, lngStyle) End Sub‘方式2--------------------------------------------------------------------Option ExplicitPrivate Declare Function SendMessage Lib "User32" Alias "SendMessageA" (ByVal hWnd As Long, ByVal wMsg As Long, ByVal wParam As Long, lParam As Long) As LongPrivate Declare Function GetWindowLong Lib "User32" Alias "GetWindowLongA" (ByVal hWnd As Long, ByVal nIndex As Long) As LongPrivate Declare Function SetWindowLong Lib "User32" Alias "SetWindowLongA" (ByVal hWnd As Long, ByVal nIndex As Long, ByVal dwNewLong As Long) As LongPrivate Const GWL_STYLE = -16&Private Const TVM_SETBKCOLOR = 4381&Private Const TVM_GETBKCOLOR = 4383&Private Const TVS_HASLINES = 2&Private Sub Form_Load()Dim nodex As NodeDim i As IntegerDim lStyle As LongCall SendMessage(TreeView1.hWnd, TVM_SETBKCOLOR, 0, ByVal RGB(255, 0, 0))lStyle = GetWindowLong(TreeView1.hWnd, GWL_STYLE)Call SetWindowLong(TreeView1.hWnd, GWL_STYLE, lStyle - TVS_HASLINES)Call SetWindowLong(TreeView1.hWnd, GWL_STYLE, lStyle) TreeView1.Style = tvwTreelinesPlusMinusPictureTextTreeView1.BorderStyle = ccFixedSingleWith TreeView1.NodesSet nodex = .Add(, , "R", "Root")nodex.BackColor = RGB(255, 0, 0)For i = 1 To 10Set nodex = .Add("R", tvwChild, "C" & i, "Child " & i)nodex.BackColor = RGB(255, 0, 0)nodex.EnsureVisibleNextEnd WithEnd Sub。

Telerik详细说明1.Book(电子书) 控件可迅速导入大批量数据,如一百万条,然后分页显示,可以实现动态翻页功能,鼠标点击书本的任意一个角就可以翻页了,做得很逼真。
可以按目录进行索引,在左侧点击你想要查看的条目,右侧的电子书就会自动翻到对应的那一页。
具有事件跟踪功能,你对电子书的任意操作均会在右侧的事件列表中显示出来。
具有绑定功能,你可以把电子书绑定到任意对象集上。
键盘导航功能,可以使用键盘上的左右方向键、Home键、End 键控制翻页。
2.Buttons(按钮)控件下拉列表框控件,下拉列表中可以是图片、树形控件等。
点击之后可以弹出另一个浮动窗口,该窗口集成了各种基础控件供用户选择。
可以把一个命令绑定到按钮中,你可以选择执行或不执行该命令,右侧会同步显示你执行的操作。
3.Calendar(日历)控件可以使用数据服务配置日期。
可以选择显示范围,如显示2009年1月的所有日、显示2009年的所有月份、显示十年如2010-2019年。
具有事件跟踪功能,你对日历的任意操作均会在右侧的事件列表中显示出来。
日期选择功能数据有效性检查功能4.Chart(图表)控件可以选择显示的图表类型,如柱状图、饼图、折线图、水平条等,还选择标签的显示模式、显示距离等。
可以处理大批量数据,还可以选择显示级别,如显示一年的、6个月的、一个月的、一周的等。
可以调节X轴和Y轴的缩放水平,也可以直接重置。
分类和过滤功能分组和聚合功能可以在图表内部或图表之间直接进行拖拽。
可以选择图例的显示位置和形状。
可以对坐标轴进行各种选择操作。
可以自定义调色板支持多个Y轴支持在图表中显示负值可以在图表中显示实时动态数据。
可以把图表导出来,以PNG、BMP、XLSX、XPS等格式。
可以对图表进行下钻操作。
提供丰富多变的API供用户选择。
支持气象图表支持数据绑定功能支持MVVM可以自定义图表中标记点的颜色、形状、是否显示等。
可以显示的图表类型有:Bar、Stacked Bar、Stacked Bar 100、Horizontal Bar、Horizontal Stacked Bar、Horizontal StackedBar 100、Line、Stacked Line、Area、Stacked Area、StackedArea 100、Range、Spline Range、Spline、Stacked Spline、Spline Area、Stacked Spline Area、Stacked Spline Area 100、Scatter/Point、Bubble、Stick、Candlestick、Pie、Doughnut。
TreeView控件改变其选中的背景⾊对于TreeView控件⽽⾔,改变选中节点的背景⾊,有俩种⽅法:1。
利⽤SelectAction属性可以实现,再在其属性中加以配置相应的背景⾊和前景⾊就可以;rootnode.SelectAction = TreeNodeSelectAction.Select可以实现缺点:页⾯会刷新2。
JS实现我要说的就是⽤第⼆种⽅法实现选中以后改变背景⾊,效果图如下:其只要aspx页⾯的JS代码如下:<script language="javascript" type="text/javascript">var tmp_background_val;var tgs;function getNode(evt,flags){evt1 = window.event ? window.event.srcElement : evt.target;//傳過來本次點擊前的的背景顏⾊if (tgs){tgs.style.background= tmp_background_val ;}//考慮到連續點同⼀個對象的情況,就不要改變保留的顏⾊evt1.style.background= '#ddedfd';tmp_background_val=flags;tgs=evt1;}</script>在后台aspx.CS中的Page_Load⽅法中添加如下的语句:TreeView1.Attributes.Add("onclick", "getNode(event,'#0099ff');");即可实现TreeView控件的选中改变背景⾊。
TreeView用法小结1.什么是TreeView?TreeView 是一个 服务器控件,可以生成用于显示分层数据的用户界面2.适用的数据结构:适用分层的数据集、文件夹视图以及其他类似的数据结构。
3.如何实现TreeView?(1)通过声明的方式创建(2)客户端或服务器上通过编程以多种方式来实现4.TreeView创建方法:(1)手动创建(2) 使用中的TreeView Editor创建5.TreeView元素TreeView 定义一个TreeViewTreeNodeType 定义一个节点类型,适用TreeView中的一个或一组节点TreeNode 在TreeView中创建一个节点注:TreeView是TreeNode和TreeNodeType的容器这些元素共同定义了数视图的结构、布局、外观。
TreeView不能包含这三种元素之外的任何HTML元素6.编写简单的TreeView(1).创建一个web application,命名为:webcontrols(2).创建一个空页面(3).添加命名空间引用,即添加“<%@ import namespace="Microsoft.Web.UI.WebControls" %>”(4).添加@ Register 指令即添加:<%@ Register TagPrefix="mytree"Namespace="Microsoft.Web.UI.WebControls"Assembly="Microsoft.Web.UI.WebControls,Version=1.0.2.226,Culture=neutral, PublicKeyToken=31bf3856ad364e35" %>(5). 添加文档结构<HTML><HEAD></HEAD><BODY></BODY></HTML>(6).添加form所有WebControl 元素必须在一个FORM 元素中建立<BODY><FORM runat="server"></FORM></BODY>(7). 添加一个TreeView 元素。
treeview控件用法TreeView控件是一种类似于目录树的控件,用于显示层次结构的数据。
它通常用来显示文件和文件夹的层次关系,也可以用来显示任何具有层次结构的数据。
使用TreeView控件的一般步骤如下:1. 在窗体中放置一个TreeView控件。
2. 使用Nodes属性添加根节点和子节点。
3. 为每个节点设置Text属性,用来显示节点的文本。
4. 可以设置节点的ImageIndex属性和SelectedImageIndex属性,来显示节点的图标。
5. 使用父节点的Nodes属性来添加子节点,形成层次结构。
6. 可以为节点添加事件处理程序,以便响应节点的单击、双击等操作。
以下是一个简单的例子,演示如何使用TreeView控件:```c#// 创建根节点TreeNode rootNode = new TreeNode("根节点");// 创建子节点TreeNode childNode1 = new TreeNode("子节点1");TreeNode childNode2 = new TreeNode("子节点2");TreeNode childNode3 = new TreeNode("子节点3");// 将子节点添加到根节点rootNode.Nodes.Add(childNode1);rootNode.Nodes.Add(childNode2);rootNode.Nodes.Add(childNode3);// 将根节点添加到TreeView控件treeView1.Nodes.Add(rootNode);```这样就创建了一个简单的TreeView控件,其中包含一个根节点和三个子节点。
TreeView控件使用教程11、TreeView 控件TreeView 控件显示Node 对象的分层列表,每个Node 对象均由一个标签与一个可选的位图组成。
TreeView 一般用于显示文档标题、索引入口、磁盘上的文件与目录、或能被有效地分层显示的其它种类信息。
语法Treeview说明创建了TreeView 控件之后,可以通过设置属性与调用方法对各Node 对象进行操作,这些操作包括添加、删除、对齐与其它操作。
可以编程展开与折回Node 对象来显示或隐藏所有子节点。
Collapse、Expand 与NodeClick 三个事件也提供编程功能。
Node 对象使用Root、Parent、Child、FirstSibling、Next、Previous 与LastSibling 属性。
在代码中可通过检索对Node 对象的引用,从而在树上定位。
也可以使用键盘定位。
UP ARROW 键与DOWN ARROW 键向下循环穿过所有展开的Node 对象。
从左到右、从上到下地选择Node 对象。
若在树的底部,选择便跳回树的顶部,必要时滚动窗口。
RIGHT ARROW 键与LEFT ARROW 键也穿过所有展开的Node 对象,但就是如果选择了未展开的Node之后再按RIGHT ARROW 键,该Node 便展开;第二次按该键,选择将移向下一个Node。
相反,若扩展的Node 有焦点,这时再按LEFT ARROW 键,该Node 便折回。
如果按下ANSI 字符集中的键,焦点将跳转至以那个字母开头的最近的Node。
后续的按该键的动作将使选择向下循环,穿过以那个字母开头的所有展开节点。
控件的外观有八种可用的替换样式,它们就是文本、位图、直线与+/- 号的组合,Node 对象可以任一种组合出现。
TreeView 控件使用由ImageList 属性指定的ImageList 控件,来存储显示于Node 对象的位图与图标。
Telerik1.Book(电子书) 控件可迅速导入大批量数据,如一百万条,然后分页显示,可以实现动态翻页功能,鼠标点击书本的任意一个角就可以翻页了,做得很逼真。
可以按目录进行索引,在左侧点击你想要查看的条目,右侧的电子书就会自动翻到对应的那一页。
具有事件跟踪功能,你对电子书的任意操作均会在右侧的事件列表中显示出来。
具有绑定功能,你可以把电子书绑定到任意对象集上。
键盘导航功能,可以使用键盘上的左右方向键、Home键、End 键控制翻页。
2.Buttons(按钮)控件下拉列表框控件,下拉列表中可以是图片、树形控件等。
点击之后可以弹出另一个浮动窗口,该窗口集成了各种基础控件供用户选择。
可以把一个命令绑定到按钮中,你可以选择执行或不执行该命令,右侧会同步显示你执行的操作。
3.Calendar(日历)控件可以使用数据服务配置日期。
可以选择显示范围,如显示2009年1月的所有日、显示2009年的所有月份、显示十年如2010-2019年。
具有事件跟踪功能,你对日历的任意操作均会在右侧的事件列表中显示出来。
日期选择功能数据有效性检查功能4.Chart(图表)控件可以选择显示的图表类型,如柱状图、饼图、折线图、水平条等,还选择标签的显示模式、显示距离等。
可以处理大批量数据,还可以选择显示级别,如显示一年的、6个月的、一个月的、一周的等。
可以调节X轴和Y轴的缩放水平,也可以直接重置。
分类和过滤功能分组和聚合功能可以在图表内部或图表之间直接进行拖拽。
可以选择图例的显示位置和形状。
可以对坐标轴进行各种选择操作。
可以自定义调色板支持多个Y轴支持在图表中显示负值可以在图表中显示实时动态数据。
可以把图表导出来,以PNG、BMP、XLSX、XPS等格式。
可以对图表进行下钻操作。
提供丰富多变的API供用户选择。
支持气象图表支持数据绑定功能支持MVVM可以自定义图表中标记点的颜色、形状、是否显示等。
可以显示的图表类型有:Bar、Stacked Bar、Stacked Bar 100、Horizontal Bar、Horizontal Stacked Bar、Horizontal StackedBar 100、Line、Stacked Line、Area、Stacked Area、StackedArea 100、Range、Spline Range、Spline、Stacked Spline、Spline Area、Stacked Spline Area、Stacked Spline Area 100、Scatter/Point、Bubble、Stick、Candlestick、Pie、Doughnut。
treeview常用的方法TreeView是一种在用户界面中常用的控件,它通常用于显示层次结构数据,例如文件夹结构或组织架构。
下面是TreeView控件常用的方法:1. Nodes属性,Nodes属性是TreeView控件中用于管理节点的集合。
可以通过Nodes属性对TreeView中的节点进行添加、删除、查找等操作。
常用的方法包括Add()方法用于添加新节点、Remove()方法用于移除指定节点、Clear()方法用于清空所有节点等。
2. ExpandAll()和CollapseAll()方法,ExpandAll()方法用于展开TreeView中的所有节点,而CollapseAll()方法用于折叠TreeView中的所有节点。
这两个方法通常用于对TreeView中的节点进行批量操作。
3. Find()方法,Find()方法用于在TreeView中查找指定的节点。
可以通过节点的名称、文本或者标识符进行查找,并返回匹配的节点。
4. BeginUpdate()和EndUpdate()方法,BeginUpdate()方法用于暂时挂起对TreeView控件的绘制,以提高对控件进行多次操作时的性能。
EndUpdate()方法用于恢复对TreeView控件的正常绘制。
5. SelectedNode属性,SelectedNode属性用于获取或设置当前TreeView中被选中的节点。
通过这个属性可以实现对节点的选择操作。
6. Sort()方法,Sort()方法用于对TreeView中的节点进行排序。
可以根据节点的文本或者其他属性进行升序或者降序排序。
7. GetNodeAt()方法,GetNodeAt()方法用于获取TreeView中指定位置的节点。
可以根据鼠标坐标或者控件内的特定位置来获取对应的节点。
以上是TreeView控件常用的方法,通过这些方法可以实现对TreeView中节点的增删改查、展开折叠、选择和排序等操作。
Silverlight Treeview 相关操作:加载,保存,索引节点,节点移动,模板节点作者:Ivan-Yan来源:博客园发布时间:2009-03-14 08:42 阅读:3064 次原文链接[收藏]最近一个Silverlight项目中,需要多处表达展示内容的“父子”关系。
自然用“树”来表达自然是再好不过。
Ms Toolkit中包含了TreeView控件,很好的满足了需求。
要表述树状关系,数据库的设计一定要合理,不然这层关系在加载的时候就会很痛苦。
另外,根据需求,树状节点的展示还要有一定的顺序,所以一棵树在保存的时候,每个节点在树中的位置也要有所记录。
数据库设计CREATE TABLE BASIC_INFO(ID NUMBER(22,3),NAME VARCHAR2(100 BYTE),PARENTID NUMBER(22,3),GRADE NUMBER(1),MEMO VARCHAR2(100 BYTE),IDX NUMBER(5))这样,加载的时候就可以根据ID,ParentID找到父子关系,并根据IDX来加载ID在树中的索引。
这个索引要从树的第一个节点开始深度遍历,根据遍历到的节点的顺序记录其索引。
-树的加载string sqlTv = "SELECT * FROM PDM_BASIC_INFO ORDER BY IDX ASC";void client_getProjectInfoCompleted(object sender, getProjectInfoComp letedEventArgs e){if (e.Error == null){tvshow.Items.Clear();ObservableCollection<ProjectInfo> listsForProject = new ObservableCol lection<ProjectInfo>();listsForProject = e.Result;//添加Title NodeTreeViewItem titleNode = new TreeViewItem();titleNode.FontSize = 15;//为树加载标题节点//titleNode.Background = new SolidColorBrush(Colors.C yan);Grid gridTitle = getTitleGridTemplate();setTitleData(gridTitle);titleNode.Header = gridTitle;// titleNode.Background = null;tvshow.Items.Add(titleNode);///加载添加NodeAddTreeNodeForProject(0, null);}else{MessageBox.Show("操作异常,请重新作业" + e.Error.Messag e, "注意", MessageBoxButton.OK);}}private void AddTreeNodeForProject(int parentID, TreeViewItem tr eeViewItem){List<ProjectInfo> result = (from Info in listsForProjectwhere Info.ParentID == parent IDselect Info).ToList<ProjectIn fo>();if (result.Count > 0){foreach (ProjectInfo info in result){TreeViewItem objTreeNode = new TreeViewItem();objTreeNode.IsExpanded = true;//如果是叶子节点,为其加载模板控制项if (info.Grade == 3) //叶子节点绑定时间控制项{Grid grid = getGridTemplate();setGridData(grid, , info.ID);objTreeNode.Header = grid;}else{objTreeNode.Header = "[" + info.ID + "]" + in ;}//添加根节点if (treeViewItem == null){tvshow.Items.Add(objTreeNode);}else{treeViewItem.Items.Add(objTreeNode);}//递归加载AddTreeNodeForProject(info.ID, objTreeNode);}}}其中,节点的header属性为object类型,这样我们可以根据需求,为其赋予需要的控制项。
设置定制节点private void setTitleData(Grid grid){TextBlock Phase = new TextBlock();Phase.Text = "Phase";Grid.SetColumn(Phase, 0);grid.Children.Add(Phase);Phase = new TextBlock();Phase.Text = "Task";Grid.SetColumn(Phase, 1); grid.Children.Add(Phase);Phase = new TextBlock();Phase.Text = "Item";Grid.SetColumn(Phase, 2); grid.Children.Add(Phase);Phase = new TextBlock();Phase.Text = "工期";Grid.SetColumn(Phase, 3); grid.Children.Add(Phase);Phase = new TextBlock();Phase.Text = "开始时间";Grid.SetColumn(Phase, 4); grid.Children.Add(Phase);Phase = new TextBlock();Phase.Text = "实际开始时间";Grid.SetColumn(Phase, 5); grid.Children.Add(Phase);Phase = new TextBlock();Phase.Text = "完成时间";Grid.SetColumn(Phase, 6); grid.Children.Add(Phase);Phase = new TextBlock();Phase.Text = "实际完成时间";Grid.SetColumn(Phase, 7); grid.Children.Add(Phase);}private void setGridData(Grid grid, string str, int id) {//序号TextBlock flag = new TextBlock();flag.Tag = id;Grid.SetColumn(flag, 0);grid.Children.Add(flag);//名称TextBlock lbl = new TextBlock();lbl.Text = "[" + id.ToString() + "]" + str;//lbl.Text = str;Grid.SetColumn(lbl, 1);grid.Children.Add(lbl);//工期TextBox txt = new TextBox();txt.IsEnabled = false;Grid.SetColumn(txt, 2);grid.Children.Add(txt);//开始时间DatePicker dp = new DatePicker();dp.IsEnabled = false;Grid.SetColumn(dp, 3);grid.Children.Add(dp);//实际开始时间dp = new DatePicker();Grid.SetColumn(dp, 4);grid.Children.Add(dp);//完成时间dp = new DatePicker();dp.IsEnabled = false;Grid.SetColumn(dp, 5);grid.Children.Add(dp);//实际完成时间dp = new DatePicker();Grid.SetColumn(dp, 6);grid.Children.Add(dp);}private Grid getGridTemplate(){Grid grid = new Grid();RowDefinition row1 = new RowDefinition();grid.RowDefinitions.Add(row1);//idColumnDefinition col = new ColumnDefinition(); col.Width = new GridLength(1);grid.ColumnDefinitions.Add(col);//ITem Namecol = new ColumnDefinition();col.Width = new GridLength(250);grid.ColumnDefinitions.Add(col);//工期col = new ColumnDefinition();col.Width = new GridLength(50);grid.ColumnDefinitions.Add(col);//计划开始时间col = new ColumnDefinition();col.Width = new GridLength(150);grid.ColumnDefinitions.Add(col);//实际开始时间col = new ColumnDefinition();col.Width = new GridLength(150);grid.ColumnDefinitions.Add(col);//完成时间col = new ColumnDefinition();col.Width = new GridLength(150);grid.ColumnDefinitions.Add(col);//实际完成时间col = new ColumnDefinition();col.Width = new GridLength(150);grid.ColumnDefinitions.Add(col);return grid;}private Grid getTitleGridTemplate(){Grid grid = new Grid();RowDefinition row1 = new RowDefinition();grid.RowDefinitions.Add(row1);//PhaseColumnDefinition col = new ColumnDefinition(); col.Width = new GridLength(40);grid.ColumnDefinitions.Add(col);//taskcol = new ColumnDefinition();col.Width = new GridLength(50);grid.ColumnDefinitions.Add(col);//itemcol = new ColumnDefinition();col.Width = new GridLength(210);grid.ColumnDefinitions.Add(col);//工期col = new ColumnDefinition();col.Width = new GridLength(50);grid.ColumnDefinitions.Add(col);//计划开始时间col = new ColumnDefinition();col.Width = new GridLength(150);grid.ColumnDefinitions.Add(col);//实际开始时间col = new ColumnDefinition();col.Width = new GridLength(150);grid.ColumnDefinitions.Add(col);//计划完成时间col = new ColumnDefinition();col.Width = new GridLength(150);grid.ColumnDefinitions.Add(col);//实际完成时间col = new ColumnDefinition();col.Width = new GridLength(150);grid.ColumnDefinitions.Add(col);return grid;}Demo:读取节点信息for (int n = 0; n < items.Items.Count; n++) //遍历ITems{TreeViewItem item = items.Items[n] as TreeVie wItem;Grid grid = item.Header as Grid;TextBlock txtID = grid.Children[0] as TextBlo ck;DatePicker txtStart = grid.Children[4] as Dat ePicker;DatePicker txtEnd = grid.Children[6] as DateP icker;//code here}--=============另外,用户提出一些特定的需求:树状节点的顺序他们要自己调整。