L7N使用手册中文
- 格式:doc
- 大小:38.65 MB
- 文档页数:228

N7e行业终端用户手册免责声明请您在使用本手册描述的产品前仔细阅读手册的所有内容,以保障产品的安全有效地使用。
阅读后请将本手册妥善保存以备下次使用时查询。
请勿自行拆卸终端或撕毁终端上的封标,否则福建新大陆自动识别技术有限公司不承担保修或更换终端的责任。
本手册中的图片仅供参考,如有个别图片与实际产品不符,请以实际产品为准。
对于本产品的改良更新,新大陆自动识别技术有限公司保留随时修改文档而不另行通知的权利。
本手册包含的所有信息受版权的保护,福建新大陆自动识别技术有限公司保留所有权利,未经书面许可,任何单位及个人不得以任何方式或理由对本文档全部或部分内容进行任何形式的摘抄、复制或与其它产品捆绑使用、销售。
本手册中描述的产品中可能包括福建新大陆自动识别技术有限公司或第三方享有版权的软件,除非获得相关权利人的许可,否则任何单位或者个人不能以任何形式对前述软件进行复制、分发、修改、摘录、反编译、反汇编、解密、反向工程、出租、转让、分许可以及其它侵犯软件版权的行为。
系统更新风险警告:本产品支持官方系统升级,如果您刷第三方的Rom系统或者采用破解方式修改系统文件,可能会导致本产品发生故障并损坏或丢失数据,有一定的安全风险。
这些操作违反“新大陆三包服务协议”,并将使您的保修失效。
福建新大陆自动识别技术有限公司对本声明拥有最终解释权。
版本记录版本号描述系统版本更新日期V1.0 初始版本N7e-L-2020-06-14_23-06-12_N7e-C_V5.01.001.zip2020-07-23 V2.0目录第一章关于本手册 (1)介绍 (1)获取更多 (1)服务指南 (1)第二章开始使用 (2)拆包 (2)配件(可选) (2)安全须知 (3)入门指南 (4)外观解读 (4)安装/移除电池 (5)电池充电 (6)充电/电池LED状态 (7)安装/移除SIM卡 (7)安装/移除T-flash卡 (8)第三章基本操作使用 (10)电源键的使用 (10)主屏幕 (11)状态栏 (11)添加/删除主屏幕快捷方式 (12)下拉菜单 (12)计算机通讯 (13)安装/卸载应用 (15)第四章如何识读条码 (17)一维条码采集 (17)二维条码采集 (18)第五章系统设置 (19)系统设置介绍 (19)WIFI的使用 (20)蓝牙的使用 (21)SIM卡及移动网络的使用 (22)显示设置 (24)应用 (25)GPS的使用 (26)屏幕锁定设置 (26)语言和输入法 (27)日期和时间设置 (27)恢复出厂设置 (28)系统在线升级 (28)状态信息 (29)键盘映射 (29)第六章系统安全设置 (32)安全设置 (32)电池更换保护 (32)第七章扫描设置与NFC (33)扫描设置 (33)扫描设置: (34)NFC功能 (40)第八章如何系统升级 (41)N7e卡刷升级系统 (41)第九章维护与故障排除 (43)使用注意事项 (43)拆解与改装 (43)外接电源 (43)异常状况 (43)跌落损坏 (43)液晶显示屏 (43)叠放重物 (43)电子设备 (43)医疗场所 (43)易燃易爆区域 (44)交通安全 (44)存放环境 (44)操作环境 (45)维护注意事项 (45)清洁维护 (45)电池的安全指引 (45)维修 (46)故障排除 (46)第十章系统定制与软件开发 (48)系统定制 (48)软件开发 (48)介绍注意:本手册介绍的N7e是基于安卓版本9.0的基础上进行的,如您手上的N7e不为9.0版本,需选择其他相应的用户手册进行阅读、使用。
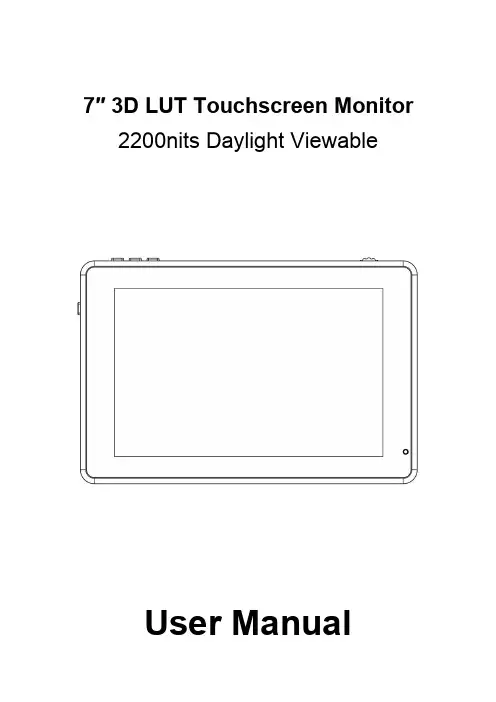
7″3D LUT Touchscreen Monitor 2200nits Daylight ViewableUser ManualProduct OverviewThank you for using our7inch ultra bright touch screen monitor. This monitor has SDI(optional),HDMI input and output,auxiliary power output,touch screen menu operation,HDR monitoring and support user3D LUT upload and other features.Advanced features include Parade,Vector,Histogram,Audio Meter,Focus Assist, False Color,Zebra Exposure,Pixel to Pixel,Center Marker,Safety Marker,Marker Mat,Monochrome,Image Freeze,Zoom, Anamorphic etc.It is an ideal,portable and lightweight viewfinder and video monitor.The monitor is equipped with dual battery plates;you can use the power adapter supply or use the external battery for power supply.To insure the best use of the unit,please read the user’s manual carefullyCAUTION1.Please avoid the heavy impact and drop onto the ground when move the product.2.The screen of this product is made of glass.Keep away from injury if the screen is broken.3.Keep the product away from the heat source,and avoid the prolonged exposures to the sun as the LCD screen will be damaged.4.Please do NOT use chemical solutions to clean this product. Please wipe the monitor with a clean soft cloth to maintain the brightness of the surface.5.No adjustable components are in the monitor.Please do not take apart or repair the unit by yourself,to avoid the damage of the product.Features●Touch screen menu operation●Support HDR monitoring●Support3D LUT Log to REC.709and user3D LUT upload●1920x1200full HD IPS screen●2200nits Daylight Viewable(Light Sensor)●All Waves display,Parada,Vector,RGB Histogram functions●Histogram is a quantitative tool to inspect the image brightness,to guide the exposure control●Focus Assist(red,green,blue,white,yellow five peaking colorsoptional)●Audio Meter●Zebra and False Color function,convenient to guide the usinglight when shooting and the post production●Monochrome(gray,red,green,blue)●Image Zoom-in function●Anamorphic Mode●Image Flip H and Flip V●Image Freeze●Pixel to Pixel●Marker Mat,Center Marker and Safety Marker●Brightness,Contrast,Sharpness,Hue,Saturation and ColorTemp Adjustment.●Stereo Earphone output●DC8.4V power out to power your DSLR camera or mirrorlesscameraCONTENTS1.Product Description-----------------------------------------4 1.1Button Instruction---------------------------------------------4 1.2Port Instruction------------------------------------------------5 1.3Power Supply Way-------------------------------------------61.4Mount Points---------------------------------------------------72.Menu Operation Instruction-------------------------------83.Menu Function Instruction--------------------------------104.Support Formats---------------------------------------------145.Technical Parameters---------------------------------------146.Trouble Shooting---------------------------------------------151.Product Description1.1Button Instruction①.Indicator Light:After connecting the power,the indicator light is on(red).Long Press button to turn on the monitor,it turns yellow.After the signal is connected,it turns green.②.MENU:See details:3.1MENU Wheel Menu Operation in3. Menu Operation Instruction.③.Light Sensor:The backlight mode under the icon is set to Auto,and the brightness of the backlight can be adjusted automatically by the light sensor.④.F1~F3:Custom function buttons1.2PortInstruction①.Dual F970Battery Plates⑥.DC 12V Power Input ②.Power /Touch Function ButtonLong press to turn on /off;short press toturn on /off the screen touch function.⑦.DC OUT 8.4V Power Output Connect the optional dummy battery cable to power camera.③.3.5mm Headphone Jack⑧.SDI OUT (Optional)④.HDMI IN⑨.SDI IN (Optional)⑤.HDMI OUT ⑩.SD Card Slot3DLUT upload via SD card and forfirmware upgrade1.3Power Supply Way(1)The rear cover of the monitor is equipped with dual F970battery plate,which is applicable to F970series of batteries.Sony F970battery plate for battery of Sony DV:Sony F970F960F950F930F770F750F730F570F550F530 seriesRemark:It is recommended to use standard original F970 batteries.Different specifications of the battery have different capability.The working time for the monitor will be different. Higher capability(working time)will be longer.Please take off the battery from the monitor if you don’t use the monitor in a long time.●Battery switching instructionWhen the battery/batteries is/are placed in the battery slot(s), battery icon will appear on the upper right of the screen.White battery icon:working;Gray battery icon:not working.Manually switching:Double-tap the gray battery icon and it will be switched to a working state in about3seconds,then it will be turned white.Automatically switching:Automatically switch to another charged battery when one battery is exhausted.(2)DC IN12V:DC power input,polarity as the input power,Barrel(5.5mm outer,2.1mm inner)at the bottom of the monitor,DC7~24V Input.(3)DC OUT8.4V:DC power output interface,polarity as the output powerBarrel output for powering your camera with a separately available DC coupler via adaptor(NP-FW50Sony&LP-E6 Canon&DMW-BLF19Panasonic).More adapters coming soon.1.4Mount PointsThere are(3)¼-20thread points(bottom,right&left)can be easily connected to the hot shoe mount,tripod fixed installation.Tilt Arm MountingThe monitor secures to your camera using the included Tilt Arm via shoe mount or1/4"-20thread.The Tilt Arm enables360°of tilt for convenient monitoring at nearly any angle.A cold shoe on the Tilt Arm lets you secure equipment(like a microphone,LED light,orwireless receiver)that would otherwise be displaced from the camera's accessory shoe.2.Menu Operation InstructionAfter the monitor is properly connected to the power supply,the indicator light is on(red).Long press button to turn on the monitor,the indicator light turns yellow.After the signal is connected,the indicator light turns green.After startup,short press to select to turn the screen touch function on or off.2.1Touch Screen Menu Operation(turn on the screen touchfunction)①.Double-click on the screen to open the main menu(show on theleft side of the screen)and click on the corresponding menu todisplay the secondary menu.You can enter the correspondingfunction option to select or set with the"<"or">"key of theoption.Exit the menu and press key of the main menuor click the touch screen.②.When the menu is not displayed,swipe up from the bottom ofthe screen to open the shortcut menu,and click on thecorresponding menu box to open or set the correspondingfunction.③.When the menu is not displayed,on the left side of the screen(1/2split screen),you can directly adjust the brightness of the screen backlight;on the right side of the screen(1/2splitscreen),you can directly adjust the volume.Figure:2.2MENU Wheel Menu Operation①.When the menu is not displayed,directly rotate the wheel tobacklight or brightness adjustment.The wheel option can beset to backlight or brightness in the menu.②.Long press the MENU wheel to open the main menu(on the leftside of the screen).Rotate the wheel to select the secondary function menu.After selecting it,press the wheel,then rotate the wheel to select or set the option function.③.Short press the MENU wheel to open the shortcut menu(belowthe screen),rotate the wheel to select the shortcut menu option, press the wheel to directly turn on/off the function,if you press the parameter selection,repeat the above operation.Theshortcut menu will automatically exit after about5secondswithout operation.3.Menu FunctionInstructionLut Switch OFF,ONAfter the LUT Switch is turned on,you can use the Lut(SLOG2, SLOG3,LOGC,VLOG).Lut Out OFF,ON(With SDI interface version)Under the SDI signal,you can choose whether to loop out the LUT after the LUT function is turned on,and the default is off.Lut Import(SD)After copying the3D LUT file to the SD card and inserting it into the SD card slot,you can click the“<”or“>”key in the Lut(SD) option,or rotate the wheel to import the3D LUT file.Note:the chip should be faced up when inserting the SD card, and press it after inserting to ensure that the SD card is fully inserted.HDR OFF,ONAfter turning on,can choose Gamma and Gamut corresponding to the company Sony,Canon,Panasonic,Fujifilm,Bolex,RED, ARRIColortemp 5600K,6500K,9300K,userUnder the“user”,the red,green,and blue values of the image can be adjusted.Backlight Mode manual,autoUnder"Manual",the Backlight(1~100)can be adjusted manually.Wheel Backlight,Volume,Zoom TimesAfter selecting the wheel option,you can click the“<”or“>”button in the wheel option,or rotate the wheel to select one of the shortcut keys to set it to the rotary wheel adjustment(when the menu is not displayed).F1~F3Input,All Waves,Nine Grid,Safety Marker,Center Marker, Marker Mat,False Color,Lut Switch,Parade,Vector,RGB Histogram,Histogram,Audio Meter,Monochrome,Focus Assist,Zebra,Scan Mode,Video Aspect,Anamorphic Mode, Auto Mirror,Flip H,Flip V,Freeze,Pixel to Pixel,Mute,Lut OutLanguage 中文,English,日本語,Deutsch,Français,Italiano,Español,한국,PусскийOSD Alpha OFF,low,middle,highOSD Time5s,10s,15s,20s,25s,30s,always Volume0~100Mute OFF,ONSave Config(SD)User custom menu savingAfter inserting SD card,click the“<”or“>”key to save the current configurationLoad Config(SD)After inserting SD card,click the“<”or“>”key to load the saved configurationExit the menu4.Support FormatsSDI Input SupportFormat(SDI version)720p (60/59.94/50/30/29.97/25/24/23.98)1080i (60/59.94/50)1080p (60/59.94/50/30/29.97/25/24/23.98)2048x1080i (60/59.94/50)2048x1080p (60/59.94/50/30/29.97/25/24/23.98)SDI OutputSupport Format(SDI version)720p (60/59.94/50/30/29.97/25/24/23.98)1080i (60/59.94/50)1080p (60/59.94/50/30/29.97/25/24/23.98)HDMI Input/Output Support Format 480i/480p/576i/576p720p(60/59.94/50/30/29.97/25/24/23.98) 1080i(60/59.94/50)1080p(60/59.94/50/30/29.97/25/24/23.98) 3840x2160p(30/29.97/25/24/23.98) 4096×2160p(30/29.97/25/24/23.98)5.Technical ParametersPanel Size7”touch screenResolution1920×1200pixelsDot Pitch0.07875(H)x0.07875(W)(mm)Aspect Ratio16:10Brightness2200cd/m2(Light Sensor)Contrast1200:1Viewing Angle80°/80°(L/R)80°/80°(U/D)Backlight LEDInput SDI(Optional),HDMIOutput SDI(Optional),HDMI,DC OUT8.4VAudio 3.5mm Stereo HeadphonePower Input Voltage7~24VPower Consumption≦18WUnit Size190Lx126Hx27D(mm)Unit Weight460gMount Points(3)¼-20thread points(left,right,bottom) Working Temperature-20℃~50℃Storage Temperature-30℃~60℃6.Trouble Shooting6.1Only black and white or monochrome picture:①please check saturation,brightness&contrast adjustment.②Please check"Monochrome"is in black,white or monochromeimage or other condition.6.2NO Image after put on the power①Check if signal cable connecting is in good condition.②Check signal cable connecting,and make sure to use thestandard adapter to connect the monitor.If power is supplied by battery,please check if the battery is fully charged.6.3Earphone No sound①Check if Volume control do not open,press the volume button,and try to increase the volume.■If there are still other problems,please contact with our related technologists.★As we are improving product features and product performance, so if there is any change on the specification without prior notice.。
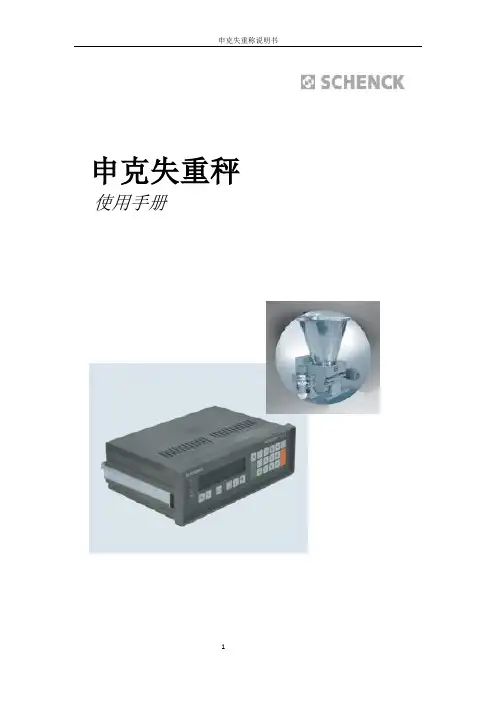
申克失重秤使用手册1.概述什么是INTECONT仪表?是可用于皮带秤,固体流量计,质量流量计,质量给料机,给料机,失重式给料机的计量计算系统。
该系统又三种变形:1.标准情况下,不用选项卡。
2.当有额外输入输出活打印机时,用VFE610V选项卡。
3.现场总线的选项卡VSS021V: Modbus/S5VPB020V: ProfibusVCB020V: DeviceNetVET020V: MODBUS/TCP本手册适用于失重式给料机的计量和控制。
1.卸料:控制(失重式)2.卸料:测量3.平台负载:控制(增量式)4.平台负载:测量更多内容,见Fieldbus 操作手册BVH2220S5-RK512 (3964R)FH 458Modbus (Compa)FH 525显示:荧光显示,6毫米字元高度上段显示左侧:运行信息右侧:设定流量单位:kg/h 或t/h总未料量单位:kg 或t下段显示左侧:故障信息右侧:可选则的流量,速度等采用美国单位时,显示有所改变信号灯(发光二极管)2个绿色和3个红色绿色:准备好红色:错误或限值的讯息键盘:可触摸性薄膜启/停选择低段显示选择功能复位调入分配功能和故障文本确认故障信息, 删除输入退出功能开始功能确认输入准备输入,如设定值输入参数输入符号和小数点儿定义:I =流量单位: kg/h 或t/h 单位时间内通过皮带的物料量P=流量设定值单位:kg/h 或t/h 根据设定值控制实际值Z=喂料量单位:kg 或t 喂料量=喂料速率×喂料时间F=平台负载单位:kg 或tFr=物料重量在总量中的百分比单位:%Nom. Amount Fo=料斗和物料总重量Y=控制器调节量单位: mAXd=控制偏差N=电机转速单位:1/m重力: 控制模式容积: 非控制模式失重式计量原理:用称重传感器测量满载的料斗,规定单位时间内的重量。
结果与单位Ma内的速度相同。
通过喂料预设的设定值计量控制喂料速率。
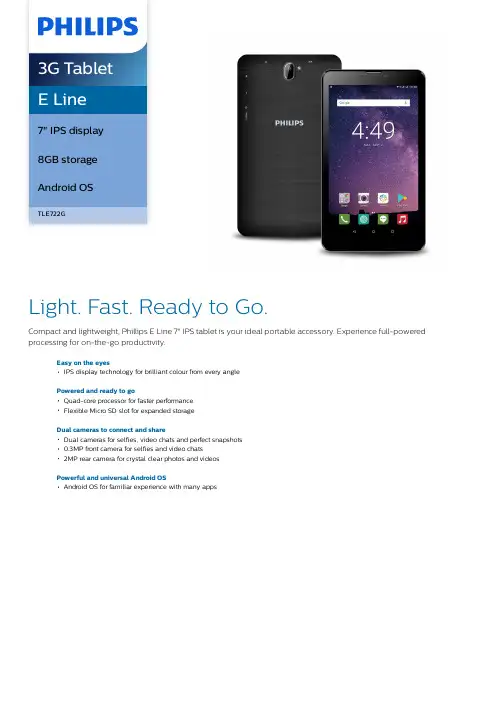
E Line7" IPS display8GB storageAndroid OSTLE722GLight. Fast. Ready to Go.Compact and lightweight, Phillips E Line 7" IPS tablet is your ideal portable accessory. Experience full-powered processing for on-the-go productivity.Easy on the eyesIPS display technology for brilliant colour from every anglePowered and ready to goQuad-core processor for faster performanceFlexible Micro SD slot for expanded storageDual cameras to connect and shareDual cameras for selfies, video chats and perfect snapshots0.3MP front camera for selfies and video chats2MP rear camera for crystal clear photos and videosPowerful and universal Android OSAndroid OS for familiar experience with many appsHighlightsIPS displayWith a crystal-clear IPS display, images and text look brilliant and clear from every angle.Quad-core performanceYour Philips tablet is even more powerful with its quad-core processor. This powerhouse easily keeps up with your multitaskingdemands. Seamlessly load web pages and enjoy uninterrupted videos. Gaming isimmersive with exceptional picture quality.Expandable storageIn addition to the included storage, the Philips tablet offers flexibility to quickly expand your storage and easily swap out memory with a Micro SD card.Front and rear camerasBring yourself to the forefront of fun shots with the front and rear cameras in your Philips tablet. As well as allowing you to take self-portraits, the front-facing camera also means that you can engage in face-to-face videocalls with friends or colleagues. The rear camera allows you to capture life's fleeting moments in crystal clear quality and send them to friends and family. A built-in flash means that you can take great photos even in dim light, so you can capture that perfect moment, night or day.Android OSAndroid is the customisable, easy-to-use operating system that powers more than a billion devices across the globe. Because it's so universal, Android works perfectly with your favourite apps. Android is also customised by you, for you. Put the stuff you care about right on your home screen: the latest news, weatheror a stream of your recent photos.SpecificationsStorage capacityCapacity: 8GB Internal memory + micro SD (up to 32GB)Physical dimensionsColour: BlackDimensions (L x W x H): 188.5 x 108 x 11 mm Weight: 265 gDISPLAYDisplay: 7" IPS (diagonal), Multi touch capacitive, 5 points P-Cap Touch Resolution: 1024 (H) x 600 (V) IPS ProcessorProcessor: MT8321 Quad-Core Processor DRAM Memory: 1 GBCamerasRear Camera: 2MPFront Camera: 0.3MPVideo Recording: 720P @ 30fpsCellular and WirelessWi-Fi: 802.11 b/g/nBluetooth: Bluetooth 4.0 technologyGSM Frequency (MHz):850/900/1800/1900MHz (Band:2/3/5/8)3G WCDMA Frequency (MHz): 900/2100MHz Audio & VideoAudio Playback Features: MPEG audio, WAVaudio, APE audio, OGG audio, FLAC audio,AAC audioAudio Playback Format: MP2/3, OGG, AAC,M4A, AMR, FLAC, APE, MAVMic: Built-inVideo Playback Features: MPEG4, 3GP, AVI,MOVVideo Playback Format: AVI, MP4, MOV, 3GPExternal ConnectorsDC Power: 5V, 1.5A, Micro USB portHeadset: 3.5-mm plugUSB: Micro USB ConnectorSD card: Micro SD Socket x 1*Power and BatteryStandard battery: Li-Polymer 2800 mAh, 3.7VBattery use (audio): about 30 hoursBattery use (video): about 3.5 hoursSensorsSensors: G-Sensor (supports screen rotation)OPERATING SYSTEMOperating System: Android 7.0Built-in Apps: Internet Browser, Video Player,Audio Player, Photo Browser, Email, SoundRecorder, Calculator, Ebook Support etc.Environmental RequirementsOperating ambient temperature: 0 to 35°C (32to 95°F)Non-operating temperature: -10 to 45°C (14 to113°F)Relative humidity: 20% ~80% (operating), 10%~90% (non-operating)Operating altitude: 5,000 mLanguagesLanguages supported: English, Support multilanguageAccessoriesIn the Box: Tablet, Power Adapter, Quick-startGuide, Warranty Statement, USB Cable* Note: Specifications are subject to change withoutnotice.* Under optimal conditions (i.e. battery is fully chargedand used at normal temperatures, headset is used andreasonable number of stop/starts)© 2019 Koninklijke Philips N.V.All Rights reserved.Specifications are subject to change without notice. Trademarks are the property of Koninklijke Philips N.V. or their respective owners.Issue date 2019‑03‑12 Version: 1.1.112 NC: 8670 001 50751 EAN: 87 12581 74945 3。

ARTIX-7 FPGA核心板用户手册AC7A200REV 1.0版芯驿电子科技(上海)有限公司黑金动力社区目录(一)简介 (3)(二)FPGA (4)(三)有源差分晶振 (6)(四)DDR3 (8)(五)QSPI Flash (12)(六)LED灯 (13)(七)JTAG接口 (15)(八)电源接口 (15)(九)扩展接口 (16)(十)电源 (24)(十一)结构图 (27)(一)简介AC7A200(核心板型号,下同)核心板,是基于XILINX公司的ARTIX-7系列200T 的XC7A200T-2FBG484I这款芯片开发的高性能核心板,具有高速,高带宽,高容量等特点,适合高速数据通信,视频图像处理,高速数据采集等方面使用。
这款核心板使用了2片MICRON公司的MT41J256M16HA-125这款DDR3芯片,每片DDR的容量为4Gbit;2片DDR芯片组合成32bit的数据总线宽度,FPGA和DDR3之间的读写数据带宽高达25Gb;这样的配置,可以满足高带宽的数据处理的需求。
这款核心板扩展出180个3.3V电平标准普通IO口,15个1.5V电平标准的普通IO口,还有4对GTP高速RX/TX差分信号。
对于需要大量IO的用户,此核心板将是不错的选择。
而且,FPGA芯片到接口之间走线做了等长和差分处理,并且核心板尺寸仅为60*60(mm),对于二次开发来说非常适合。
AC7A200核心板正面图AC7A200核心板背面图(二)FPGA前面已经介绍过了,我们所使用的FPGA型号为XC7A200T-2FBG484I,属于Xilinx公司Artix-7系列的产品,速度等级为2,温度等级为工业级。
此型号为FBG484封装,484个引脚。
Xilinx ARTIX-7 FPGA的芯片命名规则如下:图2-2-1为开发板所用的FPGA芯片实物图。
图2-2-1 FPGA芯片实物FPGA供电系统Artix-7 FPGA电源有V CCINT, V CCBRAM, V CCAUX, V CCO, V MGTAVCC和V MGTAVTT。

LM770T1/LAM770_ENG_LGEPL_MFL414889027 inch Wide TFT colorTV System/Mobile Monitor OWNER’S MANUALLAM770T1/LAM770Before connecting, operating or adjusting thisproduct, please read this instruction bookletcarefully and completely.Main features7-8 Installation9-14 Parts supplied . . . . . . . . . . . . . . . . . . . . . . . . . . . . . . .9 Before installing . . . . . . . . . . . . . . . . . . . . . . . . . . . . .9 Installation order for the stand . . . . . . . . . . . . . . . . . .10 Treatment of monitor cable . . . . . . . . . . . . . . . . . . . .11 Installation of monitor unit . . . . . . . . . . . . . . . . . . .11-12 Installation order for the stand (Rear seat monitor) . . .13 Connection of exterior units . . . . . . . . . . . . . . . . . . . .14 Parts name15-17 Front view . . . . . . . . . . . . . . . . . . . . . . . . . . . . . . . . .15 Rear view . . . . . . . . . . . . . . . . . . . . . . . . . . . . . . . . .16 Remote control . . . . . . . . . . . . . . . . . . . . . . . . . . . . .17 Battery installation . . . . . . . . . . . . . . . . . . . . . . . . . . .17 Operation18-21 Power ON/OFF . . . . . . . . . . . . . . . . . . . . . . . . . . . . .18 Mode conversion . . . . . . . . . . . . . . . . . . . . . . . . . . . .18 Adjusting the volume . . . . . . . . . . . . . . . . . . . . . . . . .18 Mute . . . . . . . . . . . . . . . . . . . . . . . . . . . . . . . . . . . . .18 To enter the FUNCTION menu . . . . . . . . . . . . . . . . .19 Adjusting FUNCTION menu . . . . . . . . . . . . . . . . . . . .19 To enter the TV SETUP menu . . . . . . . . . . . . . . . . . .20 Adjusting TV SETUP menu . . . . . . . . . . . . . . . . . .20-21 Troubleshooting22-23 Specifications242The lightning flash with arrowhead symbol, within an equilateral triangle is intended to alert the user about the presence of uninsulated dangerous voltage within the product’s enclosure that may be of sufficient magnitude to constitute a risk of electric shock.The exclamation point within an equilateral triangle is intended to alert the user to the presence of important operating and maintenance (servicing) instructions in the literature accompanying the appliance.To prevent a user or others from any physical or financial damage, please abide by the following. The following indications describe the degree of danger or damage for the misusage.To reduce the risk of fire or electric shock, do not expose this apparatus to rain or moisture.1. Read these instructions.2. Keep these instructions.3. Heed all warnings4. Follow all warnings.5. Do not use this apparatus near water.6. Clean only with dry cloth.3NoteTV function is only available for LAM770T1.NoteTV function is only available for LAM770T1.5Unplug the device during thunder storms or when not used for a long6Disposal of your old appliance1. When this crossed-out wheeled bin symbol is attached to a product,it means the product is covered by the European Directive 2002/96/EC. 2. All electrical and electronic products should be disposed of separately fromthe municipal waste stream via designated collection facilities appointed by the government or the local authorities.3. The correct disposal of your old appliance will help prevent potentialnegative consequences for the environment and human health.4. For more detailed information about disposal of your old appliance, pleasecontact your city office, waste disposal service or the shop where you purchased the product.7NoteThe LAM770T1 has three signal sources ; AV1, AV2 and TV, but theLAM770 only has two signal sources; AV1 and AV2.LAM770T1 has TV mode when press the mode convention button.The TV function will be had, but the LAM770 does not have TV mode.LAM770T1, when in TV mode , the menu button is pressed the TV tuning menu will be had the CHANNEL, BADD/ERASE, BSOUND SYSTERM, BFINE TUNE, BAUTO MEMORY and ALL RESET FUNCTIONS can be used,but the LAM770 doesn’t have the function.The remote controller is different.the LAM770T1 has 0-9 number buttons, but the LAM770 doesn’t have.The LAM770T1 has TV antenna but the LAM770 doesn’t have."89Installation At low temperature (20°C… or less) Turn on the heater for a proper temperature. (to enhance adhesive power).At high humidity (fog, rain and so on)After making adhesive side dried with a dryer,install the TV.After installing of the Stand Pulling the Monitor stand or installing the Monitor within 24 hours of the stand installation may weaken adhesive power of the stand.Before installingParts suppliedAV Cable Cigar light adapter Remote Control Section-mount cradle (Rear)Section-mount cradle(Front)Cover case101112NoteRefer to your car’s user guide.A14NoteTV function is only available for LAM770T1.When the AV Cable is insert and pulled out of the AV jack, the picture will flicker for a short moment, which is normal.Please use the appropriate jack connector for the antenna input.15161.Left/ Right Speakers Antenna (TV function is only available for LAM770T1.)3.Docking connectorNoteActual player may vary slightly from images shown.171.Remove the battery holder with fingers.2.Install the battery on the battery holder.3.Install the battery holder back into its originalposition.Notes•Use only one CR2025 (3V) lithium battery.•Remove the battery if the remote control is not used for a long period of time.•Do not leave the product in a hot or humid place.•Do not handle the battery with metallic tools.•Do not store the battery with metallic materials.•In the event of battery leakage, wipe the remote control completely clean and install a new battery.Battery installationNoteWhen power of the main system is turned on or off, the picture sometimes flicker, which is normal.NotesIf power is supplied to the main system, the TV memorizes the previous status and makesNoteWhen you turn the unit off, the current volume level is automatically memorized.19When you press the AV1/AV2 switch, thepicture will flicker for seconds, which is normal.Adjusting FUNCTION menu1. Press the v or V buttons to select a item.2. Press the b or B buttons to adjust .NoteWhen the MODE is changed between 16:9and 4:3, the picture will flicker for a second,which is normal.Item COLOR BRIGHT CONTRAST MODE ROTATE LANGUAGEVOL b Paler Weaker Darker16 : 9 n 4 : 3Rotating the menu screen.ENGLISH n RUSSIANVOL B Deeper Stronger Lighter16 : 9 n 4 : 3Rotating the menu screen.ENGLISH n RUSSIAN20repeatedly.2. Press the MENU button twice.The “TV SETUP” menu is displayed.Adjusting TV SETUP menu1. Press the v or V buttons to select a item.2. Press the b or B buttons to adjust .NoteTV function is only available for LAM770T1.SYSTEMIf the sound is abnormal, maybe the sound system setting is wrong. You can select a proper sound system as follow.PAL B/G y SECAM D/K y PAL D/K Press the b or B buttons to select a proper sound system.CHANNELPress the b or B buttons to start auto search.All active channels will be preset and stored into the memory automatically. After presetting,the TV will go to the channel before the autosearch starts.TV SETUPSYSTEM PAL B/G9438.00MHZUHF OFFCHANNEL FINE BAND SKIP MANUAL AUTOconditions. However in areas of inferior broadcast conditions where adjustment is necessary for a better picture and sound, use FINE TUNE.1. Press the v or V buttons to select theCHANNEL item.2. Press the b or B buttons to select achannel number you want to fine tune.(For example, channel 10)3. Press the v or V buttons to select the“FINE” item.4. Press the b or B buttons to fine tune till thebest possible picture and sound areobtained.BANDPress the b or B buttons to select thethe desired frequency.UHF y VHF L y VHF HSKIPPress the b or B buttons to skip a channel.MANUALPress the b or B buttons to start manual search.AUTOPress the b or B buttons to start auto search. All active channels will be preset and stored into the memory automatically. After presetting, the TV will go to the channel before the auto search starts.2122service center in this manual and we will take a proper action. (As this product is assembled in delicate parts, only a skilled technician is recommended for the disassembly of product.)Small red, blue and green points display on the screen.•LCD screen is made in a high technology. So, this may happen due to lack of pixels by 0.001% or frequent lighting up of pixels. But, it is not the reason of any trouble.Audio and Video do not work.•Check if the starting switch of a car is on ACC or ON.•Check whether a connection code is unstable or is disconnected. •This does not work while driving.Video works but Audio does not.•Check with a volume controller if the volume level is proper.•Check whether an output port for voice is connected.The corner of the screen displays on TV.•If LCD screen has been used for long dark hours, it becomes dark gradually.•If it gets dark severely, replace its exclusive fluorescent tube.Voice quality is bad while receiving TV signal.•Change the frequency in case of interference from a radio displays only in black.•Check its color by adjusting Color Set on Menu.NoteTV function is only available for LAM770T1.bad.It noises.It noises.It noises.2324P/NO : MFL41488902。
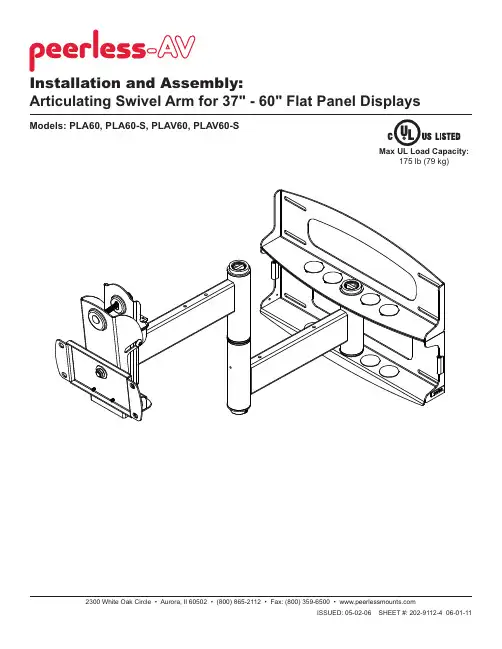
Models: PLA60, PLA60-S, PLAV60, PLAV60-SInstallation and Assembly:Articulating Swivel Arm for 37" - 60" Flat Panel Displays175 lb (79 kg)Tools Needed for Assembly• stud fi nder ("edge to edge" stud fi nder is recommended)•drill• 3/16" (5mm) drill bit for wood studs• 3/8" (10mm) masonry drill bit for concrete•7/16" socket wrench with extension (recommended)•level•phillips screwdriverAccessories• External Wall Plate (WSP716, WSP716-S, WSP724, WSP724-S) (Metal Stud not evaluated by UL)Table of ContentsParts List............................................................................................................................................................................3, 4Installation to Double Wood Stud Wall ...................................................................................................................................5Installation to Solid Concrete or Cinder Block (6)Note: Read entire instruction sheet before you start installation and assembly.PD Before you start make sure all parts listed are included with your product.KMC A E F HB JNRL Some parts may appear slightly different than illustrated.GTIWOQVUSPLA60PLA60-S PLAV60PLAV60-S Description Qty.Part #Part #Part #Part #A wall plate1201-1040201-4040201-1040201-4040B tilt-roll assembly 1201-1093201-4093201-1048201-4048C arm assembly1201-1072201-4072201-1049201-4049D wall support arm axle 1201-1041201-1041201-1041201-1041E vinyl trim3600-1012600-1012600-1012600-1012F M10 x 1.5 x 15 mm screw bolt 8520-9262520-9262520-9262520-9262G .505 x .75 x .062" nylon washer 1540-1074540-1074540-1074540-1074H tilt adjustment knob1560-0108560-0108560-0108560-0108I carriage bolt 3/8"-16 x 3.25"1520-1315520-1315520-1315520-1315J 1.525 x 2 x .062" delrin washer2540-1070540-1070540-1070540-1070K #8-32 x .375" socket head cap screw 1520-1210520-1210520-1210520-1210L plastic finishing cap 8590-1123590-1123590-1123590-1123M holding pin 1580-1166580-1166580-1166580-1166N retainer plug1590-1007590-1007590-1007590-1007O 5/16 x 3" wood screw 8520-1243520-1243520-1243520-1243P .250 x 1 x .068" washer 8540-1063540-1063540-1063540-1063Q 9/64" allen wrench1560-9728560-9728560-9728560-9728R cable management clips 4590-1166590-1166590-1166590-1166S cable tie4590-1168590-1168590-1168590-1168T 36" polyester mesh sleeve 1600-1015600-1015600-1015600-1015Parts Listp y U 6 mm allen wrench 1560-9716560-9716560-9716560-9716V 10 mm allen wrench 1n/an/a560-9727560-9727Wconcrete anchor8590-0321590-0321590-0321590-0321Installation to Wood Stud WallWall plate (A ) can be mounted to two studs that are 16" apart. Use a stud fi nder to locate the edges of the studs. Use of an edge-to-edge stud fi nder is highly recommended. Based on their edges, draw a vertical line down each stud’s center. Place wall plate on wall as a template. The top mounting slots should be located .36" above the desired screen center for PLA60 and PLA60-S and .43" below the desired screen center for PLAV60 and PLAV60-S. Level plate, and mark the center of the eight mounting holes. Make sure that the mounting holes are on the stud centerlines. Drill eight 7/32" dia. holes 3" deep. Make sure that the wall plate is level, secure it using eight 5/16 x 3" wood screws (O ) and washers (P ).Skip to step 2 on page 6.Installation to Solid Concrete or Cinder Block WallSnap four cable management clips (R ) into top or bottom of arm assembly (C ) as shown . Cable ties (S ) are used with clips for cord management.Slide one mesh sleeve (T ) over each cable. Use cable ties (S) to tighten mesh sleeves to cables.Note: There are fi ve mounting positions. The center position is shown (right). Slide washer (J ) over wall support arm axle (D ). Next, insert plastic cap (N ) into axle. Then, insert holding pin (M ) into axle. See detail 1.Note: Fit of axle (D ) into wall plate (A ) and arm assembly (C ) will be tight. Gently tap into placewith a hammer if necessary.Insert socket cap screw (K ) into hole at bottomof wall support arm axle (D ) as shown in detail 3. Tighten screw using 9/64" allen wrench (Q ).Place arm assembly (C ) with washer (J ) into wallplate (A ). Insert axle assembly shown in detail 1 through wall plate (A ), arm assembly (C ), and washer (J ). Lock axle in place by aligning holding pin (M) with notches shown in detail 2.DETAIL 3TInsert and tape carriage bolt (I ) into top hole of pitch-roll assembly (B ). Attach tilt-roll assembly to adapter bracket with four M10 socket screws (F ). Tighten screws using 6 mm allen wrench (U ).Note: Refer to adapter bracket instruction sheet for attachment of adapter bracket to plasma before proceedingwith step 5. If your adapter bracket has an aluminum race attached to it, remove before proceeding and discard race. It is not used with this product.Attach two pieces of vinyl trim (E ) to wall plate (A ). Next, attach one piece of vinyl trim to bottom of swivel box on arm assembly (C ).Insert one finishing cap (L ) into each unused hole of wall plate (A).Insert two M10 screws (F ) into swivel box on arm assembly (C ) as shown. Leave approx. 1/4" of exposed thread.SWIVEL BOXHook tilt-roll assembly (B ) onto M10 screws (F ).Insert carriage bolt (I ) into slot of swivel box as shown in fi gure 6.1. Install nylon washer (G ) and tilt adjustment knob (H ).Install remaining two M10 screws (F ) as shown in fi gure 6.2. HAND TIGHTEN all four M10 screws to allow for tilt adjustment. Remove tape from carriage bolt (I ). For tilt adjustment, push back on the top of plasma to relieve pressure on knob. Adjust tilt to de-sired position and tighten tilt adjustment knob (H ),then securely tighten all four M10 screws (F ) using 6 mm allen wrench (U ).C.25"Ffi g. 6.2HFIAdapter bracket not shown for clarity.Depending on the specifi c size & weight of the plas-ma, articulating swing arm may be angled at differentpositions, causing plasma to appear to lean sidewaysat different articulating positions. Tilt-roll assembly (B)allows plasma to be manually adjusted, so plasmacan be horizontal at all positions. To adjust, gentlyIf it is too diffi cult to adjust roll of plasma, loosenscrews shown in fi gure 7.1 using a phillips screw-driver.IMPORTANT! Do not loosen or tighten screwsmore than 1/8 turn.。
Android iOS Copyright © 2020 LG Electronics Inc.All Rights Reserved.y It is recommended that you use the 5 V AC adapter (more than 2 A) with this device. If you do not use the recommended adapter, charging is unavailable or charging time may differ.y To avoid fire or electric shock, do not open the unit. Contact to qualified personnel only.y Do not leave the unit in a place near the heating appliances or subject to direct sunlight, moisture, or mechanical shock.y The Power Plug is the disconnecting device. In case of an emergency, the Power Plug must remain readily accessible.y To clean the unit, use a soft, dry cloth. If the surfaces are extremely dirty, use a soft cloth lightly moistened with a mild detergent solution. Do not use strong solvents such as alcohol, benzine, or thinner, as these might damage the surface of the unit.y Do not use volatile liquids such as insecticide spray near the unit. Wiping with strong pressure may damage the surface. Do not leave rubber or plastic products in contact with the unit for a long period of time.y Do not place the unit over the vehicle’sair bag. When the air bag deploys, it may result in injury. Before using in the car, fix the unit.y Do not use the handsfree function during driving a car.y Do not leave the unit on an unstable place such as high shelves. it may fall down because of the vibration of the sound.y Do not use high voltage products around this product. (ex. Electrical swatter) This product may malfunction due to electrical shock.CAUTION when using this product in environments of low humidity.y It may cause static electricity in environments of low humidity.y It is recommended to use this product after touching any metal object which conducts electricity.NOTICE: For safety marking information including product identification and supply ratings, please refer to the main label on the bottom or the other surface of the product.7。

The CN75 and CN75e mobile computers’ no-compromise design provides the power and performance required by today’s mobile fieldservice and transportation workers.CN75Ultra-Rugged Mobile ComputerThe Honeywell CN75 and CN75e mobile computers offer the versatility customers demand, providing the choice of aWindows® or Android™ operating system on a single device to meet changing enterprise business demands.The no-compromise design is powered by a 1.5 GHz dual-core, multi-engine processor with 2 GB RAM and 16 GB Flash, offering the highest degree of future-proofing capability.Specifically designed for mobile field service workers who need power and performance in a compact form factor, the Honeywell CN75 mobile computer offers the perfect balance of ruggedness, duty cycle and ergonomics while providing unparalleled versatility. The CN75e device offers the same power-packed computing but with a larger keypaddesign, making it ideal for delivery environments where workers may be wearing gloves or have more data input–intensive applications.The CN75 and CN75e mobile computers deliver unparalleled reliability with smart battery technology that provides enough power to last a full work shift, eliminating dead batteries and downtime. The CN75 and CN75e mobile computers are also equipped with a high-performance imager that provides fast and accurate barcode scanning capabilities even in low-light scanning environments, with unmatched motion tolerance to eliminate costly delays in scan-intensive applications.The no-compromise design extends to radio connectivity, as well. The wide-area solutions feature a Flexible Network voice and data WWAN radio that operates on networks worldwide, offering switch-on-the-fly network selection capability and eliminating the need for multiple pools of devices dedicated to one network.FEATURES AND BENEFITSSupports Windows Embedded Handheld 6.5 and Android 6.0 Marshmallowoperating systems for flexible application support and migration.Flexible radiotechnology provides optimal network coverage and asuperior solution for implementing least- cost routing strategies.Withstands 2.4 m (8 ft) drops to concrete, 2,000 (1 m) tumbles and has an IP67 seal rating against rain and dust.Advanced barcode imaging technology with motion tolerance for snappy scanning and white illumination with laser aiming for high read rates.Full compatibility with printers,application software, communications and a complete set of peripherals andaccessories, enabling a comprehensive enterprise business solution.PHYSICAL CHARACTERISTICSCN75 Dimensions with Battery:L x W x D: 16.9 cm x 8.0 cm x 3.4 cm (6.65 in x 3.15 in x 1.34 in)Weight: 450 g (15.9 oz) with batteryCN75e Dimensions with Battery:L x W x D: 19.5 cm x 8.0 cm x 3.4 cm (7.66 in x 3.15 in x 1.34 in)Weight: 491 g (17.3 oz) with batteryENVIRONMENTALOperating Temperature: -20°C to +60°C (-4°F to +140°F)*Storage Temperature: -30°C to +70°C (-22°F to +158°F)Charging Temperature: +5°C to +35°C (41°F to 95°F)Relative Humidity: Non-condensing, 95%Rain and Dust Resistance: IP67Drop Spec: 2.4 m (8 ft) to concrete per MIL-STD 810G, 1.8 m (6 ft) to concrete across operating temperature range per MIL-STD 810G, 2,000 (1 m) tumbles per IEC 60068-2-32 specification Electrostatic Discharge: +/-15 kV air discharge; +/-8 kV direct dischargePOWERBattery Pack: 3.7 V, 4000 mAh; IEEE 1725 compliant, Li-Ion, removable, rechargeableOPERATING SYSTEM:Microsoft® Windows Embedded Handheld 6.5 or Android 6.0 Marshmallow with GMSMULTI-ENGINE PROCESSOR ARCHITECTURETexas Instruments 1.5 GHz OMAP 4470 dual-core, multi-engine processor architectureMEMORYRAM: 2 GBROM: 16 GB FlashStorage Expansion: Customer-accessible micro-SD slot for removable memory cards up to 32 GBDISPLAY8.9 cm (3.5 in) Transmissive VGA480 x 640 pixels65,536 (16-bit RGB) colorsHigh-durability touch screenHardened Corning® Gorilla® Glass display for superior durabilityLED backlightAmbient light sensorSTANDARD COMMUNICATIONSUSB – Full Speed 2.0 Host, USB – Full Speed 2.0 Client SOFTWARE APPLICATIONS ANDCOMPONENTSDevice Management:SmartSystems™ Foundation providesa single, integrated environmentfor hands-free deployment andmanagement of devices on-siteor remote. Also compatible withleading third-party data and devicemanagement products.ScanNGo for easy barcode-basedenterprise-wide device provisioning.It can be used to download devicemanagement software from HoneywellISVs.CloneNGo, a peer-to-peer devicemanagement software that enablessimple device cloning, eliminating theneed to use a management console fordevice provisioning.Application Development: HoneywellDeveloper LibraryDevice Health Monitoring: On-boardmonitoring of key subsystems includingscanning, communications and batterylifeOptional Honeywell Enterprise ClientPack: Terminal Emulation and HTML 5BrowserOptional Launcher: Application lockingDATA MANAGEMENTSkynax® Mobile CommunicationsINTEGRATED RADIOSWireless WAN: Worldwide Voice and Data(can switch between UMTS and CDMAradio networks)UMTS/HSPA+UMTS Frequencies: 800, 850,900, 1900, 2100 MHzGSM/GPRS/EDGE Frequencies:850, 900, 1800, 1900 MHzMax Speeds (Networkdependent): Uplink – 5.76Mbps; Downlink – 14.4 MbpsCDMA/EV-DO Rev ADual Band CDMA2000 Bands:BC0 & BC1 (800/1900 MHz)Max Speeds (NetworkDependent): Uplink – 1.8Mbps; Downlink – 3.1 MbpsWireless LAN: IEEE 802.11 a/b/g/nSecurity: Wi-Fi Certifiedfor WPA and WPA2,Authentication: 802.1xCisco Compatibility: CCXv4Encryption: WEP (64- or128-bit), AES, TKIPWireless PAN: Integrated Bluetooth®Power Class 1.5 Version 4GLOBAL POSITIONING SYSTEM(with WAN Radio Option): 12-channelintegrated GPS; network-independentautonomous mode; supports assistedoperation via XTRA®, CP E911GPS dedicated AT commandsProtocol: NMEA-0183 V2.3Tracking Sensitivity: better than -158dBmGLONASS supportSENSOR TECHNOLOGYAccelerometer: Embedded accelerometerenables automatic or application-specificfeatures such as screen rotation or systemsuspendAUDIO SUPPORTSupports VoIP/speech recognition/push-to-talk applications; front andrear speakers; rear speaker >80 dB at40 cm (15.7 in); front receiver and frontpanel microphone for handset audioommunication and audio recording;ireless Bluetooth headset support; wiredheadset support via snap-on adapterINTEGRATED SCANNEREA30 High-Performance Motion-Tolerant 2D Imager: (up to 500 in/s)white LED illumination; red laser aimerand framer optimized for all lightingconditions. Capable of scanning allcommon 1D and 2D barcodes; 1D assmall as 4 mils; 2D as small as 6.6 mils.Refer to User’s Manual for depth-of-fieldperformance.INTEGRATED CAMERA5-megapixel auto-focus color camerawith LED flashKEYPAD OPTIONSAll keypad options feature backlit hardkeycaps with laser-etched legends.CN75:NUMERIC KEYPAD QWERTY KEYPADCN75e:LARGE NUMERIC KEYPAD LARGE QWERTY KEYPADCN75/CN75e Mobile Computer Datasheet | Rev B | 08/21© 2021 Honeywell International Inc.For more informationHoneywell Safety andProductivity Solutions300 S Tryon St Suite 500Charlotte, NC 28202877-841-2840For a complete listing of all compliance approvals and certifications, please visit /compliance . For a complete listing of all supported barcode symbologies, please visit/symbologies .Microsoft, Windows, and the Windows Logo are registered trademarks or trademarks of Microsoft Corporation. ScanPal is a trademark or registeredtrademark of Honeywell International Inc.Android is a trademark or registered trademark of Google LLC.Bluetooth is a trademark or registered trademark of Bluetooth SG, Inc.Corning and Gorilla Glass are trademarks or registered trademarks of Corning, Inc.Qualcomm is a trademark or registered trademark of Qualcomm Incorporated.All other trademarks are the property of their respective owners.HONEYWELL GLOBAL SERVICES SUPPORTContact for Support: Public Knowledgebase Articles:Telephone support available in North America (800-782-4263). Outside of this area, contact your local representative.ACCESSORIESFlexDock modular docking system, vehicle dock, vehicle holder, snap-on adaptors, removable scan handle, magnetic stripe reader, 6822 full-page printer and PW50 workboard printerREGULATORY APPROVALS AND COMPLIANCECN75LAN, CN75WANSafety: cULus Listed, BSMIEMC: Class B – FCC/ICES/EN, GOST-R Radio: FCC, Industry Canada, A-tick (AU), NCC, IDA,ICASA, POSTEL, NTC, ETA, SIRIM, ANATELEnvironmental: EU Directives-WEEE; RoHS; Batteries and Accumulators; Packaging and Waste Packaging NON-INCENDIVE VERSIONCN75 and CN75e with NI certification comply with the following: Suitable for use in Division 2 locationsSafety: cULus Listing – ISA/ANSI 12.12.01Gases: Class I – Groups A, B, C, D Dusts: Class II – Groups F, G Fibers and Flyings: Class III*Max. Ambient:50°C (122°F) T6。
ARTIX-7 FPGA 开发平台用户手册1.0目录1、开发板简介: (3)2、开发板功能描述 (6)2.1 Artix-7 FPGA 引脚分配 (6)2.2 扩展接口 (6)2.3 电源 (10)2.3.1 电源变换 (10)2.3.2电源分配功能 (10)2.3.3电源启动顺序 (10)2.4 有源晶振 (10)2.5 FPGA启动 (11)2.6 LED和按键 (12)2.6.1 LED (12)2.6.2 按键 (15)2.7 XADC (17)2.8 DDR3 (18)2.9 SPI FLASH (19)2.9.1 FLASH (19)2.9.2 USER FLASH (19)2.10 / JTAG接口 (20)2.10.1 JTAG (20)2.10.2 USER JTAG (20)2.11 蜂鸟与FPGA连接 (21)1、开发板简介:正面背面此款开发板使用的是 Xilinx 公司的 Artix-7 系列 FPGA ,型号XC7A35T-1FTG256C ,256个引脚的 FBGA 封装。
此款 FPGA 的资源如下图所示:其中,主要的参数:逻辑单元 Logic Cells :33280; 乘法器 DSP48:90;可配置逻辑块 CLBs :400Kb ; Block RAM :1800Kb ; 时钟单元 CMTs :5; 可用 IO 数量:210 个; 内核电压:1.0V ;工作温度:0——﹢85℃;图为整个系统的结构示意图:FPGAXC7A35T晶振+5V电源接口 JTAG 口USER_JTAG 口PMOD口FLASHUSER_ FLASH256MByte DDR33.3V 电源1.0V电源1.8V电源DDR 电源 用户按键拨动开关配置指示灯用户LED 灯用户RGB 灯高速接插件电源指示灯电源开关Arduino兼容接口1.5V 电源Arduino 兼容接口2、开发板功能描述2.1 Artix-7 FPGA 引脚分配XC7A35T-1FTG256C共有5个I/0 Bank,其中U2E是FPGA专用的配置Bank,其2.2 扩展接口开发板有P1、P2、JP1三个用户接口。
小哨兵还原卡使用手册关键词:技术位于操作系统底层的全智能动态快速保护及瞬间恢复功能的全新产品——还原卡。
能够提供多种数据保护、恢复及追加功能,防止病毒、FDISK、格式化等对硬盘数据的破坏,保护CMOS参数设置。
它不占硬盘实用空间、快速保存、瞬间恢复、即插即用,无需重做硬盘。
2主要功能特点●全中文界面,“即插即用”无需重做硬盘,不占硬盘空间。
非专业人员10秒钟安装完成。
●智能双内核架构,同时保护硬盘及CMOS 数据。
●数据保存和恢复均可在几秒种内完成。
●数据可动态保存,任意恢复。
●完全主动防病毒,如可预防CIH 等恶性病毒。
●不占用硬盘实用空间、不影响机器性能。
●支持经销商或用户自己定制启动时的显示画面。
●支持1[size=10.5pt]20G海量大硬盘及DMA133/100/66 模式的高速硬盘。
●支持DOS/WindowsNT/2000/XP/Me/98/95/ 等主流操作系统。
●支持NTFS、FAT32、FAT16、BIGDOS文件系统格式。
3系统需求●CPU:486以上主机●硬盘:建议300MB以上剩余空间●RAM:8Mb以上●总线槽:至少一个PCI空插槽4安装指南4.1安装前的准备工作[size=13.5pt]确认您的计算机在安装还原卡前系统运作正常并符合系统需求。
●如果硬盘上已经安装了旧版本或是其它公司的恢复产品,请先将其移除,并最好移除其提供的VxD驱动程序。
●建议安装前请先扫瞄计算机确认计算机没有病毒,然后关闭防毒软件,因为少数防毒软件会将还原卡安装过程误认为病毒。
●将CMOS中关于Virus Warning 设置为Disable,并且在CMOS的引导顺序设定项BOOT中设定第一引导1st为网络Network或LAN。
●若需要保护的操作系统是Windows 9X/Windows Me/Windows NT 或者Windows 2000,强烈建议您先执行硬盘扫描(scandisk)程序,检查硬盘错误并修复,以及执行硬盘重组重新整理硬盘数据。
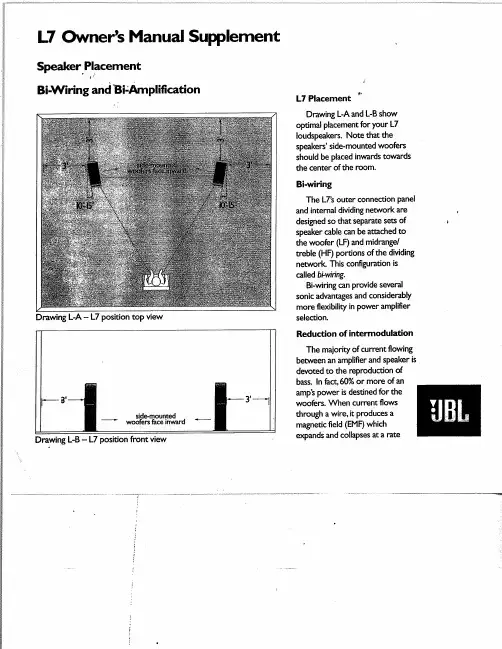
“L7” Air Cylinder/Valve CombinationHow To OrderValve and Mounting Accessory Packages“L7” V alve Mounting Accessory PackageCylinder Bore Size 11/2, 2, 21/231/4, 4Cylinder Stroke Thru 20"20" thru 40"Thru 20"20" thru 40"Manifold Mounting Accessory Package L074270000L074280000Transfer Tube Accessory PackageL074290000L074300000L074290000L074300000Accessory Package Part NumbersManifold Mounting Accessory Package Consists of:(1) Cap Screw(1) Sealed Cap Screw (2) O-Rings, Manifold (1) Manifold, Valve(2) O-Rings, Transfer T ube (2) Adapter Fittings (1) Packet of Grease (1) Manifold, T ransferT ransfer T ube Accessory Package Consists of:(1) T ransfer TubeNote: Order manifold mounting accessory package and transfer tube accessory package in order to have complete assembly accessory package.Available V alve Accessoriess Flow control “sandwich” to meter cylinder exhaust through valve.s Regulators, “sandwich” 5 to 125 psig without guage.“L7” V alve Model NumbersTwo PositionSingle Solenoid,Head or Cap End Double Solenoid,Head or Cap End Valve Part NumberL7452410153L7552410253Type74 - Single 75 - Double Operator 5 - SolenoidSize2 - 1/4" Basic Cv = 1.5Operator Options4 - Sol. w/Locking Override & Indicator Light (120V AC)Enclosure1 - Conduit Connection @ Solenoid (coil w/19" Leads)Function 0 - 2-PositionReturn1 - Air & Spring (Use w/Single Operator T ypes)2 - Operator Return (Use w/Double Operator T ypes)Voltage 45 - 12V DC53 - 120V 60Hz 57 - 240V 60 Hz 49 - 24VDCStandard Valve Model Number InterpretationOperatorType OperatorSize Options Enclosure Function Return VoltageL74524101 53How to Specify “L7”, Single Pressure, 1/4" Port Size, Dual Exhaust V alve StyleExampleFeature/Description Valve Mounting ConfigurationStyle 1 – Cap EndStyle 2 – Head EndAll ModelsSolenoid Operator:Single SolenoidDouble SolenoidVoltage – Standard 120 volt 60 Hz is supplied. Specify if other than standard.Symbol12L7SSDS120/601 L7 DS 120/60“L7” Air Cylinder/Valve Combination OrderingInformationExample W hen ordering 2MA Cylinders with “L7” Cylinder/Valve CombinationComplete Ordering Information for(Quantity) 2.50 F 2MAUS14A x 6.00S = 1L7SS-120/60 Air cylinder/valve combination Consisting of:L 7452410153 ValveL 074290000 T ransfer T ubeL 074270000 ManifoldK 342004 Flow ControlNote: For additional valve specifications and dimensional data, see Pneumatic Division Catalog.Example W hen ordering 2A Cylinders with “L7” Cylinder/Valve Combination Complete Ordering Information for(Quantity) 2.50 F 2AUS14A x 6.00S = 1L7SS-120/60 Air cylinder/valve combination Consisting of:L 7452410153 ValveL 07429000 T ransfer T ubeL 074270000 ManifoldK 342004 Flow ControlNote: For additional valve specifications and dimensional data, see Pneumatic Division Catalog.If optional control valve(s) is required, specify FLOW CONTROL VALVE Model No. K342004. If optional sand-wich regulator is required, specify Regulator Model No. L85403203N.Optional Mounting AccessoriesSpecify separately the part number for desired optional mounting accessories.Note: TT Mounting not available with “L7” Cylinder/Valve combination. The “L7” valve may interfere with various mounting styles in some applications. Consult factory for recommendations.L7 Air Cylinder/Valve Combination Assembly InstructionsT o determine the appropriate transfer tube length, first determine the distance between port centerlines for the cylinder, typically catalog dimension “P”. The cut length of the tube should be based on the following formula:[“P” + Stroke - 2.500"] ±.015"Example:For a 21/2" bore, 10" stroke air cylinder with “P”dimension = 23/8", the calculation to determine the transfer tube length is:23/8" + 10.00" stroke - 21/2" = 9.875 ± .015NOTE: Recommended Cutting Procedure: Use a hacksaw with a tube cutting vise. This will ensure that tube ends are square and that the tube does not have a reduced diameter, as would result from using a tube cutter.Step #4:Remove all burrs and sharp edges fromtube ends, I.D. and O.D.Step #5:Wash tube O.D. and I.D. completely –Tube I.D. must be free of all burrs,contaminants and foreign materials. Step #6:Pre-assemble manifolds and transfer tube prior to placement onto adapter fittings. Step #7:Place manifold and tube assembly ontoadaptor fittings.NOTE: Refer to Bulletin #0946-B1 to determine proper orientation of manifold and tube assembly to achieve proper function of cylinder. Example: Single solenoid normally extended.Step #8:Place anti-vibration cap screw (3) into screw cavity of valve manifold, place O-Ring capscrew (4) into screw cavity of transfermanifold (1). Tighten each screw withappropriate allen wrench to 24 inch pounds. NOTE: Overtorquing of these screws could cause manifold damage.Step #9:Install valve in accordance with valveinstallation instructions.。
1 / 202前言iii前言非常感谢选用乐星迈克彼恩的L7系列产品。
本使用手册详解产品的使用方法以及注意事项。
不正确的操作会引起产品安全事故或导致产品的损坏,使用之前请务必阅读本使用手册,正确操作。
• 此手册根据软件版本的不同,可能会更新部分内容。
• 此手册的任何部分在未经乐星迈克彼恩书面认可之前,不得以任何形式进行复制。
• 此手册中所提及的专利权、商标权、著作权以及其他的知识产权等均归属于乐星迈克彼恩自动化科技(无锡有限公司所有。
除用于乐星迈克彼恩产品的相关用途外,禁止擅自他用。
安全注意事项 iv安全注意事项此使用手册根据安全注意事项,分为“危险”和“注意”2个等级。
危险注意▪ 即使是以“注意”记载的事项,但也会因情况不同引发重大事故,请务必按照手册正确使用。
⏹触电注意事项分钟后,充电指示灯熄灭状态下检查电压后,进行配线作业和检查。
⏹火灾注意事项安全注意事项 v ⏹ 安装注意事项请在下列环境中保管并使用本产品。
安全注意事项vi ⏹配线注意事项⏹初期运行注意事项⏹操作及运行注意事项安全注意事项vii⏹使用注意事项⏹异常注意事项⏹维修/检查注意事项⏹一般注意事项⏹关于产品应用⏹关于EEPROM 的寿命目录 viii目录前言 (iii安全注意事项 ............................................................. i v目录 (viii1. 产品结构和信号说明 ................................................. 1-11.1 产品结构 ................................................................... 1-11.1.1产品确认 .......................................................... 1-1 1.1.2各部位名称 ........................................................ 1-3 1.2 系统构成 ................................................................... 1-71.2.1简介 .............................................................. 1-7 1.2.2CN1连接器整体配线图 ............................................... 1-9 1.2.3位置运行模式配线例 .............................................. 1-10 1.2.4速度运行模式配线例 .............................................. 1-11 1.2.5扭矩运行模式配线例 .............................................. 1-12 1.2.6速度/位置运行模式配线例 ......................................... 1-13 1.2.7速度/扭矩运行模式配线例 ......................................... 1-14 1.2.8 位置/扭矩运行模式配线例 ......................................... 1-151.3 信号说明 .................................................................. 1-161.3.1数码输入接点信号 ................................................. 1-16 1.3.2模拟输入接点信号 ................................................. 1-16 1.3.3数码输出接点信号 ................................................. 1-17 1.3.4监控器输出信号及输出电源 ......................................... 1-17 1.3.5脉冲列输入信号 ................................................... 1-18 1.3.6 编码器(ENCODER 输出信号 ........................................ 1-182. 安装 ............................................................... 2-12.1 伺服电机 ................................................................... 2-12.1.1使用环境条件 ...................................................... 2-1 2.1.2防止过度冲击 ...................................................... 2-1 2.1.3与电机的接线 ....................................... 错误!未定义书签。
安川L7参数调试一.参数设置(下列参数在调试工作中是必须掌握的)1.??环境设定:A1-00=0??语言选择:英文A1-01=2??参数的存取等级:ADVANCED。
可以修改所有的参数A1-02=3??控制模式:闭环矢量控制??(2是开环矢量控制;6是带PG的PM矢量)A1-03=0??初始化????2220(2线制的初始化,出厂设定)2.??应用参数:B1-01=1??选择频率指令:控制回路端子????(设0为数字操作器)B1-02=1??选择运行指令:控制回路端子????(设0为数字操作器)B1-03=1??停止方法:自由滑行停止??(0是减速停止,停车时输出接触器会拉弧)广州科沃—电梯维修的1203.??调整参数:C1-01=0??加速时间??(数字量约为2.5)C1-02=0??减速时间??(数字量约为2.5) C2-01=0??加速开始S??(数字量约为2.0) C2-02=0??加速完成S??(数字量约为0.8) C2-03=0??减速开始S??(数字量约为0.8) C2-04=0??减速完成S??(数字量约为1.0) C2-05=0??低于平层速度的SC5-01=3??速度环比例增益1C5-02=0.3??速度环积分增益1C5-03=3??速度环比例增益2C5-04=0.3??速度环积分增益2C5-07=2ASR切换频率C5-09=3??速度环比例增益3C5-10=0.3??速度环积分增益3C6-02=3载波频率8KHZ????设2是(5KHZ)C6-03=8KHZ??载波频率上限C6-09=0????旋转型自学习载波频率选择(0=5KHZ;1=C6-03)C6-10=1????停止型自学习载波频率选择(0=0.5KHZ;1=1KHZ;2=1.5KHZ;3=2KHZ)4.??指令参数:??????d1-01=0HZ(异步)??0%(同步)零速??????d1-02=5HZ(异步)10%(同步)检修半速??????d1-03=2HZ(异步)??4%(同步)再平层速度d1-04=3HZ(异步)6%(同步)爬行速度(数字量)d1-05=10(异步)20%(同步)检修速度(数字量)d1-06=30(异步)60%(同步)单层速度(数字量)d1-07=40(异步)80%(同步)双层速度(数字量)d1-08=50??(异步)100%(同步)多层速度(数字量)广州科沃—工控维修的1205.??电机参数:E1-01=380??输入电压设定E1-04=50??最高输出频率(注意:闭环和开环切换时会变60HZ)E1-05=380??电机最高电压E1-06=50??基频(注意:闭环和开环切换时会变60HZ)异步电机参数:E2-01=????电机额定电流(根据电机铭牌设)E2-02=????电机额定滑差(自整定得出)E2-03=????电机空载电流(自整定得出)E2-04=????电机极数??(根据电机铭牌设)E2-05=????电机线间电阻(自整定得出)E2-06=????电机漏电感(自整定得出)E2-07=????电机铁心饱和系数1(自整定得出)E2-08=????电机铁心饱和系数2(自整定得出)E2-09=????电机的机械损耗????(自整定得出)同步电机参数:E5-02????电机额定容量????KW????根据电机铭牌设E5-03????电机额定电流????*??????根据电机铭牌设E5-04????电机极数????????*??????根据电机铭牌设E5-05????电机电枢电阻??????????自整定得出??????E5-06????电机d轴电感??????????自整定得出??E5-07????电机q轴电感??????????自整定得出(但需手动设置为E5-06的1.2至1.5倍,否则超过70%负载时上行会报DEV故障)??????E5-09????电机感应电压系数??????自整定得出??????E5-11????PG原点脉冲补偿量??????自整定得出6.??选件参数:F1-01=??????PG参数F1-05=0??????PG旋转方向设定F1-06=1??????PG输出分频比F1-09=2.0F1-10=20%7.??选择端子功能:??????H1-01=24H1-02=8(14)??S4端子的功能????基极封锁H1-03=3??S5端子的功能????多段速1 H1-04=4??S6端子的功能????多段速2 H1-05=5??S7端子的功能????多段速3H2-01=40H2-02=41H2-03=6H3-01=0????0-10V(速度)H3-02=100%??模拟给定A1增益H3-03=0????模拟给定A1偏置H3-05=14????力矩补偿(AI-14B卡CH3选择)端子是TC3和TC4(0V)H3-08=0????0-10V有效H3-09=14??CH2功能(和H3-05任一个定义为14)H3-10=100??增益H3-11=0????骗置H3-15=0????端子A1功能选择,0:频率指令;1:转矩补偿。