Linux系统编程实验二:gcc、gdb的使用以及Makefile文件的编写
- 格式:docx
- 大小:32.41 KB
- 文档页数:10

linux makefile编写规则(原创实用版)目录一、Makefile 简介二、Makefile 的规则1.目标文件2.依赖文件3.命令三、Makefile 中的变量1.通用变量2.局部变量四、Makefile 中的路径1.源文件路径2.目标文件路径3.库文件路径五、Makefile 编写实例六、总结正文一、Makefile 简介Makefile 是一个用于自动化构建和编译软件的脚本文件,通常在Linux 系统中使用。
它可以帮助开发者管理源代码,以及确定哪些文件需要编译,如何编译,以及编译后的文件如何链接。
通过编写 Makefile,开发者可以轻松地构建和维护复杂的软件项目。
Makefile 主要包括三类规则:目标文件、依赖文件和命令。
1.目标文件目标文件是 Makefile 中要生成的文件,可以是对象文件、库文件或执行文件。
在 Makefile 中,目标文件通常以“target”关键字开头,后面跟要生成的文件名。
例如:“target = main.o”。
2.依赖文件依赖文件是 Makefile 中要生成目标文件所需要的其他文件,通常是源代码文件。
在 Makefile 中,依赖文件通常以“prerequisites”关键字开头,后面跟要依赖的文件名。
例如:“prerequisites = a.c b.c”。
3.命令命令是用来生成目标文件的命令,通常是编译器或链接器。
在Makefile 中,命令通常以“command”关键字开头,后面跟要执行的命令。
例如:“command = gcc -o main.o a.c b.c”。
三、Makefile 中的变量Makefile 中的变量可以用于存储常量值,以便在 Makefile 中多次使用。
变量分为通用变量和局部变量。
1.通用变量通用变量是在整个 Makefile 中都可以使用的变量。
通用变量通常在Makefile 的开头定义,使用“define”关键字。
linux的gcc使用方法Linux是一种开源的操作系统,广泛应用于服务器和嵌入式系统中。
而GCC(GNU Compiler Collection)是Linux下最常用的编译器套件之一,用于将源代码编译成可执行文件。
本文将介绍GCC的使用方法,帮助读者快速上手。
一、安装GCC在Linux系统中,默认情况下已经安装了GCC。
可以通过运行以下命令来验证是否已经安装了GCC:```gcc --version```如果GCC已经安装,则会显示GCC的版本信息;如果没有安装,则可以通过运行以下命令来安装GCC:```sudo apt-get install gcc```二、编写源代码在使用GCC之前,我们需要先编写源代码。
可以使用任何文本编辑器创建一个以.c为后缀的源文件,例如hello.c。
下面是一个示例的源代码:```c#include <stdio.h>int main() {printf("Hello, world!\n");return 0;}```三、编译源代码编写完源代码后,我们可以使用GCC来将其编译成可执行文件。
在终端中运行以下命令:```gcc -o hello hello.c```其中,-o参数用于指定编译后生成的可执行文件的名称,hello为示例的可执行文件名,hello.c为源代码文件名。
如果编译成功,GCC将会生成一个名为hello的可执行文件。
四、运行可执行文件在编译成功后,我们可以通过以下命令来运行可执行文件:```./hello```如果一切顺利,终端将会输出"Hello, world!"的字符串。
五、GCC的其他常用选项除了上述基本的使用方法外,GCC还提供了许多其他的选项,用于控制编译过程的行为。
以下是一些常用的选项:- -Wall:开启所有警告信息的显示。
- -g:生成供调试器使用的调试信息。
- -O2:进行优化处理,提高程序执行效率。

实验2 Linux下C程序设计实验目的1、掌握Linux下C语言程序设计的基本步骤。
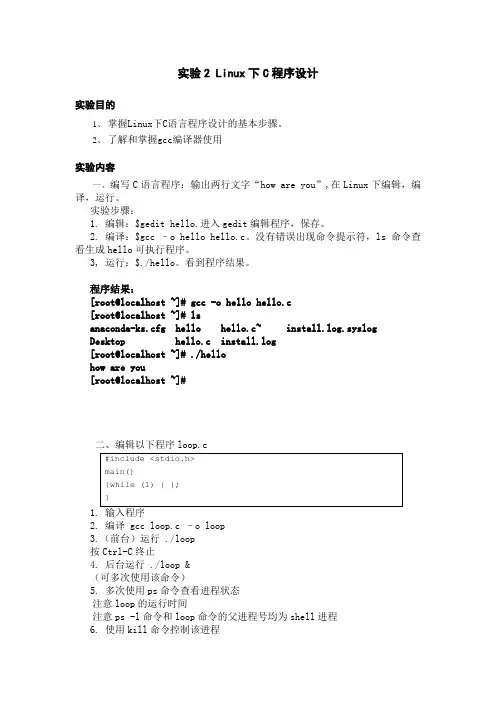
2、了解和掌握gcc编译器使用实验内容一、编写C语言程序:输出两行文字“how are you”,在Linux下编辑,编译,运行。
实验步骤:1. 编辑:$gedit hello.进入gedit编辑程序,保存。
2. 编译:$gcc –o hello hello.c。
没有错误出现命令提示符,ls命令查看生成hello可执行程序。
3, 运行:$./hello。
看到程序结果。
程序结果:[root@localhost ~]# gcc -o hello hello.c[root@localhost ~]# lsanaconda-ks.cfg hello hello.c~ install.log.syslogDesktop hello.c install.log[root@localhost ~]# ./hellohow are you[root@localhost ~]#二、编辑以下程序loop.c2. 编译 gcc loop.c –o loop3.(前台)运行 ./loop按Ctrl-C终止4. 后台运行 ./loop &(可多次使用该命令)5. 多次使用ps命令查看进程状态注意loop的运行时间注意ps -l命令和loop命令的父进程号均为shell进程6. 使用kill命令控制该进程暂停kill –STOP <该进程的进程号> 恢复kill –CONT <该进程的进程号> 终止kill –KILL <该进程的进程号>程序结果:[root@localhost ~]# gcc -o loop loop.c[root@localhost ~]# ./loop&[1] 21118[root@localhost ~]# psPID TTY TIME CMD21074 pts/3 00:00:00 bash21118 pts/3 00:00:12 loop21125 pts/3 00:00:00 ps[root@localhost ~]# psPID TTY TIME CMD21074 pts/3 00:00:00 bash21118 pts/3 00:00:16 loop21128 pts/3 00:00:00 ps[root@localhost ~]# kill -stop 21118[root@localhost ~]# psPID TTY TIME CMD21074 pts/3 00:00:00 bash21118 pts/3 00:00:49 loop21145 pts/3 00:00:00 ps[1]+ Stopped ./loop[root@localhost ~]# psPID TTY TIME CMD21074 pts/3 00:00:00 bash21118 pts/3 00:00:49 loop21148 pts/3 00:00:00 ps[root@localhost ~]# psPID TTY TIME CMD21074 pts/3 00:00:00 bash21118 pts/3 00:00:49 loop21153 pts/3 00:00:00 ps[root@localhost ~]# kill -cont 21118[root@localhost ~]# psPID TTY TIME CMD21074 pts/3 00:00:00 bash21118 pts/3 00:00:53 loop21159 pts/3 00:00:00 ps[root@localhost ~]# psPID TTY TIME CMD 21074 pts/3 00:00:00 bash21118 pts/3 00:00:55 loop21160 pts/3 00:00:00 ps[root@localhost ~]# kill -kill 21118 [root@localhost ~]# psPID TTY TIME CMD 21074 pts/3 00:00:00 bash21167 pts/3 00:00:00 ps[1]+ Killed ./loop [root@localhost ~]#。
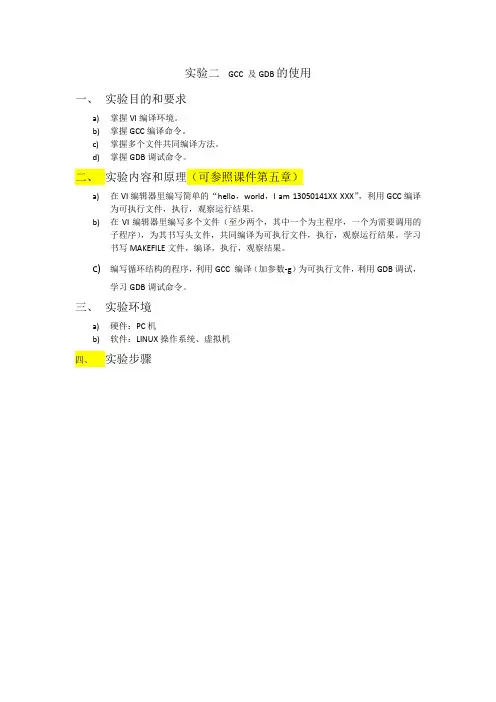
实验二GCC 及GDB的使用一、实验目的和要求a)掌握VI编译环境。
b)掌握GCC编译命令。
c)掌握多个文件共同编译方法。
d)掌握GDB调试命令。
二、实验内容和原理(可参照课件第五章)a)在VI编辑器里编写简单的“hello,world,I am 13050141XX XXX”,利用GCC编译为可执行文件,执行,观察运行结果。
b)在VI编辑器里编写多个文件(至少两个,其中一个为主程序,一个为需要调用的子程序),为其书写头文件,共同编译为可执行文件,执行,观察运行结果。
学习书写MAKEFILE文件,编译,执行,观察结果。
c)编写循环结构的程序,利用GCC 编译(加参数-g)为可执行文件,利用GDB调试,学习GDB调试命令。
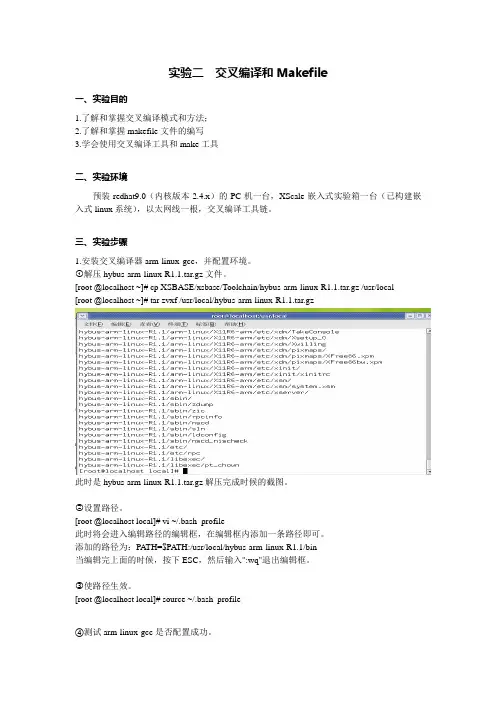
三、实验环境a)硬件:PC机b)软件:LINUX操作系统、虚拟机四、实验步骤vi hello.c i:C语言编程Esc :wq gcc hello.c gdb file a.out run a实验三交叉编译环境配置一、实验目的和要求熟悉 Linux 开发环境,学会基于S3C2410 的Linux 开发环境的配置和使用。
使用Linux 的armv4l-unknown-linux-gcc 编译,使用基于NFS 方式的下载调试,了解嵌入式开发的基本过程。
二、实验内容a)配置网络,包括配置IP 地址、NFS 服务、防火墙。
b)安装交叉编译器c)配置超级终端,下载文件到目标机上。
三、实验设备及工具(包括软件调试工具)硬件:UP-TECH S2410/P270 DVP 嵌入式实验平台、PC 机Pentium 500 以上, 硬盘10G 以上。
软件:REDHAT LINUX 9.0+超级终端+ARM-LINUX 开发环境四、实验步骤(所有的内容截图)1、虚拟机设置为桥接模式。
2、配置IP地址,设置为192.168.0.xxx参照实验指导书图1.4.1-1.4.3. 自己截图,说明3、关闭防火墙,参照实验指导书图1.4.4自己截图,说明4、打开桌面超级终端(HyperTerminal),配置COM1,115200波特率,8N1,实验箱插上电源线,网线与主机相连,串口线与主机串口1相连,开机,看bootloader程序VIVI是否自动加载,回车后进入命令提示符。
linux下c程序的编写实验报告实验主题:在Linux下编写C程序的实验报告一、引言(150-200字)Linux是一种广泛应用的操作系统,具有高度开放性和灵活性,也是许多程序员首选的开发环境。
在Linux中,通过编写C程序可以实现各种应用和功能。
本实验旨在通过一步一步的说明和回答,介绍在Linux下编写C 程序的基本步骤和方法。
二、实验步骤(400-500字)1. 设置编程环境在Linux中编写C程序,首先需要安装相关的开发工具和编译器。
常用的编译器有gcc和clang,可以通过包管理器进行安装。
同时,也需要一个文本编辑器来编写C代码,比如vim或者emacs。
2. 编写Hello World程序Hello World程序是C语言学习的经典入门程序,它可以在屏幕上输出"Hello World"。
在文本编辑器中新建一个文件,命名为hello.c,然后在文件中输入以下代码:#include <stdio.h>int main() {printf("Hello World\n");return 0;}保存文件后,使用gcc编译器将该文件编译成可执行文件。
在终端中执行以下命令:gcc -o hello hello.c此时会生成一个名为hello的可执行文件。
通过执行该文件,可以在终端中看到输出结果"Hello World"。
3. 命令行参数和用户输入C程序可以接受命令行参数和用户输入,从而实现更复杂的功能。
在上一步编写的程序的基础上,我们尝试接收用户输入的姓名,并输出相应的问候语。
在hello.c文件中添加以下代码段:#include <stdio.h>int main(int argc, char *argv[]) {char name[100];printf("Please enter your name: ");scanf("s", name);printf("Hello, s!\n", name);return 0;}重新编译程序并执行,可以看到在终端中会提示用户输入姓名,并输出相应的问候语。
makefile基本使用方法makefile是一种用来管理和自动化构建程序的工具。
它可以根据源代码文件的依赖关系和编译规则来自动构建目标文件和可执行文件。
makefile的基本使用方法如下:1. 创建makefile文件:在项目的根目录下创建一个名为makefile 的文件。
2. 定义变量:在makefile中,可以使用变量来存储一些常用的参数和路径,以便于后续的使用。
例如,可以定义一个名为CC的变量来指定编译器的名称,如:CC=gcc。
3. 编写规则:在makefile中,可以使用规则来指定如何编译源代码文件和生成目标文件。
一个规则由两部分组成:目标和依赖。
目标是要生成的文件,依赖是生成目标文件所需要的源代码文件。
例如,可以编写以下规则:```target: dependency1 dependency2command1command2```其中,target是目标文件,dependency1和dependency2是依赖的源代码文件,command1和command2是生成目标文件所需要执行的命令。
4. 编写默认规则:在makefile中,可以使用一个默认规则来指定如何生成最终的可执行文件。
默认规则的目标通常是可执行文件,依赖是所有的源代码文件。
例如,可以编写以下默认规则:```all: target1 target2```其中,target1和target2是生成的目标文件。
5. 编写clean规则:在makefile中,可以使用clean规则来清理生成的目标文件和可执行文件。
例如,可以编写以下clean规则: ```clean:rm -f target1 target2```其中,target1和target2是要清理的目标文件。
6. 运行make命令:在命令行中,使用make命令来执行makefile 文件。
make命令会自动根据规则和依赖关系来编译源代码文件和生成目标文件。
例如,可以运行以下命令:``````make命令会根据makefile文件中的规则和依赖关系来编译源代码文件并生成目标文件和可执行文件。

makefile gcc编译
Makefile 是一个用来组织代码编译的工具,而 GCC 是一个常用的 C 和 C++ 编译器。
在 Makefile 中使用 GCC 进行编译可以通过以下步骤完成:
1. 创建一个名为 "Makefile" 的文本文件,并确保它位于你的项目根目录下。
2. 在 Makefile 中定义你的编译规则。
例如,假设你有一个名为 "main.c" 的源文件需要编译成可执行文件 "app",你可以这样编写 Makefile:
make.
app: main.c.
gcc -o app main.c.
在这个例子中,我们定义了一个名为 "app" 的目标,它依赖于"main.c" 这个源文件。
当你运行 "make" 命令时,Make 工具会根
据这个规则来执行编译。
3. 打开终端,进入到包含 Makefile 的项目目录下。
4. 运行命令 "make"。
Make 工具会读取 Makefile 文件,并执行其中定义的编译规则。
在这个例子中,它会使用 GCC 编译器来编译 "main.c" 并生成可执行文件 "app"。
需要注意的是,Makefile 可以包含更复杂的规则和变量定义,以及支持多个源文件的编译。
你可以根据你的项目需求来进一步扩展和定制 Makefile 文件。
总之,通过合理编写 Makefile 并结合使用 GCC 编译器,你可以高效地组织和管理你的代码编译过程。
实验报告实验题目Linux系统Makefile编写与GCC编译实验姓名:学号:课程名称:所在学院:专业班级:任课教师:四、实验过程、步骤及内容(一)GCC编译1、准备环境2、建立相关目录$ cd workdir/linux/application$ mkdir 6-gcc3、将代码从共享目录拷入虚拟机L inux 操作系统下;(可使用【crtl+空格】切换输入法)$ cp /mnt/hgfs/share/实验代码/03.\ Linux 系统GCC 编译器的使用实验/实验代码/* 6-gcc/ -a$ cd 6-gcc/4、编译代码$ arm-none-linux-gnueabi-gcc helloworld.c -o hello$ mkdir /source/rootfs/app$ cp hello /source/rootfs/app/5、执行代码通过tftp 下载内核,nfs 挂载文件系统,启动开发板。
在开发板串口终端执行应用程序。
# cd /app# ./hello6、相关代码:#include <stdio.h>int main (int argc,char **argv){printf("hello,world!\n");return 0;}(二)Makefile编程1、环境准备2、建立相关目录$ cd workdir/linux/application$ mkdir 7-Makefile3、将代码从共享目录拷入虚拟机L inux 操作系统下;(可使用【crtl+空格】切换输入法)$ cp /mnt/hgfs/share/实验代码/05.\ Linux 系统Makefile 编写实验/实验代码/5.2/makefileTest/* 7-Makefile/ -a$ cd 7-Makefile/4、执行代码进入makefileTest 目录,执行make。
$ make CLEAN$ make会出现如下信息:5、在开发板上执行通过tftp下载内核,nfs挂载文件系统,启动开发板6、相关代码:CC = arm-none-linux-gnueabi-gcc SUBDIRS = f1 \f2 \main \objOBJS = f1.o f2.o main.oBIN = myappOBJS_DIR = objBIN_DIR = binexport CC OBJS BIN OBJS_DIR BIN_DIRall : CHECK_DIR $(SUBDIRS)cp bin/myapp /source/rootfs/app CHECK_DIR :mkdir -p $(BIN_DIR) $(SUBDIRS) : ECHOmake -C $@ECHO:@echo $(SUBDIRS)@echo begin compileCLEAN :@$(RM) $(OBJS_DIR)/*.o@rm -rf $(BIN_DIR)五、实验数据(现象)处理分析实验现象如下:(一)GCC编译(二)Makefile编程。
linux开发工具的使用gcc实验总结简短在Linux开发中,GCC是一个广泛应用的编译器套件,为程序员提供了丰富的工具和功能,方便进行开发和调试。
本文将为大家总结一下使用GCC进行实验的经验与技巧。
一、安装GCC在开始使用GCC之前,首先需要安装GCC编译器。
在大多数Linux发行版中,GCC已经预安装,可以直接使用。
如果没有安装,可以通过包管理器进行安装,例如在Ubuntu上可以使用以下命令进行安装:```sudo apt-get install gcc```二、编写和编译源代码1. 创建源代码文件使用任意文本编辑器,创建一个以.c为扩展名的源代码文件,例如hello.c。
2. 编写源代码在源代码文件中,可以使用C语言来编写程序。
下面是一个简单的示例代码:```c#include <stdio.h>int main() {printf("Hello, World!\n");return 0;}```3. 编译源代码打开终端,进入源代码所在的目录,使用以下命令进行编译:```gcc hello.c -o hello```其中,`hello.c`是源代码文件的名称,`hello`是生成的可执行文件的名称。
通过`-o`选项指定输出文件名。
三、运行和调试程序1. 运行程序编译成功后,可以直接运行生成的可执行文件。
在终端输入以下命令运行程序:```./hello```程序将会输出`Hello, World!`。
2. 调试程序GCC也提供了强大的调试功能,方便程序员进行调试和排错。
可以通过使用`-g`选项来编译生成带有调试信息的可执行文件:```gcc -g hello.c -o hello-debug```然后,可以使用`gdb`命令来启动调试器,并加载可执行文件进行调试:```gdb hello-debug```调试器提供了许多命令和功能,可以帮助你定位和修复代码中的问题。
Linux实验报告姓名黄芳恺班级软件工程114学号119074258指导教师阮越目录实验一 Linux基本命令的使用实验二简单Shell程序设计实验三 Linux下简单C程序设计与文件操作实验四 Linux下进程操作与进程间通信实验五 Linux线程的使用实验六 Linux进程间的IPC实验七 Linux下访问Mysql数据库实验八 Linux下网络编程练习题:grep、bash、生产者消费者实验一 Linux基本命令的使用1、实验目的学习和掌握Linux的基本命令。
2、实验内容和步骤步骤1:以user_login用户身份并使用telnet登录Linux服务器,按照提示创建自己的账户和口令。
步骤 2:使用新创建的用户账户和口令登录Linux系统,察看登录后的界面。
步骤3:使用pwd命令察看当前的工作目录,然后用ls命令查看当前目录下的内容,尝试使用-a,—l,—F,—A,-lF等不同选项并比较不同之处。
-a do not ignore entries starting with—I, --ignore=PATTERN do not list implied entries matching shell PATTERN —l use a long listing format—F,—-classify append indicator (one of */=〉@|) to entries-A,—-almost-all do not list implied 。
and 。
—lF ignore file步骤4:在当前目录下建立一个名为test的新目录,然后将工作目录切换到test下,尝试将/etc目录下的文件passwd拷贝到该目录下(cp 源文件目的目录)。
察看当前目录下的passwd文件的属主和文件权限.步骤5:尝试向当前目录下的passwd文件和/etc/passwd文件分别写入一些新内容(可使用echo “字符串” 〉>文件的命令),看看操作能否成功,如果不能成功,请说明原因。
linux下的c语言编程实验报告Linux下的C语言编程实验报告一、引言C语言是一种广泛应用于系统软件和应用软件开发的编程语言,而Linux是一个非常流行的操作系统,因其开源和稳定性而被广泛使用。
本实验报告旨在介绍在Linux平台下进行C语言编程的实验过程和结果。
二、实验目的本实验的主要目的是通过在Linux操作系统上进行C语言编程实验,提高学生对C语言的理解和运用能力。
具体目标如下:1. 熟悉Linux环境下的C语言编程工具和开发环境;2. 掌握C语言的基本语法和常用函数;3. 理解C语言程序的运行原理和调试技巧;4. 学会使用C语言编写简单的程序解决实际问题。
三、实验过程1. 实验环境准备在开始实验之前,需要准备好以下环境:- 一台安装有Linux操作系统的计算机;- 一个文本编辑器,如Vim或Gedit,用于编写C语言程序;- GCC编译器,用于编译和运行C语言程序。
2. 实验步骤本实验主要包括以下几个步骤:- 编写C语言程序:根据实验要求,使用文本编辑器编写C语言程序,实现特定的功能;- 编译程序:使用GCC编译器将C语言程序编译成可执行文件;- 运行程序:在Linux终端中运行编译生成的可执行文件,验证程序的正确性;- 调试程序:如果程序存在错误或异常,使用调试工具如GDB进行调试,找出并修复问题;- 总结实验结果:根据实验结果总结和分析实验过程中遇到的问题和解决方法,得出结论。
四、实验结果根据实验要求,我们编写了一系列C语言程序,并在Linux环境下进行了测试。
以下是实验结果的一些例子:1. 实验一:编写一个程序,输出“Hello, World!”。
```c#include <stdio.h>int main() {printf("Hello, World!\n");return 0;}```2. 实验二:编写一个程序,计算并输出两个整数的和。
```c#include <stdio.h>int main() {int num1, num2, sum;printf("请输入两个整数:");scanf("%d %d", &num1, &num2);sum = num1 + num2;printf("两个数的和为:%d\n", sum);return 0;}```3. 实验三:编写一个程序,判断一个整数是否为偶数。
实验二:gcc 、gdb 、Makefile 的使用实验目的:(一) 学会使用gcc 编译器 (二) 学会gdb 调试器的使用 (三) 学会编写 Makefile实验要求:(一) 编写一应用程序,使用 gcc 进行编译,并分别使用-o ,-g ,-static ,-02等选项 (二) 编写一应用程序,使用 gdb 调试,调试中使用到该小节所介绍的所有命令 (三) 实现一应用程序,该程序有两个 c 文件构成,使用 makefile 来完成对该程序的编译实验器材:软件:安装了 Linux 的vmware 虚拟机 硬件:PC 机一台实验步骤:(一) gcc 编译器1先用vi 编辑hello.c 文件,内容如下:#include <stdio,h>int nain (void ){printfC'hello world\n ,1); return 0;}2、gcc 指令的一般格式为:gcc [选项]要编译的文件[选项][目标文件]例:使用gcc 编译命令,编译 hello.c 生成可执行文件 hello ,并运行hello上面的命令一步由.c 文件生成了可执行文件,将 gcc 的四个编译流程:预处理、编译、汇编、连接一步完成,下面将介绍四个流程分别做了什么工作3、-E 选项的作用:只进行预处理,不做其他处理。
例:只对hello.c 文件进行预处理,生成文件 hello.i ,并查看[root@localhost gcc]# gcc ・E hello.c -o hello.i [root@localhost gcc]# Is hello hello.c hello t i通过查看可以看到头文件包含部分代码 #include <stdio.h>经过预处理阶段之后,编译 器已将stdio.h 的内容贴了进来。
4、-S 选项的使用-S 选项的作用:只是编译不汇编,生成汇编代码 例:将hello.i 文件只进行编译而不进行汇编,生成汇编代码 hello.s[root (alocalhost gcc]# gcc -S hello,i -o hello ■与[rootfalocalhost gcc]# Is lello hello.c hello.i hello.s [root (3localhost[root@localhost gcc]# [root@localhost gcc]# [root@localhost gcc]# hello world [root@lo 匚alhost gcc]# vi hello^c gcc hello.c -o hello ■/hellogcc]# |5、-c选项的使用-c 选项的作用:只是编译不连接,生成目标文件 .0 例:将汇编代码hello.s 只编译不链接成 hello.o 文件[rootfalocalhost gcc]# gcc -c hello.5 -o hello.o [rootfalocalhost gcc]# Ishello hello.c hello.i hello.o hello ・56、将编译好的hello.o 链接库,生成可执行文件 hello[roottalocalhost gcc]# [root@localho5t gcc]# hello hello,c hello [root (alocalhost gcc]#hello world gcc hello.o -o hello Is i hello.o hello.s• /hello 7、-static 选项的使用-static 选项的作用:链接静态库例:比较hello.c 连接动态库生成的可执行文件hellol 的大小hello 和链接静态库生成的可执行文件gcc]# gcc hello.c g 匚c]# gcc -stati 匚 gcc]# 11 -o hello hello ■匚-o hellol -rwxr- xr-x 1 root root 4641 J un -rwxr- xr-x 1 root root 605990 J un -rw- r- ._ p _ 1 root root 75 J un -rw- r- 1 root root 18880 J un -rw- r- 1 root root844 J un -rw - r-1 root root 416 J un1 03 47 hello 1 03 47 hellol 1 03 15 hello.t 1 03 27 hello.i 1 03 41 hello.o 1 03 35 helloes hellol 比动态链接库的可执行文件 hello 要大的多,他们的执行效果是一样的8、-g 选项的使用-g 选项的作用:在可执行程序中包含标准调试信息例:将hello.c 编译成包含标准调试信息的可执行文件hello2[root@localhost [root@localhost hello hello2 hellol hello.cgcc]# gcc -g hello-c -o hello2 gcc]# Is hello.i hello ・s hello.o带有标准调试信息的可执行文件可以使用gdb 调试器进行调试,以便找出逻辑错误9、-02选项的使用-02选项的作用:完成程序的优化工作例:将hello.c 用02优化选项编译成可执行文件 hello3,和正常编译产生的可执行文件hello 进行比较[rootfdlocalhost [root@localhost [root@localhost total 636可以看到静态链接库的可执行文件gcc]# gcc -02 hello-c gcc]# Ishello.c hellohello.i hello .5 gcc]# ./hello gcc]# ./hello3用于gdb 调试器调试,内容如下 #i nclude <stdio.h> int main( void)2、将test.c 文件编译成包含标准调试信息的文件test[root@localhost gdb]# gcc -g test. [root (alocalhost gdb]# Is test test3、启动gdb 进行调试[root@localhost [root@localhost hello hello2 hellal hello3[root@localhost hello world[rootOlocalhost hello world(二) gdb 调试器1先用vi 编辑文件test.co hello3 -o test[rootglocalhost gdb]# gdb testGNU gdb Red Hat Linux (6.5^25*el5rh)Copyright (匚)2006 Free Software Foundation, Inc .GDB is free software F 匚overed by the GNU General Publi 匚 License t and you 日「Ewelcome to change it and/or distribute copies of it und er certain conditions.Type "show copying" to see the conditions ・There is absolutely no warranty for GDB ・ Type "show wa rranty" for dEtails *This GDB was configured as "1386-redhat-linux*gnu"・・.Us ing host libthreaddb library "/^ib/i686/nosegneg/libth read db ・ so.1” ・ 在gdb 中可以设置多个断点。
代码运行时会到断点对应的行之前暂停,上图中,代码就会运行到第7行之前暂停(并没有运行第 7行)。
6、info 命令info 命令用于查看断点情况,设置好断点后可以用它来查看(run)(gdb)可以看到gdb 启动界面中显示了 gdb 的版本、自由软件等信息,然后进入了有” 开头的命令行界面 4、I (list )命令I 命令用于查看文件list#include <stdio .h> int gdb ”(gdb) 123456 main(void) 8 910rT , result); Iint sum(int sum); int i,result=0; sum(100);for(i=l;i<=100;i++){ result+=i; printf("The sum in main function is %d\(gdb) 1112 13可以看到每行代码面前都有对应的行旦 5、b (breakpoint )命令b 用于设置断点,断点调试时调试程序的一个非常重要的手段,设置方法:在” 令之后加上对应的行号,如下图(gdb) b 6Breakpoint 2 at 0x804839c: file test .c , linereturn 0; } intsum(int num) 号,这样方便我们设置断点。
b ”命■号, 6.(gdb) b 1Breakpoint 1 at 0x8G483a8: file test.c, line 7. (gdb) info bNum Type Disp Enb Address What1 breakpoint keep y 0x080483a8 in mainat test.c:7 (gdb) |r命令用于运行代码,默认是从首行开始运行,也可以在r后面加上行号,从程序中指定行开始运行。
.(gdb) rStarting program: /home/Linux C/test/gdb/testThe sum in sum function is 5050Breakpoint 1, main () at test * c:77 for(i=l;i<=100;i++){(gdb) |可以看到程序运行到断点处就停止了8、p ( print )命令p命令用于查看变量的值,在调试的时候我们经常要查看某个变量当前的值与我们逻辑设定的值是否相同,输入p+变量名即可(gdb) p result$1 = 0(gdb) p numNo symbol "num" in current context・(gdb) p i$2 = 2420724(gdb) |可以看到result在第6行已被赋值为零,而i目前还没有被赋值所以是一个随机数,在主函数里看不到num的值,只有进入子函数才能看到9、s ( step )命令s命令用于单步运行,另外n (next)命令也用于单步运行,他们的区别在于:如果有函数调用的时候,s会进入该函数而n不会进入该函数。